
Chapter 11. Handling Events in Code
In This Chapter
• Working with Entities in Code
• Handling Custom Query Events in Code
• Handling Screen Events in Code
• Launching Screens Programmatically
As you have read many times already in this book, Visual Studio LightSwitch is a tool for developers, with its main goal being to simplify the creation of line-of-business applications. And, this point is very important: Although Visual Studio LightSwitch makes building applications easy, it gives developers full control of what happens behind the scenes with regard to the business logic. This includes having control of particular actions that are handled at runtime. An LightSwitch application’s architecture raises and handles events, but developers can intercept events and provide a behavior different from the default one.
In this chapter, you learn about available events in the LightSwitch programming model and how you can handle them to provide custom behaviors on both data and the user interface. In addition, you write .NET code. So, it is helpful if you have had some exposure to programming, no matter what the language or the environment.
Working with Entities in Code
So far, you have seen how Visual Studio LightSwitch enables you to create applications that offer an infrastructure that takes care of most of the work required to handle data correctly. As a developer, your main goal is focusing on the business logic. As you would expect from a technical perspective, operations that the runtime performs against data are handled by the LightSwitch framework. The benefit is that such a runtime framework takes care of everything happening behind the scenes, but it also provides many hooks for you to write your own code.
Behind the scenes, the runtime raises an event each time an action runs or completes. You might have several reasons to work over code that handles data automatically. For example, you might want to provide additional actions. Think of writing a message to a log each time a user adds a new item. Another example is changing the appeal of elements in the user interface each time a particular operation is completed; for example, you might disable buttons if a particular data item is selected. Basically, you can intercept events raised by the runtime and customize the behavior of available method hooks.
This can be done for data and screens. As a general rule, all the available methods can be reached via the Write Code button in the upper-right corner of both the Table Designer and the Screen Designer. This section explains how to handle data events and how to execute data operations in code. Before we go into that, however, it is necessary for you to understand how Visual Studio LightSwitch generates data objects when you add data sources to your application.
Understanding Data Objects
Every time you add a data source to your application, such as a new table, Visual Studio LightSwitch generates a new .NET class that describes and represents the data source. For example, if you add a new table called Invoices, behind the scenes LightSwitch generates a new class called Invoice for representing a single item in the table. By using classes, LightSwitch can represent and describe data in a managed fashion. Therefore, it takes advantage of all features available within classes, like properties (which identify columns), methods (which represents functions or procedures), and events, but also of the .NET Framework’s memory management infrastructure, like the garbage collection process handled by the Common Language Runtime.
In the LightSwitch terminology, a class representing an item within a table is known as entity. Every entity needs to represent a business item, and this involves properties. Basically, with properties an entity represents columns in a table. Continuing the previous example, the Invoice class exposes a property called InvoiceDate of type Date, a property InvoiceDueDate of type Date, and so on.
A table contains multiple elements, and therefore it contains multiple entities. A group of entities is known as entity set and represents a collection of items in a table. An entity set is a .NET collection of type Microsoft.LightSwitch.Framework.EntitySet(Of T), where T is the entity type (for example, Invoice). You can have several data sources (such as SQL Server, SQL Azure, WCF RIA Services, and SharePoint 2010), which can expose entities with the same name. If entities were not organized this way, this could lead to compile errors. Fortunately, LightSwitch organizes entities and entity collections within data source classes; this means that it creates a class for each data source, and each class behaves as a container of entities and entity collections. For example, think of the sample application that you built in Chapter 8, “Aggregating Data from Different Data Sources,” against different data sources. For the sake of simplicity, focus on the application data and on data coming from the Northwind database. These are two different data sources, and LightSwitch created a class called ApplicationData and one called NorthwindData. The ApplicationData class is the container for entities that you designed from scratch, whereas the NorthwindData class is the container for entities that map tables from the Northwind database. Every data source class exposes entity collections through properties of the appropriate type. For example, the ApplicationData class in the sample application exposes a collection of Customer entities through a property called Customers, of type EntitySet(Of Customer).
Data source classes are grouped into their top-level class, called DataWorkspace. You may think of this class as the entry point for all data access operations, which acts as a container for data sources class Why this is important is explained in a minute. Actually, LightSwitch also creates another class called Application, which provides access to other objects in the application, such as information on the current user and on the application details but which is not strictly related to data access. Figure 11.1 shows the hierarchy of generated classes.
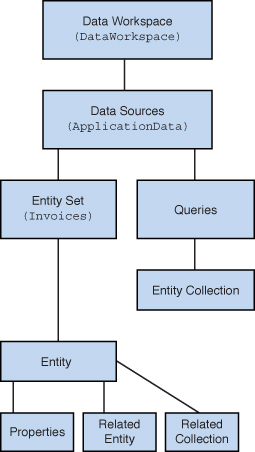
Figure 11.1. The hierarchy of autogenerated data objects.
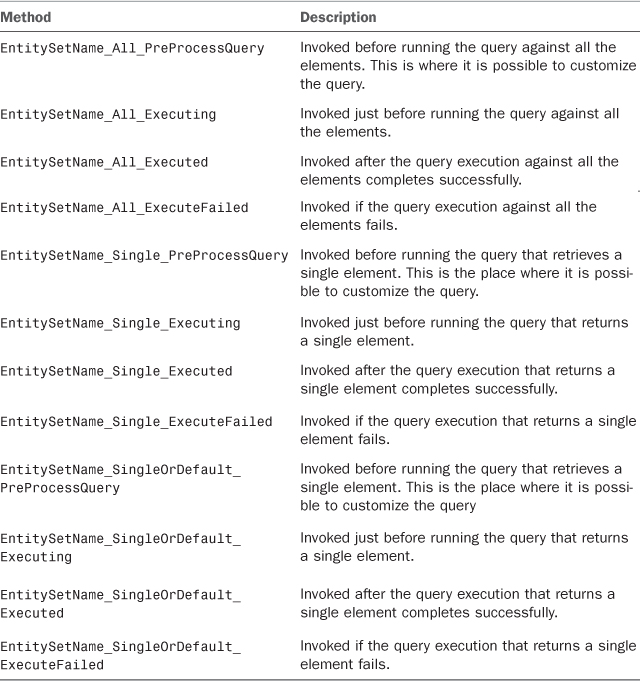
In Figure 11.1, you can see how data sources classes contain another element, represented by a rectangle called Queries. The reason is that each data source class exposes methods for retrieving a specified data set. For example, they expose methods that run custom queries that you created via the Query Designer. If you think of the Invoice Management application, this means that the ApplicationData class exposes a method called MostActiveCustomers, another method called SortedCustomersQuery, and so on. In addition, each data source class exposes two methods that return a single instance of one entity. The first method is EntitySetName_Single (where EntitySetName is the name of the entity set, such as Customers_Single), and the second one is EntitySetName_SingleOrDefault. Both methods require an argument representing the identity field in the table and behave the same way. The difference is that Single throws an exception if no entity matches the specified Id, whereas SingleOrDefault returns a null value if no entity matches the Id. Finally, data sources expose _All methods, which return the whole entity set. For instance, Customers_All returns the whole list of customers from the Customers table.
If you have experience with writing LINQ queries, you should be familiar with Single and SingleOrDefault because they have been part of the runtime (in the form of extension methods) since the first version of LINQ.
Query methods return groups of entities in the form of objects of type IDataServiceQueryable(Of T). Also notice how the Entity element exposes other elements such as properties and related entities or related entity collections. Properties are .NET members representing columns in the table, whereas the latter are objects having a relationship with the current entity. So, at this point, you might wonder why all these notions were required. The reason is that you can access data objects in code and invoke members manually. For example, suppose you want to run manually the MostActiveCustomers query and then analyze whether the result contains the specified customer. To do so, you can write the following lines of code:
Dim query = Me.DataWorkspace.ApplicationData.MostActiveCustomers()
Dim desiredCustomer = (From cust In query
Where cust.CompanyName.ToUpper = "DEL SOLE").
SingleOrDefault
If desiredCustomer Is Nothing Then
'The specified customer does not exist in the collection
End If
Dim desiredCustomer = (From cust In query
Where cust.CompanyName.ToUpper = "DEL SOLE").
SingleOrDefault
Notice that you can take advantage of the IntelliSense technology while writing your code to understand what kind of object you are interacting with. Figure 11.2 shows how IntelliSense simplifies the way you access objects in the hierarchy and how it helps you understand the .NET type returned by the selected object.
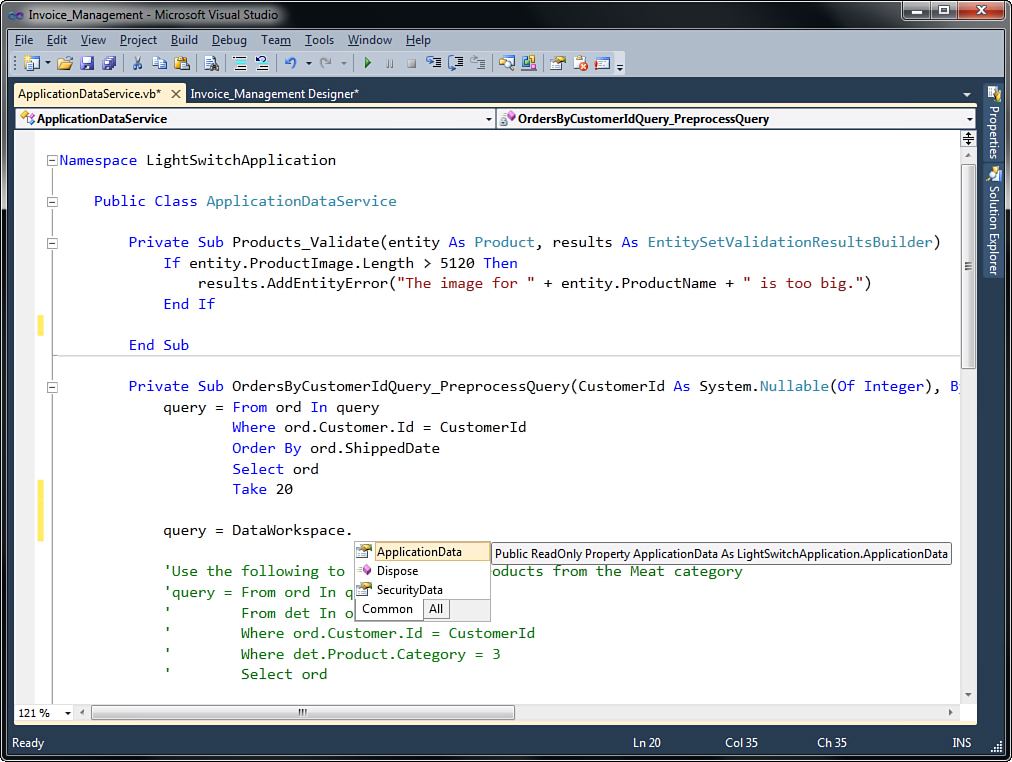
Figure 11.2. IntelliSense helps you working with data objects.
Each data object in the hierarchy provides access to a specific level in the data model and allows executing specific operations against data sources. When operations are running and completing, data objects raise events that you can handle to customize the default behavior. This is explained in the next subsection.
Handling Data Events in Code
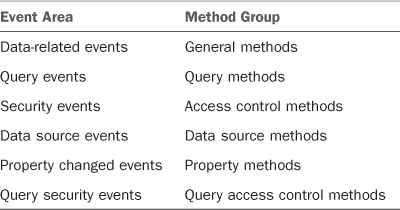
When executing data operations, the LightSwitch runtime raises events. Such events can be summarized as follows:
• Data-related events, occurring when data is created, updated, or deleted
• Query events, which occur when the runtime performs queries against the data source (referred to as default queries, not custom queries that you write in the Query Designer and which are discussed later)
• Access control events, which occur when access control is enabled and which are raised to check permissions for executing CRUD (copy, read, update, delete) operations or queries
• Events that are raised when data is saved to the data source
• Events that are raised when the value of a property changes
Security events were discussed in detail in Chapter 9, so in this chapter you learn about all the other events. If you are not new to development, you know that when events occur, you can intercept them and work with their result by writing the so-called method hooks.
These are procedures (or methods, according to the .NET terminology) that are associated with events and that are invoked when the associated event is raised. This clarification is important because the LightSwitch development environment provides shortcuts by grouping methods, not event handlers, according to the area they belong to. By following this assumption, events are referred to via their method counterparts, which are summarized in Table 11.1.
Table 11.1. Event Method Handlers
If you are wondering why this explanation is necessary, the answer relates to how Visual Studio LightSwitch provides shortcuts for accessing methods. First, you need to open a table definition in the Entity Designer, and then you can expand the Write Code drop-down list in the upper-right corner of the designer. This lists all the available methods grouped in the way that was explained in Table 11.1, as shown in Figure 11.3.
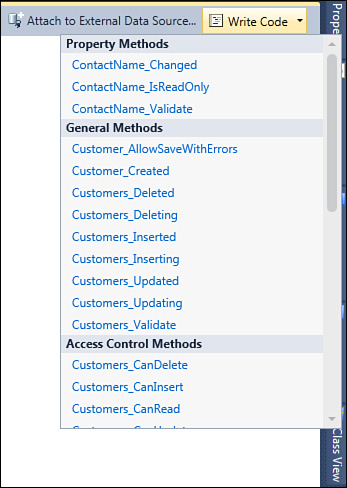
Figure 11.3. Shortcuts to data events methods.
Remember that property methods are available only when an entity property is selected in the Entity Designer.
You just need to select the desired method from the list, and Visual Studio LightSwitch will redirect you to the code editor, pointing to the stub for the method you selected (see Figure 11.4).
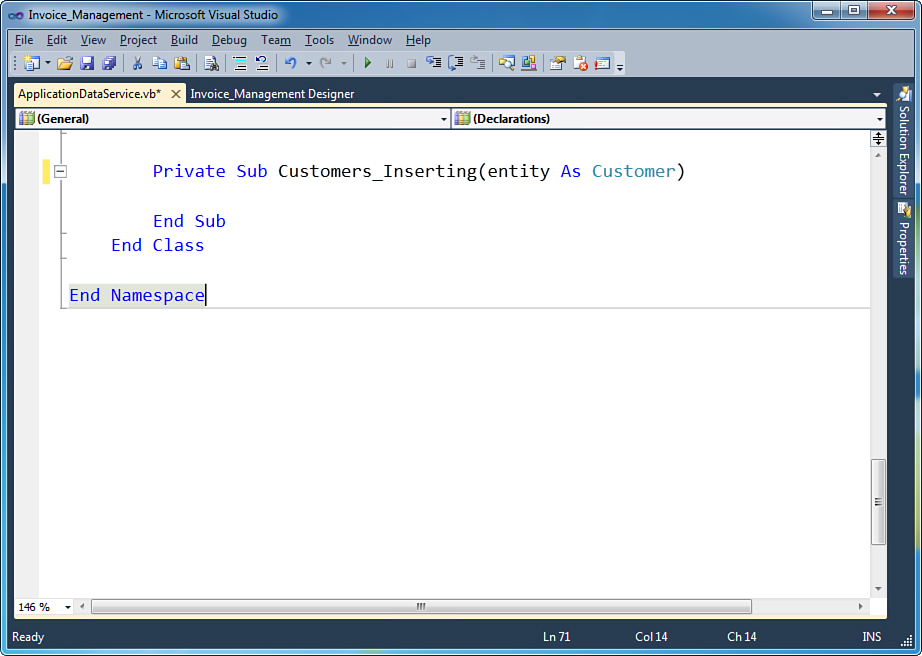
Figure 11.4. Selecting methods from Write Code opens the code editor.
Now that you know how methods are organized and how you can reach them, it is time to learn about events. First, though, let’s review an example. Suppose, for instance, that you want to track data operations by adding a log to a table in the application database. Such a log could help you know when items have been added, updated, or removed. In a real-world scenario, you restrict this kind of tracking to just specific users and areas.
Using techniques that you know well, create a new table named DataLog. Then add the following two properties:
• Message of type String, required. This stores a descriptive message of the data operation that occurred.
• TimeStamp of type DateTime, required. This stores the exact moment in time at which the operation occurred.
After you have completed this, add a new Search Screen for the newly added table. This will be useful later to display stored information.
General Methods: Handling Events for Data Operations
The LightSwitch runtime raises events every time an operation against data starts and when it completes. This includes adding, updating, and deleting entities, which means that you can also perform operations against data programmatically. Table 11.2 summarizes events that are raised when data-related operations occur. (Note that EntityName stands for the entity name representing a single item, and CollectionName stands for the entity set name.)
Table 11.2. Events Raised for Data-Related Operations
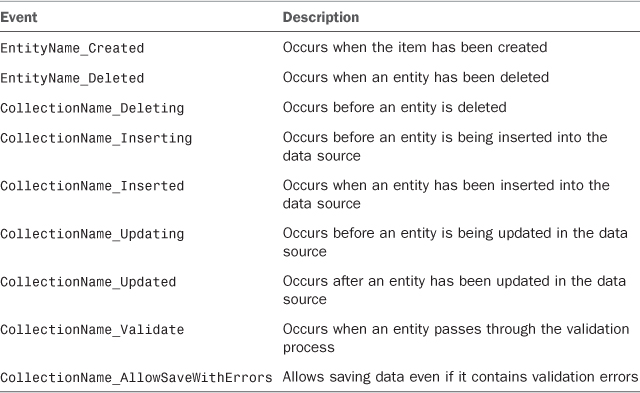
All these events run on the server, except for Created, which runs on the tier where the item was created, and AllowSaveWithErrors, which runs on the calling tier. You already learned about the Validate event back in Chapter 5, “Customizing Data Validation.”
In several situations, you might find it useful to work with data programmatically. For instance, consider two scenarios. First, suppose that you want to write log information to the database every time a customer is either added or deleted. Second, suppose you want to provide some default property values each time a new entity of type Order is added. In the first case, you need to access methods for Inserting, Inserted, Deleting, and Deleted events. When you are in the code editor, write the following code:
Private Sub Customers_Inserted(entity As Customer)
Dim newLog As DataLog = DataWorkspace.ApplicationData.DataLogs.AddNew()
With newLog
.Message = "Added customer " & entity.CompanyName
.TimeStamp = Date.Now
End With
End Sub
Private Sub Customers_Inserting(entity As Customer)
Dim newLog As DataLog = DataWorkspace.ApplicationData.DataLogs.AddNew()
With newLog
.Message = "Adding customer " & entity.CompanyName
.TimeStamp = Date.Now
End With
End Sub
Private Sub Customers_Deleting(entity As Customer)
Dim newLog As DataLog = DataWorkspace.ApplicationData.DataLogs.AddNew()
With newLog
.Message = "Removing customer " & entity.CompanyName
.TimeStamp = Date.Now
End With
End Sub
Private Sub Customers_Deleted(entity As Customer)
Dim newLog As DataLog = DataWorkspace.ApplicationData.DataLogs.AddNew()
With newLog
.Message = "Removed customer " & entity.CompanyName
.TimeStamp = Date.Now
End With
End Sub
• Every method receives as an argument the instance of the entity that it is working on. This is particularly useful to retrieve information about the current item.
• You can create new items programmatically, as it happens for new entities of type DataLog.
• Continuing from the previous point, when you create new entities programmatically by invoking the AddNew method from the entity set name, you must access the data source class in the data workspace (DataWorkspace.ApplicationData) because this handles the live instances of the entity sets in use.
You could extend the tracking system to entity updates, as well, by handling Updating and Updated, but you could also restrict tracking to completed operations only. Finally, you could extend the code to other entities if you want. If you now run the application, every time you add or remove customer information these actions are tracked to the application database. This is demonstrated in Figure 11.5, which shows the Search Screen for the DataLogs table.
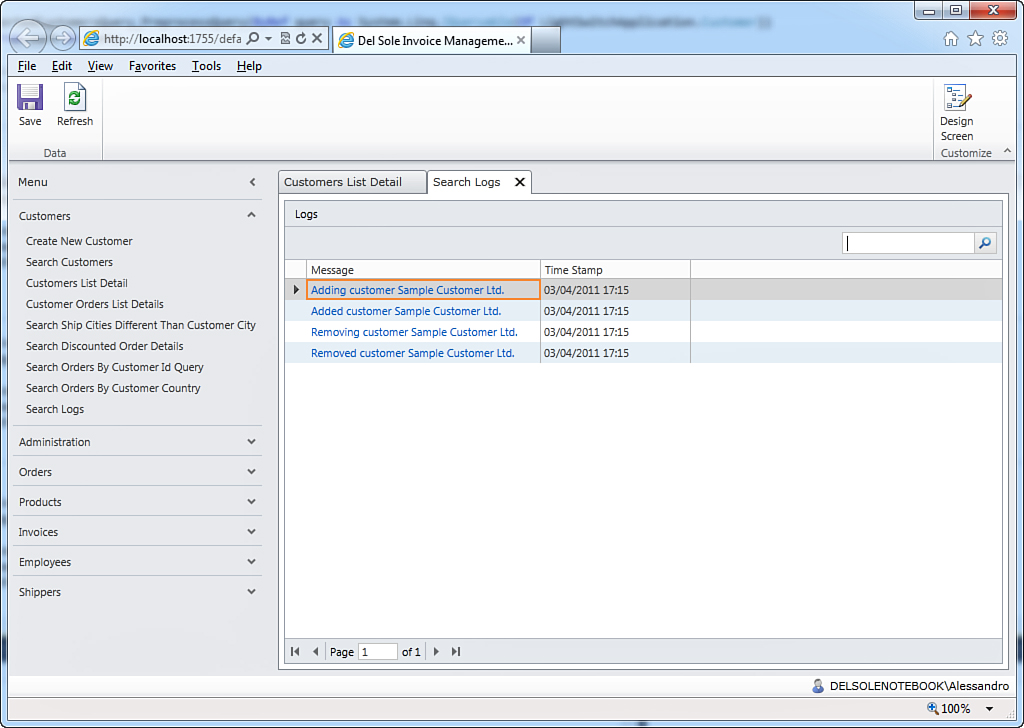
Figure 11.5. Displaying the list of changes tracked via events.
You could consider extending the current example by adding the name of the user who made the requested changes over data. This could be accomplished by adding a property of type String to the DataLog entity, to represent the username. Next, you access the current logged user properties by writing the following line of code:
Dim userName = Me.Application.User.FullName
The Application class exposes the Current property, which represents the running instance of the application. This offers a property called User that contains information on the current logged user. Notice that this line returns user information only when you implement access control; otherwise, it returns a null object (Nothing in Visual Basic and null in C#).
In the second scenario, which is what we focus on here, the goal is to provide some default values each time an entity of type OrderHeader is added. You might want to do this for any number of reasons (and in different ways). For example, you might provide some default property values to speed up the way the user enters information or just to include missing information that the user did not supply. This can prove particularly useful when you have some required fields that you might want to fill in with default values on behalf of the user. The example provides default values for the ShippedDate, RequiredDate, and Freight properties at the moment at which the new entity is created, and then it adds default shipment information if this are not supplied by the user. Now follow these steps:
1. In Solution Explorer, double-click OrderHeaders.
2. When the Entity Designer appears, expand the Write Code drop-down list and select OrderHeader_Created. This opens the code editor pointing to the selected method, which enables you to interact in code with the instance of the new entity (for example, modify its properties). Notice that the code editor opens the Order.vb file, which refers to the entity definition, and not the ApplicationDataService.vb file, as instead happens for other events. This makes sense, because you need to work on just a single instance.
3. Provide default values for the desired properties, as shown in the following code snippet:
Private Sub OrderHeader_Created()
With Me
.ShippedDate = Date.Today.AddDays(1)
.RequiredDate = Date.Today.AddDays(2)
.Freight = 100D
End With
End Sub
When you set property values in code, these are automatically assigned when you create a new order and are immediately available onscreen. You can try this yourself by running the application and creating a new order. Figure 11.6 shows an example.
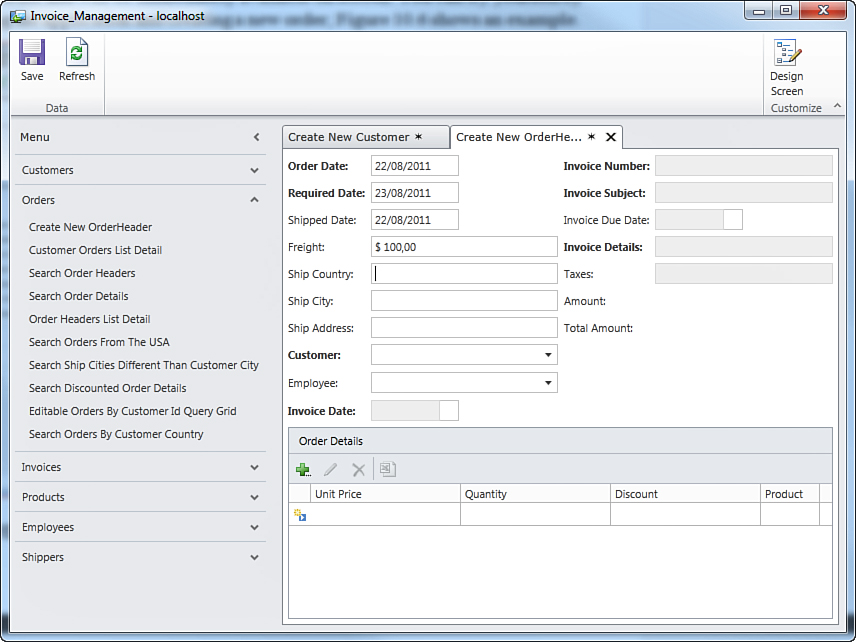
Figure 11.6. Default property values as per the Created event handler.
Now suppose that the user does not fill in the information about the order shipment. It would be useful to provide default values based on the associated customer. For example, you could assume that the ship country, city, and address are the same as for the related customer. This is pretty simple, because you can access an object that has relationships with the current one by invoking the appropriate property. For example, the following code retrieves the instance of the customer associated with the current order:
Dim associatedCustomer As Customer = _
Me.Customer 'where Me is the Order instance
The problem is that the relationship between an order and its customer is performed after the order instance has been created. In fact, the association is finalized once the user selects the customer to associate via the Customer autocomplete box. So, this means that when a new OrderHeader instance has been created, its Customer property is null. For this reason, you cannot pick up information from the related customer within the Created method. A good place to accomplish this instead is the Inserting method, which is invoked before data is being submitted to the data source. To access the OrderHeaders_Inserting method, open the OrderHeader definition in the Entity Designer and select the method from the Write Code drop-down list. The code for the method could look like this:
Private Sub OrderHeaders_Inserting(entity As OrderHeader)
With entity
'If a Customer is associated...
If .Customer IsNot Nothing Then
'check if the user has already supplied values
'if not, add default values
If String.IsNullOrEmpty(.ShipCountry) = True Then
.ShipCountry = .Customer.Country
End If
If String.IsNullOrEmpty(.ShipCity) = True Then
.ShipCity = .Customer.City
End If
If String.IsNullOrEmpty(.ShipAddress) = True Then
.ShipAddress = .Customer.Address
End If
End If
End With
End Sub
The code ensures that a valid instance of Customer is associated with the current order. If the customer is not null, property values about the shipment are assigned with corresponding property values from the related customer. When you save changes, edits made in code appear onscreen, as shown in Figure 11.7.
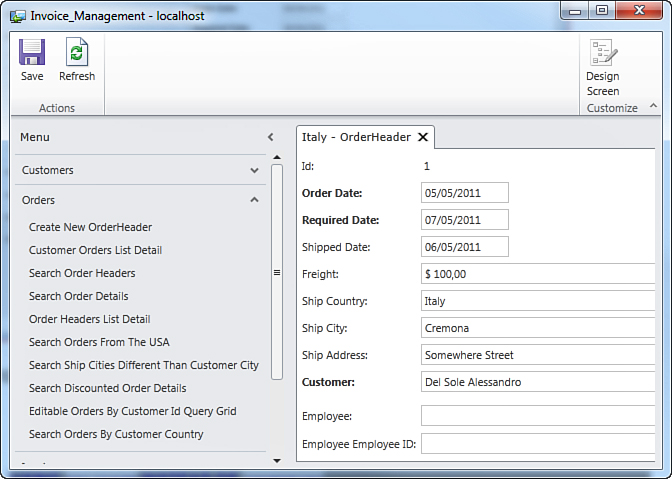
Figure 11.7. The OrderHeader’s property values have been automatically assigned.
Using Validate Instead of Inserting
You could also place the latest code snippet as the body of the Validate method so that users can see the values before saving. In addition, remember that methods such as Inserting, Updating, and Deleting are particularly useful to automate tasks such as the sending of emails, workflows, and calling services when the events happen on the middle tier.
Deleting Entities
Every entity instance exposes a method called Delete, which allows removing the instance from the data source. Consider the following code:
Dim customer = (From c In Me.DataWorkspace.ApplicationData.Customers
Where c.CompanyName.ToLower.Contains("del sole")).
FirstOrDefault
If customer IsNot Nothing Then customer.Delete()
Dim customer = (From c In Me.DataWorkspace.ApplicationData.Customers
Where c.CompanyName.ToLower.Contains("del sole")).FirstOrDefault
If customer IsNot Nothing Then customer.Delete()
It queries the Customers collection from the ApplicationData source and retrieves the only customer instance (FirstOrDefault) where the company name contains the specified literal (Where c.CompanyName.ToLower.Contains("del sole")). The Customer instance that is retrieved exposes the Delete method, which removes the instance itself from the data source. You then have to make a call to DataWorkspace.ApplicationData.SaveChanges to send changes to the database.
This example probably does not sound very useful to you. The reason is that this code is running on the server and, therefore, most data operations are already handled by LightSwitch for you. At the end of this chapter, you learn about screen events and how to execute data-related operations on the client side, a scenario in which you can have deeper interaction with data by invoking manual operations. This includes saving, deleting, updating, and reading data.
Forcing Invalid Data to Be Saved
You can force the application to save data even if these contain validation errors. This behavior is disabled by default, and you can enable it manually, and it should be done only in very specific cases, such as to allow a manager to override the credit limit of a customer.
The reason why it is disabled by default is that the database has its own validation mechanisms and could reject the submission. To enable forcing programmatically, you handle the AllowSaveWithErrors method. The following code shows an example of the Customer entity:
Private Sub Customer_AllowSaveWithErrors(ByRef result As Boolean)
result = True
End Sub
As you can see, you just need to assign the result variable with the Boolean value indicating whether the submission should be forced (True) or not (False).
Data Source Methods: Handling Data Source Events
Data source events notify the application about the following happenings:
• The save process is about to begin; this is represented by the SaveChanges_Executing event.
• The save process completed successfully; this is represented by the SaveChanges_Executed event.
• The save process failed because of errors; this is represented by the SaveChanges_ExecuteFailed event.
All these events run on the server, and in Visual Studio LightSwitch shortcuts (inside the Write Code drop-down list in the Entity Designer), they are grouped under Data Source Methods. Because they run on the server, you will not usually handle them with custom code (which makes more sense when handling their client counterparts, as discussed in the “Handling Screen Events” section, later in this chapter).
In case you want to handle these events on the server side, the following code provides an example in which a log is added to the application’s database when the save process completes both successfully and with failures:
Private Sub SaveChanges_Executed()
Dim newLog As DataLog = DataWorkspace.
ApplicationData.DataLogs.
AddNew()
With newLog
.Message = "Changes saved successfully"
.TimeStamp = Date.Now
End With
End Sub
Private Sub SaveChanges_ExecuteFailed(exception As Exception)
Dim newLog As DataLog = DataWorkspace.
ApplicationData.DataLogs.
AddNew()
With newLog
.Message = "Encountered exception " & exception.Message
.TimeStamp = Date.Now
End With
End Sub
Notice that SaveChanges_ExecuteFailed receives by the runtime the instance of the occurred exception as an argument. You can then use the instance to get further information about the error and reasons for the error.
The methods involved in the save process are part of the so-called save pipeline. In Chapter 12, “Dissecting a LightSwitch Application,” the save pipeline is reconsidered from an architecture point of view, so you will learn how the pipeline works in different phases according to the three tiers that comprise an application. The discussion focuses on both the server and the client perspectives. Any further discussion about the save pipeline requires knowledge of some basic concepts on LightSwitch’s architecture, which are explained in the next chapter.
Query Methods: Handling Built-In Queries Events
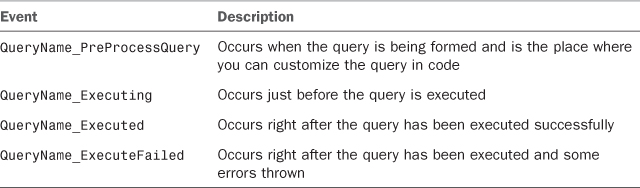
As you learned at the beginning of this chapter in the “Understanding Data Objects” section, when you create an entity, behind the scenes Visual Studio LightSwitch generates the entity set, which returns the full list of entities from the appropriate table in the database, plus the Single and SingleOrDefault methods. The entity set and the two methods are known as default queries, which differ from custom queries that you can create in the Query Designer (see Chapter 6, “Querying, Filtering, and Sorting Data,” for a recap). Each query has four associated events: PreProcessQuery, Executing, Executed, and ExecuteFailed. Table 11.3 summarizes describes these. Notice that events related to entity sets as a whole include the All literal.
Table 11.3. Default Query Events
Do Not Handle PreProcessQuery Here
In Chapter 6, you learned how to create and customize queries, and you also learned how to handle the PreProcessQuery event. From the coding perspective, default queries work like custom queries, and this is why you can see the PreProcessQuery method still available. In theory, you could customize PreProcessQuery and provide a different behavior to default queries. It is generally preferred to create a new custom query and customize the query’s behavior by writing a PreProcessQuery event handler in this context.
In Visual Studio LightSwitch, shortcuts for accessing query methods are available in the Query Methods group within the Write Code drop-down list in the Entity Designer. As an example, suppose you want to track query failures by adding a log to the database each time a query fails. This can be accomplished with the following code:
Private Sub Customers_All_ExecuteFailed(exception As Exception)
Dim newLog As DataLog = DataWorkspace.
ApplicationData.DataLogs.
AddNew()
With newLog
.Message = "Querying all customers failed: " & exception.
Message
.TimeStamp = Date.Now
End With
End Sub
Private Sub Customers_Single_ExecuteFailed(Id As Integer?,
exception As System.Exception)
Dim newLog As DataLog = DataWorkspace.
ApplicationData.DataLogs.
AddNew()
With newLog
.Message = "Retrieving Customer " & _
CStr(Id.Value) & " failed: " & _
exception.Message
.TimeStamp = Date.Now
End With
End Sub
Private Sub Customers_SingleOrDefault_ExecuteFailed(Id As Integer?,
exception As System.Exception)
Dim newLog As DataLog = DataWorkspace.
ApplicationData.DataLogs.
AddNew()
With newLog
.Message = "Retrieving Customer " & _
CStr(Id.Value) & " failed: " & _
exception.Message
.TimeStamp = Date.Now
End With
End Sub
Actually, queries can be another place to edit property values for entities that are retrieved. For instance, suppose you want to get the list of customers and then iterate through the collection to move to uppercase the value of ContactName for each customer. From the Methods drop-down list, select Customers_All_Execute. This method is invoked after the full list of customers has been retrieved. Then write the following code:
Private Sub Customers_All_Executed(result _
As System.Collections.
Generic.IEnumerable(Of Customer))
For Each item In result
item.ContactName = item.ContactName.ToUpper
Next
'This is for making data consistent
Me.DataWorkspace.ApplicationData.SaveChanges()
End Sub
The code iterates through the collection of customers and moves to uppercase the value of the desired property. Changes are then reflected to the user interface, but not in the database automatically. Notice that the SaveChanges call has been made to bring data to a consistent state. Of course, this is just an example, and you might handle Executed to accomplish different objectives.
Figure 11.8 shows an example.
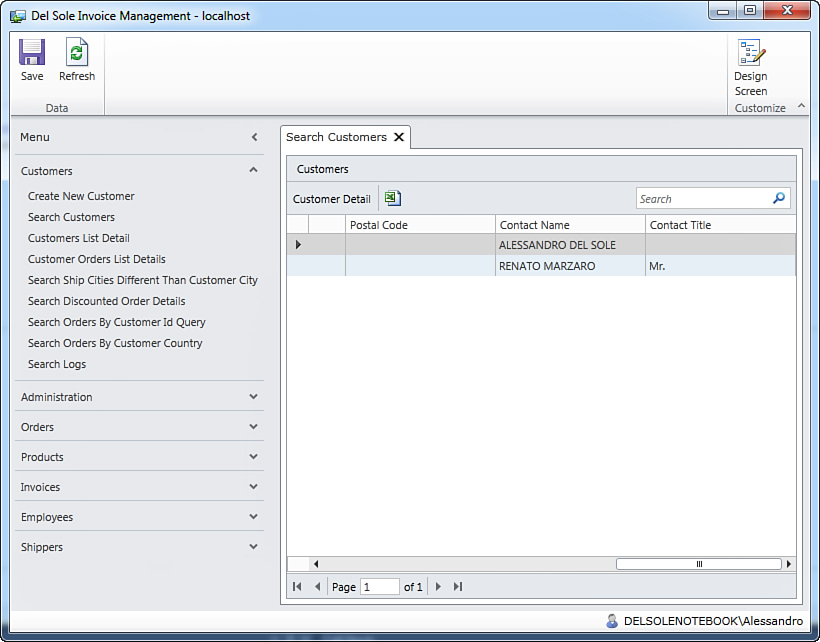
Figure 11.8. The code inside the query has moved characters to uppercase.
So, query methods are definitely a good way to place code that interacts with collections of items.
Property Methods: Handling Property-Related Events
Property methods allow interacting with entity properties and shortcuts in the Write Code drop-down list are available only when an entity property is selected in the Entity Designer (Property Methods group), whereas you can access them anytime within the code editor. There are three property methods available:
• PropertyName_Changed, which is invoked when the value of a property has changed
• PropertyName_IsReadOnly, which is invoked to understand if a property is read-only and that is useful to check security permissions
• PropertyName_Validate, which is the place in which custom validation occurs
They all run on the tier in which the property is currently active. We discussed the Validate event back in Chapter 5, so you already know a fair bit about it. The other events are not used as often as Validate, but some examples are offered.
For example, you usually are not interested in when a property changes, but you are interested in validating the new value. The following code demonstrates how to handle Changed and IsReadOnly for debugging purposes:
Private Sub ContactName_Changed()
System.Diagnostics.
Debug.WriteLine(ContactName)
End Sub
Private Sub ContactName_IsReadOnly(ByRef result As Boolean)
System.Diagnostics.
Debug.WriteLine(result)
End Sub
In LightSwitch, you can write code to do more than just handle events. For instance, you can also perform data operations manually, as explained in the next subsection.
The SecurityData Class
Now that you know how to interact in code with data objects, you need to be aware of a special data object called SecurityData. From an architectural point of view, this object behaves similarly to classes such as the ApplicationData, but it differs in that it is only for security-related tasks. Of course, the use of this class requires knowledge of the security concepts in LightSwitch (see Chapter 9).
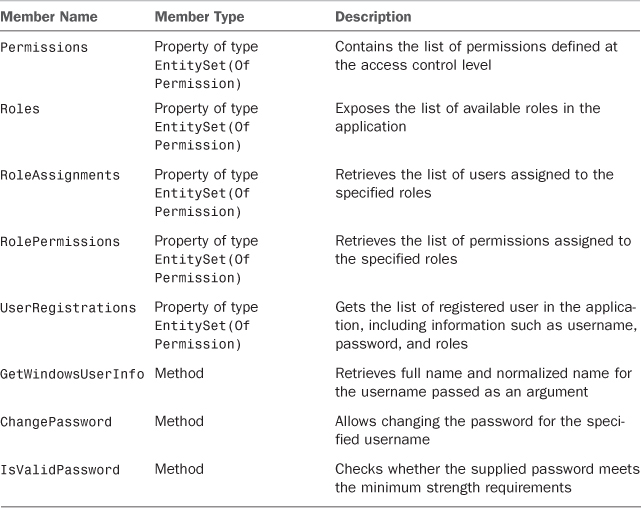
This class implements queries over permissions, roles, and users, but also methods used by the runtime to manage users and passwords. Table 11.4 summarizes the most interesting members of the class.
Table 11.4. Members in the SecurityData Class
In addition, default queries such as All, Single, and SingleOrDefault are available for each entity set belonging to this class. It is worth mentioning that this is an object that LightSwitch generates for its own purposes and that interacting in code with SecurityData is a quite unusual but possible. In fact, as you learn in Chapter 14, “Debugging LightSwitch Applications,” the access control infrastructure provides all you need to administer users and roles in a more comfortable way without writing code (except for checking permissions), including user and password management. However, you might want to implement additional administration features that you can leverage via this class.
Handling Custom Query Events in Code
When custom queries created via the Query Designer are executed, these raise some events. Query events where discussed back in Chapter 6, and so here you just review the query events pipeline, summarized in Table 11.5. (QueryName stands for the name of the query as you specified it in the Query Designer.)
All the events described in Table 11.5 run on the server. Take a look at the code examples in Chapter 6 for a fuller understanding of query events.
Handling Screen Events in Code
Similar to what happens with entities, you can work with screen events that are raised in certain circumstances. By handling screen events in code, you can customize the application’s behavior and perform additional actions. However, an important difference exists between events occurring over data and events at the screen level. The first category runs on the server and is specific to entities, whereas the second category runs on the client side and allows customizing the application’s behavior before the data is sent to the server (beyond just customizing the user experience).
As with the Entity Designer, the Screen Designer has a Write Code drop-down list that you use to access method shortcuts and that redirects you to the code editor, pointing to the body of the method you selected from the list.
For example, within screen events, you can show a text message to the user; this is not possible with data events. According to the MSDN documentation, screen events can be divided into four main areas, as summarized in Table 11.6.
Table 11.6. Screen Events Main Areas
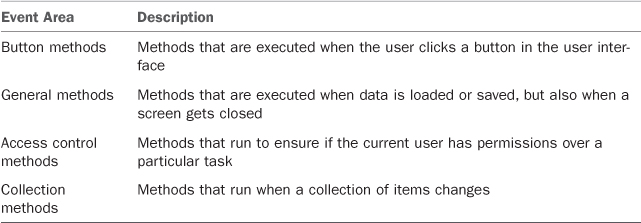
Access control methods are discussed further in Chapter 9. In this current chapter, you learn about button methods, general methods, and collection methods. By learning these methods, you will understand basic concepts that are also common to access control methods.
Button methods were introduced back in Chapter 7, “Customizing Applications with Buttons, COM Automation, and Extensions,” but in this chapter, you will see different uses for them. (For example, you will handle button methods to perform data-related operations.)
Button Methods
There are two button methods: Execute and CanExecute. The latter is all about security, as discussed in Chapter 9. Focus on Execute; this is invoked when the user clicks a button and runs the code specified within the method body. It is available for all buttons in the user interface, meaning that you can associate an action to a custom button but also that you can override the behavior of built-in buttons. For example, suppose you want to ask user confirmation before deleting an entity from an editable grid, such as the EditableProductsGrid. In Solution Explorer, double-click the screen so that it becomes available in the Screen Designer. Expand the user interface definition and locate the Delete button underneath the Products Data Grid Command Bar. Double-click the button so that Visual Studio LightSwitch opens the code editor pointing to the Execute method body. As you can see, in this case, the method name is gridDeleteSelected_Execute, but it varies depending on the type of screen that is hosting the control. You can now completely override the behavior of this built-in button by writing all the required code. The goal is to ask for confirmation before deleting an item. This is accomplished with the following code snippet:
Private Sub gridDeleteSelected_Execute()
'Gets the instance of the selected product
'in the grid
Dim prod As Product = Me.Products.SelectedItem
'If the user has permissions to delete
'items from the Products collection..
If Me.Products.CanDelete Then
'asks for confirmation
Dim result As System.Windows.MessageBoxResult = _
Me.ShowMessageBox("Are you sure you want to delete product " + _
prod.ProductName + "?", "Product deletion",
MessageBoxOption.YesNo)
Select Case result
'if the choice is yes, then explictly invoke Delete
Case Is = Windows.MessageBoxResult.Yes
prod.Delete()
Exit Sub
'otherwise do nothing
Case Else
Exit Sub
End Select
Else
'If the user does not have permissions,
'then shows a warning
Me.ShowMessageBox("You do not have permissions to delete this item",
"Security warning",
MessageBoxOption.Ok)
End If
End Sub
Comments inside the code help you understand what it does, but some further clarification is still necessary:
• The code checks if the user has permissions to delete elements from the Products collection by checking the result from CanDelete.
• Generally speaking, you can ask for user confirmations by invoking the ShowMessageBox screen extension method, which shows the specified text message and buttons inside an input box. Accepted combinations of buttons (which are self-explanatory) are Ok, OkCancel, YesNo, and YesNoCancel. This method returns an object of type System.Windows.MessageBoxResult that contains the result of the user choice.
• Depending on the user choice, which is analyzed within the Select..End Select block, the code deletes (or not) the selected item. Deletion is performed by invoking the Product.Delete method. Notice that invoking this method removes the object instance from the active context but that it does not remove the item from the database until the user clicks Save on the screen
Now run the application and open the Editable Products Grid screen and select a product from the list. At this point, click the Delete button. The confirmation dialog appears, as shown in Figure 11.9, requesting user confirmation. If the user agrees, the product is removed.
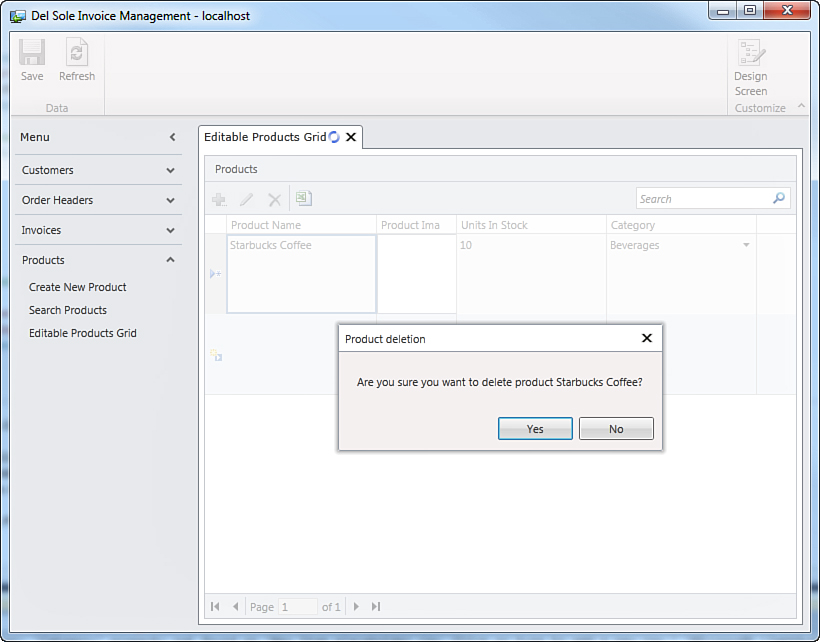
Figure 11.9. Asking confirmation before deleting an item.
Similarly, you could add and update entities by combining techniques described in the section “Working with Entities in Code,” within the Button_Execute methods to accomplish data operations programmatically. You can provide sophisticated behaviors to your applications and enhance the default user experience via button methods.
ShowMessageBox and ShowInputBox
In the previous example, you saw in action the ShowMessageBox method, which asks the user to make a decision based on the text message that you enter in the message box and based on choice buttons that you include. Technically speaking, ShowMessageBox is an extension method exposed by a static class called Microsoft.LightSwitch.Presentation.ScreenExtensions. As the name implies, this class exposes extension methods that work with screens. Among the others, ShowInputBox is another method that you might find useful. Put simply, it shows an input box in which the user enters some text that is returned under the form of an object of type String. This can prove to be useful if you need the user to enter some values that you can elaborate further. The following code demonstrates how to invoke the method and store the result of the invocation:
Dim value As String = Me.
ShowInputBox("Please enter a value", "Input box demo")
You can then elaborate the user’s input by working with the value variable. Other methods exposed by the class are as follows:
• OpenModalWindow, which opens a screen as a modal window, supplying its name as a parameter.
• CloseModalWindow, which closes a screen opened as a modal window, supplying its name as a parameter.
• FindControl, which returns the instance of the specified control supplying its name as a parameter.
• FindControlInCollection, which returns the instance of the specified control inside a collection of controls, such as a row in a DataGrid.
If for some reason you need to retrieve the instance of a control via FindControl or FindControlInCollection, you do not usually manually handle OpenModalWindow and CloseModalWindow, which are instead used by the LightSwitch runtime to manage modal windows. This is why examples about these methods are not provided in this chapter but an example about FindControl is (in the “Collection Methods” section).
General Methods
General methods group procedures that run on the client and that are invoked when data is loaded or saved or when a screen closes. Table 11.6 summarizes screen general methods (where ScreenName stands for the screen name as visible in the LightSwitch Screen Designer, such as EditableProductsGrid). Notice that the order in which methods are listed in Table 11.7 represents the execution process on the screen, except for Saving, Saved, and SaveError, which depend on a user interaction.
Table 11.7. Screen General Methods
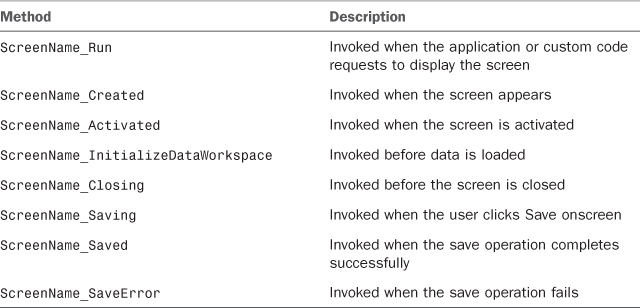
Among all the available screen general methods, you will most likely work with InitializeDataWorkspace, Saving, Saved, and SaveError. These are described in the next subsections.
Handling InitializeDataWorkspace
InitializeDataWorkspace occurs just before data is loaded. The two main scenarios in which you might handle this method are as follows:
• You want to set a screen parameter used in a query to a default value.
• You want to tell LightSwitch to save changes to multiple data sources. For example, suppose you have a one-to-one relationship between a table in the application database and another table in an external database, SharePoint list, or other custom data source. If you want to edit both of them on the same screen, you need to tell LightSwitch to enable editing on both of them in the InitializeDataWorkspace. Then you must specify the order of saving them in the Saving method.
The first scenario is easy to demonstrate. For example, suppose you want to provide a default value for a screen parameter called CustomerId inside a Search Screen. You can do so with the following code:
Private Sub SearchCustomers_InitializeDataWorkspace(saveChangesTo _
As System.Collections.Generic.
List(Of Microsoft.LightSwitch.IDataService))
Me.CustomerId = 100
End Sub
Handling Saving, Saved, and SaveError
You can control, in code, the process of saving changes from a client perspective so that the operations you request over the process are executed before control passes to the server. For example, you might want to tell the user that saving changes is not revertible (and so the application needs confirmation). Customizing the save process requires overriding the default behavior, which is accomplished by handling the screen’s Saving method. Take a look at the following code:
Private Sub CreateNewOrderHeader_Saving(ByRef handled As Boolean)
' Write your code here.
Dim result As System.Windows.MessageBoxResult = _
Me.ShowMessageBox("You cannot undo a save process. " _
+ "Proceed anyway?", "Warning",
MessageBoxOption.YesNo)
If result = Windows.MessageBoxResult.Yes Then
Me.DataWorkspace.ApplicationData.SaveChanges()
End If
handled = True
End Sub
Basically, this code does the following:
1. Asks for the user’s confirmation before saving.
2. If the user confirms, the code explicitly invokes SaveChanges on the appropriate data source class.
3. Marks the event as handled, by setting the handled variable’s value to True. This prevents infinite check loops over the event.
The next action that you must consider when manually handling the save process is handling exceptions. Basically, if the save process fails, the runtime invokes the SaveError method. This method receives an argument that represents the exception instance, which you can analyze and handle according to your needs. For example, the following code checks for exceptions and writes a log to a text file, using well-known objects from the .NET Framework. (Note, however, that it works only if the application is running as a desktop client.)
Private Sub CreateNewOrderHeader_SaveError(exception As _
System.Exception, ByRef handled As Boolean)
If TypeOf (exception) Is DataServiceOperationException Then
Using logFile As New System.IO.StreamWriter(Environment.
GetFolderPath(Environment.
SpecialFolder.MyDocuments) + "Log.txt")
logFile.WriteLine(exception.Message)
logFile.WriteLine(DateTime.Now.ToShortDateString)
End Using
End If
handled = True
End Sub
The last method in the save process is Saved. This is invoked when data is saved successfully. By default, LightSwitch adds the appropriate runtime code to handle the event correctly. You do not usually have to handle Saved; you instead add your logic to Saving, as shown before. Now run the application and open the Create New Order Detail screen, and make sure to replace the default product with one that is not duplicated. When you click Save, the application prompts for confirmation (per the first code snippet in this section), as shown in Figure 11.10.
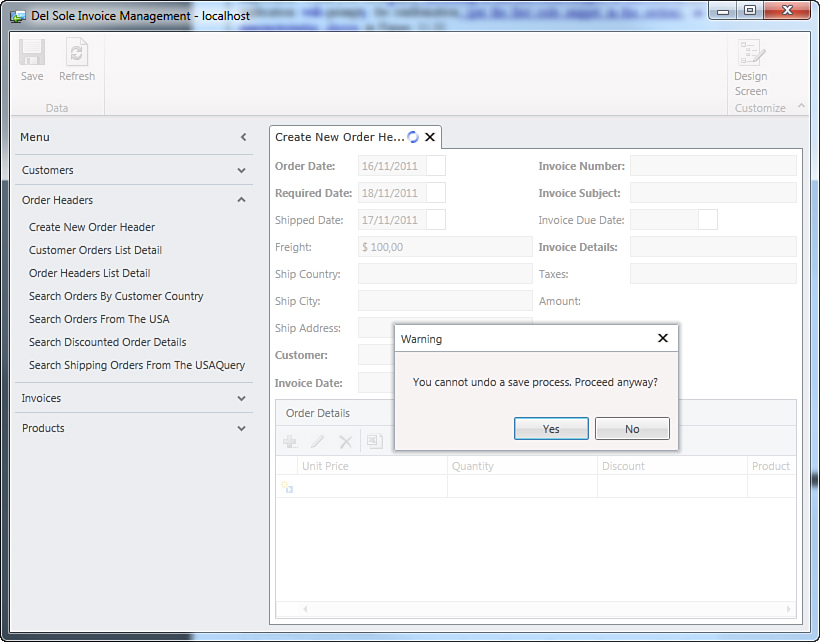
Figure 11.10. The screen asks for user confirmation before saving.
If the save process throws server-side errors, SaveError is invoked, displaying the error message provided in code.
Collection Methods
Collection methods are executed when values within a collection change or when the user selects a different item in a list. In the first case, the LightSwitch runtime raises an event and invokes the Changed method, whereas in the second case, it invokes the SelectionChanged method. Handling Changed is useful to be notified of specific edits, such as adding or removing items, or providing default values on newly added rows based on previous rows in a grid. The following code snippet demonstrates how to get information about newly added products, where the runtime raises the change notification event:
Private Sub Products_Changed(e As System.
Collections.Specialized.
NotifyCollectionChangedEventArgs)
If e.Action = Collections.Specialized.
NotifyCollectionChangedAction.Add Then
For Each prod As Product In e.NewItems
System.Diagnostics.
Debug.WriteLine(prod.ProductName)
Next
End If
End Sub
The method receives an argument e of type System.Collections.Specialized.NotifyCollectionChangedEventArgs. This object contains information about the kind of changes that affected the collection, such as adding, removing, and replacing items. The action type is contained in the Action property. The preceding code checks for newly added items and then writes the name of each item to the Output window for debugging purposes. (See Chapter 14, “Debugging LightSwitch Applications,” for more information about debugging.)
Other interesting properties are OldItems, OldStartIndex, and NewStartIndex. The first property contains the list of items that were modified, and the latest two properties provide information about the position of items in the collection by their index. SelectionChanged is useful when you want to control the selected item on screen or to apply different behavior to the user interface according to the selected item’s type. For instance, the following code demonstrates how to disable the Delete button in the Editable Products Grid Screen when the selected item belongs to the Beverages category:
Private Sub Products_SelectionChanged()
If Products.SelectedItem.Category = 3 Then
FindControl("gridDeleteSelected").IsEnabled = False
Else
FindControl("gridDeleteSelected").IsEnabled = True
End If
End Sub
As you can see, the current item is represented by the SelectedItem property, which is common to all kinds of collections, and its type is the same of the entity that it is representing. In this case, SelectedItem represents a product in the grid, so it is of type Product. This is why the Category property, exposed by Product, is available in SelectedItem. The code uses a new method called FindControl, which gets the instance of the user control specified via its name (as it appears in the Properties window). This method returns an object of type IContentItemProxy, which represents an element of the user interface, thus including screens.
Collections also expose two other methods: Validate and Loaded. The reason they are not discussed here is simple: The first was discussed back in Chapter 5, “Customizing Data Validation,” and the second, Loaded, simply runs after a property value is loaded from the data source, so it does not make much sense to handle this method with custom code.
Launching Screens Programmatically
You can invoke screens programmatically by calling methods that Visual Studio LightSwitch generates behind the scenes when you create new screens. This can prove useful if you want to open screens only under certain conditions or simply if you want to launch a screen by clicking a button on the toolbar. Screens in LightSwitch can be single instance or multiple instance. Basically, a single-instance screen can appear only once in the user interface. In contrast, when a screen is marked as multi-instance, new instances can be launched and shown in the user interface. This is important to understand before writing code. Typically, screens that allow the creation of new entities are multiple instance by default, whereas screens that include tabular data representations are single instance (including the Search Screen, Editable Grid, List and Details). You can change the default behavior by checking the Allow Multiple Instances check box for each screen. This property is available in the Properties window when you open the Screen Designer, as shown in Figure 11.11.
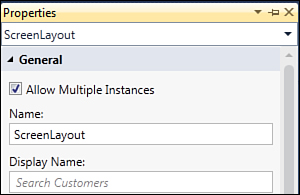
Figure 11.11. Allowing multiple instances of a screen.
Of course, when you change this setting, the screen behavior changes even if you do not launch screens in code. So, you can display the required number of screen instances by simply launching screens via their built-in shortcuts in the user interface. Figure 11.12 shows two instances of the Search Customers screen launched via the appropriate shortcut in the Customers group of the task bar.
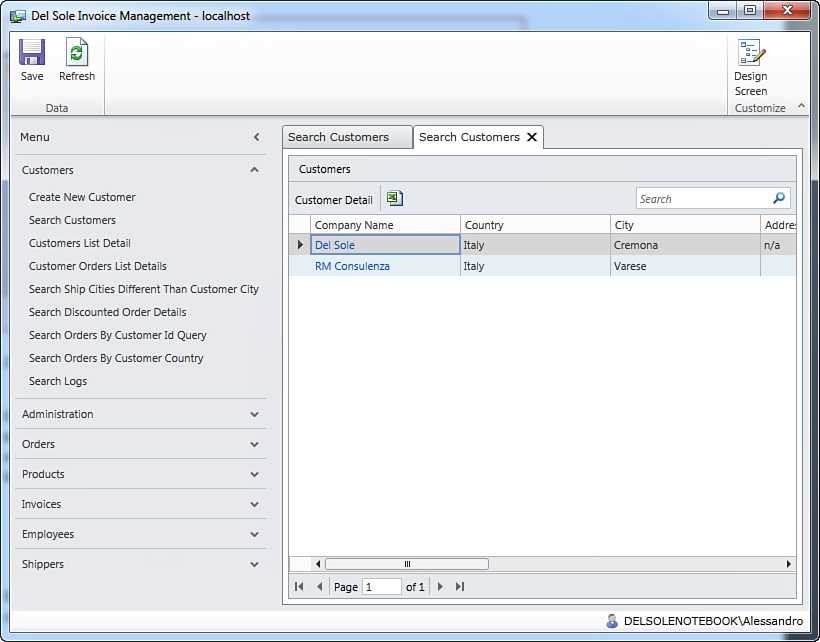
Figure 11.12. Launching multiple instances of a screen.
So, you might encounter the following situations when invoking screens:
• Requesting to open a multi-instance screen: This action creates and shows a new instance of a screen.
• Requesting to open a single-instance screen that is not already running: This action creates and shows a new instance of a screen.
• Requesting to open a single-instance screen that is already open: This action simply open the existing instance.
To show screens in code, you need to invoke special methods that LightSwitch generates behind the scenes. Such methods are exposed by the Application class and, as a general rule, their name is made of the Show literal plus the name of the screen. For example, in the Invoice Management application, there are methods such as ShowEditableProductGrid, ShowCreateNewCustomer, ShowInvoicesListDetails, and so on. You have two options for launching screens in code: invoking screens via their specialized methods, or launching screens by passing parameters. Both scenarios are explained in the next subsections.
Opening Screens Without Passing Parameters
You can make calls to autogenerated methods to launch screens at particular points (for example, within buttons’ Execute methods). You call a screen in code like this:
Application.ShowCreateNewCustomer()
If the screen is marked as multi-instance, each time you invoke the method a new instance of the screen is created and shown. The Application class also exposes a property called ActiveScreens, of type List(Of IActiveScreen), which stores a list of screens in the application. IActiveScreen is a type that represents the instance of a screen. You can interact with ActiveScreens to get information about screens at runtime. For example, the following code iterates the list of active screens and stores the name/description pair into a Dictionary collection:
Dim screenInfo As New Dictionary(Of String, String)
For Each screen In Application.ActiveScreens
screenInfo.Add(screen.GetName, screen.GetDescription)
Next
Then you can analyze the Dictionary (for example, via a For Each loop) to retrieve detailed information about screens.
Opening Screens by Passing Parameters
Some screens in Visual Studio LightSwitch are invoked by methods that require a parameter. This is what usually happens behind the scenes and is a common behavior, not specific to writing custom code. For example, think of Search Screens. If you open the Search Customers screen, you can access the selected customer’s details by clicking a hyperlink on the Company name, which is also generated by LightSwitch. When you click this hyperlink, which automatically opens the default details screen, behind the scenes the runtime invokes the ShowCustomerDetails method and passes the customer Id as a parameter, so that the Customer Details screen will be able to display information for the selected customer. Not all screens provide a button for showing item details, so it would be nice to add one, or you might just have a custom details screen that is not the default one and that you might want to open in code. The following steps demonstrate how to reproduce this with the default details screen:
1. Open the Search Customers screen in the Screen Designer.
2. Expand the Command Bar element under the DataGrid control.
3. Add a new Button control and specify a name for the methods associated with the new control. Figure 11.13 shows an example.
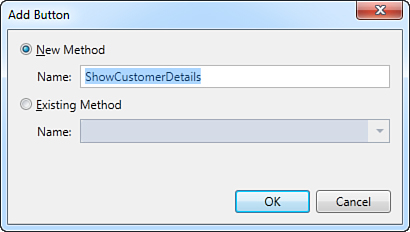
Figure 11.13. Specifying a method name.
4. Double-click the newly added item so that Visual Studio LightSwitch opens the code editor pointing to the ShowCustomerDetails_Execute method. Now, write the following code:
Private Sub ShowCustomerDetails_Execute()
' Write your code here.
Application.ShowCustomerDetail(Me.Customers.SelectedItem.Id)
End Sub
The code invokes the ApplicationShowCustomerDetail method, which requires the customer Id as the argument. This is retrieved by getting the instance of the currently selected customer in the grid and then calling the Id property, which is the actual parameter passed to the method. If you now run the application and open the Search Screen, you will notice that
• The new button appears in the toolbar related to the grid.
• When you click this button, the customer details appear based on your selection.
If you want to intercept the value of the passed parameter within the target screen, you can handle the Created event like this:
Private Sub CustomerDetail_Created()
If CustomerId = 0 Then
Me.ShowMessageBox("Customer ID cannot be zero")
End If
End Sub
You can also use local properties on screens and set them as parameters to use them in method invocations.
You can take advantage of query parameters discussed in Chapter 6 to provide additional actions when opening screens in code. A “How Do I” video in the Visual Studio LightSwitch Developer Center explains how to accomplish this: http://msdn.microsoft.com/en-us/lightswitch/ff961919.
Summary
A significant part of building applications with Visual Studio LightSwitch involves writing code.
Other than the business logic, you can interact, as needed, in code with LightSwitch applications by handling methods invoked when some events are raised. These usually happen on both the server and the client sides and are related to entities, queries, and screens.
This chapter explained how to handle data and screen events by customizing methods, giving an overview of possible customizations in the application’s execution. From what you learned in this chapter, you can now understand the complex job LightSwitch performs under the hood to generate code that serves as the application infrastructure. In the next chapter, you learn about architecture and how projects and applications are organized beyond what you see in Solution Explorer.