
6. Form Handling
Changing Menus Dynamically 140
Checking Fields against Each Other 147
Identifying Problem Fields 149
Putting Form Validation into Action 151
Working with Radio Buttons 156
Setting One Field with Another 159
Validating Email Addresses 166
Any time you need to gather information from the users of your Web sites, you’ll need to use a form.
Forms can contain most of the usual graphical interface elements, including entry fields, radio buttons, check boxes, pop-up menus, and entry lists. In addition, HTML forms can contain password fields, shielding the user’s input from prying eyes.
Once the form is filled out, a click on the form’s Submit button sends the form’s information to your Web server, where a CGI (that stands for Common Gateway Interface, and it’s a script that runs on the Web server) interprets the data and acts on it. Often, the data is then stored in a database for later use. It’s useful to make sure that the data the user enters is “clean,” that is, accurate and in the correct format, before it gets stored on the server side. JavaScript is the perfect way to check the data; this is called form validation. Though the CGI can do the validation (and should as a backup measure, since some people will have JavaScript turned off in their browsers), it’s much faster and more efficient for your users to also do it on their own machines with JavaScript.
In this chapter, you’ll learn how to use JavaScript to make sure that your forms contain valid information, check data in one field against the data in another field, and highlight incorrect information to let the user know what needs to be changed.
Table 6.1. Just Enough HTML—Forms

Select-and-Go Navigation
You’ve probably seen lots of examples of the standard navigation menu on the Web; you pick a choice from a menu and click a Go button, which takes you to your destination. For example, many online stores use such menus to move you to different departments. But with a bit of JavaScript, you can launch users on their way with just the menu choice, eliminating the Go button ![]() . This makes your site feel snappier and more responsive, which is always a good idea. We call these JavaScript-enhanced menus select-and-go menus, and they’re easy to create. The HTML is in Listing 6.1, the CSS is in Listing 6.2, and the JavaScript is shown in Listing 6.3. You’ll never want to use a Go button again!
. This makes your site feel snappier and more responsive, which is always a good idea. We call these JavaScript-enhanced menus select-and-go menus, and they’re easy to create. The HTML is in Listing 6.1, the CSS is in Listing 6.2, and the JavaScript is shown in Listing 6.3. You’ll never want to use a Go button again!
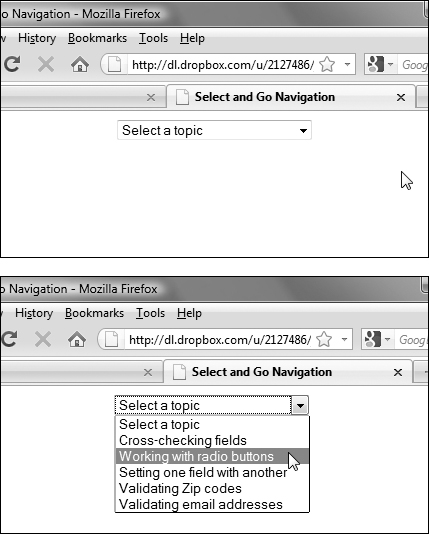
![]() Picking any of the choices in this menu jumps you directly to the page containing that topic, without requiring a separate Go button.
Picking any of the choices in this menu jumps you directly to the page containing that topic, without requiring a separate Go button.
Listing 6.1. The HTML for a select-and-go menu is fairly simple.
<!DOCTYPE html>
<html>
<head>
<title>Select and Go Navigation</title>
<script src="script01.js"></script>
<link rel="stylesheet" href="script01.css">
</head>
<body>
<form action="gotoLocation.cgi" class="centered">
<select id="newLocation">
<option selected>Select a topic</option>
<option value="script06.html">Cross-checking fields</option>
<option value="script07.html">Working with radio buttons</option>
<option value="script08.html">Setting one field with another</option>
<option value="script09.html">Validating Zip codes</option>
<option value="script10.html">Validating email addresses</option>
</select>
<noscript>
<input type="submit" value="Go There!">
</noscript>
</form>
</body>
</html>
To create a select-and-go menu
1. window.onload = initForm;
window.onunload = function() {};
When the window loads, call the initForm() function. The next line needs some explanation, because it is a workaround for the odd behavior of some browsers.
When the window unloads (i.e., when it is closed or the browser goes to another location), we call an anonymous function, that is, a function that doesn’t have a name. In this case, it not only doesn’t have a name, it doesn’t have anything at all. It’s here because we have to set onunload to something—otherwise, the onload event isn’t triggered when the browser’s back button is clicked, because the page is cached in some browsers, such as Firefox and Safari. Having onunload do anything at all causes the page to be uncached, and therefore, when we come back, the onload happens.
The anonymous part of the term refers to the fact that there’s no name between function and (). This is the simplest way to trigger onunload but not have it do anything. The braces are just like any function; they would hold the contents of the function. They’re empty here because this particular function does nothing.
Listing 6.2. There’s not a lot in this CSS file, but it’s here when you want to add more styling.
.centered {
text-align: center;
}
2. document.getElementById("newLocation").selectedIndex = 0;
document.getElementById("newLocation").onchange = jumpPage;
In the initForm() function, the first line gets the menu on the HTML page, which has the id of newLocation, and sets its selectedIndex property to zero, which forces it to say “Select a topic”.
The second line tells the script to call the jumpPage() function when the menu selection changes.
3. var newLoc = document.getElementById("newLocation");
Inside the jumpPage() function, the newLoc variable looks up the value chosen in the menu by the visitor.
4. var newPage = newLoc.options[newLoc.selectedIndex].value;
Start from the code inside the brackets and work outward. The object newLoc.selectedIndex will be a number from 0 to 5 (because there are six possible menu choices; remember that JavaScript arrays are zero-based). Given that number, we next get the value for the corresponding menu option, which is the name of the Web page we want to jump to. Then we assign the result to the variable newPage.
5. if (newPage != "") {
window.location = newPage;
This conditional first checks to see that newPage is not equal to nothing (that is, it’s not empty). In other words, if newPage has a value, then tell the window to go to the URL specified by the menu option chosen.
Listing 6.3. You can use JavaScript and forms for active site navigation.
window.onload = initForm;
window.onunload = function() {};
function initForm() {
document.getElementById("newLocation").selectedIndex = 0;
document.getElementById("newLocation").onchange = jumpPage;
}
function jumpPage() {
var newLoc = document.getElementById("newLocation");
var newPage = newLoc.options[newLoc.selectedIndex].value;
if (newPage != "") {
  window.location = newPage;
}
}
One of the nicest things about this script is that once the JavaScript function has been added, there’s no need to modify the function when pull-down options are added, modified, or changed. Only the values of the options (i.e., the URLs that the menu options jump to) need to be set. For this reason, this script works well with WYSIWYG page editors.
As mentioned above, Firefox caches pages, causing onload events to not be triggered when the back button is clicked. One way to work around this is covered above; another way we can do this is to add the line:
window.onpageshow = initForm;
We didn’t use this because it doesn’t work in Safari (the other caching troublemaker). But if you are specifically targeting Firefox, it’s worth knowing that there are two new non-standard window event handlers, onpageshow and onpagehide, which can be used to handle events that we only want triggered in Firefox.
We call these “select-and-go” menus, which isn’t especially elegant but clearly tells you what’s going on. You may see other names for the same functionality; for example, Dreamweaver calls them “jump menus.” By the way, if you’re a Dreamweaver user and need a great book on getting the most out of Dreamweaver, let us suggest Dreamweaver: Visual QuickStart Guide (Peachpit Press), by, uh, us.
Accommodating the JavaScript-impaired User
<form action="gotoLocation.cgi">
The form tag has the action attribute, which calls the CGI. But a form action requires the user to click a submit button, and there’s no such button in ![]() at the beginning of this section. Ah, but there is in
at the beginning of this section. Ah, but there is in ![]() , which shows what happens when you turn JavaScript off. These lines contain the button, which is wrapped in the
, which shows what happens when you turn JavaScript off. These lines contain the button, which is wrapped in the noscript tags, which are only executed if JavaScript is missing.
<noscript>
<input type="submit" value="Go There!">
</noscript>
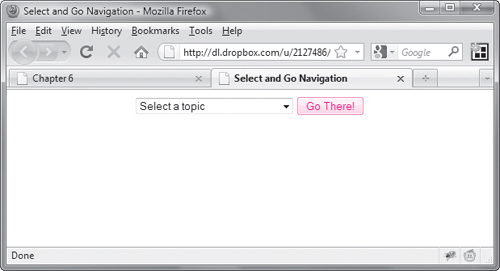
![]() If the user doesn’t have JavaScript, they’ll still be able to get around on your site, because the Go There! button automagically appears.
If the user doesn’t have JavaScript, they’ll still be able to get around on your site, because the Go There! button automagically appears.
Changing Menus Dynamically
It’s often useful to offer the user a choice of inputs via pop-up menus, and to be able to change the contents of one or more pop-up menus depending on the choice the user makes in another pop-up menu. You’ve probably seen this on Web sites that ask you to choose the country you live in from a pop-up menu and then fill a second menu with state or province names, based on the choice you made. In Listings 6.4 (HTML) and 6.5 (JavaScript), we’re using two pop-up menus ![]() . The first menu is for months. When the user picks a month, the script populates the second pop-up menu with the correct number of days for the selected month
. The first menu is for months. When the user picks a month, the script populates the second pop-up menu with the correct number of days for the selected month ![]() .
.
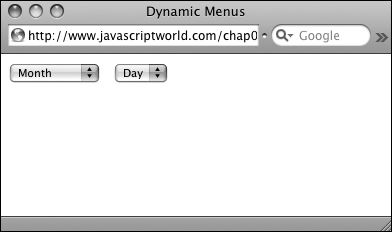
![]() The contents of the second menu are filled in automatically when the user makes a selection from the first menu.
The contents of the second menu are filled in automatically when the user makes a selection from the first menu.

![]() The result of choosing a month: the correct number of days in that month appears in the Day menu.
The result of choosing a month: the correct number of days in that month appears in the Day menu.
To change menus dynamically
1. var monthDays = new Array(31,28,31,30,31,30,31,31,30,31,30,31);
This new array contains 12 values for the 12 months, with the correct number of days in each month. The array is stored in the variable monthDays.
2. var monthStr = this.options[this.selectedIndex].value;
We’re using this (the month the user picked from the first menu) to get the value from the menu, and storing it in monthStr.
Listing 6.4. The HTML for the pop-up menus lists the months but not the days.
<!DOCTYPE html>
<html>
<head>
<title>Dynamic Menus</title>
<script src="script02.js"></script>
</head>
<body>
<form action="#">
<select id="months">
<option value="">Month</option>
<option value="0">January</option>
<option value="1">February</option>
<option value="2">March</option>
<option value="3">April</option>
<option value="4">May</option>
<option value="5">June</option>
<option value="6">July</option>
<option value="7">August</option>
<option value="8">September</option>
<option value="9">October</option>
<option value="10">November</option>
<option value="11">December</option>
</select>
<select id="days">
<option>Day</option>
</select>
</form>
</body>
</html>
Listing 6.5. By selecting a value from one pop-up menu, you can create the contents of a second pop-up menu.
window.onload = initForm;
function initForm() {
document.getElementById("months").selectedIndex = 0;
document.getElementById("months").onchange = populateDays;
}
function populateDays() {
var monthDays = new Array(31,28,31,30,31,30,31,31,30,31,30,31);
var monthStr = this.options[this.selectedIndex].value;
if (monthStr != "") {
var theMonth = parseInt(monthStr);
document.getElementById("days").options.length = 0;
for(var i=0; i<monthDays[theMonth];i++) {
document.getElementById("days").options[i] = new Option(i+1);
}
}
}
3. if (monthStr != "") {
var theMonth = parseInt (monthStr);
If the value of monthStr is "", then the user chose the word “Month” in the menu, rather than a month name. What these lines do is check to see that the value of monthStr is not ""; if that condition is true, then monthStr is turned into a number with the parseInt() method, and the variable theMonth is set to the result.
4. document.getElementById("days").options.length = 0;
for (var i=0; i<monthDays[theMonth]; i++) {
document.getElementById("days").options[i] = new Option(i+1);
Start changing the day menu by setting its options length to zero. That clears out whatever happened to be there before, so we’re starting fresh. The loop simply goes through the number of days in whatever the chosen month is, adding a new option to the menu for each day. Option is passed i+1, so that it shows 1 to 31 instead of 0 to 30.
The monthDays array contains the number of days in each month, which works fine except in the case of leap years. To get your script to work in a leap year, you’ll need to change the February value in monthDays.
Making Fields Required
When filling out a form, you may want to specify particular fields that are required to be filled out by the user before the form can be submitted. You can use JavaScript to check that some or all fields are filled out. In this example, we use HTML, CSS, and JavaScript (Listings 6.6, 6.7, and 6.8, respectively) to highlight fields that are not filled out with a red border and a yellow interior. The check occurs when the user clicks the form’s Submit button.
Here’s the big picture: the class attributes in the HTML store which checks we want the JavaScript to do. If a check is failed, we add invalid to the list of class attributes. Doing that causes (1) the form submission to fail, and (2) the CSS in Listing 6.7 to change the appearance of the field on the page ![]() .
.
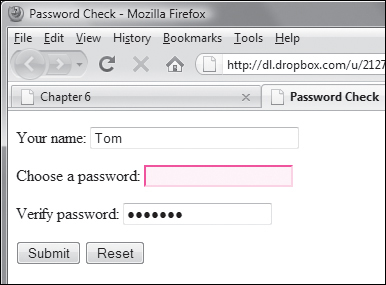
![]() Make sure that passwords are entered correctly by highlighting the background to let the user know there’s a problem with a particular field.
Make sure that passwords are entered correctly by highlighting the background to let the user know there’s a problem with a particular field.
To make fields required
1. function initForms() {
for (var i=0; i< document.forms.length; i++) {
document.forms[i].onsubmit = validForm;
When the page first loads, the initForms() function is called. This function loops through every form on the page. For each one, it adds an event handler to that form’s onsubmit: a call to validForm. When an onsubmit handler returns a value of false, the form doesn’t get passed back to the server. The server only gets the form (running whatever CGI is stored in the action attribute) when we return a value of true.
Listing 6.6. The HTML for the password check example.
<!DOCTYPE html>
<html>
<head>
<title>Password Check</title>
<link rel="stylesheet" href="script03.css">
<script src="script03.js"></script>
</head>
<body>
<form action="#">
<p><label for="userName">Your name: <input type="text" size="30" id="userName" class="reqd"></label></p>
<p><label for="passwd1">Choose a password: <input type="password" id="passwd1" class="reqd"></label></p>
<p><label for="passwd2">Verify password: <input type="password" id="passwd2" class="reqd passwd1"></label></p>
<p><input type="submit" value="Submit"> <input type="reset"></p>
</form>
</body>
</html>
2. var allTags = document.getElementsByTagName("*");
The document.getElementsByTagName("*") object is very useful—that asterisk tells JavaScript to return an array containing every tag on the page. Once we have that, we can then just loop through the allTags array looking for things of interest.
3. for (var i=0; i<allTags.length; i++) {
if (!validTag(allTags[i])) {
allGood = false;
This loop searches through allTags, and the if conditional calls the validTag() function, which checks each tag to see if there’s anything there that should keep the form from submitting this page. It’s passed allTags[i], which is the object that we’re currently processing. If any tag causes validTag() to return false, we set allGood to false. However, even if one is false, we still keep going through all the tags.
4. return allGood;
We return allGood, to signify whether or not we’re good to go.
5. function validTag(thisTag) {
Create the validTag() function, and set it to receive the parameter thisTag.
Listing 6.7. The CSS sets the style for invalid form elements.
body {
color: #000;
background-color: #FFF;
}
input.invalid {
background-color: #FF9;
border: 2px red inset;
}
label.invalid {
color: #F00;
font-weight: bold;
}
6. var allClasses = thisTag.className.split(" ");
For each tag, we want to look at every class attribute (remember, class can be set to have multiple attributes “like so and so and so”). The allClasses array is created and set based on thisTag.className.split(" "); which splits a string up into an array, broken up by the string that’s passed in. Here, the string is a space, which would, for example, cause the string “this that and the other” to turn into an array of five elements: this, that, and, the, other.
We want to look at each class attribute, because class is where we’re storing what we want each form field to have to provide. In this task, the one we care about is reqd—required. If any form field has a class that includes reqd, it’s got to contain something.
7. for (var j=0; j<allClasses.length; j++) {
outClass += validBasedOnClass(allClasses[j]) + " ";
}
This loop uses j as its loop variable because we’re inside a loop that’s using i. We loop around once for each class attribute in allClasses.
For each class, we perform: outClass += validBasedOnClass(allClasses[j]) + " ";. This calls the validBasedOnClass() function (explained below), passing in the current class we’re looking at. That function returns something, and that something, plus a space, is appended onto the outClass variable.
Listing 6.8. This script serves as the basis for all the rest of the examples in this chapter; it’s a framework that you can use to add additional validation checks.
window.onload = initForms;
function initForms() {
  for (var i=0; i< document.forms.length; i++) {
    document.forms[i].onsubmit = validForm;
}
}
function validForm() {
var allGood = true;
var allTags = document.getElementsByTagName("*");
for (var i=0; i<allTags.length; i++) {
  if (!validTag(allTags[i])) {
    allGood = false;
}
}
return allGood;
function validTag(thisTag) {
var outClass = "";
var allClasses = thisTag.className.split(" ");
for (var j=0; j<allClasses.length; j++) {
  outClass += validBasedOnClass(allClasses[j]) + " ";
}
thisTag.className = outClass;
if (outClass.indexOf("invalid") > -1) {
thisTag.focus();
if (thisTag.nodeName == "INPUT") {
  thisTag.select();
}
return false;
}
return true;
function validBasedOnClass(thisClass) {
var classBack = "";
switch(thisClass) {
case "":
case "invalid":
  break;
case "reqd":
  if (allGood && thisTag.value == "") {
    classBack = "invalid ";
  }
  classBack += thisClass;
  break;
default:
  classBack += thisClass;
}
return classBack;
}
}
}
8. thisTag.className = outClass;
When we’ve finished with the allClasses loop, we take the contents of outClass and put it into thisTag.className, overwriting the current class attribute for this form field. That’s because it can change during this process, as we’ll see very shortly.
9. if (outClass.indexOf("invalid") > -1) {
Something that can be returned in the new class attribute is the word “invalid”, so we check for it. If that’s found anywhere in the new class, do the following, as there’s a problem.
10. thisTag.focus();
If this form field can take focus (remember, we discussed focus in Chapter 5), we want to put the focus into the field, and that’s what this line does. This is a way of forcing the user to know which field is the problem.
11. if (thisTag.nodeName == "INPUT") {
thisTag.select();
}
Basically, these lines say, “This tag I’m looking at: is it an <input> tag? If so, select its value so that the user has an easier time modifying it.”
12. return false;
We’re still inside the “invalid was returned” block, so we return false back to where we were called.
13. return true;
If all is good and valid, we return true.
14. function validBasedOnClass(thisClass) {
Begin the new validBasedOnClass() function, and set it to receive the value thisClass.
Create the classBack variable, and fill it with nothing for now. This is going to contain the class to be returned, that is, the value we want to send back.
16. switch(thisClass) {
The switch statement looks at the single class attribute that was passed in (in thisClass) and does something based on it.
17. case "":
case "invalid":
break;
If thisClass is empty or invalid, then break out of the conditional; otherwise, continue.
18. case "reqd":
if (allGood && thisTag.value == "") {
classBack = "invalid ";
}
classBack += thisClass;
break;
If the attribute being processed is reqd and allGood is true and the current value of the current tag is "" (i.e., nothing), then we set classBack to be invalid, because there’s a problem, and we want to notify the user. After that, whether there was a problem or not, we append the current class to classBack so that it doesn’t get lost.
19. default:
classBack += thisClass;
The default block is executed whenever something happens that isn’t caught by one of the above cases. When that happens, it’s a class we don’t care about, so we just stick it onto classBack and don’t fret.
20. return classBack;
Finally, we return classBack.
Checking Fields against Each Other
It’s common to want to check one field against another, especially when you’re asking the user to type in a password. You want to make them type it in twice for accuracy, and you want to make sure that they typed the same thing both times.
This example reuses Listings 6.6 (HTML) and 6.7 (CSS); only a few lines of JavaScript need to be added to Listing 6.8 (Listing 6.9) to give the script the extra cross-checking functionality. The result is shown in ![]() ; once again, when the check fails, the offending field gets a red border.
; once again, when the check fails, the offending field gets a red border.
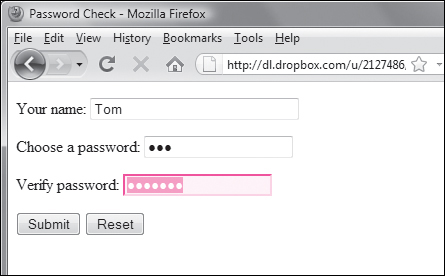
![]() The two password fields cross-check to make sure their contents are identical. In this case, not so much.
The two password fields cross-check to make sure their contents are identical. In this case, not so much.
Listing 6.9. Use this script to compare the value of one field to another. Do they match?
window.onload = initForms;
function initForms() {
for (var i=0; i< document.forms.length; i++) {
document.forms[i].onsubmit = validForm;
}
}
function validForm() {
var allGood = true;
var allTags = document.getElementsByTagName("*");
for (var i=0; i<allTags.length; i++) {
if (!validTag(allTags[i])) {
allGood = false;
}
}
return allGood;
function validTag(thisTag) {
var outClass = "";
var allClasses = thisTag.className.split(" ");
for (var j=0; j<allClasses.length; j++) {
outClass += validBasedOnClass(allClasses[j]) + " ";
}
thisTag.className = outClass;
if (outClass.indexOf("invalid") > -1) {
thisTag.focus();
if (thisTag.nodeName == "INPUT") {
thisTag.select();
}
return false;
}
return true;
function validBasedOnClass(thisClass) {
var classBack = "";
switch(thisClass) {
case "":
case "invalid":
break;
case "reqd":
if (allGood && thisTag.value == "") {
classBack = "invalid ";
}
classBack += thisClass;
break;
default:
if (allGood && !crossCheck(thisTag,thisClass)) {
  classBack = "invalid ";
}
classBack += thisClass;
}
return classBack;
}
function crossCheck(inTag,otherFieldID) {
  if (!document.getElementById(otherFieldID)) {
    return false;
  }
  return (inTag.value == document.getElementById(otherFieldID).value);
}
}
}
To check one field against another
1. if (allGood && !crossCheck(thisTag,thisClass)) {
classBack = "invalid ";
}
We’re now checking to make sure that the two password fields are the same. Because (see Listing 6.6) the second password field has a class containing passwd1, this JavaScript knows that it has to cross-check the second field against the first. Here in the default block of the conditional is where that’s handled. If allGood is true and the crossCheck() function (see below) spotted a problem (and returned false), then we want to set classBack to invalid.
2. function crossCheck(inTag,otherFieldID) {
if (!document.getElementById(otherFieldID)) {
return false;
}
return (inTag.value == document.getElementById(otherFieldID).value);
}
Here’s the crossCheck() function. It takes in the current tag and the id of the other field to check against. In this case, the current tag is the passwd2 <input> and the id of the other field is passwd1. If the other field doesn’t exist, no check can be done; that’s a problem, so the function returns false. Otherwise, the fields both exist, so we compare their values: if they’re equivalent, true is returned; if they aren’t, false is returned.
This script does not check against a master password database to see if the password the user entered is valid; that requires a CGI on the server. It just makes sure that when a password is entered twice, it is the same value both times.
Identifying Problem Fields
Changing the border of the input field to red is nice and all, but it would be better if we could make it a little clearer which field was the problem. In this example, you’ll learn how to set the label around the field to be red and bold, making it clear where the problem lies ![]() . Once again, the HTML and CSS files have not changed (they’re still Listings 6.6 and 6.7). In Listing 6.10, we’ve added a few lines of JavaScript to the previous Listing 6.9 to help point out entry errors.
. Once again, the HTML and CSS files have not changed (they’re still Listings 6.6 and 6.7). In Listing 6.10, we’ve added a few lines of JavaScript to the previous Listing 6.9 to help point out entry errors.
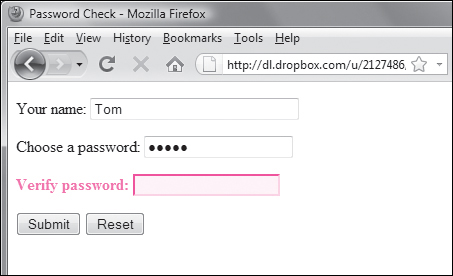
![]() When there’s a problem, you can make the field’s label red and bold, as well as the field itself.
When there’s a problem, you can make the field’s label red and bold, as well as the field itself.
Listing 6.10. This script highlights the incorrect field’s label when it finds an error.
window.onload = initForms;
function initForms() {
for (var i=0; i< document.forms.length; i++) {
document.forms[i].onsubmit = validForm;
}
}
function validForm() {
var allGood = true;
var allTags = document.getElementsByTagName("*");
for (var i=0; i<allTags.length; i++) {
if (!validTag(allTags[i])) {
allGood = false;
}
}
return allGood;
function validTag(thisTag) {
var outClass = "";
var allClasses = thisTag.className.split(" ");
for (var j=0; j<allClasses.length; j++) {
outClass += validBasedOnClass(allClasses[j]) + " ";
}
thisTag.className = outClass;
if (outClass.indexOf("invalid") > -1) {
invalidLabel(thisTag.parentNode);
thisTag.focus();
if (thisTag.nodeName == "INPUT") {
thisTag.select();
}
return false;
}
return true;
function validBasedOnClass(thisClass) {
var classBack = "";
switch(thisClass) {
case "":
case "invalid":
break;
case "reqd":
if (allGood && thisTag.value == "") {
classBack = "invalid ";
}
classBack += thisClass;
break;
default:
if (allGood && !crossCheck(thisTag,thisClass)) {
classBack = "invalid ";
}
classBack += thisClass;
}
return classBack;
}
function crossCheck(inTag,otherFieldID) {
if (!document.getElementById(otherFieldID)) {
return false;
}
return (inTag.value == document.getElementById(otherFieldID).value);
}
function invalidLabel(parentTag) {
  if (parentTag.nodeName == "LABEL") {
    parentTag.className += " invalid";
  }
}
}
}
To identify a problem form field
1. invalidLabel(thisTag.parentNode);
This line of code has been added to the invalid check inside validTag(). When the current field fails validation, we want to check to see if we can also invalidate the label surrounding the problem child. To do this, call the new invalidLabel() function (explained below) and pass it the parent of our current tag. That is, if there’s a problem with the passwd1 input field, we want both that tag and the label tag around it to be assigned a class of invalid. So, once we know that the passwd1 input field has a problem, we pass its parent (the label tag) over to invalidLabel() to see if it’s an appropriate element to mark invalid.
2. function invalidLabel(parentTag) {
if (parentTag.nodeName == "LABEL") {
parentTag.className += " invalid";
}
}
This function takes in a tag and checks to see if that tag is a label. If it is, it adds the attribute invalid to its class.
If we now try to submit the form and there’s an error, we’ll notice that the field labels for the problem fields turn bold and red when there’s a problem. Fix the error, submit the form, and they’ll turn black again.
Putting Form Validation into Action
One interesting thing about the script that we built up in the last few examples is that it is largely independent of the HTML page that we used with it. In other words, you can substitute an entirely different page, with a completely different form, and you need to make only minor changes to the script to have it do all the validation tasks you want.
For example, take a look at ![]() , which is a simplistic version of a form that could be used to customize a car that you want to purchase. The form includes a variety of options and interface elements, including radio buttons, menus, check boxes, and text fields that need validation for correct data entry. You’ll find the HTML for this form in Listing 6.11 and the CSS in Listing 6.12; we’ll be using these files for the rest of the examples in this chapter.
, which is a simplistic version of a form that could be used to customize a car that you want to purchase. The form includes a variety of options and interface elements, including radio buttons, menus, check boxes, and text fields that need validation for correct data entry. You’ll find the HTML for this form in Listing 6.11 and the CSS in Listing 6.12; we’ll be using these files for the rest of the examples in this chapter.
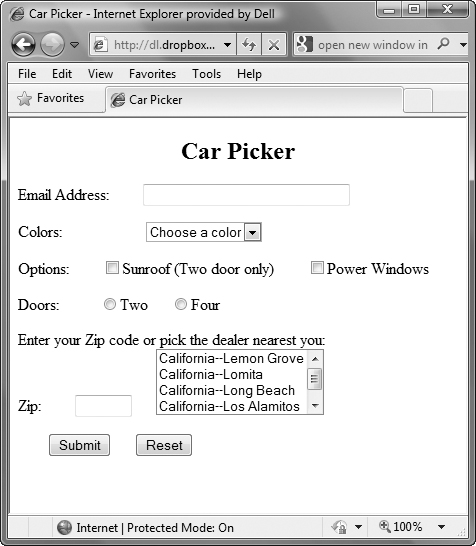
![]() The Car Picker form uses text fields, a pop-up menu, check boxes, and radio buttons—all common form elements.
The Car Picker form uses text fields, a pop-up menu, check boxes, and radio buttons—all common form elements.
The JavaScript file, Listing 6.13, builds on the script that we’ve used earlier in this chapter. We’ve added a few lines to the script to handle the new interface elements, but otherwise the form is the same. In this example, you’ll see what needed to be added to prepare the script for more validation, and subsequent examples will go deeper into specific types of form elements.
Listing 6.11. Here’s the entire HTML page for the Car Picker example.
<!DOCTYPE html>
<html>
<head>
<title>Car Picker</title>
<link rel="stylesheet" href="script06.css">
<script src="script06.js"></script>
</head>
<body>
<h2 class="centered">Car Picker</h2>
<form action="someAction.cgi">
<p><label for="emailAddr">Email Address:
<input id="emailAddr" type="text" size="30" class="reqd email">
</label></p>
<p><label for="color">Colors:
<select id="color" class="reqd">
<option value="" selected>Choose a color</option>
<option value="Red">Red</option>
<option value="Green">Green</option>
<option value="Blue">Blue</option>
</select>
</label></p>
<p>Options:
<label for="sunroof"><input type="checkbox" id="sunroof" value="Yes">Sunroof (Two door only)</label>
<label for="pWindows"><input type="checkbox" id="pWindows" value="Yes">Power Windows</label>
</p>
<p><label for="DoorCt">Doors:
<input type="radio" id="twoDoor" name="DoorCt" value="twoDoor" class="radio">Two
<input type="radio" id="fourDoor" name="DoorCt" value="fourDoor" class="radio">Four
</label></p>
<p><label for="zip">Enter your Zip code or pick the dealer nearest you:<br>
Zip: <input id="zip" type="text" size="5" maxlength="5" class="isZip dealerList">
<select id="dealerList" size="4" class="zip">
<option value="California--Lemon Grove">California--Lemon Grove</option>
<option value="California--Lomita">California--Lomita</option>
<option value="California--Long Beach">California--Long Beach</option>
<option value="California--Los Alamitos">California--Los Alamitos</option>
<option value="California--Los Angeles">California--Los Angeles</option>
</select>
</label></p>
<p><input type="submit" value="Submit"> <input type="reset"></p>
</form>
</body>
</html>
Listing 6.12. Some of the styles shown here will only be used later on.
body {
color: #000;
background-color: #FFF;
}
input.invalid {
background-color: #FF9;
border: 2px red inset;
}
label.invalid {
color: #F00;
font-weight: bold;
}
select {
margin-left: 80px;
}
input {
margin-left: 30px;
}
input+select, input+input {
margin-left: 20px;
}
.centered {
text-align: center;
}
To validate a form with many elements
1. case "radio":
case "isNum":
case "isZip":
case "email":
classBack += thisClass;
break;
By adding additional blocks to the switch/case conditional inside the validBasedOnClass() function, we allow the script to check more fields and more situations. We’ve added radio, isNum, isZip, and email to the list. Although we’re not validating them in this task, we want to prevent a problem when we do, so we add each to the list of attributes handled by the switch/case. Because there are no instructions in the first three blocks, all of them fall through to email, which just adds the attribute currently being checked onto classBack.
2. return (inTag.value != "" || document.getElementById(otherFieldID).value != "");
This line in crossCheck() has changed a bit. Instead of comparing the two fields to make sure they’re the same, we’re comparing two fields to make sure that at least one of them is set (this is in preparation for dealing with the zip code and list elements at the end of the form). If either field contains a value, we return true. If not, we return false.
Listing 6.13. This script adds several blocks to the switch/case conditional, setting it up for later examples.
window.onload = initForms;
function initForms() {
for (var i=0; i< document.forms.length; i++) {
document.forms[i].onsubmit = validForm;
}
}
function validForm() {
var allGood = true;
var allTags = document.getElementsByTagName("*");
for (var i=0; i<allTags.length; i++) {
if (!validTag(allTags[i])) {
allGood = false;
}
}
return allGood;
function validTag(thisTag) {
var outClass = "";
var allClasses = thisTag.className.split(" ");
for (var j=0; j<allClasses.length; j++) {
outClass += validBasedOnClass(allClasses[j]) + " ";
}
thisTag.className = outClass;
if (outClass.indexOf("invalid") > -1) {
invalidLabel(thisTag.parentNode);
thisTag.focus();
if (thisTag.nodeName == "INPUT") {
thisTag.select();
}
return false;
}
return true;
function validBasedOnClass(thisClass) {
var classBack = "";
switch(thisClass) {
case "":
case "invalid":
break;
case "reqd":
if (allGood && thisTag.value == "") {
classBack = "invalid ";
}
classBack += thisClass;
break;
case "radio":
case "isNum":
case "isZip":
case "email":
  classBack += thisClass;
  break;
default:
if (allGood && !crossCheck(thisTag,thisClass)) {
classBack = "invalid ";
}
classBack += thisClass;
}
return classBack;
}
function crossCheck(inTag,otherFieldID) {
if (!document.getElementById(otherFieldID)) {
return false;
}
return (inTag.value != "" || document.getElementById(otherFieldID).value != "");
}
function invalidLabel(parentTag) {
if (parentTag.nodeName == "LABEL") {
parentTag.className += " invalid";
}
}
}
}
Working with Radio Buttons
Radio buttons are an either/or interface element that let the user pick one (and only one) choice within a group of options. Radio buttons should be used when one of those options is required. As shown in ![]() , the form uses radio buttons to let the hypothetical car buyer choose between a two-door or four-door automobile. In this case, you can only pick one of these choices, and you must make a choice.
, the form uses radio buttons to let the hypothetical car buyer choose between a two-door or four-door automobile. In this case, you can only pick one of these choices, and you must make a choice.
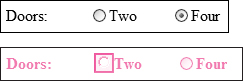
![]() Radio buttons are the best way to let the user pick only one choice from a group of options.
Radio buttons are the best way to let the user pick only one choice from a group of options.
As seen in Listing 6.14, it doesn’t take much scripting to check that one button is selected. We use a technique where we loop through each button and check its status and then turn the radio buttons’ label and buttons red and bold if no button is picked.
Listing 6.14. Only one radio button may be selected, and this JavaScript is there to enforce the interface law.
window.onload = initForms;
function initForms() {
for (var i=0; i< document.forms.length; i++) {
document.forms[i].onsubmit = validForm;
}
}
function validForm() {
var allGood = true;
var allTags = document.getElementsByTagName("*");
for (var i=0; i<allTags.length; i++) {
if (!validTag(allTags[i])) {
allGood = false;
}
}
return allGood;
function validTag(thisTag) {
var outClass = "";
var allClasses = thisTag.className.split(" ");
for (var j=0; j<allClasses.length; j++) {
outClass += validBasedOnClass(allClasses[j]) + " ";
}
thisTag.className = outClass;
if (outClass.indexOf("invalid") > -1) {
invalidLabel(thisTag.parentNode);
thisTag.focus();
if (thisTag.nodeName == "INPUT") {
thisTag.select();
}
return false;
}
return true;
function validBasedOnClass(thisClass) {
var classBack = "";
switch(thisClass) {
case "":
case "invalid":
break;
case "reqd":
if (allGood && thisTag.value == "") {
classBack = "invalid ";
}
classBack += thisClass;
break;
case "radio":
if (allGood && !radioPicked(thisTag.name)) {
  classBack = "invalid ";
}
classBack += thisClass;
break;
case "isNum":
case "isZip":
case "email":
classBack += thisClass;
break;
default:
if (allGood && !crossCheck(thisTag,thisClass)) {
classBack = "invalid ";
}
classBack += thisClass;
}
return classBack;
}
function crossCheck(inTag,otherFieldID) {
if (!document.getElementById(otherFieldID)) {
return false;
}
return (inTag.value != "" || document.getElementById(otherFieldID).value != "");
}
function radioPicked(radioName) {
  var radioSet = "";
for (var k=0; k<document.forms.length; k++) {
  if (!radioSet) {
    radioSet = document.forms[k][radioName];
  }
}
if (!radioSet) {
  return false;
}
for (k=0; k<radioSet.length; k++) {
  if (radioSet[k].checked) {
    return true;
  }
}
return false;
}
function invalidLabel(parentTag) {
if (parentTag.nodeName == "LABEL") {
parentTag.className += "invalid";
}
}
}
}
To make sure that the user picks a radio button
1. if (allGood && !radioPicked(thisTag.name)) {
classBack = "invalid ";
This goes into the radio block of the switch/case conditional. We want to check to make sure at least one of the radio buttons was picked, and the new radioPicked() function handles that. If it returns false, then we set classBack to invalid.
2. function radioPicked(radioName) {
var radioSet = "";
Start the new radioPicked() function, and initialize the radioSet variable.
This function takes in the name of the set of radio buttons—in this case, DoorCt, as found in Listing 6.11. Note that that’s not the id of the current tag or a class or anything that we usually see, but its name. The name attribute of <input> tags is how HTML knows which radio buttons are grouped together; that is, all <input> tags with the same name attribute are part of one radio button set.
3. for (var k=0; k<document.forms.length; k++) {
if (!radioSet) {
radioSet = document.forms[k][radioName];
}
}
We next loop through all the forms on the current page. We know the name of the radio button set, but we don’t know what form it’s a part of, and any given page can have several forms. Because this function is inside another function looping on j, we use k for our loop here.
We then try to set radioSet to the name of this set of radio buttons inside the form we’re looking at. If it’s found, radioSet will then have a value.
4. if (!radioSet) {
return false;
When the loop is done, we look at radioSet—if it hasn’t been set, we return false, because we couldn’t find it, and so, couldn’t check it.
5. for (k=0; k<radioSet.length; k++) {
if (radioSet[k].checked) {
return true;
}
}
OK, we’ve got the radio button set we want to inspect. Now, we start another loop to look through each button. When we find one that’s checked, we return true, because we’re done.
6. return false;
If we make it to the end of the loop, we’ve looked at the entire set and nothing was clicked. In that case, return false and change the radio buttons’ label and make the buttons red and bold.
Setting One Field with Another
With your forms, you’ll often find that if the user makes one choice, that choice dictates the value of other fields on the form. For example, let’s say that the sunroof option is only available on a two-door model. You could deal with this in two ways. First, you could check the entry and put up an alert dialog if the user makes the wrong choice. But it’s a slicker design to simply make the entry for the user. So if they pick the sunroof, the script automatically clicks the two-door button, as in ![]() . Listing 6.15 shows you how.
. Listing 6.15 shows you how.

![]() When the user checks the sunroof option, the script automatically sets the two-door radio button.
When the user checks the sunroof option, the script automatically sets the two-door radio button.
To set a field value automatically
1. document.getElementById("sunroof").onclick = doorSet;
This line of code has been added to initForms(). When the user clicks the sunroof check box, the doorSet() function will be called.
2. function doorSet() {
if (this.checked) {
document.getElementById("twoDoor").checked = true;
}
}
This new function checks to see if the sunroof field was checked; if so, it sets the twoDoor radio button to true. If we’ve clicked the sunroof check box to turn it off, nothing happens.
You may have noticed that there’s no check to see if the user clicked the sunroof and then reset the fourDoor radio button. We’ll leave that as an exercise for you, the reader.
Listing 6.15. A sophisticated way to handle user choices lets you control and set field entries based on other choices made by the user.
window.onload = initForms;
function initForms() {
for (var i=0; i< document.forms.length; i++) {
document.forms[i].onsubmit = validForm;
}
document.getElementById("sunroof").onclick = doorSet;
}
function validForm() {
var allGood = true;
var allTags = document.getElementsByTagName("*");
for (var i=0; i<allTags.length; i++) {
if (!validTag(allTags[i])) {
allGood = false;
}
}
return allGood;
function validTag(thisTag) {
var outClass = "";
var allClasses = thisTag.className.split(" ");
for (var j=0; j<allClasses.length; j++) {
outClass += validBasedOnClass(allClasses[j]) + " ";
}
thisTag.className = outClass;
if (outClass.indexOf("invalid") > -1) {
invalidLabel(thisTag.parentNode);
thisTag.focus();
if (thisTag.nodeName == "INPUT") {
thisTag.select();
}
return false;
}
return true;
function validBasedOnClass(thisClass) {
var classBack = "";
switch(thisClass) {
case "":
case "invalid":
break;
case "reqd":
if (allGood && thisTag.value == "") {
classBack = "invalid ";
}
classBack += thisClass;
break;
case "radio":
if (allGood && !radioPicked(thisTag.name)) {
classBack = "invalid ";
}
classBack += thisClass;
break;
case "isNum":
case "isZip":
case "email":
classBack += thisClass;
break;
default:
if (allGood && !crossCheck(thisTag,thisClass)) {
classBack = "invalid ";
}
classBack += thisClass;
}
return classBack;
}
function crossCheck(inTag,otherFieldID) {
if (!document.getElementById(otherFieldID)) {
return false;
}
return (inTag.value != "" || document.getElementById(otherFieldID).value != "");
}
function radioPicked(radioName) {
var radioSet = "";
for (var k=0; k<document.forms.length; k++) {
if (!radioSet) {
radioSet = document.forms[k][radioName];
}
}
if (!radioSet) {
return false;
}
for (k=0; k<radioSet.length; k++) {
if (radioSet[k].checked) {
return true;
}
}
return false;
}
function invalidLabel(parentTag) {
if (parentTag.nodeName == "LABEL") {
parentTag.className += " invalid";
}
}
}
}
function doorSet() {
  if (this.checked) {
    document.getElementById("twoDoor").checked = true;
  }
}
Validating Zip Codes
Those wacky users can type almost anything into a form, so you’ll want to make sure that if they entered anything into the zip code field ![]() that it contains only numbers. Listing 6.16 shows you how.
that it contains only numbers. Listing 6.16 shows you how.

![]() You can make sure that the user either enters a zip code or makes a selection from the scrolling list.
You can make sure that the user either enters a zip code or makes a selection from the scrolling list.
Listing 6.16. Banish incorrect letters from your zip codes with just a few lines of JavaScript.
window.onload = initForms;
function initForms() {
for (var i=0; i< document.forms.length; i++) {
document.forms[i].onsubmit = validForm;
}
document.getElementById("sunroof").onclick = doorSet;
}
function validForm() {
var allGood = true;
var allTags = document.getElementsByTagName("*");
for (var i=0; i<allTags.length; i++) {
if (!validTag(allTags[i])) {
allGood = false;
}
}
return allGood;
function validTag(thisTag) {
var outClass = "";
var allClasses = thisTag.className.split(" ");
for (var j=0; j<allClasses.length; j++) {
outClass += validBasedOnClass(allClasses[j]) + " ";
}
thisTag.className = outClass;
if (outClass.indexOf("invalid") > -1) {
invalidLabel(thisTag.parentNode);
thisTag.focus();
if (thisTag.nodeName == "INPUT") {
thisTag.select();
}
return false;
}
return true;
function validBasedOnClass(thisClass) {
var classBack = "";
switch(thisClass) {
case "":
case "invalid":
break;
case "reqd":
if (allGood && thisTag.value == "") {
classBack = "invalid ";
}
classBack += thisClass;
break;
case "radio":
if (allGood && !radioPicked(thisTag.name)) {
classBack = "invalid ";
}
classBack += thisClass;
break;
case "isNum":
if (allGood && !isNum(thisTag.value)) {
  classBack = "invalid ";
}
classBack += thisClass;
break;
case "isZip":
if (allGood && !isZip(thisTag.value)) {
  classBack = "invalid ";
}
classBack += thisClass;
break;
case "email":
classBack += thisClass;
break;
default:
if (allGood && !crossCheck(thisTag,thisClass)) {
classBack = "invalid ";
}
classBack += thisClass;
}
return classBack;
}
function crossCheck(inTag,otherFieldID) {
if (!document.getElementById(otherFieldID)) {
return false;
}
return (inTag.value != "" || document.getElementById(otherFieldID).value != "");
}
function radioPicked(radioName) {
var radioSet = "";
for (var k=0; k<document.forms.length; k++) {
if (!radioSet) {
radioSet = document.forms[k][radioName];
}
}
if (!radioSet) {
return false;
}
for (k=0; k<radioSet.length; k++) {
if (radioSet[k].checked) {
return true;
}
}
return false;
}
function isNum(passedVal) {
if (passedVal == "") {
  return false;
}
for (var k=0; k<passedVal.length; k++) {
if (passedVal.charAt(k) < "0") {
  return false;
}
if (passedVal.charAt(k) > "9") {
  return false;
}
}
return true;
}
function isZip(inZip) {
  if (inZip == "") {
    return true;
  }
  return (isNum(inZip));
}
function invalidLabel(parentTag) {
if (parentTag.nodeName == "LABEL") {
parentTag.className += " invalid";
}
}
}
}
function doorSet() {
if (this.checked) {
document.getElementById("twoDoor").checked = true;
}
}
To make sure zip codes are valid
1. if (allGood && !isNum(thisTag.value)) {
classBack = "invalid ";
}
classBack += thisClass;
This goes into the isNum block of the switch/case conditional. If the entry is non-numeric, isNum() returns false.
2. if (allGood && !isZip(thisTag.value)) {
classBack = "invalid ";
This line has been added to the isZip switch/case block. If the field is not blank and it’s not a zip code, isZip() returns false.
3. if (passedVal == "") {
return false;
}
Inside the isNum() function, if passedVal is empty, then the field we’re looking at isn’t a number. When that happens, return false, signaling an error.
4. for (var k=0; k<passedVal.length; k++) {
Now scan through the length of passedVal, incrementing the k counter each time it goes through the loop. We’re using k because we’re already inside two other loops (i and j).
5. if (passedVal.charAt(k) < "0") {
return false;
}
if (passedVal.charAt(k) > "9") {
return false;
}
The charAt() operator checks the character at the position k. If the character is less than “0” or greater than “9”, it isn’t a digit, so bail out and declare the input to be non-numeric, or false.
6. return true;
If we make it here, we’ve got a number, so we return true.
7. function isZip(inZip) {
if (inZip == "") {
return true;
}
return (isNum(inZip));
}
In the context of this form, it’s valid for the zip code field to be empty. Because of that, we first check the field to see if the user entered anything, and if they didn’t, we return true—it’s a valid entry. If they did enter anything, though, it needs to be numeric, so that’s the next check.
If at some later point we want to add a new field to the HTML form that has to be numeric, no new JavaScript code would need to be written. Instead, we’d just use the now-existing isNum check.
Remember, it’s the World Wide Web, not the American Web. If your site is likely to draw attention from outside the United States, don’t require that the user enter a zip code. Addresses outside the United States may or may not have postal codes, and those postal codes may not be numeric.
Validating Email Addresses
Internet addresses can be tricky things for users—especially new users—to type. You can help them out by scanning the email address they enter and checking it for proper form. For example, you can check that there’s only one @ sign, and that there are no invalid characters, as there are in ![]() . The limit, of course, is that your script can’t catch misspellings, so if the user meant to type in [email protected] and instead entered [email protected], the mistake will go through. Listing 6.17 shows you how to snoop through an address for errors.
. The limit, of course, is that your script can’t catch misspellings, so if the user meant to type in [email protected] and instead entered [email protected], the mistake will go through. Listing 6.17 shows you how to snoop through an address for errors.
![]()
![]() Here’s an example of the kind of entry error that the email validation script will catch.
Here’s an example of the kind of entry error that the email validation script will catch.
Listing 6.17. By scanning through the text within an email field on your form, you can ensure that you get proper email addresses.
window.onload = initForms;
function initForms() {
for (var i=0; i< document.forms.length; i++) {
document.forms[i].onsubmit = validForm;
}
document.getElementById("sunroof").onclick = doorSet;
}
function validForm() {
var allGood = true;
var allTags = document.getElementsByTagName("*");
for (var i=0; i<allTags.length; i++) {
if (!validTag(allTags[i])) {
allGood = false;
}
}
return allGood;
function validTag(thisTag) {
var outClass = "";
var allClasses = thisTag.className.split(" ");
for (var j=0; j<allClasses.length; j++) {
outClass += validBasedOnClass(allClasses[j]) + " ";
}
thisTag.className = outClass;
if (outClass.indexOf("invalid") > -1) {
invalidLabel(thisTag.parentNode);
thisTag.focus();
if (thisTag.nodeName == "INPUT") {
thisTag.select();
}
return false;
}
return true;
function validBasedOnClass(thisClass) {
var classBack = "";
switch(thisClass) {
case "":
case "invalid":
break;
case "reqd":
if (allGood && thisTag.value == "") {
classBack = "invalid ";
}
classBack += thisClass;
break;
case "radio":
if (allGood && !radioPicked(thisTag.name)) {
classBack = "invalid ";
}
classBack += thisClass;
break;
case "isNum":
if (allGood && !isNum(thisTag.value)) {
classBack = "invalid ";
}
classBack += thisClass;
break;
case "isZip":
if (allGood && !isZip(thisTag.value)) {
classBack = "invalid ";
}
classBack += thisClass;
break;
case "email":
if (allGood && !validEmail(thisTag.value)) {
  classBack = "invalid ";
}
classBack += thisClass;
break;
default:
if (allGood && !crossCheck(thisTag,thisClass)) {
classBack = "invalid ";
}
classBack += thisClass;
}
return classBack;
}
function crossCheck(inTag,otherFieldID) {
if (!document.getElementById(otherFieldID)) {
return false;
}
return (inTag.value != "" || document.getElementById(otherFieldID).value != "");
}
function radioPicked(radioName) {
var radioSet = "";
for (var k=0; k<document.forms.length; k++) {
if (!radioSet) {
radioSet = document.forms[k][radioName];
}
}
if (!radioSet) {
return false;
}
for (k=0; k<radioSet.length; k++) {
if (radioSet[k].checked) {
return true;
}
}
return false;
}
function isNum(passedVal) {
if (passedVal == "") {
return false;
}
for (var k=0; k<passedVal.length; k++) {
if (passedVal.charAt(k) < "0") {
return false;
}
if (passedVal.charAt(k) > "9") {
return false;
}
}
return true;
}
function isZip(inZip) {
if (inZip == "") {
return true;
}
return (isNum(inZip));
}
function validEmail(email) {
var invalidChars = " /:,;";
if (email == "") {
  return false;
}
for (var k=0; k<invalidChars.length; k++) {
var badChar = invalidChars.charAt(k);
if (email.indexOf(badChar) > -1) {
  return false;
}
}
var atPos = email.indexOf("@",1);
if (atPos == -1) {
  return false;
}
if (email.indexOf("@",atPos+1) != -1) {
  return false;
}
var periodPos = email.indexOf(".",atPos);
if (periodPos == -1) {
  return false;
}
if (periodPos+3 > email.length) {
  return false;
}
return true;
}
function invalidLabel(parentTag) {
if (parentTag.nodeName == "LABEL") {
parentTag.className += " invalid";
}
}
}
}
function doorSet() {
if (this.checked) {
document.getElementById("twoDoor").checked = true;
}
}
To validate an email address
1. if (allGood && !validEmail(thisTag.value)) {
classBack = "invalid ";
This line has been added to the email switch/case block. If the validEmail() function returns false, set the class to be invalid.
2. var invalidChars = " /:,;";
Inside the validEmail() function, create a variable, invalidChars, that contains the five most likely invalid characters in an email address: blank space, slash, colon, comma, and semicolon.
3. if (email == "") {
return false;
This test says, “If the contents of email is nothing (or empty), then the result is false.”
4. for (var k=0; k<invalidChars.length; k++) {
In this for statement, start a loop that scans through the invalidChars string. Start by initializing the counter k to zero, then, each time through the loop that k is less than the length of the string, add 1 to k with the ++ increment operator.
5. var badChar = invalidChars.charAt(k);
if (email.indexOf(badChar) > -1) {
return false;
}
The badChar variable is set to the invalid character in position k in the invalidChars string, and we then check to see if that character is in email. If so, indexOf() returns the position where it was found; if not, it returns a -1. If we get a value other than -1, we’ve found a bad character, and so we then return a value of false.
6. var atPos = email.indexOf("@",1);
if (atPos == -1) {
return false;
}
The atPos variable holds the position of the @ sign. Using indexOf, the script checks for the first @ sign, starting at the second character in the address. If the result is that the position of the @ sign is –1, it means that there is no @ sign in the address, and you’ve got trouble in Address City.
7. if (email.indexOf("@",atPos+1) != -1) {
return false;
}
Now the script is making sure that there is only one @ sign and rejecting anything with more than one @, by checking characters beginning at 1 past where we found the first @.
8. var periodPos = email.indexOf(".",atPos);
if (periodPos == -1) {
return false;
}
Now the script checks that there is a period somewhere after the @ sign. If not, we get a false result.
9. if (periodPos+3 > email.length) {
return false;
}
return true;
Finally, the script requires that there be at least two characters after the period in the address. If we made it this far without a false result, then the value of the function validEmail is true, meaning we have a good email address.
There’s a difference between validating an email address and verifying it. This script validates addresses by making sure that what the user entered is in the proper form for an email address. But it doesn’t verify that the address really exists. The only way to do that would be to send an email message to the address and see if the message bounces. Besides the fact that you would probably annoy your users a great deal if you sent such a verifying message, it can take hours for a message to bounce, and the user isn’t going to wait patiently at your form in the meantime.
This script routine doesn’t catch every possible incorrect email address, just the most likely errors. A full check for every possible bad email address would take several pages of code. If you think about it a bit, you can probably come up with possible mistakes that fall outside the checks in this script.