
7. Forms and Regular Expressions
Validating an Email Address with Regular Expressions 173
Formatting and Sorting Strings 187
Formatting and Validating Strings 189
Replacing Elements using Regular Expressions 192
Regular expressions are an amazingly powerful way to validate and format text strings. Using regular expressions, you can write a line or two of JavaScript code that can accomplish tasks that otherwise would have taken several dozen lines.
A regular expression (often abbreviated as RegExp or called by its synonym grep) is a pattern, written using special symbols, which describes one or more text strings. You use regular expressions to match patterns of text, so that your script can easily recognize and manipulate text. Like an arithmetic expression, you create a regular expression by using operators, in this case operators that work on text, rather than numbers. There are many regular expression operators, and we’ll look at some of the most common in this chapter. By learning and using these operators, you’ll be able to save yourself a huge amount of effort whenever you need to detect and manipulate text strings.
Regular expressions are also commonly considered to be one of the geekiest parts of programming. You’ve gotten to the point where you think that you have a good grasp of JavaScript, and then you’ll look at a script that contains a regular expression, and it makes no sense at all. If you don’t know the syntax, you don’t have any way of even guessing what’s going on. What does all that gibberish mean?
But the syntax isn’t that hard, so long as you break the gibberish down into small, meaningful pieces (at which point it’s no longer gibberish). In this chapter, we’ll demystify regular expression syntax and discuss how to make your code tighter and more powerful using regular expressions.
Validating an Email Address with Regular Expressions
Back in Chapter 6, one of the tasks was validating an email address. To do the job, the script needed to be relatively long. Listing 7.3, at its heart, does exactly the same thing as Listing 6.17; but by using regular expressions, it takes many fewer lines, and you get a more rigorous result. You’ll find the simple HTML in Listing 7.1, and the CSS in Listing 7.2.
Listing 7.1. The HTML for the email validation example.
<!DOCTYPE html>
<html>
<head>
<title>Email Validation</title>
<link rel="stylesheet" href="script01.css">
<script src="script01.js"></script>
</head>
<body>
<h2 class="centered">Email Validation</h2>
<form action="someAction.cgi">
<p><label>Email Address:
<input class="email" type="text" size="50"></label></p>
<p><input type="reset"> <input type="submit" value="Submit"></p>
</form>
</body>
</html>
Listing 7.2. Here’s the little bit of CSS that the first few tasks in this chapter require.
body {
color: #000;
background-color: #FFF;
}
input.invalid {
background-color: #FF9;
border: 2px red inset;
}
label.invalid {
color: #F00;
font-weight: bold;
}
.centered {
text-align: center;
}
To validate an email address using regular expressions
1. var re = /^w+([.-]?w+)*@w+([.-]?w+)*(.w{2,3})+$/;
Yow! What on earth is this? Don’t panic; it’s just a regular expression in the validEmail() function. Let’s break it apart and take it piece by piece. Like any line of JavaScript, you read a regular expression from left to right.
First, re is just a variable. We’ve given it the name re so that when we use it later, we’ll remember that it’s a regular expression. The line sets the value of re to the regular expression on the right side of the equals sign.
A regular expression always begins and ends with a slash, / (of course, there is still a semicolon here, to denote the end of the JavaScript line, but the semicolon is not part of the regular expression). Everything in between the slashes is part of the regular expression.
The caret ^ means that we’re going to use this expression to examine a string starting at the string’s beginning. If the caret was left off, the email address might show as valid even though there was a bunch of garbage at the beginning of the string.
The expression w means any one character, “a” through “z”, “A” through “Z”, “0” through “9”, or underscore. An email address must start with one of these characters.
The plus sign + means one or more of whatever the previous item was that we’re checking on. In this case, an email address must start with one or more of any combination of the characters “a” through “z”, “A” through “Z”, “0” through “9”, or underscore.
The opening parenthesis ( signifies a group. It means that we’re going to want to refer to everything inside the parentheses in some way later, so we put them into a group now.
The brackets [] are used to show that we can have any one of the characters inside. In this example, the characters .- are inside the brackets. We want to allow the user to enter either a period or a dash, but the period has a special meaning to regular expressions, so we need to preface it with a backslash to show that we really want to refer to the period itself, not its special meaning. Using a backslash before a special character is called escaping that character. Because of the brackets, the entered string can have either a period or a dash here, but not both. Note that the dash doesn’t stand for any special character, just itself.
Listing 7.3. These few lines of JavaScript go a long way to validate email addresses.
window.onload = initForms;
function initForms() {
for (var i=0; i< document.forms.length; i++) {
document.forms[i].onsubmit = validForm;
}
}
function validForm() {
var allGood = true;
var allTags = document.getElementsByTagName("*");
for (var i=0; i<allTags.length; i++) {
if (!validTag(allTags[i])) {
allGood = false;
}
}
return allGood;
function validTag(thisTag) {
var outClass = "";
var allClasses = thisTag.className.split(" ");
for (var j=0; j<allClasses.length; j++) {
outClass += validBasedOnClass(allClasses[j]) + " ";
}
thisTag.className = outClass;
if (outClass.indexOf("invalid") > -1) {
invalidLabel(thisTag.parentNode);
thisTag.focus();
if (thisTag.nodeName == "INPUT") {
thisTag.select();
}
return false;
}
return true;
function validBasedOnClass(thisClass) {
var classBack = "";
switch(thisClass) {
case "":
case "invalid":
break;
case "email":
if (allGood && !validEmail(thisTag.value))classBack = "invalid ";
default:
classBack += thisClass;
}
return classBack;
}
function validEmail(email) {
var re = /^w+([.-]?w+)*@w+([.-]?w+)*(.w{2,3})+$/;
return re.test(email);
}
function invalidLabel(parentTag) {
if (parentTag.nodeName == "LABEL") {
parentTag.className += " invalid";
}
}
}
}
The question mark ? means that we can have zero or one of the previous item. So along with it being OK to have either a period or a dash in the first part of the email address (the part before the @), it’s also OK to have neither.
Following the ?, we once again have w+, which says that the period or dash must be followed by some other characters.
The closing parenthesis ) says that this is the end of the group. That’s followed by an asterisk *, which means that we can have zero or more of the previous item—in this case, whatever was inside the parentheses. So while “dori” is a valid email prefix, so is “testing-testing-1-2-3”.
The @ character doesn’t stand for anything besides itself, located between the email address and the domain name.
The w+ once again says that a domain name must start with one or more of any character “a” through “z”, “A” through “Z”, “0” through “9”, or underscore. That’s again followed by ([.-]?w+)* which says that periods and dashes are allowed within the suffix of an email address.
We then have another group within a set of parentheses: .w{2,3} which says that we’re expecting to find a period followed by characters. In this case, the numbers inside the braces mean either 2 or 3 of the previous item (in this case the w, meaning a letter, number, or underscore). Following the right parenthesis around this group is a +, which again means that the previous item (the group, in this case) must exist one or more times. This will match “.com” or “.edu”, for instance, as well as “ox.ac.uk”.
And finally, the regular expression ends with a dollar sign $, which signifies that the matched string must end here. This keeps the script from validating an email address that starts off properly but contains garbage characters at the end. The slash closes the regular expression. The semicolon ends the JavaScript statement, as usual.
2. return re.test(email);
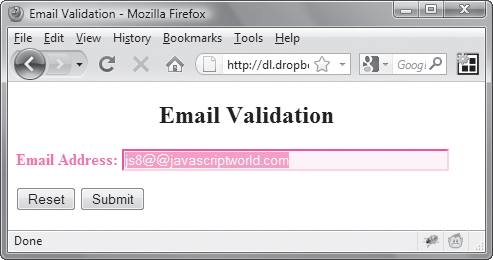
This single line takes the regular expression defined in the previous step and uses the test() method to check the validity of email. If the entered string doesn’t fit the pattern stored in re, test() returns false, and the user sees the incorrect field and its label turn red and bold, as shown in ![]() . Otherwise, a valid entry returns true
. Otherwise, a valid entry returns true ![]() , and the form submits the email address to a CGI,
, and the form submits the email address to a CGI, someAction.cgi for additional processing.
![]() Here’s the result if the user enters an invalid email address: the label and field turn red and bold.
Here’s the result if the user enters an invalid email address: the label and field turn red and bold.

![]() But this address is just fine.
But this address is just fine.
This code doesn’t match every possible legal variation of email addresses, just the ones that you’re likely to want to allow a person to enter.
Note that in Listing 7.3, after we assigned the value of re, we used re as an object in step 2. Like any other JavaScript variable, the result of a regular expression can be an object.
Compare the validEmail() functions in Listings 6.17 and 7.3. The former has 27 lines of code; the latter, only four. They do the same thing, so you can see that the power of regular expressions can save you a lot of coding.
In Listing 7.1, someAction.cgi is just an example name for a CGI—it’s literally “some action”—any action that you want it to be. If you want to learn to write CGIs, we recommend Elizabeth Castro’s book Perl and CGI for the World Wide Web, Second Edition: Visual QuickStart Guide.
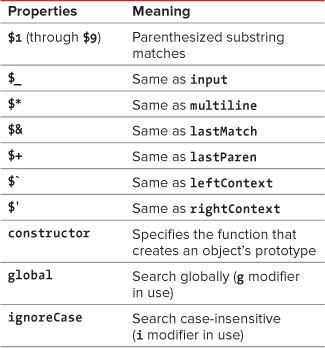
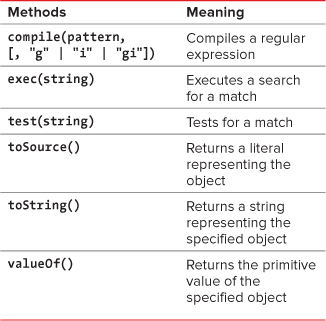
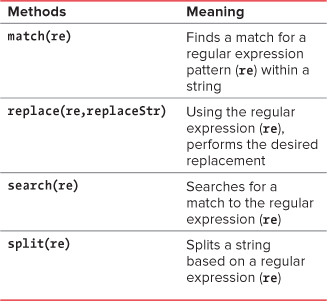
You’ll see in Table 7.1 that the special characters (sometimes called meta characters) in regular expressions are case-sensitive. Keep this in mind when debugging scripts that use regular expressions.
Table 7.1. Regular Expression Special Characters
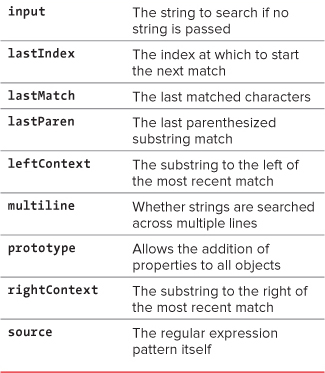
There are characters in regular expressions that modify other operators. We’ve listed them in Table 7.2.
Table 7.2. Regular Expression Modifiers

Validating a File Name
There are many things that can be done with regular expressions, but one of the most useful is validating entry fields in forms on your Web pages. Listing 7.4 expects the user to enter a valid URL of an image, and the regular expression helps to make sure that users do as you’ve requested (specifically, that there has to be a suffix that denotes an image file). ![]() shows the appearance of the page when an invalid entry was accidentally entered, and
shows the appearance of the page when an invalid entry was accidentally entered, and ![]() shows the result when the image name was typed correctly.
shows the result when the image name was typed correctly.
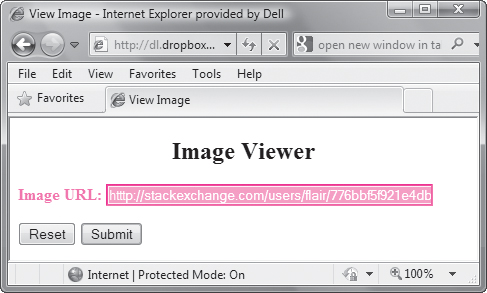
![]() If the user enters something that isn’t a valid image file name, the page shows an error, thanks to regular expressions.
If the user enters something that isn’t a valid image file name, the page shows an error, thanks to regular expressions.
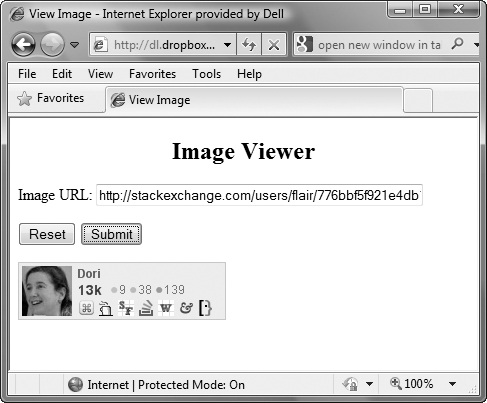
![]() When the image name is entered correctly, the image is displayed on the page.
When the image name is entered correctly, the image is displayed on the page.
Listing 7.4. This script asks for an image location and, if it passes the validation, displays the image on the page.
window.onload = initForms;
function initForms() {
for (var i=0; i< document.forms.length; i++) {
document.forms[i].onsubmit = validForm;
}
}
function validForm() {
var allGood = true;
var allTags = document.getElementsByTagName("*");
for (var i=0; i<allTags.length; i++) {
if (!validTag(allTags[i])) {
allGood = false;
}
}
return false;
function validTag(thisTag) {
var outClass = "";
var allClasses = thisTag.className.split(" ");
for (var j=0; j<allClasses.length; j++) {
outClass += validBasedOnClass(allClasses[j]) + " ";
}
thisTag.className = outClass;
if (outClass.indexOf("invalid") > -1) {
invalidLabel(thisTag.parentNode);
thisTag.focus();
if (thisTag.nodeName == "INPUT") {
thisTag.select();
}
return false;
}
return true;
function validBasedOnClass(thisClass) {
var classBack = "";
switch(thisClass) {
case "":
case "invalid":
break;
case "imgURL":
if (allGood && !imgURL(thisTag.value))classBack = "invalid ";
default:
classBack += thisClass;
}
return classBack;
}
function imgURL(newURL) {
var re = /^(file|http)://S+/S+.(gif|jpg|png)$/i;
if (re.test(newURL)) {
document.getElementById("chgImg").src = newURL;
return true;
}
return false;
}
function invalidLabel(parentTag) {
if (parentTag.nodeName == "LABEL") {
parentTag.className += " invalid";
}
}
}
}
To validate a URL
• var re = /^(file|http)://S+/S+.(gif|jpg|png)$/i;
This is in the imgURL() function. As in the previous example, we want to check the full field entered, so the regular expression begins with /^ and ends with $/. The input can begin with either the text “http” or “file”, so the two are grouped together with a | to show that either one or the other value is acceptable. Whether the user is getting the image off of their hard drive or off the Web, the next characters have to be “://”, so that’s checked for next. Note that each of the forward slashes must be escaped individually (that’s what the two instances of / are, escaped forward slashes), because forward slashes are regular expression special characters.
After that, nearly anything goes, so S+ is used to signify that one or more non–white space characters follow. Then there’s another required forward slash (again escaped) to separate the domain from the file name, and then another S+ to handle the file name.
The file name needs to end with a period and then “gif”, “jpg”, or “png”. The period is escaped, and the suffixes are grouped together to test for any match.
After the regular expression, the modifier i is used, to allow the user input to be either upper- or lowercase. This modifier tells the regular expression not to be case-sensitive.
Extracting Strings
String validation isn’t the only useful thing you can do with regular expressions. String extraction is also useful; being able to take just part of a string and manipulate it allows you to have more control over the final result. In Listing 7.5, we’ll take a list of names entered in first-name-first order and swap them so that they’re in last-name-first order.
To extract strings
1. var re = /s*
s*/;
Here’s a new regular expression, which simply searches for a pattern that consists of any white space s*, followed by a new line character
, followed again by any white space s*.
2. var nameList = inNameList.split(re);
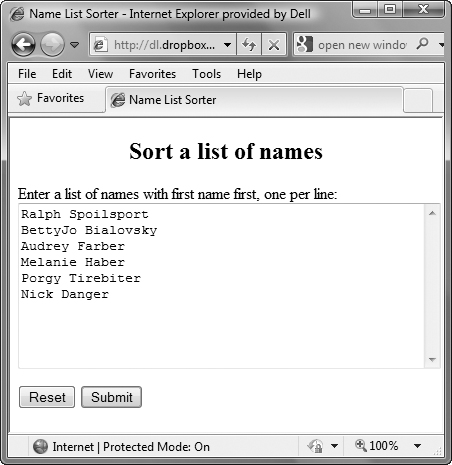
The string method split() takes the regular expression and applies it to the data entered by the user ![]() , stored in
, stored in inNameList. Every new line separates a name, and split() cuts up the entered data at each new line. The result is a string array of the entered names, one name per array element, stored in the array nameList.

![]() Here’s the before version of the list.
Here’s the before version of the list.
3. re = /(S+)s(S+)/;
Next we’ll need another regular expression, which splits each name into first and last names. It looks for any non–white space characters (S+) followed by a single white space character s, followed by any non–white space characters (S+). The parentheses are required around each group of characters so that the information can be used later.
Listing 7.5. This script rearranges an entered list of names.
window.onload = initForms;
function initForms() {
for (var i=0; i< document.forms.length; i++) {
document.forms[i].onsubmit = validForm;
}
}
function validForm() {
var allTags = document.getElementsByTagName("*");
for (var i=0; i<allTags.length; i++) {
validTag(allTags[i]);
}
return false;
function validTag(thisTag) {
var allClasses = thisTag.className.split(" ");
for (var j=0; j<allClasses.length; j++) {
validBasedOnClass(allClasses[j]);
}
function validBasedOnClass(thisClass) {
switch(thisClass) {
case "":
break;
case "nameList":
thisTag.value = nameList(thisTag.value);
default:
}
}
function nameList(inNameList) {
var newNames = new Array;
var newNameField = "";
var re = /s*
s*/;
var nameList = inNameList.split(re);
re = /(S+)s(S+)/;
for (var k=0; k<nameList.length; k++) {
newNames[k] = nameList[k].replace(re, "$2, $1");
}
for (k=0; k<newNames.length; k++) {
  newNameField += newNames[k] + "
";
}
return newNameField;
}
}
}
4. for (var k=0; k<nameList.length; k++) {
For each name in the nameList array, loop through the following line of code.
5. newNames[k] = nameList[k].replace(re, "$2, $1");
Remember those parentheses in step 3? When the replace() method is executed, the regular expression re breaks apart nameList into first and last names. Those parentheses tell JavaScript to store the first name in the regular expression property $1 and the last name in the regular expression property $2. The replace() method then uses the second parameter passed to it to return the last name $2, followed by a comma, followed by the first name $1. The names, now in last-name-first order, are stored in the new array newNames.
6. for (k=0; k<newNames.length; k++) {
newNameField += newNames[k] + "
";
}
This loop sets up a new variable newNameField, which will contain the revised version of the user-entered text. For each name in the newNames array, append that name followed by a new line character to newNameField.
We pass the result back up to update the Web page. This happens in the switch/case section: thisTag.value = nameList(thisTag.value);. The result is shown in ![]() .
.
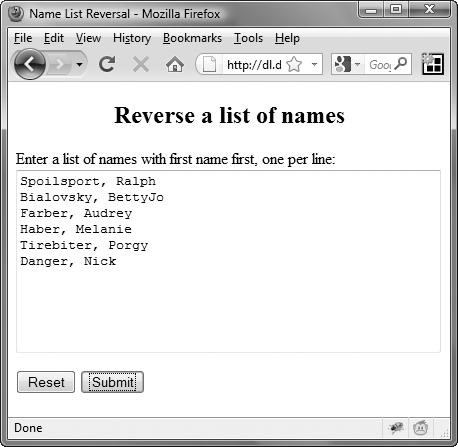
![]() Here’s the reordered version of the page.
Here’s the reordered version of the page.
This script, as shown, only handles first and last names that are separated by a space. You’ll have to change it if you want it to handle middle names or multi-part last names.
In this script, the variable re gets used more than once, with different values being assigned to it at different parts of the script. That’s perfectly OK to do in JavaScript (and that’s why we’ve done it here as an illustration), but you might want to consider using different variable names in your own scripts. It makes them easier to debug or change when you come back to them in a few months.
Formatting Strings
Those darn users often enter data in a haphazard fashion. If you want entries to follow a standard format, your best bet is to handle the formatting yourself. Listing 7.6 shows how to take a list of names and convert them to standard capitalization format.
Listing 7.6. This script takes a name entered in any format and replaces it with the capitalization you desire.
window.onload = initForms;
function initForms() {
for (var i=0; i< document.forms.length; i++) {
document.forms[i].onsubmit = validForm;
}
}
function validForm() {
var allTags = document.getElementsByTagName("*");
for (var i=0; i<allTags.length; i++) {
validTag(allTags[i]);
}
return false;
function validTag(thisTag) {
var allClasses = thisTag.className.split(" ");
for (var j=0; j<allClasses.length; j++) {
validBasedOnClass(allClasses[j]);
}
function validBasedOnClass(thisClass) {
switch(thisClass) {
case "":
break;
case "nameList":
thisTag.value = nameList(thisTag.value);
default:
}
}
function nameList(inNameList) {
var newNames = new Array;
var newNameField = "";
var re = /s*
s*/;
var nameList = inNameList.split(re);
re = /^(S)(S+)s(S)(S+)$/;
for (var k=0; k<nameList.length; k++) {
if (nameList[k]) {
re.exec(nameList[k]);
newNames[k] = RegExp.$1.toUpperCase() + RegExp.$2.toLowerCase() + " " + RegExp.$3.toUpperCase() + RegExp.$4.toLowerCase();
}
}
for (k=0; k<newNames.length; k++) {
newNameField += newNames[k] + "
";
}
return newNameField;
}
}
}
To format a string
1. re = /^(S)(S+)s(S)(S+)$/;
This regular expression again expects to find names in first name, space, last name order, and separates each name into four parts: the first letter of the first name ^(S), the remainder of the first name (S+), the first letter of the last name (S), and the remainder of the last name (S+)$. Note that the ^ and $ force the string to begin at the beginning and end at the ending—we don’t want to leave any parts out.
2. for (var k=0; k<nameList.length; k++) {
We want to look at each name in the nameList array, shown in ![]() .
.
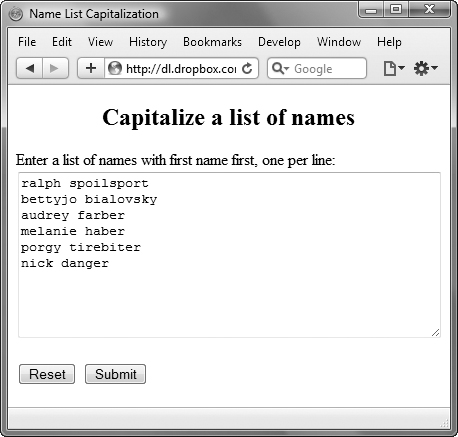
![]() Here’s the before version of the names.
Here’s the before version of the names.
This step uses the exec() method to execute the re pattern on the string nameList[k], breaking the string into four parts and automatically setting JavaScript’s built-in RegExp object. These four parts will be stored in RegExp.$1, RegExp.$2, RegExp.$3, and RegExp.$4 (respectively).
4. newNames[k] = RegExp.$1.toUpperCase() + RegExp.$2.toLowerCase() + " " + RegExp.$3.toUpperCase() + RegExp.$4.toLowerCase();
The new version of the name is stored in the newNames array. It consists of the first letter of the first name (RegExp.$1) forced to uppercase, then the remainder of the first name (RegExp.$2) forced to lowercase, then a space, then the first letter of the last name (RegExp.$3) forced to uppercase, and finally the remainder of the last name (RegExp.$4) forced to lowercase. The name is then displayed, as shown in ![]() .
.

![]() And here’s how they look afterwards, just the way we wanted them.
And here’s how they look afterwards, just the way we wanted them.
Formatting and Sorting Strings
Another typical task you might want to do is to sort a group of names. Listing 7.7 combines the previous two examples and adds a sort. The end result is the list of names in last-name order, properly capitalized, and alphabetized.
Listing 7.7. This script takes a bunch of names in any format and order and turns them into a neat and orderly list.
window.onload = initForms;
function initForms() {
for (var i=0; i< document.forms.length; i++) {
document.forms[i].onsubmit = validForm;
}
}
function validForm() {
var allTags = document.getElementsByTagName("*");
for (var i=0; i<allTags.length; i++) {
validTag(allTags[i]);
}
return false;
function validTag(thisTag) {
var allClasses = thisTag.className.split(" ");
for (var j=0; j<allClasses.length; j++) {
validBasedOnClass(allClasses[j]);
}
function validBasedOnClass(thisClass) {
switch(thisClass) {
case "":
break;
case "nameList":
thisTag.value = nameList(thisTag.value);
default:
}
}
function nameList(inNameList) {
var newNames = new Array;
var newNameField = "";
var re = /s*
s*/;
var nameList = inNameList.split(re);
re = /^(S)(S+)s(S)(S+)$/;
for (var k=0; k<nameList.length; k++) {
if (nameList[k]) {
re.exec(nameList[k]);
newNames[k] = RegExp.$3.toUpperCase() + RegExp.$4.toLowerCase() + ", " + RegExp.$1.toUpperCase() + RegExp.$2.toLowerCase();
}
}
newNames.sort();
for (k=0; k<newNames.length; k++) {
newNameField += newNames[k] + "
";
}
return newNameField;
}
}
}
To format and sort strings
1. newNames[k] = RegExp.$3.toUpperCase() + RegExp.$4.toLowerCase() + ", " + RegExp.$1.toUpperCase() + RegExp.$2.toLowerCase();
In this example, we want to sort by last name, so we create the new newNames array by appending the uppercased first letter of the last name, the lowercased remainder of the last name, a comma and space, the uppercased first letter of the first name, and the lowercased remainder of the first name.
2. newNames.sort();
The array method sort() sorts the elements of an array in place, overwriting the previous contents. ![]() shows the “before” version and
shows the “before” version and ![]() the “after” version.
the “after” version.
![]() Here’s the version as the user entered it.
Here’s the version as the user entered it.

![]() And here’s the sorted and cleaned-up list, just the way we want it.
And here’s the sorted and cleaned-up list, just the way we want it.
Formatting and Validating Strings
Regular expressions can be used to simultaneously format and validate an entered value. In Listing 7.8, the user enters a phone number in any format. Either the end result will be a formatted phone number or the input box will turn red and the label will turn red and bold.
Listing 7.8. This script validates and formats a user-entered phone number.
window.onload = initForms;
function initForms() {
for (var i=0; i< document.forms.length; i++) {
document.forms[i].onsubmit = validForm;
}
}
function validForm() {
var allTags = document.getElementsByTagName("*");
for (var i=0; i<allTags.length; i++) {
validTag(allTags[i]);
}
return false;
function validTag(thisTag) {
var outClass = "";
var allClasses = thisTag.className.split(" ");
for (var j=0; j<allClasses.length; j++) {
outClass += validBasedOnClass(allClasses[j]) + " ";
}
thisTag.className = outClass;
if (outClass.indexOf("invalid") > -1) {
invalidLabel(thisTag.parentNode);
thisTag.focus();
if (thisTag.nodeName == "INPUT") {
thisTag.select();
}
}
function validBasedOnClass(thisClass) {
var classBack = "";
switch(thisClass) {
case "":
case "invalid":
break;
case "phone":
if (!validPhone(thisTag.value)) classBack = "invalid ";
default:
classBack += thisClass;
}
return classBack;
}
function validPhone(phoneNum) {
var re = /^(?(d{3}))?[.-/]?(d{3})[.-/ ]?(d{4})$/;
var phoneArray = re.exec(phoneNum);
if (phoneArray) {
  document.getElementById("phoneField").value = "(" + phoneArray[1] + ") " + phoneArray[2] + "-" + phoneArray[3];
return true;
}
return false;
}
function invalidLabel(parentTag) {
if (parentTag.nodeName == "LABEL") {
parentTag.className += " invalid";
}
}
}
}
To format and validate a phone number
1. var re = /^(?(d{3}))?[.-/]?(d{3})[.-/]?(d{4})$/;
This regular expression looks for a string that has:
• An optional left parenthesis (?
• 3 digits (d{3})
• An optional right parenthesis )?
• An optional period, dash, forward slash, or space [.-/ ]?
• 3 digits (d{3})
• An optional period, dash, forward slash, or space [.-/ ]?
• 4 digits (d{4})
This pattern is anchored to both the beginning and ending of the string, so extraneous characters are not valid. The sequences of three digits (the area code), three digits (the prefix), and four digits (the suffix) are saved, if found.
2. var phoneArray = re.exec(phoneNum);
The exec() method performs the regular expression stored in re on phoneNum. If the pattern we’re searching for isn’t found ![]() ,
, phoneArray will be set to null. Otherwise, phoneArray will be an array of the values stored by the regular expression.
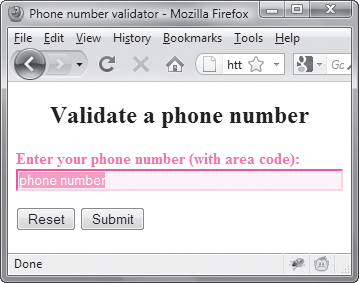
![]() Here’s the result when an invalid number is entered.
Here’s the result when an invalid number is entered.
3. if (phoneArray) {
document.getElementById("phoneField").value = "(" + phoneArray[1] + ") " + phoneArray[2] + "-" + phoneArray[3];
If phoneArray is true, the test was successfully passed, and the array has been initialized. So, we reset the form field on the page to the area code inside parentheses and a space, followed by the prefix, a dash, and the suffix, as shown in ![]() .
.
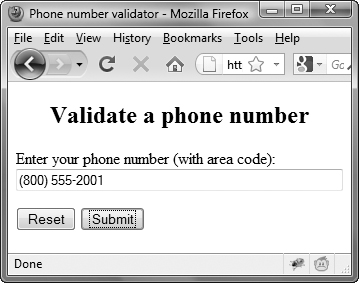
![]() And here’s what’s displayed when the number is entered correctly.
And here’s what’s displayed when the number is entered correctly.
Replacing Elements using Regular Expressions
You’ve already seen how useful regular expressions are for finding, matching, and replacing strings. But you can also use them to replace the names of page elements, and this can often save you a bunch of time. In this task, we’re going to retrofit a regular expression into a script that you’ve seen before, Listing 4.6. That script built three-state rollovers. It’s a useful script, but it has one drawback: it requires you to have tagged every image that you want to manipulate with its own id. That’s not too difficult, but you can instead let JavaScript build the names of page elements and save yourself some work.
At this point, you should review Chapter 4’s image rollovers (Listings 4.5 and 4.6) to see what’s going on in this example. Go ahead, we’ll wait.
Back so soon? Great. In short, instead of creating the _click and _on names of an image on the fly based on the id of each image, we’re instead creating the _click and _on names on the fly based on the _off name of the image. That way, we don’t even need the image ids. Listing 7.9 shows you the way. There’s no change in the way the page looks or acts from changing the JavaScript; but it saves you work in creating the HTML pages.
Listing 7.9. Use regular expressions to save you from writing or retrofitting your HTML files.
window.onload = rolloverInit;
function rolloverInit() {
for (var i=0; i<document.images.length; i++) {
if (document.images[i].parentNode.tagName.toLowerCase() == "a") {
setupRollover(document.images[i]);
}
}
}
function setupRollover(thisImage) {
var re = /s*_offs*/;
thisImage.outImage = new Image();
thisImage.outImage.src = thisImage.src;
thisImage.onmouseout = function() {
this.src = this.outImage.src;
}
thisImage.overImage = new Image();
thisImage.overImage.src = thisImage.src.replace(re,"_on");
thisImage.onmouseover = function() {
this.src = this.overImage.src;
}
thisImage.clickImage = new Image();
thisImage.clickImage.src = thisImage.src.replace(re,"_click");
thisImage.onclick = function() {
this.src = this.clickImage.src;
}
thisImage.parentNode.childImg = thisImage;
thisImage.parentNode.onblur = function() {
this.childImg.src = this.childImg.outImage.src;
}
thisImage.parentNode.onfocus = function() {
this.childImg.src = this.childImg.overImage.src;
}
}
To use a regular expression to replace an element
This line sets up a new regular expression pattern that looks for the text _off anywhere in a string.
2. thisImage.overImage.src = thisImage.src.replace(re,"_on");
The line in Listing 4.6 was thisImage.overImage.src = "images/" + thisImage.id + "_on.gif";
The new line uses the re pattern to look for that particular bit of a string and, when it’s found, replace it with this string. In this case, we’re looking for _off and turning it into _on. This allows us to not worry about the id attribute being set on this image—it just doesn’t matter any more.
3. thisImage.clickImage.src = thisImage.src.replace(re,"_click");
The line in Listing 4.6 was thisImage.clickImage.src = "images/" + thisImage.id + "_click.gif"; In this case, we’re looking for _off and turning it into _click.
This can also be handy if your images are a mixture of GIF and JPEG files—now, your JavaScript code doesn’t have to ever know what suffix each image has.
You may have noticed that there’s some code at the end of this script that isn’t in Listing 4.6. We’ve added a little bit of extra code here to enhance accessibility—now, for those people who use the keyboard instead of a mouse, tabbing onto an image will give the same effect that a hover does for a mousing user.