
9. JavaScript and Cookies
Displaying “New to You” Messages 235
In Web terms, a cookie is a unique nugget of information that a Web server gives to your browser when the two first meet and which they then share with each return visit. The remote server saves its part of the cookie and the information it contains about you; your browser does the same, as a plain text file stored on your computer’s hard disk.
As a JavaScript author, you can do many useful things with cookies. If your site requires registration, you can set cookies to store your readers’ user names and passwords on their hard drives, so they don’t need to enter them every time they visit. You can keep track of which parts of your site the user has visited and count the number of visits from that user.
There are many common misconceptions about cookies, so it’s important to note what you can’t do with them: you can’t get any real information about the user, such as their email address; you can’t use cookies to check out the contents of their hard disks; and cookies can’t transmit computer viruses. A cookie is just a simple text file on the user’s hard disk where you, the JavaScript programmer, can store some information.
A cookie always includes the address of the server that sent it. That’s the primary idea behind cookie technology: identification. Think of it as Caller ID for the Web, with variations on the theme—each Web site using cookies gives your browser a personalized ID of some sort, so that it can recognize you on the next visit. When you return to the Web server that first passed you a particular cookie, the server can query your browser to see if you are one of its many cookie holders. If so, the server can then retrieve the information stored in the cookie the two of you originally exchanged. Keep in mind that cookies just identify the computer being used, not the individual using the computer.
Baking Your First Cookie
A cookie is a text string with a particular format:
cookieName=cookieValue;
expires=expirationDateGMT;
path=URLpath; domain=siteDomain
Breaking this down, the first part of the string gives the cookie a name and assigns it a value. This is the only mandatory part of a cookie; the rest of the string is optional. Next is the expiration date of the cookie; when this date is reached, the browser automatically deletes the cookie. The expiration date is followed by a URL path, which lets you store a URL in the cookie. Finally, you can store a domain value in the cookie.
Listing 9.1, the HTML file, calls the JavaScript in Listing 9.2, which sets a cookie from a value entered by the user into a form. When you try this one out ![]() , it won’t appear to do that much, but the cookie is actually being created. Later examples in this chapter build on this one.
, it won’t appear to do that much, but the cookie is actually being created. Later examples in this chapter build on this one.
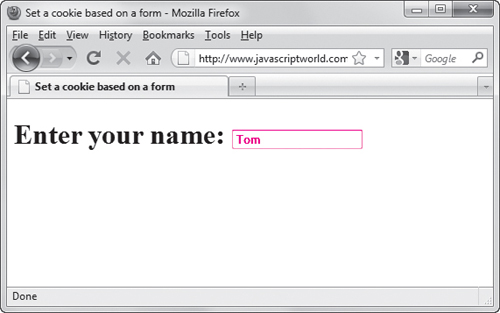
![]() It doesn’t look like much, but the content of the form’s text field has just been written to a cookie.
It doesn’t look like much, but the content of the form’s text field has just been written to a cookie.
Listing 9.1. The HTML for our first cookie page.
<!DOCTYPE html>
<html>
<head>
<title>Set a cookie based on a form</title>
<script src="script01.js"></script>
</head>
<body>
<form id="cookieForm" action="#">
<h1>Enter your name: <input type="text" id="nameField"></h1>
</form>
</body>
</html>
To set a cookie
1. function nameFieldInit() {
First, set up the function nameFieldInit() to define the value of the cookie. This function is called when the window has completed loading.
2. var userName = "";
Next, we initialize the variable userName with a null value.
3. if (document.cookie != "") {
userName = document.cookie.split("=")[1];
We begin a conditional test by first checking that the object document.cookie does not contain a null value. The method split("=") splits a cookie into an array, where cookieField[0] is the cookie name and cookieField[1] is the cookie value. Note that cookieField can be any variable that you want to use to store a particular cookie’s fields. So you assign userName the value returned by document.cookie.split("=")[1], that is, the cookie value.
4. document.getElementById("nameField").value = userName;
Setting getElementById("nameField").value puts the user’s name into the text field when the page loads if there’s a name stored in the cookie file.
5. document.getElementById("nameField").onblur = setCookie;
document.getElementById("cookieForm").onsubmit = setCookie;
In the first line, the onblur event handler (see Chapter 1) calls the setCookie() function when the user leaves the text field. In the second, we do the same thing for the form’s onsubmit handler. If you press Enter after you’ve typed your name, Internet Explorer, for some reason, doesn’t trigger the onblur handler. Adding the onsubmit handler catches all the variants.
6. function setCookie() {
Now begin a new function, called setCookie().
Listing 9.2. Use this script to set a browser cookie.
window.onload = nameFieldInit;
function nameFieldInit() {
var userName = "";
if (document.cookie != "") {
  userName = document.cookie.split("=")[1];
}
document.getElementById("nameField").value = userName;
document.getElementById("nameField").onblur = setCookie;
  document.getElementById("cookieForm").onsubmit = setCookie;
}
function setCookie() {
var expireDate = new Date();
expireDate.setMonth(expireDate.getMonth()+6);
var userName = document.getElementById("nameField").value;
document.cookie = "userName=" + userName + ";expires=" + expireDate.toGMTString();
document.getElementById("nameField").blur();
return false;
}
7. var expireDate = new Date();
Get the current date, and put it into the new variable expireDate.
8. expireDate.setMonth(expireDate.getMonth()+6);
This line gets the month portion of expireDate, adds 6 to the month, and then sets the month portion of expireDate to the new value. In other words, it sets the expiration date of the cookie we’re creating to six months in the future.
9. var userName = document.getElementById("nameField").value;
This line creates a new userName variable and assigns it whatever the user typed into the text field. The userName variable has to be created twice (once inside each function) because it’s not a global; that is, we’re using it inside each function, but we’re not expecting it to keep its value across functions—it’s new each time.
10. document.cookie = "userName=" + userName + ";expires=" + expireDate.toGMTString();
Here’s where we write the cookie. We’re setting document.cookie (remember, a cookie is just a text string, so you can use the same text string techniques to build it, like using the + sign to combine things) to contain the user’s name and the cookie expiration date. The toGMTString() method converts the expireDate Date object into a text string so that it can be written into the cookie.
11. document.getElementById("nameField").blur();
return false;
Remember when we set up the form so that setCookie() could be called in one of two ways? Here’s where we handle the fallout of that choice:
• If we’re in IE, the first line causes the focus to leave the name field, so it’s clear that something has occurred, and the second (returning a value of false) keeps the form from actually submitting.
• If we’re not in IE, the first line does nothing (that is, we’ve already left the name field, so leaving it again doesn’t matter) and the second line keeps the form submission from being triggered.
This script assumes that the first cookie contains the user name. Later scripts show how to handle multiple cookies and get a cookie by name instead of number.
The scripts in this chapter are ordered in such a way that they’ll work fine if you run them in the order they appear. If you skip around, though, you may encounter some weird results (such as the browser thinking that your name is a number). If you want to run them out of sequence, try running Listing 9.7 (“Deleting Cookies”) in between scripts.
Reading a Cookie
Once you’ve set a cookie, you’ll need to retrieve it in order to do anything useful. The last example set the cookie with the text string “Tom”. The very simple Listings 9.3 and 9.4 show you how to get that value from the cookie and display it on the screen (of course, you normally would not show off your cookies; this script just displays the cookie as an example).
Listing 9.3. JavaScript uses the id in this HTML page to insert the cookie result.
<!DOCTYPE html>
<html>
<head>
<title>I know your name!</title>
<script src="script02.js"></script>
</head>
<body>
<h1 id="nameField"> </h1>
</body>
</html>
Listing 9.4. This short script reads a previously set cookie and sends it to the document window.
window.onload = nameFieldInit;
function nameFieldInit() {
if (document.cookie != "") {
document.getElementById("nameField").innerHTML = "Hello, " + document.cookie.split("=")[1];
}
}
To read a cookie
1. if (document.cookie != "") {
Make sure that the value in the object document.cookie isn’t null.
2. document.getElementById("nameField").innerHTML = "Hello, " + document.cookie.split("=")[1]);
If the cookie isn’t empty, then write a text string (the “Hello,” and note the extra space after the comma) and combine it with the split of the cookie value ![]() .
.
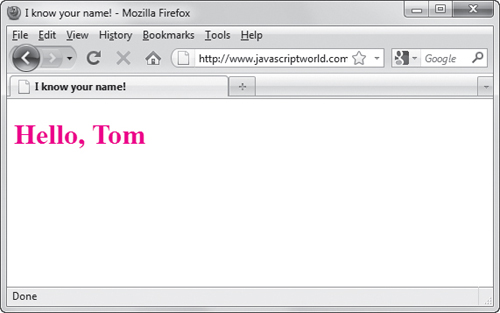
![]() This cookie had my name on it.
This cookie had my name on it.
Did you notice that you don’t need to specify which of the cookies in the cookie file you are reading? That’s because a cookie can only be read by the server that wrote it in the first place. The internal cookie mechanisms in the browser won’t let you read or write cookies written by someone else. You only have access to your own cookies.
Showing Your Cookies
In the previous example, we read the value of one cookie from the server. Now we’ll see how to write a script that reads all the cookies that came from your server and displays their names and values. If there are no cookies, the script says, “There are no cookies here” ![]() . If there are cookies, it displays a line per cookie showing what’s in the cookie
. If there are cookies, it displays a line per cookie showing what’s in the cookie ![]() . Listing 9.5 shows you how.
. Listing 9.5 shows you how.
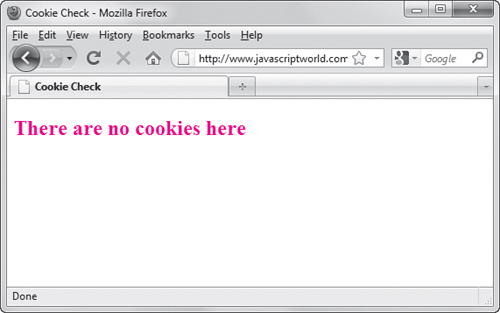
![]() If there are no cookies from the server your Web page is on, you’ll see this result.
If there are no cookies from the server your Web page is on, you’ll see this result.
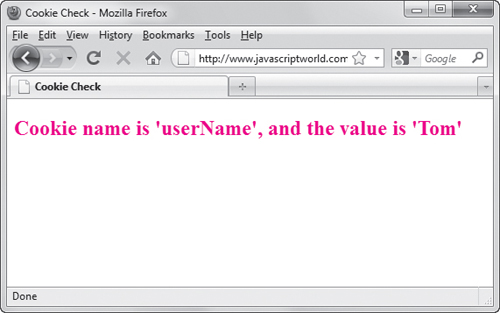
![]() If there are one or more cookies, then the script writes them into the document window.
If there are one or more cookies, then the script writes them into the document window.
To show all your cookies
1. var outMsg = "";
Start by initializing the variable outMsg, which will contain the message we want to display.
2. if (document.cookie == "") {
outMsg = "There are no cookies here";
This conditional test is read, “If the document.cookie object is null (that is, empty), then set outMsg to “There are no cookies here”.
3. var thisCookie = document.cookie.split("; ");
If the previous test failed (i.e., if there was at least one cookie present), then get the values of all of the cookies using document.cookie.split("; ") and stuff those values into an array called thisCookie. Remember that the split("; ") command creates an array of all of the cookies. Later, the script will be able to reference each of the values in that array.
Listing 9.5. This script steps through and displays all of the cookies on your machine that have been set by a particular server.
window.onload = showCookies;
function showCookies() {
var outMsg = "";
if (document.cookie == "") {
  outMsg = "There are no cookies here";
}
else {
var thisCookie = document.cookie.split("; ");
for (var i=0; i<thisCookie.length; i++) {
outMsg += "Cookie name is '" + thisCookie[i].split("=")[0];
outMsg += "', and the value is '" + thisCookie[i].split("=")[1] + "'<br>";
}
}
document.getElementById("cookieData").innerHTML = outMsg;
}
4. for (var i=0; i<thisCookie.length; i++) {
This line starts a loop by first setting the value of i, the counter variable, to 0. Then, if i is less than the number of cookies in the thisCookie array, increment the value of i by 1.
5. outMsg += "Cookie name is '" + thisCookie[i].split("=")[0]);
outMsg += "', and the value is '" + thisCookie[i].split("=")[1] + "'<br>");
As the script moves through the array, it puts the text string "Cookie name is '" into outMsg, followed by the name of the cookie. Then it concatenates the text string "', and the value is '" and the value of the cookie. And at the end of each line, we add an HTML break.
6. document.getElementById.
("cookieData").innerHTML = outMsg;
After setting the variable outMsg, it gets dumped out to the page via innerHTML when all the cookies have been gone through.
Using Cookies as Counters
Because cookies are persistent, that is, because they are available across multiple sessions between a Web server and browser, you can use cookies to store how many times a particular user has accessed a page. But this isn’t the same thing as the page counters you see on many Web pages. Because a cookie is specific to a user, you can only tell that user how many times he or she has visited; you can’t use cookies to tell all users how many times the page has been hit. Still, it’s useful to know how to create such an individual counter, and you can adapt Listing 9.6 for other purposes, too (see Tips).
Listing 9.6. This script counts your cookies.
window.onload = initPage;
function initPage() {
var expireDate = new Date();
expireDate.setMonth(expireDate.getMonth()+6);
var hitCt = parseInt(cookieVal ("pageHit"));
hitCt++;
document.cookie = "pageHit=" + hitCt + ";expires=" + expireDate.toGMTString();
document.getElementById("pageHits").innerHTML = "You have visited this page " + hitCt + " times.";
}
function cookieVal(cookieName) {
var thisCookie = document.cookie.split("; ");
for (var i=0; i<thisCookie.length; i++) {
if (cookieName == thisCookie[i].split("=")[0]) {
return thisCookie[i].split("=") [1];
}
}
return 0;
}
To use a cookie as a counter
1. var expireDate = new Date();
expireDate.setMonth(expireDate.getMonth()+6);
These two lines are the same as in steps 7 and 8 of the “Baking Your First Cookie” example. Refer there for an explanation.
2. var hitCt = parseInt(cookieVal ("pageHit"));
The string pageHit is the name of the cookie. In a few steps, you’ll see the function cookieVal(). This line takes the name of the cookie from cookieVal(), turns it into a number using the parseInt() method, and then stores the result in the variable hitCt. The parseInt() method changes a string (which is what is in the cookie) into a number (which is what the variable needs to use it as a counter).
Now take the value of hitCt and add 1 to it, incrementing the counter.
4. document.cookie = "pageHit=" + hitCt + ";expires=" + expireDate.toGMTString();
This writes back the updated information to the cookie for future use. What’s being written is a text string that combines the string "pageHit=" with the incremented value of hitCt and adds ";expires=" with the expiration date, which was incremented by six months back in step 1.
5. document.getElementById("pageHits").innerHTML = "You have visited this page " + hitCt + " times.";
This line displays the user message in the document ![]() . There are extra spaces after “page” and before “times” to make the line look right on screen.
. There are extra spaces after “page” and before “times” to make the line look right on screen.
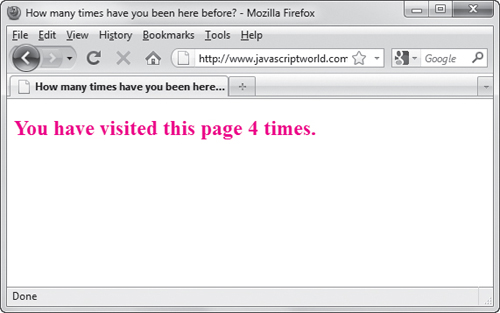
![]() Hard to believe we’ve visited this dull page this often.
Hard to believe we’ve visited this dull page this often.
6. function cookieVal(cookieName) {
This line begins a new function called cookieVal(). It is passed some data, which can then be referenced inside the function as the variable cookieName.
7. var thisCookie = document.cookie.split("; ");
The variable thisCookie is set to the array generated by the split("; ") method.
8. for (var i=0; i<thisCookie.length; i++) {
Here we’re beginning a loop, just as in step 4 of the “Showing Your Cookies” example.
9. if (cookieName == thisCookie[i].split("=")[0]) {
This conditional checks to see if cookieName is the same as the ith element of the cookie array.
10. return thisCookie[i].split("=")[1];
If the test in step 9 succeeded, then return the cookie’s value.
11. return 0;
If we’ve looked at all the items in the array and found no match, return a 0 value.
When you load the HTML page that calls this script, press the Reload button in your browser to see the counter increment.
As mentioned earlier, you can adapt Listing 9.6 for other purposes. One possibility would be to use a cookie to track when a particular user had last visited your site and display different pages depending on when that was. For example, some online magazines have a cover page with artwork and the names of the stories in the day’s issue. If the user visits the site more than once in a 24-hour period, they only see the cover page the first time; subsequent visits jump the user directly to the site’s Table of Contents page.
If you want a true page hit counter, one that tells how many times a page has been loaded by all users, you’ll need to use a counter program that is installed on your Web server. Check with your Web hosting company to see if they have counters available, or put “Web page hit counter” into your favorite search engine.
Deleting Cookies
At some point, you’re going to want to delete a cookie or many cookies in a cookie record. It’s fairly easy to do; one technique that works well is to simply set the cookie’s expiration date to a date in the past, which causes the browser to delete it automatically. Listing 9.7 shows how to force your cookies to become stale.
Listing 9.7. This script deletes cookies.
window.onload = cookieDelete;
function cookieDelete() {
var cookieCt = 0;
if (document.cookie != "" && confirm ("Do you want to delete the cookies?")) {
var thisCookie = document.cookie.split("; ");
cookieCt = thisCookie.length;
var expireDate = new Date();
expireDate.setDate(expireDate.getDate()-1);
for (var i=0; i<cookieCt; i++) {
var cookieName = thisCookie[i].split("=")[0];
document.cookie = cookieName + "=;expires=" + expireDate.toGMTString();
}
}
document.getElementById("cookieData").innerHTML = "Number of cookies deleted: " + cookieCt;
}
To delete cookies
1. var cookieCt = 0;
This script is going to keep track of how many cookies we’ve deleted, so we start off by creating the cookieCt variable and setting it to zero.
2. if (document.cookie != "" && confirm ("Do you want to delete the cookies?")) {
This test first checks to make sure that the cookie doesn’t contain a null value, that is, there are some cookies. If the test shows that the cookie is empty, then the script will do nothing. The second part of the test tells the browser to put up a confirmation dialog with the included text ![]() . If
. If confirm() returns true, then we know the user wants to delete their cookies. If false, then we skip down to step 9.
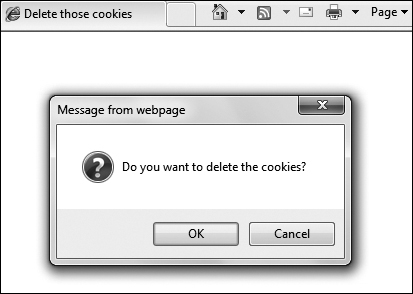
![]() It’s good interface design to confirm with the user whenever you are going to erase or delete anything.
It’s good interface design to confirm with the user whenever you are going to erase or delete anything.
3. var thisCookie = document.cookie.split("; ");
This line splits the contents of the cookie into an array with the split("; ") method and assigns that array to the variable thisCookie.
4. cookieCt = thisCookie.length;
We now know how many cookies we’re going to be deleting, so that’s stored in cookieCt.
5. var expireDate = new Date();
expireDate.setDate(expireDate.getDate()-1);
Here we create a new date object, expireDate, which is then set to the current date minus 1—in other words, to yesterday.
6. for (var i=0; i<cookieCt; i++) {
Now begin a for loop, so that we can delete all the cookies, not just one. First set the value of i to 0; then, as long as i is less than the number of cookies, increment i by 1.
7. var cookieName = thisCookie[i].split("=")[0];
Use split("=")[0] to get the name of the ith cookie in the array, which is then stored in the variable cookieName.
8. document.cookie = cookieName + "=;expires=" + expireDate.toGMTString();
Here’s where the cookie with the changed expiration date gets written back out.
9. document.getElementById("cookieData").innerHTML = "Number of cookies deleted: " + cookieCt;
The script is out of the for loop now, and this line sets the number of cookies deleted in the HTML document ![]() .
.
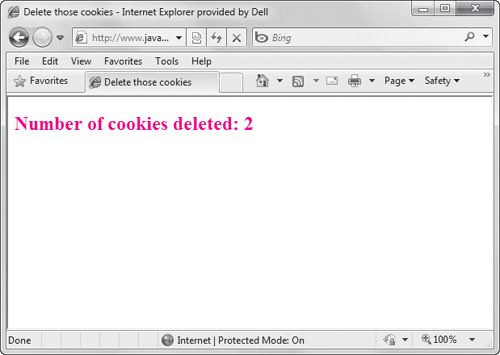
![]() Users should also get feedback that events have occurred as expected.
Users should also get feedback that events have occurred as expected.
In some previous editions of this book, this script showed nothing at all if no cookies existed, or if the user canceled the deletion. Setting innerHTML to a value will now show the actual number of cookies deleted in those cases (always zero) as well.
Handling Multiple Cookies
You will often want to deal with more than one cookie at a time, and Listing 9.8 shows you how to read from more than one cookie and display the information. This example shares a fair amount of code with the “Using Cookies as Counters” example.
Listing 9.8. Use an array to deal with multiple cookies in a single script.
window.onload = initPage;
function initPage() {
var now = new Date();
var expireDate = new Date();
expireDate.setMonth(expireDate.getMonth()+6);
var hitCt = parseInt(cookieVal("pageHit"));
hitCt++;
var lastVisit = cookieVal("pageVisit");
if (lastVisit == 0) {
  lastVisit = "";
}
document.cookie = "pageHit=" + hitCt + ";expires=" + expireDate.toGMTString();
document.cookie = "pageVisit=" + now + ";expires=" + expireDate.toGMTString();
var outMsg = "You have visited this page " + hitCt + " times.";
if (lastVisit != "") {
  outMsg += "<br>Your last visit was " + lastVisit;
}
document.getElementById("cookieData").innerHTML = outMsg;
}
function cookieVal(cookieName) {
var thisCookie = document.cookie.split("; ");
for (var i=0; i<thisCookie.length; i++) {
if (cookieName == thisCookie[i].split("=")[0]) {
return thisCookie[i].split("=")[1];
}
}
return 0;
}
To handle multiple cookies
1. var lastVisit = cookieVal("pageVisit");
We start off by looking for a cookie named pageVisit by passing that string to the cookieVal() function. It returns a value, which is then stored in lastVisit.
2. if (lastVisit == 0) {
lastVisit = "";
}
If the value of lastVisit is zero, then put a null value into lastVisit. We now know the user has never been here before.
3. document.cookie = "pageHit=" + hitCt + ";expires=" + expireDate.toGMTString();
document.cookie = "pageVisit=" + now + ";expires=" + expireDate.toGMTString();
These two lines write the two cookies back to disk with an updated hit number and visit date.
4. var outMsg = "You have visited this page " + hitCt + " times.";
if (lastVisit != "") {
outMsg += "<br>Your last visit was " + lastVisit;
}
The outMsg variable stores the outgoing message for our site’s visitor and starts off by being set to tell them how many times they’ve been here. The next lines check if the user has been here before (in code: if lastVisit isn’t null) and if they have, we remind them when.
5. document.getElementById("cookieData").innerHTML = outMsg;
And finally, outMsg is displayed on the screen, telling the user what they’ve done before. The result of this script is shown in ![]() .
.
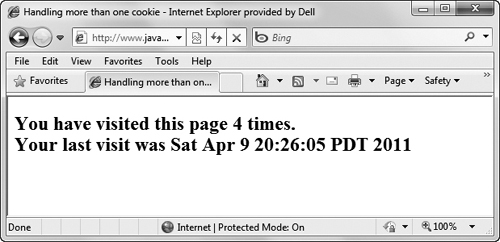
![]() The two cookies, written to the screen (along with some other text).
The two cookies, written to the screen (along with some other text).
Displaying “New to You” Messages
You can use cookies and JavaScript to alert frequent visitors to your site to items that are new to them. This gives the user a more personalized experience when they visit your site, making it a smarter and friendlier place. Listings 9.9, 9.10, and 9.11 add a little “New!” image to the beginning of lines when the cookie says that a line has been added since the last time the visitor was there ![]() . Again, you’ll see familiar code from previous examples in this chapter.
. Again, you’ll see familiar code from previous examples in this chapter.

![]() JavaScript can ask a cookie when you’ve last visited a site and flag new items for you.
JavaScript can ask a cookie when you’ve last visited a site and flag new items for you.
Listing 9.9. The HTML of this page applies the next script’s results to the page.
<!DOCTYPE html>
<html>
<head>
<title>New for You</title>
<link rel="stylesheet" href="script07.css">
<script src="script07.js"></script>
</head>
<body>
<p>Negrino and Smith's most recent books:</p>
<p id="New-20110801"><a href="http://www.javascriptworld.com">JavaScript: Visual QuickStart Guide, 8<sup>th</sup> Edition</a></p>
<p id="New-20100601"><a href="http://www.dreamweaverbook.com">Dreamweaver CS5: Visual QuickStart Guide</a></p>
</body>
</html>
Listing 9.10. The CSS combined with the JavaScript and HTML makes things personal.
body {
background-color: #FFF;
}
p.newImg {
   padding-left: 35px;
   background-image: url(images/new.gif);
   background-repeat: no-repeat;
}
To display a “New to You” message
1. p.newImg {
padding-left: 35px;
background-image: url(images/new.gif);
background-repeat: no-repeat;
}
In Listing 9.10, we use CSS to specify that anything on the page marked as a paragraph (within a <p> tag) which also has a class of newImg will have 35 pixels of padding added to the left and a “New!” image put in the background. However, since the padding ensures that nothing appears in front of the paragraph contents, the image won’t look like a background pattern.
Listing 9.11. This script can help you personalize your site by alerting the user to new content.
window.onload = initPage;
function initPage() {
var now = new Date();
var lastVisit = new Date(cookieVal("pageVisit"));
var expireDate = new Date();
expireDate.setMonth(expireDate.getMonth()+6);
document.cookie = "pageVisit=" + now + ";expires=" + expireDate.toGMTString();
var allGrafs = document.getElementsByTagName("p");
for (var i=0; i<allGrafs.length; i++) {
if (allGrafs[i].id.indexOf("New-") != -1) {
newCheck(allGrafs[i],allGrafs[i].id.substring(4));
}
}
function newCheck(grafElement,dtString) {
var yyyy = parseInt(dtString.substring(0,4),10);
var mm = parseInt(dtString.substring(4,6),10);
var dd = parseInt(dtString.substring(6,8),10);
var lastChgd = new Date(yyyy,mm-1,dd);
if (lastChgd.getTime() > lastVisit.getTime()) {
grafElement.className += "newImg";
}
}
}
function cookieVal(cookieName) {
  var thisCookie = document.cookie.split("; ");

  for (var i=0; i<thisCookie.length; i++) {
    if (cookieName == thisCookie[i].split("=")[0]) {
      return thisCookie[i].split("=")[1];
    }
  }
  return "1 January 1970";
}
2. <p id="New-20110801"><a href="http://www.javascriptworld.com">JavaScript: Visual QuickStart Guide, 8<sup>th</sup> Edition</a></p>
<p id="New-20100601"><a href="http://www.dreamweaverbook.com">Dreamweaver CS5: Visual QuickStart Guide</a></p>
In Listing 9.9, the id attributes on these two paragraphs will signal to the JavaScript (as we’ll see shortly) that they contain dates that get compared against the information set up in the following steps.
3. var lastVisit = new Date(cookieVal("pageVisit"));
var expireDate = new Date();
expireDate.setMonth(expireDate.getMonth()+6);
In Listing 9.11, this section initializes the lastVisit and expireDate dates. The first is the saved date of the surfer’s last visit to the site, and the second will be the expiration date of the cookie when it’s rewritten.
4. document.cookie = "pageVisit=" + now + ";expires=" + expireDate.toGMTString();
This line writes the cookie, putting the current date into the pageVisit value and the value of expireDate into expires.
5. var allGrafs = document.getElementsByTagName("p");
This line creates an array of all the <p> elements on the page, which allows us to go through each of them one by one looking for just the ones we care about.
6. for (var i=0; i<allGrafs.length; i++) {
Here, we start a loop to go through the array, looking at each paragraph element in turn.
7. if (allGrafs[i].id.indexOf("New-") != -1) {
If this paragraph has an id attribute that contains the text “New-”, then we know that this is a paragraph we care about, so do the following.
8. newCheck(allGrafs[i], allGrafs[i].id.substring(4));
We want to check to see if this paragraph has something in it that will be new to the visitor. The newCheck() function will do that, and it’s passed two parameters: the current paragraph element (allGrafs[i]) and the second part of the id attribute. The substring() grabs the part of the string from the fifth character on to the end, and as that’s all we care about here, that’s all we’ll pass. (Remember that JavaScript strings are zero-relative, which is why the fifth character of the string is found at position 4.)
9. function newCheck(grafElement, dtString) {
This function is expecting two parameters to be passed in, which will be referred to internally as grafElement (that paragraph element) and dtString (the second part of the id attribute).
10. var yyyy = parseInt(dtString.substring(0,4),10);
var mm = parseInt(dtString.substring(4,6),10);
var dd = parseInt(dtString.substring(6,8),10);
Here, the date is parsed out of a string; so, for example, “20060901” is 1 September 2006.
The yyyy variable gets the first 4 digits (starting at digit 0 and ending just before digit 4), with the result of “2006”. The mm variable gets the fourth and fifth digits, and the dd variable gets the sixth and seventh digits. In each case, we also do a parseInt() on the result, which forces the value returned by substring() into an integer.
11. var lastChgd = new Date(yyyy, mm-1, dd);
Finally, we can set lastChgd, because we’ve got a year, month, and day. But wait! JavaScript and its bizarre dates now hit us, and we have to subtract 1 from the month to get the correct result—just the month, mind you, not the year or day. Really. Months are zero-relative, years and days are one-relative. (See Chapter 11, “Making Your Pages Dynamic,” for more on dates and their oddities.)
12. if (lastChgd.getTime() > lastVisit.getTime()) {
Now we can compare the two dates, and only do the following line if the date that the information last changed is after the date the surfer last visited.
13. grafElement.className += "newImg";
Now, here’s the slick part: we know that this is a paragraph that should display the “New!” image. So, if we add a class attribute of newImg to the <p> tag, that style (declared on the HTML page) automatically then applies to that paragraph, resulting in the display of the image.
That is, we can use JavaScript to add an attribute (and its associated value) to an element. In this case, the element is a <p>, the attribute is class, and the value of the attribute is newImg. As the element may already have an existing class, this code takes care to add the value and not just overwrite what’s currently there.
Once this new attribute has been added, it triggers the browser’s rendering engine to immediately and automatically apply the style to the element, causing the image to appear.
14. function cookieVal(cookieName) {
var thisCookie = document.cookie.split("; ");
for (var i=0; i<thisCookie.length; i++) {
if (cookieName == thisCookie[i].split("=")[0]) {
return thisCookie[i].split("=")[1];
}
}
return "1 January 1970";
}
This is the now-familiar cookieVal() function. The only difference here is that it has been changed to return “1 January 1970” instead of zero if no cookie with that name was found, which makes the code a bit simpler elsewhere. The oddity of that date is that JavaScript thinks that is when time began, so everything should be after that. That date won’t appear to the user; it’s just an internal reference date for JavaScript.
You’re probably more familiar with parseInt() being passed only a single parameter. Here, two are passed: the string to be converted, and 10. That last parameter tells parseInt() to always return a decimal number. Otherwise, when parseInt() is passed a string starting with 0, it may try to turn the result into octal (base 8 numbering), with incorrect results. In this case, a call to parseInt("09") doesn’t return the same result as parseInt("09",10), and the latter is what we want. It’s just a weird JavaScript thing that you need to be aware of.