
3. Your First Web App
Around and Around with Loops 50
Passing a Value to a Function 55
Working with Functions That Return Values 61
Calling Scripts Multiple Ways 66
Combining JavaScript and CSS 68
Now that you’ve gotten your feet wet, let’s wade a bit deeper into the JavaScript language. In this chapter, we’ll go into more detail about the basic elements of JavaScript and introduce you to other aspects of the JavaScript language, such as loops, arrays, and more about functions (don’t let your eyes glaze over; we promise that it’ll be easy).
You’ll see how you can use JavaScript to write your Web pages for you, learn how JavaScript handles errors that the user makes, and much more.
Table 3.1. Just Enough HTML—Tables
Around and Around with Loops
It’s common in programming to test for a particular condition and repeat the test as many times as needed. Let’s use an example you probably know well: doing a search and replace in a word processor. You search for one bit of text, change it to a different text string, and then repeat the process for all of the instances of the first string in the document. Now imagine that you have a program that does it for you automatically. The program would execute a loop, which lets it repeat an action a specified number of times. In JavaScript, loops become a vital part of your scripting toolbox.
More about loops
The kind of loop that we mostly use in this book is the for loop, named after the command that begins the loop. This sort of loop uses a counter, which is a variable that begins with one value (usually 0) and ends when a conditional test inside the loop is satisfied.
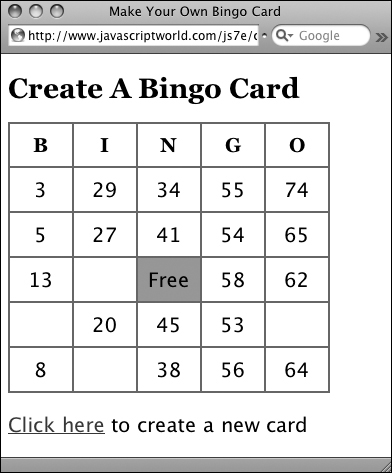
![]() This Bingo card has randomly generated numbers, but it isn’t a valid Bingo card. Yet.
This Bingo card has randomly generated numbers, but it isn’t a valid Bingo card. Yet.
The command that starts the loop structure is immediately followed by parentheses. Inside the parentheses you’ll usually find the counter definition and the way the counter is incremented (i.e., the way the counter’s value is increased).
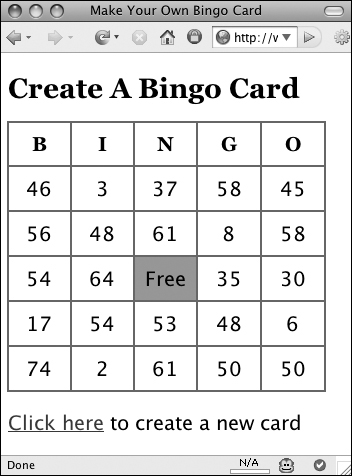
In the next several examples we’re going to build a simple yet familiar application, a Bingo card. We’ll use each example to show you a new aspect of JavaScript. We’ll begin with an HTML page, Listing 3.1. It contains the table that is the Bingo card’s framework ![]() . Take a look at the script, and you’ll see that the first row contains the letters at the top of the card, and each subsequent row contains five table cells. Most cells contain just a non-breaking space (using the HTML entity
. Take a look at the script, and you’ll see that the first row contains the letters at the top of the card, and each subsequent row contains five table cells. Most cells contain just a non-breaking space (using the HTML entity ); however, the third row contains the Free space, so one table cell in that row contains the word “Free”. Note that each cell has an id attribute, which the script uses to manipulate the cell contents. The id is in the form of square0, square1, square2, through square23, for reasons that we’ll explain below. At the bottom of the page, there’s a link that generates a new card.
Listing 3.1. This HTML page creates the skeleton for the Bingo card.
<!DOCTYPE html>
<html>
<head>
<title>Make Your Own Bingo Card</title>
<link rel="stylesheet" href="script01.css">
<script src="script01.js"></script>
</head>
<body>
<h1>Create A Bingo Card</h1>
<table>
<tr>
<th>B</th>
<th>I</th>
<th>N</th>
<th>G</th>
<th>O</th>
</tr>
<tr>
<td id="square0"> </td>
<td id="square5"> </td>
<td id="square10"> </td>
<td id="square14"> </td>
<td id="square19"> </td>
</tr>
<tr>
<td id="square1"> </td>
<td id="square6"> </td>
<td id="square11"> </td>
<td id="square15"> </td>
<td id="square20"> </td>
</tr>
<tr>
<td id="square2"> </td>
<td id="square7"> </td>
<td id="free">Free</td>
<td id="square16"> </td>
<td id="square21"> </td>
</tr>
<tr>
<td id="square3"> </td>
<td id="square8"> </td>
<td id="square12"> </td>
<td id="square17"> </td>
<td id="square22"> </td>
</tr>
<tr>
<td id="square4"> </td>
<td id="square9"> </td>
<td id="square13"> </td>
<td id="square18"> </td>
<td id="square23"> </td>
</tr>
</table>
<p><a href="script01.html" id="reload">Click here</a> to create a new card</p>
</body>
</html>
Listing 3.2 is the CSS file that we’re using to style the contents of the Bingo card. If you don’t know CSS, don’t worry about it, as it doesn’t matter much here anyway. The HTML and CSS pages won’t change for the rest of the Bingo card examples, so we’re only going to print them once here.
Listing 3.2. This CSS file adds style to the Bingo card.
body {
background-color: white;
color: black;
font-size: 20px;
font-family: "Lucida Grande", Verdana, Arial, Helvetica, sans-serif;
}
h1, th {
font-family: Georgia, "Times New Roman", Times, serif;
}
h1 {
font-size: 28px;
}
table {
border-collapse: collapse;
}
th, td {
padding: 10px;
border: 2px #666 solid;
text-align: center;
width: 20%;
}
#free, .pickedBG {
background-color: #f66;
}
.winningBG {
background-image: url(images/redFlash.gif);
}
This example shows you how to set up and use a loop to populate the contents of the Bingo card with randomly generated numbers. Listing 3.3 contains the JavaScript you need to make it happen. The card that is generated from this script is not a valid Bingo card, because there are constraints on which numbers can be in particular columns. Later examples add to the script until the resulting Bingo card is valid.
Listing 3.3. Welcome to your first JavaScript loop.
window.onload = initAll;
function initAll() {
for (var i=0; i<24; i++) {
var newNum = Math.floor(Math.random() * 75) + 1;
document.getElementById("square" + i).innerHTML = newNum;
}
}
To use a loop to create the table’s contents
1. window.onload = initAll;
This is in Listing 3.3. This line calls the initAll() function when the window finishes loading. It’s common to use an event handler to call a function.
2. function initAll() {
This line begins the function.
3. for (var i=0; i<24; i++) {
This line begins the loop. Programmers traditionally use the variable i to denote a variable used as a counter inside a loop. First i is set to 0. A semicolon signals the end of that statement and allows us to put another statement on the same line. The next part is read as “if i is less than 24, do the following code inside the braces.” The final bit (after the second semicolon) adds 1 to the value of i. Because this is new, let’s break that down a bit. The i++ part uses the ++ operator you saw in Chapter 1 to increment the value of i by 1. The loop will repeat 24 times, and the code inside the loop will execute 24 times. On the first go-through, i will be 0, and on the last go-through i will be 23.
4. var newNum = Math.floor(Math.random() * 75) + 1;
Inside the loop, we create a new variable, newNum, and fill it with the result of the calculation on the right side of the equals sign. The built-in JavaScript command Math.random() gives us a number between 0 and 1, such as 0.12345678. Multiplying Math.random() by the maximum value (remember, values in Bingo cards can be from 1 to 75) gives us a result between 0 and one less than the max value. The floor of that result gives us the integer portion, i.e., an integer between 0 and (one less than the maximum value). Add one, and we have a number between 1 and our maximum value.
5. document.getElementById("square" + i).innerHTML = newNum;
This is where we write into the table the value of the random number we just got. We get the element with the id named square with the current value of i concatenated onto it. For example, the first time through the loop, the value of i will be zero, so the line gets the element with the id of square0. Then the line sets the innerHTML property of the square0 object to the current value of newNum. Then, because we’re still inside the loop, steps 4 and 5 happen again, until the whole Bingo card is filled out.
A for loop has three parts ![]() :
:
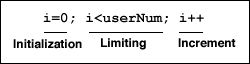
![]() The three parts of a loop.
The three parts of a loop.
1. The initialization step. The first time through the loop, this is what the loop variable (i, in this case) is set to.
2. The limiting step. This is where we say when to stop looping. While normal people count from one to ten, it’s common in programming languages to count from zero to nine. In both cases, the code inside the loop is run ten times, but the latter method works better with languages (like JavaScript) where arrays start with a zeroth position. That’s why you’ll see loops have a limitation of “less than userNum” instead of “less than or equal to userNum.” Let’s say that the variable userNum is 10, and you want the loop to run ten times. If you count from 0 to 9 (using the “less than” test), the loop runs ten times. If you count from 0 to 10 (using the “less than or equals to” test), the loop runs 11 times.
3. The increment step. This is where we say by how much to increase the loop counter on each pass through the loop. In this case, we add one each time through, using ++ to add one to i’s value.
Passing a Value to a Function
You’ll often want to take some information and give it to a function to use. This is called passing the information to the function. For example, look at this function definition:
function playBall(batterup)
The variable batterup is a parameter of the function. When a function is called, a value can be passed into the function. Then, when you’re inside the function, that data is in the batterup variable. Functions can be passed just about any data you want to use, including text strings, numbers, or even other JavaScript objects. For example, the batterup variable could be passed a player’s name as a text string ("Mantle"), or his number in the lineup (7) (although mixing the two can be a very bad idea unless you really know what you’re doing). Like all variables, give the ones you use as function parameters names that remind you what the variable is being used for.
You can have more than one parameter in a function. Just separate them inside the parentheses with commas like this:
function currentScore(hometeam,visitors)
so these code fragments are all equivalent:
currentScore(6,4);
var homeScore = 6;
var visitingScore = 4;
currentScore(homeScore,visitingScore);
currentScore(6,3+1);
For all three examples, once we’re inside currentScore(), the value of hometeam is 6, and the value of visitors is 4 (which is great news for the home team).
In this example, we’ll clean up some of the calculations from Listing 3.3 by taking them out of the initAll() function, restating them a bit, and putting them into a function with passed values, in order to make it more obvious what’s going on. It all happens in Listing 3.4.
Listing 3.4. By passing values to the setSquare() function, the script becomes easier to read and understand.
window.onload = initAll;
function initAll() {
for (var i=0; i<24; i++) {
setSquare(i);
}
}
function setSquare(thisSquare) {
var currSquare = "square" + thisSquare;
var newNum = Math.floor(Math.random() * 75) + 1;
document.getElementById(currSquare).innerHTML = newNum;
}
To pass a value to a function
1. setSquare(i);
This is inside the initAll() function. We’re passing the value of i into the setSquare() function.
2. function setSquare(thisSquare) {
This defines the setSquare() function, and it’s being passed the current square number that we want to update. When we pass it in, it’s the loop variable i. When the function receives it, it’s the parameter thisSquare. What is a little tricky to understand is that this function is passed i, and does stuff with that value, but doesn’t actually see i itself. Inside the function, all it knows about is the thisSquare variable.
3. var currSquare = "square" + thisSquare;
In order to make the getElementById() call later in the script clearer, we’re creating and setting a new variable: currSquare. This is the current square that we’re working on. It takes the text string "square" and concatenates it with the thisSquare variable.
4. document.getElementById(currSquare).innerHTML = newNum;
This line gets the element with the name specified by currSquare and changes it to display newNum.
Detecting Objects
When you’re scripting, you may want to check to see if the browser is smart enough to understand the objects you want to use. There is a way to do this check, which is called object detection.
What you do is pose a question for the object you’re looking for, like this:
if (document.getElementById) {
If the object exists, the if statement is true, and the script continues on its merry way. But if the browser doesn’t understand the object, the test returns false, and the else portion of the conditional executes. Listing 3.5 gives you the JavaScript you need, and you can see the result in an obsolete browser ![]() .
.
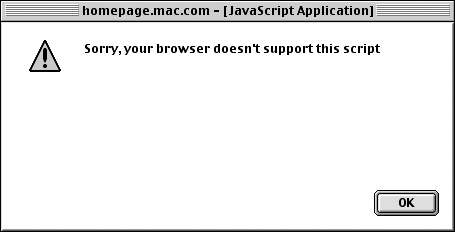
![]() Object detection rejected this ancient browser (Netscape 4 for Mac) and displayed this error message.
Object detection rejected this ancient browser (Netscape 4 for Mac) and displayed this error message.
Listing 3.5. Object detection is an important tool for scripters.
window.onload = initAll;
function initAll() {
if (document.getElementById) {
for (var i=0; i<24; i++) {
setSquare(i);
}
}
else {
  alert("Sorry, your browser doesn't support this script");
}
}
function setSquare(thisSquare) {
var currSquare = "square" + thisSquare;
var newNum = Math.floor(Math.random() * 75) + 1;
document.getElementById(currSquare).innerHTML = newNum;
}
To detect an object
1. if (document.getElementById) {
This line begins the conditional. If the object inside the parentheses exists, the test returns true, and the rest of this block in the initAll() function runs.
2. else {
alert("Sorry, your browser doesn't support this script");
}
If the test in step 1 returns false, this line pops up an alert, and the script ends.
In a production environment, it’s better to give users something else to do, or at least some version of the page that doesn’t require this capability. Here, though, there’s nothing to be done.
It’s important to understand that you won’t always check for document.getElementById. What objects you check for depends on what objects your script uses. If your scripts use objects with less than 100% support, always check first if the browser can handle it—never assume that it can. We aren’t showing object detection throughout this book to save space, but in the real world, it’s vital.
Working with Arrays
In this example, we’re introducing another useful JavaScript object, the array. An array is a kind of variable that can store a group of information. Like variables, arrays can contain any sort of data: text strings, numbers, other JavaScript objects, whatever. You declare an array with the elements of the array inside parentheses, separated by commas, like so:
var newCars = new Array("Toyota", "Honda", "Nissan");
After this, the newCars array contains the three text strings with the car makes. To access the contents of the array, you use the variable name with the index number of the array member you want to use, in square brackets. So newCars[2] has the value "Nissan", because array numbering, like most other numbering in JavaScript, begins at zero. Notice in the example above we’re using text strings as elements of the array. Each text string needs to be contained within straight quotes, and the commas that separate each element of the array go outside of the quotes.
In this example, shown in Listing 3.6, we begin making sure the Bingo card is valid. On a real Bingo card, each column has a different range of numbers: B is 1–15, I is 16–30, N is 31–45, G is 46–60, and O is 61–75. If you look back at ![]() (in “More about loops”), you’ll see that it is not a valid card, because it was generated with a version of the script that simply put a random number between 1 and 75 in each square. This example fixes that, with only three lines of changed or new code. When we’re done it’s still not a valid Bingo card (note how there are duplicate numbers in some of the columns), but we’re getting there
(in “More about loops”), you’ll see that it is not a valid card, because it was generated with a version of the script that simply put a random number between 1 and 75 in each square. This example fixes that, with only three lines of changed or new code. When we’re done it’s still not a valid Bingo card (note how there are duplicate numbers in some of the columns), but we’re getting there ![]() .
.

![]() This Bingo card is improved, but not quite right yet, because there are duplicate numbers in some of the columns.
This Bingo card is improved, but not quite right yet, because there are duplicate numbers in some of the columns.
Listing 3.6. This script limits the range of values that can go into each column.
window.onload = initAll;
function initAll() {
if (document.getElementById) {
for (var i=0; i<24; i++) {
setSquare(i);
}
}
else {
alert("Sorry, your browser doesn't support this script");
}
}
function setSquare(thisSquare) {
var currSquare = "square" + thisSquare;
var colPlace = new Array(0,0,0,0,0,1,1,1,1,1,2,2,2,2,3,3,3,3,3,4,4,4,4,4);
var colBasis = colPlace[thisSquare] * 15;
var newNum = colBasis + Math.floor(Math.random() * 15) + 1;
document.getElementById(currSquare).innerHTML = newNum;
}
To use an array
1. var colPlace = new Array(0,0,0,0,0,1,1,1,1,1,2,2,2,2,3,3,3,3,3,4,4,4,4,4);
We’re concerned with limiting which random numbers go into which columns. The simplest way to keep track of this is to give each column a number (B: 0, I: 1, N: 2, G: 3, O: 4) and then calculate the numbers that can go into each column as (the column number × 15) + (a random number from 1–15).
The colPlace array keeps track of, for each square, which column it’s in. It’s the numbers 0–4 repeated five times (minus the free space; notice that the digit 2 representing the N column is only used four times).
2. var colBasis = colPlace[thisSquare] * 15;
var newNum = colBasis + Math.floor(Math.random() * 15) + 1;
We start off by calculating the column basis: the number stored in colPlace[thisSquare] multiplied by 15. The newNum variable still generates the random numbers, but instead of coming up with a number from 1–75, it now calculates a random number from 1–15, and then adds that to the column basis. So, if our random number is 7, it would be 7 in the B column, 22 in the I column, 37 in the N column, 52 in the G column, and 67 in the O column.
Working with Functions That Return Values
Up to this point, all the functions that you’ve seen simply do something and then return. Sometimes, though, you want to return a result of some kind. Listing 3.7 makes the overall script more understandable by breaking out some of the calculations in previous examples into a function which returns the random numbers for the cells on the Bingo card. Another function then uses this result.
Listing 3.7. A function can return a value, which can then be checked.
window.onload = initAll;
function initAll() {
if (document.getElementById) {
for (var i=0; i<24; i++) {
setSquare(i);
}
}
else {
alert("Sorry, your browser doesn't support this script");
}
}
function setSquare(thisSquare) {
var currSquare = "square" + thisSquare;
var colPlace = new Array(0,0,0,0,0,1,1,1,1,1,2,2,2,2,3,3,3,3,3,4,4,4,4,4);
var colBasis = colPlace[thisSquare] * 15;
var newNum = colBasis + getNewNum() + 1;
document.getElementById(currSquare).innerHTML = newNum;
}
function getNewNum() {
  return Math.floor(Math.random() * 15);
}
To return a value from a function
1. var newNum = colBasis + getNewNum() + 1;
This line is again just setting the newNum variable to our desired number, but here we’ve moved that random number generator into a function, called getNewNum(). By breaking the calculation up, it makes it easier to understand what’s going on in the script.
2. function getNewNum() {
return Math.floor(Math.random() * 15);
}
This code calculates a random number between 0 and 14 and returns it. This function can be used anywhere a variable or a number can be used.
Updating Arrays
As you saw in ![]() in “Working with Arrays,” the Bingo card script doesn’t yet have a way to make sure that duplicate numbers don’t appear in a given column. This example fixes that problem, while simultaneously demonstrating that arrays don’t have to be just initialized and then read—instead, they can be declared and then set on the fly. This gives you a great deal of flexibility, since you can use calculations or functions to change the values in the array while the script is running. Listing 3.8 shows you how, with only a few new lines of code.
in “Working with Arrays,” the Bingo card script doesn’t yet have a way to make sure that duplicate numbers don’t appear in a given column. This example fixes that problem, while simultaneously demonstrating that arrays don’t have to be just initialized and then read—instead, they can be declared and then set on the fly. This gives you a great deal of flexibility, since you can use calculations or functions to change the values in the array while the script is running. Listing 3.8 shows you how, with only a few new lines of code.
Listing 3.8. Changing the contents of arrays to store the current situation is a very powerful technique.
window.onload = initAll;
var usedNums = new Array(76);
function initAll() {
if (document.getElementById) {
for (var i=0; i<24; i++) {
setSquare(i);
}
}
else {
alert("Sorry, your browser doesn't support this script");
}
}
function setSquare(thisSquare) {
var currSquare = "square" + thisSquare;
var colPlace = new Array(0,0,0,0,0,1,1,1,1,1,2,2,2,2,3,3,3,3,3,4,4,4,4,4);
var colBasis = colPlace[thisSquare] * 15;
var newNum = colBasis + getNewNum() + 1;
if (!usedNums[newNum]) {
  usedNums[newNum] = true;
document.getElementById(currSquare).innerHTML = newNum;
}
}
function getNewNum() {
return Math.floor(Math.random() * 15);
}
To update an array on the fly
1. var usedNums = new Array(76);
Here is a new way of declaring an array. We’re creating usedNums, a new array with 76 objects. As mentioned before, those objects can be anything. In this case, they’re going to be Booleans, that is, true/false values.
2. if (!usedNums[newNum]) {
usedNums[newNum] = true;
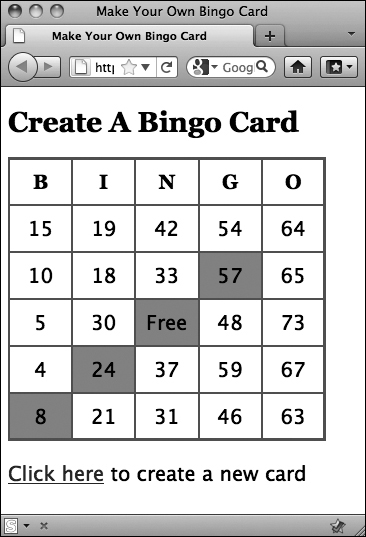
If the newNum slot in the usedNums array is false (represented by the ! before the statement, meaning “not”), then we set it to true and write it out to the card. If it’s true, we don’t do anything at all, leaving us with no duplicates, but possibly blank spaces on our card ![]() . That’s not good either, which leads us to the next task.
. That’s not good either, which leads us to the next task.
![]() We’ve gotten rid of the duplicate numbers, but some of the spaces are now blank. Time to go back to the drawing board.
We’ve gotten rid of the duplicate numbers, but some of the spaces are now blank. Time to go back to the drawing board.
Why is the array defined as containing 76 items? Because we want to use the values 1 to 75. If we initialized it to contain 75 items, the numbering would go from 0 to 74. 76 lets us use 1 through 75, and we’ll just ignore item 0.
Using Do/While Loops
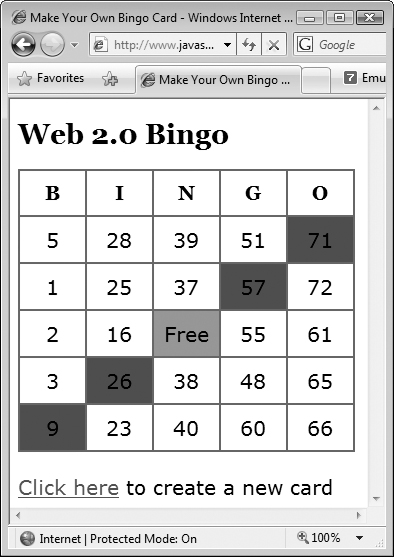
Sometimes you’ll need to have a loop in your code that loops around a number of times, but there’s no way of knowing in advance how many times you’ll want to loop. That’s when you’ll want to use a do/while loop: you want to do something, while some value is true. Listing 3.9 writes out each row of numbers as always, but this time it checks first to see if a number has been used already before putting it in a cell. If it has, the script generates a new random number and repeats the process until it finds one that’s unique. ![]() shows the working, finally valid Bingo card.
shows the working, finally valid Bingo card.
Listing 3.9. This script prevents numbers in a given column from being used more than once.
window.onload = initAll;
var usedNums = new Array(76);
function initAll() {
if (document.getElementById) {
for (var i=0; i<24; i++) {
setSquare(i);
}
}
else {
alert("Sorry, your browser doesn't support this script");
}
}
function setSquare(thisSquare) {
var currSquare = "square" + thisSquare;
var colPlace = new Array(0,0,0,0,0,1,1,1,1,1,2,2,2,2,3,3,3,3,3,4,4,4,4,4);
var colBasis = colPlace[thisSquare] * 15;
var newNum;
do {
newNum = colBasis + getNewNum() + 1;
}
while (usedNums[newNum]);
usedNums[newNum] = true;
document.getElementById(currSquare).innerHTML = newNum;
}
function getNewNum() {
return Math.floor(Math.random() * 15);
}
To use a do/while loop
1. var newNum;
In the previous task, we initialized the newNum variable when we created it. Because we’re going to be setting it multiple times, we’re instead going to create it just the once, before we get into the loop.

![]() Finally, we’ve ended up with a valid Bingo card!
Finally, we’ve ended up with a valid Bingo card!
2. do {
This line starts the do block of code. One of the things you have to remember about this type of loop is that the code inside the do block will always be executed at least once.
3. newNum = colBasis + getNewNum() + 1;
This line inside the loop sets the newNum variable to our desired number, as in previous examples.
4. }
The closing brace signals the end of the do block.
5. while (usedNums[newNum]);
The while check causes the do block of code to repeat until the check evaluates to false. In this case, we’re checking newNum against the usedNums[] array, to see if newNum has already been used. If it has, control is passed back to the top of the do block and the whole process starts again. Eventually, we’ll find a number that hasn’t been used. When we do, we drop out of the loop, set the usedNums[] item to true, and write it out to the card, as in the last task.
A common use for a do/while loop would be to strip blanks or invalid characters off data entered by a user. But again, remember that the do block of code always gets executed at least once, whether the while check evaluates to true or false.
Calling Scripts Multiple Ways
Up to this point in the book, you’ve seen scripts that usually run automatically when the page loads. But in the real world, you’ll often want to give the user more control over your scripts, even allowing them to run a script whenever they want. In this example (Listing 3.10), the script still runs when the page loads. But we also allow the user to click the link at the bottom of the page to rerun the script that generates the Bingo card entirely in their browser, without needing to reload the page from the server. This gives the user fast response with zero server load.
Listing 3.10. Give your user the ability to run scripts themselves.
window.onload = initAll;
var usedNums = new Array(76);
function initAll() {
if (document.getElementById) {
document.getElementById("reload").onclick = anotherCard;
newCard();
}
else {
alert("Sorry, your browser doesn't support this script");
}
}
function newCard() {
for (var i=0; i<24; i++) {
setSquare(i);
}
}
function setSquare(thisSquare) {
var currSquare = "square" + thisSquare;
var colPlace = new Array(0,0,0,0,0,1,1,1,1,1,2,2,2,2,3,3,3,3,3,4,4,4,4,4);
var colBasis = colPlace[thisSquare] * 15;
var newNum;
do {
newNum = colBasis + getNewNum() + 1;
}
while (usedNums[newNum]);
usedNums[newNum] = true;
document.getElementById(currSquare).innerHTML = newNum;
}
function getNewNum() {
return Math.floor(Math.random() * 15);
}
function anotherCard() {
  for (var i=1; i<usedNums.length; i++) {
    usedNums[i] = false;
  }

  newCard();
  return false;
}
To call a script multiple ways
1. document.getElementById("reload").onclick = anotherCard;
newCard();
The initAll() function we’ve seen before has one change and one addition. All it does that’s new is set the link on the HTML page (the one with the id of reload; refer back to Listing 3.1) to call the anotherCard() function when it’s clicked. All the calculations that used to be in this function have now been moved to our new newCard() function—and that’s all that’s done there, so there’s nothing new in that function for us to look at.
2. function anotherCard() {
for (var i=1; i<usedNums.length; i++) {
usedNums[i] = false;
}
newCard();
return false;
}
Here’s the anotherCard() function that’s called when someone clicks the link. It does three things:
• Sets all the items in the usedNums[] array to false (so that we can reuse all the numbers again)
• Calls the newCard() function (generating another card)
• Returns a value of false so that the browser won’t try to load the page in the href in the link (we covered this in Chapter 2)
If you’ve gotten this far, you now know how to do something that many people consider to be a fundamental part of Ajax—using JavaScript to reload a part of a page instead of hitting the server and requesting an entirely new page. We’ll be going into Ajax in much more detail in Chapters 13 and up.
Combining JavaScript and CSS
If you’ve been following along this far with the Bingo example, you may well be wondering, “Hey, they said that JavaScript was all about the interactivity—why haven’t we seen any user interaction?” That’s a reasonable question, and here, we show how to now let the user actually play that Bingo card you generated. To do that, Listing 3.11 uses some JavaScript to leverage the power of CSS.
Listing 3.11. Adding a class via JavaScript allows our code to leverage the power of CSS.
window.onload = initAll;
var usedNums = new Array(76);
function initAll() {
if (document.getElementById) {
document.getElementById("reload").onclick = anotherCard;
newCard();
}
else {
alert("Sorry, your browser doesn't support this script");
}
}
function newCard() {
for (var i=0; i<24; i++) {
setSquare(i);
}
}
function setSquare(thisSquare) {
var currSquare = "square" + thisSquare;
var colPlace = new Array(0,0,0,0,0,1,1,1,1,1,2,2,2,2,3,3,3,3,3,4,4,4,4,4);
var colBasis = colPlace[thisSquare] * 15;
var newNum;
do {
newNum = colBasis + getNewNum() + 1;
}
while (usedNums[newNum]);
usedNums[newNum] = true;
document.getElementById(currSquare).innerHTML = newNum;
document.getElementById(currSquare).className = "";
document.getElementById(currSquare).onmousedown = toggleColor;
}
function getNewNum() {
return Math.floor(Math.random() * 15);
}
function anotherCard() {
for (var i=1; i<usedNums.length; i++) {
usedNums[i] = false;
}
newCard();
return false;
}
function toggleColor(evt) {
if (evt) {
  var thisSquare = evt.target;
}
else {
  var thisSquare = window.event.srcElement;
}
if (thisSquare.className == "") {
  thisSquare.className = "pickedBG";
}
else {
  thisSquare.className = "";
}
}
To apply a style using JavaScript
1. document.getElementById(currSquare).className = "";
document.getElementById (currSquare).onmousedown = toggleColor;
Because our Bingo card can be used and reused, we’re going to make sure that we start off with a clean slate: for every square that’s set in setSquare(), we’re going to set the class attribute to "" (the empty string), and the onmousedown event handler to call the new toggleColor() function.
2. function toggleColor(evt) {
If you’re a CSS wiz, you may have noticed back in Listing 3.2 that we declared styles that we’ve never used. Now, inside the new toggleColor() function we’re going to change that. The user can now click any of the squares on the card, and that square’s background will change color to show that that number was called.
3. if (evt) {
var thisSquare = evt.target;
}
else {
var thisSquare = window.event.srcElement;
}
First off, we need to figure out which square was clicked. Unfortunately, there are two ways to do this: the Internet Explorer way, and the way every other browser handles events.
If a value called evt was passed into this function, we know we’re in a non-IE browser, and we can look at its target. If we’re in IE, we instead need to look at the event property of the window object, and then at its srcElement property. Either way, we end up with the thisSquare object, which we can then examine and modify.
4. if (thisSquare.className == "") {
thisSquare.className = "pickedBG";
}
else {
thisSquare.className = "";
}
Here, we check to see if the class attribute of the clicked square has a value. If it doesn’t, we want to give it one: pickedBG, named because the background of the square shows that the number has been picked.
Now, normally, just changing a class attribute wouldn’t actually change anything visually on the page—but remember the CSS back in Listing 3.2? Any tag with a class of pickedBG gets the same background color as the free square. Changing the class here automatically makes that style apply to this square, causing it to also have a pink background ![]() .
.
![]() Being able to mark squares when numbers are called lets the user interact with the card.
Being able to mark squares when numbers are called lets the user interact with the card.
Of course, squares can be picked accidentally, and we need to make sure there’s a way to reset the value. Click the square again, and this time around, className has a value, so we toggle it to once again be the empty string.
Instead of changing the class attribute on the square, we could instead change its style attribute, and then we wouldn’t have to worry about the CSS file. That’s the wrong approach, though—because we’re leveraging the CSS file, it’s simple to change the page’s visual appearance without having to touch its behavior.
Checking State
Along with interaction to let the user set a square, we can also check to see if the squares form a winning pattern. In this penultimate example, the user checks off which numbers have been called, and then Listing 3.12 lets the user know when they’ve won.
Listing 3.12. Complex math makes this script simple: a winning combination.
window.onload = initAll;
var usedNums = new Array(76);
function initAll() {
if (document.getElementById) {
document.getElementById("reload").onclick = anotherCard;
newCard();
}
else {
alert("Sorry, your browser doesn't support this script");
}
}
function newCard() {
for (var i=0; i<24; i++) {
setSquare(i);
}
}
function setSquare(thisSquare) {
var currSquare = "square" + thisSquare;
var colPlace = new Array(0,0,0,0,0,1,1,1,1,1,2,2,2,2,3,3,3,3,3,4,4,4,4,4);
var colBasis = colPlace[thisSquare] * 15;
var newNum;
do {
newNum = colBasis + getNewNum() + 1;
}
while (usedNums[newNum]);
usedNums[newNum] = true;
document.getElementById(currSquare).innerHTML = newNum;
document.getElementById(currSquare).className = "";
document.getElementById(currSquare).onmousedown = toggleColor;
}
function getNewNum() {
return Math.floor(Math.random() * 15);
}
function anotherCard() {
for (var i=1; i<usedNums.length; i++) {
usedNums[i] = false;
}
newCard();
return false;
}
function toggleColor(evt) {
if (evt) {
var thisSquare = evt.target;
}
else {
var thisSquare = window.event.srcElement;
}
if (thisSquare.className == "") {
thisSquare.className = "pickedBG";
}
else {
thisSquare.className = "";
}
checkWin();
}
function checkWin() {
var winningOption = -1;
var setSquares = 0;
var winners = new Array(31,992,15360,507904,541729,557328,1083458,2162820,4329736,8519745,8659472,16252928);
for (var i=0; i<24; i++) {
var currSquare = "square" + i;
if (document.getElementById(currSquare).className != "") {
document.getElementById(currSquare).className = "pickedBG";
setSquares = setSquares | Math.pow(2,i);
}
}
for (var i=0; i<winners.length; i++) {
  if ((winners[i] & setSquares) == winners[i]) {
    winningOption = i;
  }
}
if (winningOption > -1) {
   for (var i=0; i<24; i++) {
     if (winners[winningOption] & Math.pow(2,i)) {
       currSquare = "square" + i;
       document.getElementById(currSquare).className = "winningBG";
     }
   }
}
}
There’s some powerful math going on in this example; if you’ve never had to deal with binary before, you’ll want to read the sidebar “A Bit About Bits.” And if you want to get into the details, check out the sidebar “Getting Wise About Bits” (but you can skip that one if you feel your eyes glazing over!).
To check for the winning state
1. checkWin();
Any time the user toggles a square, it’s possible that the winning status has changed, so here’s a call to checkWin() at the end of toggleColor().
2. var winningOption = -1;
var setSquares = 0;
var winners = new Array (31, 992, 15360, 507904, 541729, 557328, 1083458, 2162820, 4329736, 8519745, 8659472, 16252928);
Three new variables are created at the beginning of checkWin():
• winningOption, which stores which of the possible winning options the user has hit (if any),
• setSquares, which stores which squares have been clicked, and
• winners, an array of numbers, each of which is the encoded value of a possible winning line.
3. for (var i=0; i<24; i++) {
var currSquare = "square" + i;
if (document.getElementById (currSquare).className != "") {
For each square on the card, we need to check to see whether or not its number has already been called. We’ll use the square’s class attribute as a flag—if it’s empty, then it hasn’t been clicked. If there is a class attribute, do the following lines.
4. document.getElementById (currSquare).className = "pickedBG";
setSquares = setSquares | Math.pow(2,i);
The first line here is straightforward, and in fact, should be redundant—the class attribute should already be set to pickedBG. However, there’s a chance it might not be, such as when someone clicks a square they didn’t mean to click, gets a win (resetting the attribute to winningBG instead of pickedBG), and then clicks it again to turn it off. If it actually is a winner, that’ll be reset later.
The second line uses bitwise arithmetic to set setSquares to a number based on each possible state of the card. The single bar (|) does a bitwise or of two values: setSquares itself and the number 2i, which is the result of Math.pow(2,i). That is, 20 is 1, 21 is 2, 22 is 4, and so on. Or’ing each of these numbers together results in a unique variable storing which of the 16-some million possible states we’re in.
5. for (var i=0; i<winners.length; i++) {
if ((winners[i] & setSquares) == winners[i]) {
winningOption = i;
}
}
Here’s the second complex section: now that we know just what state the card is currently in, we want to know if it’s a winning state. In a common Bingo game, there are 12 winning states, and this section compares our card’s current state to each. We do a bitwise and between each winning state and the current state, which results in a new state that only has true values for each square that is in both of the two. Comparing that back to the same winning state allows us to see if we’ve fully hit this pattern—that is, the result will have no hits outside the winning state (as they aren’t found in the winning state) and so long as everything found in the winning pattern is also in the current pattern, we’ve got ourselves a winner. In that case, set winningOption to i, the pattern we matched.
6. if (winningOption > -1) {
for (var i=0; i<24; i++) {
if (winners[winningOption] & Math.pow(2,i)) {
currSquare = "square" + i;
document.getElementById(currSquare).className = "winningBG";
}
}
}
Finally, if winningOption is a number greater than -1, we know we’ve got a winner. In that case, we want to loop through each square and check to see if it’s found in the winning pattern. If it is, we set the class attribute to winningBG, and we’re done ![]() .
.
![]() Looks like we’ve got a winner! (In print, you can’t see the pulsing colors.)
Looks like we’ve got a winner! (In print, you can’t see the pulsing colors.)
Again, just setting the class attribute of the winning squares to match a particular CSS style is enough to change the card’s appearance. Because this is paper, though, you can’t see how it truly looks: the winningBG rule sets the background to an animated gif which slowly flashes between red and white. A friend of mine described it as “delightfully obnoxious.”
There are a number of different Bingo games, each with different winning patterns. By modifying the single line of code that initializes the winners array, your script can fit any result someone might want.
If you’ve ever wondered why conditionals use && and || (for and and or, respectively), now you know: the single version of those operators tells JavaScript that you’re doing binary math, not decimal math.
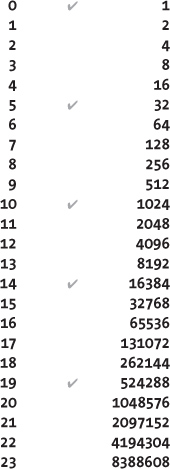
000010001001000100010000 and
000010001000000100010000
________________________
000010001000000100010000
Working with String Arrays
Up to this point, all the arrays we’ve dealt with have consisted of Booleans or numbers. As our final Bingo-related example, Listing 3.13 combines everything we’ve done previously with a string array to create the popular “Buzzword Bingo” game.
Listing 3.13. A private game of Buzzword Bingo will liven up that next deadly dull staff meeting—just add your own text strings.
var buzzwords = new Array ("Aggregate",
"Ajax",
"API",
"Bandwidth",
"Beta",
"Bleeding edge",
"Convergence",
"Design pattern",
"Disruptive",
"DRM",
"Enterprise",
"Facilitate",
"Folksonomy",
"Framework",
"Impact",
"Innovate",
"Long tail",
"Mashup",
"Microformats",
"Mobile",
"Monetize",
"Open social",
"Paradigm",
"Podcast",
"Proactive",
"Rails",
"Scalable",
"Social bookmarks",
"Social graph",
"Social software",
"Spam",
"Synergy",
"Tagging",
"Tipping point",
"Truthiness",
"User-generated",
"Vlog",
"Webinar",
"Wiki",
"Workflow"
);
var usedWords = new Array(buzzwords.length);
window.onload = initAll;
function initAll() {
if (document.getElementById) {
document.getElementById("reload").onclick = anotherCard;
newCard();
}
else {
alert("Sorry, your browser doesn't support this script");
}
}
function newCard() {
for (var i=0; i<24; i++) {
setSquare(i);
}
}
function setSquare(thisSquare) {
do {
  var randomWord = Math.floor((Math.random() * buzzwords.length));
}
while (usedWords[randomWord]);

usedWords[randomWord] = true;
var currSquare = "square" + thisSquare;
document.getElementById(currSquare).innerHTML = buzzwords[randomWord];
document.getElementById(currSquare).className = "";
document.getElementById(currSquare).onmousedown = toggleColor;
}
function anotherCard() {
for (var i=0; i<buzzwords.length; i++) {
  usedWords[i] = false;
}
newCard();
return false;
}
function toggleColor(evt) {
if (evt) {
var thisSquare = evt.target;
}
else {
var thisSquare = window.event.srcElement;
}
if (thisSquare.className == "") {
thisSquare.className = "pickedBG";
}
else {
thisSquare.className = "";
}
checkWin();
}
function checkWin() {
var winningOption = -1;
var setSquares = 0;
var winners = new Array(31,992,15360,507904,541729,557328,1083458,2162820,4329736,8519745,8659472,16252928);
for (var i=0; i<24; i++) {
var currSquare = "square" + i;
if (document.getElementById(currSquare).className != "") {
document.getElementById(currSquare).className = "pickedBG";
setSquares = setSquares | Math.pow(2,i);
}
}
for (var i=0; i<winners.length; i++) {
if ((winners[i] & setSquares) == winners[i]) {
winningOption = i;
}
}
if (winningOption > -1) {
for (var i=0; i<24; i++) {
if (winners[winningOption] & Math.pow(2,i)) {
currSquare = "square" + i;
document.getElementById(currSquare).className = "winningBG";
}
}
}
}
To use string arrays
1. var buzzwords = new Array ("Aggregate", "Ajax", "API", "Bandwidth", "Beta", "Bleeding edge", "Convergence", "Design pattern", "Disruptive", "DRM", "Enterprise", "Facilitate", "Folksonomy", "Framework", "Impact", "Innovate", "Long tail", "Mashup", "Microformats", "Mobile", "Monetize", "Open social", "Paradigm", "Podcast", "Proactive", "Rails", "Scalable", "Social bookmarks", "Social graph", "Social software", "Spam", "Synergy", "Tagging", "Tipping point", "Truthiness", "User-generated", "Vlog", "Webinar", "Wiki", "Workflow");
var usedWords = new Array(buzzwords.length);
This game of Buzzword Bingo has a “Web 2.0” theme, but you can put strings based around any topic inside the buzzwords array. You’ll need to have at least 24 entries (more is better), and you won’t want them to be too lengthy (or they won’t fit in the squares), but other than those restrictions, the only limit is your imagination.
Along with initializing the string array, we also need to initialize the new usedWords array of Booleans. Giving it a size of buzzwords.length means that nothing needs to change when we add new entries—it will automatically be the right length.
2. do {
var randomWord = Math.floor((Math.random() * buzzwords.length));
}
while (usedWords[randomWord]);
usedWords[randomWord] = true;
var currSquare = "square" + thisSquare;
document.getElementById(currSquare).innerHTML = buzzwords[randomWord];
Figuring out what strings to put in what squares is actually simpler, as any string can go in any square (unlike the number restrictions in standard Bingo). All we’re doing here is making sure that we’re getting an as-yet-unused word, marking it as used, and then writing it into the square.
3. for (var i=0; i<buzzwords.length; i++) {
usedWords[i] = false;
}
When a new card is generated, just like with the standard Bingo card, we have to set all the flags in usedWords back to false so they’re once again available.
When Apple still attended the annual Macworld Expo in San Francisco, it was traditional for the opening keynote to be given by Steve Jobs—which was, therefore, referred to as the “SteveNote.” Also somewhat traditional was audience members playing “SteveNote Bingo,” seeing which of Steve’s pet phrases (such as “Boom!” and “One more thing...”) were said and which of the rumored products actually appeared.
Because the iPhone comes with the standard Safari browser, I was able to easily come up with an interactive version of this game ![]() for the Macworld following the iPhone’s introduction. It was very well received, although no one actually yelled out “Bingo!” during the keynote. I’ve also adapted this same Bingo example for other breaking news events, such as televised US political debates.
for the Macworld following the iPhone’s introduction. It was very well received, although no one actually yelled out “Bingo!” during the keynote. I’ve also adapted this same Bingo example for other breaking news events, such as televised US political debates.

![]() With a mobile browser and a little imagination, you can write a bingo game of your own for almost any occasion.
With a mobile browser and a little imagination, you can write a bingo game of your own for almost any occasion.