
16. Building on jQuery
Using jQuery as a Foundation 398
Using ThemeRoller to Customize Your Look 400
Adding a Calendar to Your Page 403
Dragging and Dropping Elements 408
Using jQuery with External Data 411
In the last couple of chapters, you’ve seen how the jQuery library can be used to add complex functions to Web sites with a minimum of coding, and in ways that leverage your existing knowledge of HTML and CSS. It’s usually easier to add JavaScript functions to your sites with jQuery than to code them individually.
The previous chapter covered jQuery’s user interface toolkit, which allows you to easily add the features, such as menus, buttons, dialogs, and progress bars, that Mac OS X and Windows users are used to. Here, you’ll learn how to take those themes and customize them for your site.
Besides user interface enhancements, the jQuery library works well as a foundation on which to add almost unlimited functionality to a site. As just two examples: you can use jQuery to access remote data from servers using Ajax, JSON, or both; and with jQuery plugins, you can add entirely new abilities to jQuery and, therefore, to your sites. Let’s start building!
Using jQuery as a Foundation
One of the most important things you’ll gain from using jQuery is freedom from worrying about browser compatibility. Because no two browsers use JavaScript in quite the same way, hand-coding JavaScript often requires that you write code to work around the idiosyncrasies of different browsers. When you use jQuery, that problem simply goes away because jQuery gives you a common set of functions that work across all browsers. Behind the scenes, the jQuery library worries about browser quirks, so you don’t have to.
Using jQuery, you can access and manipulate any of the elements on a page, using familiar CSS selectors, including classes and IDs. You get even more control over your page because jQuery gives you the ability to create or delete HTML elements at any time.
Because the jQuery library loads before any of the other elements on your page (because it’s called from the head section of the page and the rest of the page elements will be in the body), the library can run code as soon as the elements you want to manipulate are ready. This is better than using the browser’s onload function, which gets called only after all of the page elements, including images, have loaded. The benefit to your user is that the page will be more responsive to their actions.
Ajax, JSON, and jQuery
The jQuery library has a rich set of Ajax functions that let your page talk to the server behind the scenes, fetching more data without needing to refresh the page.
This is great because it allows Web-based applications to be as responsive as desktop applications. Once the updated data has been received from the server, jQuery lets you update page elements without a noticeable flicker while the page refreshes.
As you’ve seen in prior chapters, it’s certainly possible to code Ajax requests with your own JavaScript, using the XMLHttpRequest object. You have to load any data that you want to send to the server into that object, and then set up another function to receive the server’s response. You also need error checking code to make sure that the server’s response makes sense. Instead of writing all that code, you can simply use the jQuery function $.ajax() to handle the entire process.
Similarly, jQuery provides $.getJSON(), which lets you easily access and then manipulate data received in JSON format.
jQuery plugins
The main jQuery library has a lot of built-in functionality, but it’s easy for developers to add new features as plugins, which add a virtually unlimited feature set to your sites. There are hundreds of plugins freely available for downloading, which extends jQuery in many different areas, such as animation effects, dragging and dropping page elements, changing the page layout, dealing with different media types, working with page navigation, adding useful widgets, and many more.
A simple search in your favorite Web search engine will lead you to a bountiful selection of jQuery plugins, or you can begin your search at http://plugins.jquery.com.
Using ThemeRoller to Customize Your Look
As a Web developer, you need to work with designers to create a unified look across your site. Happily, the creators of jQuery understand that simply adding functionality to your site isn’t enough; that functionality must also work within the look and feel of your site. That’s why they created ThemeRoller, a tool that allows you to design custom jQuery user interface themes for your projects. You can create a completely custom theme or modify one of the many predesigned themes. To get started with ThemeRoller, go to http://jqueryui.com/themeroller.
To create a custom theme
1. The simplest way to make your own theme is to use one of the many existing jQuery themes as your starting point. To view your choices, click “Gallery” in the left sidebar ![]() .
.
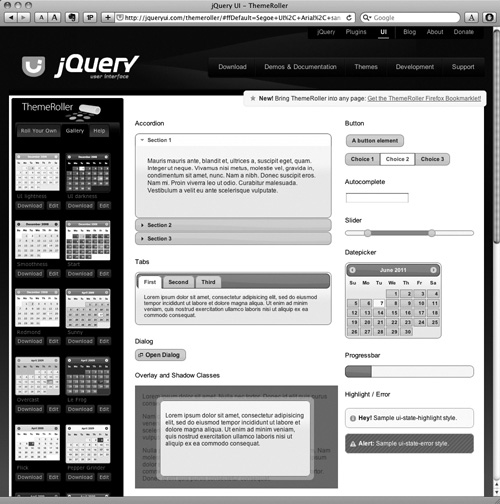
![]() It’s usually best to begin customizing a theme in ThemeRoller by picking one of the existing themes from the Gallery tab.
It’s usually best to begin customizing a theme in ThemeRoller by picking one of the existing themes from the Gallery tab.
2. Scroll through the available themes, and find the one that’s closest to your desired look. Click the Edit button just underneath and to the right of the theme. The left sidebar will then switch to the Roll Your Own panel ![]() .
.
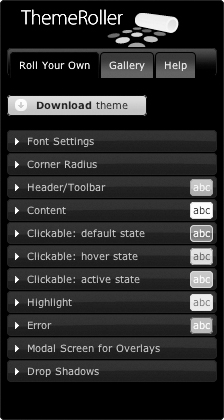
![]() Clicking the Roll Your Own tab shows you the wide range of customization options that are available.
Clicking the Roll Your Own tab shows you the wide range of customization options that are available.
3. At this point, you can pick any of the accordion menu options on the panel, and that option’s settings appear ![]() .
.
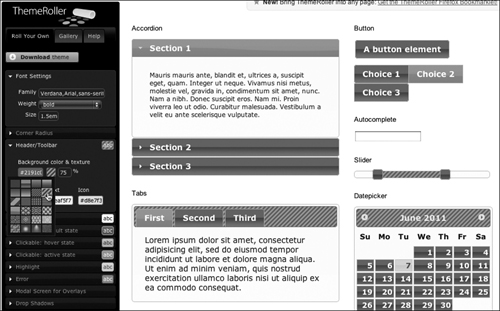
![]() As you make changes to categories in the Roll Your Own tab, ThemeRoller gives you a live preview on the right side of the screen. In this case, we’ve bumped up the font weight to Bold, increased the font size from 1.1em to 1.5em, and added a diagonal crosshatch pattern to the Header/Toolbar section, which you can see most clearly in the Tabs and Datepicker widgets.
As you make changes to categories in the Roll Your Own tab, ThemeRoller gives you a live preview on the right side of the screen. In this case, we’ve bumped up the font weight to Bold, increased the font size from 1.1em to 1.5em, and added a diagonal crosshatch pattern to the Header/Toolbar section, which you can see most clearly in the Tabs and Datepicker widgets.
4. As you edit the values in the sidebar, the body of the page updates to match, allowing you to immediately see (and judge!) the difference.
5. When you’re happy with the result, click the Download Theme button at the top of the panel and you’ll be taken to the Build Your Download page ![]() .
.
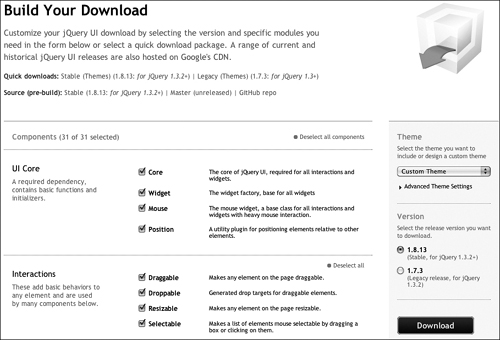
![]() Clicking the Download Theme button in ThemeRoller brings you to the Build Your Download page, where you can further customize the components you want to build and download. When you have just the options you want, click the Download button.
Clicking the Download Theme button in ThemeRoller brings you to the Build Your Download page, where you can further customize the components you want to build and download. When you have just the options you want, click the Download button.
6. On this page, you can choose how light or heavy you want your CSS to be—if you select all the components, your pages will take longer to download and render than if you pick the minimum. That is, if you know that your site is never going to use the Shake or Pulsate effects, just deselect their check boxes and their overhead won’t be included.
7. When you know just what you want, click the Download button. You should end up with a downloaded folder of jQuery goodness, with an index.html file at its root level. Open that page in a browser, and it should tell you exactly what you’ve downloaded and give you directions on how to add your new theme to your pages.
If you use a custom theme, make sure your pages reference the files you just downloaded and not Google’s CDN. And of course, remember to upload them to your server!
Adding a Calendar to Your Page
Many Web applications need a calendar that the user can refer to and interact with. Reservation forms, to-do lists, navigation for posts on blogs—the list goes on and on. The jQuery library has a good calendar widget that is easy to implement ![]() . Best of all, it’s very flexible; you can change its look and abilities by adding simple bits of code. Here’s an example of an interactive one-up calendar (where only one month appears).
. Best of all, it’s very flexible; you can change its look and abilities by adding simple bits of code. Here’s an example of an interactive one-up calendar (where only one month appears).
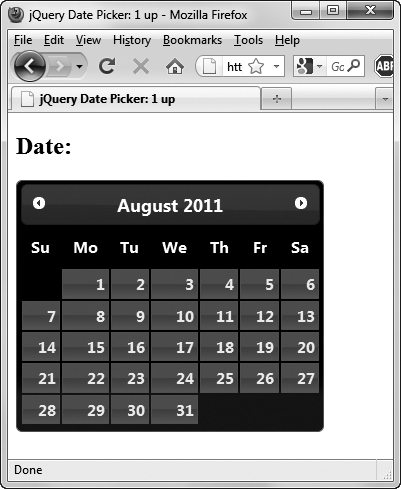
![]() When you first bring up the page, the
When you first bring up the page, the datepicker widget appears in the theme you’ve selected.
To add a one-up calendar
1. <h2>Date: <span id="datepicked"></span></h2>
<div id="datepicker"></div>
Here’s all that Listing 16.1, our HTML page, needs to support a jQuery calendar.
Listing 16.1. The HTML page for our calendar example. Note that we’re pointing at a Google-hosted copy of jQuery.
<!DOCTYPE html>
<html>
<head>
<title>jQuery Date Picker: 1 up</title>
<link rel="stylesheet" href="http://ajax.googleapis.com/ajax/libs/jqueryui/1/themes/ui-darkness/jquery-ui.css">
<script src="http://ajax.googleapis.com/ajax/libs/jquery/1/jquery.js"></script>
<script src="http://ajax.googleapis.com/ajax/libs/jqueryui/1/jquery-ui.js"></script>
<script src="script02.js"></script>
</head>
<body>
<h2>Date: <span id="datepicked"></span></h2>
<div id="datepicker"></div>
</body>
</html>
2. $("#datepicker").datepicker({
Our HTML has a datepicker div, and in this line of JavaScript from Listing 16.2, we attach the jQuery UI datepicker widget to it.
3. dateFormat: 'DD, MM dd, yy',
We know that we’re going to want to display the date on our page in a certain fashion, and this is where we tell jQuery just how we want it: the day of the week, followed by the full month name, the day of the month, and the four-digit year.
4. onSelect: function(selectedDate) {
The date widget automatically pops up on the page, and when any date is selected, the onSelect jQuery event handler is triggered.
5. $("#datepicked").empty().append (selectedDate);
When a date is chosen, we want to update the display on the page, and that’s done here. We update the datepicked span, first by emptying its current value (if any) and then by appending selectedDate ![]() .
.
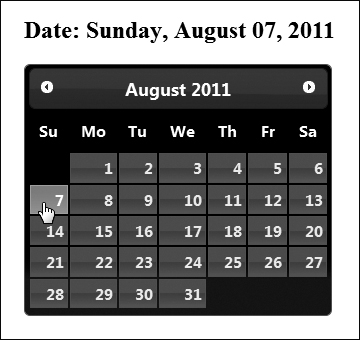
![]() Once you make a date selection with your mouse, the selection highlights in the calendar. In this instance, we’ve also added code to display the date above the calendar.
Once you make a date selection with your mouse, the selection highlights in the calendar. In this instance, we’ve also added code to display the date above the calendar.
It may look odd, but yes, yy gives us a four-digit year. If you want a two-digit year instead, use y.
Listing 16.2. This JavaScript file calls jQuery and sets the parameters used to display the date after the user clicks on the calendar.
$(function() {
$("#datepicker").datepicker({
dateFormat: 'DD, MM dd, yy',
onSelect: function(selectedDate) {
$("#datepicked").empty().append (selectedDate);
}
});
});
Listing 16.3. In this HTML page, we’ve added a two-up calendar, including the two date fields.
<!DOCTYPE html>
<html>
<head>
<title>jQuery Date Picker: 2 up</title>
<link rel="stylesheet" href="http://ajax.googleapis.com/ajax/libs/jqueryui/1/themes/sunny/jquery-ui.css">
<script src="http://ajax.googleapis.com/ajax/libs/jquery/1/jquery.js"></script>
<script src="http://ajax.googleapis.com/ajax/libs/jqueryui/1/jquery-ui.js"></script>
<script src="script03.js"></script>
</head>
<body>
<h1>Select your check in and check out dates:</h1>
<label for="from">From</label>
<input type="text" id="from"name="from">
<label for="to">to</label>
<input type="text" id="to" name="to">
</body>
</html>
Adding a two-up calendar to your page
Sometimes you only need one calendar: appointments, restaurant reservations, what have you. But two-up calendars are also common; they’re used for events that begin and end on different dates. You’ll often see them when making hotel reservations and purchasing plane tickets, for instance.
To add a two-up calendar
1. <label for="from">From</label>
<input type="text" id="from" name="from">
<label for="to">to</label>
<input type="text" id="to" name="to">
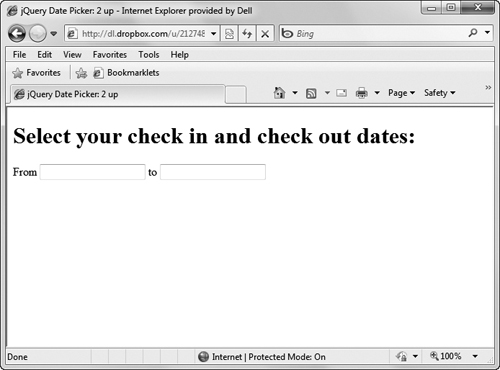
Here’s the minimal amount of HTML that needs to be added to Listing 16.3, our Web page ![]() .
.
![]() In the two-up variant of the
In the two-up variant of the datepicker widget, we begin with two date fields. When you tab to the first field or click in it with your mouse, the two-calendar datepicker appears.
2. var dates = $("#from, #to").datepicker({
Our JavaScript page, Listing 16.4, starts off similarly to Listing 16.2, but not identically. Instead of attaching datepicker to one element on the page, we’re now attaching it to two: from and to. Additionally, we’re returning the result of datepicker and storing it in the dates variable for future use.
3. defaultDate: "+1w",
We can tell the datepicker widget to have a default start date, and here we set that to always be one week from today.
4. numberOfMonths: 2,
One of the reasons we’re using jQuery is its flexibility, and one of the ways in which the datepicker widget is flexible is that it’s easy to modify how many months to show. We tell it here to show two months at a time.
5. onSelect: function(selectedDate) {
Again, there are things we want to accomplish when a date is selected, and that happens here ![]() .
.
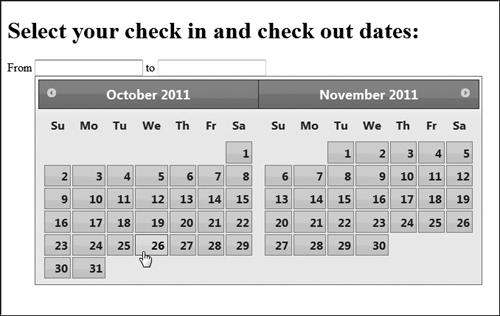
![]() You can click the round arrow buttons at the left and right edges of the bar with the month names to change the months display. To pick the first date, simply click a date in the left-hand calendar.
You can click the round arrow buttons at the left and right edges of the bar with the month names to change the months display. To pick the first date, simply click a date in the left-hand calendar.
Listing 16.4. This jQuery function attaches the datepicker object to the two date fields on the page, and stores the results in a variable.
$(function() {
var dates = $("#from, #to").datepicker({
defaultDate: "+1w",
numberOfMonths: 2,
onSelect: function(selectedDate) {
var option = (this.id == "from") ? "minDate" : "maxDate",
date = $.datepicker.parseDate($.datepicker._defaults.dateFormat, selectedDate);
dates.not(this).datepicker("option", option, date);
}
});
});
6. var option = (this.id == "from") ? "minDate" : "maxDate",
Here we figure out which calendar we’re in, and store that in option. If this.id is from, option is set to minDate. Otherwise (if this.id is to), option is set to maxDate.
7. date = $.datepicker.parseDate($.datepicker._defaults.dateFormat, selectedDate);
We automatically get selectedDate, but that’s not the format we want. Here, we use datepicker’s parseDate() routine to set date.
8. dates.not(this).datepicker("option", option, date);
And finally, we use our just-set values for option and date to help set the beginning (minDate) and ending (maxDate) days of our selected range ![]() .
.
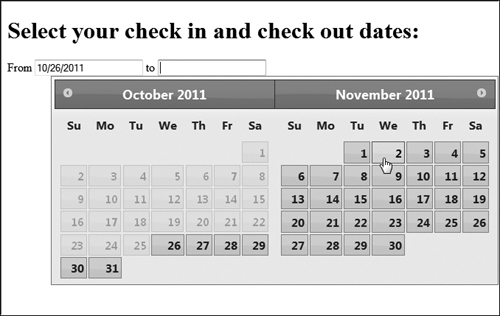
![]() Note that once a date is picked in the left-hand calendar, all prior dates are dimmed. The first date that you picked is also entered into the first date field above the date picker. Now you can choose the second date (which is highlighted) in the right-hand calendar. That date will be placed into the second date field.
Note that once a date is picked in the left-hand calendar, all prior dates are dimmed. The first date that you picked is also entered into the first date field above the date picker. Now you can choose the second date (which is highlighted) in the right-hand calendar. That date will be placed into the second date field.
Dragging and Dropping Elements
One of the nicest UI features is the ability to drag and drop page elements to suit your preferences. You see this implemented on, for instance, personalized My Yahoo! and iGoogle pages, which allow you to move customizable modules.
In this example, we’ve created a virtual light-table page for a Web-based slideshow ![]() . You can drag and drop the images into a particular order on the page
. You can drag and drop the images into a particular order on the page ![]() . If this were a complete Web application, you could then click the “Build it!” button to create and play the slideshow in the order you chose
. If this were a complete Web application, you could then click the “Build it!” button to create and play the slideshow in the order you chose ![]() . The HTML for the page is in Listing 16.5, the CSS is in Listing 16.6, and the JavaScript is in Listing 16.7.
. The HTML for the page is in Listing 16.5, the CSS is in Listing 16.6, and the JavaScript is in Listing 16.7.

![]() When you first load the slideshow page, the photos appear in a preset order.
When you first load the slideshow page, the photos appear in a preset order.

![]() Clicking and dragging an image makes the other images move out of its way.
Clicking and dragging an image makes the other images move out of its way.

![]() The rearranged images are ready to be built into a slide show, once you click the “Build it!” button (but that’s another plugin).
The rearranged images are ready to be built into a slide show, once you click the “Build it!” button (but that’s another plugin).
To enable drag and drop for page elements
1. <ul id="sortable">
<li class="ui-state-default"><img src="images/img_0001.jpg" alt="slide #1"></li>
<li class="ui-state-default"><img src="images/img_0002.jpg"alt="slide #2"></li>
Here are the first two (of twelve) list items on our HTML page. If you want more or fewer images in your slideshow, all you have to do is add or delete list elements.
Listing 16.5. The HTML page for the virtual light table has an unordered list that contains all the images.
<!DOCTYPE html>
<html>
<head>
<title>Drag and Drop Slides</title>
<link rel="stylesheet" href="http://ajax.googleapis.com/ajax/libs/jqueryui/1/themes/flick/jquery-ui.css">
<link rel="stylesheet" href="script04.css">
<script src="http://ajax.googleapis.com/ajax/libs/jquery/1/jquery.js"></script>
<script src="http://ajax.googleapis.com/ajax/libs/jqueryui/1/jquery-ui.js"></script>
<script src="script04.js"></script>
</head>
<body>
<h1>Build Your Slide Show <a href="#">Build it!</a></h1>
<ul id="sortable">
<li class="ui-state-default"><img src="images/img_0001.jpg" alt="slide #1"></li>
<li class="ui-state-default"><img src="images/img_0002.jpg" alt="slide #2"></li>
<li class="ui-state-default"><img src="images/img_0003.jpg" alt="slide #3"></li>
<li class="ui-state-default"><img src="images/img_0004.jpg" alt="slide #4"></li>
<li class="ui-state-default"><img src="images/img_0005.jpg" alt="slide #5"></li>
<li class="ui-state-default"><img src="images/img_0006.jpg" alt="slide #6"></li>
<li class="ui-state-default"><img src="images/img_0007.jpg" alt="slide #7"></li>
<li class="ui-state-default"><img src="images/img_0008.jpg" alt="slide #8"></li>
<li class="ui-state-default"><img src="images/img_0009.jpg" alt="slide #9"></li>
<li class="ui-state-default"><img src="images/img_0010.jpg" alt="slide #10"></li>
<li class="ui-state-default"><img src="images/img_0011.jpg" alt="slide #11"></li>
<li class="ui-state-default"><img src="images/img_0012.jpg" alt="slide #12"></li>
</ul>
</body>
</html>
2. #sortable {
list-style-type: none;
margin: 0;
padding: 0;
width: 820px;
}
In our CSS, all the list items we want to sort are inside the sortable div, and here’s where we lay out the bulk of the page.
3. #sortable li {
margin: 3px;
padding: 3px;
float: left;
}
Each individual list item gets a little bit of margin and padding and is floated left to fit snugly next to its neighbors.
4. #sortable li img {
width: 256px;
height: 192px;
}
Here’s where we tell the browser what size we want for our images.
5. $("#sortable").sortable().disableSelection();
And finally, in the jQuery code... that’s it? Yes, really. All of the above gets handled by a single line of jQuery, in which we tell the sortable div that we want to be able to sort whatever it contains—but by the way, we don’t want anyone actually selecting any of our items.
Listing 16.6. The CSS file for the virtual light table defines the physical appearance of the page.
#sortable {
  list-style-type: none;
  margin: 0;
  padding: 0;
  width: 820px;
}
#sortable li {
  margin: 3px;
  padding: 3px;
  float: left;
}
#sortable li img {
  width: 256px;
  height: 192px;
}
h1 a {
float: right;
display: inline-block;
font-size: .8em;
padding: 8px;
text-decoration: none;
background-color: silver;
border: 1px solid gray;
margin: -5px 25px 0 0;
}
Listing 16.7. This simple jQuery function is all you need to allow the user to drag and drop the images on the page.
$(function() {
$("#sortable").sortable().disableSelection();
});
Listing 16.8. When you want to grab and display an external data feed (in this case a Twitter feed), you need to first create the HTML page.
<!DOCTYPE html>
<html>
<head>
<title>Twitter status</title>
<link rel="stylesheet" href="script05.css">
<script src="http://ajax.googleapis.com/ajax/libs/jquery/1/jquery.js"></script>
<script src="script05.js"></script>
</head>
<body>
<div class="twitter" id="jstweets">
<h1>Twitter Feed with jQuery</h1>
</div>
</body>
</html>
Using jQuery with External Data
Conceptually, the idea of using external (that is, XML or JSON) data on your Web page is simple. The users have a page on their screen; there’s more data somewhere out there on a server; you want to load that data onto the page without a page refresh.
The data out on the server can be almost anything: text, images, music, video, and more. In this example, we’ll see how to use jQuery to load and automatically refresh one of the author’s Twitter feeds. The HTML is in Listing 16.8, the CSS in Listing 16.9, and the JavaScript (described next) in Listing 16.10.
To use jQuery to access a data feed
1. $.getJSON(
"http://twitter.com/statuses/user_timeline.json?screen_name=negrino&count=15&callback=?",
function(data) {
twitDataCallback(data);
}
);
This may look complex at first, but it really isn’t. There are just two parameters being passed to $.getJSON:
• A string containing the URL of the data we want; in this case, it’s the Twitter feed of a particular user named negrino.
• An anonymous function that will be called when we get that data. Here, that function does one thing: call another function, twitDataCallback().
2. var userData = twitData[0].user;
Here we are inside twitDataCallback(), where we want to start parsing our input (now an array of data called twitData, and seen in Listing 16.11) so we can add elements to our page. First off, we want information about the user himself, and JSON has that in user, but we’re going to store it as userData.
Listing 16.9. This CSS file styles the different elements once they’ve been parsed out of the Twitter feed.
a {
text-decoration: none;
font-weight: bold;
}
a:hover {
text-decoration: underline;
}
#jstweets {
border: 1px solid #555;
margin: 30px;
padding: 0 30px 30px 30px;
display: inline-block;
}
h1 {
font-size: 48px;
font-weight: normal;
font-family: "Myriad Pro", Arial, Helvetica, sans-serif;
margin: 5px 0 30px 0;
text-align: center;
}
img {
float: left;
padding: 0 10px 20px 0;
height: 96px;
width: 96px;
}
.twitline {
padding: 10px 0;
border-top: 1px silver dotted;
}
.tdate {
font-size: small;
}
Listing 16.10. The jQuery in this JavaScript file starts off by getting us the Twitter feed in JSON format.
$(document).ready(function() {
$.getJSON(
  "http://twitter.com/statuses/user_timeline.json?screen_name=negrino&count=15&callback=?",
  function(data) {
    twitDataCallback(data);
  }
);
function twitDataCallback(twitData) {
var userData = twitData[0].user;
var ct = "<div><img src='"+ userData.profile_image_url + "' alt='twitter pic'>";
ct += "<a href='http://www.twitter.com/" + userData.screen_name + "'>";
ct += userData.name + "</a><br>Friends: " + userData.friends_count;
ct += "<br>Followers: " + userData.followers_count;
ct += "<br>Listed: " + userData.listed_count;
ct += "<br>" + userData.description + "</div><br clear='all'>";
$("#jstweets").append(ct);
$.each(twitData, function(i, item) {
ct = "<div class='twitline'>" + item.text;
ct = ct.replace(/http://S+/g, '<a href="$&">$&</a>'),
ct += " (<a class='tdate' href= 'http://www.twitter.com/";
ct += userData.screen_name + "/status/" + item.id_str;
ct += "'>" + item.created_at.substr(4,6) + "</a>)</div>";
$("#jstweets").append(ct);
});
}
});
3. var ct = "<div><img src='"+ userData.profile_image_url + "' alt='twitter pic'>";
It’s time to start working on our output, and that will all be done with the ct variable, declared here. First off, we grab the profile image from userData.
4. ct += "<a href='http://www.twitter.com/" + userData.screen_name + "'>"
Next, we start to create a link to the user’s Twitter page.
5. ct += userData.name + "</a><br>Friends: " + userData.friends_count;
Here’s the rest of the name and the end of the link, followed by the user’s friend count.
6. ct += "<br>Followers: " + userData.followers_count;
The friend count doesn’t look like much, until you see the user’s follower count next to it.
7. ct += "<br>Listed: " + userData.listed_count;
And while we’re at it, we’ll also show how many lists he’s on.
8. ct += "<br>" + userData.description + "</div><br clear='all'>";
And finally for the userData section, we add his self-description.
9. $("#jstweets").append(ct);
Now that we’ve built up ct, it’s time to add it to our page.
10. $.each(twitData, function(i, item) {
Next up: we need to loop through each individual tweet. The built-in $.each() function knows how to get the data out of each line and put it into item.
11. ct = "<div class='twitline'>" + item.text;
Here’s the text of the tweet.
12. ct = ct.replace(/http://S+/g, '<a href="$&">$&</a>')
If there is a URL in this tweet, we want to un-encode it and turn it into a link.
13. ct += " (<a class='tdate'href='http://www.twitter.com/";
We also want to show the date of the tweet, and we might as well make that a link back to the tweet’s Web page.
14. ct += userData.screen_name + "/status/" + item.id_str;
We build the URL of the link here.
15. ct += "'>" + item.created_at.substr(4,6) + "</a>)</div>";
Here we add the text of the link and finish off the tweet line.
16. $("#jstweets").append(ct);
And finally, here’s where each individual tweet gets displayed on the page ![]() .
.
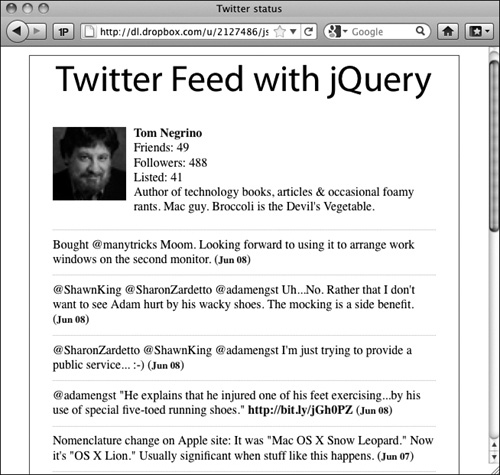
![]() The jQuery code grabs a JSON data feed (in this case, the Twitter stream of one of the authors), parses it, and displays the result on the page.
The jQuery code grabs a JSON data feed (in this case, the Twitter stream of one of the authors), parses it, and displays the result on the page.
Listing 16.11. This listing isn’t part of our code at all; it’s an excerpt of the JSON data feed downloaded by the JavaScript in Listing 16.10.
jQuery16104507184331305325_1307612310205([
{
"in_reply_to_status_id":null,
"user":{
"listed_count":41, "profile_background_color":"EBEBEB", "protected":false, "profile_background_image_url":"http://a1.twimg.com/images/themes/theme7/ bg.gif", "screen_name":"negrino", "name":"Tom Negrino", "statuses_count":4889, "id_str":"6187302", "lang":"en", "utc_offset":-28800, "profile_text_color":"333333", "default_profile_image":false, "favourites_count":1, "profile_sidebar_fill_color": "F3F3F3", "description":"Author of technology books, articles & occasional foamy rants. Mac guy. Broccoli is the Devil's Vegetable.", "profile_background_tile":false, "friends_count":49, "location":"Healdsburg, CA", "is_translator":false, "default_profile":false, "follow_request_sent":false, "profile_link_color":"990000", "followers_count":488, "url":"http://www.backupbrain.com", "id":6187302, "following":true, "verified":false, "profile_sidebar_border_color":"DFDFDF", "time_zone":"Pacific Time (US & Canada)", "created_at":"Mon May 21 01:14:31 +0000 2007", "show_all_inline_media":false, "contributors_enabled":false, "geo_enabled":true, "notifications":false, "profile_use_background_image":true, "profile_image_url":"http://a2.twimg.com/profile_images/1205071991/TN-headshot_normal.jpg"
},
"favorited":false, "in_reply_to_status_id_str":null, "id_str":"78272847184805888", "in_reply_to_screen_name":null, "text":"Bought @manytricks Moom. Looking forward to using it to arrange work windows on the second monitor.", "in_reply_to_user_id_str": null, "place":null, "contributors":null, "retweeted":false, "coordinates":null, "geo":null, "retweet_count":0, "in_reply_to_user_id":null, "id":78272847184805888, "truncated":false, "source":"u003Ca href="http://www.nambu.com/" rel="nofollow"u003ENambuu003C/au003E", "created_at":"Wed Jun 08 01:31:15 +0000 2011"
},
{
"in_reply_to_status_id":78263067070312450,
"user":{
"follow_request_sent":false, "friends_count":49, "profile_background_color":"EBEBEB", "protected":false, "profile_background_image_url":"http://a1.twimg.com/images/themes/theme7/bg.gif", "screen_name":"negrino", "name":"Tom Negrino", "id_str": "6187302", "lang":"en", "utc_offset":-28800, "profile_text_color":"333333", "show_all_inline_media":false, "listed_count":41, "geo_enabled":true, "favourites_count":1, "profile_sidebar_fill_color":"F3F3F3", "description":"Author of technology books, articles & occasional foamy rants. Mac guy. Broccoli is the Devil's Vegetable.", "contributors_enabled":false, "profile_background_tile":false, "location":"Healdsburg, CA", "statuses_count":4888, "profile_link_color":"990000", "followers_count":488, "url":"http://www.backupbrain.com", "id":6187302, "default_profile_image":false, "following":true, "verified":false, "profile_sidebar_border_color":"DFDFDF", "default_profile":false, "time_zone":"Pacific Time (US & Canada)", "created_at":"Mon May 21 01:14:31 +0000 2007", "is_translator":false, "notifications":false, "profile_use_background_image":true, "profile_image_url":"http://a2.twimg.com/profile_images/1205071991/TN-headshot_normal.jpg"
},
"favorited":false, "in_reply_to_status_id_str":"78263067070312450", "id_str": "78265427008045057", "in_reply_to_screen_name":"ShawnKing", "text":"@ShawnKing @SharonZardetto @adamengst Uh...No. Rather that I don't want to see Adam hurt by his wacky shoes. The mocking is a side benefit.", "in_reply_to_user_id_str":"5026991", "place":null, "contributors":null, "retweeted":false, "coordinates":null, "geo":null, "retweet_count":0, "in_reply_to_user_id":5026991, "id":78265427008045057, "truncated" :false, "source":"u003Ca href="http://www.nambu.com/" rel="nofollow"u003ENambuu003C/au003E", "created_at":"Wed Jun 08 01:01:46 +0000 2011"
},
{
"retweet_count":0, "geo":null,
"user":{
"default_profile_image":false, "profile_sidebar_border_color":"DFDFDF", "protected": false, "show_all_inline_media":false, "verified":false, "geo_enabled":true, "time_zone":"Pacific Time (US & Canada)", "favourites_count":1, "created_at":"Mon May 21 01:14:31 +0000 2007", "friends_count":49, "screen_name":"negrino", "name": "Tom Negrino", "id_str":"6187302", "is_translator":false, "default_profile":false, "profile_use_background_image":true, "follow_request_sent":false, "following":false, "utc_offset":-28800, "profile_background_color":"EBEBEB", "contributors_enabled": false, "statuses_count":4889, "notifications":false, "profile_background_image_url": "http://a1.twimg.com/images/themes/theme7/bg.gif", "followers_count":489, "description":"Author of technology books, articles & occasional foamy rants. Mac guy. Broccoli is the Devil's Vegetable.", "profile_text_color":"333333", "listed_count":41, "profile_sidebar_fill_color":"F3F3F3", "id":6187302, "profile_background_tile":false, "location":"Healdsburg, CA", "lang":"en", "profile_link_color":"990000", "url":"http://www.backupbrain.com", "profile_image_url":"http://a2.twimg.com/profile_images/1205071991/TN-headshot_normal.jpg"
},
"created_at":"Wed Jun 08 00:51:51 +0000 2011", "id_str":"78262929430028288", "in_reply_to_user_id":20821898, "text":"@SharonZardetto @ShawnKing @adamengst I'm just trying to provide a public service... :-)", "truncated":false, "favorited":false, "in_reply_to_status_id_str":"78262156885377024", "id":78262929430028288, "in_reply_to_screen_name": "SharonZardetto", "in_reply_to_status_id":78262156885377024, "source":"u003Ca href="http://www.nambu.com/" rel="nofollow"u003ENambuu003C/au003E", "in_reply_to_user_id_str":"20821898", "coordinates":null, "contributors":null, "place":null, "retweeted":false
},
{
"retweet_count":0, "geo":null,
"user":{
"default_profile_image":false, "profile_sidebar_border_color":"DFDFDF", "protected": false, "show_all_inline_media":false, "verified":false, "geo_enabled":true, "time_zone":"Pacific Time (US & Canada)", "favourites_count":1, "created_at":"Mon May 21 01:14:31 +0000 2007", "friends_count":49, "screen_name":"negrino", "name": "Tom Negrino", "id_str":"6187302", "is_translator":false, "default_profile":false, "profile_use_background_image":true, "follow_request_sent":false, "following":false, "utc_offset":-28800, "profile_background_color":"EBEBEB", "contributors_enabled": false, "statuses_count":4889, "notifications":false, "profile_background_image_url": "http://a1.twimg.com/images/themes/theme7/bg.gif", "followers_count":489, "description":"Author of technology books, articles & occasional foamy rants. Mac guy. Broccoli is the Devil's Vegetable.", "profile_text_color":"333333", "listed_count":41, "profile_sidebar_fill_color":"F3F3F3", "id":6187302, "profile_background_tile":false, "location":"Healdsburg, CA", "lang":"en", "profile_link_color":"990000", "url":"http://www.backupbrain.com", "profile_image_url":"http://a2.twimg.com/profile_images/1205071991/TN-headshot_normal.jpg"
},
"created_at":"Wed Jun 08 00:44:08 +0000 2011", "id_str":"78260990495571968", "in_reply_to_user_id":1502501, "text":"@adamengst "He explains that he injured one of his feet exercising...by his use of special five-toed running shoes." http://bit.ly/jGh0PZ", "truncated":false, "favorited":false, "in_reply_to_status_id_str":null, "id":78260990495571968, "in_reply_to_screen_name":"adamengst", "in_reply_to_status_id": null, "source":"u003Ca href="http://www.nambu.com/" rel="nofollow"u003ENambuu003C/au003E", "in_reply_to_user_id_str":"1502501", "coordinates":null, "contributors":null, "place":null, "retweeted":false
},
{
"retweet_count":0, "geo":null,
"user":{
"default_profile_image":false, "profile_sidebar_border_color":"DFDFDF", "protected": false, "show_all_inline_media":false, "verified":false, "geo_enabled":true, "time_zone":"Pacific Time (US & Canada)", "favourites_count":1, "created_at":"Mon May 21 01:14:31 +0000 2007", "friends_count":49, "screen_name":"negrino", "name": "Tom Negrino", "id_str":"6187302", "is_translator":false, "default_profile":false, "profile_use_background_image":true, "follow_request_sent":false, "following":false, "utc_offset":-28800, "profile_background_color":"EBEBEB", "contributors_enabled": false, "statuses_count":4889, "notifications":false, "profile_background_image_url": "http://a1.twimg.com/images/themes/theme7/bg.gif", "followers_count":489, "description":"Author of technology books, articles & occasional foamy rants. Mac guy. Broccoli is the Devil's Vegetable.", "profile_text_color":"333333", "listed_count":41, "profile_sidebar_fill_color":"F3F3F3", "id":6187302, "profile_background_tile":false, "location":"Healdsburg, CA", "lang":"en", "profile_link_color":"990000", "url":"http://www.backupbrain.com", "profile_image_url":"http://a2.twimg.com/profile_images/1205071991/TN-headshot_normal.jpg"
},
"created_at":"Tue Jun 07 18:11:00 +0000 2011", "id_str":"78162052518117376", "in_reply_to_user_id":null, "text":"Nomenclature change on Apple site: It was "Mac OS X Snow Leopard." Now it's "OS X Lion." Usually significant when stuff like this happens.", "truncated":false, "favorited":false, "in_reply_to_status_id_str":null, "id":78162052518117376, "in_reply_to_screen_name":null, "in_reply_to_status_id":null, "source":"u003Ca href="http://www.nambu.com/" rel="nofollow"u003ENambuu003C/au003E", "in_reply_to_user_id_str":null, "coordinates":null, "contributors":null, "place":null, "retweeted":false
},
{
"retweet_count":0, "geo":null,
"user":{
"default_profile_image":false, "profile_sidebar_border_color":"DFDFDF", "protected": false, "show_all_inline_media":false, "verified":false, "geo_enabled":true, "time_zone":"Pacific Time (US & Canada)", "favourites_count":1, "created_at":"Mon May 21 01:14:31 +0000 2007", "friends_count":49, "screen_name":"negrino", "name": "Tom Negrino", "id_str":"6187302", "is_translator":false, "default_profile":false, "profile_use_background_image":true, "follow_request_sent":false, "following":false, "utc_offset":-28800, "profile_background_color":"EBEBEB", "contributors_enabled": false, "statuses_count":4889, "notifications":false, "profile_background_image_url": "http://a1.twimg.com/images/themes/theme7/bg.gif", "followers_count":489, "description":"Author of technology books, articles & occasional foamy rants. Mac guy. Broccoli is the Devil's Vegetable.", "profile_text_color":"333333", "listed_count":41, "profile_sidebar_fill_color":"F3F3F3", "id":6187302, "profile_background_tile":false, "location":"Healdsburg, CA", "lang":"en", "profile_link_color":"990000", "url":"http://www.backupbrain.com", "profile_image_url":"http://a2.twimg.com/profile_images/1205071991/TN-headshot_normal.jpg"
},
"created_at":"Tue Jun 07 17:57:01 +0000 2011", "id_str":"78158535229317120", "in_reply_to_user_id":15868259, "text":"@npann @tedlandau Question: if the file system goes away (Steve was pretty explicit yesterday), do we lose control over our own data?", "truncated":false, "favorited":false, "in_reply_to_status_id_str":"78156242631135232", "id":78158535229317120, "in_reply_to_screen_name":"npann", "in_reply_to_status_id": 78156242631135232, "source":"u003Ca href="http://www.nambu.com/" rel="nofollow"u003ENambuu003C/au003E", "in_reply_to_user_id_str":"15868259", "coordinates":null, "contributors":null, "place":null, "retweeted":false
},
{
"retweet_count":0, "geo":null,
"user":{
"default_profile_image":false, "profile_sidebar_border_color":"DFDFDF", "protected": false, "show_all_inline_media":false, "verified":false, "geo_enabled":true, "time_zone":"Pacific Time (US & Canada)", "favourites_count":1, "created_at":"Mon May 21 01:14:31 +0000 2007", "friends_count":49, "screen_name":"negrino", "name": "Tom Negrino", "id_str":"6187302", "is_translator":false, "default_profile":false, "profile_use_background_image":true, "follow_request_sent":false, "following":false, "utc_offset":-28800, "profile_background_color":"EBEBEB", "contributors_enabled": false, "statuses_count":4889, "notifications":false, "profile_background_image_url": "http://a1.twimg.com/images/themes/theme7/bg.gif", "followers_count":489, "description":"Author of technology books, articles & occasional foamy rants. Mac guy. Broccoli is the Devil's Vegetable.", "profile_text_color":"333333", "listed_count":41, "profile_sidebar_fill_color":"F3F3F3", "id":6187302, "profile_background_tile":false, "location":"Healdsburg, CA", "lang":"en", "profile_link_color":"990000", "url":"http://www.backupbrain.com", "profile_image_url":"http://a2.twimg.com/profile_images/1205071991/TN-headshot_normal.jpg"
},
"created_at":"Tue Jun 07 17:45:14 +0000 2011", "id_str":"78155571475390464", "in_reply_to_user_id":11450572, "text":"@tedlandau @npann Dropbox is so part of my workflow now that it's not replaceable. It xfers files on adjacent machines, on the same network.", "truncated":false, "favorited":false, "in_reply_to_status_id_str":"78153263664463872", "id":78155571475390464, "in_reply_to_screen_name":"tedlandau", "in_reply_to_status_id": 78153263664463872, "source":"u003Ca href="http://www.nambu.com/" rel="nofollow"u003ENambuu003C/au003E", "in_reply_to_user_id_str":"11450572", "coordinates":null, "contributors":null, "place":null, "retweeted":false
}
]);
Using jQuery Plugins
As noted earlier, developers have created jQuery plugins to extend jQuery’s core functionality in many different directions. There are far too many plugins for us to discuss in this book, so we’ll use this one example to show off the power of jQuery plugins.
In this example, you’ll see how to use a jQuery plugin to implement a full-featured audio player that takes advantage of the HTML5 audio tag, with a Flash fallback for browsers that don’t support HTML5. When the page loads, there are just a couple of small buttons ![]() , but press Play and it expands to show all its features
, but press Play and it expands to show all its features ![]() .
.
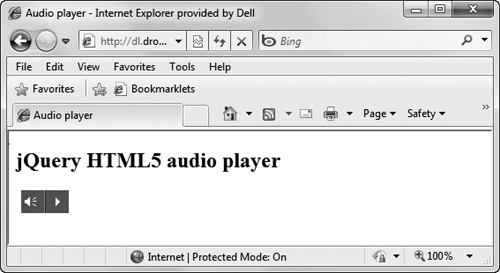
![]() This jQuery plugin creates an HTML5 audio player. When loaded, the controls are minimized.
This jQuery plugin creates an HTML5 audio player. When loaded, the controls are minimized.
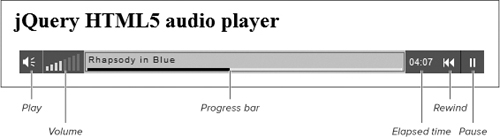
![]() Once you click the Play button and start playing the file, you get the familiar range of playback controls.
Once you click the Play button and start playing the file, you get the familiar range of playback controls.
Listing 16.12. On this HTML page, we’ve added a jQuery plugin that provides an HTML5 audio player.
<!DOCTYPE html>
<html>
<head>
<title>Audio player</title>
<link rel="stylesheet"href="script06.css"/>
<script src="http://ajax.googleapis.com/ajax/libs/jquery/1/jquery.js"></script>
<script src="mbPlayer/jquery.mb.miniPlayer.js"></script>
<script src="mbPlayer/jquery.jplayer.min.js"></script>
<script src="script06.js"></script>
</head>
<body>
<h2>jQuery HTML5 audio player</h2>
<div>
<a class="audio {ogg:'mbPlayer/Rhapsody_in_Blue.ogg'}" href="mbPlayer/Rhapsody_in_Blue.mp3">Rhapsody in Blue</a>
</div>
</body>
</html>
To add an audio player
1. <script src="mbPlayer/jquery.mb.miniPlayer.js"></script>
<script src="mbPlayer/jquery.jplayer.min.js"></script>
In Listing 16.12, these script tags bring in the two parts of the audio plugin, which we found at http://plugins.jquery.com/project/mbMiniAudioPlayer. This particular plugin is available as a free download, which, just like custom themes, then needs to be integrated into your site. That same download includes Listing 16.13, the CSS needed to style the player.
2. <a class="audio {ogg:'mbPlayer/Rhapsody_in_Blue.ogg'}" href="mbPlayer/Rhapsody_in_Blue.mp3">Rhapsody in Blue</a>
Following the directions (also included with the download) produces this link, which, when loaded, plays either the MP3 or Ogg versions of one of our favorite pieces.
Listing 16.13. The CSS in this file comes with the audio player plugin, and it styles the different parts of the audio player.
@font-face {
font-family: 'mb_audio_fontRegular'; src: url('mbPlayer/mbAudioFont/mb_audio_font.eot'),
src: local(',ò∫'), url('mbPlayer/mbAudioFont/mb_audio_font.woff')format('woff'), url('mbPlayer/mbAudioFont/mb_audio_font.ttf')format('truetype'), url('mbPlayer/mbAudioFont/mb_audio_font-webfont_svg#webfontywr4YLri')
format('svg'), font-weight: normal;
font-style: normal;
}
.mbMiniPlayer span {
font: 16px/20px "mb_audio_fontRegular","Webdings",sans-serif;
}
a.audio {
display: none;
}
.mbMiniPlayer table {
-moz-border-radius: 5px;
-webkit-border-radius: 8px;
border-radius: 5px;
margin: 5px;
}
.mbMiniPlayer.shadow table {
border: 1px solid white;
-moz-box-shadow: #ccc 0px 0px 5px;
-webkit-box-shadow: #ccc 0px 0px 5px;
box-shadow: #ccc 0px 0px 5px;
}
.mbMiniPlayer.black td {
margin: 0;
padding: 0;
}
.jp-progress {
position: relative;
background-color: #fff;
height: 8px;
margin: 2px;
margin-top: 0;
top: -2px;
-moz-box-sizing: border-box;
cursor: pointer;
}
.jp-load-bar {
background-color: #e9e6e6;
height: 6px;
-moz-box-sizing: border-box;
}
.jp-play-bar {
background-color: black;
background-image: -webkit-gradient(linear, 0% 0%, 0% 100%, from(#7D7D7D), to(#262626), color-stop(.6,#333));
height: 6px;
-moz-box-sizing: border-box;
}
.mbMiniPlayer td.controlsBar {
background-color: #ccc;
background-image: -webkit-gradient(linear, 0% 0%, 0% 100%, from(#DEDEDE), to(#FFF), color-stop(.6,#FFF));
margin: 0;
padding: 0;
cursor: default !important;
box-shadow: inset 1px 1px 2px #999;
-moz-box-shadow: inset 1px 1px 3px #999;
-webkit-box-shadow: inset 1px 1px 2px #999;
}
.mbMiniPlayer .controls {
margin: 1px;
display: none;
width: 1px;
border: 1px solid gray;
height: 100%;
-moz-box-sizing: border-box;
overflow: hidden;
white-space: nowrap;
}
.mbMiniPlayer span {
display: inline-block;
padding: 3px;
width: 20px;
height: 20px;
color: white;
text-align: center;
text-shadow: 1px -1px 1px #000;
background-image: -webkit-gradient(linear, 0% 5%, 85% 100%, from(transparent), to(rgba(100, 100, 100,0.5)));
}
.mbMiniPlayer span.title {
position: relative;
color: #333;
font:10px/12px sans-serif;
text-shadow: none !important;
letter-spacing: 1px;
width: 100%;
height: 8px;
top: -4px;
background: transparent !important;
text-align: left;
cursor: default !important;
}
.mbMiniPlayer span.rew {
width: 1px;
cursor: pointer;
}
.mbMiniPlayer span.volumeLevel a {
position: relative;
display: inline-block;
margin: 0;
margin-right: 2px;
width: 2px;
padding: 0;
background-color: white;
height: 0;
vertical-align: bottom;
opacity: .1;
cursor: pointer;
}
.mbMiniPlayer span.volumeLevel a.sel {
-moz-box-shadow: #000 0px 0px 1px;
-webkit-box-shadow: #000 0px 0px 1px;
box-shadow: #000 0px 0px 1px;
}
.mbMiniPlayer span.time {
width: 1px;
font: 11px/20px sans-serif;
overflow: hidden;
white-space: nowrap;
cursor: default !important;
text-shadow: 0 0 2px #999!important;
}
.mbMiniPlayer span.play {
-moz-border-radius: 0 5px 5px 0;
-webkit-border-top-right-radius: 5px;
-webkit-border-bottom-right-radius: 5px;
border-radius: 0 5px 5px 0;
cursor: pointer;
}
.mbMiniPlayer span.volume {
-moz-border-radius: 5px 0 0 5px;
-webkit-border-top-left-radius: 5px;
-webkit-border-bottom-left-radius: 5px;
border-radius: 5px 0 0 5px;
cursor: pointer;
}
.mbMiniPlayer.black span {
background-color: #666;
text-shadow: 1px -1px 1px #000;
}
.mbMiniPlayer.black span.play {
border-left: 1px solid #333;
}
.mbMiniPlayer.black span.volume {
border-right: 1px solid #999;
}
.mbMiniPlayer.black span.volume.mute {
color: #999;
}
3. $(".audio").mb_miniPlayer({
width: 360,
inLine: false,
showRew: true,
showTime: true
});
Here’s all the jQuery code we have to add—everything else that’s needed is handled for us by the plugin scripts. In this step, we set the player’s width to 360 pixels, we set inline to false (that is, it’s not part of the regular document flow), and we set the player to show both the Rewind button and the elapsed time.
Listing 16.14. The JavaScript file with the jQuery call to the audio player plugin is almost anticlimactic.
$(function(){
$(".audio").mb_miniPlayer({
   width: 360,
   inLine: false,
   showRew: true,
   showTime: true
});
});