3. Creating Dynamic Web Sites
Handling HTML Forms, Revisited 85
Creating Your Own Functions 95
With the fundamentals of PHP under your belt, it’s time to begin building truly dynamic Web sites. Dynamic Web sites, as opposed to the static ones on which the Web was first built, are easier to maintain, are more responsive to users, and can alter their content in response to differing situations. This chapter introduces three new ideas, all commonly used to create more sophisticated Web applications (Chapter 11, “Web Application Development,” covers another handful of topics along these same lines).
The first subject involves using external files. This is an important concept, as more complex sites often demand compartmentalizing some HTML or PHP code. Then the chapter returns to the subject of handling HTML forms. You’ll learn some new variations on this important and standard feature of dynamic Web sites. Finally, you’ll learn how to define and use your own functions.
Including Multiple Files
To this point, every script in the book has consisted of a single file that contains all of the required HTML and PHP code. But as you develop more complex Web sites, you’ll see that this approach is not often practical. A better way to create dynamic Web applications is to divide your scripts and Web sites into distinct parts, each part being stored in its own file. Frequently, you will use multiple files to extract the HTML from the PHP or to separate out commonly used processes.
PHP has four functions for incorporating external files: include( ), include_once( ), require( ), and require_once( ). To use them, your PHP script would have a line like
include_once('filename.php'),
require('/path/to/filename.html'),
Using any one of these functions has the end result of taking all the content of the included file and dropping it in the parent script (the one calling the function) at that juncture. An important consideration with included files is that PHP will treat the included code as HTML (i.e., send it directly to the browser) unless the file contains code within the PHP tags.
In terms of functionality, it also doesn’t matter what extension the included file uses, be it .php or .html. However, giving the file a symbolic name and extension helps to convey its purpose (e.g., an included file of HTML might use .inc.html). Also note that you can use either absolute or relative paths to the included file (see the sidebar for more).
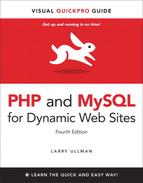
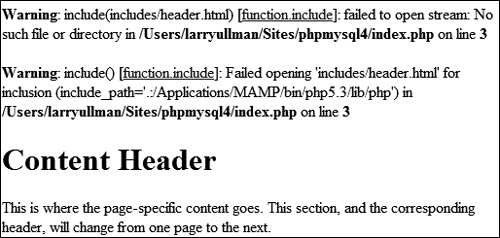
The include( ) and require( ) functions are exactly the same when working properly but behave differently when they fail. If an include( ) function doesn’t work (it cannot include the file for some reason), a warning will be printed to the Web browser ![]() , but the script will continue to run. If
, but the script will continue to run. If require( ) fails, an error is printed and the script is halted ![]() .
.
![]() One failed
One failed include( ) call generates these two error messages (assuming that PHP is configured to display errors), but the rest of the page continues to execute.
![]() The failure of a
The failure of a require( ) function call will print an error and terminate the execution of the script. If PHP is not configured to display errors, then the script will terminate without printing the problem first (i.e., it’d be a blank page).
Both functions also have a *_once( ) version, which guarantees that the file in question is included only once regardless of how many times a script may (presumably inadvertently) attempt to include it.
require_once('filename.php'),
include_once('filename.php'),
Because require_once( ) and include_once( ) require extra work from the PHP module (i.e., PHP must first check that the file has not already been included), it’s best not to use these two functions unless a redundant include is likely to occur (which can happen on complex sites).
In this next example, included files will separate the primary HTML formatting from any PHP code. Then, the rest of the examples in this chapter will be able to have the same appearance—as if they are all part of the same Web site—without the need to rewrite the common HTML every time. This technique creates a template system, an easy way to make large applications consistent and manageable. The focus in these examples is on the PHP code itself; you should also read the “Site Structure” sidebar so that you understand the organizational scheme on the server. If you have any questions about the CSS (Cascading Style Sheets) or (X)HTML used in the example, see a dedicated resource on those topics.
To include multiple files
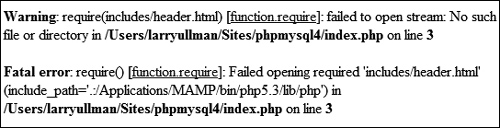
1. Design an HTML page in your text or WYSIWYG editor (Script 3.1 and ![]() ).
).
![]() The HTML and CSS design as it appears in the Web browser (without using any PHP).
The HTML and CSS design as it appears in the Web browser (without using any PHP).
To start creating a template for a Web site, design the layout like a standard HTML page, independent of any PHP code. For this chapter’s example, I’m using a slightly modified version of the “Plain and Simple” template created by Christopher Robinson (www.edg3.co.uk) and used with his kind permission.
2. Mark where any page-specific content goes.
Almost every Web site has several common elements on each page—header, navigation, advertising, footer, etc.—and one or more page-specific sections. In the HTML page (Script 3.1), enclose the section of the layout that will change from page to page within HTML comments to indicate its status.
Script 3.1. The HTML template for this chapter’s Web pages. Download the style.css file it uses from the book’s supporting Web site (www.LarryUllman.com).
1 <!DOCTYPE html PUBLIC "-//W3C//DTD XHTML 1.0 Strict//EN" "http://www.w3.org/TR/xhtml1/DTD/
xhtml1-strict.dtd">
2 <html xmlns="http://www.w3.org/1999/xhtml">
3 <head>
4 <title>Page Title</title>
5 <link rel="stylesheet" href="includes/style.css" type="text/css" media="screen" />
6 <meta http-equiv="content-type" content="text/html; charset=utf-8" />
7 </head>
8 <body>
9 <div id="header">
10 <h1>Your Website</h1>
11 <h2>catchy slogan...</h2>
12 </div>
13 <div id="navigation">
14 <ul>
15 <li><a href="index.php">Home Page</a></li>
16 <li><a href="calculator.php">Calculator</a></li>
17 <li><a href="#">link three</a></li>
18 <li><a href="#">link four</a></li>
19 <li><a href="#">link five</a></li>
20 </ul>
21 </div>
22 <div id="content"><!-- Start of the page-specific content. -->
23 <h1>Content Header</h1>
24
25 <p>This is where the page-specific content goes. This section, and the
corresponding header, will change from one page to the next.</p>
26
27 <p>Volutpat at varius sed sollicitudin et, arcu. Vivamus viverra. Nullam turpis.
Vestibulum sed etiam. Lorem ipsum sit amet dolore. Nulla facilisi. Sed tortor. Aenean felis.
Quisque eros. Cras lobortis commodo metus. Vestibulum vel purus. In eget odio in sapien
adipiscing blandit. Quisque augue tortor, facilisis sit amet, aliquam, suscipit vitae, cursus
sed, arcu lorem ipsum dolor sit amet.</p>
28
29 <!-- End of the page-specific content. --></div>
30
31 <div id="footer">
32 <p>Copyright © <a href="#">Plain and Simple</a> 2007 | Designed by
<a href="http://www.edg3.co.uk/">edg3.co.uk</a> | Sponsored by <a href="http://
www.opendesigns.org/">Open Designs</a> | Valid <a href="http://jigsaw.w3.org/
css-validator/">CSS</a> & <a href="http://validator.w3.org/">XHTML</a></p>
33 </div>
34 </body>
35 </html>
3. Copy everything from the first line of the layout’s HTML source to just before the page-specific content and paste it in a new document, to be named header.html (Script 3.2):
<!DOCTYPE html PUBLIC "-//W3C//DTD XHTML 1.0 Strict//EN" "http://www.w3.org/TR/xhtml1/DTD/xhtml1-strict.dtd">
<html xmlns="http://www.w3.org/1999/xhtml">
<head>
<title>Page Title</title>
<link rel="stylesheet" href="includes/style.css" type="text/css" media="screen" />
<meta http-equiv="content-type" content="text/html; charset=utf-8" />
</head>
<body>
<div id="header">
<h1>Your Website</h1>
<h2>catchy slogan...</h2>
</div>
<div id="navigation">
<ul>
<li><a href="index.php">Home Page</a></li>
<li><a href="calculator.php">Calculator</a></li>
<li><a href="#">link three</a></li>
<li><a href="#">link four</a></li>
<li><a href="#">link five</a></li>
</ul>
</div>
<div id="content"><!-- Start of the page-specific content. -->
<!-- Script 3.2 - header.html -->
Script 3.2. The initial HTML for each Web page is stored in a header file.
1 <!DOCTYPE html PUBLIC "-//W3C//DTD XHTML 1.0 Strict//EN" "http://www.w3.org/TR/xhtml1/DTD/
xhtml1-strict.dtd">
2 <html xmlns="http://www.w3.org/1999/xhtml">
3 <head>
4 <title><?php echo $page_title; ?></title>
5 <link rel="stylesheet" href="includes/style.css" type="text/css" media="screen" />
6 <meta http-equiv="content-type" content="text/html; charset=utf-8" />
7 </head>
8 <body>
9 <div id="header">
10 <h1>Your Website</h1>
11 <h2>catchy slogan...</h2>
12 </div>
13 <div id="navigation">
14 <ul>
15 <li><a href="index.php">Home Page</a></li>
16 <li><a href="calculator.php">Calculator</a></li>
17 <li><a href="#">link three</a></li>
18 <li><a href="#">link four</a></li>
19 <li><a href="#">link five</a></li>
20 </ul>
21 </div>
22 <div id="content"><!-- Start of the page-specific content. -->
23 <!-- Script 3.2 - header.html -->
This first file will contain the initial HTML tags (from DOCTYPE through the head and into the beginning of the page body). It also has the code that makes the Web site name and slogan, plus the horizontal bar of links across the top ![]() . Finally, as each page’s content goes within a
. Finally, as each page’s content goes within a DIV whose id value is content, this file includes that code as well.
4. Change the page’s title line to read:
<?php echo $page_title; ?>
The page title (which appears at the top of the Web browser ![]() ) should be changeable on a page-by-page basis. For that to be possible, this value will be based upon a PHP variable, which will then be printed out. You’ll see how this plays out shortly.
) should be changeable on a page-by-page basis. For that to be possible, this value will be based upon a PHP variable, which will then be printed out. You’ll see how this plays out shortly.
5. Save the file as header.html.
As stated already, included files can use just about any extension for the filename. This file is called header.html, indicating that it is the template’s header file and that it contains (primarily) HTML.
6. Copy everything in the original template from the end of the page-specific content to the end of the page and paste it in a new file, to be named footer.html (Script 3.3):
<!-- Script 3.3 - footer.html -->
<!-- End of the page-specific content. --></div>
<div id="footer">
<p>Copyright © <a href="#">Plain and Simple</a> 2007 | Designed by <a href="http://www.edg3.co.uk/">edg3.co.uk</a> | Sponsored by <a href="http://www.opendesigns.org/">Open Designs</a> | Valid <a href="http://jigsaw.w3.org/css-validator/">CSS</a> & <a href="http://validator.w3.org/">XHTML</a></p>
</div>
</body>
</html>
The footer file starts by closing the content DIV opened in the header file (see Step 3). Then the footer is added, which will be the same for every page on the site, and the HTML document itself is completed.
Script 3.3. The concluding HTML for each Web page is stored in this footer file.
1 <!-- Script 3.3 - footer.html -->
2 <!-- End of the page-specific content. --></div>
3
4 <div id="footer">
5 <p>Copyright © <a href="#">Plain and Simple</a> 2007 | Designed by <a href=
"http://www.edg3.co.uk/">edg3.co.uk</a> | Sponsored by <a href="http://www.opendesigns.
org/">Open Designs</a> | Valid <a href="http://jigsaw.w3.org/css-validator/">CSS</a>
& <a href="http://validator.w3.org/">XHTML</a></p>
6 </div>
7 </body>
8 </html>
7. Save the file as footer.html.
8. Begin a new PHP document in your text editor or IDE, to be named index.php (Script 3.4):
<?php # Script 3.4 - index.php
Since this script will use the included files for most of its HTML, it can begin and end with the PHP tags.
9. Set the $page_title variable and include the HTML header:
$page_title = 'Welcome to this Site!';
include ('includes/header.html'),
The $page_title variable will store the value that appears in the top of the browser window (and therefore, is also the default value when a person bookmarks the page). This variable is printed in header.html (see Script 3.2). By defining the variable prior to including the header file, the header file will have access to that variable. Remember that this include( ) line has the effect of dropping the contents of the included file into this page at this spot.
The include( ) function call uses a relative path to header.html (see the sidebar, “Absolute vs. Relative Paths”). The syntax states that in the same folder as this file is a folder called includes and in that folder is a file named header.html.
10. Close the PHP tags and add the page-specific content:
?>
<h1>Content Header</h1>
<p>This is where the page-specific content goes. This section, and the corresponding header, will change from one page to the next.</p>
For most pages, PHP will generate this content, instead of having static text. This information could be sent to the browser using echo, but since there’s no dynamic content here, it’s easier and more efficient to exit the PHP tags temporarily. (The script and the images have a bit of extra Latin than is shown here, just to fatten up the page.)
Script 3.4. This script generates a complete Web page by including a template stored in two external files.
1 <?php # Script 3.4 - index.php
2 $page_title = 'Welcome to this Site!';
3 include ('includes/header.html'),
4 ?>
5
6 <h1>Content Header</h1>
7
8 <p>This is where the page-specific content goes. This section, and the
corresponding header, will change from one page to the next.</p>
9
10 <p>Volutpat at varius sed sollicitudin et, arcu. Vivamus viverra. Nullam turpis.
Vestibulum sed etiam. Lorem ipsum sit amet dolore. Nulla facilisi. Sed tortor.
Aenean felis. Quisque eros. Cras lobortis commodo metus. Vestibulum vel purus.
In eget odio in sapien adipiscing blandit. Quisque augue tortor, facilisis sit
amet, aliquam, suscipit vitae, cursus sed, arcu lorem ipsum dolor sit amet.</p>
11
12 <?php
13 include ('includes/footer.html'),
14 ?>
11. Create a final PHP section and include the footer file:
<?php
include ('includes/footer.html'),
?>
12. Save the file as index.php, and place it in your Web directory.
13. Create an includes directory in the same folder as index.php. Then place header.html, footer.html, and style.css (part of the downloadable code at www.LarryUllman.com), into this includes directory.
Note: In order to save space, the CSS file for this example (which controls the layout) is not included in the book. You can download the file through the book’s supporting Web site or do without it (the template will still work, it just won’t look as nice).
14. Test the template system by going to the index.php page in your Web browser ![]() .
.

![]() Now the same layout
Now the same layout ![]() has been created using external files in PHP.
has been created using external files in PHP.
The index.php page is the key script in the template system. You do not need to access any of the included files directly, as index.php will take care of incorporating their contents. As this is a PHP page, you still need to access it through a URL.
15. If desired, view the HTML source of the page ![]() .
.
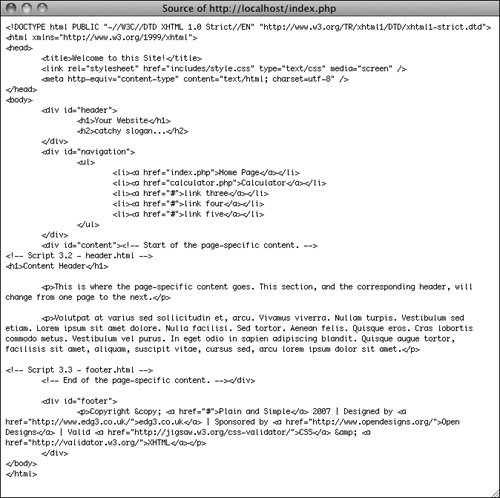
![]() The generated HTML source of the Web page should replicate the code in the original template (refer to Script 3.1).
The generated HTML source of the Web page should replicate the code in the original template (refer to Script 3.1).
In the php.ini configuration file, you can adjust the include_path setting, which dictates where PHP is and is not allowed to retrieve included files.
As you’ll see in Chapter 9, “Using PHP with MySQL,” any included file that contains sensitive information (like database access) should ideally be stored outside of the Web directory so it can’t be viewed within a Web browser.
Since require( ) has more impact on a script when it fails, it’s recommended for mission-critical includes (like those that connect to a database). The include( ) function would be used for less important inclusions.
If a block of PHP code contains only a single executable, it’s common to place both it and the PHP tags on a single line:
<?php include ('filename.html'), ?>
Because of the way CSS works, if you don’t use the CSS file or if the browser doesn’t read the CSS, the generated result is still functional, just not aesthetically as pleasing.
Handling HTML Forms, Revisited
A good portion of Chapter 2, “Programming with PHP,” involves handling HTML forms with PHP (which makes sense, as a good portion of Web programming with PHP is exactly that). All of those examples use two separate files: one that displays the form and another that receives its submitted data. While there’s certainly nothing wrong with this approach, there are advantages to putting the entire process into one script.
To have one page both display and handle a form, a conditional must check which action (display or handle) should be taken:
if (/* form has been submitted */) {
// Handle the form.
} else {
// Display the form.
}
The question, then, is how to determine if the form has been submitted. The answer is simple, after a bit of explanation.
When you have a form that uses the POST method and gets submitted back to the same page, two different types of requests will be made of that script ![]() . The first request, which loads the form, will be a GET request. This is the standard request made of most Web pages. When the form is submitted, a second request of the script will be made, this time a POST request (so long as the form uses the POST method). With this in mind, you can test for a form’s submission by checking the request method, found in the
. The first request, which loads the form, will be a GET request. This is the standard request made of most Web pages. When the form is submitted, a second request of the script will be made, this time a POST request (so long as the form uses the POST method). With this in mind, you can test for a form’s submission by checking the request method, found in the $_SERVER array:
if ($_SERVER['REQUEST_METHOD'] = = 'POST') {
// Handle the form.
} else {
// Display the form.
}
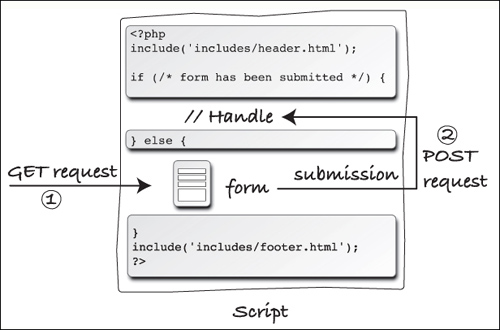
![]() The interactions between the user and this PHP script on the server involves the user making two requests of this script.
The interactions between the user and this PHP script on the server involves the user making two requests of this script.
If you want a page to handle a form and then display it again (e.g., to add a record to a database and then give an option to add another), drop the else clause:
if ($_SERVER['REQUEST_METHOD'] = = 'POST') {
// Handle the form.
}
// Display the form.
Using that code, a script will handle a form if it has been submitted and display the form every time the page is loaded.
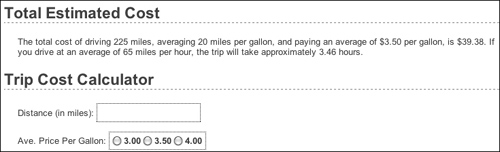
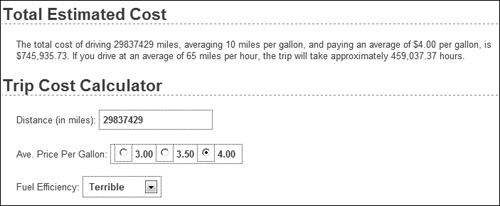
To demonstrate this important technique (of having the same page both display and handle a form), let’s create a calculator that estimates the cost and time required to take a car trip, based upon user-entered values ![]() .
.
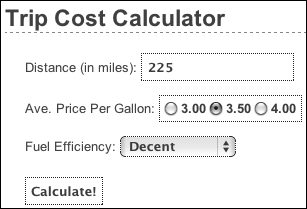
![]() The HTML form, completed by the user.
The HTML form, completed by the user.
To handle HTML forms
1. Begin a new PHP document in your text editor or IDE, to be named calculator.php (Script 3.5):
<?php # Script 3.5 - calculator.php
$page_title = 'Trip Cost Calculator';
include ('includes/header.html'),
This, and all the remaining examples in the chapter, will use the same template system as index.php (Script 3.4). The beginning syntax of each page will therefore be the same, but the page titles will differ.
2. Write the conditional that checks for a form submission:
if ($_SERVER['REQUEST_METHOD'] = = 'POST') {
As suggested already, checking if the page is being requested via the POST method is a good test for a form submission (so long as the form uses POST).
Script 3.5. The calculator.php script both displays a simple form and handles the form data: performing some calculations and reporting upon the results.
1 <?php # Script 3.5 - calculator.php
2
3 $page_title = 'Trip Cost Calculator';
4 include ('includes/header.html'),
5
6 // Check for form submission:
7 if ($_SERVER['REQUEST_METHOD'] = = 'POST') {
8
9 // Minimal form validation:
10 if (isset($_POST['distance'], $_POST['gallon_price'], $_POST['efficiency']) &&
11 is_numeric($_POST['distance']) && is_numeric($_POST['gallon_price'])
&& is_numeric($_POST ['efficiency']) ) {
12
13 // Calculate the results:
14 $gallons = $_POST['distance'] / $_POST['efficiency'];
15 $dollars = $gallons * $_POST['gallon_price'];
16 $hours = $_POST['distance']/65;
17
18 // Print the results:
19 echo '<h1>Total Estimated Cost</h1>
20 <p>The total cost of driving ' . $_POST['distance'] . ' miles, averaging ' . $_POST
['efficiency'] . ' miles per gallon, and paying an average of $' . $_POST['gallon_price'] . '
per gallon, is $' . number_format ($dollars, 2) . '. If you drive at an average of 65 miles
per hour, the trip will take approximately ' . number_format($hours, 2) . ' hours.</p>';
21
22 } else { // Invalid submitted values.
23 echo '<h1>Error!</h1>
24 <p class="error">Please enter a valid distance, price per gallon, and fuel efficiency.</p>';
25 }
26
27 } // End of main submission IF.
28
29 // Leave the PHP section and create the HTML form:
30 ?>
31
32 <h1>Trip Cost Calculator</h1>
33 <form action="calculator.php" method="post">
34 <p>Distance (in miles): <input type="text" name="distance" /></p>
35 <p>Ave. Price Per Gallon: <span class="input">
36 <input type="radio" name="gallon_price" value="3.00" /> 3.00
37 <input type="radio" name="gallon_price" value="3.50" /> 3.50
38 <input type="radio" name="gallon_price" value="4.00" /> 4.00
39 </span></p>
40 <p>Fuel Efficiency: <select name="efficiency">
41 <option value="10">Terrible</option>
42 <option value="20">Decent</option>
43 <option value="30">Very Good</option>
44 <option value="50">Outstanding</option>
45 </select></p>
46 <p><input type="submit" name="submit" value="Calculate!" /></p>
47 </form>
48
49 <?php include ('includes/footer.html'), ?>
if (isset($_POST['distance'], $_POST['gallon_price'], $_POST['efficiency']) &&
is_numeric($_POST['distance']) && is_numeric($_POST['gallon_price']) && is_numeric($_POST ['efficiency']) ) {
The validation here is very simple: it merely checks that three submitted variables are set and are all numeric types. You can certainly elaborate on this, perhaps checking that all values are positive (in fact, Chapter 13, “Security Methods,” has a variation on this script that does just that).
If the validation passes all of the tests, the calculations will be made; otherwise, the user will be asked to try again.
4. Perform the calculations:
$gallons = $_POST['distance'] / $_POST['efficiency'];
$dollars = $gallons * $_POST['gallon_price'];
$hours = $_POST['distance']/65;
The first line calculates the number of gallons of gasoline the trip will take, determined by dividing the distance by the fuel efficiency. The second line calculates the cost of the fuel for the trip, determined by multiplying the number of gallons times the average price per gallon. The third line calculates how long the trip will take, determined by dividing the distance by 65 (representing 65 miles per hour).
5. Print the results:
echo '<h1>Total Estimated Cost</h1>
<p>The total cost of driving ' . $_POST['distance'] . ' miles, averaging ' . $_POST['efficiency'] . ' miles per gallon, and paying an average of $' . $_POST['gallon_price'] . ' per gallon, is $' . number_format ($dollars, 2) . '. If you drive at an average of 65 miles per hour, the trip will take approximately ' . number_format($hours, 2) . ' hours.</p>';
All of the values are printed out, while formatting the cost and hours with the number_format( ) function. Using the concatenation operator (the period) allows the formatted numeric values to be appended to the printed message.
6. Complete the conditionals and close the PHP tag:
} else { // Invalid submitted values.
echo '<h1>Error!</h1>
<p class="error">Please enter a valid distance, price per gallon, and fuel efficiency.</p>';
}
} // End of main submission IF.
?>
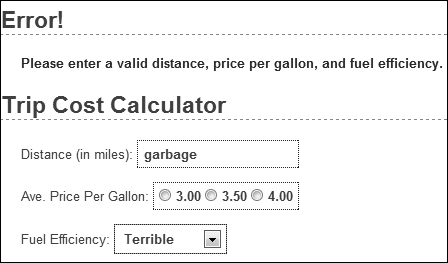
The else clause completes the validation conditional (Step 3), printing an error if the three submitted values aren’t all set and numeric ![]() . The final closing curly brace closes the
. The final closing curly brace closes the isset($_SERVER['REQUEST_METHOD'] = = 'POST') conditional. Finally, the PHP section is closed so that the form can be created without using echo (see Step 7).
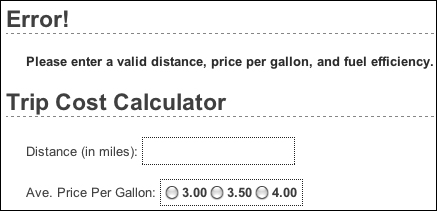
![]() If any of the submitted values is not both set and numeric, an error message is displayed.
If any of the submitted values is not both set and numeric, an error message is displayed.
7. Begin the HTML form:
<h1>Trip Cost Calculator</h1>
<form action="calculator.php" method="post">
<p>Distance (in miles): <input type="text" name="distance" /></p>
The form itself is fairly obvious, containing only one new trick: the action attribute uses this script’s name, so that the form submits back to this page instead of to another. The first element within the form is a text input, where the user can enter the distance of the trip.
8. Complete the form:
<p>Ave. Price Per Gallon: <span class="input">
<input type="radio" name="gallon_price" value="3.00" /> 3.00
<input type="radio" name="gallon_price" value="3.50" /> 3.50
<input type="radio" name="gallon_price" value="4.00" /> 4.00
</span></p>
<p>Fuel Efficiency: <select name="efficiency">
<option value="10">Terrible</option>
<option value="20">Decent</option>
<option value="30">Very Good</option>
<option value="50">Outstanding</option>
</select></p>
<p><input type="submit" name="submit" value="Calculate!" /></p>
</form>
The form uses radio buttons as a way to select the average price per gallon (the buttons are wrapped within span tags in order to format them similarly to the other form elements). For the fuel efficiency, the user can select from a drop-down menu of four options. A submit button completes the form.
9. Include the footer file:
<?php include ('includes/footer.html'), ?>
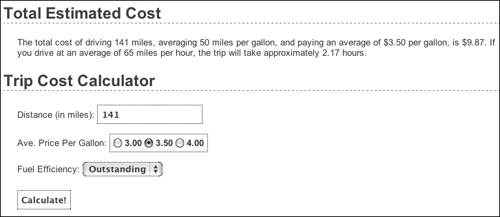
10. Save the file as calculator.php, place it in your Web directory, and test it in your Web browser ![]() .
.
![]() The page performs the calculations, reports on the results, and then redisplays the form.
The page performs the calculations, reports on the results, and then redisplays the form.
You can also have a form submit back to itself by using no value for the action attribute:
<form action="" method="post">
By doing so, the form will always submit back to this same page, even if you later change the name of the script.
Making Sticky Forms
A sticky form is simply a standard HTML form that remembers how you filled it out. This is a particularly nice feature for end users, especially if you are requiring them to resubmit a form after filling it out incorrectly in the first place (as in ![]() in the previous section).
in the previous section).
To preset what’s entered in a text input, use its value attribute:
<input type="text" name="city" value="Innsbruck" />
To have PHP preset that value, print the appropriate variable (this assumes that the referenced variable exists):
<input type="text" name="city" value="<?php echo $city; ?>" />
(This is also a nice example of the benefit of PHP’s HTML-embedded nature: you can place PHP code anywhere, including within HTML tags.)
To preset the status of radio buttons or check boxes (i.e., to pre-check them), add the code checked="checked" to their input tags. Using PHP, you might write:
<input type="radio" name="gender" value="F" <?php if ($gender = = 'F') {
echo 'checked="checked"';
} ?>/>
(As you can see, the syntax can quickly get complicated; you may find it easiest to create the form element and then add the PHP code as a second step.)
To preset the value of a textarea, print the value between the textarea tags:
<textarea name="comments" rows="10" cols="50"><?php echo $comments; ?></textarea>
Note that the textarea tag does not have a value attribute like the standard text input.
To preselect a pull-down menu, add selected="selected" to the appropriate option. This is really easy if you also use PHP to generate the menu:
echo '<select name="year">';
for ($y = 2011; $y <= 2021; $y+ +) {
echo "<option value="$y"";
if ($year = = $y) {
echo ' selected="selected"';
}
echo ">$y</option>
";
}
echo '</select>';
With this new information in mind, let’s rewrite calculator.php so that it’s sticky. Unlike the above examples, the existing values will be present in $_POST variables. Also, since it’s best not to refer to variables unless they exist, conditionals will check that a variable is set before printing its value.
To make a sticky form
1. Open calculator.php (refer to Script 3.5) in your text editor or IDE, if it is not already.
2. Change the distance input to read (Script 3.6):
<input type="text" name="distance" value="<?php if (isset($_POST['distance'])) echo $_POST['distance']; ?>" />
The first change is to add the value attribute to the input. Then, print out the value of the submitted distance variable ($_POST['distance']). Since the first time the page is loaded, $_POST['distance'] has no value, a conditional ensures that the variable is set before attempting to print it. The end result for setting the input’s value is the PHP code
<?php
if (isset($_POST['distance'])) {
echo $_POST['distance'];
}
?>
This can be condensed to the more minimal form used in the script (you can omit the curly braces if you have only one statement within a conditional block, although I very rarely recommend that you do so).
Script 3.6. The calculator’s form now recalls the previously entered and selected values (creating a sticky form).
1 <?php # Script 3.6 - calculator.php #2
2
3 $page_title = 'Trip Cost Calculator';
4 include ('includes/header.html'),
5
6 // Check for form submission:
7 if ($_SERVER['REQUEST_METHOD'] = = 'POST') {
8
9 // Minimal form validation:
10 if (isset($_POST['distance'], $_POST['gallon_price'], $_POST['efficiency']) &&
11 is_numeric($_POST['distance']) && is_numeric($_POST['gallon_price']) && is_numeric($_POST
['efficiency']) ) {
12
13 // Calculate the results:
14 $gallons = $_POST['distance'] / $_POST['efficiency'];
15 $dollars = $gallons * $_POST['gallon_price'];
16 $hours = $_POST['distance']/65;
17
18 // Print the results:
19 echo '<h1>Total Estimated Cost</h1>
20 <p>The total cost of driving ' . $_POST['distance'] . ' miles, averaging ' . $_POST
['efficiency'] . ' miles per gallon, and paying an average of $' . $_POST['gallon_price'] . '
per gallon, is $' . number_format ($dollars, 2) . '. If you drive at an average of 65 miles
per hour, the trip will take approximately ' . number_format($hours, 2) . ' hours.</p>';
21
22 } else { // Invalid submitted values.
23 echo '<h1>Error!</h1>
24 <p class="error">Please enter a valid distance, price per gallon, and fuel efficiency.</p>';
25 }
26
27 } // End of main submission IF.
28
29 // Leave the PHP section and create the HTML form:
30 ?>
31
32 <h1>Trip Cost Calculator</h1>
33 <form action="calculator.php" method="post">
34 <p>Distance (in miles): <input type="text" name="distance" value="<?php if
(isset($_POST['distance'])) echo $_POST['distance']; ?>" /></p>
35 <p>Ave. Price Per Gallon: <span class="input">
36 <input type="radio" name="gallon_price" value="3.00" <?php if (isset($_POST
['gallon_price']) && ($_POST['gallon_price'] = = '3.00')) echo 'checked="checked"
'; ?>/> 3.00
37 <input type="radio" name="gallon_price" value="3.50" <?php if (isset($_POST
['gallon_price']) && ($_POST['gallon_price'] = = '3.50')) echo 'checked="checked"
'; ?>/> 3.50
38 <input type="radio" name="gallon_price" value="4.00" <?php if (isset($_POST
['gallon_price']) && ($_POST['gallon_price'] = = '4.00')) echo 'checked="checked"
'; ?>/> 4.00
39 </span></p>
40 <p>Fuel Efficiency: <select name="efficiency">
41 <option value="10"<?php if (isset($_POST['efficiency']) && ($_POST['efficiency']
= = '10')) echo ' selected="selected"'; ?>>Terrible</option>
42 <option value="20"<?php if (isset($_POST['efficiency']) && ($_POST['efficiency']
= = '20')) echo ' selected="selected"'; ?>>Decent</option>
43 <option value="30"<?php if (isset($_POST['efficiency']) && ($_POST['efficiency']
= = '30')) echo ' selected="selected"'; ?>>Very Good</option>
44 <option value="50"<?php if (isset($_POST['efficiency']) && ($_POST['efficiency']
= = '50')) echo ' selected="selected"'; ?>>Outstanding</option>
45 </select></p>
46 <p><input type="submit" name="submit" value="Calculate!" /></p>
47 </form>
48
49 <?php include ('includes/footer.html'), ?>
3. Change the radio buttons to:
<input type="radio" name="gallon_price" value="3.00" <?php if (isset($_POST['gallon_price']) && ($_POST['gallon_price'] = = '3.00')) echo 'checked="checked" '; ?>/> 3.00 <input type="radio" name="gallon_price" value="3.50" <?php if (isset($_POST['gallon_price']) && ($_POST['gallon_price'] = = '3.50')) echo 'checked="checked" '; ?>/> 3.50 <input type="radio" name="gallon_price" value="4.00" <?php if (isset ($_POST['gallon_price']) && ($_POST['gallon_price'] = = '4.00')) echo 'checked="checked" '; ?>/> 4.00
For each of the three radio buttons, the following code must be added within the input tag:
<?php if (isset($_POST['gallon_price']) && ($_POST['gallon_price'] = = 'XXX')) echo 'checked="checked" '; ?>
For each button, the comparison value (XXX) gets changed accordingly.
4. Change the select menu options to:
<option value="10"<?php if (isset($_POST['efficiency']) && ($_POST['efficiency'] = = '10')) echo ' selected="selected"'; ?>>Terrible</option>
<option value="20"<?php if (isset($_POST['efficiency']) && ($_POST['efficiency'] = = '20')) echo ' selected="selected"'; ?>>Decent</option>
<option value="30"<?php if (isset($_POST['efficiency']) && ($_POST['efficiency'] = = '30')) echo ' selected="selected"'; ?>>Very Good</option>
<option value="50"<?php if (isset($_POST['efficiency']) && ($_POST['efficiency'] = = '50')) echo ' selected="selected"'; ?>>Outstanding</option>
For each option, within the opening option tag, the following code is added:
<?php if (isset($_POST['efficiency']) && ($_POST['efficiency'] = = 'XX')) echo ' selected="selected"'; ?>
Again, just the specific comparison value (XX) must be changed to match each option.
5. Save the file as calculator.php, place it in your Web directory, and test it in your Web browser ![]() and
and ![]() .
.

![]() The form now recalls the previously submitted values...
The form now recalls the previously submitted values...
![]() ...whether or not the form was completely filled out.
...whether or not the form was completely filled out.
Because the price per gallon and fuel efficiency values are numeric, you can quote or not quote the comparison values within the added conditionals. I choose to quote them, because they’re technically strings with numeric values.
Because the added PHP code in this example exists inside of the HTML form element tags, error messages may not be obvious. If problems occur, check the HTML source of the page to see if PHP errors are printed within the value attributes and the tags themselves.
You should always double-quote HTML attributes, particularly the value attribute of a text input. If you don’t, multiword values like Elliott Smith will appear as just Elliott in the Web browser.
Some Web browsers will also remember values entered into forms for you; this is a separate but potentially overlapping issue from using PHP to accomplish this.
Creating Your Own Functions
PHP has a lot of built-in functions, addressing almost every need you might have. More importantly, though, PHP has the capability for you to define and use your own functions for whatever purpose. The syntax for making your own function is
function function_name ( ) {
// Function code.
}
The name of your function can be any combination of letters, numbers, and the underscore, but it must begin with either a letter or the underscore. You also cannot use an existing function name for your function (print, echo, isset, and so on). One perfectly valid function definition is
function do_nothing( ) {
// Do nothing.
}
In PHP, as mentioned in the first chapter, function names are case-insensitive (unlike variable names), so you could call that function using do_Nothing( ) or DO_NOTHING( ) or Do_Nothing( ), etc., but not donothing( ) or DoNothing( ).
The code within the function can do nearly anything, from generating HTML to performing calculations to calling other functions.
The most common reasons to create your own functions are:
• To associate repeated code with one function call.
• To separate out sensitive or complicated processes from other code.
• To make common code bits easier to reuse.
This chapter runs through a couple of examples and you’ll see some others throughout the rest of the book. For this first example, a function will be defined that outputs the HTML code for generating theoretical ads. This function will then be called twice on the home page ![]() .
.

![]() The two “ads” are generated by calling the same user-defined function.
The two “ads” are generated by calling the same user-defined function.
To create your own function
1. Open index.php (Script 3.4) in your text editor or IDE.
2. After the opening PHP tag, begin defining a new function (Script 3.7):
function create_ad( ) {
The function to be written here would, in theory, generate the HTML required to add ads to a Web page. The function’s name clearly states its purpose.
Although not required, it’s conventional to place a function definition near the very top of a script or in a separate file.
3. Generate the HTML:
echo '<p class="ad">This is an annoying ad! This is an annoying ad! This is an annoying ad! This is an annoying ad!</p>';
Script 3.7. This version of the home page has a user-defined function that outputs a theoretical ad. The function is called twice in the script, creating two ads.
1 <?php # Script 3.7 - index.php #2
2
3 // This function outputs theoretical HTML
4 // for adding ads to a Web page.
5 function create_ad( ) {
6 echo '<p class="ad">This is an annoying ad! This is an annoying ad! This is an
annoying ad! This is an annoying ad!</p>';
7 } // End of the function definition.
8
9 $page_title = 'Welcome to this Site!';
10 include ('includes/header.html'),
11
12 // Call the function:
13 create_ad( );
14 ?>
15
16 <h1>Content Header</h1>
17
18 <p>This is where the page-specific content goes. This section, and the
corresponding header, will change from one page to the next.</p>
19
20 <p>Volutpat at varius sed sollicitudin et, arcu. Vivamus viverra. Nullam turpis.
Vestibulum sed etiam. Lorem ipsum sit amet dolore. Nulla facilisi. Sed tortor.
Aenean felis. Quisque eros. Cras lobortis commodo metus. Vestibulum vel purus.
In eget odio in sapien adipiscing blandit. Quisque augue tortor, facilisis sit
amet, aliquam, suscipit vitae, cursus sed, arcu lorem ipsum dolor sit amet.</p>
21
22 <?php
23
24 // Call the function again:
25 create_ad( );
26
27 include ('includes/footer.html'),
28 ?>
In a real function, the code would output actual HTML instead of a paragraph of text. (The actual HTML would be provided by the service you’re using to generate and tracks ads.)
4. Close the function definition:
} // End of the function
definition.
It’s helpful to place a comment at the end of a function definition so that you know where a definition starts and stops (it’s helpful on longer function definitions, at least).
5. After including the header and before exiting the PHP block, call the function:
create_ad( );
The call to the create_ad( ) function will have the end result of inserting the function’s output at this point in the script.
6. Just before including the footer, call the function again:
create_ad( );
7. Save the file and test it in your Web browser ![]() .
.
If you ever see a call to undefined function function_name error, this means that you are calling a function that hasn’t been defined. This can happen if you misspell the function’s name (either when defining or calling it) or if you fail to include the file where the function is defined.
Because a user-defined function takes up some memory, you should be prudent about when to use one. As a general rule, functions are best used for chunks of code that may be executed in several places in a script or Web site.
Creating a function that takes arguments
Just like PHP’s built-in functions, those you write can take arguments (also called parameters). For example, the strlen( ) function takes as an argument the string whose character length will be determined.
A function can take any number of arguments, but the order in which you list them is critical. To allow for arguments, add variables to a function’s definition:
function print_hello ($first, $last) {
// Function code.
}
The variable names you use for your arguments are irrelevant to the rest of the script (more on this in the “Variable Scope” sidebar toward the end of this chapter), but try to use valid, meaningful names.
Once the function is defined, you can then call it as you would any other function in PHP, sending literal values or variables to it:
print_hello ('Jimmy', 'Stewart'),
$surname = 'Stewart';
print_hello ('Jimmy', $surname);
As with any function in PHP, failure to send the right number of arguments results in an error ![]() .
.
![]()
![]() Failure to send a function the proper number (and sometimes type) of arguments creates an error.
Failure to send a function the proper number (and sometimes type) of arguments creates an error.
To demonstrate this concept, let’s rewrite the calculator form so that a user-defined function creates the price-per-gallon radio buttons. Doing so will help to clean up the messy form code.
To define functions that take arguments
1. Open calculator.php (Script 3.6) in your text editor or IDE.
2. After the initial PHP tag, start defining the create_gallon_radio( ) function (Script 3.8):
function create_gallon_radio ($value) {
The function will create code like this:
<input type="radio" name="gallon_price" value="XXX" checked="checked" /> XXX
or:
<input type="radio" name="gallon_price" value="XXX" /> XXX
In order to be able to dynamically set the value of each radio button, that value must be passed to the function with each call. Therefore, that’s the one argument the function takes.
Notice that the variable used as an argument is not $_POST['gallon_price']. The function’s argument variable is particular to this function and has its own name.
Script 3.8. The calculator.php form now uses a function to create the radio buttons. Unlike the create_ad( ) user-defined function, this one takes an argument.
1 <?php # Script 3.8 - calculator.php #3
2
3 // This function creates a radio button.
4 // The function takes one argument: the value.
5 // The function also makes the button "sticky".
6 function create_gallon_radio($value) {
7
8 // Start the element:
9 echo '<input type="radio" name="gallon_price" value="' . $value . '"';
10
11 // Check for stickiness:
12 if (isset($_POST['gallon_price']) && ($_POST['gallon_price'] = = $value)) {
13 echo ' checked="checked"';
14 }
15
16 // Complete the element:
17 echo " /> $value ";
18
19 } // End of create_gallon_radio( ) function.
20
21 $page_title = 'Trip Cost Calculator';
22 include ('includes/header.html'),
23
24 // Check for form submission:
25 if ($_SERVER['REQUEST_METHOD'] = = 'POST') {
26
27 // Minimal form validation:
28 if (isset($_POST['distance'], $_POST['gallon_price'], $_POST['efficiency']) &&
29 is_numeric($_POST['distance']) && is_numeric($_POST['gallon_price']) &&
is_numeric($_POST['efficiency']) ) {
30
31 // Calculate the results:
32 $gallons = $_POST['distance'] / $_POST['efficiency'];
33 $dollars = $gallons * $_POST['gallon_price'];
34 $hours = $_POST['distance']/65;
35
36 // Print the results:
37 echo '<h1>Total Estimated Cost</h1>
38 <p>The total cost of driving ' . $_POST['distance'] . ' miles, averaging
' . $_POST['efficiency'] . ' miles per gallon, and paying an average of $' .
$_POST['gallon_price'] . ' per gallon, is $' . number_format ($dollars, 2) . '.
If you drive at an average of 65 miles per hour, the trip will take
approximately ' . number_format($hours, 2) . ' hours.</p>';
39
40 } else { // Invalid submitted values.
41 echo '<h1>Error!</h1>
42 <p class="error">Please enter a valid distance, price per gallon, and fuel
efficiency.</p>';
43 }
44
45 } // End of main submission IF.
46
47 // Leave the PHP section and create the HTML form:
48 ?>
49
50 <h1>Trip Cost Calculator</h1>
51 <form action="calculator.php" method="post">
52 <p>Distance (in miles): <input type="text" name="distance" value="<?php if
(isset($_POST['distance'])) echo $_POST['distance']; ?>" /></p>
53 <p>Ave. Price Per Gallon: <span class="input">
54 <?php
55 create_gallon_radio('3.00'),
56 create_gallon_radio('3.50'),
57 create_gallon_radio('4.00'),
58 ?>
59 </span></p>
60 <p>Fuel Efficiency:
61 <select name="efficiency">
62 <option value="10"<?php if (isset($_POST['efficiency']) && ($_POST['efficiency']
= = '10')) echo ' selected="selected"'; ?>>Terrible</option>
63 <option value="20"<?php if (isset($_POST['efficiency']) && ($_POST['efficiency']
= = '20')) echo ' selected="selected"'; ?>>Decent</option>
64 <option value="30"<?php if (isset($_POST['efficiency']) && ($_POST['efficiency']
= = '30')) echo ' selected="selected"'; ?>>Very Good</option>
65 <option value="50"<?php if (isset($_POST['efficiency']) && ($_POST['efficiency']
= = '50')) echo ' selected="selected"'; ?>>Outstanding</option>
66 </select></p>
67 <p><input type="submit" name="submit" value="Calculate!" /></p>
68 </form>
69
70 <?php include ('includes/footer.html'), ?>
3. Begin creating the radio button element:
echo '<input type="radio" name="gallon_price" value="' . $value . '"';
This code starts the HTML for the radio button, including its value attribute, but does not complete the radio button so that “stickiness” can be addressed next. The value for the input comes from the function argument.
4. Make the input “sticky”, if appropriate:
if (isset($_POST['gallon_price']) && ($_POST['gallon_price'] = = $value)) {
echo ' checked="checked"';
}
This code is similar to that in the original form, except now the comparison value comes from the function’s argument.
5. Complete the form element and the function:
echo " /> $value ";
} // End of create_gallon_radio( ) function.
Finally, the input tag is closed and the value is displayed afterwards, with a space on either side.
6. Replace the hard-coded radio buttons in the form with three function calls:
<?php
create_gallon_radio('3.00'),
create_gallon_radio('3.50'),
create_gallon_radio('4.00'),
?>
To create the three buttons, just call the function three times, passing different values for each. The numeric values are quoted here or else PHP would drop the trailing zeros.
7. Save the file as calculator.php, place it in your Web directory, and test it in your Web browser ![]() .
.

![]() Although a user-defined function is used to create the radio buttons (see Script 3.8), the end result is no different to the user.
Although a user-defined function is used to create the radio buttons (see Script 3.8), the end result is no different to the user.
Setting default argument values
Another variant on defining your own functions is to preset an argument’s value. To do so, assign the argument a value in the function’s definition:
function greet ($name, $msg = 'Hello') {
echo "$msg, $name!";
}
The end result of setting a default argument value is that that particular argument becomes optional when calling the function. If a value is passed to it, the passed value is used; otherwise, the default value is used.
You can set default values for as many of the arguments as you want, as long as those arguments come last in the function definition. In other words, the required arguments must always be listed first.
With the example function just defined, any of these will work:
greet ($surname, $message);
greet ('Zoe'),
greet ('Sam', 'Good evening'),
However, just greet( ) will not work. Also, there’s no way to pass $msg a value without passing one to $name as well (argument values must be passed in order, and you can’t skip a required argument).
To take advantage of default argument values, let’s make a better version of the create_gallon_radio( ) function. As originally written, the function only creates radio buttons with a name of gallon_price. It’d be better if the function could be used multiple times in a form, for multiple radio button groupings (although the function won’t be used like that in this script).
To set default argument values
1. Open calculator.php (refer to Script 3.8) in your text editor or IDE, if it is not already.
2. Change the function definition line (line 6) so that it takes a second, optional argument (Script 3.9):
function create_radio($value, $name = 'gallon_price') {
Script 3.9. The redefined function now assumes a set radio button name unless one is specified when the function is called.
1 <?php # Script 3.9 - calculator.php #4
2
3 // This function creates a radio button.
4 // The function takes two arguments: the value and the name.
5 // The function also makes the button "sticky".
6 function create_radio($value, $name = 'gallon_price') {
7
8 // Start the element:
9 echo '<input type="radio" name="' . $name .'" value="' . $value . '"';
10
11 // Check for stickiness:
12 if (isset($_POST[$name]) && ($_POST[$name] = = $value)) {
13 echo ' checked="checked"';
14 }
15
16 // Complete the element:
17 echo " /> $value ";
18
19 } // End of create_radio( ) function.
20
21 $page_title = 'Trip Cost Calculator';
22 include ('includes/header.html'),
23
24 // Check for form submission:
25 if ($_SERVER['REQUEST_METHOD'] = = 'POST') {
26
27 // Minimal form validation:
28 if (isset($_POST['distance'], $_POST['gallon_price'], $_POST['efficiency']) &&
29 is_numeric($_POST['distance']) && is_numeric($_POST['gallon_price']) && is_numeric($_POST
['efficiency']) ) {
30
31 // Calculate the results:
32 $gallons = $_POST['distance'] / $_POST['efficiency'];
33 $dollars = $gallons * $_POST['gallon_price'];
34 $hours = $_POST['distance']/65;
35
36 // Print the results:
37 echo '<h1>Total Estimated Cost</h1>
38 <p>The total cost of driving ' . $_POST['distance'] . ' miles, averaging ' . $_POST
['efficiency'] . ' miles per gallon, and paying an average of $' . $_POST['gallon_price']
. ' per gallon, is $' . number_format ($dollars, 2) . '. If you drive at an average of
65 miles per hour, the trip will take approximately ' . number_format($hours, 2) . '
hours.</p>';
39
40 } else { // Invalid submitted values.
41 echo '<h1>Error!</h1>
42 <p class="error">Please enter a valid distance, price per gallon, and fuel
efficiency.</p>';
43 }
44
45 } // End of main submission IF.
46
47 // Leave the PHP section and create the HTML form:
48 ?>
49
50 <h1>Trip Cost Calculator</h1>
51 <form action="calculator.php" method="post">
52 <p>Distance (in miles): <input type="text" name="distance" value="<?php if (isset($_POST
['distance'])) echo $_POST['distance']; ?>" /></p>
53 <p>Ave. Price Per Gallon: <span class="input">
54 <?php
55 create_radio('3.00'),
56 create_radio('3.50'),
57 create_radio('4.00'),
58 ?>
59 </span></p>
60 <p>Fuel Efficiency: <select name="efficiency">
61 <option value="10"<?php if (isset($_POST['efficiency']) && ($_POST['efficiency'] = = '10'))
echo ' selected="selected"'; ?>>Terrible</option>
62 <option value="20"<?php if (isset($_POST['efficiency']) && ($_POST['efficiency'] = = '20'))
echo ' selected="selected"'; ?>>Decent</option>
63 <option value="30"<?php if (isset($_POST['efficiency']) && ($_POST['efficiency'] = = '30'))
echo ' selected="selected"'; ?>>Very Good</option>
64 <option value="50"<?php if (isset($_POST['efficiency']) && ($_POST['efficiency'] = = '50'))
echo ' selected="selected"'; ?>>Outstanding</option>
65 </select></p>
66 <p><input type="submit" name="submit" value="Calculate!" /></p>
67 </form>
68
69 <?php include ('includes/footer.html'), ?>
There are two changes here. First, the name of the function is changed to be reflective of its more generic nature. Second, the function now takes a second argument, $name, although that argument has a default value, which makes that argument optional when the function is called.
3. Change the function definition so that it uses the $name argument in lieu of gallon_price:
echo '<input type="radio" name="'
. $name .'" value="' . $value .
'"';
if (isset($_POST[$name]) && ($_
POST[$name] = = $value)) {
echo ' checked="checked"';
}
Three changes are necessary. First, $name is used for the name attribute of the element. Second, the conditional that checks for “stickiness” now uses $_POST[$name] twice instead of $_POST['gallon_price'].
4. Change the function call lines:
create_radio('3.00'),
create_radio('3.50'),
create_radio('4.00'),
The function calls must be changed to use the new function name. But because the second argument has a default value, it can be omitted in these calls. The end result is the same as executing this call—
create_radio('4.00', 'gallon_price'),
—but now the function could be used to create other radio buttons as well.
5. Save the file, place it in your Web directory, and test it in your Web browser ![]() .
.
![]() The addition of the second, optional argument, has not affected the functionality of the function.
The addition of the second, optional argument, has not affected the functionality of the function.
In the PHP manual, square brackets ([ ]) are used to indicate a function’s optional parameters ![]() .
.
![]() The PHP manual’s description of the
The PHP manual’s description of the number_format( ) function shows that only the first argument is required.
Returning values from a function
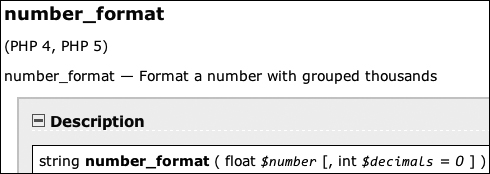
The final attribute of a user-defined function to discuss is that of returning values. Some, but not all, functions do this. For example, print will return either a 1 or a 0 indicating its success, whereas echo will not. As another example, the number_format( ) function returns a string, which is the formatted version of a number (see ![]() in the previous section).
in the previous section).
To have a function return a value, use the return statement. This function might return the astrological sign for a given birth month and day:
function find_sign ($month, $day) {
// Function code.
return $sign;
}
A function can return a literal value (say a string or a number) or the value of a variable that has been determined within the function.
When calling a function that returns a value, you can assign the function result to a variable:
$my_sign = find_sign ('October', 23);
or use it as an argument when calling another function:
echo find_sign ('October', 23);
Let’s update the calculator.php script so that it uses a function to determine the cost of the trip.
To have a function return a value
1. Open calculator.php (refer to Script 3.9) in your text editor or IDE, if it is not already.
2. After the first function definition, begin defining a second function (Script 3.10):
function calculate_trip_cost ($miles, $mpg, $ppg) {
The calculate_trip_cost( ) function takes three arguments: the distance to be travelled, the average miles per gallon, and the average price per gallon.
Script 3.10. Another user-defined function is added to the script. It performs the main calculation and returns the result.
1 <?php # Script 3.10 - calculator.php #5
2
3 // This function creates a radio button.
4 // The function takes two arguments: the value and the name.
5 // The function also makes the button "sticky".
6 function create_radio($value, $name = 'gallon_price') {
7
8 // Start the element:
9 echo '<input type="radio" name="' . $name .'" value="' . $value . '"';
10
11 // Check for stickiness:
12 if (isset($_POST[$name]) && ($_POST[$name] = = $value)) {
13 echo ' checked="checked"';
14 }
15
16 // Complete the element:
17 echo " /> $value ";
18
19 } // End of create_radio( ) function.
20
21 // This function calculates the cost of the trip.
22 // The function takes three arguments: the distance, the fuel efficiency, and the price
per gallon.
23 // The function returns the total cost.
24 function calculate_trip_cost($miles, $mpg, $ppg) {
25
26 // Get the number of gallons:
27 $gallons = $miles/$mpg;
28
29 // Get the cost of those gallons:
30 $dollars = $gallons/$ppg;
31
32 // Return the formatted cost:
33 return number_format($dollars, 2);
34
35 } // End of calculate_trip_cost( ) function.
36
37 $page_title = 'Trip Cost Calculator';
38 include ('includes/header.html'),
39
40 // Check for form submission:
41 if ($_SERVER['REQUEST_METHOD'] = = 'POST') {
42
43 // Minimal form validation:
44 if (isset($_POST['distance'], $_POST['gallon_price'], $_POST['efficiency']) &&
45 is_numeric($_POST['distance']) && is_numeric($_POST['gallon_price'])
&& is_numeric($_POST['efficiency']) ) {
46
47 // Calculate the results:
48 $cost = calculate_trip_cost($_POST['distance'], $_POST['efficiency'],
$_POST['gallon_price']);
49 $hours = $_POST['distance']/65;
50
51 // Print the results:
52 echo '<h1>Total Estimated Cost</h1>
53 <p>The total cost of driving ' . $_POST['distance'] . ' miles, averaging ' .
$_POST['efficiency'] . ' miles per gallon, and paying an average of $' . $_POST
['gallon_price'] . ' per gallon, is $' . $cost . '. If you drive at an average of
65 miles per hour, the trip will take approximately ' . number_format($hours, 2)
. ' hours.</p>';
54
55 } else { // Invalid submitted values.
56 echo '<h1>Error!</h1>
57 <p class="error">Please enter a valid distance, price per gallon, and fuel
efficiency.</p>';
58 }
59
60 } // End of main submission IF.
61
62 // Leave the PHP section and create the HTML form:
63 ?>
64
65 <h1>Trip Cost Calculator</h1>
66 <form action="calculator.php" method="post">
67 <p>Distance (in miles): <input type="text" name="distance" value="<?php if (isset($_POST
['distance'])) echo $_POST['distance']; ?>" /></p>
68 <p>Ave. Price Per Gallon: <span class="input">
69 <?php
70 create_radio('3.00'),
71 create_radio('3.50'),
72 create_radio('4.00'),
73 ?>
74 </span></p>
75 <p>Fuel Efficiency: <select name="efficiency">
76 <option value="10"<?php if (isset($_POST['efficiency']) && ($_POST['efficiency'] = =
'10')) echo ' selected="selected"'; ?>>Terrible</option>
77 <option value="20"<?php if (isset($_POST['efficiency']) && ($_POST['efficiency'] = =
'20')) echo ' selected="selected"'; ?>>Decent</option>
78 <option value="30"<?php if (isset($_POST['efficiency']) && ($_POST['efficiency'] = =
'30')) echo ' selected="selected"'; ?>>Very Good</option>
79 <option value="50"<?php if (isset($_POST['efficiency']) && ($_POST['efficiency'] = =
'50')) echo ' selected="selected"'; ?>>Outstanding</option>
80 </select></p>
81 <p><input type="submit" name="submit" value="Calculate!" /></p>
82 </form>
83
84 <?php include ('includes/footer.html'), ?>
3. Perform the calculations and return the formatted cost:
$gallons = $miles/$mpg;
$dollars = $gallons/$ppg;
return number_format($dollars, 2);
} // End of calculate_trip_cost( )function.
The first two lines are the same calculations as the script used before, but now they use function variables. The last thing the function does is return a formatted version of the calculated cost.
4. Replace the two lines that calculate the cost (lines 32-33 of Script 3.9) with a function call:
$cost = calculate_trip_cost ($_POST['distance'], $_POST['efficiency'], $_POST['gallon_price']);
Invoking the function, while passing it the three required values, will perform the calculation. Since the function returns a value, the results of the function call—the returned value—can be assigned to a variable.
5. Change the echo statement to use the new variable:
echo '<h1>Total Estimated Cost</h1>
<p>The total cost of driving' . $_POST['distance'] .' miles, averaging ' . $_POST['efficiency'] . ' miles per gallon, and paying an average of $' . $_POST['gallon_price'] . ' per gallon, is $' . $cost . '. If you drive at an average of 65 miles per hour, the trip will take approximately '. number_format($hours, 2) . ' hours.</p>';
The echo statement uses the $cost variable here, instead of $dollars (as in the previous version of the script). Also, since the $cost variable is formatted within the function, the number_format( ) function does not need to be applied within the echo statement to this variable.
6. Save the file, place it in your Web directory, and test it in your Web browser ![]() .
.
![]() The calculator now uses a user-defined function to calculate and return the trip’s cost. But this change has no impact on what the user sees.
The calculator now uses a user-defined function to calculate and return the trip’s cost. But this change has no impact on what the user sees.
The return statement terminates the code execution at that point, so any code within a function after an executed return will never run.
A function can have multiple return statements (e.g., in a switch statement or conditional) but only one, at most, will ever be invoked. For example, functions commonly do something like this:
function some_function ( ) {
if (/* condition */) {
return TRUE;
} else {
return FALSE;
}
}
To have a function return multiple values, use the array( ) function to return an array of values:
return array ($var1, $var2);
When calling a function that returns an array, use the list( ) function to assign the array elements to individual variables:
list($v1, $v2) = some_function( );
Review and Pursue
If you have any problems with the review questions or the pursue prompts, turn to the book’s supporting forum (www.LarryUllman.com/forums/).
Review
• What is an absolute path? What is a relative path?
• What is the difference between include( ) and require( )?
• What is the difference between include( ) and include_once( )? Which function should you generally avoid using and why?
• Why does it not matter what extension is used for an included file?
• What is the significance of the $_SERVER['REQUEST_METHOD'] value?
• How do you make the following form elements sticky?
• Text input
• Select menu
• Radio button
• Check box
• Textarea
• If you have a PHP error caused by code placed within an HTML tag, where must you look to find the error message?
• What is the syntax for defining your own function?
• What is the syntax for defining a function that takes arguments?
• What is the syntax for defining a function that takes arguments with default values? How do default values impact how the function can be called?
• How do you define and call a function that returns a value?
Pursue
• Create a new HTML template for the pages in this chapter. Use that new template as the basis for new header and footer files. By doing so, you should be able to change the look of the entire site without modifying any of the PHP scripts.
• Create a new form and give it the ability to be “sticky”. Have the form use a textarea and a check box (neither of which is demonstrated in this chapter).
• Change calculator.php so that it uses a constant in lieu of the hard-coded average speed of 65. (As written, the average speed is a “magic number”: a value used in a script without explanation.)
• Better yet, modify calculator.php so that the user can enter the average speed or select it from a list of options.
• Update the output of calculator.php so that it displays the number of days and hours the trip will take, when the number of hours is greater than 24.
• As a more advanced trick, rewrite calculator.php so that the create_radio( ) function call is only in the script once, but still creates three radio buttons. Hint: Use a loop.