A. Installation
There are three technical requirements for executing all of this book’s examples: MySQL (the database application), PHP (the scripting language), and the Web server application (that PHP runs through). This appendix describes the installation of these tools on two different platforms—Windows 7 and Mac OS X. If you are using a hosted Web site, all of this will already be provided for you, but these products are all free and easy enough to install, so putting them on your own computer still makes sense.
After covering installation, the appendix discusses related issues that will be of importance to almost every user. First, I introduce how to create users in MySQL. Next, I demonstrate how to test your PHP and MySQL installation, showing techniques you’ll want to use when you begin working on any server for the first time. Then, you’ll learn how to configure PHP to change how it runs. Finally, and new in this edition of this book, I introduce how to change the Apache Web server’s behavior, in order to address common needs.
Installation on Windows
Although you can certainly install a Web server (like Apache, Abyss, or IIS), PHP, and MySQL individually on a Windows computer, I strongly recommend you use an all-in-one installer instead. It’s simply easier and more reliable to do so.
There are several all-in-one installers out there for Windows. The two mentioned most frequently are XAMPP (www.apachefriends.org) and WAMP (www.wampserver.com). For this appendix, I’ll use XAMPP, which runs on most versions of Windows.
Along with Apache, PHP, and MySQL, XAMPP also installs:
• PEAR (PHP Extension and Application Repository), a library of PHP code
• Perl, a very popular programming language
• phpMyAdmin, the Web-based interface to a MySQL server
• A mail server (for sending email)
• Several useful extensions
At the time of this writing XAMPP (Version 1.7.4) installs PHP 5.3.5, MySQL 5.5.8, Apache 2.2.17, and phpMyAdmin 3.3.9.
I’ll run through the installation process in these next steps. Note that if you have any problems, you can use the book’s supporting forum (www.LarryUllman.com/forums/), but you’ll probably have more luck turning to the XAMPP site (it is their product, after all). Also, the installer works really well and isn’t that hard to use, so rather than detail every single step in the process, I’ll highlight the most important considerations.
To install XAMPP on Windows
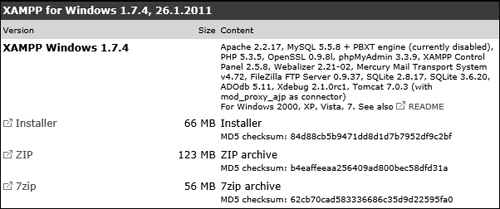
1. Download the latest release of XAMPP for Windows from www.apachefriends.org.
You’ll need to click around a bit to find the download section, but eventually you’ll come to an area where you can find the download ![]() . Then click EXE, which is the specific item you want.
. Then click EXE, which is the specific item you want.
![]() From the Apache Friends Web site, grab the latest installer for Windows.
From the Apache Friends Web site, grab the latest installer for Windows.
2. On your computer, double-click the downloaded file in order to begin the installation process.
3. If prompted, install XAMPP somewhere other than in the Program Files directory.
You shouldn’t install it in the Program Files directory because of a permissions issue on some versions of Windows. I recommend installing XAMPP in your root directory (e.g., C:).
Wherever you decide to install the program, make note of that location, as you’ll need to know it several other times as you work through this appendix.
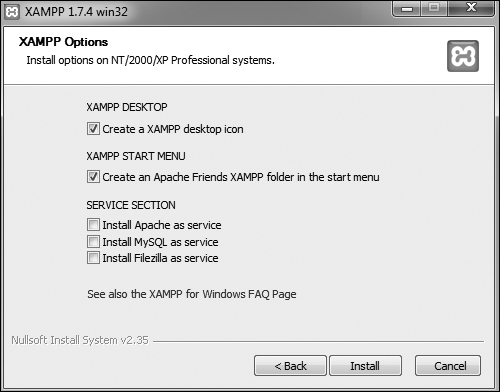
4. If you want, create Desktop and Start Menu shortcuts ![]() .
.
![]() Select what additional installation options you want.
Select what additional installation options you want.
5. Continue through the remaining prompts, reading them and pressing Enter/Return to continue.
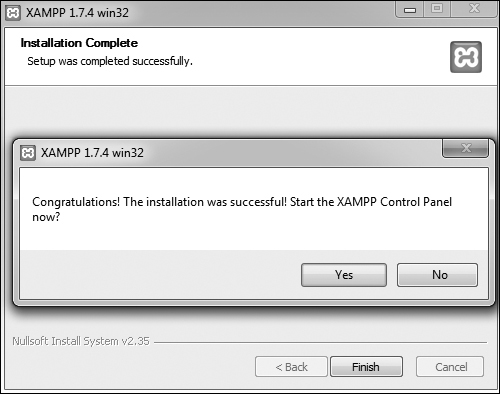
6. After the installation process has done its thing ![]() , click Yes to start the control panel.
, click Yes to start the control panel.
![]() The installation of XAMPP is complete!
The installation of XAMPP is complete!
7. To start, stop, and configure XAMPP, use the XAMPP control panel ![]() .
.
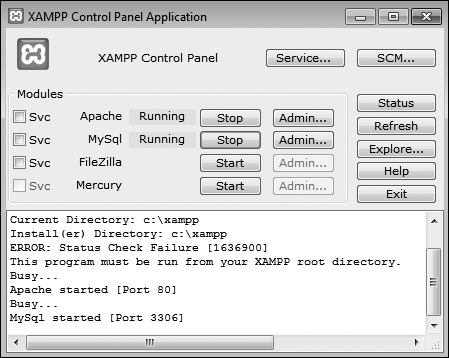
![]() The XAMPP control panel, used to manage the software.
The XAMPP control panel, used to manage the software.
8. As needed, using the control panel, start Apache, MySQL, and Mercury.
Apache has to be running for every chapter in this book. MySQL must be running for about half of the chapters. Mercury is the mail server that XAMPP installs. It needs to be running in order to send email using PHP (see Chapter 11, “Web Application Development”).
9. Immediately set a password for the root MySQL user.
How you do this is explained later in the appendix.
The XAMPP control panel’s various admin links will take you to different Web pages (on your server) and other resources ![]() .
.
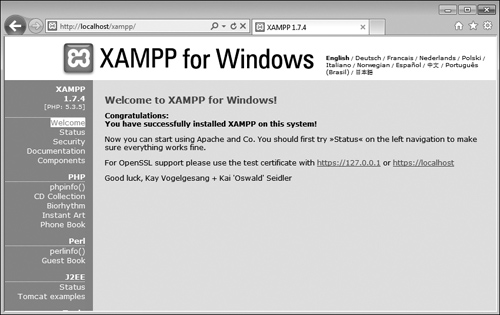
![]() The Web-based splash page for XAMPP, linked from the control panel.
The Web-based splash page for XAMPP, linked from the control panel.
Your Web root directory—where your PHP scripts should be placed in order to test them—is the htdocs folder in the directory where XAMPP was installed. Following these installation instructions, this would be C:xampphtdocs.
When starting the XAMPP Control Panel using XAMPP 1.7.4 on a 64-bit version of Windows 7, I consistently saw an error message about a “Status Check Failure.” I never figured out the cause, but the error didn’t prevent XAMPP from being completely usable.
Installation on Mac OS X
Although Mac OS X comes with Apache built in, and installing MySQL is not that hard, I recommend that beginners take a more universally foolproof route and use the all-in-one MAMP installer (www.mamp.info). It’s available in both free and commercial versions, is very easy to use, and won’t affect the Apache server built into the operating system.
Along with Apache, PHP, and MySQL, MAMP also installs phpMyAdmin, the Web-based interface to a MySQL server, along with lots of useful PHP extensions. As of this writing, MAMP (Version 1.9.6.1) installs both PHP 5.2.13 and 5.3.2, in addition to MySQL 5.1.44, Apache 2.0.63, and phpMyAdmin 3.2.5.
I’ll run through the installation process in these next steps. If you have any problems, you can use the book’s supporting forum (www.LarryUllman.com/forums/), but you’ll probably have more luck turning to the MAMP site (it is their product, after all). Also, the installer works really well and isn’t that hard to use, so rather than detail every single step in the process, I’ll highlight the most important considerations.
To install MAMP on Mac OS X
1. Download the latest release of MAMP from www.mamp.info.
On the front page, click Downloads, and then click Download: MAMP & MAMP PRO 1.9.6.1 ![]() . (As new releases of MAMP come out, the link and filename will obviously change accordingly.)
. (As new releases of MAMP come out, the link and filename will obviously change accordingly.)
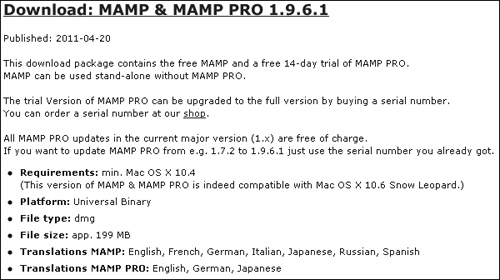
![]() Download MAMP from this page at www.mamp.info.
Download MAMP from this page at www.mamp.info.
The same downloaded file is used for both products. In fact, MAMP Pro is just a nicer interface for controlling and customizing the same MAMP software.
2. On your computer, double-click the downloaded file in order to mount the disk image ![]() .
.
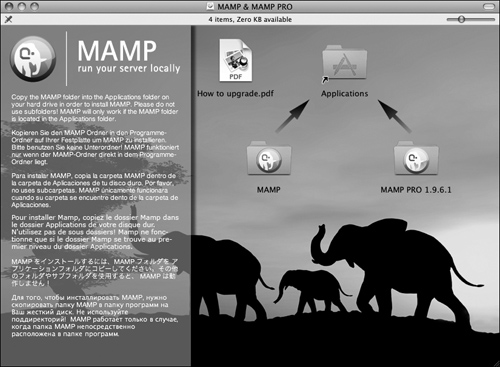
![]() The contents of the downloaded MAMP disk image.
The contents of the downloaded MAMP disk image.
3. Copy the MAMP folder from the disk image to your Applications folder.
If you think you might prefer the commercial MAMP PRO, copy that folder as well (again, it’s an interface to MAMP, so both folders are required). MAMP PRO comes with a free 14-day trial period.
Whichever folder you choose, note that you must place it within the Applications folder. It cannot go in a subfolder or another directory on your computer.
4. Open the /Applications/MAMP (or /Applications/MAMP PRO) folder.
5. Double-click the MAMP (or MAMP PRO) application to start the program ![]() .
.
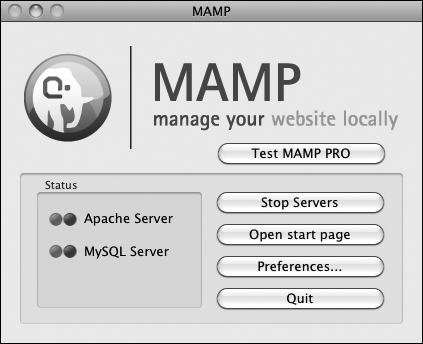
![]() The simple MAMP application, used to control and configure Apache, PHP, and MySQL.
The simple MAMP application, used to control and configure Apache, PHP, and MySQL.
It may take just a brief moment to start the servers, but then you’ll see a result like that in ![]() for MAMP or
for MAMP or ![]() for MAMP PRO.
for MAMP PRO.
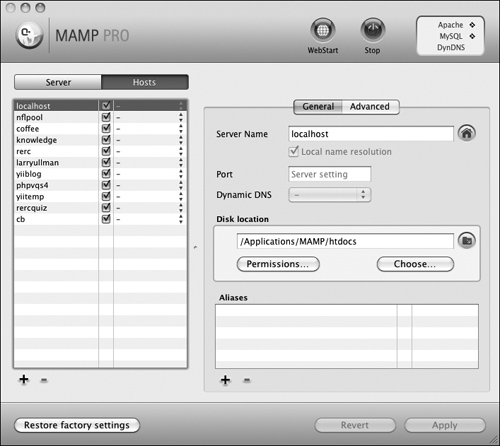
![]() The MAMP PRO application, used to control and configure Apache, PHP, MySQL, and more.
The MAMP PRO application, used to control and configure Apache, PHP, MySQL, and more.
When starting MAMP, a start page should also open in your default Web browser ![]() . Through this page you can view the version of PHP that’s running, as well as how it’s configured, and interface with the MySQL database using phpMyAdmin.
. Through this page you can view the version of PHP that’s running, as well as how it’s configured, and interface with the MySQL database using phpMyAdmin.
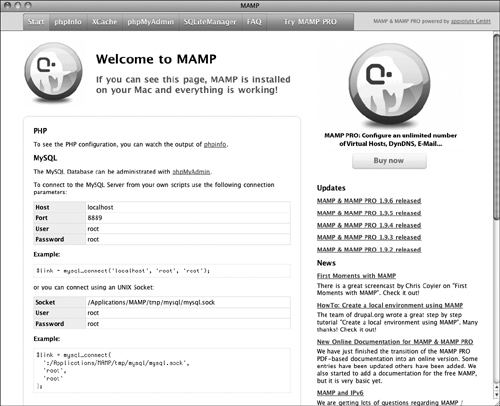
![]() The MAMP Web start page.
The MAMP Web start page.
With MAMP PRO, you can access that same page by clicking the WebStart button ![]() .
.
6. To start, stop, and configure MAMP, use the MAMP or MAMP PRO application ![]() or
or ![]() .
.
There’s not much to the MAMP application itself (which is a good thing), but if you click Preferences, you can tweak the application’s behavior ![]() , set the version of PHP to run, and more.
, set the version of PHP to run, and more.
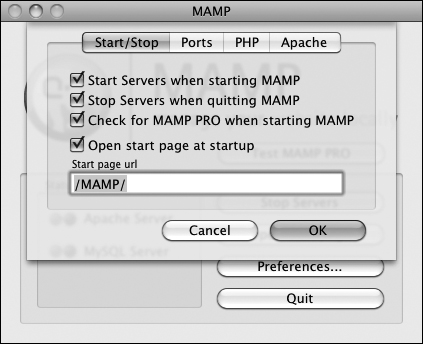
![]() These options dictate what happens when you start and stop the MAMP application.
These options dictate what happens when you start and stop the MAMP application.
MAMP PRO also makes it easy to create different virtual hosts (i.e., different sites; discussed separately later in this appendix), adjust how Apache is configured and runs, use dynamic DNS, change how email is sent, and more.
7. Immediately change the password for the root MySQL user.
How you do this is explained later in the appendix.
Personally, I appreciate how great MAMP alone is, and that it’s free. I also don’t like spending money, but I’ve found the purchase of MAMP PRO to be worth the relatively little money it costs.
Your Web root directory—where your PHP scripts should be placed in order to test them—is the htdocs folder in the directory where MAMP was installed. For a standard MAMP installation without alteration, this would be Applications/MAMP/htdocs.
You may want to change the Apache Document Root ![]() to the
to the Sites directory in your home folder. By doing so, you assure that your Web documents will be backed up along with your other files (and you are performing regular backups, right?).
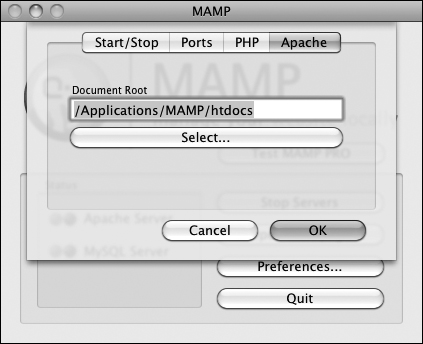
![]() MAMP allows you to change where the Web documents are placed.
MAMP allows you to change where the Web documents are placed.
Managing MySQL Users
Once you’ve successfully installed MySQL, you can begin creating MySQL users. A MySQL user is a fundamental security concept, limiting access to, and influence over, stored data. Just to clarify, your databases can have several different users, just as your operating system might. But MySQL users are different from operating system users. While learning PHP and MySQL on your own computer, you don’t necessarily need to create new users, but live production sites need to have dedicated MySQL users with appropriate permissions.
The initial MySQL installation comes with one user (named root) with no password set (except when using MAMP, which sets a default password of root). At the very least, you should create a new, secure password for the root user after installing MySQL. After that, you can create other users with more limited permissions. As a rule, you shouldn’t use the root user for normal, day-to-day operations.
I’ll walk you through both of these processes over the next couple of pages. Note that if you’re using a hosted server, they’ll likely create the MySQL users for you. These instructions require use of either the command-line mysql client or phpMyAdmin. If you don’t know how to access either of these on your computer, quickly read the Accessing MySQL section of Chapter 4, “Introduction to MySQL.”
Setting the root user password
When you install MySQL, no value—or no secure password—is established for the root user. This is certainly a security risk that should be remedied before you begin to use the server (as the root user has unlimited powers).
You can set any user’s password using either phpMyAdmin or the mysql client, so long as the MySQL server is running. If MySQL isn’t currently running, start it now using the steps outlined earlier in the appendix.
Second, you must be connected to MySQL as the root user in order to be able to change the root user’s password.
To assign a password to the root user via the MySQL client
1. Connect to the MySQL client.
See Chapter 4 for detailed instructions, if needed.
2. Enter the following command, replacing thepassword with the password you want to use ![]() :
:
SET PASSWORD FOR 'root'@' localhost' = PASSWORD ('thepassword');

![]() Updating the root user’s password using SQL within the MySQL client.
Updating the root user’s password using SQL within the MySQL client.
Keep in mind that passwords in MySQL are case-sensitive, so Kazan and kazan aren’t interchangeable. The term PASSWORD that precedes the actual quoted password tells MySQL to encrypt that string. And there cannot be a space between PASSWORD and the opening parenthesis.
exit
4. Test the new password by logging in to the MySQL client again.
Now that a password has been established, you need to add the -p flag to the connection command. You’ll see an Enter password: prompt, where you enter the just-created password.
To assign a password to the root user via phpMyAdmin
1. Open phpMyAdmin in your Web browser.
See the preceding set of steps for detailed instructions.
2. On the home page, click the Privileges tab.
You can always click the home icon, in the upper-left corner, to get to the home page.
3. In the list of users, click the Edit Privileges icon on the root user’s row ![]() .
.

![]() The list of MySQL users, as shown in phpMyAdmin.
The list of MySQL users, as shown in phpMyAdmin.
4. Use the Change Password form ![]() , found farther down the resulting page, to change the password.
, found farther down the resulting page, to change the password.
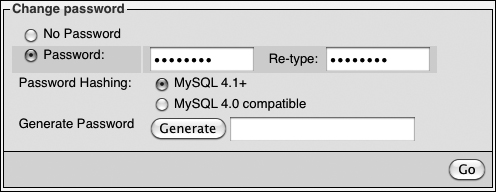
![]() The form for updating a MySQL user’s password within phpMyAdmin.
The form for updating a MySQL user’s password within phpMyAdmin.
5. Change the root user’s password in phpMyAdmin’s configuration file, if necessary.
The result of changing the root user’s password will likely be that phpMyAdmin is denied access to the MySQL server. This is because phpMyAdmin, on a local server, normally connects to MySQL as the root user, with the root user’s password hard-coded into a configuration file. After following Steps 1–4, find the config.inc.php file in the phpMyAdmin directory—likely /Applications/MAMP/bin/phpMyAdmin (Mac OS X with MAMP) or C:xamppphpMyAdmin (Windows with XAMPP). Open that file in any text editor or IDE and change this next line to use the new password:
$cfg['Servers'][$i]['password'] = 'the_new_password';
Then save the file and reload phpMyAdmin in your Web browser.
Creating users and privileges
After you have MySQL successfully up and running, and after you’ve established a password for the root user, you can add other users. To improve the security of your databases, you should always create new users to access your databases rather than using the root user at all times.
The MySQL privileges system was designed to ensure proper authority for certain commands on specific databases. This technology is how a Web host, for example, can let several users access several databases without concern. Each user in the MySQL system can have specific capabilities on specific databases from specific hosts (computers). The root user—the MySQL root user, not the system’s—has the most power and is used to create subusers, although subusers can be given rootlike powers (inadvisably so).
When a user attempts to do something with the MySQL server, MySQL first checks to see if the user has permission to connect to the server at all (based on the username, the user’s host, the user’s password, and the information in the mysql database’s user table). Second, MySQL checks to see if the user has permission to run the specific SQL statement on the specific databases—for example, to select data, insert data, or create a new table. Table A.1 lists most of the various privileges you can set on a user-by-user basis.
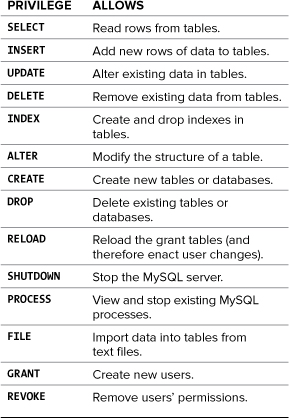
There are a handful of ways to set users and privileges in MySQL, but I’ll start by discussing the GRANT command. The syntax goes like this:
GRANT privileges ON database.* TO 'username'@'hostname' IDENTIFIED BY 'password';
For the privileges aspect of this statement, you can list specific privileges from Table A.1, or you can allow for all of them by using ALL (which isn’t prudent). The database.* part of the statement specifies which database and tables the user can work on. You can name specific tables using the database.tablename syntax or allow for every database with *.* (again, not prudent). Finally, you can specify the username, hostname, and a password.
The username has a maximum length of 16 characters. When creating a username, be sure to avoid spaces (use the underscore instead), and note that usernames are case-sensitive.
The hostname is the computer from which the user is allowed to connect. This could be a domain name, such as www.example.com, or an IP address. Normally, localhost is specified as the hostname, meaning that the MySQL user must be connecting from the same computer that the MySQL database is running on. To allow for any host, use the hostname wildcard character (%):
GRANT privileges ON database.* TO 'username'@'%' IDENTIFIED BY 'password';
But that is also not recommended. When it comes to creating users, it’s best to be explicit and confining.
The password has no length limit but is also case-sensitive. The passwords are encrypted in the MySQL database, meaning they can’t be recovered in a plain text format. Omitting the IDENTIFIED BY 'password' clause results in that user not being required to enter a password (which, once again, should be avoided).
As an example of this process, you’ll create two new users with specific privileges on a new database named temp. Keep in mind that you can only grant permissions to users on existing databases. This next sequence will also show how to create a database.
To create new users
1. Log in to the MySQL client as a root user.
Use the steps explained in Chapter 4 to do this, if you don’t already know. You must be logged in as a user capable of creating databases and other users.
2. Create the temp database:
CREATE DATABASE temp;
Creating a database is quite easy, using the preceding syntax. This command will work as long as you’re connected as a user with the proper privileges.
3. Create a user that has basic-level privileges on the temp database ![]() :
:
GRANT SELECT, INSERT, UPDATE, DELETE
ON temp.* TO
'webuser'@'localhost'
IDENTIFIED BY 'BroWs1ng';

![]() Creating a user that can perform basic tasks on one database.
Creating a user that can perform basic tasks on one database.
The generic webuser user can browse through records (SELECT from tables) and add (INSERT), modify (UPDATE), or DELETE them. The user can only connect from localhost (from the same computer) and can only access the temp database.
FLUSH PRIVILEGES;
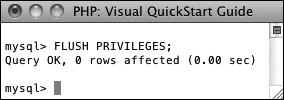
![]() Don’t forget this step before you try to access MySQL using the newly created users.
Don’t forget this step before you try to access MySQL using the newly created users.
The changes just made won’t take effect until you’ve told MySQL to reset the list of acceptable users and privileges, which is what this command does. Forgetting this step and then being unable to access the database using the newly created users is a common mistake.
Any database whose name begins with test_ can be modified by any user who has permission to connect to MySQL. Therefore, be careful not to create a database named this way unless it truly is experimental.
Testing Your Installation
Now that you’ve installed everything and created the necessary MySQL users, you should test the installation. Two quick PHP scripts can be used for this purpose. In all likelihood, if an error occurred, you would already know it by now, but these steps will allow you to perform tests on your (or any other) server before getting into complicated PHP, or PHP and MySQL, programming.
The first script being run is phpinfo.php. It both tests if PHP is enabled and shows a ton of information about the PHP installation. As simple as this script is, it is one of the most important scripts PHP developers ever write, in my opinion, because it provides so much valuable knowledge.
The second script will serve two purposes. It will first see if support for MySQL has been enabled. If not, you’ll need to see the next section of this chapter to change that. The script will also test if the MySQL user has permission to connect to a specific MySQL database.
Script A.1. The phpinfo.php script tests and reports upon the PHP installation.
1 <?php
2 phpinfo( );
3 ?>
To test PHP
1. Create the following PHP document in a text editor or IDE (Script A.1):
<?php
phpinfo( );
?>
The phpinfo( ) function returns the configuration information for a PHP installation in a table. It’s the perfect tool to test that PHP is working properly.
You can use almost any application to create your PHP script as long as it can save the file in a plain text format.
2. Save the file as phpinfo.php.
You need to be certain that the file’s extension is just .php. Be careful when using Notepad on Windows, as it will secretly append .txt. Similarly, TextEdit on Mac OS X wants to save everything as .rtf.
3. Place the file in the proper directory on your server.
What the proper directory is depends upon your operating system and your Web server. If you are using a hosted site, check with the hosting company. For Windows users who installed XAMPP, the directory is called htdocs and is within the XAMPP directory. For Mac OS X users who installed MAMP, the default directory is called htdocs, found within the MAMP folder.
4. Test the PHP script by accessing it in your Web browser ![]() .
.
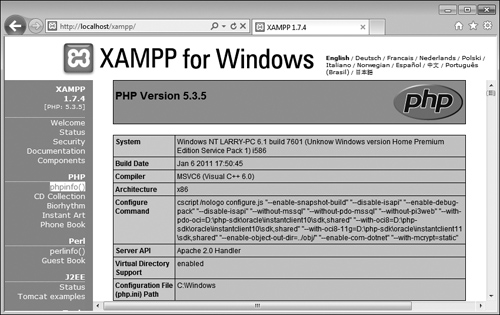
![]() The information for this server’s PHP configuration.
The information for this server’s PHP configuration.
Run this script in your Web browser by going to http://your.url.here/phpinfo.php. On your own computer, this may be something like http://localhost/phpinfo.php (Windows with XAMPP) or http://localhost:8888/phpinfo.php (Mac OS X with MAMP).
To test PHP and MySQL
1. Create a new PHP document in your text editor or IDE (Script A.2):
<?php
mysqli_connect ('localhost',
'webuser', 'BroWsIng', 'temp');
?>
This script will attempt to connect to the MySQL server using the username and password just established in this appendix.
2. Save the file as mysqli_test.php, place it in the proper directory for your Web server, and test it in your Web browser.
If the script was able to connect, the result will be a blank page. If it could not connect, you should see an error message like ![]() . Most likely this indicates a problem with the MySQL user’s privileges or the provided information (see the preceding section of this chapter).
. Most likely this indicates a problem with the MySQL user’s privileges or the provided information (see the preceding section of this chapter).
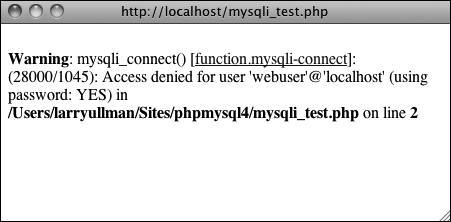
![]() The script was not able to connect to the MySQL server.
The script was not able to connect to the MySQL server.
If you see an error like in ![]() , this means that PHP does not have MySQL support enabled. See the next section of this chapter for the solution.
, this means that PHP does not have MySQL support enabled. See the next section of this chapter for the solution.
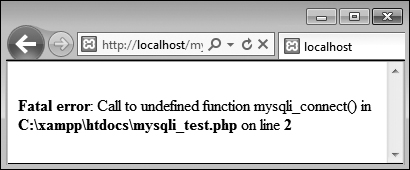
![]() The script was not able to connect to the MySQL server because PHP does not have MySQL support enabled.
The script was not able to connect to the MySQL server because PHP does not have MySQL support enabled.
For security reasons, you should not leave the phpinfo.php script on a live server because it gives away too much information.
If you run a PHP script in your Web browser and it attempts to download the file, then your Web server is not recognizing that file extension as PHP. Check your Apache (or other Web server) configuration to correct this.
PHP scripts must always be run from a URL starting with http://. They cannot be run directly off a hard drive (as if you had opened it in your browser).
If a PHP script cannot connect to a MySQL server, it is normally because of a permissions issue. Double-check the username, password, and host being used, and be absolutely certain to flush the MySQL privileges.
Script A.2. The mysqli_test.php script tests for MySQL support in PHP and if the proper MySQL user privileges have been set.
1 <?php
2 mysqli_connect ('localhost', 'webuser',
'BroWs1ng', 'temp');
3 ?>
Configuring PHP
One of the benefits of installing PHP on your own computer is that you can configure it however you prefer. How PHP runs is determined by the php.ini configuration file, which is normally created when PHP is installed.
Changing PHP’s behavior is very simple and will most likely be required at some point in time. Just a few of the things you’ll want to consider adjusting are
• Whether or not display_errors is on
• The default level of error reporting
• Support for the Improved MySQL Extension functions
• SMTP values for sending emails
What each of these means—if you don’t already know—is covered in the book’s chapters and in the PHP manual. But for starters, I would highly recommend that you make sure that display_errors is on and that you set error reporting to its highest level.
Changing PHP’s configuration is really simple. The short version is: edit the php.ini file and then restart the Web server. But because many different problems can arise, I’ll cover configuration in more detail. If you are looking to enable support for an extension, like the MySQL functions, the configuration is more complicated (see the sidebar).
To alter PHP’s configuration
1. In your Web browser, execute a script that invokes the phpinfo( ) function.
The phpinfo( ) function, discussed in the previous section of the appendix (see ![]() ), reveals oodles of information about the PHP installation.
), reveals oodles of information about the PHP installation.
2. In the browser’s output, search for Loaded Configuration File ![]() .
.

![]() Use a
Use a phpinfo( ) script to confirm the active PHP configuration file to be edited.
The value next to this text is the location of the active configuration file. This will be something like C:xamppphpphp.ini or / /Applications/MAMP/conf/php5.3/php.ini. Your server may have multiple php.ini files on it, but this is the one that counts.
If there is no value for the Loaded Configuration File, your server has no active php.ini file. In that case, you’ll need to download the PHP source code, from www.php.net, to find a sample configuration file.
3. Open the php.ini file in any text editor.
If you go to the directory listed and there’s no php.ini file there, you’ll need to download this file from the PHP Web site (it’s part of the PHP source code).
4. Make any changes you want, keeping in mind the following:
• Comments are marked using a semicolon. Anything after the semicolon is ignored.
• Instructions on what most of the settings mean are included in the file.
• The top of the file lists general information with examples. Do not change these values! Change the settings where they appear later in the file.
• For safety purposes, don’t change any original settings. Just comment them out (by preceding the line with a semicolon) and then add the new, modified line afterward.
• Add a comment (using the semicolon) to mark what changes you made and when. For example:
; display_errors = Off
; Next line added by LEU
08/28/2011
display_errors = On
5. Save the php.ini file.
6. Restart your Web server.
You do not have to restart the entire computer, just the Web serving application (Apache, IIS, etc.). How you do this depends upon the application being used, the operating system, and the installation method. Windows users can use the XAMPP Control Panel. Mac OS X users can use the MAMP Control Panel. Unix users can normally just enter apachectl graceful in a Terminal window.
7. Rerun the phpinfo.php script to make sure the changes took effect.
If you edit the php.ini file and restart the Web server but your changes don’t take effect, make sure you’re editing the proper php.ini file (you may have more than one on your computer).
MAMP PRO on Mac OS X uses a template for the php.ini file that must be edited within MAMP PRO itself. To change the PHP settings when using MAMP PRO, select File > Edit Template > PHP X.X.X php.ini.
Configuring Apache
New in this edition of this book is this section, providing an introduction to configuring the Apache Web server. Like PHP, Apache is an open-source technology, and has become a dominant force in Web technologies. If you installed either XAMPP or MAMP on your computer, you now have a functional version of Apache. If you’re using a hosted Web site, more than likely you’re being provided with Apache there as well.
Once Apache with support for PHP has successfully been installed, many PHP programmers never think twice about the Web server. But as you continue to learn about Web development, picking up a bit more knowledge of Apache is a logical next step.
The most common reasons you’ll need to know more about Apache include being able to do the following:
• Create virtual hosts
• Add Secure Sockets Layer (SSL) support
• Protect directories
• Enable URL rewrites
These, and other changes to Apache’s behavior, can be made in two ways: by editing the primary configuration file or by creating directory-specific files. The primary configuration file is httpd.conf, found within a conf directory, and it dictates how the entire Apache Web server runs. An .htaccess file (pronounced “H-T access”) is placed within the Web directories and is used to affect how Apache behaves within just that folder and subfolders.
Generally speaking, it’s preferred to make changes in the httpd.conf file, as this file only needs to be read by the Web server each time the server is started. Conversely, .htaccess files must be read by the Web server once for every request to that which an.htaccess file might apply. For example, if you have www.example.com/somedir/.htaccess, any request to www.example.com/somedir/whatever requires reading the .htaccess file, as well as reading an .htaccess file that might exist in www.example.com/. On the other hand, in shared hosting environments, individual users are not allowed to customize the entire Apache configuration, but may be allowed to use .htaccess to make changes that only affect their sites.
Over the next few pages, I’ll explain some of the fundamentals for working with these two types of files. In the process, you’ll learn how to perform some standard Apache customizations.
To be safe, I’d recommend making a backup copy of your original Apache configuration file, before pursuing any of the subsequent edits.
In this book, I cannot adequately explain how to enable HTTPS (HTTP over an SSL) as the key component—obtaining and installing an SSL certificate varies too much from one person and server to the next. Look online for specific details, or post a message in my support forums (www.LarryUllman.com/forums/), if you need assistance. If you have a hosted account wherein you want to enable SSL, speak with your hosting company.
Creating Virtual Hosts
When you install Apache on a computer, Apache is set up to serve one Web site, such as www.example.com. For the Web site being served, Apache associates a hostname (and/or an IP address) with a directory on the server, called the Web document root. When a user visits www.example.com, Apache provides files from that site’s directory ![]() .
.
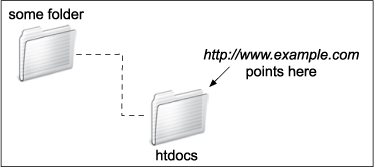
![]() The Web server associates a URL or hostname with a directory or file on the computer.
The Web server associates a URL or hostname with a directory or file on the computer.
But Apache can easily be configured to serve several different sites, all hosted on the same computer, by creating virtual hosts. After establishing one or more virtual hosts, Apache will know that when a user makes a request of www.example.com, documents from X directory should be served, but requests of www.example.net should be pointed to the documents from Y directory ![]() .
.
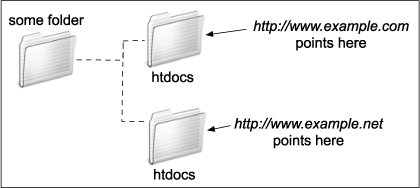
![]() Thanks to virtual hosts, different directories on the computer can be associated with different hostnames.
Thanks to virtual hosts, different directories on the computer can be associated with different hostnames.
Understand that setting up virtual hosts does not, in fact, make www.example.com or www.example.net a valid domain name, accessible over the Internet. Accomplishing that requires use of DNS (Domain Name System), a much more complicated subject. You can, however, use virtual hosts to create different hosts for your own development projects on your home computer, as explained in the following sequence.
To create a virtual host
1. Open httpd.conf in any text editor or IDE.
If you’re using XAMPP on Windows, the file to open is C:xamppapacheconfhttpd.conf (assuming XAMPP is installed in the root of the C drive). If you’re using MAMP on Mac OS X, the file to open is /Applications/MAMP/conf/apache/httpd.conf. Note that if you’re using MAMP Pro, virtual hosts are created within that application’s control panel.
2. At the very end of the configuration file, add:
NameVirtualHost 127.0.0.1
Virtual hosts are conventionally defined at the end of the configuration file (or in a separate configuration file, to be included by this one). This line says that Apache should watch for named virtual hosts (as opposed to IP address-based virtual hosts) on the 127.0.0.1 IP address. This is a special IP address, always equating to localhost (i.e., this same computer).
Depending upon your server, this line may already be present in the configuration file, but prefaced by a #, which makes it a comment (i.e., renders it ineffectual). In that case, just remove the #.
3. On the next line, add:
<VirtualHost 127.0.0.1>
</VirtualHost>
The VirtualHost tags are used to create a new virtual host. For each opening tag, there needs to be a closing one. Within the opening tag, the IP address or hostname to watch for is identified, here: 127.0.0.1. This value needs to match that used on the NameVirtualHost line.
The rest of the virtual host definition will go between these opening and closing tags.
4. Within the virtual host tags, add:
DocumentRoot /path/to/folder
ServerName servername
The DocumentRoot directive indicates the Web root directory for the virtual host: in other words, where the actual files for this site can be found. On XAMPP on Windows, this value might be C:/xampp/htdocs/something. On MAMP on Mac OS X, this value might be /Applications/MAMP/htdocs/something.
The ServerName is where you put the hostname: what you’ll enter into the browser to access this site.
As an example, if you wanted to create a virtual host for the forums site from Chapter 17, “Example—Message Board,” you could create a new folder within htdocs, called forums, and copy all of the applicable scripts there. Then you would use C:/xampp/htdocs/forums or /Applications/MAMP/htdocs/forums as the DocumentRoot value. For the ServerName value, I would use something meaningful, such as forums.local: a local version of a forums site.
5. Add a second virtual host for localhost ![]() :
:
<VirtualHost 127.0.0.1>
DocumentRoot "C:/xampp/htdocs"
ServerName localhost
</VirtualHost>
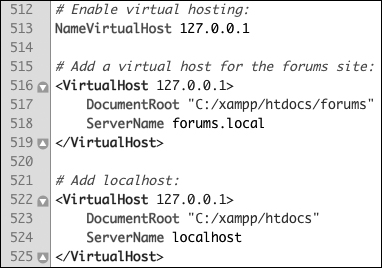
![]() The new directives added to the end of the Apache configuration file.
The new directives added to the end of the Apache configuration file.
The previous set of steps created a new virtual host, but in the process, the one original Web site (localhost, the default for your own computer) will become unusable. The fix is to create another virtual host for that site.
6. Save the configuration file.
7. Restart Apache.
Any changes to the configuration file will not take effect until the Web server is restarted. You can restart Apache using the XAMPP or MAMP control panel.
If there is an error in the configuration file, Apache will not be able to start and you’ll need to check the error logs to find out why.
Note that you can’t access the virtual host using your browser yet, as you still need to update your computer’s list of hosts.
The default Apache configuration file, httpd.conf, has comments in it indicating what each section of code does. You can browse through it to learn some things about configuring Apache.
The DocumentRoot value, or any value in the httpd.conf file, must be quoted if it contains spaces.
The definition of a virtual host can contain other directives, but I’m trying to introduce these fundamental Apache concepts as simply as possible.
It’s actually preferable to have Apache only listen for activity on a specific port, commonly 80. In that case, the virtual hosts configuration would start
NameVirtualHost 127.0.0.1:80
<VirtualHost 127.0.0.1:80>
But as MAMP on Mac OS X, and XAMPP, depending upon possible conflicts, don’t always use port 80, I’m using code that’s most foolproof.
On a full-scale Web server, it’s preferable to create multiple configuration files, which will then be read and used by the primary configuration file. On your own personal computer, without too much customization, a single configuration file is fine.
Updating Your Computer’s Hosts
The previous sequence of steps created a virtual host in Apache, allowing you to access, in this example, the forums Web site by going to http://forums.local in your Web browser. There is a catch, however: if you were to enter that URL into your browser, the browser would attempt to find forums.local on the Internet, and would be unable to do so ![]() . To solve this dilemma, you need to tell your browser(s) that
. To solve this dilemma, you need to tell your browser(s) that forums.local can be found on your computer. This is done by modifying your operating system’s hosts file, per these directions.
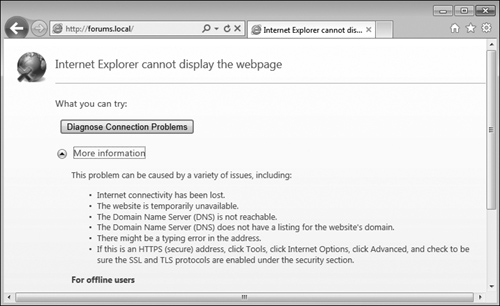
![]() The error that Internet Explorer displays when it can’t find the local virtual host.
The error that Internet Explorer displays when it can’t find the local virtual host.
To update your computer’s hosts
1. Open your computer’s hosts file in any text editor or IDE.
This is the only tricky part of this process: finding and opening the hosts file. On Mac OS X and Unix, the hosts file is /etc/hosts (there’s no file extension), where / refers to the computer’s root directory. On Mac OS X, /etc is a hidden directory, making hosts a hidden file. There are three easy ways of finding this file:
• Use your editing application to open it directly, if the application is capable of opening hidden files.
• In the Finder, select Go > Go To Folder, and enter /etc in the prompt ![]() to open the
to open the /etc directory in the Finder. Then drag the hosts file onto the editing application in the Dock.
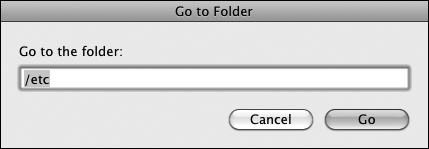
![]() The Finder’s Go > Go to Folder option can be used to access hidden directories.
The Finder’s Go > Go to Folder option can be used to access hidden directories.
• Use the Terminal to find and open the file.
On Windows, baring a nonstandard installation, the file in question is C:WindowsSystem32driversetchosts. Unfortunately, you may have permissions issues in trying to edit this file. I had good luck by opening Notepad in administrator mode (right-click on Notepad in the Start Menu to be given this option ![]() ), and then opening the file within Notepad.
), and then opening the file within Notepad.
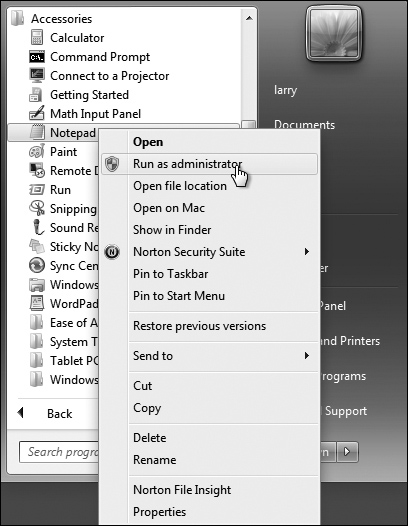
![]() You can open Notepad in administrator mode in order to edit system files.
You can open Notepad in administrator mode in order to edit system files.
2. At the very end of the file, add:
127.0.0.1 forums.local
This associates the name forums.local with the IP address 127.0.0.1, which is to say the same computer.
3. Save the file.
4. Load http://forums.local in your Web browser ![]() .
.
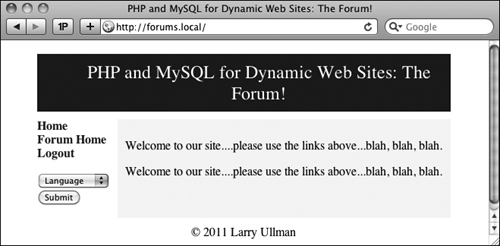
![]() The forums site, available locally through the URL
The forums site, available locally through the URL http://forums.local.
Repeat these two sequences of steps—creating the virtual host in Apache and adding the host to your hosts file—any time you want to create a new Web site project with its own associated hostname.
Using .htaccess Files
As already stated, all Apache configuration can actually be accomplished within the httpd.conf file. In fact, doing so is preferred. But the configuration file is not always available for you to edit, so it’s worth also knowing how to use .htaccess files to change how a site functions.
An .htaccess file is just a plain-text file, with the name .htaccess (again, no file extension, and the initial period makes this a hidden file). When placed within a Web directory, the directives defined in the .htaccess file will apply to that directory and its subdirectories.
A common hang-up when using .htaccess files is that permission has to be granted to allow .htaccess to make server behavior changes. Depending upon the installation and configuration, Apache, on the strictest level of security, will not allow .htaccess files to change Apache behavior. This is accomplished with code like the following, in httpd.conf:
<Directory />
AllowOverride None
</Directory>
The Directory directive is used within httpd.conf to modify Apache’s behavior within a specific directory. In the above code, the root directory (/) is the target, meaning that Apache will not allow overrides—changes—made within any directories on the computer at all. Prior to creating .htaccess files, then, the main configuration file must be set to allow overrides in the applicable Web directory (or directories).
The AllowOverride directive takes one or more flags indicating what, specifically, can be overridden:
• AuthConfig, for using authorization and authentication
• FileInfo, for performing redirects and URL rewriting
• Indexes, for listing directory contents
• Limit, for restricting access to the directory
• Options, for setting directory behavior, such as the ability to execute CGI scripts or to index folder contents
• All
• None
For example, to allow AuthConfig and FileInfo to be overridden within the forums directory (just created), the httpd.conf file should include:
<Directory /path/to/forums>
AllowOverride AuthConfig FileInfo
</Directory>
As long as this code comes after any AllowOverride None block, an .htaccess file in the forums directory will be able to make some changes to Apache’s behavior when serving files from that directory (and its subdirectories).
To allow .htaccess overrides
1. Open httpd.conf in any text editor or IDE.
2. Within the VirtualHost tag for the site in question, add:
<Directory /path/to/directory>
</Directory>
The Directory tag is how you customize Apache behavior within a specific directory or its subdirectories. Within the opening tag, provide an absolute path to the directory in question, such as C:xampphtdocssomedir or /Applications/MAMP/htdocs/somedir.
3. Within the Directory tags, add ![]() :
:
AllowOverride All
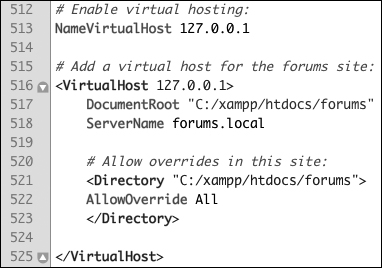
![]() The updated virtual hosts configuration, now allowing for overrides within the forums Web directory.
The updated virtual hosts configuration, now allowing for overrides within the forums Web directory.
This is a heavy-handed solution, but will do the trick. On a live, publicly available server, you’d want to be more specific about what exact settings can be overridden, but on your home computer, this won’t be a problem.
4. Save the configuration file.
5. Restart Apache.
The Directory directive does not have to go within the VirtualHost tag for the involved site, but it makes sense to place it there.
Anything accomplished within an .htaccess file can also be achieved using a Directory tag within httpd.conf.
Protected Directories
A common use of an .htaccess file is to protect the contents of a directory. There are two possible scenarios:
• Denying all access
• Restricting access to authorized users
Strange as it may initially sound, there are plenty of situations in which files and folders placed in the Web directory should be made unavailable. For example, you could create an includes directory that has sensitive PHP scripts or an uploads directory for storing uploaded files. In both cases, the contents of the directory would not be meant for direct access, but rather PHP scripts in other directories would reference that content as needed. To deny all access to a directory, place the code in Script A.3 in an .htaccess file in that folder (comments indicate what each line does).
Again, this code just prevents direct access to that directory’s contents via a Web browser. A PHP script could still use include( ), require( ), readfile( ), and other functions to access that content. In fact, the show_image.php script from Chapter 11 does exactly that: acting as a proxy script to display an image stored outside of the Web document root (i.e., otherwise unavailable in the Web browser).
Script A.3. This code, in an .htaccess file, will deny all access to the contents of a directory, and its subdirectories.
1 # Disable directory browsing:
2 Options All -Indexes
3
4 # Prevent folder listing:
5 IndexIgnore *
6
7 # Prevent access to any file:
8 <FilesMatch "^.*$">
9 Order Allow,Deny
10 Deny from all
11 </FilesMatch>
There are a couple of ways of restricting access to authorized users, with the mod_auth module being the most basic and common. This module creates prompts in the browser wherein the user can enter her or his credentials ![]() . Apache will compare those credentials to those stored in a file on the server, allowing or denying access accordingly. It’s not hard to use
. Apache will compare those credentials to those stored in a file on the server, allowing or denying access accordingly. It’s not hard to use mod_auth, but you have to invoke a secondary Apache tool to create the credentials file. If you want to pursue this route, just do a search online for Apache mod_auth.
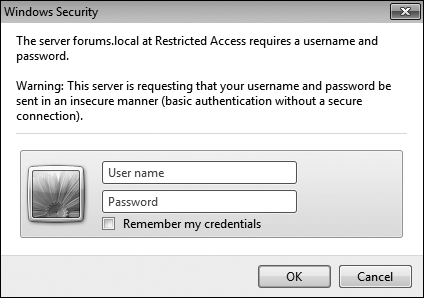
![]() This prompt, as displayed in Internet Explorer on Windows, is generated by Apache to limit access to authenticated users.
This prompt, as displayed in Internet Explorer on Windows, is generated by Apache to limit access to authenticated users.
Apache will not display .htaccess files in the Web browser, by default, which is a smart security approach.
When creating .htaccess files, make sure your text editor or IDE is not secretly adding a .txt extension. Notepad, for example, will do this. You can confirm this has happened if you can load www.example.com/.htaccess.txt in your Web browser. In Notepad, you can prevent the added extension by quoting the file name and saving it as type “All files”.
Enabling URL Rewriting
The final topic to be discussed in this appendix is how to perform URL rewriting. URL rewriting has gained attention as part of the overbearing focus on Search Engine Optimization (SEO), but URL rewriting has been a useful tool for years. With a dynamically driven site, like an e-commerce store, a value will often be passed to a page in the URL to indicate what category of products to display, resulting in URLs such as www.example.com/category.php?id=23. The PHP script, category.php, would then use the value of $_GET['id'] to know what products to pull from the database and display. (There are oodles of similar examples in this book.)
With URL rewriting applied, the URL shown in the browser, visible to the end user, and referenced in search engine results, can be transformed into something more obviously meaningful, such as www.example.com/category/23/ or, better yet, www.example.com/category/garden+gnomes/. Apache, via URL rewriting, takes the more user-friendly URL and parses it into something usable by the PHP scripts. This is made possible by the Apache mod_rewrite module. To use it, the .htaccess file must first check for the module and turn on the rewrite engine:
<IfModule mod_rewrite.c>
RewriteEngine on
</IfModule>
After enabling the engine, and before the closing IfModule tag, you add rules dictating the rewrites. The syntax is:
RewriteRule match rewrite
For example, you could do the following (although it’s not a good use of mod_rewrite):
RewriteRule somepage.php otherpage.php
Part of the complication with performing URL rewrites is that Perl-Compatible Regular Expressions (PCRE) are needed to most flexibly find matches. If you’re not already comfortable with regular expressions, you’ll need to read Chapter 14, “Perl-Compatible Regular Expressions,” to follow the rest of this material.
For example, to treat www.example.com/category/23 as if it were www.example.com/category.php?id=23, you would have the following rule:
RewriteRule ^category/([0-9]+)/?$ category.php?id=$1
The initial caret (^) says that the expression must match the beginning of the string. After that should be the word category, followed by a slash. Then, any quantity of digits follows, concluding with an optional slash (allowing for both category/23 and category/23/). The dollar sign closes the match, meaning that nothing can follow the optional slash. That’s the pattern for the example match (and it’s a simple pattern at that, really).
The rewrite part is what will actually be executed, unbeknownst to the Web browser and the end user. In this line, that’s category.php?id=$1. The $1 is a backreference to the first parenthetical grouping in the match (e.g., 23). Thus, www.example.com/category/23 is treated by the server as if the URL was actually www.example.com/category.php?id=23.
This is the underlying premise with mod_rewrite. Unfortunately, mastering mod_rewrite requires mastery, or near mastery, of PCRE, which can be daunting. If you want to practice this, you can take the simple example just explained and apply it to any of the examples in the book in which a value is passed in the URL. For example, in Chapter 10, “Common Programming Techniques,” a user ID is passed in the URL to delete_user.php and edit_user.php. Both could be transformed into “prettier” URLs, such as www.example.com/delete/45/ or www.example.com/edit/895/.
As always, search online for more information on this subject, should you be interested, and post a question in the supporting forums (www.LarryUllman.com/forums/) if you run into problems.
