11. Web Application Development
Understanding HTTP Headers 355
The preceding two chapters focus on using PHP and MySQL together (which is, after all, the primary point of this book). But there’s still a lot of PHP-centric material to be covered. Taking a quick break from using PHP with MySQL, this chapter covers a handful of techniques that are often used in more complex Web applications.
The first topic covered in this chapter is sending email using PHP. It’s a very common thing to do and is surprisingly simple (assuming that the server is properly set up). After that, the chapter has uses-related examples to cover three new ideas: handling file uploads through an HTML form, using PHP and JavaScript together, and how to use the header( ) function to manipulate the Web browser. The chapter concludes by touching upon some of the date and time functions present in PHP.
Sending Email
One of my absolute favorite things about PHP is how easy it is to send an email. On a properly configured server, the process is as simple as using the mail( ) function:
mail (to, subject, body, [headers]);
The to value should be an email address or a series of addresses, separated by commas. Any of these are allowed:
• [email protected], [email protected]
• Actual Name <[email protected]>
• Actual Name <[email protected]>, This Name <[email protected]>
The subject value will create the email’s subject line, and body is where you put the contents of the email. To make things more legible, variables are often assigned values and then used in the mail( ) function call:
$to = '[email protected]';
$subject = 'This is the subject';
$body = 'This is the body.
It goes over multiple lines.';
mail ($to, $subject, $body);
As you can see in the assignment to the $body variable, you can create an email message that goes over multiple lines by having the text do exactly that within the quotation marks. You can also use the newline character (
) within double quotation marks to accomplish this:
$body = "This is the body. It goes over multiple lines.";
This is all very straightforward, and there are only a couple of caveats. First, the subject line cannot contain the newline character (
). Second, each line of the body should be no longer than 70 characters in length (this is more of a recommendation than a requirement). You can accomplish this using the wordwrap( ) function. It will insert a newline into a string every X number of characters. To wrap text to 70 characters, use
$body = wordwrap($body, 70);
The mail( ) function takes a fourth, optional parameter for additional headers. This is where you could set the From, Reply-To, Cc, Bcc, and similar settings. For example,
mail ($to, $subject, $body, 'From: [email protected]'),
To use multiple headers of different types in your email, separate each with
:
$headers = "From: [email protected] r
";
$headers .= "Cc: [email protected], [email protected]
";
mail ($to, $subject, $body, $headers);
Although this fourth argument is optional, it is advised that you always include a From value (although that can also be established in PHP’s configuration file).
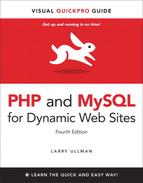
To use the mail( ) function, let’s create a page that shows a contact form ![]() and then handles the form submission, validating the data and sending it along in an email. This example will also provide a nice tip you’ll sometimes use on pages with sticky forms.
and then handles the form submission, validating the data and sending it along in an email. This example will also provide a nice tip you’ll sometimes use on pages with sticky forms.
![]() A standard contact form.
A standard contact form.
Note two things before running this script: First, for this example to work, the computer on which PHP is running must have a working mail server. If you’re using a hosted site, this shouldn’t be an issue; on your own computer, you’ll likely need to take preparatory steps (see the sidebar). I will say in advance that these steps can be daunting for the beginner; it will likely be easiest and most gratifying to use a hosted site for this particular script.
Second, this example, while functional, could be manipulated by bad people, allowing them to send spam through your contact form (not just to you but to anyone). The steps for preventing such attacks are provided in Chapter 13, “Security Methods.” Following along and testing this example is just fine; relying upon it as your long-term contact form solution is a bad idea.
To send email
1. Begin a new PHP script in your text editor or IDE, to be named email.php (Script 11.1):
<!DOCTYPE html PUBLIC "-//W3C//DTD XHTML 1.0 Transitional//EN" "http://www.w3.org/TR/xhtml1/DTD/xhtml1-transitional.dtd">
<html xmlns="http://www.w3.org/1999/xhtml" xml:lang="en" lang="en">
<head>
<meta http-equiv="Content-Type" content="text/html; charset=utf-8" />
<title>Contact Me</title>
</head>
<body>
<h1>Contact Me</h1>
<?php # Script 11.1 - email.php
None of the examples in this chapter will use a template, like those in the past two chapters, so it starts with the standard HTML.
2. Create the conditional for checking if the form has been submitted and validate the form data:
if ($_SERVER['REQUEST_METHOD'] = = 'POST') {
if (!empty($_POST['name']) && !empty($_POST['email']) && !empty($_POST['comments']) ) {
The form contains three text inputs (technically, one is a textarea). The empty( ) function will confirm that something was entered into each. In Chapter 13, you’ll learn how to use the Filter extension to confirm that the supplied email address has a valid format.
Script 11.1. This page displays a contact form that, upon submission, will send an email with the form data to an email address.
1 <!DOCTYPE html PUBLIC "-//W3C//DTD XHTML
1.0 Transitional//EN" "http://www.w3.org/
TR/xhtml1/DTD/xhtml1-transitional.dtd">
2 <html xmlns="http://www.w3.org/1999/
xhtml" xml:lang="en" lang="en">
3 <head>
4 <meta http-equiv="Content-Type"
content="text/html; charset=utf-8" />
5 <title>Contact Me</title>
6 </head>
7 <body>
8 <h1>Contact Me</h1>
9 <?php # Script 11.1 - email.php
10
11 // Check for form submission:
12 if ($_SERVER['REQUEST_METHOD'] = = 'POST') {
13
14 // Minimal form validation:
15 if (!empty($_POST['name']) && !empty
($_POST['email']) && !empty($_POST
['comments']) ) {
16
17 // Create the body:
18 $body = "Name: {$_POST['name']}
Comments: {$_POST['comments']}";
19
20 // Make it no longer than 70
characters long:
21 $body = wordwrap($body, 70);
22
23 // Send the email:
24 mail('[email protected]',
'Contact Form Submission',
$body, "From: {$_POST['email']}");
25
26 // Print a message:
27 echo '<p><em>Thank you for
contacting me. I will reply some
day.</em></p>';
28
29 // Clear $_POST (so that the form's
not sticky):
30 $_POST = array( );
31
32 } else {
33 echo '<p style="font-weight: bold;
color: #C00">Please fill out the
form completely.</p>';
34 }
35
36 } // End of main isset( ) IF.
37
38 // Create the HTML form:
39 ?>
40 <p>Please fill out this form to contact
me.</p>
41 <form action="email.php" method="post">
42 <p>Name: <input type="text"
name="name" size="30" maxlength="60"
value="<?php if (isset($_POST['name']))
echo $_POST['name']; ?>" /></p>
43 <p>Email Address: <input type="text"
name="email" size="30" maxlength="80"
value="<?php if (isset($_POST['email']))
echo $_POST['email']; ?>" /></p>
44 <p>Comments: <textarea name="comments"
rows="5" cols="30"><?php if (isset
($_POST['comments'])) echo $_POST
['comments']; ?></textarea></p>
45 <p><input type="submit" name="submit"
value="Send!" /></p>
46 </form>
47 </body>
48 </html>
3. Create the body of the email:
$body = "Name: {$_POST['name']}
nComments: {$_POST['comments']}";
$body = wordwrap($body, 70);
The email’s body will start with the prompt Name:, followed by the name entered into the form. Then the same treatment is given to the comments. The wordwrap( ) function then formats the whole body so that each line is only 70 characters long.
4. Send the email and print a message in the Web browser:
mail('[email protected]', 'Contact Form Submission', $body, "From: {$_POST['email']}");
echo '<p><em>Thank you for contacting me. I will reply some day.</em></p>';
Assuming the server is properly configured, this one line will send the email. You will need to change the to value to your actual email address. The From value will be the email address from the form. The subject will be a literal string.
There’s no easy way of confirming that the email was successfully sent, let alone received, but a generic message is printed.
5. Clear the $_POST array;
$_POST = array( );
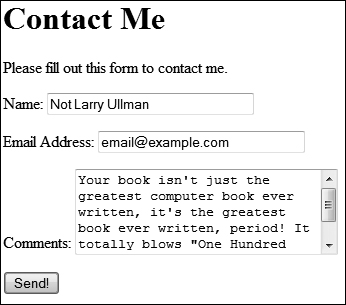
In this example, the form will always be shown, even upon successful submission. The form will be sticky in case the user omitted something ![]() . However, if the mail was sent, there’s no need to show the values in the form again. To avoid that, the
. However, if the mail was sent, there’s no need to show the values in the form again. To avoid that, the $_POST array can be cleared of its values using the array( ) function.
![]() The contact form will remember the user-supplied values in case it is not completely filled out.
The contact form will remember the user-supplied values in case it is not completely filled out.
} else {
echo '<p style="font-weight: bold; color: #C00">Please fill out the form completely.</p>';
}
} // End of main isset( ) IF.
The error message contains some inline CSS, so that it’s in red and made bold.
7. Begin the form:
<p>Please fill out this form to contact me.</p>
<form action="email.php" method="post">
<p>Name: <input type="text" name="name" size="30" maxlength="60" value="<?php if (isset($_POST['name'])) echo $_POST['name']; ?>" /></p>
<p>Email Address: <input type="text" name="email" size="30" maxlength="80" value="<?php if (isset($_POST ['email'])) echo $_POST ['email']; ?>" /></p>
The form will submit back to this same page using the POST method. The first two inputs are of type text; both are made sticky by checking if the corresponding $_POST variable has a value. If so, that value is printed as the current value for that input. Because the $_POST array is cleared out in Step 5, $_POST['name'] and the like will not be set when this form is viewed again, after its previous successful completion and submission.
8. Complete the form:
<p>Comments: <textarea name="comments" rows="5" cols="30"> <?php if (isset($_POST ['comments'])) echo $_POST ['comments']; ?></textarea></p>
<p><input type="submit" name="submit" value="Send!" /></p>
</form>
The comments input is a textarea, which does not use a value attribute. Instead, to be made sticky, the value is printed between the opening and closing textarea tags.
9. Complete the HTML page:
</body>
</html>
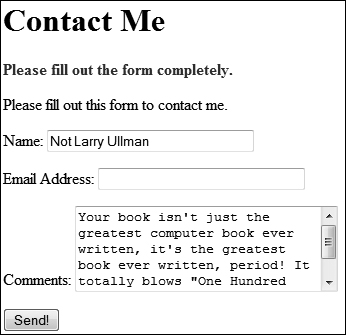
10. Save the file as email.php, place it in your Web directory, and test it in your Web browser ![]() .
.
![]() Successful completion and submission of the form.
Successful completion and submission of the form.
11. Check your email to confirm that you received the message ![]() .
.
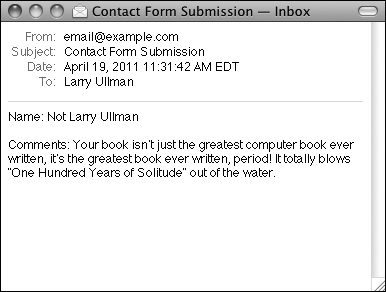
![]() The resulting email (from the data in
The resulting email (from the data in ![]() ).
).
If you don’t actually get the email, you’ll need to do some debugging work. With this example, you should confirm with your host (if using a hosted site) or yourself (if running PHP on your server), that there’s a working mail server installed. You should also test this using different email addresses (for both the to and from values). Also, watch that your spam filter isn’t eating up the message.
The mail( ) function takes an optional fifth argument, for additional parameters to be sent to the mail-sending application.
The mail( ) function returns a 1 or a 0 indicating the success of the function call. This is not the same thing as the email successfully being sent or received. Again, you cannot easily test for either using PHP.
While it’s easy to send a simple message with the mail( ) function, sending HTML emails or emails with attachments involves more work. I discuss how you can do both in my book PHP 5 Advanced: Visual QuickPro Guide (Peachpit Press, 2007).
Using a contact form that has PHP send an email is a great way to minimize the spam you receive. With this system, your actual email address is not visible in the Web browser, meaning it can’t be harvested by spambots.
Handling File Uploads
Chapters 2, “Programming with PHP,” and 3, “Creating Dynamic Web Sites,” go over the basics of handling HTML forms with PHP. For the most part, every type of form element can be handled the same in PHP, with one exception: file uploads. The process of uploading a file has two dimensions. First the HTML form must be displayed, with the proper code to allow for file uploads. Upon submission of the form, the server will first store the uploaded file in a temporary directory, so the next step is for the PHP script to copy the uploaded file to its final destination.
For this process to work, several things must be in place:
• PHP must run with the correct settings.
• A temporary storage directory must exist with the correct permissions.
• The final storage directory must exist with the correct permissions.
With this in mind, this next section will cover the server setup to allow for file uploads; then a PHP script will be created that actually does the uploading.
Allowing for file uploads
As I said, certain settings must be established in order for PHP to be able to handle file uploads. I’ll first discuss why or when you’d need to make these adjustments before walking you through the steps.
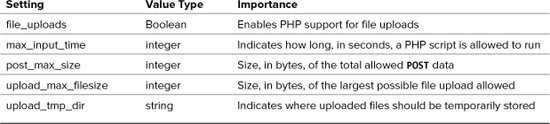
The first issue is PHP itself. There are several settings in PHP’s configuration file (php.ini) that dictate how PHP handles uploads, specifically stating how large of a file can be uploaded and where the upload should temporarily be stored (Table 11.1). Generally speaking, you’ll need to edit this file if any of these conditions apply:
• file_uploads is disabled.
• PHP has no temporary directory to use.
• You will be uploading very large files (larger than 2MB).
Table 11.1. File Upload Configurations
If you don’t have access to your php.ini file—like if you’re using a hosted site—presumably the host has already configured PHP to allow for file uploads.
The second issue is the location of, and permissions on, the temporary directory. This is where PHP will store the uploaded file until your PHP script moves it to its final destination. If you installed PHP on your own Windows computer, you might need to take steps here. Mac OS X and Unix users need not worry about this, as a temporary directory already exists for such purposes (namely, a special directory called /tmp).
Finally, the destination folder must be created and have the proper permissions established on it. This is a step that everyone must take for every application that handles file uploads. Because there are important security issues involved in this step, please also make sure that you read and understand the sidebar, “Secure Folder Permissions.”
With all of this in mind, let’s go through the steps.
To prepare the server
1. Run the phpinfo( ) function to confirm your server settings ![]() .
.
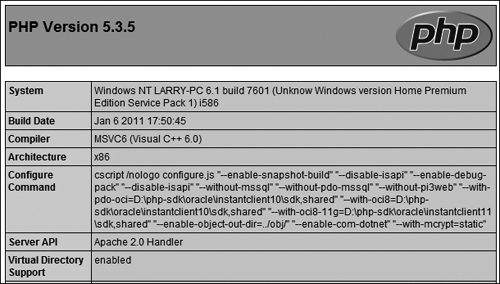
![]() A
A phpinfo( ) script returns all the information regarding your PHP setup, including all the file-upload handling stuff.
The phpinfo( ) function prints out a slew of information about your PHP setup. It’s one of the most important functions in PHP, if not the most (in my opinion). Search for the settings listed in Table 11.1 and confirm their values. Make sure that file_uploads has a value of On and that the limit for upload_max_filesize (2MB, by default) and post_max_size (8MB) won’t be a restriction for you. If running PHP on Windows, see if upload_tmp_dir has a value. If it doesn’t, that might be a problem (you’ll know for certain after running the PHP script that handles the file upload). For non-Windows users, if this value says no value, that’s perfectly fine.
By the way, another advantage of using an all-in-one installer, such as XAMPP for Windows or MAMP for Mac OS X, is that the installer should properly configure these settings, too.
2. If necessary, open php.ini in your text editor.
If there’s anything you saw in Step 1 that needs to be changed, or if something happens when you actually go to handle a file upload using PHP, you’ll need to edit the php.ini file. To find this file, see the Configuration File (php.ini) path value in the phpinfo( ) output. This indicates exactly where this file is on your computer (also download Appendix A for more).
If you are not allowed to edit your php.ini file (if, for instance, you’re using a hosted server), then presumably any necessary edits would have already been made to allow for file uploads. If not, you’ll need to request these changes from your hosting company (which may or may not agree to make them).
3. Search the php.ini file for the configuration to be changed and make any edits ![]() .
.
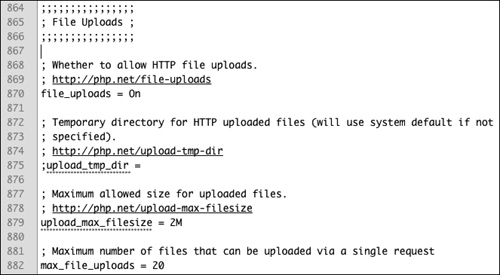
![]() The File Uploads subsection of the
The File Uploads subsection of the php.ini file.
For example, in the File Uploads section, you’ll see these three lines:
file_uploads = On
;upload_tmp_dir =
upload_max_filesize = 2M
The first line dictates whether or not uploads are allowed. The second states where the uploaded files should be temporarily stored. On most operating systems, including Mac OS X and Unix, this setting can be left commented out (preceded by a semicolon) without any problem.
If you are running Windows and need to create a temporary directory, set this value to C: mp, making sure that the line is not preceded by a semicolon.
Again, using XAMPP on Windows 7, I did not need to create a temporary directory, so you may be able to get away without one too.
Finally, a maximum upload file size is set (the M is shorthand for megabytes in configuration settings).
4. Save the php.ini file and restart your Web server.
How you restart your Web server depends upon the operating system and Web-serving application being used. See Appendix A for instructions.
5. Confirm the changes by rerunning the phpinfo( ) script.
Before going any further, confirm that the necessary changes have been enacted by repeating Step 1.
6. If you are running Windows and need to create a temporary directory, add a tmp folder within C: and make sure that everyone can write to that directory ![]() .
.
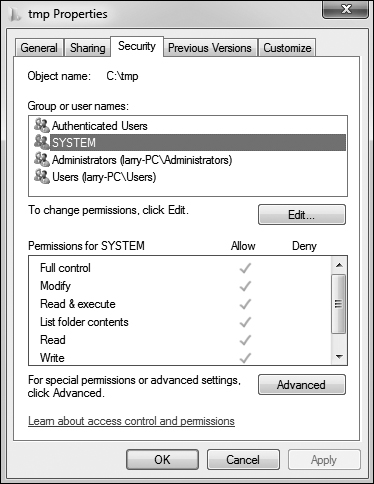
![]() Windows users need to make sure that the
Windows users need to make sure that the C: mp (or whatever directory is used) is writable by PHP.
PHP, through your Web server, will temporarily store the uploaded file in the upload_tmp_dir. For this to work, the Web user (if your Web server runs as a particular user) must have permission to write to the folder.
In all likelihood, you may not actually have to change the permissions, but to do so, depending upon what version of Windows you are running, you can normally adjust the permissions by right-clicking the folder and selecting Properties. With the Properties window, there should be a Security tab where permissions are set. It may also be under Sharing. Windows uses a more lax permissions system, so you probably won’t have to change anything unless the folder is deliberately restricted.
Mac OS X and Unix users can skip this step as the temporary directory—/tmp—has open permissions already.
7. Create a new directory, called uploads, in a directory outside of the Web root directory.
All of the uploaded files will be permanently stored in the uploads directory. If you’ll be placing your PHP script in the C:xampphtdocsch11 directory, then create a C:xamppuploads directory. Or if the files are going in /Users/~<username>/Sites/ch11, make a /Users/~<username>/uploads folder. Figure ![]() shows the structure you should establish, and the sidebar discusses why this step is necessary.
shows the structure you should establish, and the sidebar discusses why this step is necessary.
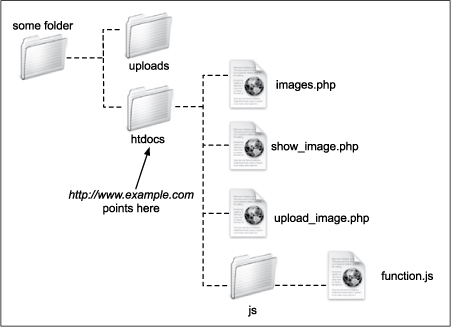
![]() Assuming that htdocs is the Web root directory (http://www.example.com or
Assuming that htdocs is the Web root directory (http://www.example.com or http://localhost points there), then the uploads directory needs to be placed outside of it.
8. Set the permissions on the uploads directory so that the Web server can write to it.
Again, Windows users can use the Properties window to make these changes, although it may not be necessary. Mac OS X users can...
A. Select the folder in the Finder.
B. Press Command+I.
C. Allow everyone to Read & Write, under the Ownership & Permissions panel ![]() .
.
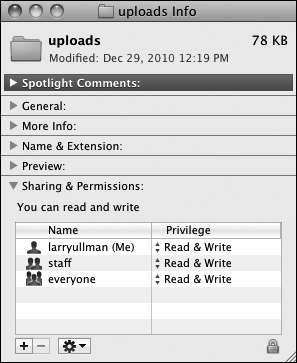
![]() Adjusting the properties on the uploads folder in Mac OS X.
Adjusting the properties on the uploads folder in Mac OS X.
If you’re using a hosted site, the host likely provides a control panel through which you can tweak a folder’s settings or you might be able to do this within your FTP application.
Depending upon your operating system, you may be able to upload files without first taking this step. You can try the following script before altering the permissions, just to see. If you see messages like those in ![]() , then you will need to make some adjustments.
, then you will need to make some adjustments.
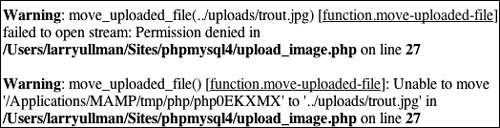
![]() If PHP could not move the uploaded image over to the uploads folder because of a permissions issue, you’ll see an error message like this one. Fix the permissions on uploads to correct this.
If PHP could not move the uploaded image over to the uploads folder because of a permissions issue, you’ll see an error message like this one. Fix the permissions on uploads to correct this.
Unix users can use the chmod command to adjust a folder’s permissions. The proper permissions in Unix terms can be either 755 or 777.
Because of the time it can take to upload a large file, you may also need to change the max_input_time value in the php.ini file or temporarily bypass it using the set_time_limit( ) function in your script.
File and directory permissions can be complicated stuff, particularly if you’ve never dealt with them before. If you have problems with these steps or the next script, search the Web or turn to the book’s corresponding forum (www.LarryUllman.com/forums/).
Uploading files with PHP
Now that the server has (hopefully) been set up to properly allow for file uploads, you can create the PHP script that does the actual file handling. There are two parts to such a script: the HTML form and the PHP code.
The required syntax for a form to handle a file upload has three parts:
<form enctype="multipart/form-data" action="script.php" method="post">
<input type="hidden" name="MAX_FILE_SIZE" value="30000" />
File <input type="file" name="upload" />
The enctype part of the initial form tag indicates that the form should be able to handle multiple types of data, including files. If you want to accept file uploads, you must include this enctype! Also note that the form must use the POST method. The MAX_FILE_SIZE hidden input is a form restriction on how large the chosen file can be, in bytes, and must come before the file input. While it’s easy for a user to circumvent this restriction, it should still be used. Finally, the file input type will create the proper button in the form (![]() and
and ![]() ).
).
![]()
![]() The file input as it appears in IE 9 on Windows.
The file input as it appears in IE 9 on Windows.
![]()
![]() The file input as it appears in Google Chrome on Mac OS X.
The file input as it appears in Google Chrome on Mac OS X.
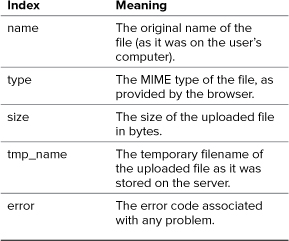
Upon form submission, the uploaded file can be accessed using the $_FILES superglobal. The variable will be an array of values, listed in Table 11.2.
Once the file has been received by the PHP script, the move_uploaded_file( ) function can transfer it from the temporary directory to its permanent location.
move_uploaded_file (temporary _filename,
/path/to/destination/filename);
Script 11.2. This script allows the user to upload an image file from their computer to the server.
1 <!DOCTYPE html PUBLIC "-//W3C//DTD XHTML
1.0 Transitional//EN" "http://www.w3.org/
TR/xhtml1/DTD/xhtml1-transitional.dtd">
2 <html xmlns="http://www.w3.org/1999/
xhtml" xml:lang="en" lang="en">
3 <head>
4 <meta http-equiv="Content-Type"
content="text/html; charset=utf-8" />
5 <title>Upload an Image</title>
6 <style type="text/css" title="text/css"
media="all">
7 .error {
8 font-weight: bold;
9 color: #C00;
10 }
11 </style>
12 </head>
13 <body>
14 <?php # Script 11.2 - upload_image.php
15
16 // Check if the form has been submitted:
17 if ($_SERVER['REQUEST_METHOD'] = = 'POST') {
18
19 // Check for an uploaded file:
20 if (isset($_FILES['upload'])) {
21
22 // Validate the type. Should be
JPEG or PNG.
23 $allowed = array ('image/pjpeg',
'image/jpeg', 'image/JPG', 'image/
X-PNG', 'image/PNG', 'image/png',
'image/x-png'),
24 if (in_array($_FILES['upload']
['type'], $allowed)) {
25
26 // Move the file over.
27 if (move_uploaded_file
($_FILES['upload']['tmp_name'],
"../uploads/{$_FILES['upload']
['name']}")) {
28 echo '<p><em>The file has
been uploaded!</em></p>';
29 } // End of move... IF.
30
31 } else { // Invalid type.
32 echo '<p class="error">Please
upload a JPEG or PNG image.</p>';
33 }
34
35 } // End of isset($_FILES['upload']) IF.
36
37 // Check for an error:
38 if ($_FILES['upload']['error'] > 0) {
39 echo '<p class="error">The file could
not be uploaded because: <strong>';
40
41 // Print a message based upon the
error.
42 switch ($_FILES['upload']['error']) {
43 case 1:
44 print 'The file exceeds the
upload_max_filesize setting
in php.ini.';
45 break;
46 case 2:
47 print 'The file exceeds the
MAX_FILE_SIZE setting in the
HTML form.';
48 break;
49 case 3:
50 print 'The file was only
partially uploaded.';
51 break;
52 case 4:
53 print 'No file was uploaded.';
54 break;
55 case 6:
56 print 'No temporary folder
was available.';
57 break;
58 case 7:
59 print 'Unable to write to
the disk.';
60 break;
61 case 8:
62 print 'File upload stopped.';
63 break;
64 default:
65 print 'A system error
occurred.';
66 break;
67 } // End of switch.
68
69 print '</strong></p>';
70
71 } // End of error IF.
72
73 // Delete the file if it still exists:
74 if (file_exists ($_FILES['upload']
['tmp_name']) && is_file($_FILES
['upload']['tmp_name']) ) {
75 unlink ($_FILES['upload']
['tmp_name']);
76 }
77
78 } // End of the submitted conditional.
79 ?>
80
81 <form enctype="multipart/form-data"
action="upload_image.php" method="post">
82
83 <input type="hidden" name="MAX_FILE_
SIZE" value="524288" />
84
85 <fieldset><legend>Select a JPEG or
PNG image of 512KB or smaller to be
uploaded:</legend>
86
87 <p><b>File:</b> <input type="file"
name="upload" /></p>
88
89 </fieldset>
90 <div align="center"><input type="submit"
name="submit" value="Submit" /></div>
91
92 </form>
93 </body>
94 </html>
This next script will let the user select a file on their computer and will then store it in the uploads directory. The script will check that the file is of an image type, specifically a JPEG or PNG. In the next section of this chapter, another script will list, and create links to, the uploaded images.
To handle file uploads in PHP
1. Create a new PHP document in your text editor or IDE, to be named upload_image.php (Script 11.2):
<!DOCTYPE html PUBLIC "-//W3C//DTD XHTML 1.0 Transitional//EN" "http://www.w3.org/TR/xhtml1/DTD/xhtml1-transitional.dtd">
<html xmlns="http://www.w3.org/1999/xhtml" xml:lang="en" lang="en">
<head>
<meta http-equiv="Content-Type" content="text/html; charset=utf-8" />
<title>Upload an Image</title>
<style type="text/css" title="text/css" media="all">
.error {
font-weight: bold;
color: #C00;
}
</style>
</head>
<body>
<?php # Script 11.2 - upload_image.php
This script will make use of one CSS class to format any errors.
2. Check if the form has been submitted and that a file was selected:
if ($_SERVER['REQUEST_METHOD'] = = 'POST') {
if (isset($_FILES['upload'])) {
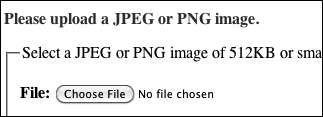
Since this form will have no other fields to be validated ![]() , this is the only conditional required. You could also validate the size of the uploaded file to determine if it fits within the acceptable range (refer to the
, this is the only conditional required. You could also validate the size of the uploaded file to determine if it fits within the acceptable range (refer to the $_FILES['upload'] ['size'] value).

![]() This very basic HTML form only takes one input: a file.
This very basic HTML form only takes one input: a file.
3. Check that the uploaded file is of the proper type:
$allowed = array ('image/pjpeg', 'image/jpeg', 'image/JPG', 'image/X-PNG', 'image/PNG', 'image/png', 'image/x-png'),
if (in_array($_FILES['upload'] ['type'], $allowed)) {
The file’s type is its MIME type, indicating what kind of file it is. The browser can determine and may provide this information, depending upon the properties of the selected file.
To validate the file’s type, first create an array of allowed options. The list of allowed types is based upon accepting JPEGs and PNGs. Some browsers have variations on the MIME types, so those are included here as well. If the uploaded file’s type is in this array, the file is valid and should be handled.
4. Copy the file to its new location on the server:
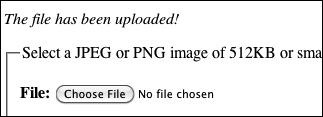
if (move_uploaded_file ($_FILES ['upload']['tmp_name'], "../uploads/{$_FILES['upload'] ['name']}")) {
echo '<p><em>The file has been uploaded!</em></p>';
} // End of move... IF.
The move_uploaded_file( ) function will move the file from its temporary to its permanent location (in the uploads folder). The file will retain its original name. In Chapter 18, “Example—E-Commerce,” you’ll see how to give the file a new name, which is generally a good idea.
As a rule, you should always use a conditional to confirm that a file was successfully moved, instead of just assuming that the move worked.
5. Complete the image type and isset ($_FILES['upload']) conditionals:
} else { // Invalid type.
echo '<p class="error">Please upload a JPEG or PNG image.</p>';
}
} // End of isset($_FILES ['upload']) IF.
The first else clause completes the if begun in Step 3. It applies if a file was uploaded but it wasn’t of the right MIME type ![]() .
.
![]() If the user uploads a file that’s not a JPEG or PNG, this is the result.
If the user uploads a file that’s not a JPEG or PNG, this is the result.
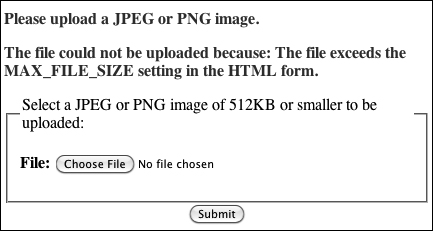
6. Check for, and report on, any errors:
if ($_FILES['upload']['error'] > 0) {
echo '<p class="error">The file could not be uploaded because: <strong>';
If an error occurred, then $_FILES ['upload']['error'] will have a value greater than 0. In such cases, this script will report what the error was.
7. Begin a switch that prints a more detailed error:
switch ($_FILES['upload']['error']) {
case 1:
print 'The file exceeds the upload_max_filesize setting in php.ini.';
break;
case 2:
print 'The file exceeds the MAX_FILE_SIZE setting in the HTML form.';
break;
case 3:
print 'The file was only partially uploaded.';
break;
case 4:
print 'No file was uploaded.';
break;
There are several possible reasons a file could not be uploaded and moved. The first and most obvious one is if the permissions are not set properly on the destination directory. In such a case, you’ll see an appropriate error message (see ![]() in the previous section of the chapter). PHP will often also store an error number in the
in the previous section of the chapter). PHP will often also store an error number in the $_FILES['upload'] ['error'] variable. The numbers correspond to specific problems, from 0 to 4, plus 6 through 8 (oddly enough, there is no 5). The switch conditional here prints out the problem according to the error number. The default case is added for future support (if different numbers are added in later versions of PHP).
For the most part, these errors are useful to you, the developer, and not things you’d indicate to the average user.
8. Complete the switch:
case 6:
print 'No temporary folder was available.';
break;
case 7:
print 'Unable to write to the disk.';
break;
case 8:
print 'File upload stopped.';
break;
default:
print 'A system error occurred.';
break;
} // End of switch.
9. Complete the error if conditional:
print '</strong></p>';
} // End of error IF.
10. Delete the temporary file if it still exists:
if (file_exists ($_FILES['upload'] ['tmp_name']) && is_file($_FILES ['upload']['tmp_name']) ) {
unlink ($_FILES['upload'] ['tmp_name']);
}
If the file was uploaded but it could not be moved to its final destination or some other error occurred, then that file is still sitting on the server in its temporary location. To remove it, apply the unlink( ) function. Just to be safe, prior to applying unlink( ), a conditional checks that the file exists and that it is a file (because the file_exists( ) function will return TRUE if the named item is a directory).
} // End of the submitted conditional.
?>
12. Create the HTML form:
<form enctype="multipart/form-data" action="upload_image.php" method="post">
<input type="hidden" name="MAX_FILE_SIZE" value="524288" />
<fieldset><legend>Select a JPEG or PNG image of 512KB or smaller to be uploaded: </legend>
<p><b>File:</b> <input type="file" name="upload" /></p>
</fieldset>
<div align="center"><input type="submit" name="submit" value="Submit" /></div>
</form>
This form is very simple ![]() , but it contains the three necessary parts for file uploads: the form’s
, but it contains the three necessary parts for file uploads: the form’s enctype attribute, the MAX_FILE_SIZE hidden input, and the file input.
13. Complete the HTML page:
</body>
</html>
14. Save the file as upload_image.php, place it in your Web directory, and test it in your Web browser (![]() and
and ![]() ).
).
![]() The result upon successfully uploading and moving a file.
The result upon successfully uploading and moving a file.
![]() The result upon attempting to upload a file that is too large.
The result upon attempting to upload a file that is too large.
If you want, you can confirm that the script works by checking the contents of the uploads directory.
Windows users must use either forward slashes or double backslashes to refer to directories (so C:\ or C:/ but not C:). This is because the backslash is the escape character in PHP.
The move_uploaded_file( ) function will overwrite an existing file without warning if the new and existing files both have the same name.
The MAX_FILE_SIZE is a restriction in the browser as to how large a file can be, although not all browsers abide by this restriction. The PHP configuration file has its own restrictions. You can also validate the uploaded file size within the receiving PHP script.
In Chapter 13, you’ll learn a method for improving the security of this script by validating the uploaded file’s type more reliably.
PHP and JavaScript
Although PHP and JavaScript are fundamentally different technologies, they can be used together to make better Web sites. The most significant difference between the two languages is that JavaScript is primarily client-side (meaning it runs in the Web browser) and PHP is always server-side. Therefore, JavaScript can do such things as detect the size of the browser window, create pop-up windows, make image mouseovers, whereas PHP can do nothing like these things. Conversely, PHP can interact with MySQL on the server, but JavaScript cannot.
Although PHP cannot do certain things that JavaScript can, PHP can be used to create JavaScript, just as PHP can create HTML. To be clear, in a Web browser, JavaScript is incorporated by, and interacts with HTML, but PHP can dynamically generate JavaScript code, just as you’ve been using PHP to dynamically generate HTML.
To demonstrate this, one PHP script will be created that lists all the images uploaded by the upload_image.php script ![]() . The PHP script will also create each image name as a clickable link. The links themselves will call a JavaScript function
. The PHP script will also create each image name as a clickable link. The links themselves will call a JavaScript function ![]() that creates a pop-up window. The pop-up window will actually show the clicked image. This example will in no way be a thorough discussion of JavaScript, but it does adequately demonstrate how the various technologies—PHP, HTML, and JavaScript—can be used together. In Chapter 15, “Introducing jQuery,” you’ll learn how to use the jQuery JavaScript framework to add all sorts of functionality to PHP-based scripts.
that creates a pop-up window. The pop-up window will actually show the clicked image. This example will in no way be a thorough discussion of JavaScript, but it does adequately demonstrate how the various technologies—PHP, HTML, and JavaScript—can be used together. In Chapter 15, “Introducing jQuery,” you’ll learn how to use the jQuery JavaScript framework to add all sorts of functionality to PHP-based scripts.
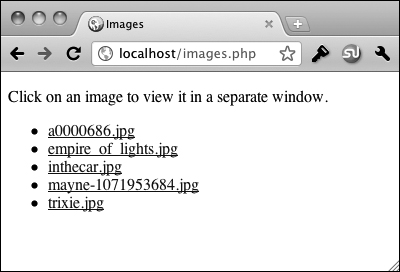
![]() This PHP page dynamically creates a list of all the uploaded images.
This PHP page dynamically creates a list of all the uploaded images.

![]() Each image’s name is linked as a call to a JavaScript function. The function call’s parameters are created by PHP.
Each image’s name is linked as a call to a JavaScript function. The function call’s parameters are created by PHP.
Creating the JavaScript File
Even though JavaScript and PHP are two different languages, they are similar enough that it’s possible to dabble with JavaScript without any formal training. Before creating the JavaScript code for this example, I’ll explain a few of the fundamentals.
First, JavaScript code can be added to an HTML page in one of two ways: inline or through an external file. To add inline JavaScript, place the JavaScript code between HTML script tags:
<script type="text/javascript">
// Actual JavaScript code.
</script>
To use an external JavaScript file, add a src attribute to the script tag:
<script type="text/javascript" src="somefile.js"></script>
Your HTML pages can have multiple uses of the script tag, but each can only include an external file or have some JavaScript code, but not both.
As you can see in the above, JavaScript files use a .js extension. The file should use the same encoding (as set in your text editor or IDE) as the HTML script that will include the file. You can indicate the file’s encoding in the script tag:
<script type="text/javascript" charset="utf-8" src="somefile.js"> </script>
Whether you place your JavaScript code within script tags or in an external file, there are no opening and closing JavaScript tags, like the opening and closing PHP tags.
Next, know that variables in JavaScript are case-sensitive, just like PHP, but variables in JavaScript do not begin with dollar signs.
Finally, one of the main differences between JavaScript and PHP is that JavaScript is an Object-Oriented Programming (OOP) language. Whereas PHP can be used in both a procedural approach, as most of this book demonstrates, and an object-oriented approach (introduced in Chapter 16, “An OOP Primer”), JavaScript is only ever an object-oriented language. This means you’ll see the “dot” syntax like something.something( ) or something.something.something.
That’s enough of the basics; in the following script I’ll explain the particulars of each bit of code in sufficient detail. In this next sequence of steps, you’ll create a separate JavaScript file that will define one JavaScript function. The function itself will take three arguments—an image’s name, width, and height. The function will use these values to create a pop-up window specifically for that image.
To create JavaScript with PHP
1. Begin a new JavaScript document in your text editor or IDE, to be named function.js (Script 11.3):
// Script 11.3 - function.js
Again, there are no opening JavaScript tags here, you can just start writing JavaScript code. Comments in JavaScript can use either the single line (//) or multiline (/* */) syntax.
2. Begin the JavaScript function:
function create_window (image, width, height) {
The JavaScript create_window( ) function will accept three parameters: the image’s name, its width, and its height. Each of these will be passed to this function when the user clicks a link. The exact values of the image name, width, and height will be determined by PHP.
The syntax for creating a function in JavaScript is very similar to a user-defined function in PHP, except that the variables do not have initial dollar signs.
3. Add ten pixels to the received width and height values:
width = width + 10;
height = height + 10;
Some pixels will be added to the width and height values to create a window slightly larger than the image itself. Math in JavaScript uses the same operators as in pretty much every language.
4. Resize the pop-up window if it is already open:
if (window.popup && !window.popup. closed) {
window.popup.resizeTo(width, height);
}
Script 11.3. The function.js script defines a JavaScript function for creating the pop-up window that will show an individual image.
1 // Script 11.3 - function.js
2
3 // Make a pop-up window function:
4 function create_window (image, width,
height) {
5
6 // Add some pixels to the width and
height:
7 width = width + 10;
8 height = height + 10;
9
10 // If the window is already open,
11 // resize it to the new dimensions:
12 if (window.popup && !window.popup.
closed) {
13 window.popup.resizeTo(width, height);
14 }
15
16 // Set the window properties:
17 var specs = "location=no,
scrollbars=no, menubars=no,
toolbars=no, resizable=yes,
left=0, top=0, width=" + width + ",
height=" + height;
18
19 // Set the URL:
20 var url = "show_image.php?image=" +
image;
21
22 // Create the pop-up window:
23 popup = window.open(url, "ImageWindow",
specs);
24 popup.focus( );
25
26 } // End of function.
Later in the function, a window will be created, associated with the popup variable. If the user clicks one image name, creating the pop-up window, and then clicks another image’s name without having closed the first pop-up window, the new image will be displayed in a mis-sized window. To prevent that, a bit of code here first checks if the pop-up window exists and if it is not closed. If both conditions are TRUE (which is to say that the window is already open), the window will be resized according to the new image dimensions. This is accomplished by calling the resizeTo( ) method of the popup object (a method is the OOP term for a function).
5. Determine the properties of the pop-up window:
var specs = "location=no, scrollbars=no, menubars=no, toolbars=no, resizable=yes, left=0, top=0, width=" + width + ", height=" + height;
This line creates a new JavaScript variable with a name of specs. The var keyword before the variable name is the preferred way to create variables within a function (specifically, it creates a variable local to the function). Note that the image, width, and height variables didn’t use this keyword, as they were created as the arguments to a function.
This variable will be used to establish the properties of the pop-up window. The window will have no location bar, scroll bars, menus, or toolbars; it should be resizable; it will be located in the upper-left corner of the screen; and it will have a width of width and a height of height ![]() .
.

![]() The pop-up window, created by JavaScript.
The pop-up window, created by JavaScript.
With strings in JavaScript, the plus sign is used to perform concatenation (whereas PHP uses the period).
6. Define the URL:
var url = "show_image.php?image=" + image;
This code sets the URL of the pop-up window, which is to say what page the window should load. That page is show_image.php, to be created later in this chapter. The show_image.php script expects to receive an image’s name in the URL, so the value of the url variable is show_image.php?image= plus the name of the image concatenated to the end ![]() .
.

![]() The address of the pop-up window shows how the image value is passed in the URL.
The address of the pop-up window shows how the image value is passed in the URL.
7. Create the pop-up window:
popup = window.open(url, "ImageWindow", specs);
popup.focus( );
Finally, the pop-up window is created using the open( ) method of the window object. The window object is a global JavaScript object created by the browser to refer to the open windows. The open( ) method’s first argument is the page to load, the second is the title to be given to the window, and the third is a list of properties. Note that the creation of this window is assigned to the popup variable. Because this variable’s creation does not begin with the keyword var, popup will be a global variable. This is necessary in order for multiple calls of this function to reference that same variable.
Finally, focus is given to the new window, meaning it should appear above the current window.
8. Save the script as function.js.
9. Place the script, or a copy, in the js folder of your Web directory.
JavaScript, like CSS, ought to be separated out when organizing your Web directory. Normally, external JavaScript files are placed in a folder named js, javascript, or scripts.
Creating the PHP Script
Now that the JavaScript code required by the page has been created, it’s time to create the PHP script itself (which will output the HTML that calls the JavaScript function). The purpose of this script is to list all of the images already uploaded by upload_image.php. To do this, PHP needs to dynamically retrieve the contents of the uploads directory. That can be done via the scandir( ) function. It returns an array listing the files in a given directory (it was added in PHP 5).
The PHP script must link each displayed image name as a call to the just-defined JavaScript function. That function expects to receive three arguments: the image’s name, its width, and its height. For PHP to find these last two values, the script will use the getimagesize( ) function. It returns an array of information for a given image (Table 11.3).
Table 11.3. The getimagesize( ) Array

To create JavaScript with PHP
1. Begin a new PHP document in your text editor or IDE, to be named images.php (Script 11.4):
<!DOCTYPE html PUBLIC "-//W3C//DTD XHTML 1.0 Transitional//EN" "http://www.w3.org/TR/xhtml1/DTD/xhtml1-transitional.dtd">
<html xmlns="http://www.w3.org/1999/xhtml" xml:lang="en" lang="en">
<head>
<meta http-equiv="Content-Type" content="text/html; charset=utf-8" />
<title>Images</title>
2. Include the JavaScript file:
<script type="text/javascript" charset="utf-8" src="js/function.js"></script>
You can use the script tags anywhere in an HTML page, but inclusions of external files are commonly performed in the document’s head. The reference to function.js assumes that the file will be found in the js directory, with the js directory being in the same directory as this current script (see ![]() under “Handling File Uploads”).
under “Handling File Uploads”).
Script 11.4. The images.php script uses JavaScript and PHP to create links to images stored on the server. The images will be viewable through show_image.php (Script 11.5).
1 <!DOCTYPE html PUBLIC "-//W3C//DTD XHTML
1.0 Transitional//EN" "http://www.w3.org/
TR/xhtml1/DTD/xhtml1-transitional.dtd">
2 <html xmlns="http://www.w3.org/1999/
xhtml" xml:lang="en" lang="en">
3 <head>
4 <meta http-equiv="Content-Type"
content="text/html; charset=utf-8" />
5 <title>Images</title>
6 <script type="text/javascript" charset=
"utf-8" src="js/function.js"></script>
7 </head>
8 <body>
9 <p>Click on an image to view it in a
separate window.</p>
10 <ul>
11 <?php # Script 11.4 - images.php
12 // This script lists the images in the
uploads directory.
13
14 $dir = '../uploads'; // Define the
directory to view.
15
16 $files = scandir($dir); // Read all the
images into an array.
17
18 // Display each image caption as a link
to the JavaScript function:
19 foreach ($files as $image) {
20
21 if (substr($image, 0, 1) != '.') { //
Ignore anything starting with a period.
22
23 // Get the image's size in pixels:
24 $image_size = getimagesize
("$dir/$image");
25
26 // Make the image's name URL-safe:
27 $image_name = urlencode($image);
28
29 // Print the information:
30 echo "<li><a href="javascript:
create_window('$image_name',
$image_size[0],$image_size[1])">
$image</a></li>
";
31
32 } // End of the IF.
33
34 } // End of the foreach loop.
35 ?>
36 </ul>
37 </body>
38 </html>
3. Complete the HTML head and begin the body:
</head>
<body>
<p>Click on an image to view it in a separate window.</p>
4. Begin an HTML unordered list:
<ul>
To make things simple, this script displays each image as an item in an unordered list.
5. Start the PHP code and create an array of images by referring to the uploads directory:
<?php # Script 11.4 - images.php
$dir = '../uploads';
$files = scandir($dir);
This script will automatically list and link all of the images stored in the uploads folder (presumably put there by upload_image.php, Script 11.3). The code begins by defining the directory as a variable, so that it’s easier to refer to. Then the scandir( ) function, which returns an array of files and directories found within a folder, assigns that information to an array called $files.
6. Begin looping through the $files array:
foreach ($files as $image) {
if (substr($image, 0, 1) != '.') {
This loop will go through every image in the array and create a list item for it. Within the loop, there is one conditional that checks if the first character in the file’s name is a period. On non-Windows systems, hidden files start with a period, the current directory is referred to using just a single period, and two periods refers to the parent directory. Since all of these might be included in $files, they need to be weeded out.
7. Get the image information and encode its name:
$image_size = getimagesize ("$dir/$image");
$image_name = urlencode($image);
The getimagesize( ) function returns an array of information about an image (Table 11.3). The values returned by this function will be used to set the width and height sent to the create_window( ) JavaScript function.
Next, the urlencode( ) function makes a string safe to pass in a URL. Because the image name may contain characters not allowed in a URL (and it will be passed in the URL when invoking show_image.php), the name should be encoded.
8. Print the list item:
echo "<li><a href="javascript: create_window('$image_name', $image_size[0],$image_size[1])"> $image</a> ";
Finally, the loop creates the HTML list item, consisting of the linked image name. The link itself is a call to the JavaScript create_window( ) function. In order to execute the JavaScript function from within HTML, preface it with javascript:. (There’s much more to calling JavaScript from within HTML, but just use this syntax for now.)
The function’s three arguments are: the image’s name, the image’s width, and the image’s height. Because the image’s name will be a string, it must be wrapped in quotation marks.
9. Complete the if conditional, the foreach loop, and the PHP section:
} // End of the IF.
} // End of the foreach loop.
?>
10. Complete the unordered list and the HTML page:
</ul>
</body>
</html>
11. Save the file as images.php, place it in your Web directory (in the same directory as upload_image.php), and test it in your Web browser ![]() .
.
Note that clicking the links will not work yet, as show_image.php—the page the pop-up window attempts to load—hasn’t been created.
12. View the source code to see the dynamically generated links ![]() .
.
Notice how the parameters to each function call are appropriate to the specific image.
Different browsers will handle the sizing of the window differently. In my tests, for example, Google Chrome always required that the window be at least a certain width and Internet Explorer 9 would pad the displayed image on all four sides.
Some versions of Windows create a Thumbs.db file in a folder of images. You might want to check for this value in the conditional in Step 6 that weeds out some returned items. That code would be
if ( (substr($image, 0, 1) != '.') && ($image != 'Thumbs.db') ) {
Not to belabor the point, but most everything Web developers do with JavaScript (for example, resize or move the browser window) cannot be done using the server-side PHP.
There is a little overlap between the PHP and JavaScript. Both can set and read cookies, create HTML, and do some browser detection.
Understanding HTTP Headers
The images.php script, just created, displays a list of image names, each of which is linked to a JavaScript function call. That JavaScript function creates a pop-up window which loads a PHP script that will actually reveal the image. This may sound like a lot of work for little effort, but there’s a method to my madness. A trivial reason for this approach is that JavaScript is required in order to create a window sized to fit the image (as opposed to creating a pop-up window of any size, with the image in it). More importantly, because the images are being stored in the uploads directory, ideally stored outside of the Web root directory, the images cannot be viewed directly in the Web browser using either of the following:
http://www.example.com/uploads/image.png
or
<img src="image.png" />
The reason why neither of the above will work is that files and folders located outside of the Web root directory are, by definition, unavailable via a Web browser. This is actually a good thing, because it allows you to safeguard content, providing it only when appropriate. To make that content available through a Web browser, you need to create a proxy script in PHP. A proxy script just fulfills a role, such as providing a file (displaying an image is actually the same thing as providing a file to the browser). Thus, given the proxy script proxy.php, the above examples could be made to work using either ![]() :
:
http://www.example.com/proxy.php?image=image.png
or
<img src="proxy.php?image=image.png" />
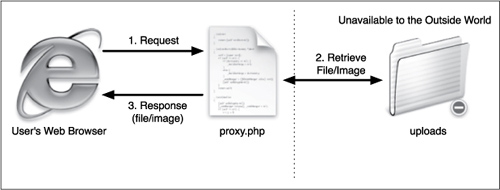
![]() A proxy script is able to provide access to content on the server that would otherwise be unavailable.
A proxy script is able to provide access to content on the server that would otherwise be unavailable.
This, of course, is exactly what’s being done with show_image.php, linked in the create_window( ) JavaScript function. But how does proxy.php, or show_image.php, work? The answer lies in an understanding of HTTP headers.
HTTP (Hypertext Transfer Protocol) is the technology at the heart of the World Wide Web and defines the way clients and servers communicate (in layman’s terms). When a browser requests a Web page, it receives a series of HTTP headers in return. This happens behind the scenes; most users aren’t aware of this at all.
PHP’s built-in header( ) function can be used to take advantage of this protocol. The most common example of this will be demonstrated in the next chapter, when the header( ) function will be used to redirect the Web browser from the current page to another. Here, you’ll use it to send files to the Web browser.
In theory, the header( ) function is easy to use. Its syntax is
header(header string);
The list of possible header strings is quite long, as headers are used for everything from redirecting the Web browser, to sending files, to creating cookies, to controlling page caching, and much, much more. Starting with something simple, to use header( ) to redirect the Web browser, type
header ('Location: http://www.example.com/page.php'),
That line will send the Web browser from the page it’s on over to that other URL. You’ll see examples of this in the next chapter.
In this next example, which will send an image file to the Web browser, three header calls are used. The first is Content-Type. This is an indication to the Web browser of what kind of data is about to follow. The Content-Type value matches the data’s MIME type. This line lets the browser know it’s about to receive a PDF file:
header("Content-Type:application/pdf ");
Next, you can use Content-Disposition, which tells the browser how to treat the data:
header ("Content-Disposition: attachment; filename="somefile.pdf" ");
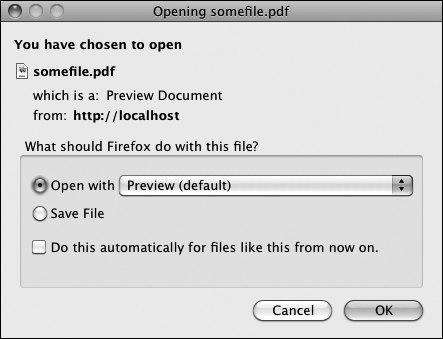
The attachment value will prompt the browser to download the file ![]() . An alternative is to use inline, which tells the browser to display the data, assuming that the browser can. The
. An alternative is to use inline, which tells the browser to display the data, assuming that the browser can. The filename attribute is just that: it tells the browser the name associated with the data. Some browsers abide by this instruction, others do not.
![]() Firefox prompts the user to download the file because of the attachment Content-Disposition value.
Firefox prompts the user to download the file because of the attachment Content-Disposition value.
A third header to use for downloading files is Content-Length. This is a value, in bytes, corresponding to the amount of data to be sent.
header ("Content-Length: 4096 ");
That’s the basics with respect to using the header( ) function. Before getting to the example, note that if a script uses multiple header( ) calls, each should be terminated by a newline (
) as in the preceding code snippets. More importantly, the absolutely critical thing to remember about the header( ) function is that it must be called before anything is sent to the Web browser. This includes HTML or even blank spaces. If your code has any echo or print statements, has blank lines outside of PHP tags, or includes files that do any of these things before calling header( ), you’ll see an error message like that in ![]() .
.
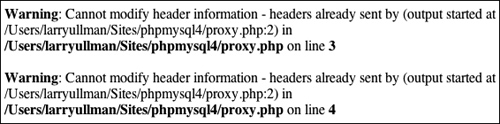
![]() The headers already sent error means that the Web browser was sent something—HTML, plain text, even a space—prior to using the
The headers already sent error means that the Web browser was sent something—HTML, plain text, even a space—prior to using the header( ) function.
To use the header() function
1. Begin a new PHP document in your text editor or IDE, to be named show_image.php (Script 11.5):
<?php # Script 11.5 - show_image.php
$name = FALSE;
Because this script will use the header( ) function, nothing—absolutely nothing—can be sent to the Web browser. No HTML, not even a blank line, tab, or space before the opening PHP tag.
The $name variable will be used as a flag, indicating if all of the validation routines have been passed.
2. Check for an image name:
if (isset($_GET['image'])) {
The script needs to receive a valid image name in the URL. This should be appended to the URL in the JavaScript function that calls this page (see function.js, Script 11.3).
3. Validate the image’s extension:
$ext = strtolower ( substr ($_GET['image'], -4));
if (($ext = = '.jpg') OR ($ext = = 'jpeg') OR ($ext = = '.png')) {
The next check is that the file to be sent to the Web browser has a .jpeg, .jpg, or .png extension. This way the script won’t try to send something bad to the user. For example, if a malicious user changed the address in the pop-up window from http://www.example.com/show_image.php?image=image.png to http://www.example.com/show_image.php?image=../../../path/to/ something/important, this conditional would catch, and prevent, that hack.
Script 11.5. This script retrieves an image from the server and sends it to the browser, using HTTP headers.
1 <?php # Script 11.5 - show_image.php
2 // This page displays an image.
3
4 $name = FALSE; // Flag variable:
5
6 // Check for an image name in the URL:
7 if (isset($_GET['image'])) {
8
9 // Make sure it has an image's
extension:
10 $ext = strtolower ( substr ($_GET
['image'], -4));
11
12 if (($ext = = '.jpg') OR ($ext = =
'jpeg') OR ($ext = = '.png')) {
13
14 // Full image path:
15 $image = "../uploads/{$_GET['image']}";
16
17 // Check that the image exists and
is a file:
18 if (file_exists ($image) &&
(is_file($image))) {
19
20 // Set the name as this image:
21 $name = $_GET['image'];
22
23 } // End of file_exists( ) IF.
24
25 } // End of $ext IF.
26
27 } // End of isset($_GET['image']) IF.
28
29 // If there was a problem, use the
default image:
30 if (!$name) {
31 $image = 'images/unavailable.png';
32 $name = 'unavailable.png';
33 }
34
35 // Get the image information:
36 $info = getimagesize($image);
37 $fs = filesize($image);
38
39 // Send the content information:
40 header ("Content-Type: {$info['mime']}
");
41 header ("Content-Disposition: inline;
filename="$name"
");
42 header ("Content-Length: $fs
");
43
44 // Send the file:
45 readfile ($image);
To validate the extension, the substr( ) function returns the last four characters from the image’s name (the -4 accomplishes this). The extension is also run through the strtolower( ) function so that .PNG and .png are treated the same. Then a conditional checks to see if $ext is equal to any of the three allowed values.
4. Check that the image is a file on the server:
$image = "../uploads/{$_GET['image']}";
if (file_exists ($image) && (is_file($image))) {
Before attempting to send the image to the Web browser, make sure that it exists and that it is a file (as opposed to a directory). As a security measure, the image’s full path is defined as a combination of ../uploads and the received image name.
5. Set the value of the flag variable to the image’s name:
$name = $_GET['image'];
Once the image has passed all of these tests, the $name variable is assigned the value of the image.
6. Complete the conditionals begun in Steps 2, 3, and 4:
} // End of file_exists( ) IF.
} // End of $ext IF.
} // End of isset($_GET['image']) IF.
There are no else clauses for any of these three conditions. If all three conditions aren’t TRUE, then the flag variable $name will still have a FALSE value.
7. If no valid image was received by this page, use a default image:
if (!$name) {
$image = 'images/unavailable.png';
$name = 'unavailable.png';
}
If the image doesn’t exist, if it isn’t a file, or if it doesn’t have the proper extension, then the $name variable will still have a value of FALSE. In such cases, a default image will be used instead ![]() . The image itself can be downloaded from the book’s corresponding Web site (www.LarryUllman.com, found with all the downloadable code) and should be placed in an
. The image itself can be downloaded from the book’s corresponding Web site (www.LarryUllman.com, found with all the downloadable code) and should be placed in an images folder. The images folder should be in the same directory as this script, not in the same directory as the uploads folder.
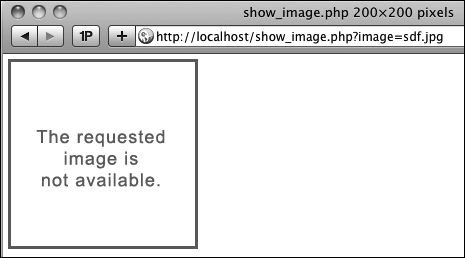
![]() This image will be shown any time there’s a problem with showing the requested image.
This image will be shown any time there’s a problem with showing the requested image.
8. Retrieve the image’s information:
$info = getimagesize($image);
$fs = filesize($image);
To send a file to the Web browser, the script needs to know the file’s MIME type and size. An image file’s type can be found using getimagesize( ). The file’s size, in bytes, is found using filesize( ). Because the $image variable represents either ../uploads/{$_GET['image']} or images/unavailable.png, these lines will work on both the correct and the unavailable image.
9. Send the file:
header ("Content-Type: {$info['mime']}
");
header ("Content-Disposition: inline; filename="$name"
");
header ("Content-Length: $fs
");
These header( ) calls will send the file data to the Web browser. The first line uses the image’s MIME type for the value of the Content-Type header. The second line tells the browser the name of the file and that it should be displayed in the browser (inline). The last header( ) function indicates how much data is to be expected.
The file data itself is sent using the readfile( ) function, which reads in a file and immediately sends the content to the Web browser.
10. Save the file as show_image.php, place it in your Web directory, in the same folder as images.php, and test it in your Web browser by clicking a link in images.php ![]() .
.
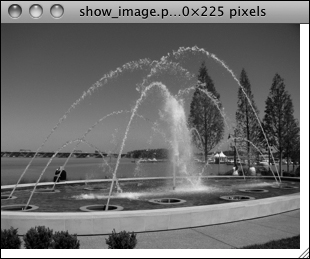
![]() This image is displayed by having PHP send the file to the Web browser.
This image is displayed by having PHP send the file to the Web browser.
Notice that this page contains no HTML. It only sends an image file to the Web browser. Also note that I omitted the terminating PHP tag. This is acceptable, and in certain situations like this, preferred. If you included the closing PHP tag, and you inadvertently had an extra space or blank line after that tag, the browser could have problems displaying the image (because the browser will have received the image data of X length, matching the Content-Length header, plus a bit of extra data).
I cannot stress strongly enough that nothing can be sent to the Web browser before using the header( ) function. Even an included file that has a blank line after the closing PHP tag will make the header( ) function unusable.
To avoid problems when using header( ), you can call the headers_sent( ) function first. It returns a Boolean value indicating if something has already been sent to the Web browser:
if (!headers_sent( )) {
// Use the header( ) function.
} else {
// Do something else.
}
Output buffering, demonstrated in Chapter 17, “Example—User Registration,” can also prevent problems when using header( ).
Debugging scripts like this, where PHP sends data, not text, to the Web browser, can be challenging. For help, use one of the many developer plug-ins for the Firefox browser ![]() .
.
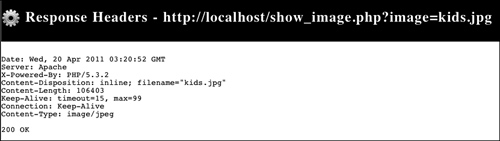
![]() The Web Developer Toolbar extension for Firefox includes the ability to see what headers were sent by a page and/or server. This can be useful debugging information.
The Web Developer Toolbar extension for Firefox includes the ability to see what headers were sent by a page and/or server. This can be useful debugging information.
You can also indicate to the Web browser the page’s encoding using PHP and the header( ) function:
<?php header ('Content-Type: text/html; charset=UTF-8'), ?>
This can be more effective than using a META tag, but it does require the page to be a PHP script. If using this, it must be the first line in the page, before any HTML.
Date and Time Functions
Chapter 5, “Introduction to SQL,” demonstrates a handful of great date and time functions that MySQL supports. Naturally, PHP has its own date and time functions. To start, there’s date_default_timezone_set( ). This function is used to establish the default time zone (which can also be set in PHP’s configuration file).
date_default_timezone_set(tz);
The tz value is a string like America/New_York or Pacific/Auckland. There are too many to list here (Africa alone has over 50), but see the PHP manual for them all. Note that as of PHP 5.1, the default time zone must be set, either in a script or in PHP’s configuration file, prior to calling any of the date and time functions, or else you’ll see an error.
Next up, the checkdate( ) function takes a month, a day, and a year and returns a Boolean value indicating whether that date actually exists (or existed). It even takes into account leap years. This function can be used to ensure that a user supplied a valid date (birth date or other):
if (checkdate(month, day, year)) { // OK!
Perhaps the most frequently used function is the aptly named date( ). It returns the date and/or time as a formatted string. It takes two arguments:
date (format, [timestamp]);
The timestamp is an optional argument representing the number of seconds since the Unix Epoch (midnight on January 1, 1970) for the date in question. It allows you to get information, like the day of the week, for a particular date. If a timestamp is not specified, PHP will just use the current time on the server.
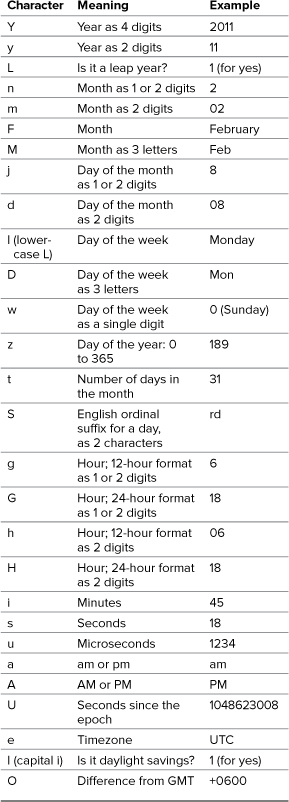
There are myriad formatting parameters available (Table 11.4), and these can be used in conjunction with literal text. For example,
echo date('F j, Y'), // January 26, 2011
echo date('H:i'), // 23:14
echo date('D'), // Sat
Table 11.4. Date( ) Function Formatting
You can find the timestamp for a particular date using the mktime( ) function:
$stamp = mktime (hour, minute, second, month, day, year);
If called with no arguments, mktime( ) returns the current timestamp, which is the same as calling the time( ) function.
Finally, the getdate( ) function can be used to return an array of values (Table 11.5) for a date and time. For example,
$today = getdate( );
echo $today['month']; // October
Table 11.5. The getdate( ) Array

This function also takes an optional timestamp argument. If that argument is not used, getdate( ) returns information for the current date and time.
These are just a handful of the many date and time functions PHP has. For more, see the PHP manual. To practice working with these functions, let’s modify images.php (Script 11.4) in a couple of ways. First, the script will show each image’s uploaded date and time. Second, while a change is being made to the layout, the script will show each image’s file size, too ![]() .
.

![]() The revised
The revised images.php shows two more pieces of information about each image.
To use the date and time functions
1. Open images.php (Script 11.4) in your text editor or IDE, if it is not already.
2. As the first line of code after the opening PHP tag, establish the time zone (Script 11.6):
date_default_timezone_set ('America/New_York'),
Before calling any of the date and time functions, the time zone has to be established. To find your time zone, see www.php.net/timezones.
3. Within the foreach loop, after getting the image’s dimensions, calculate its file size:
$file_size = round ( (filesize ("$dir/$image")) / 1024) . "kb";
The filesize( ) function was first used in the show_image.php script. It returns the size of a file in bytes. To calculate the kilobytes of a file, divide this number by 1,024 (there are that many bytes in a kilobyte) and round it off.
4. On the next line, determine the image’s modification date and time:
$image_date = date("F d, Y H:i:s", filemtime("$dir/$image"));
To find a file’s modification date and time, call the filemtime( ) function, providing the function with the file, or directory, to be examined. This function returns a timestamp, which can then be used as the second argument to the date( ), which will format the timestamp accordingly.
If you’re perplexed by what’s happening here, you can break the code into two steps:
$filemtime = filemtime ("$dir/$image");
$image_date = date("F d, Y H:i:s ", $filemtime);
5. Change the echo statement so that it also prints the file size and modification date:
echo "<li><a href="javascript: create_window('$image_name', $image_size[0],$image_size[1])"> $image</a> $file_size ($image_date)</li> ";
Both are printed outside of the A tag, so they aren’t part of the links.
6. Save the file as images.php, place it in your Web directory, and test it in your Web browser.
The date( ) function has some parameters that are used for informative purposes, not formatting. For example, date('L') returns 1 or 0 indicating if it’s a leap year; date('t') returns the number of days in the current month; and date('I') returns a 1 if it’s currently daylight saving time.
PHP’s date functions reflect the time on the server (because PHP runs on the server); you’ll need to use JavaScript if you want to determine the date and time on the user’s computer.
Script 11.6. This modified version of images.php (Script 11.4) uses PHP’s date and time functions in order to report some information to the user.
1 <!DOCTYPE html PUBLIC "-//W3C//DTD XHTML 1.0 Transitional//EN" "http://www.w3.org/TR/xhtml1/DTD/
xhtml1-transitional.dtd">
2 <html xmlns="http://www.w3.org/1999/xhtml" xml:lang="en" lang="en">
3 <head>
4 <meta http-equiv="Content-Type" content="text/html; charset=utf-8" />
5 <title>Images</title>
6 <script type="text/javascript" charset="utf-8" src="js/function.js"></script>
7 </head>
8 <body>
9 <p>Click on an image to view it in a separate window.</p>
10 <ul>
11 <?php # Script 11.6 - images.php
12 // This script lists the images in the uploads directory.
13 // This version now shows each image's file size and uploaded date and time.
14
15 // Set the default timezone:
16 date_default_timezone_set ('America/New_York'),
17
18 $dir = '../uploads'; // Define the directory to view.
19
20 $files = scandir($dir); // Read all the images into an array.
21
22 // Display each image caption as a link to the JavaScript function:
23 foreach ($files as $image) {
24
25 if (substr($image, 0, 1) != '.') { // Ignore anything starting with a period.
26
27 // Get the image's size in pixels:
28 $image_size = getimagesize ("$dir/$image");
29
30 // Calculate the image's size in kilobytes:
31 $file_size = round ( (filesize ("$dir/$image")) / 1024) . "kb";
32
33 // Determine the image's upload date and time:
34 $image_date = date("F d, Y H:i:s", filemtime("$dir/$image"));
35
36 // Make the image's name URL-safe:
37 $image_name = urlencode($image);
38
39 // Print the information:
40 echo "<li><a href="javascript:create_window('$image_name',$image_size[0],
$image_size[1])">$image</a> $file_size ($image_date)</li>
";
41
42 } // End of the IF.
43
44 } // End of the foreach loop.
45
46 ?>
47 </ul>
48 </body>
49 </html>
Review and Pursue
If you have any problems with the review questions or the pursue prompts, turn to the book’s supporting forum (www.LarryUllman.com/forums/).
Review
• What function is used to send email? What are the function’s arguments? What does the server need in order to send email?
• Does it make a difference whether
is used within single or double quotation marks?
• Can you easily know for certain if, or when, a recipient received an email sent by PHP?
• What debugging steps can you take if you aren’t receiving any email that should be sent from a PHP script?
• How do folder permissions come into play for handling uploaded files?
• What two directories are used in handling file uploads?
• What additional attribute must be made to the opening form tag in order to handle a file upload?
• What is a MIME type?
• In what ways are PHP and JavaScript alike? How are they different?
• What tag is used to add JavaScript to an HTML page?
• What does the var keyword mean in JavaScript?
• What is the concatenation operator in JavaScript?
• What does the PHP header( ) function do?
• What do headers already sent error messages mean?
• What is a proxy script? When might a proxy script be necessary?
• What does the readfile( ) function do?
Pursue
• Create a more custom contact form. Have the PHP script also send a more custom email, including any other data requested by the form.
• Search online using the keywords php email spam filters to learn techniques for improving the successful delivery of PHP-sent email (i.e., to minimize the chances of spam filters eating legitimate emails).
• Make a variation on upload_image.php that supports the uploading of different file types. Create a corresponding version of show_image.php. Note: You’ll need to do some research on MIME types to complete these challenges.
• Check out the PHP manual page for the glob( ) function.
• A lot of information and new functions were introduced in this chapter. Check out the PHP manual for some of them to learn more.