5. Introduction to SQL
Creating Databases and Tables 130
The preceding chapter provides a quick introduction to MySQL. The focus there is on two topics: using MySQL’s rules and data types to define a database, and how to interact with the MySQL server. This chapter moves on to the lingua franca of databases: SQL.
SQL, short for Structured Query Language, is a group of special words used exclusively for interacting with databases. SQL is surprisingly easy to learn and use, and yet, amazingly powerful. In fact, the hardest thing to do in SQL is use it to its full potential!
In this chapter you’ll learn all the SQL you need to know to create tables, populate them, and run other basic queries. The examples will all use the users table discussed in the preceding chapter. Also, as with that other chapter, this chapter assumes you have access to a running MySQL server and know how to use a client application to interact with it.
Creating Databases and Tables
The first logical use of SQL will be to create a database. The syntax for creating a new database is simply
CREATE DATABASE databasename
That’s all there is to it (as I said, SQL is easy to learn)!
The CREATE term is also used for making tables:
CREATE TABLE tablename (
column1name description,
column2name description
...)
As you can see from this syntax, after naming the table, you define each column within parentheses. Each column-description pair should be separated from the next by a comma. Should you choose to create indexes at this time, you can add those at the end of the creation statement, but you can add indexes at a later time as well. (Indexes are more formally discussed in Chapter 6, “Database Design,” but Chapter 4, “Introduction to MySQL,” introduced the topic.)
In case you were wondering, SQL is case-insensitive. However, I make it a habit to capitalize the SQL keywords as in the preceding example syntax and the following steps. Doing so helps to contrast the SQL terms from the database, table, and column names.
To create databases and tables
1. Access MySQL using whichever client you prefer.
Chapter 4 shows how to use two of the most common interfaces—the mysql command-line client and phpMyAdmin—to communicate with a MySQL server. Using the steps in the last chapter, you should now connect to MySQL.
Throughout the rest of this chapter, most of the SQL examples will be entered using the mysql client, but they will work just the same in phpMyAdmin or most other client tools.
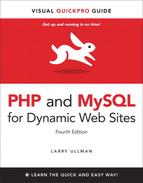
2. Create and select the new database ![]() :
:
CREATE DATABASE sitename;
USE sitename;
![]() A new database, called sitename, is created in MySQL. It is then selected for future queries.
A new database, called sitename, is created in MySQL. It is then selected for future queries.
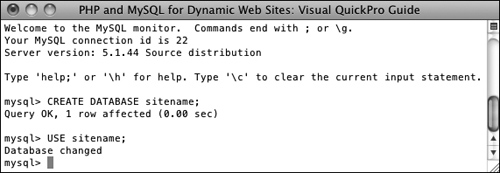
This first line creates the database (assuming that you are connected to MySQL as a user with permission to create new databases). The second line tells MySQL that you want to work within this database from here on out. Remember that within the mysql client, you must terminate every SQL command with a semicolon, although these semicolons aren’t technically part of SQL itself. If executing multiple queries at once within phpMyAdmin, they should also be separated by semicolons ![]() . If running only a single query within phpMyAdmin, no semicolons are necessary.
. If running only a single query within phpMyAdmin, no semicolons are necessary.
![]() The same commands for creating and selecting a database can be run within phpMyAdmin’s SQL window.
The same commands for creating and selecting a database can be run within phpMyAdmin’s SQL window.
If you are using a hosting company’s MySQL, they will probably create the database for you. In that case, just connect to MySQL and select the database.
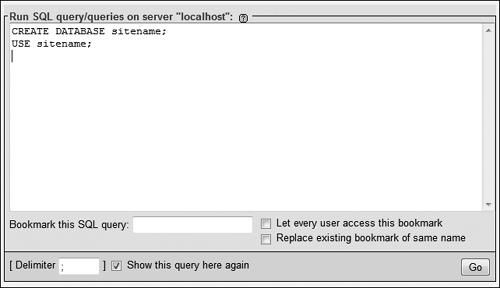
3. Create the users table ![]() :
:
CREATE TABLE users (
user_id MEDIUMINT UNSIGNED NOT NULL
AUTO_INCREMENT,
first_name VARCHAR(20) NOT NULL,
last_name VARCHAR(40) NOT NULL,
email VARCHAR(60) NOT NULL,
pass CHAR(40) NOT NULL,
registration_date DATETIME NOT NULL,
PRIMARY KEY (user_id)
);
![]() This
This CREATE SQL command will make the users table.
The design for the users table was developed in Chapter 4. There, the names, types, and attributes of each column in the table are determined based upon a number of criteria (see that chapter for more information). Here, that information is placed within the CREATE table syntax to actually make the table in the database.
Because the mysql client will not run a query until it encounters a semicolon (or G or g), you can enter statements over multiple lines as in ![]() (by pressing Return or Enter at the end of each line). This often makes a query easier to read and debug. In phpMyAdmin, you can also run queries over multiple lines, although they will not be executed until you click Go.
(by pressing Return or Enter at the end of each line). This often makes a query easier to read and debug. In phpMyAdmin, you can also run queries over multiple lines, although they will not be executed until you click Go.
4. Confirm the existence of the table ![]() :
:
SHOW TABLES;
SHOW COLUMNS FROM users;
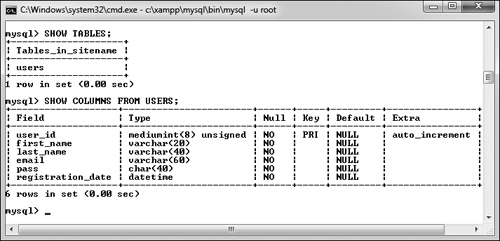
![]() Confirm the existence of, and columns in, a table using the
Confirm the existence of, and columns in, a table using the SHOW command.
The SHOW command reveals the tables in a database or the column names and types in a table.
Also, you might notice in ![]() that the default value for user_id is
that the default value for user_id is NULL, even though this column was defined as NOT NULL. This is actually correct and has to do with user_id being an automatically incremented primary key. MySQL will often make minor changes to a column’s definition for better performance or other reasons.
In phpMyAdmin, a database’s tables are listed on the left side of the browser window, under the database’s name ![]() . Click a table’s name to view its columns
. Click a table’s name to view its columns ![]() .
.
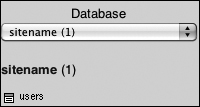
![]() phpMyAdmin shows that the sitename database contains one table, named users.
phpMyAdmin shows that the sitename database contains one table, named users.
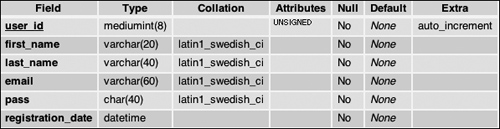
![]() phpMyAdmin shows a table’s definition on this screen (accessed by clicking the table’s name in the left-hand column).
phpMyAdmin shows a table’s definition on this screen (accessed by clicking the table’s name in the left-hand column).
The rest of this chapter assumes that you are using the mysql client or comparable tool and have already selected the sitename database with USE.
The order you list the columns when creating a table has no functional impact, but there are stylistic suggestions for how to order them. I normally list the primary-key column first, followed by any foreign-key columns (more on this subject in the next chapter), followed by the rest of the columns, concluding with any date columns.
When creating a table, you have the option of specifying its type. MySQL supports many table types, each with its own strengths and weaknesses. If you do not specify a table type, MySQL will automatically create the table using the default type for that MySQL installation. Chapter 6 discusses this in more detail.
When creating tables and text columns, you have the option to specify its collation and character set. Both come into play when using multiple languages or languages other than the default for the MySQL server. Chapter 6 also covers these subjects.
Inserting Records
After a database and its table(s) have been created, you can start populating them using the INSERT command. There are two ways that an INSERT query can be written. With the first method, you name the columns to be populated:
INSERT INTO tablename (column1, column2...) VALUES (value1, value2 ...)
INSERT INTO tablename (column4, column8) VALUES (valueX, valueY)
Using this structure, you can add rows of records, populating only the columns that matter. The result will be that any columns not given a value will be treated as NULL (or given a default value, if one was defined). Note that if a column cannot have a NULL value (it was defined as NOT NULL) and does not have a default value, not specifying a value will cause an error or warning ![]() .
.
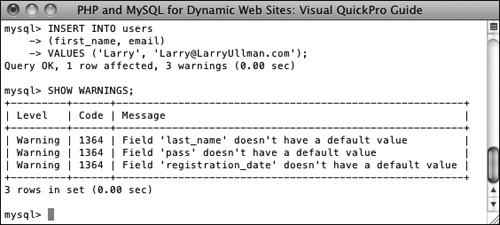
![]() Failure to provide, or predefine, a value for a
Failure to provide, or predefine, a value for a NOT NULL column results in errors or warnings.
The second format for inserting records is not to specify any columns at all but to include values for every one:
INSERT INTO tablename VALUES (value1, NULL, value2, value3, ...)
If you use this second method, you must specify a value, even if it’s NULL, for every column. If there are six columns in the table, you must list six values. Failure to match the number of values to the number of columns will cause an error ![]() . For this and other reasons, the first format of inserting records is generally preferable.
. For this and other reasons, the first format of inserting records is generally preferable.

![]() Not providing a value for every column in a table, or named in an
Not providing a value for every column in a table, or named in an INSERT query, also causes an error.
MySQL also allows you to insert multiple rows at one time, separating each record by a comma.
INSERT INTO tablename (column1, column4) VALUES (valueA, valueB),
(valueC, valueD),
(valueE, valueF)
While you can do this with MySQL, it is not acceptable within the SQL standard and is therefore not supported by all database applications. In MySQL, however, this syntax is faster than using individual INSERT queries.
Note that in all of these examples, placeholders are used for the actual table names, column names, and values. Furthermore, the examples forgo quotation marks. In real queries, you must abide by certain rules to avoid errors (see the “Quotes in Queries” sidebar).
To insert data into a table
1. Insert one row of data into the users table, naming the columns to be populated ![]() :
:
INSERT INTO users
(first_name, last_name, email, pass, registration_date)
VALUES ('Larry', 'Ullman', 'email@ example.com', SHA1('mypass'), NOW( ));
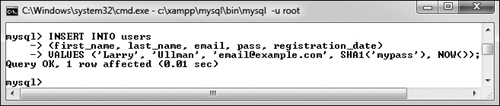
![]() This query inserts a single record into the users table. The 1 row affected message indicates the success of the insertion.
This query inserts a single record into the users table. The 1 row affected message indicates the success of the insertion.
Again, this syntax (where the specific columns are named) is more foolproof but not always the most convenient. For the first name, last name, and email columns, simple strings are used for the values (and strings must always be quoted).
For the password and registration date columns, two functions are being used to generate the values (see the sidebar “Two MySQL Functions”). The SHA1( ) function will encrypt the password (mypass in this example). The NOW( ) function will set the registration_date as this moment.
When using any function in an SQL statement, do not place it within quotation marks. You also must not have any spaces between the function’s name and the following parenthesis (so NOW( ) not NOW ( )).
2. Insert one row of data into the users table, without naming the columns ![]() :
:
INSERT INTO users VALUES
(NULL, 'Zoe', 'Isabella', '[email protected]', SHA1('mojito'), NOW( ));
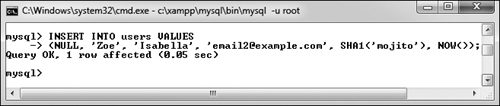
![]() Another record is inserted into the table, this time by providing a value for every column in the table.
Another record is inserted into the table, this time by providing a value for every column in the table.
In this second syntactical example, every column must be provided with a value. The user_id column is given a NULL value, which will cause MySQL to use the next logical number, per its AUTO_INCREMENT description. In other words, the first record will be assigned a user_id of 1, the second, 2, and so on.
3. Insert several values into the users table ![]() :
:
INSERT INTO users (first_name, last_name, email, pass, registration_date) VALUES
('John', 'Lennon', '[email protected]', SHA1('Happin3ss'), NOW( )),
('Paul', 'McCartney', '[email protected]', SHA1('letITbe'), NOW( )),
('George', 'Harrison', '[email protected] ', SHA1('something'), NOW( )),
('Ringo', 'Starr', '[email protected]', SHA1('thisboy'), NOW( ));
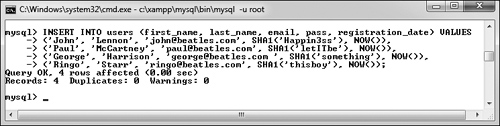
![]() This one query—which MySQL allows but other database applications will not—inserts several records into the table at once.
This one query—which MySQL allows but other database applications will not—inserts several records into the table at once.
Since MySQL allows you to insert multiple values at once, you can take advantage of this and fill up the table with records.
4. Continue Steps 1 and 2 until you’ve thoroughly populated the users table.
Throughout the rest of this chapter I will be performing queries based upon the records I entered into my database. Should your database not have the same specific records as mine, change the particulars accordingly. The fundamental thinking behind the following queries should still apply regardless of the data, since the sitename database has a set column and table structure.
On the downloads page of the book’s supporting Web site (www.LarryUllman.com), you can download all of the SQL commands for the book. Using some of those commands, you can populate your users table exactly as I have.
phpMyAdmin’s INSERT tab allows you to insert records using an HTML form ![]() .
.
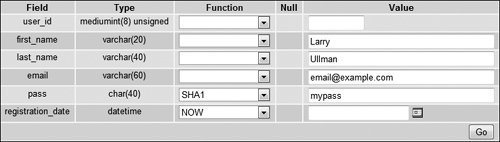
![]() phpMyAdmin’s
phpMyAdmin’s INSERT form shows a table’s columns and provides text boxes for entering values. The pull-down menu lists functions that can be used, like SHA1( ) for the password or NOW( ) for the registration date.
Depending upon the version of MySQL in use, failure to provide a value for a column that cannot be NULL may issue warnings with the INSERT still working ![]() , or issue errors, with the
, or issue errors, with the INSERT failing.
You’ll occasionally see uses of the backtick (`) in SQL commands. This character, found on the same key as the tilde (~), is different than a single quotation mark. The backtick is used to safely reference a table or column name that might be the same as an existing keyword.
If MySQL warns you about the previous query, the SHOW WARNINGS command will display the problem ![]() .
.
An interesting variation on INSERT is REPLACE. If the value used for the table’s primary key, or a UNIQUE index, already exists, then REPLACE updates that row. If not, REPLACE inserts a new row.
Selecting Data
Now that the database has some records in it, you can retrieve the stored information with the most used of all SQL terms, SELECT. A SELECT query returns rows of records using the syntax
SELECT which_columns FROM which_table
The simplest SELECT query is
SELECT * FROM tablename
The asterisk means that you want to retrieve every column. The alternative would be to specify the columns to be returned, with each separated from the next by a comma:
SELECT column1, column3 FROM tablename
There are a few benefits to being explicit about which columns are selected. The first is performance: There’s no reason to fetch columns you will not be using. The second is order: You can return columns in an order other than their layout in the table. Third—and you’ll see this later in the chapter—naming the columns allows you to manipulate the values in those columns using functions.
To select data from a table
1. Retrieve all the data from the users table ![]() :
:
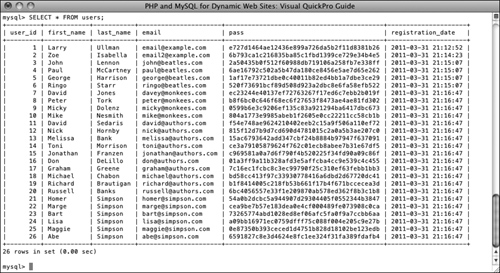
SELECT * FROM users;
![]() The
The SELECT * FROM tablename query returns every column for every record stored in the table.
This very basic SQL command will retrieve every column of every row stored within that table.
2. Retrieve just the first and last names from users ![]() :
:
SELECT first_name, last_name
FROM users;
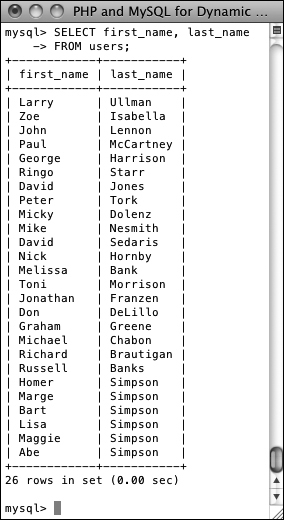
![]() Only two of the columns for every record in the table are returned by this query.
Only two of the columns for every record in the table are returned by this query.
Instead of showing the data from every column in the users table, you can use the SELECT statement to limit the results to only the fields you need.
You can actually use SELECT without naming tables or columns. For example, SELECT NOW( ) ![]() .
.
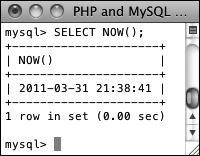
![]() Many queries can be run without specifying a database or table. This query selects the result of calling the
Many queries can be run without specifying a database or table. This query selects the result of calling the NOW( ) function, which returns the current date and time (according to MySQL).
The order in which you list columns in your SELECT statement dictates the order in which the values are presented (compare ![]() with
with ![]() ).
).
![]() If a
If a SELECT query specifies the columns to be returned, they’ll be returned in that order.
With SELECT queries, you can even retrieve the same column multiple times, a feature that enables you to manipulate the column’s data in many different ways.
Using Conditionals
The SELECT query as used thus far will always retrieve every record from a table. But often you’ll want to limit what rows are returned, based upon certain criteria. This can be accomplished by adding conditionals to SELECT queries. Conditionals use the SQL term WHERE and are written much as you’d write a conditional in PHP:
SELECT which_columns FROM which_table WHERE condition(s)
Table 5.1 lists the most common operators you would use within a conditional. For example, a simple equality check:
SELECT name FROM people
WHERE birth_date = '2011-01-26'
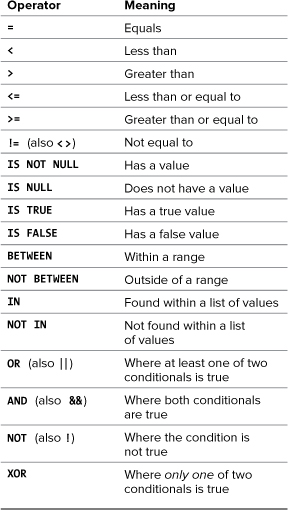
The operators can be used together, along with parentheses, to create more complex expressions:
SELECT * FROM items WHERE
(price BETWEEN 10.00 AND 20.00) AND
(quantity > 0)
SELECT * FROM cities WHERE
(zip_code = 90210) OR (zip_code = 90211)
This last example could also be written as:
SELECT * FROM cities WHERE
zip_code IN (90210, 90211)
To demonstrate using conditionals, let’s run some more SELECT queries on the sitename database. The examples that follow will be just a few of the nearly limitless possibilities. Over the course of this chapter and the entire book you will see how conditionals are used in all types of queries.
To use conditionals
1. Select all of the users whose last name is Simpson ![]() :
:
SELECT * FROM users
WHERE last_name = 'Simpson';
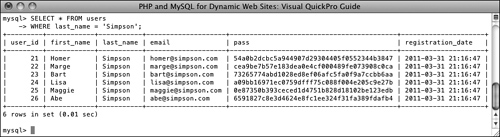
![]() All of the Simpsons who have registered.
All of the Simpsons who have registered.
This simple query returns every column of every row whose last_name value is Simpson. (Again, if the data in your table differs, you can change any of these queries accordingly.)
2. Select just the first names of users whose last name is Simpson ![]() :
:
SELECT first_name FROM users
WHERE last_name = 'Simpson';
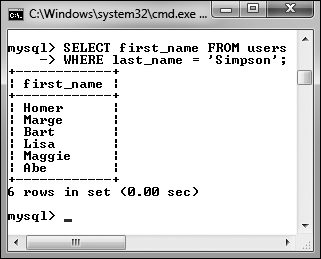
![]() Just the first names of all of the Simpsons who have registered.
Just the first names of all of the Simpsons who have registered.
Here only one column (first_name) is being returned for each row. Although it may seem strange, you do not have to select a column on which you are performing a WHERE. The reason for this is that the columns listed after SELECT dictate only what columns to return and the columns listed in a WHERE dictate which rows to return.
3. Select every column from every record in the users table that does not have an email address ![]() :
:
SELECT * FROM users
WHERE email IS NULL;
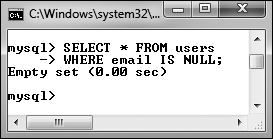
![]() No records are returned by this query because the email column cannot have a
No records are returned by this query because the email column cannot have a NULL value. So this query did work; it just had no matching records.
The IS NULL conditional is the same as saying does not have a value. Keep in mind that an empty string is different than NULL and therefore would not match this condition. An empty string would, however, match
SELECT * FROM users WHERE email='';
4. Select the user ID, first name, and last name of all records in which the password is mypass ![]() :
:
SELECT user_id, first_name, last_name
FROM users
WHERE pass = SHA1('mypass'),
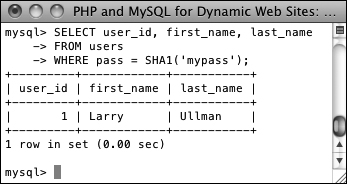
![]() Conditionals can make use of functions, like
Conditionals can make use of functions, like SHA1( ) here.
Since the stored passwords were encrypted with the SHA1( ) function, you can match a password by using that same encryption function in a conditional. SHA1( ) is case-sensitive, so this query will work only if the passwords (stored vs. queried) match exactly.
5. Select the user names whose user ID is less than 10 or greater than 20 ![]() :
:
SELECT first_name, last_name
FROM users WHERE
(user_id < 10) OR (user_id > 20);
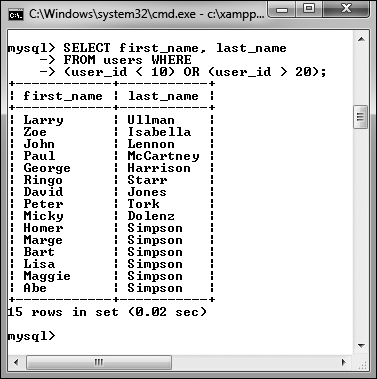
![]() This query uses two conditions and the
This query uses two conditions and the OR operator.
This same query could also be written as
SELECT first_name, last_name FROM
users WHERE user_id
NOT BETWEEN 10 and 20;
or even
SELECT first_name, last_name FROM
users WHERE user_id NOT IN
(10, 11, 12, 13, 14, 15, 16, 17, 18, 19, 20);
You can perform mathematical calculations within your queries using the mathematic addition (+), subtraction (-), multiplication (*), and division (/) characters.
MySQL supports the keywords TRUE and FALSE, case-insensitive. Internally, TRUE evaluates to 1 and FALSE evaluates to 0. So, in MySQL, TRUE + TRUE equals 2.
Using LIKE and NOT LIKE
Using numbers, dates, and NULLs in conditionals is a straightforward process, but strings can be trickier. You can check for string equality with a query such as
SELECT * FROM users
WHERE last_name = 'Simpson'
However, comparing strings in a more liberal manner requires extra operators and characters. If, for example, you wanted to match a person’s last name that could be Smith or Smiths or Smithson, you would need a more flexible conditional. This is where the LIKE and NOT LIKE terms come in. These are used—primarily with strings—in conjunction with two wildcard characters: the underscore ( _ ), which matches a single character, and the percentage sign (% ), which matches zero or more characters. In the last-name example, the query would be
SELECT * FROM users
WHERE last_name LIKE 'Smith%'
This query will return all rows whose last_name value begins with Smith. Because it’s a case-insensitive search by default, it would also apply to names that begin with smith.
To use LIKE
1. Select all of the records in which the last name starts with Bank ![]() :
:
SELECT * FROM users
WHERE last_name LIKE 'Bank%';
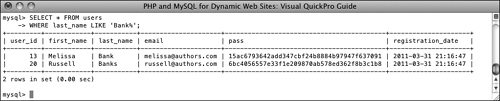
![]() The
The LIKE SQL term adds flexibility to your conditionals. This query matches any record where the last name value begins with Bank.
2. Select the name for every record whose email address is not of the form [email protected] ![]() :
:
SELECT first_name, last_name
FROM users WHERE
email NOT LIKE '%@authors.com';
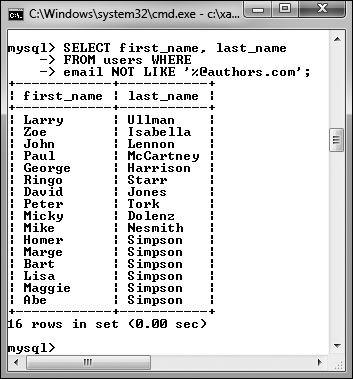
![]() A
A NOT LIKE conditional returns records based upon what a value does not contain.
To rule out the presence of values in a string, use NOT LIKE with the wildcard.
Queries with a LIKE conditional are generally slower because they can’t take advantage of indexes. Use LIKE and NOT LIKE only if you absolutely have to.
The wildcard characters can be used at the front and/or back of a string in your queries.
SELECT * FROM users
WHERE last_name LIKE '_smith%'
Although LIKE and NOT LIKE are normally used with strings, they can also be applied to numeric columns.
To use either the literal underscore or the percentage sign in a LIKE or NOT LIKE query, you will need to escape it (by preceding the character with a backslash) so that it is not confused with a wildcard.
The underscore can be used in combination with itself; as an example, LIKE ' _ _ ' would find any two-letter combination.
In Chapter 7, “Advanced SQL and MySQL,” you’ll learn about FULLTEXT searches, which can be more useful than LIKE searches.
Sorting Query Results
By default, a SELECT query’s results will be returned in a meaningless order (for many new to databases, this is an odd concept). To give a meaningful order to a query’s results, use an ORDER BY clause:
SELECT * FROM tablename ORDER BY column
SELECT * FROM orders ORDER BY total
The default order when using ORDER BY is ascending (abbreviated ASC), meaning that numbers increase from small to large, dates go from oldest to most recent, and text is sorted alphabetically. You can reverse this by specifying a descending order (abbreviated DESC):
SELECT * FROM tablename
ORDER BY column DESC
You can even order the returned values by multiple columns:
SELECT * FROM tablename
ORDER BY column1, column2
You can, and frequently will, use ORDER BY with WHERE or other clauses. When doing so, place the ORDER BY after the conditions:
SELECT * FROM tablename WHERE conditions
ORDER BY column
To sort data
1. Select all of the users in alphabetical order by last name ![]() :
:
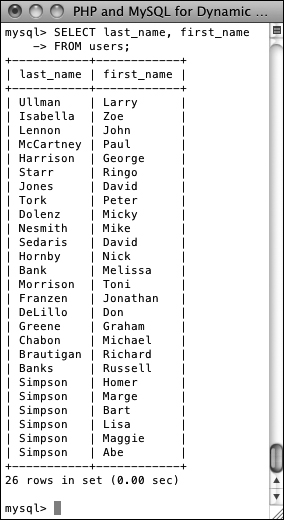
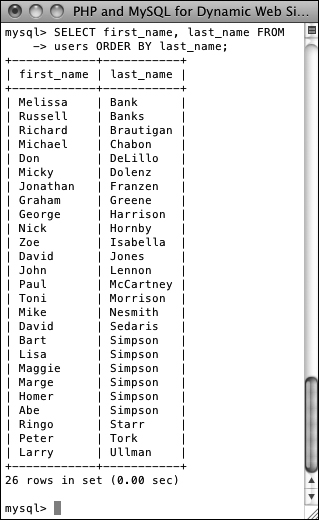
SELECT first_name, last_name FROM
users ORDER BY last_name;
![]() The records in alphabetical order by last name.
The records in alphabetical order by last name.
If you compare these results with those in ![]() in the “Selecting Data” section, you’ll see the benefits of using
in the “Selecting Data” section, you’ll see the benefits of using ORDER BY.
2. Display all of the users in alphabetical order by last name and then first name ![]() :
:
SELECT first_name, last_name FROM
users ORDER BY last_name ASC,
first_name ASC;
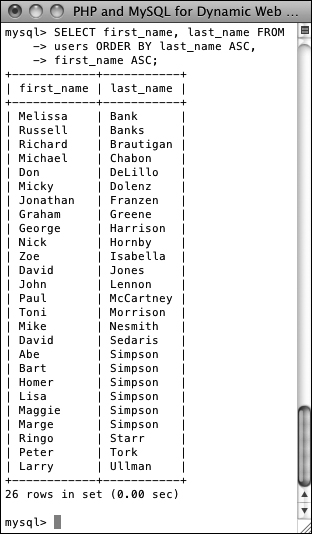
![]() The records in alphabetical order, first by last name, and then by first name within that.
The records in alphabetical order, first by last name, and then by first name within that.
In this query, the effect would be that every row is returned, first ordered by the last_name, and then by first_name within the last_names. The effect is most evident among the Simpsons.
3. Show all of the non-Simpson users by date registered ![]() :
:
SELECT * FROM users
WHERE last_name != 'Simpson'
ORDER BY registration_date DESC;
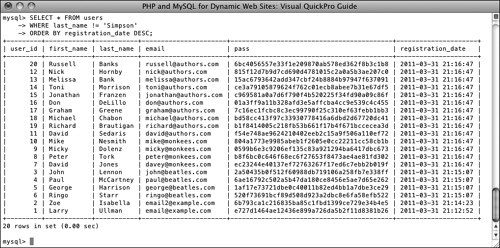
![]() All of the users not named Simpson, displayed by date registered, with the most recent listed first.
All of the users not named Simpson, displayed by date registered, with the most recent listed first.
You can use an ORDER BY on any column type, including numbers and dates. The clause can also be used in a query with a conditional, placing the ORDER BY after the WHERE.
Because MySQL works naturally with any number of languages, the ORDER BY will be based upon the collation being used (see Chapter 6).
If the column that you choose to sort on is an ENUM type, the sort will be based upon the order of the possible ENUM values when the column was created. For example, if you have the column gender, defined as ENUM('M', 'F'), the clause ORDER BY gender returns the results with the M records first.
Limiting Query Results
Another SQL clause that can be added to most queries is LIMIT. In a SELECT query, WHERE dictates which records to return, and ORDER BY decides how those records are sorted, but LIMIT states how many records to return. It is used like so:
SELECT * FROM tablename LIMIT x
In such queries, only the initial x records from the query result will be returned. To return only three matching records, use:
SELECT * FROM tablename LIMIT 3
Using this format
SELECT * FROM tablename LIMIT x, y
you can have y records returned, starting at x. To have records 11 through 20 returned, you would write
SELECT * FROM tablename LIMIT 10, 10
Like arrays in PHP, result sets begin at 0 when it comes to LIMITs, so 10 is the 11th record.
Because SELECT does not return results in any meaningful order, you almost always want to apply an ORDER BY clause when using LIMIT. You can use LIMIT with WHERE and/or ORDER BY clauses, always placing LIMIT last:
SELECT which_columns FROM tablename WHERE
conditions ORDER BY column LIMIT x
To limit the amount of data returned
1. Select the last five registered users ![]() :
:
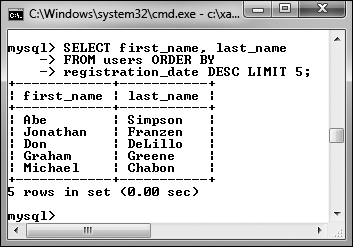
SELECT first_name, last_name
FROM users ORDER BY
registration_date DESC LIMIT 5;
![]() Using the
Using the LIMIT clause, a query can return a specific number of records.
To return the latest of anything, sort the data by date, in descending order. Then, to see just the most recent five, add LIMIT 5 to the query.
2. Select the second person to register ![]() :
:
SELECT first_name, last_name
FROM users ORDER BY
registration_date ASC LIMIT 1, 1;
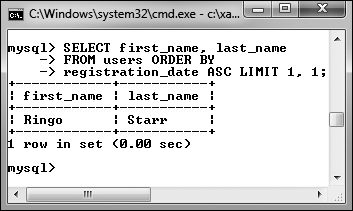
![]() Thanks to the
Thanks to the LIMIT clause, a query can even return records from the middle of a group, using the LIMIT x, y format.
This may look strange, but it’s just a good application of the information learned so far. First, order all of the records by registration_date ascending, so the first people to register would be returned first. Then, limit the returned results to start at 1 (which is the second row) and to return just one record.
The LIMIT x, y clause is most frequently used when paginating query results (showing them in blocks over multiple pages). You’ll see this in Chapter 10, “Common Programming Techniques.”
A LIMIT clause does not improve the execution speed of a query, since MySQL still has to assemble the entire result and then truncate the list. But a LIMIT clause will minimize the amount of data to handle when it comes to the mysql client or your PHP scripts.
The LIMIT term is not part of the SQL standard and is therefore (sadly) not available on all databases.
Updating Data
Once tables contain some data, you have the potential need to edit those existing records. This might be necessary if information was entered incorrectly or if the data changes (such as a last name or email address). The syntax for updating records is:
UPDATE tablename SET column=value
You can alter multiple columns at a single time, separating each from the next by a comma.
UPDATE tablename SET column1=valueA,
column5=valueB...
You will almost always want to use a WHERE clause to specify what rows should be updated:
UPDATE tablename SET column2=value
WHERE column5=value
If you don’t use a WHERE clause, the changes would be applied to every record.
Updates, along with deletions, are one of the most important reasons to use a primary key. This value—which should never change—can be a reference point in WHERE clauses, even if every other field needs to be altered.
To update a record
1. Find the primary key for the record to be updated ![]() :
:
SELECT user_id FROM users
WHERE first_name = 'Michael'
AND last_name='Chabon';
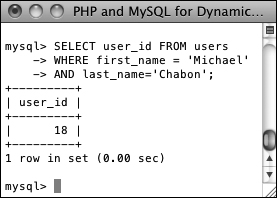
![]() Before updating a record, determine which primary key to use in the
Before updating a record, determine which primary key to use in the UPDATE’s WHERE clause.
In this example, I’ll change the email for this author’s record. To do so, I must first find that record’s primary key, which this query accomplishes.
2. Update the record ![]() :
:
UPDATE users
SET email='[email protected]'
WHERE user_id = 18;
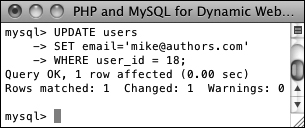
![]() This query altered the value of one column in just one row.
This query altered the value of one column in just one row.
To change the email address, use an UPDATE query, using the primary key (user_id) to specify to which record the update should apply. MySQL will report upon the success of the query and how many rows were affected.
3. Confirm that the change was made ![]() :
:
SELECT * FROM users
WHERE user_id=18;

![]() As a final step, you can confirm the update by selecting the record again.
As a final step, you can confirm the update by selecting the record again.
Although MySQL already indicated the update was successful ![]() , it can’t hurt to select the record again to confirm that the proper changes occurred.
, it can’t hurt to select the record again to confirm that the proper changes occurred.
Be extra certain to use a WHERE conditional whenever you use UPDATE unless you want the changes to affect every row.
If you run an update query that doesn’t actually change any values (like UPDATE users SET first_name='mike' WHERE first_name='mike'), you won’t see any errors but no rows will be affected. More recent versions of MySQL would show that X rows matched the query but that 0 rows were changed ![]() .
.
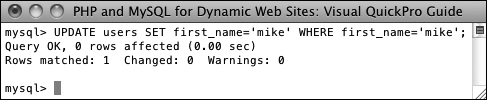
![]() Recent versions of MySQL will report upon both matching and changed records for
Recent versions of MySQL will report upon both matching and changed records for UPDATE queries.
To protect yourself against accidentally updating too many rows, apply a LIMIT clause to your UPDATEs:
UPDATE users SET email='mike@authors.
com' WHERE user_id = 18 LIMIT 1
You should never perform an UPDATE on a primary-key column, because the primary key value should never change. Altering the value of a primary key could have serious repercussions.
To update a record in phpMyAdmin, you can run an UPDATE query using the SQL window or tab. Alternatively, run a SELECT query to find the record you want to update, and then click the pencil next to the record. This will bring up a form similar to the insert form, where you can edit the record’s current values.
Deleting Data
Along with updating existing records, another step you might need to take is to entirely remove a record from the database. To do this, you use the DELETE command:
DELETE FROM tablename
That command as written will delete every record in a table, making it empty again. Once you have deleted a record, there is no way of retrieving it.
In most cases you’ll want to delete individual rows, not all of them. To do so, apply a WHERE clause:
DELETE FROM tablename WHERE condition
To delete a record
1. Find the primary key for the record to be deleted ![]() :
:
SELECT user_id FROM users
WHERE first_name='Peter'
AND last_name='Tork';
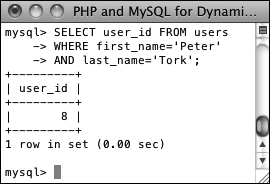
![]() The user_id value will be used to refer to this record in a
The user_id value will be used to refer to this record in a DELETE query.
Just as in the UPDATE example, I first need to determine which primary key to use for the delete.
2. Preview what will happen when the delete is made ![]() :
:
SELECT * FROM users
WHERE user_id = 8;

![]() To preview the effect of a
To preview the effect of a DELETE query, first run a syntactically similar SELECT query.
A really good trick for safeguarding against errant deletions is to first run the query using SELECT * instead of DELETE. The results of this query will represent which row(s) will be affected by the deletion.
DELETE FROM users
WHERE user_id = 8 LIMIT 1;

![]() Deleting one record from the table.
Deleting one record from the table.
As with the update, MySQL will report on the successful execution of the query and how many rows were affected. At this point, there is no way of reinstating the deleted records unless you backed up the database beforehand.
Even though the SELECT query (Step 2 and ![]() ) only returned the one row, just to be extra careful, a
) only returned the one row, just to be extra careful, a LIMIT 1 clause is added to the DELETE query.
4. Confirm that the change was made ![]() :
:
SELECT user_id FROM users
WHERE first_name='Peter'
AND last_name='Tork';
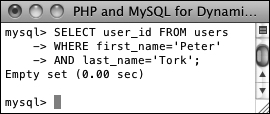
![]() The record is no longer part of this table.
The record is no longer part of this table.
To delete all of the data in a table, as well as the table itself, use DROP TABLE:
DROP TABLE tablename
To delete an entire database, including every table therein and all of its data, use
DROP DATABASE databasename
Using Functions
To wrap up this chapter, you’ll learn about a number of functions that you can use in your MySQL queries. You have already seen two—NOW( ) and SHA1( )—but those are just the tip of the iceberg. Most of the functions you’ll see here are used with SELECT queries to format and alter the returned data, but you may use MySQL functions in other types of queries as well.
To apply a function to a column’s values, the query would look like:
SELECT FUNCTION(column) FROM tablename
To apply a function to one column’s values while also selecting some other columns, you can write a query like either of these:
• SELECT *, FUNCTION(column) FROM
tablename
• SELECT column1, FUNCTION(column2),
column3 FROM tablename
Generally speaking, the latter syntax is preferred, as it only returns the columns you need (as opposed to all of them).
Before getting to the actual functions, make note of a couple more things. First, functions are often applied to stored data (i.e., columns) but can also be applied to literal values. Either of these applications of the UPPER( ) function (which capitalizes a string) is valid:
SELECT UPPER(first_name) FROM users
SELECT UPPER('this string')
Second, while the function names themselves are case-insensitive, I will continue to write them in an all-capitalized format, to help distinguish them from table and column names (as I also capitalize SQL terms). Third, an important rule with functions is that you cannot have spaces between the function name and the opening parenthesis in MySQL, although spaces within the parentheses are acceptable. And finally, when using functions to format returned data, you’ll often want to make uses of aliases, a concept discussed in the sidebar.
Just as there are different standards of SQL and different database applications have their own slight variations on the language, some functions are common to all database applications and others are particular to MySQL. This chapter, and book, only concerns itself with the MySQL functions.
Text functions
The first group of functions to demonstrate are those meant for manipulating text. The most common of the functions in this category are listed in Table 5.2. As with most functions, these can be applied to either columns or literal values (both represented by t, t1, t2, etc).
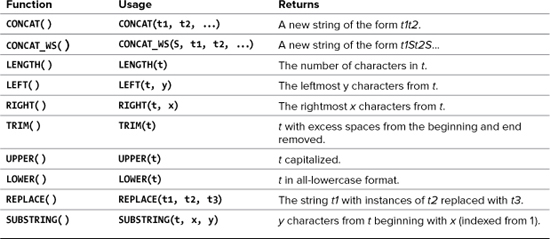
CONCAT( ), perhaps the most useful of the text functions, deserves special attention. The CONCAT( ) function accomplishes concatenation, for which PHP uses the period (see Chapter 1, “Introduction to PHP”). The syntax for concatenation requires you to place, within parentheses, the various values you want assembled, in order and separated by commas:
SELECT CONCAT(t1, t2) FROM tablename
While you can—and normally will—apply CONCAT( ) to columns, you can also incorporate strings, entered within quotation marks. For example, to format a person’s name as First<SPACE>Last, you would use
SELECT CONCAT(first_name, ' ', last_name)
FROM users
Because concatenation normally returns values in a new format, it’s an excellent time to use an alias (see the sidebar):
SELECT CONCAT(first_name, ' ', last_name)
AS Name FROM users
To format text
1. Concatenate the names without using an alias ![]() :
:
SELECT CONCAT(last_name, ', ', first_name)
FROM users;
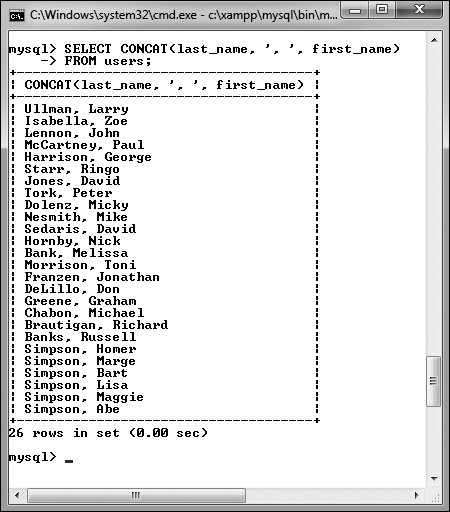
![]() This simple concatenation returns every registered user’s full name. Notice how the column heading is the use of the
This simple concatenation returns every registered user’s full name. Notice how the column heading is the use of the CONCAT( ) function.
This query will demonstrate two things. First, the users’ last names, a comma and a space, plus their first names are concatenated together to make one string (in the format of Last, First). Second, as the figure shows, if you don’t use an alias, the returned data’s column heading will be the function call. In the mysql client or phpMyAdmin, this is just unsightly; when using PHP to connect to MySQL, this will likely be a problem.
2. Concatenate the names while using an alias ![]() :
:
SELECT CONCAT(last_name, ', ', first_name)
AS Name FROM users ORDER BY Name;
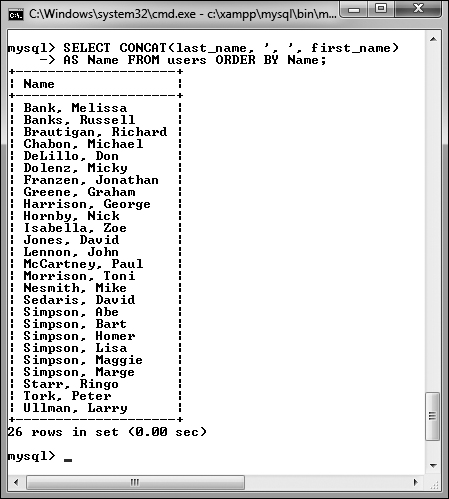
![]() By using an alias, the returned data is under the column heading of Name (compare with
By using an alias, the returned data is under the column heading of Name (compare with ![]() ).
).
To use an alias, just add AS aliasname after the item to be renamed. The alias will be the new title for the returned data. To make the query a little more interesting, the same alias is also used in the ORDER BY clause.
3. Find the longest last name ![]() :
:
SELECT LENGTH(last_name) AS L,
last_name FROM users
ORDER BY L DESC LIMIT 1;
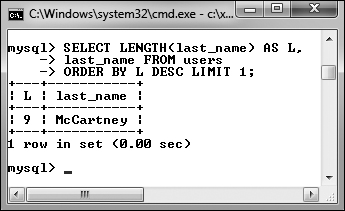
![]() By using the
By using the LENGTH( ) function, an alias, an ORDER BY clause, and a LIMIT clause, this query returns the length and value of the longest stored name.
To determine which registered user’s last name is the longest (has the most characters in it), use the LENGTH( ) function. To find the name, select both the last name value and the calculated length, which is given an alias of L. To then find the longest name, order all of the results by L, in descending order, but only return the first record.
A query like that in Step 3 (also ![]() ) may be useful for helping to fine-tune your column lengths once your database has some records in it.
) may be useful for helping to fine-tune your column lengths once your database has some records in it.
MySQL has two functions for performing regular expression searches on text: REGEXP( ) and NOT REGEXP( ). Chapter 14, “Perl-Compatible Regular Expressions,” introduces regular expressions using PHP.
CONCAT( ) has a corollary function called CONCAT_WS( ), which stands for with separator. The syntax is CONCAT_WS(separator, t1, t2, ...). The separator will be inserted between each of the listed columns or values. For example, to format a person’s full name as First<SPACE>_Middle<SPACE>_Last, you would write
SELECT CONCAT_WS(' ', first, middle,
last) AS Name FROM tablename
CONCAT_WS( ) has an added advantage over CONCAT( ) in that it will ignore columns with NULL values. So that query might return Joe Banks from one record but Jane Sojourner Adams from another.
Numeric functions
Besides the standard math operators that MySQL uses (for addition, subtraction, multiplication, and division), there are a couple dozen functions for formatting and performing calculations on numeric values. Table 5.3 lists the most common of these, some of which will be demonstrated shortly. As with most functions, these can be applied to either columns or literal values (both represented by n, n1, n2, etc.).

I want to specifically highlight three of these functions: FORMAT( ), ROUND( ), and RAND( ). The first—which is not technically number-specific—turns any number into a more conventionally formatted layout. For example, if you stored the cost of a car as 20198.20, FORMAT(car_cost, 2) would turn that number into the more common 20,198.20.
ROUND( ) will take one value, presumably from a column, and round that to a specified number of decimal places. If no decimal places are indicated, it will round the number to the nearest integer. If more decimal places are indicated than exist in the original number, the remaining spaces are padded with zeros (to the right of the decimal point).
The RAND( ) function, as you might infer, is used for returning random numbers ![]() :
:
SELECT RAND( )
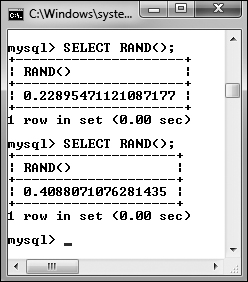
![]() The
The RAND( ) function returns a random number between 0 and 1.0.
A further benefit to the RAND( ) function is that it can be used with your queries to return the results in a random order:
SELECT * FROM tablename ORDER BY RAND( )
To use numeric functions
1. Display a number, formatting the amount as dollars ![]() :
:
SELECT CONCAT('$', FORMAT(5639.6, 2))
AS cost;
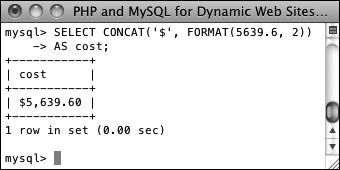
![]() Using an arbitrary example, this query shows how the
Using an arbitrary example, this query shows how the FORMAT( ) function works.
Using the FORMAT( ) function, as just described, with CONCAT( ), you can turn any number into a currency format as you might display it in a Web page.
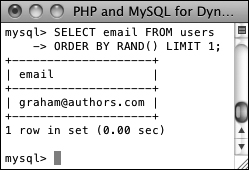
2. Retrieve a random email address from the table ![]() :
:
SELECT email FROM users
ORDER BY RAND( ) LIMIT 1;
![]() This query uses the
This query uses the RAND( ) function to select a random record. Subsequent executions of the same query would return different random results.
What happens with this query is: All of the email addresses are selected; the order they are in is shuffled (ORDER BY RAND( )); and then the first one is returned. Running this same query multiple times will produce different random results. Notice that you do not specify a column to which RAND( ) is applied.
Along with the mathematical functions listed here, there are several trigonometric, exponential, and other types of numeric functions available.
The MOD( ) function is the same as using the percent sign:
SELECT MOD(9,2)
SELECT 9%2
It returns the remainder of a division (1 in these examples).
Date and time functions
The date and time column types in MySQL are particularly flexible and useful. But because many database users are not familiar with all of the available date and time functions, these options are frequently underused. Whether you want to make calculations based upon a date or return only the month name from a value, MySQL has a function for that purpose. Table 5.4 lists most of these; see the MySQL manual for a complete list. As with most functions, these can be applied to either columns or literal values (both represented by dt, short for datetime).
Table 5.4. Date and Time Functions
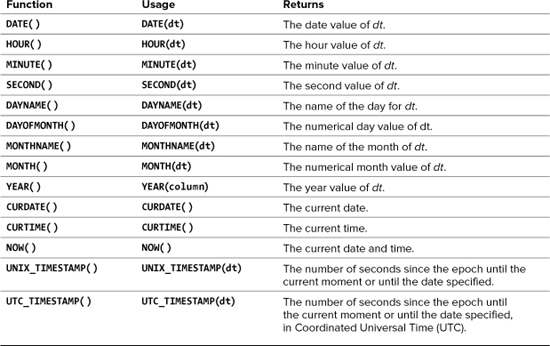
MySQL supports two data types that store both a date and a time (DATETIME and TIMESTAMP), one type that stores just the date (DATE), one that stores just the time (TIME), and one that stores just a year (YEAR). Besides allowing for different types of values, each data type also has its own unique behaviors (again, I’d recommend reading the MySQL manual’s pages on this for all of the details). But MySQL is very flexible as to which functions you can use with which type. You can apply a date function to any value that contains a date (i.e., DATETIME, TIMESTAMP, and DATE), or you can apply an hour function to any value that contains the time (i.e., DATETIME, TIMESTAMP, and TIME). MySQL will use the part of the value that it needs and ignore the rest. What you cannot do, however, is apply a date function to a TIME value or a time function to a DATE or YEAR value.
To use date and time functions
1. Display the date that the last user registered ![]() :
:
SELECT DATE(registration_date) AS
Date FROM users ORDER BY
registration_date DESC LIMIT 1;
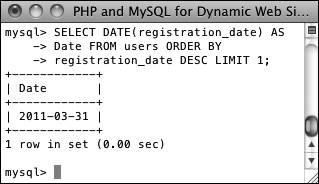
![]() The date functions can be used to extract information from stored values.
The date functions can be used to extract information from stored values.
The DATE( ) function returns the date part of a value. To see the date that the last person registered, an ORDER BY clause lists the users starting with the most recently registered and this result is limited to just one record.
2. Display the day of the week that the first user registered ![]() :
:
SELECT DAYNAME(registration_date) AS
Weekday FROM users ORDER BY
registration_date ASC LIMIT 1;
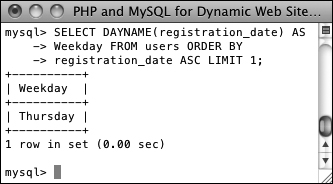
![]() This query returns the name of the day that a given date represents.
This query returns the name of the day that a given date represents.
This is similar to the query in Step 1, but the results are returned in ascending order and the DAYNAME( ) function is applied to the registration_date column. This function returns Sunday, Monday, Tuesday, etc., for a given date.
3. Show the current date and time, according to MySQL ![]() :
:
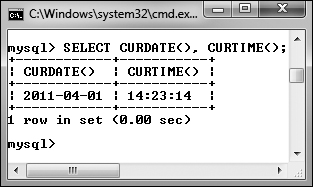
SELECT CURDATE( ), CURTIME( );
![]() This query, not run on any particular table, returns the current date and time on the MySQL server.
This query, not run on any particular table, returns the current date and time on the MySQL server.
To show what date and time MySQL currently thinks it is, you can select the CURDATE( ) and CURTIME( ) functions, which return these values. This is another example of a query that can be run without referring to a particular table.
4. Show the last day of the current month ![]() :
:
SELECT LAST_DAY(CURDATE( )),
MONTHNAME(CURDATE( ));

![]() Among the many things MySQL can do with date and time types is determine the last date in a month or the name value of a given date.
Among the many things MySQL can do with date and time types is determine the last date in a month or the name value of a given date.
As the last query showed, CURDATE( ) returns the current date on the server. This value can be used as an argument to the LAST_DAY( ) function, which returns the last date in the month for a given date. The MONTHNAME( ) function returns the name of the current month.
The date and time returned by MySQL’s date and time functions correspond to those on the server, not on the client accessing the database.
Not mentioned in this section or in Table 5.4 are ADDDATE( ), SUBDATE( ), ADDTIME( ), SUBTIME( ), and DATEDIFF( ). Each can be used to perform arithmetic on date and time values. These can be very useful (for example, to find everyone registered within the past week), but their syntax is cumbersome. As always, see the MySQL manual for more information.
As of MySQL 5.0.2, the server will also prevent invalid dates (e.g., February 31, 2011) from being inserted into a date or date/time column.
Formatting the date and time
There are two additional date and time functions that you might find yourself using more than all of the others combined: DATE_FORMAT( ) and TIME_FORMAT( ). There is some overlap between the two and when you would use one or the other.
DATE_FORMAT( ) can be used to format both the date and time if a value contains both (e.g., YYYY-MM-DD HH:MM:SS). Comparatively, TIME_FORMAT( ) can format only the time value and must be used if only the time value is being stored (e.g., HH:MM:SS). The syntax is
SELECT DATE_FORMAT(datetime, formatting)
The formatting relies upon combinations of key codes and the percent sign to indicate what values you want returned. Table 5.5 lists the available date- and time-formatting parameters. You can use these in any combination, along with literal characters, such as punctuation, to return a date and time in a more presentable form.
Assuming that a column called the_date has the date and time of 1996-04-20 11:07:45 stored in it, common formatting tasks and results would be
• Time (11:07:45 AM)
TIME_FORMAT(the_date, '%r')
• Time without seconds (11:07 AM)
TIME_FORMAT(the_date, '%l:%i %p')
• Date (April 20th, 1996)
DATE_FORMAT(the_date, '%M %D, %Y')
Table 5.5. *_FORMAT( ) Parameters

To format the date and time
1. Return the current date and time as Month DD, YYYY - HH:MM ![]() :
:
SELECT DATE_FORMAT(NOW( ),'%M %e, %Y %l:%i'),

![]() The current date and time, formatted.
The current date and time, formatted.
Using the NOW( ) function, which returns the current date and time, you can practice formatting to see what results are returned.
2. Display the current time, using 24-hour notation ![]() :
:
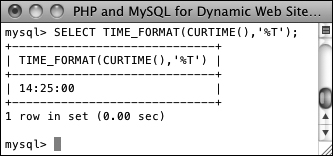
SELECT TIME_FORMAT(CURTIME( ),'%T'),
![]() The current time, in a 24-hour format.
The current time, in a 24-hour format.
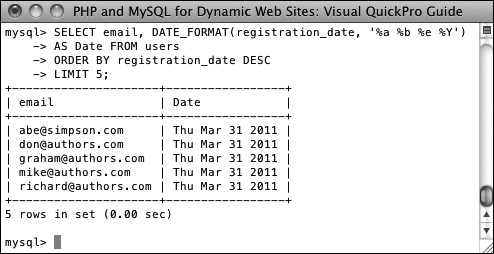
3. Select the email address and date registered, ordered by date registered, formatting the date as Weekday (abbreviated) Month (abbreviated) Day Year, for the last five registered users ![]() :
:
SELECT email, DATE_FORMAT (registration_date, '%a %b %e %Y')
AS Date FROM users
ORDER BY registration_date DESC
LIMIT 5;
![]() The
The DATE_FORMAT( ) function is used to preformat the registration date when selecting records from the users table.
This is just one more example of how you can use these formatting functions to alter the output of an SQL query.
In your Web applications, you should almost always use MySQL functions to format any dates coming from the database (as opposed to formatting the dates within PHP after retrieving them from the database).
The only way to access the date or time on the client (the user’s machine) is to use JavaScript. It cannot be done with PHP or MySQL.
Review and Pursue
If you have any problems with the review questions or the pursue prompts, turn to the book’s supporting forum (www.LarryUllman.com/forums/).
Review
• What version of MySQL are you using? If you don’t know, find out now!
• What SQL command is used to make a new database? What command is used to make a new table in a database?
• What SQL command is used to select the database with which you want to work?
• What SQL commands are used for adding records to a table? Hint: There are multiple options.
• What types of values must be quoted in queries? What types of values shouldn’t be quoted?
• What does the asterisk in SELECT * FROM tablename mean? How do you restrict which columns are returned by a query?
• What does the NOW( ) function do?
• How do you restrict which rows are returned by a query?
• How do LIKE and NOT LIKE differ from simple equality comparisons? Which type of comparison will be faster? What are the two LIKE and NOT LIKE wildcard characters?
• How do you affect the sorting of the returned records? What is the default sorting method? How do you inverse the sort? What is the syntax for sorting by multiple columns?
• What does the LIMIT clause do? How does LIMIT x differ from LIMIT x, y?
• What SQL command is used to change the values already stored in a table? How do you change multiple columns at once? How do you restrict to which rows the changes are applied?
• What SQL command is used to delete rows stored in a table? How do you restrict to which rows the deletions are applied?
• What is an SQL alias? How do you create one? Why is an alias useful?
Pursue
• If you haven’t done so already, bookmark the version of the MySQL manual that matches the version of MySQL you are running.
• Go through each of the step sequences in this chapter again, coming up with your own queries to execute (that demonstrate similar concepts as those in the steps).
• Check out the MySQL manual pages for operators used in conditionals.
• Check out the MySQL manual pages for some of MySQL’s functions.
• Create, populate, and manipulate your own table of data.
• Do some more practice using functions and aliases.
• Check out the MySQL manual pages for the various date and time types. Also check out ADDDATE( ) and other date-related functions.