13. Security Methods
Using the Filter Extension 421
Preventing SQL Injection Attacks 425
The security of your Web applications is such an important topic that it really cannot be overstressed. Although security-related issues have been mentioned throughout this book, this chapter will help to fill in certain gaps, finalize other points, and teach several new things.
The topics discussed here include: preventing spam; typecasting variables; preventing cross-site scripting (XSS) and SQL injection attacks; the new Filter extension; and validating uploaded files by type. This chapter will use five discrete examples to best demonstrate these concepts. Some other common security issues and best practices will be mentioned in sidebars as well.
Preventing Spam
Spam is nothing short of a plague, cluttering up the Internet and email inboxes. There are steps you can take to avoid receiving spam at your email accounts, but in this book the focus is on preventing spam being sent through your PHP scripts.
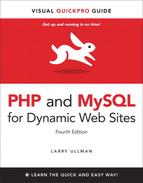
Chapter 11, “Web Application Development,” shows how easy it is to send email using PHP’s mail( ) function. The example there, a contact form, took some information from the user ![]() and sent it to an email address. Although it may seem like there’s no harm in this system, there’s actually a big security hole. But first, some background on what an email actually is.
and sent it to an email address. Although it may seem like there’s no harm in this system, there’s actually a big security hole. But first, some background on what an email actually is.
![]() A simple, standard HTML contact form.
A simple, standard HTML contact form.
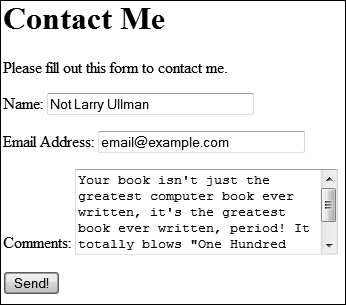
Regardless of how an email is sent, how it’s formatted, and what it looks like when it’s received, an email contains two parts: a header and a body. The header includes such information as the to and from addresses, the subject, the date, and more ![]() . Each item in the header is on its own line, in the format Name: value. The body of the email is exactly what you think it is: the body of the email.
. Each item in the header is on its own line, in the format Name: value. The body of the email is exactly what you think it is: the body of the email.
![]() The raw source version of the email sent by the contact form
The raw source version of the email sent by the contact form ![]() .
.
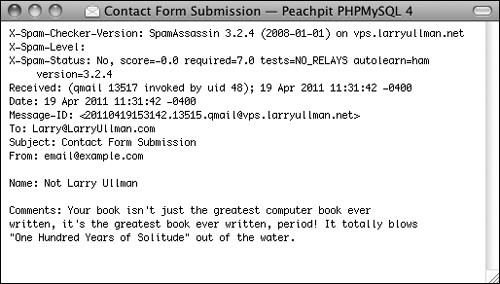
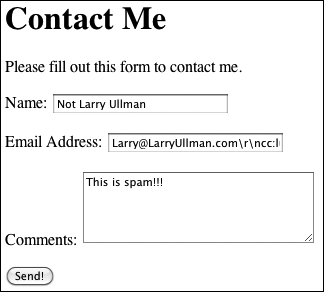
In looking at PHP’s mail( ) function—mail (to, subject, body [,headers]);—you can see that one of the arguments goes straight to the email’s body and the rest appear in its header. To send spam to your address (as in Chapter 11’s example), all a person would have to do is enter the spam message into the comments section of the form ![]() . That’s bad enough, but to send spam to anyone else at the same time, all the user would have to do is add Bcc: [email protected], followed by some sort of line terminator (like a newline or carriage return), to the email’s header. With the example as is, this just means entering this into the from value of the contact form: [email protected] nBcc:[email protected].
. That’s bad enough, but to send spam to anyone else at the same time, all the user would have to do is add Bcc: [email protected], followed by some sort of line terminator (like a newline or carriage return), to the email’s header. With the example as is, this just means entering this into the from value of the contact form: [email protected] nBcc:[email protected].
You might think that safeguarding everything that goes into an email’s header would be sufficiently safe, but as an email is just one document, bad input in a body can impact the header, too.
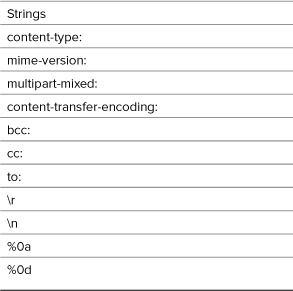
There are a couple of preventive techniques that can be applied to this contact form. First, validate any email addresses using regular expressions, covered in Chapter 13, “Perl-Compatible Regular Expressions,” or the Filter extension, discussed in just a few pages. Second, now that you know what an evildoer must enter to send spam (Table 13.1), watch for those characters and strings in form values. If a value contains anything from that list, don’t use that value in a sent email. (The last four values in Table 13.1 are all different ways of creating newlines.)
In this next example, a modification of the email script from Chapter 11, I’ll define a function that scrubs all potentially dangerous characters from provided data. Two new PHP functions will be used as well: str_replace( ) and array_map( ). Both will be explained in detail in the steps that follow.
To prevent spam
1. Open email.php (Script 11.1) in your text editor or IDE.
To complete this spam-purification, the email script needs to be modified.
2. After checking for the form submission, begin defining a function (Script 13.1):
function spam_scrubber($value) {
This function will take one argument: a string. Normally, I would define functions at the top of the script, or in a separate file, but to make things simpler, it’ll be defined within the submission-handling block of code.
3. Create a list of really bad things that wouldn’t be in a legitimate contact form submission:
$very_bad = array('to:', 'cc:', 'bcc:', 'content-type:', 'mime-version:', 'multipart-mixed:', 'content-transfer-encoding:'),
Any of these strings should not be present in an honest contact form submission (it’s possible someone might legitimately use to: in their comments, but unlikely). If any of these strings are present, then this is a spam attempt. To make it easier to test for all these, they’re placed in an array, which will be looped through (Step 4). The comparison in Step 4 will be case-insensitive, so each of the dangerous strings is written in all lowercase letters.
4. Loop through the array. If a very bad thing is found, return an empty string instead:
foreach ($very_bad as $v) {
if (stripos($value, $v) != = false) return '';
}
Script 13.1. This version of the script can now safely send emails without concern for spam. Any problematic characters will be caught by the spam_scrubber( ) function.
1 <!DOCTYPE html PUBLIC "-//W3C//DTD XHTML
1.0 Transitional//EN" "http://www.w3.org/
TR/xhtml1/DTD/xhtml1-transitional.dtd">
2 <html xmlns="http://www.w3.org/1999/
xhtml" xml:lang="en" lang="en">
3 <head>
4 <meta http-equiv="Content-Type"
content="text/html; charset=utf-8" />
5 <title>Contact Me</title>
6 </head>
7 <body>
8 <h1>Contact Me</h1>
9 <?php # Script 13.1 - email.php #2
10 // This version now scrubs dangerous
strings from the submitted input.
11
12 // Check for form submission:
13 if ($_SERVER['REQUEST_METHOD'] = = 'POST') {
14
15 /* The function takes one argument: a
string.
16 * The function returns a clean
version of the string.
17 * The clean version may be either an
empty string or
18 * just the removal of all newline
characters.
19 */
20 function spam_scrubber($value) {
21
22 // List of very bad values:
23 $very_bad = array('to:',
'cc:', 'bcc:', 'content-type:',
'mime-version:', 'multipart-mixed:',
'content-transfer-encoding:'),
24
25 // If any of the very bad strings
are in
26 // the submitted value, return an
empty string:
27 foreach ($very_bad as $v) {
28 if (stripos($value, $v) != =
false) return '';
29 }
30
31 // Replace any newline characters
with spaces:
32 $value = str_replace(array( "
",
"
", "%0a", "%0d"), ' ', $value);
33
34 // Return the value:
35 return trim($value);
36
37 } // End of spam_scrubber( )
function.
38
39 // Clean the form data:
40 $scrubbed = array_map
('spam_scrubber', $_POST);
41
42 // Minimal form validation:
43 if (!empty($scrubbed['name']) &&
!empty($scrubbed['email']) &&
!empty($scrubbed['comments']) ) {
44
45 // Create the body:
46 $body = "Name: {$scrubbed
['name']}
Comments:
{$scrubbed['comments']}";
47
48 // Make it no longer than 70
characters long:
49 $body = wordwrap($body, 70);
50
51 // Send the email:
52 mail('[email protected]',
'Contact Form Submission', $body,
"From: {$scrubbed['email']}");
53
54 // Print a message:
55 echo '<p><em>Thank you for
contacting me. I will reply some
day.</em></p>';
56
57 // Clear $_POST (so that the form's
not sticky):
58 $_POST = array( );
59
60 } else {
61 echo '<p style="font-weight: bold;
color: #C00">Please fill out the
form completely.</p>';
62 }
63
64 } // End of main isset( ) IF.
65
66 // Create the HTML form:
67 ?>
68 <p>Please fill out this form to contact me.</p>
69 <form action="email.php" method="post">
70 <p>Name: <input type="text" name="name" size="30" maxlength="60" value="<?php if
(isset($scrubbed['name'])) echo $scrubbed['name']; ?>" /></p>
71 <p>Email Address: <input type="text" name="email" size="30" maxlength="80"
value="<?php if (isset($scrubbed['email'])) echo $scrubbed['email']; ?>" /></p>
72 <p>Comments: <textarea name="comments" rows="5" cols="30"><?php if
(isset($scrubbed['comments'])) echo $scrubbed['comments']; ?></textarea></p>
73 <p><input type="submit" name="submit" value="Send!" /></p>
74 </form>
75 </body>
76 </html>
The foreach loop will access each item in the $very_bad array one at a time, assigning each item to $v. Within the loop, the stripos( ) function will check if the item is in the string provided to this function as $value. The stripos( ) function performs a case-insensitive search (so it would match bcc:, Bcc:, bCC:, etc.). The function returns a Boolean TRUE if the needle is found in the haystack (e.g., looking for occurrences of $v in $value). The conditional therefore says that if that function’s results do not equal FALSE (i.e., $v was not found in $value), return an empty string.
Therefore, for each of the dangerous character strings, the first time that any of them is found in the submitted value, the function will return an empty string and terminate (functions automatically stop executing once they hit a return).
5. Replace any newline characters with spaces:
$value = str_replace(array( " ", " ", "%0a", "%0d"), ' ', $value);
Newline characters, which are represented by
,
, %0a, and %0d, may or may not be problematic. A newline character is required to send spam (or else you can’t create the proper header) but will also appear if a user just hits Enter or Return while typing in a textarea box. For this reason, any found newlines will just be replaced by a space. This means that the submitted value could lose some of its formatting, but that’s a reasonable price to pay to stop spam.
The str_replace( ) function looks through the value in the third argument and replaces any occurrences of the characters in the first argument with the character or characters in the second. Or as the PHP manual puts it:
mixed str_replace (mixed $search, mixed $replace, mixed $subject)
This function is very flexible in that it can take strings or arrays for its three arguments (the mixed means it accepts a mix of argument types). Hence, this line of code in the script assigns to the $value variable its original value, with any newline characters replaced by a single space.
There is a case-insensitive version of this function, but it’s not necessary here, as, for example,
is a carriage return but R is not.
6. Return the value and complete the function:
return trim($value);
} // End of spam_scrubber( ) function.
Finally, this function returns the value, trimmed of any leading and ending spaces. Keep in mind that the function will only get to this point if none of the very bad things was found.
7. After the function definition, invoke the spam_scrubber( ) function:
$scrubbed = array_map('spam_scrubber', $_POST);
This approach is beautiful in its simplicity! The array_map( ) function has two required arguments. The first is the name of the function to call. In this case, that’s spam_scrubber (without the parentheses, because you’re providing the function’s name, not calling the function). The second argument is an array.
What array_map( ) does is apply the named function once for each array element, sending each array element’s value to that function call. In this script, $_POST has four elements—name, email, comments, and submit, meaning that the spam_scrubber( ) function will be called four times, thanks to array_map( ). After this line of code, the $scrubbed array will end up with four elements: $scrubbed['name'] will have the value of $_POST['name'] after running it through spam_scrubber( ); $scrubbed['email'] will have the same value as $_POST['email'] after running it through spam_scrubber( ); and so forth.
This one line of code then takes an entire array of potentially tainted data ($_POST), cleans it using spam_scrubber( ), and assigns the result to a new variable. Here’s the most important thing about this technique: from here on out, the script must use the $scrubbed array, which is clean, not $_POST, which is still potentially dirty.
8. Change the form validation to use this new array:
if (!empty($scrubbed['name']) && !empty($scrubbed['email']) && !empty($scrubbed['comments']) ) {
Each of these elements could have an empty value for two reasons. First, if the user left them empty. Second, if the user entered one of the bad strings in the field ![]() , which would be turned into an empty string by the
, which would be turned into an empty string by the spam_scrubber( ) function ![]() .
.
![]() The presence of cc: in the email address field will prevent this submission from being sent in an email
The presence of cc: in the email address field will prevent this submission from being sent in an email ![]() .
.
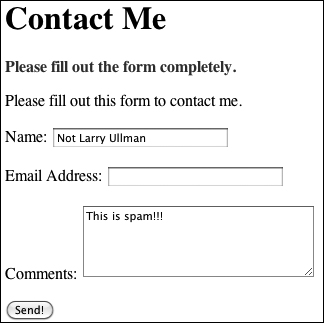
![]() The email was not sent because of the very bad characters used in the email address, which gets turned into an empty string by the spam prevention function.
The email was not sent because of the very bad characters used in the email address, which gets turned into an empty string by the spam prevention function.
9. Change the creation of the $body variable so that it uses the clean values:
$body = "Name: {$scrubbed['name']} Comments: {$scrubbed['comments']}";
10. Change the invocation of the mail( ) function to use the clean email address:
mail('[email protected]', 'Contact Form Submission', $body, "From: {$scrubbed['email']}");
Remember to use your own email address in the mail( ) call, or you’ll never get the message!
11. Change the form so that it uses the $scrubbed version of the values:
<p>Name: <input type="text" name="name" size="30" maxlength="60" value="<?php if (isset($scrubbed['name'])) echo $scrubbed['name']; ?>" /></p>
<p>Email Address: <input type="text" name="email" size="30" maxlength="80" value="<?php if (isset ($scrubbed['email'])) echo $scrubbed['email']; ?>" /></p>
<p>Comments: <textarea name="comments" rows="5" cols="30"><?php if (isset ($scrubbed['comments'])) echo $scrubbed['comments']; ?> </textarea></p>
12. Save the script as email.php, place it in your Web directory, and test it in your Web browser ![]() and
and ![]() .
.
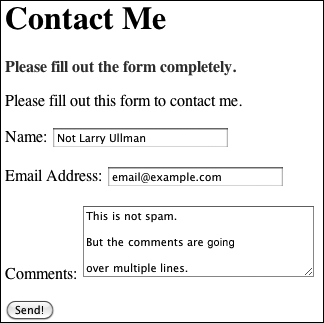
![]() Although the comments field contains newline characters (created by pressing Enter or Return), the email will still be sent
Although the comments field contains newline characters (created by pressing Enter or Return), the email will still be sent ![]() .
.
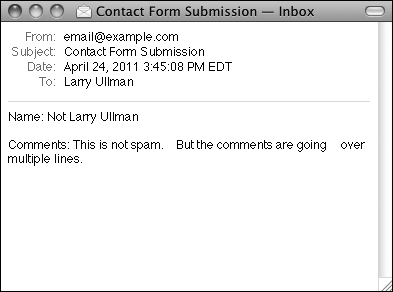
![]() The received email, with the newlines in the comments
The received email, with the newlines in the comments ![]() turned into spaces.
turned into spaces.
Using the array_map( ) function as I have in this example is convenient but not without its downsides. First, it blindly applies the spam_scrubber( ) function to the entire $_POST array, even to the submit button. This isn’t harmful but is unnecessary. Second, any multidimensional arrays within $_POST will be lost. In this specific example, that’s not a problem, but it is something to be aware of.
To prevent automated submissions to any form, you could use a CAPTCHA test. These are prompts that can only be understood by humans (in theory). While this is commonly accomplished using an image of random characters, the same thing can be achieved using a question like What is two plus two? or On what continent is China?. Checking for the correct answer to this question would then be part of the validation routine.
Validating Data by Type
For the most part, the form validation used in this book thus far has been rather minimal, often just checking if a variable has any value at all. In many situations, this really is the best you can do. For example, there’s no perfect test for what a valid street address is or what a user might enter into a comments field. Still, much of the data you’ll work with can be validated in stricter ways. In the next chapter, the sophisticated concept of regular expressions will demonstrate just that. But here I’ll cover the more approachable ways you can validate some data by type.
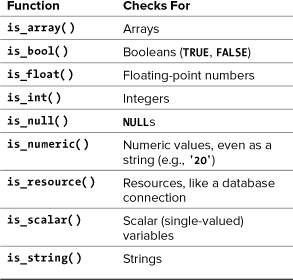
PHP supports many types of data: strings, numbers (integers and floats), arrays, and so on. For each of these, there’s a specific function that checks if a variable is of that type (Table 13.2). You’ve already seen the is_numeric( ) function in action in earlier chapters, and is_array( ) is great for confirming a variable is acceptable to use in a foreach loop. Each function returns TRUE if the submitted variable is of a certain type and FALSE otherwise.
Table 13.2. Type Validation Functions
In PHP, you can even change a variable’s type, after it’s been assigned a value. Doing so is called typecasting and is accomplished by preceding a variable’s name by the destination type in parentheses:
$var = 20.2;
echo (int) $var; // 20
Depending upon the original and destination types, PHP will convert the variable’s value accordingly:
$var = 20;
echo (float) $var; // 20.0
With numeric values, the conversion is straightforward, but with other variable types, more complex rules apply:
$var = 'trout';
echo (int) $var; // 0
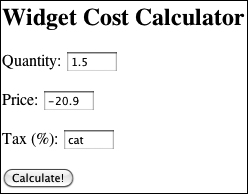
In most circumstances you don’t need to cast a variable from one type to another, as PHP will often automatically do so as needed. But forcibly casting a variable’s type can be a good security measure in your Web applications. To show how you might use this notion, let’s create a calculator script for determining the total purchase price of an item ![]() .
.
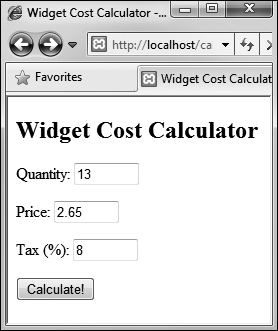
![]() The HTML form takes three inputs: a quantity, a price, and a tax rate.
The HTML form takes three inputs: a quantity, a price, and a tax rate.
To use typecasting
1. Begin a new PHP document in your text editor or IDE, to be named calculator.php (Script 13.2):
<!DOCTYPE html PUBLIC "-//W3C//DTD XHTML 1.0 Transitional//EN" "http://www.w3.org/TR/xhtml1/DTD/xhtml1-transitional.dtd">
<html xmlns="http://www.w3.org/1999/xhtml" xml:lang="en" lang="en">
<head>
<meta http-equiv="Content-Type" content="text/html; charset=utf-8" />
<title>Widget Cost Calculator </title>
</head>
<body>
<?php # Script 13.2 - calculator.php
Script 13.2. By typecasting variables, this script more definitively validates that data is of the correct format.
1 <!DOCTYPE html PUBLIC "-//W3C//DTD XHTML
1.0 Transitional//EN" "http://www.w3.org/
TR/xhtml1/DTD/xhtml1-transitional.dtd">
2 <html xmlns="http://www.w3.org/1999/
xhtml" xml:lang="en" lang="en">
3 <head>
4 <meta http-equiv="Content-Type"
content="text/html; charset=utf-8" />
5 <title>Widget Cost Calculator</title>
6 </head>
7 <body>
8 <?php # Script 13.2 - calculator.php
9 // This script calculates an order total
based upon three form values.
10
11 // Check if the form has been submitted:
12 if ($_SERVER['REQUEST_METHOD'] = = 'POST') {
13
14 // Cast all the variables to a
specific type:
15 $quantity = (int) $_POST['quantity'];
16 $price = (float) $_POST['price'];
17 $tax = (float) $_POST['tax'];
18
19 // All variables should be positive!
20 if ( ($quantity > 0) && ($price >
0) && ($tax > 0) ) {
21
22 // Calculate the total:
23 $total = $quantity * $price;
24 $total += $total * ($tax/100);
25
26 // Print the result:
27 echo '<p>The total cost of purchasing
' . $quantity . ' widget(s) at $' .
number_format ($price, 2) . ' each,
plus tax, is $' . number_format
($total, 2) . '.</p>';
28
29 } else { // Invalid submitted values.
30 echo '<p style="font-weight: bold;
color: #C00">Please enter a valid
quantity, price, and tax rate.</p>';
31 }
32
33 } // End of main isset( ) IF.
34
35 // Leave the PHP section and create the
HTML form.
36 ?>
37 <h2>Widget Cost Calculator</h2>
38 <form action="calculator.php"
method="post">
39 <p>Quantity: <input type="text"
name="quantity" size="5" maxlength="10"
value="<?php if (isset($quantity)) echo
$quantity; ?>" /></p>
40 <p>Price: <input type="text"
name="price" size="5" maxlength="10"
value="<?php if (isset($price)) echo
$price; ?>" /></p>
41 <p>Tax (%): <input type="text"
name="tax" size="5" maxlength="10"
value="<?php if (isset($tax)) echo
$tax; ?>" /></p>
42 <p><input type="submit" name="submit"
value="Calculate!" /></p>
43 </form>
44 </body>
45 </html>
2. Check if the form has been submitted:
if ($_SERVER['REQUEST_METHOD'] = = 'POST') {
Like many previous examples, this one script will both display the HTML form and handle its submission.
3. Cast all the variables to a specific type:
$quantity = (int) $_POST['quantity'];
$price = (float) $_POST['price'];
$tax = (float) $_POST['tax'];
The form itself has three text boxes ![]() , into which practically anything could be typed (there’s no number type of input for forms in HTML 4 or XHTML 1.1). But the quantity must be an integer, and both price and tax are acceptable as floats (i.e., could contain decimal points). To force these constraints, cast each one to a specific type.
, into which practically anything could be typed (there’s no number type of input for forms in HTML 4 or XHTML 1.1). But the quantity must be an integer, and both price and tax are acceptable as floats (i.e., could contain decimal points). To force these constraints, cast each one to a specific type.
4. Check if the variables have proper values:
if ( ($quantity > 0) && ($price > 0) && ($tax > 0) ) {
For this calculator to work, the three variables must be specific types (see Step 3). More importantly, they must all be positive numbers. This conditional checks for that prior to performing the calculations. Note that, per the rules of typecasting, if the posted values are not numbers, they will be cast to 0 and therefore not pass this conditional.
5. Calculate and print the results:
$total = $quantity * $price;
$total += $total * ($tax/100);
echo '<p>The total cost of purchasing ' . $quantity . ' widget(s) at $' . number_format ($price, 2) . ' each, plus tax, is $' . number_format ($total, 2) . '.</p>';
To calculate the total, first the quantity is multiplied by the price. To apply the tax to the total, the value of the total times the tax divided by 100 (e.g., 6.5% becomes .065) is then added, using the addition assignment shortcut operator. The number_format( ) function is used to print both the price and total values in the proper format ![]() .
.
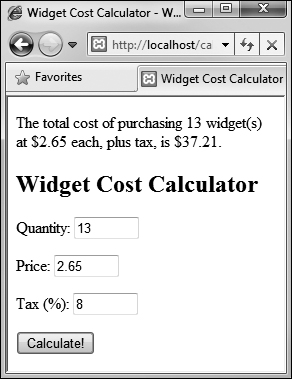
![]() The results of the calculation when the form is properly completed.
The results of the calculation when the form is properly completed.
6. Complete the conditionals:
} else {
echo '<p style="font-weight: bold; color: #C00">Please enter a valid quantity, price, and tax rate.</p>';
}
} // End of main isset( ) IF.
A little CSS is used to create a bold, red error message, should there be a problem ![]() .
.
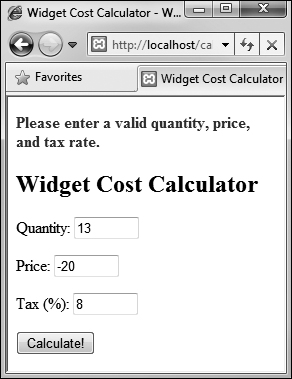
![]() An error message is printed in bold, red text if any of the three fields does not contain a positive number.
An error message is printed in bold, red text if any of the three fields does not contain a positive number.
7. Begin the HTML form:
?>
<h2>Widget Cost Calculator</h2>
<form action="calculator.php" method="post">
<p>Quantity: <input type="text" name="quantity" size="5" maxlength="10" value="<?php if (isset($quantity)) echo $quantity; ?>" /></p>
The HTML form is really simple and posts back to this same page. The inputs will have a sticky quality, so the user can see what was previously entered. By referring to $quantity etc. instead of $_POST['quantity'] etc., the form will reflect the value for each input as it was typecast.
8. Complete the HTML form:
<p>Price: <input type="text" name="price" size="5" maxlength="10" value="<?php if (isset($price)) echo $price; ?>" /></p>
<p>Tax (%): <input type="text" name="tax" size="5" maxlength="10" value="<?php if (isset($tax)) echo $tax; ?>" /></p>
<p><input type="submit" name="submit" value="Calculate!" /></p>
</form>
9. Complete the HTML page:
</body>
</html>
10. Save the file as calculator.php, place it in your Web directory, and test it in your Web browser ![]() and
and ![]() .
.
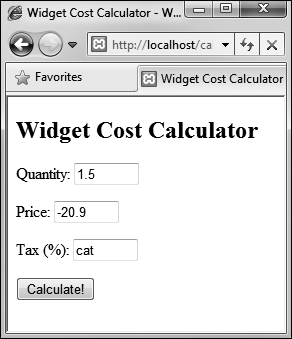
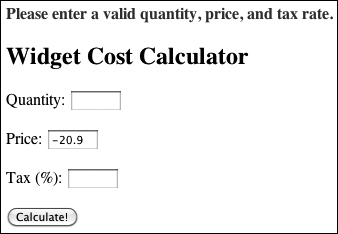
![]() If invalid values are entered, such as floats for the quantity or strings for the tax...
If invalid values are entered, such as floats for the quantity or strings for the tax...
![]() ...they’ll be cast into more appropriate formats. The negative price will also keep this calculation from being made (although the casting won’t change that value).
...they’ll be cast into more appropriate formats. The negative price will also keep this calculation from being made (although the casting won’t change that value).
You should definitely use typecasting when working with numbers within SQL queries. Numbers aren’t quoted in queries, so if a string is somehow used in a number’s place, there will be an SQL syntax error. If you typecast such variables to an integer or float first, the query may not work (in terms of returning a record) but will still be syntactically valid. You’ll frequently see this in the book’s last three chapters.
As I implied, regular expressions are a more advanced method of data validation and are sometimes your best bet. But using type-based validation, when feasible, will certainly be faster (in terms of processor speed) and less prone to programmer error (did I mention that regular expressions are complex?).
To repeat myself, the rules of how values are converted from one data type to another are somewhat complicated. If you want to get into the details, see the PHP manual.
Validating Files by Type
Chapter 11 includes an example of handling file uploads in PHP. As uploading files allows users to place a more potent type of content on your server (compared with just the text sent via a form), one cannot be too mindful of security when it comes to handling them. In that particular example, the uploaded file was validated by checking its MIME type. Specifically, with an uploaded file, $_FILES['upload']['type'] refers to the MIME type provided by the uploading browser. This is a good start, but it’s easy for a malicious user to trick the browser into providing a false MIME type. A more reliable way of confirming a file’s type is to use the Fileinfo extension.
Added in PHP 5.3, the Fileinfo extension determines a file’s type (and encoding) by hunting for “magic bytes” or “magic numbers” within the file. For example, the data that makes up a GIF image must begin with the ASCII code that represents either GIF89a or GIF87a; the data that makes up a PDF file starts with %PDF.
To use Fileinfo, start by creating a Fileinfo resource:
$fileinfo = finfo_open(kind);
The kind value will be one of several constants, indicating the type of resource you want to create. To determine a file’s type, the constant is FILEINFO_MIME_TYPE:
$fileinfo = finfo_open(FILEINFO_MIME_TYPE);
Next, call the finfo_file( ) function, providing the Fileinfo resource and a reference to the file you want to examine:
finfo_file($fileinfo, $filename);
This function returns the file’s MIME type (given the already created resource), based upon the file’s actual magic bytes.
Finally, once you’re done, you should close the Fileinfo resource:
finfo_close($fileinfo);
This next script will use this information to confirm that an uploaded file is an RTF (Rich Text Format). Note that you’ll only be able to test this example if you are using version 5.3 of PHP or later ![]() . If you are using an earlier version, you’ll need to install the Fileinfo extension through PECL (PHP Extension Community Library, http://pecl.php.net). On Windows, if you are using PHP 5.3 or later, the Fileinfo DLL file should be included with your installation, but you may need to enable it in your
. If you are using an earlier version, you’ll need to install the Fileinfo extension through PECL (PHP Extension Community Library, http://pecl.php.net). On Windows, if you are using PHP 5.3 or later, the Fileinfo DLL file should be included with your installation, but you may need to enable it in your php.ini configuration file (download Appendix A, “Installation” from peachpit.com).

![]() If your PHP installation does not support the Fileinfo extension, you’ll see an error message like this one.
If your PHP installation does not support the Fileinfo extension, you’ll see an error message like this one.
Script 13.3. Using the Fileinfo extension, this script does a good job of confirming an uploaded file’s type.
1 <!DOCTYPE html PUBLIC "-//W3C//DTD XHTML
1.0 Transitional//EN" "http://www.w3.org/
TR/xhtml1/DTD/xhtml1-transitional.dtd">
2 <html xmlns="http://www.w3.org/1999/
xhtml" xml:lang="en" lang="en">
3 <head>
4 <meta http-equiv="Content-Type"
content="text/html; charset=utf-8" />
5 <title>Upload a RTF Document</title>
6 </head>
7 <body>
8 <?php # Script 13.3 - upload_rtf.php
9
10 // Check if the form has been submitted:
11 if ($_SERVER['REQUEST_METHOD'] = = 'POST')
{
12
13 // Check for an uploaded file:
14 if (isset($_FILES['upload']) && file_
exists($_FILES['upload']['tmp_name'])) {
15
16 // Validate the type. Should be
RTF.
17 // Create the resource:
18 $fileinfo = finfo_open
(FILEINFO_MIME_TYPE);
19
20 // Check the file:
21 if (finfo_file($fileinfo,
$_FILES['upload']['tmp_name']) = =
'text/rtf') {
22
23 // Indicate it's okay!
24 echo '<p><em>The file would be
acceptable!</em></p>';
25
26 // In theory, move the file over.
In reality, delete the file:
27 unlink($_FILES['upload']
['tmp_name']);
28
29 } else { // Invalid type.
30 echo '<p style="font-weight:
bold; color: #C00">Please
upload an RTF document.</p>';
31 }
32
33 // Close the resource:
34 finfo_close($fileinfo);
35
36 } // End of isset($_FILES['upload'])
IF.
37
38 // Add file upload error handling, if
desired.
39
40 } // End of the submitted conditional.
41 ?>
42
43 <form enctype="multipart/form-data"
action="upload_rtf.php" method="post">
44 <input type="hidden" name="MAX_FILE_
SIZE" value="524288" />
45 <fieldset><legend>Select an RTF
document of 512KB or smaller to be
uploaded:</legend>
46 <p><b>File:</b> <input type="file"
name="upload" /></p>
47 </fieldset>
48 <div align="center"><input
type="submit" name="submit"
value="Submit" /></div>
49 </form>
50 </body>
51 </html>
To validate files by type
1. Begin a new PHP script in your text editor or IDE, to be named upload_rtf.php (Script 13.3):
<!DOCTYPE html PUBLIC "-//W3C//DTD XHTML 1.0 Transitional//EN" "http://www.w3.org/TR/xhtml1/DTD/xhtml1-transitional.dtd">
<html xmlns="http://www.w3.org/1999/xhtml" xml:lang="en" lang="en">
<head>
<meta http-equiv="Content-Type" content="text/html; charset=utf-8" />
<title>Upload a RTF Document</title>
</head>
<body>
<?php # Script 13.3 - upload_rtf.php
2. Check if the form has been submitted:
if ($_SERVER['REQUEST_METHOD'] = = 'POST') {
This same script will both display and handle the form.
3. Check for an uploaded file:
if (isset($_FILES['upload']) && file_exists($_FILES['upload'] ['tmp_name'])) {
This script first confirms that the $_FILES['upload'] variable is set, which would be the case after a form submission. The conditional then confirms that the uploaded file exists (by default, in the temporary directory). This clause prevents attempts to validate the file’s type should the upload have failed (e.g., because the selected file was too large).
4. Create the Fileinfo resource:
$fileinfo = finfo_open(FILEINFO_MIME_TYPE);
This line, as already explained, creates a Fileinfo resource whose specific purpose is to retrieve a file’s MIME type.
5. Check the file’s type:
if (finfo_file($fileinfo, $_FILES['upload']['tmp_name']) = = 'text/rtf') {
echo '<p><em>The file would be acceptable!</em></p>';
If the finfo_file( ) function returns a value of text/rtf for the uploaded file, then the file has the proper type for the purposes of this script. In that case, a message is printed ![]() .
.
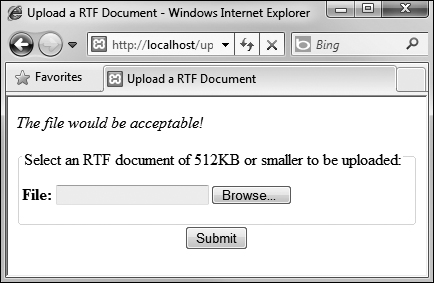
![]() If the selected and uploaded document has a valid RTF MIME type, the user will see this result.
If the selected and uploaded document has a valid RTF MIME type, the user will see this result.
6. Delete the uploaded file:
unlink($_FILES['upload'] ['tmp_name']);
In a real-world example, the script would now move the file over to its final destination on the server. As this script is simply for the purpose of validating a file’s type, the file can be removed instead.
7. Complete the type conditional:
} else { // Invalid type.
echo '<p style="font-weight: bold; color: #C00">Please upload an RTF document.</p>';
}
If the uploaded file’s MIME type is not text/rtf, the script will print an error message ![]() .
.
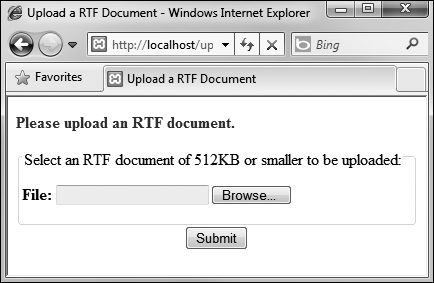
![]() Uploaded files without the proper MIME type are rejected.
Uploaded files without the proper MIME type are rejected.
8. Close the Fileinfo resource:
finfo_close($fileinfo);
The final step is to close the open Fileinfo resource, once it’s no longer needed.
9. Complete the remaining conditionals:
} // End of isset($_FILES['upload']) IF.
} // End of the submitted conditional.
?>
You could also add debugging information, such as the related uploaded error message, if an error occurs.
10. Create the form:
<form enctype="multipart/form-data" action="upload_rtf.php" method="post">
<input type="hidden" name="MAX_FILE_SIZE" value="524288" />
<fieldset><legend>Select an RTF document of 512KB or smaller to be uploaded:</legend>
<p><b>File:</b> <input type="file" name="upload" /></p>
</fieldset>
<div align="center"><input type="submit" name="submit" value="Submit" /></div>
</form>
The form uses the proper enctype attribute, has a MAX_FILE_SIZE recommendation in a hidden form input, and uses a file input type: the three requirements for accepting file uploads. That’s all there is to this example (as in ![]() and
and ![]() ).
).
11. Complete the page:
</body>
</html>
12. Save the file as upload_rtf.php, place it in your Web directory, and test it in your Web browser.
The same Fileinfo resource can be applied to multiple files. Just close the resource after the script is done with the resource.
Preventing XSS Attacks
HTML is simply plain text, like <b>, which is given special meaning by Web browsers (as by making text bold). Because of this fact, your Web-site’s user could easily put HTML in their form data, like in the comments field in the email example. What’s wrong with that, you might ask?
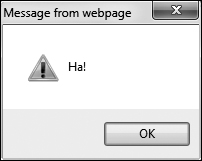
Many dynamically driven Web applications take the information submitted by a user, store it in a database, and then redisplay that information on another page. Think of a forum, as just one example. At the very least, if a user enters HTML code in their data, such code could throw off the layout and aesthetic of your site. Taking this a step further, JavaScript is also just plain text, but text that has special meaning—executable meaning—within a Web browser. If malicious code entered into a form were re-displayed in a Web browser ![]() , it could create pop-up windows
, it could create pop-up windows ![]() , steal cookies, or redirect the browser to other sites. Such attacks are referred to as cross-site scripting (XSS). As in the email example, where you need to look for and nullify bad strings found in data, prevention of XSS attacks is accomplished by addressing any potentially dangerous PHP, HTML, or JavaScript.
, steal cookies, or redirect the browser to other sites. Such attacks are referred to as cross-site scripting (XSS). As in the email example, where you need to look for and nullify bad strings found in data, prevention of XSS attacks is accomplished by addressing any potentially dangerous PHP, HTML, or JavaScript.
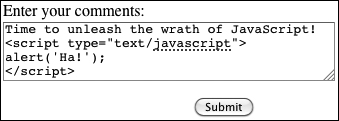
![]() The malicious and savvy user can enter HTML, CSS, and JavaScript into textual form fields.
The malicious and savvy user can enter HTML, CSS, and JavaScript into textual form fields.
![]() The JavaScript entered into the comments field
The JavaScript entered into the comments field ![]() would create this alert window when the comments were displayed in the Web browser.
would create this alert window when the comments were displayed in the Web browser.
PHP includes a handful of functions for handling HTML and other code found within strings. These include:
• htmlspecialchars( ), which turns &, ‘, “, <, and > into an HTML entity format (&, ", etc.)
• htmlentities( ), which turns all applicable characters into their HTML entity format
• strip_tags( ), which removes all HTML and PHP tags
These three functions are roughly listed in order from least disruptive to most. Which function you’ll want to use depends upon the application at hand. To demonstrate how these functions work and differ, let’s just create a simple PHP page that takes some text and runs it through these functions, printing the results ![]() .
.
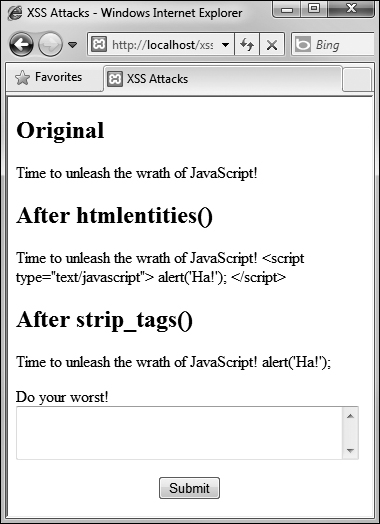
![]() Thanks to the
Thanks to the htmlentities( ) and strip_tags( ) functions, malicious code entered into a form field ![]() can be rendered inert.
can be rendered inert.
Script 13.4. Applying the htmlentities( ) and strip_tags( ) functions to submitted text can prevent XSS attacks.
1 <!DOCTYPE html PUBLIC "-//W3C//DTD XHTML
1.0 Transitional//EN" "http://www.w3.org/
TR/xhtml1/DTD/xhtml1-transitional.dtd">
2 <html xmlns="http://www.w3.org/1999/
xhtml" xml:lang="en" lang="en">
3 <head>
4 <meta http-equiv="Content-Type"
content="text/html; charset=utf-8" />
5 <title>XSS Attacks</title>
6 </head>
7 <body>
8 <?php # Script 13.4 - xss.php
9
10 if ($_SERVER['REQUEST_METHOD'] = = 'POST') {
11
12 // Apply the different functions,
printing the results:
13 echo "<h2>Original</h2><p>{$_POST
['data']}</p>";
14 echo '<h2>After htmlentities( )
</h2><p>' . htmlentities($_POST
['data']). '</p>';
15 echo '<h2>After strip_tags( )
</h2><p>' . strip_tags($_POST
['data']). '</p>';
16
17 }
18 // Display the form:
19 ?>
20 <form action="xss.php" method="post">
21 <p>Do your worst! <textarea name="data"
rows="3" cols="40"></textarea></p>
22 <div align="center"><input
type="submit" name="submit"
value="Submit" /></div>
23 </form>
24 </body>
25 </html>
To prevent XSS attacks
1. Begin a new PHP document in your text editor or IDE, to be named xss.php (Script 13.4):
<!DOCTYPE html PUBLIC "-//W3C//DTD XHTML 1.0 Transitional//EN" "http://www.w3.org/TR/xhtml1/DTD/xhtml1-transitional.dtd">
<html xmlns="http://www.w3.org/1999/xhtml" xml:lang="en" lang="en">
<head>
<meta http-equiv="Content-Type" content="text/html; charset=utf-8" />
<title>XSS Attacks</title>
</head>
<body>
<?php # Script 13.4 - xss.php
2. Check for the form submission and print the received data in its original format:
if ($_SERVER['REQUEST_METHOD'] = = 'POST') {
echo "<h2>Original</h2> <p>{$_POST['data']}</p>";
To compare and contrast what was originally received with the result after applying the functions, the original value must first be printed.
3. Apply the htmlentities( ) function, printing the results:
echo '<h2>After htmlentities( ) </h2><p>' . htmlentities($_POST ['data']). '</p>';
To keep submitted information from messing up a page or hacking the Web browser, it’s run through the htmlentities( ) function. With this function, any HTML entity will be translated; for instance, < and > will become < and > respectively.
4. Apply the strip_tags( ) function, printing the results:
echo '<h2>After strip_tags( ) </h2><p>' . strip_tags($_POST ['data']). '</p>';
The strip_tags( ) function completely takes out any HTML, JavaScript, or PHP tags. It’s therefore the most foolproof function to use on submitted data.
5. Complete the PHP section:
}
?>
6. Display the HTML form:
<form action="xss.php" method="post">
<p>Do your worst! <textarea name="data" rows="3" cols="40"></textarea></p>
<div align="center"><input type="submit" name="submit" value="Submit" /></div>
</form>
The form ![]() has only one field for the user to complete: a textarea.
has only one field for the user to complete: a textarea.
7. Complete the page:
</body>
</html>
8. Save the page as xss.php, place it in your Web directory, and test it in your Web browser.
9. View the source code of the page to see the full effect of these functions ![]() .
.
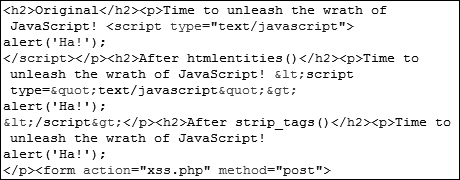
![]() This snippet of the page’s HTML source
This snippet of the page’s HTML source ![]() shows the original, submitted value, the value after using
shows the original, submitted value, the value after using html_entities( ), and the value after using strip_tags( ).
Both htmlspecialchars( ) and htmlentities( ) take an optional parameter indicating how quotation marks should be handled. See the PHP manual for specifics.
The strip_tags( ) function takes an optional parameter indicating what tags should not be stripped.
$var = strip_tags ($var, '<p><br />'),
The strip_tags( ) function will remove even invalid HTML tags, which may cause problems. For example, strip_tags( ) will yank out all of the code it thinks is an HTML tag, even if it’s improperly formed, like <b I forgot to close the tag.
Unrelated to security but quite useful is the nl2br( ) function. It turns every return (such as those entered into a text area) into an HTML <br /> tag.
Using the Filter Extension
Earlier, this chapter introduced the concept of typecasting, which is a good way to force a variable to be of the right type. In the next chapter, you’ll learn about regular expressions, which can validate both the type of data and its specific contents or format. Introduced in PHP 5.2 is the Filter extension (www.php.net/filter), an important tool that bridges the gap between the relatively simple approach of typecasting and the more complex concept of regular expressions.
The Filter extension can be used for one of two purposes: validating data or sanitizing it. A validation process, as you know well by now, confirms that data matches expectations. Sanitization, by comparison, alters data by removing inappropriate characters in order to make the data meet expectations.
The most important function in the Filter extension is filter_var( ):
filter_var(variable, filter [,options]);
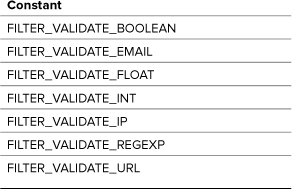
The function’s first argument is the variable to be filtered; the second is the filter to apply; and, the optional third argument is for adding additional criteria. Table 13.3 lists the validation filters, each of which is represented as a constant.
Table 13.3. Validation Filters
For example, to confirm that a variable has a decimal value, you would use:
if (filter_var($var, FILTER_VALIDATE_FLOAT)) {
A couple of filters take an optional parameter, the most common being the FILTER_VALIDATE_INT filter, which has min_range and max_range options for controlling the smallest and largest acceptable values. For example, this next bit of code confirms that the $age variable is an integer between 1 and 120 (inclusive):
if (filter_var($var, FILTER_VALIDATE_INT, array('min_range' => 1, 'max_range' => 120))) {
To sanitize data, you’ll still use the filter_var( ) function, but use one of the sanitation filters as listed in Table 13.4.
Table 13.4. Sanitization Filters

Many of the filters duplicate other PHP functions. For example, FILTER_SANITIZE_MAGIC_QUOTES is the same as applying addslashes( ); FILTER_SANITIZE_SPECIAL_CHARS can be used in lieu of htmlspecialchars( ), and FILTER_SANITIZE_STRING( ) can be used as a replacement for strip_tags( ). The PHP manual lists several additional flags, as constants, that can be used as the optional third argument to affect how each filter behaves. As an example of applying a sanitizing filter, this code is equivalent to how strip_tags( ) is used in xss.php (Script 13.4):
echo '<h2>After strip_tags( )</h2> <p>' . filter_var($_POST['data'], FILTER_SANITIZE_STRING) . '</p>';
If you get hooked on using the Filter extension, you may appreciate the consistency of being able to use it for all data sanitization, even when functions such as strip_tags( ) exist.
To practice this, the next example will update calculator.php (Script 13.2) so that it sanitizes all of the incoming data. Remember that you need PHP 5.2 or later to use the Filter extension. If you’re using an earlier version of PHP, you can install the Filter extension using PECL.
To use the Filter extension
1. Open calculator.php (Script 13.2) in your text editor or IDE.
2. Change the assignment of the $quantity variable to (Script 13.5):
$quantity = (isset($_POST['quantity'])) ? filter_var ($_POST['quantity'], FILTER_VALIDATE_INT, array('min_range' => 1)) : NULL;
Script 13.5. Using the Filter extension, this script sanitizes incoming data rather than typecasting it, as in the earlier version of the script.
1 <!DOCTYPE html PUBLIC "-//W3C//DTD XHTML
1.0 Transitional//EN" "http://www.w3.org/
TR/xhtml1/DTD/xhtml1-transitional.dtd">
2 <html xmlns="http://www.w3.org/1999/
xhtml" xml:lang="en" lang="en">
3 <head>
4 <meta http-equiv="Content-Type"
content="text/html; charset=utf-8" />
5 <title>Widget Cost Calculator</title>
6 </head>
7 <body>
8 <?php # Script 13.5 - calculator.php #2
9 // This version of the script uses the
Filter extension instead of typecasting.
10
11 // Check if the form has been submitted:
12 if ($_SERVER['REQUEST_METHOD'] = = 'POST') {
13
14 // Sanitize the variables:
15 $quantity = (isset($_POST
['quantity'])) ? filter_var($_POST
['quantity'], FILTER_VALIDATE_INT,
array('min_range' => 1)) : NULL;
16 $price = (isset($_POST['price']))
? filter_var($_POST['price'],
FILTER_SANITIZE_NUMBER_FLOAT,
FILTER_FLAG_ALLOW_FRACTION) : NULL;
17 $tax = (isset($_POST['tax'])) ?
filter_var($_POST['tax'], FILTER_
SANITIZE_NUMBER_FLOAT, FILTER_FLAG_
ALLOW_FRACTION) : NULL;
18
19 // All variables should be positive!
20 if ( ($quantity > 0) && ($price > 0)
&& ($tax > 0) ) {
21
22 // Calculate the total:
23 $total = $quantity * $price;
24 $total += $total * ($tax/100);
25
26 // Print the result:
27 echo '<p>The total cost of
purchasing ' . $quantity . '
widget(s) at $' . number_format
($price, 2) . ' each, plus tax,
is $' . number_format ($total, 2) .
'.</p>';
28
29 } else { // Invalid submitted values.
30 echo '<p style="font-weight: bold;
color: #C00">Please enter a valid
quantity, price, and tax rate.</p>';
31 }
32
33 } // End of main isset( ) IF.
34
35 // Leave the PHP section and create the
HTML form.
36 ?>
37 <h2>Widget Cost Calculator</h2>
38 <form action="calculator.php"
method="post">
39 <p>Quantity: <input type="text"
name="quantity" size="5" maxlength="10"
value="<?php if (isset($quantity)) echo
$quantity; ?>" /></p>
40 <p>Price: <input type="text"
name="price" size="5" maxlength="10"
value="<?php if (isset($price)) echo
$price; ?>" /></p>
41 <p>Tax (%): <input type="text"
name="tax" size="5" maxlength="10"
value="<?php if (isset($tax)) echo
$tax; ?>" /></p>
42 <p><input type="submit" name="submit"
value="Calculate!" /></p>
43 </form>
44 </body>
45 </html>
This version of the script will improve upon its predecessor in a couple of ways. First, each POST variable is checked for existence using isset( ), instead of assuming the variable exists. If the variable is not set, then $quantity is assigned NULL. If the variable is set, it’s run through filter_var( ), sanitizing the value as an integer greater than 1. The sanitized value is then assigned to $quantity. All of this code is written using the ternary operator, introduced in Chapter 10, “Common Programming Techniques,” for brevity’s sake. As an if-else conditional, the same code would be written as:
if (isset($_POST['quantity'])) {
$quantity = filter_var($_POST['quantity'], FILTER_VALIDATE_INT, array('min_range' => 1));
} else {
$quantity = NULL;
}
3. Change the assignment of the $price variable to:
$price = (isset($_POST['price'])) ? filter_var($_POST['price'], FILTER_SANITIZE_NUMBER_FLOAT, FILTER_FLAG_ALLOW_FRACTION) : NULL;
This code is a repetition of that in Step 2, except that the sanitizing filter insists that the data be a float. The additional argument, FILTER_FLAG_ALLOW_FRACTION, says that it’s acceptable for the value to use a decimal point.
4. Change the assignment of the $tax variable to:
$tax = (isset($_POST['tax'])) ? filter_var($_POST['tax'], FILTER_SANITIZE_NUMBER_FLOAT, FILTER_FLAG_ALLOW_FRACTION) : NULL;
This is a repetition of the code in Step 3.
5. Save the page, place it in your Web directory, and test it in your Web browser ![]() and
and ![]() .
.
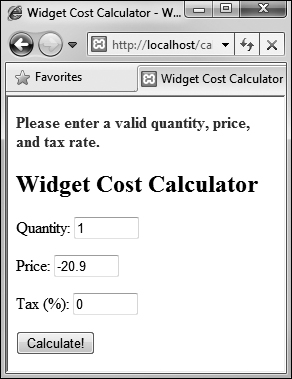
![]() Invalid values in submitted form data...
Invalid values in submitted form data...
![]() ...will be nullified by the Filter extension (as opposed to typecasting, which, for example, converted the string cat to the number 0).
...will be nullified by the Filter extension (as opposed to typecasting, which, for example, converted the string cat to the number 0).
The filter_input_array( ) function allows you to apply an array of filters to an array of variables in one step. For details (and perhaps to be blown away), see the PHP manual.
Preventing SQL Injection Attacks
Another type of attack that malicious users can attempt is SQL injection attacks. As the name implies, these are endeavors to insert bad code into a site’s SQL queries. One aim of such attacks is that they would create a syntactically invalid query, thereby revealing something about the script or database in the resulting error message ![]() . An even bigger aspiration is that the injection attack could alter, destroy, or expose the stored data.
. An even bigger aspiration is that the injection attack could alter, destroy, or expose the stored data.

![]() If a site reveals a detailed error message and doesn’t properly handle problematic characters in submitted values, hackers can learn a lot about your server.
If a site reveals a detailed error message and doesn’t properly handle problematic characters in submitted values, hackers can learn a lot about your server.
Fortunately, SQL injection attacks are rather easy to prevent. Start by validating all data to be used in queries (and perform typecasting, or apply the Filter extension, whenever possible). Second, use a function like mysqli_real_escape_string( ), which makes data safe to use in queries. This function was introduced in Chapter 9, “Using PHP and MySQL.” Third, don’t show detailed errors on live sites.
An alternative to using mysqli_real_escape_string( ) is to use prepared statements. Prepared statements were added to MySQL in version 4.1, and PHP can use them as of version 5 (thanks to the Improved MySQL extension). When not using prepared statements, the entire query, including the SQL syntax and the specific values, is sent to MySQL as one long string. MySQL then parses and executes it. With a prepared query, the SQL syntax is sent to MySQL first, where it is parsed, making sure it’s syntactically valid (e.g., confirming that the query does not refer to tables or columns that don’t exist). Then the specific values are sent separately; MySQL assembles the query using those values, then executes it. The benefits of prepared statements are important: greater security and potentially better performance. I’ll focus on the security aspect here, but see the sidebar for a discussion of performance.
Prepared statements can be created out of any INSERT, UPDATE, DELETE, or SELECT query. Begin by defining your query, marking placeholders using question marks. As an example, take the SELECT query from edit_user.php (Script 10.3):
$q = "SELECT first_name, last_name, email FROM users WHERE user_id=$id";
As a prepared statement, this query becomes
$q = "SELECT first_name, last_name, email FROM users WHERE user_id=?";
Next, prepare the statement in MySQL, assigning the results to a PHP variable:
$stmt = mysqli_prepare($dbc, $q);
At this point, MySQL will parse the query, but it won’t execute it.
Next, you bind PHP variables to the query’s placeholders. In other words, you state that one variable should be used for the first question mark, another variable for the next question mark, and so on. Continuing with the same example, you would code
mysqli_stmt_bind_param($stmt, 'i', $id);
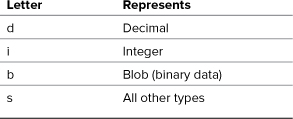
The i part of the command indicates what kind of value should be expected, using the characters listed in Table 13.5. In this case, the query expects to receive one integer. As another example, here’s how the login query from Chapter 12, “Cookies and Sessions,” would be handled:
$q = "SELECT user_id, first_name FROM users WHERE email=? AND pass=SHA1(?)";
$stmt = mysqli_prepare($dbc, $q);
mysqli_stmt_bind_param($stmt, 'ss', $e, $p);
In this example, something interesting is also revealed: even though both the email address and password values are strings, they are not placed within quotes in the query. This is another difference between a prepared statement and a standard query.
Once the statement has been bound, you can assign values to the PHP variables (if that hasn’t happened already) and then execute the statement. Using the login example, that’d be:
$e = '[email protected]';
$p = 'mypass';
mysqli_stmt_execute($stmt);
The values of $e and $p will be used when the prepared statement is executed.
To see this process in action, let’s write a script that adds a post to the messages table in the forum database (created in Chapter 6, “Database Design”). I’ll also use the opportunity to demonstrate a couple of the other prepared statement-related functions.
Script 13.6. This script, which represents a simplified version of a message posting page, uses prepared statements as a way of preventing SQL injection attacks.
1 <!DOCTYPE html PUBLIC "-//W3C//DTD XHTML
1.0 Transitional//EN" "http://www.w3.org/
TR/xhtml1/DTD/xhtml1-transitional.dtd">
2 <html xmlns="http://www.w3.org/1999/
xhtml" xml:lang="en" lang="en">
3 <head>
4 <meta http-equiv="Content-Type"
content="text/html; charset=utf-8" />
5 <title>Post a Message</title>
6 </head>
7 <body>
8 <?php # Script 13.6 - post_message.php
9
10 if ($_SERVER['REQUEST_METHOD'] = = 'POST') {
11
12 // Validate the data (omitted)!
13
14 // Connect to the database:
15 $dbc = mysqli_connect ('localhost',
'username', 'password', 'forum'),
16
17 // Make the query:
18 $q = 'INSERT INTO messages
(forum_id, parent_id, user_id,
subject, body, date_entered)
VALUES (?, ?, ?, ?, ?, NOW( ))';
19
20 // Prepare the statement:
21 $stmt = mysqli_prepare($dbc, $q);
22
23 // Bind the variables:
24 mysqli_stmt_bind_param($stmt,
'iiiss', $forum_id, $parent_id,
$user_id, $subject, $body);
25
26 // Assign the values to variables:
27 $forum_id = (int) $_POST['forum_id'];
28 $parent_id = (int) $_POST['parent_id'];
29 $user_id = 3; // The user_id value
would normally come from the session.
30 $subject = strip_tags($_POST['subject']);
31 $body = strip_tags($_POST['body']);
32
33 // Execute the query:
34 mysqli_stmt_execute($stmt);
35
36 // Print a message based upon the result:
37 if (mysqli_stmt_affected_rows($stmt)
== 1) {
38 echo '<p>Your message has been
posted.</p>';
39 } else {
40 echo '<p style="font-weight: bold;
color: #C00">Your message could
not be posted.</p>';
41 echo '<p>' . mysqli_stmt_error
($stmt) . '</p>';
42 }
43
44 // Close the statement:
45 mysqli_stmt_close($stmt);
46
47 // Close the connection:
48 mysqli_close($dbc);
49
50 } // End of submission IF.
51
52 // Display the form:
53 ?>
54 <form action="post_message.php"
method="post">
55
56 <fieldset><legend>Post a message:
</legend>
57
58 <p><b>Subject</b>: <input
name="subject" type="text" size="30"
maxlength="100" /></p>
59
60 <p><b>Body</b>: <textarea name="body"
rows="3" cols="40"></textarea></p>
61
62 </fieldset>
63 <div align="center"><input type="submit"
name="submit" value="Submit" /></div>
64 <input type="hidden" name="forum_id"
value="1" />
65 <input type="hidden" name="parent_id"
value="0" />
66
67 </form>
68 </body>
69 </html>
To use prepared statements
1. Begin a new PHP script in your text editor or IDE, to be named post_message.php (Script 13.6):
<!DOCTYPE html PUBLIC "-//W3C//DTD XHTML 1.0 Transitional//EN" "http://www.w3.org/TR/xhtml1/DTD/xhtml1-transitional.dtd">
<html xmlns="http://www.w3.org/1999/xhtml" xml:lang="en" lang="en">
<head>
<meta http-equiv="Content-Type" content="text/html; charset=utf-8" />
<title>Post a Message</title>
</head>
<body>
<?php # Script 13.6 - post_message.php
2. Check for form submission and connect to the forum database:
if ($_SERVER['REQUEST_METHOD'] = = 'POST') {
$dbc = mysqli_connect ('localhost', 'username', 'password', 'forum'),
Note that, for brevity’s sake, I’m omitting basic data validation and error reporting. Although a real site (a more realized version of this script can be found in Chapter 17, “Example—Message Board”), would check that the message subject and body aren’t empty and that the various ID values are positive integers, this script will still be relatively safe, thanks to the security offered by prepared statements.
This example will use the forum database, created in Chapter 6.
3. Define and prepare the query:
$q = 'INSERT INTO messages (forum_id, parent_id, user_id, subject, body, date_entered) VALUES (?, ?, ?, ?, ?, NOW( ))';
$stmt = mysqli_prepare($dbc, $q);
This syntax has already been explained. The query is defined, using placeholders for values to be assigned later. Then the mysqli_prepare( ) function sends this to MySQL, assigning the result to $stmt.
The query itself was first used in Chapter 6. It populates six fields in the messages table. The value for the date_entered column will be the result of the NOW( ) function, not a bound value.
4. Bind the appropriate variables and create a list of values to be inserted:
mysqli_stmt_bind_param($stmt, 'iiiss', $forum_id, $parent_id, $user_id, $subject, $body);
$forum_id = (int)$_POST['forum_id'];
$parent_id = (int)$_POST['parent_id'];
$user_id = 3;
$subject = strip_tags($_POST ['subject']);
$body = strip_tags($_POST['body']);
The first line says that three integers and two strings will be used in the prepared statement. The values will be found in the variables to follow.
For those variables, the subject and body values come straight from the form ![]() , after running them through
, after running them through strip_tags( ) to remove any potentially dangerous code. The forum ID and parent ID (which indicates if the message is a reply to an existing message or not) also come from the form. They’ll be typecast to integers (for added security, you would confirm that they’re positive numbers after typecasting them, or you could use the Filter extension).
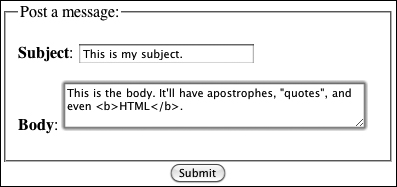
![]() The simple HTML form.
The simple HTML form.
The user ID value, in a real script, would come from the session, where it would be stored when the user logged in.
5. Execute the query:
mysqli_stmt_execute($stmt);
Finally, the prepared statement is executed.
6. Print the results of the execution and complete the loop:
if (mysqli_stmt_affected_rows ($stmt) = = 1) {
echo '<p>Your message has been posted.</p>';
} else {
echo '<p style="font-weight: bold; color: #C00">Your message could not be posted.</p>';
echo '<p>' . mysqli_stmt_error ($stmt) . '</p>';
}
The successful insertion of a record can be confirmed using the mysqli_stmt_affected_rows( ) function, which works as you expect it would (returning the number of affected rows). In that case, a simple message is printed ![]() . If a problem occurred, the m
. If a problem occurred, the mysqli_stmt_error( ) function returns the specific MySQL error message. This is for your debugging purposes, not to be used in a live site. That being said, often the PHP error message is more useful than that returned by mysqli_stmt_error( ) ![]() .
.
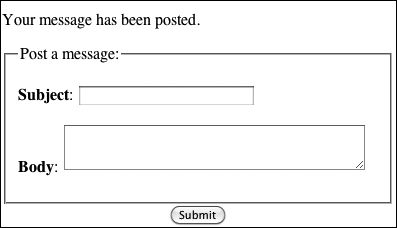
![]() If one record in the database was affected by the query, this will be the result.
If one record in the database was affected by the query, this will be the result.
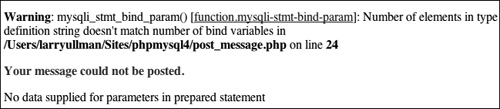
![]() Error reporting with prepared statements can be confounding sometimes!
Error reporting with prepared statements can be confounding sometimes!
7. Close the statement and the database connection:
mysqli_stmt_close($stmt);
mysqli_close($dbc);
The first function closes the prepared statement, freeing up the resources. At this point, $stmt no longer has a value. The second function closes the database connection.
8. Complete the PHP section:
} // End of submission IF.
?>
<form action="post_message.php" method="post">
<fieldset><legend>Post a message:</legend>
<p><b>Subject</b>: <input name="subject" type="text" size="30" maxlength="100" /></p>
<p><b>Body</b>: <textarea name="body" rows="3" cols="40"></textarea></p>
</fieldset>
The form begins with just a subject text input and a textarea for the message’s body.
<div align="center"><input type="submit" name="submit" value="Submit" /></div>
<input type="hidden" name="forum_id" value="1" />
<input type="hidden" name="parent_id" value="0" />
</form>
The form contains two fields the user would fill out and two hidden inputs that store values the query needs. In a real version of this script, the forum_id and parent_id values would be determined dynamically.
11. Complete the page:
</body>
</html>
12. Save the file as post_message.php, place it in your Web directory, and test it in your Web browser ![]() .
.
There are two kinds of prepared statements. Here I have demonstrated bound parameters, where PHP variables are bound to a query. The other type is bound results, where the results of a query are bound to PHP variables.
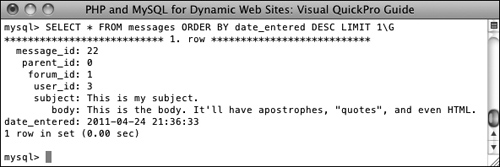
![]() Selecting the most recent entry in the messages table confirms that the prepared statement (Script 13.6) worked. Notice that the HTML was stripped out of the post but the quotes are still present.
Selecting the most recent entry in the messages table confirms that the prepared statement (Script 13.6) worked. Notice that the HTML was stripped out of the post but the quotes are still present.
Review and Pursue
If you have any problems with the review questions or the pursue prompts, turn to the book’s supporting forum (www.LarryUllman.com/forums/).
Review
• What are some of the inappropriate strings and characters that could be indicators of potential spam attempts?
• What does the stripos( ) function do? What is its syntax?
• What does the str_replace( ) function do? What is its syntax?
• What does the array_map( ) function do? What is its syntax?
• What is typecasting? How do you typecast a variable in PHP?
• What function is used to move an uploaded file to its final destination on the server?
• What is the Fileinfo extension? How is it used?
• What does the htmlspecialchars( ) function do?
• What does the htmlentities( ) function do?
• What does the strip_tags( ) function do?
• What function converts newline characters into HTML break tags?
• What is the most important function in the Filter extension? How is it used?
• What are prepared statements? What benefits might prepared statements have over the standard method of querying a database?
• What is the syntax for using prepared statements?
Pursue
• If you haven’t applied the Filter function, for email validation, and the spam_scrubber( ) function to a contact form used on one of your sites, do so now!
• Change calculator.php to allow for no tax rate.
• Update calculator.php, from Chapter 3, “Creating Dynamic Web Sites,” so that it also uses typecasting or the Filter extension. (As a reminder, that calculator determined the cost of a car trip, based upon the distance, average miles per gallon, and average price paid per gallon.)
• Modify upload_rtf.php so that it reports the actual MIME type for the uploaded file, should it not be text/rtf.
• Create a PHP script that reports the MIME type of any uploaded file.
• Apply the strip_tags( ) function to a previous script in the book, such as the registration example, to prevent inappropriate code from being stored in the database.
• Apply the Filter function to the login process in Chapter 12 to guarantee that the submitted email address meets the email address format, prior to using it in a query.
• Apply the Filter function, or typecasting, to the delete_user.php and edit_user.php scripts from Chapter 10.
• Apply the Fileinfo extension to the show_image.php script from Chapter 11.