7. Advanced SQL and MySQL
Performing FULLTEXT Searches 222
This, the last chapter dedicated to SQL and MySQL (although most of the rest of the book will use these technologies in some form or another), discusses the higher-end concepts often needed to work with more complicated databases, like those created in the previous chapter. The first such topic is the JOIN, a critical SQL term for querying normalized databases with multiple tables. From there, the chapter introduces a category of functions that are specifically used when grouping query results, followed by more complex ways to select values from a table.
In the middle of the chapter, you’ll learn how to perform FULLTEXT searches, which can add search engine-like functionality to any site. Next up is the EXPLAIN command: it provides a way to test the efficiency of your database schema and your queries. The chapter concludes with coverage of transactions and database encryption.
Performing Joins
Because relational databases are more complexly structured, they sometimes require special query statements to retrieve the information you need most. For example, if you wanted to know what messages are in the MySQL forum (using the forum database created in the previous chapter), you would need to first find the forum_id for MySQL:
SELECT forum_id FROM forums WHERE name='MySQL'
Then you would use that number to retrieve all the records from the messages table that have that forum_id:
SELECT * FROM messages WHERE forum_id=1
This one simple (and, in a forum, often necessary) task would require two separate queries. By using a join, you can accomplish all of that in one fell swoop.
A join is an SQL query that uses two or more tables, and produces a virtual table of results. Any time you need to simultaneously retrieve information from more than one table, a join is what you’ll probably use.
Joins can be written in many different ways, but the basic syntax is:
SELECT what_columns FROM tableA JOIN_TYPE tableB JOIN_CLAUSE
Because joins involve multiple tables, the what_columns can include columns in any named table. And as joins often return so much information, it’s normally best to specify exactly what columns you want returned, instead of selecting them all.
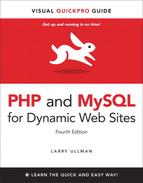
When selecting from multiple tables, you must use the dot syntax (table.column) if the tables named in the query have columns with the same name. This is often the case when dealing with relational databases because a primary key from one table may have the same name as a foreign key in another. If you are not explicit when referencing your columns, you’ll get an error ![]() :
:
SELECT forum_id FROM messages INNER JOIN
forums ON messages.forum_id=forums. forum_id
![]() Generically referring to a column name present in multiple tables will cause an ambiguity error.
Generically referring to a column name present in multiple tables will cause an ambiguity error.
The two main types of joins are inner and outer (there are subtypes within both). As you’ll see with outer joins, the order in which you reference the tables does matter.
The join clause is where you indicate the relationship between the joined tables. For example, forums.forum_id should equal messages.forum_id (as in the above).
You can also use WHERE and ORDER BY clauses with a join, as you would with any SELECT query.
As a last note, before getting into joins more specifically, the SQL concept of an alias—introduced in Chapter 5, “Introduction to SQL”—will come in handy when writing joins. Often an alias will just be used as a shorthand way of referencing the same table multiple times within the same query. If you don’t recall the syntax for creating aliases, or how they’re used, revisit that part of Chapter 5.
(As in the previous two chapters, this chapter will use the command-line mysql client to execute queries, but you can also use phpMyAdmin or another tool. The chapter assumes you know how to connect to the MySQL server and declare the character set to use, if necessary.)
Inner Joins
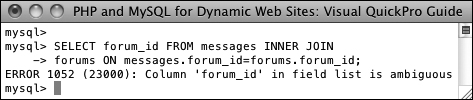
An inner join returns all of the records from the named tables wherever a match is made. For example, to find every message posted in the MySQL forum, the inner join would be written as ![]()
SELECT m.message_id, m.subject, f.name
FROM messages AS m INNER JOIN forums AS f
ON m.forum_id = f.forum_id
WHERE f.name = 'MySQL'
![]() This join returns three columns from two tables where the forum_id value—1—represents the MySQL forum.
This join returns three columns from two tables where the forum_id value—1—represents the MySQL forum.
This join is selecting three columns from the messages table (aliased as m) and one column from the forums table (aliased as f) under two conditions. First, the f.name column must have a value of MySQL (this will return the forum_id of 1). Second, the forum_id value in the forums table must match the forum_id value in the messages table. Because of the equality comparison being made across both tables (m.forum_id = f.forum_id), this is known as an equijoin.
As an alternative syntax, if the column in both tables being used in the equality comparison has the same name, you can simplify your query with USING:
SELECT m.message_id, m.subject, f.name
FROM messages AS m INNER JOIN forums AS f
USING (forum_id)
WHERE f.name = 'MySQL'
To use inner joins
1. Connect to MySQL and select the forum database.
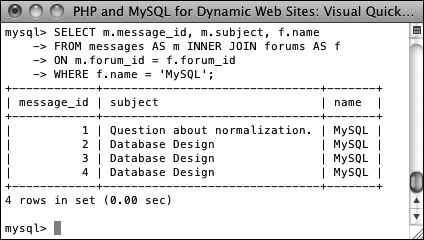
2. Retrieve the forum name and message subject for every record in the messages table ![]() :
:
SELECT f.name, m.subject FROM forums
AS f INNER JOIN messages AS m
USING (forum_id) ORDER BY f.name;
![]() A basic inner join that returns only two columns of values.
A basic inner join that returns only two columns of values.
This query will effectively replace the forum_id value in the messages table with the corresponding name value from the forums table for each of the records in the messages table. The end result is that it displays the textual version of the forum name for each message subject.
Notice that you can still use ORDER BY clauses in joins.
3. Retrieve the subject and date entered for every message posted by the user funny man ![]() :
:
SELECT m.subject,
DATE_FORMAT(m.date_entered, '%M %D, %Y') AS Date
FROM users AS u
INNER JOIN messages AS m
USING (user_id)
WHERE u.username = 'funny man';
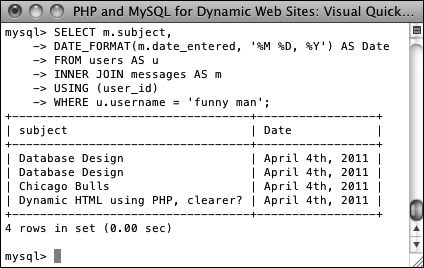
![]() A slightly more complicated version of an inner join, based upon the users and messages tables.
A slightly more complicated version of an inner join, based upon the users and messages tables.
This join also uses two tables: users and messages. The linking column for the two tables is user_id, so that’s placed in the USING clause. The WHERE conditional identifies the user being targeted, and the DATE_FORMAT( ) function will help format the date_entered value.
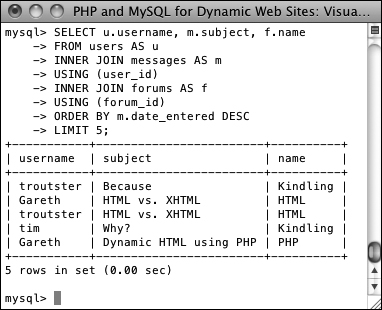
4. Find the forums that have had the five most recent postings ![]() :
:
SELECT f.name FROM forums AS f
INNER JOIN messages AS m
USING (forum_id)
ORDER BY m.date_entered DESC LIMIT 5;
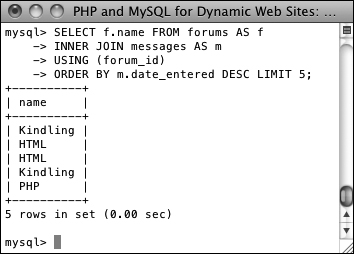
![]() An
An ORDER BY clause and a LIMIT clause are applied to this join, which returns the forums with the five most recent messages.
Since the only information that needs to be returned is the forum name, that’s the sole column selected by this query. The join is then across the forums and messages table, linked via the forum_id. The query to that point would return every message matched with the forum it’s in. That result is then ordered by the date_entered column, in descending order, and restricted to just the first five records.
Inner joins can also be written without formally using the phrase INNER JOIN. To do so, place a comma between the table names and turn the ON, or USING, clause into another WHERE condition:
SELECT m.message_id, m.subject, f.name FROM messages AS m, forums AS f WHERE m.forum_id = f.forum_id
AND f.name = 'MySQL'
Joins that do not include a join clause (ON or USING) or a WHERE clause (e.g., SELECT * FROM urls INNER JOIN url_associations) are called full joins and will return every record from both tables. This construct can have unwieldy results with larger tables.
A NULL value in a column referenced in an inner join will never be returned, because NULL matches no other value, including NULL.
MySQL’s supported join types differ slightly from the SQL standard. For example, SQL supports a CROSS JOIN and an INNER JOIN as two separate things, but in MySQL they are syntactically the same.
Outer Joins
Whereas an inner join returns records based upon making matches between two tables, an outer join will return records that are matched by both tables, and will return records that don’t match. In other words, an inner join is exclusive but an outer join is inclusive. There are three outer join subtypes: left, right, and full, with left being the most important by far. An example of a left join is:
SELECT f.*, m.subject FROM forums AS f
LEFT JOIN messages AS m
ON f.forum_id = m.forum_id
The most important consideration with left joins is which table gets named first. In this example, all of the forums records will be returned along with all of the messages information, if a match is made. If no messages records match a forums row, then NULL values will be returned for the selected messages columns instead ![]() .
.
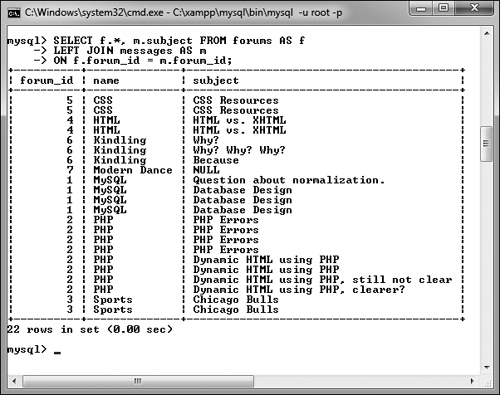
![]() An outer join returns all the records from the first table listed, with non-matching records from the second table replaced with
An outer join returns all the records from the first table listed, with non-matching records from the second table replaced with NULL values.
As with an inner join, if the column in both tables being used in the equality comparison has the same name, you can simplify your query with USING:
SELECT f.*, m.subject FROM forums AS f
LEFT JOIN messages AS m
USING (forum_id)
A right outer join does the opposite of a left outer join: it returns all of the applicable records from the right-hand table, along with matches from the left-hand table. This query is equivalent to the above:
SELECT f.*, m.subject FROM messages AS m
RIGHT JOIN forums AS f
USING (forum_id)
Generally speaking, the left join is preferred over the right (and, arguably, there’s no need to have both).
A full outer join is like a combination of a left outer join and a right outer join. In other words, all of the matching records from both tables will be returned, along with all of the records from the left-hand table that do not have matches in the right-hand table, along with all of the records from the right-hand table that do not have matches in the left-hand table. MySQL does not directly support the full outer join, but you can replicate that functionality using a left join, a right join, and a UNION statement. A full outer join is not often needed, but see the MySQL manual if you’re curious about it or unions.
To use outer joins
1. Connect to MySQL and select the forum database, if you have not already.
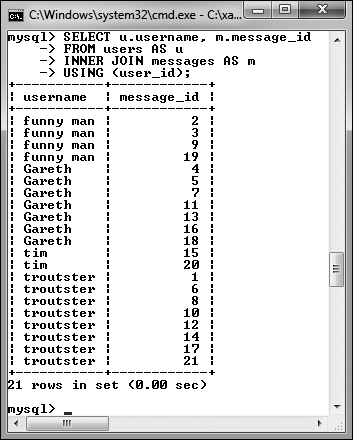
2. Retrieve every username and every message ID posted by that user ![]() :
:
SELECT u.username, m.message_id
FROM users AS u
LEFT JOIN messages AS m
USING (user_id);
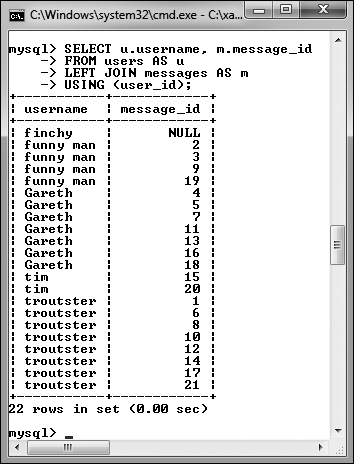
![]() This left join returns for every user, every posted message ID. If a user hasn’t posted a message (like finchy at the top), the message ID value will be
This left join returns for every user, every posted message ID. If a user hasn’t posted a message (like finchy at the top), the message ID value will be NULL.
If you were to run an inner join similar to this, a user who had not yet posted a message would not be listed ![]() . Hence, an outer join is required to be inclusive of all users. Note that the fully included table (here, users), must be the first table listed in a left join.
. Hence, an outer join is required to be inclusive of all users. Note that the fully included table (here, users), must be the first table listed in a left join.
![]() This inner join will not return any users who haven’t yet posted messages (see finchy at the top of
This inner join will not return any users who haven’t yet posted messages (see finchy at the top of ![]() ).
).
3. Retrieve every forum name and every message submission date in that forum in order of submission date ![]() :
:
SELECT f.name,
DATE_FORMAT(m.date_entered, '%M %D, Y') AS Date
FROM forums AS f
LEFT JOIN messages AS m
USING (forum_id)
ORDER BY date_entered DESC;
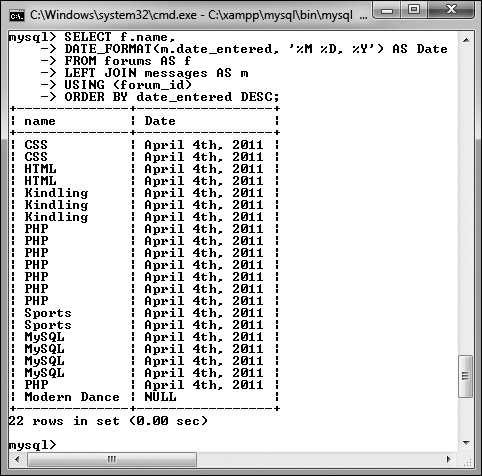
![]() This left outer join returns every forum name and the date of every message posted in that forum.
This left outer join returns every forum name and the date of every message posted in that forum.
This is really just a variation on the join in Step 2, this time swapping the forums table for the users table.
Joins can be created using conditionals involving any columns, not just the primary and foreign keys, although that’s the most common basis for comparison.
You can perform joins across multiple databases using the database.table.column syntax, as long as every database is on the same server (you cannot do this across a network) and you’re connected as a user with permission to access every database involved.
The word OUTER in a left outer join is optional and often omitted. To be formal, you could write:
SELECT f.name, DATE_FORMAT(m.date_entered, '%M %D, Y') AS Date FROM forums AS f LEFT OUTER JOIN messages AS m USING (forum_id) ORDER BY date_entered DESC;
Joining Three or More Tables
Joins are a somewhat complicated but important concept, so hopefully you’re following along well enough thus far. There are two more ways joins can be used with which you ought to be familiar: self-joins, discussed in the sidebar, and joins on three or more tables.
When joining three or more tables, it helps to remember that a join between two tables creates a virtual table of results. When you add a third table, the join is between this initial virtual table and the third referenced table ![]() . The syntax for a three-table join is of the format
. The syntax for a three-table join is of the format
SELECT what_columns FROM tableA JOIN_TYPE tableB JOIN_CLAUSE JOIN_TYPE tableC JOIN_CLAUSE
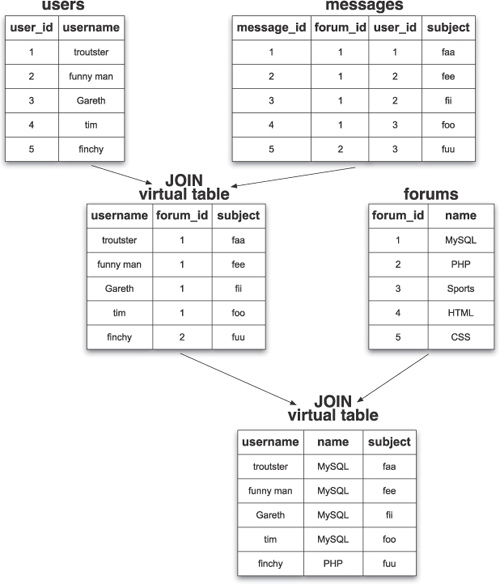
![]() How a join across three tables works: by first creating a virtual table of results, and then by joining the third table to that.
How a join across three tables works: by first creating a virtual table of results, and then by joining the third table to that.
The join types do not have to be the same in both cases—one could be an inner and the other an outer—and the join clauses are almost certain to be different. You can even add WHERE, ORDER BY, and LIMIT clauses to the end of this. Simply put, to perform a join on more than two tables, just continue to add JOIN_TYPE tableX JOIN_CLAUSE sections as needed.
There are three likely problems you’ll have with joins that span three or more tables. The first is a simple syntax error, especially when you use parentheses to separate out the clauses. The second is an ambiguous column error, which is common enough among any join type. The third likely problem will be a lack of results returned. Should that happen to you, simplify the join down to just two tables to confirm the result, and then try to reapply the additional join clauses to find where the problem is.
To use joins on three tables or more
1. Connect to MySQL and select the forum database, if you have not already.
2. Retrieve the message ID, subject, and forum name for every message posted by the user troutster ![]() :
:
SELECT m.message_id, m.subject, f.name
FROM users AS u
INNER JOIN messages AS m
USING (user_id)
INNER JOIN forums AS f
USING (forum_id)
WHERE u.username = 'troutster';

![]() An inner join across all three tables.
An inner join across all three tables.
This join is similar to one earlier in the chapter, but takes things a step further by incorporating a third table.
3. Retrieve the username, message subject, and forum name for every user ![]() :
:
SELECT u.username, m.subject, f.name
FROM users AS u
LEFT JOIN messages AS m
USING (user_id)
LEFT JOIN forums AS f
USING (forum_id);
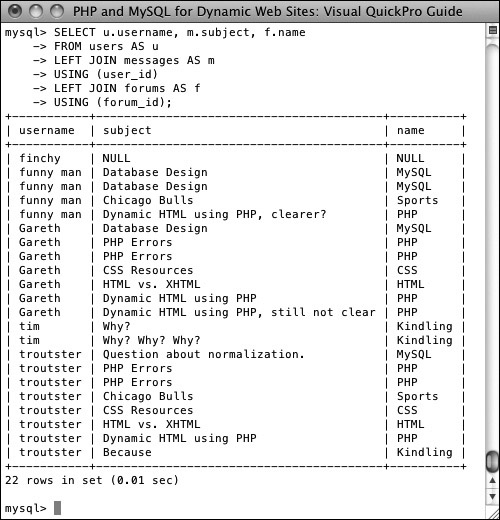
![]() This left join returns for every user, every posted message subject, and every forum name. If a user hasn’t posted a message (like finchy at the top), his or her subject and forum name values will be
This left join returns for every user, every posted message subject, and every forum name. If a user hasn’t posted a message (like finchy at the top), his or her subject and forum name values will be NULL.
Whereas the query in Step 2 performs two inner joins, this one performs two outer joins. The process behind this query is visually represented by the diagram in ![]() .
.
4. Find the users that have had the five most recent postings, while also selecting the message subject, and the forum name ![]() :
:
SELECT u.username, m.subject, f.name
FROM users AS u
INNER JOIN messages AS m
USING (user_id)
INNER JOIN forums AS f
USING (forum_id)
ORDER BY m.date_entered DESC
LIMIT 5;
![]() This inner join returns values from all three tables, with applied
This inner join returns values from all three tables, with applied ORDER BY and LIMIT clauses.
In order to retrieve the username, the message subject, and the forum name, a join across all three tables is required. As the query is only looking for users that have posted, an inner join is appropriate. The result of the two joins will be every username, with every message they posted, in every forum. That result is then ordered by the message’s date_entered column, and limited to just the first five records.
Grouping Selected Results
Chapter 5 discussed and demonstrated several different categories of functions one can use in MySQL. Another category, used for more complex queries, are the grouping or aggregate functions (Table 7.1).

Whereas most of the functions covered in Chapter 5 manipulate a single value in a single row at a time (e.g., formatting the value in a date column), what the grouping functions return is based upon a value present in a single column over a set of rows. For example, to find the average account balance in the banking database, you would run this query ![]() :
:
SELECT AVG(balance) FROM accounts
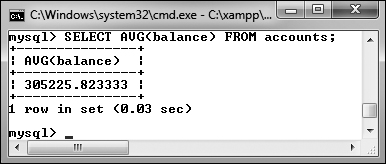
![]() The
The AVG( ) function is used to find the average of all the account balances.
To find the smallest and largest account balances, use ![]() :
:
SELECT MAX(balance), MIN(balance) FROM accounts
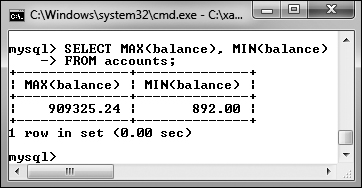
![]() The
The MAX( ) and MIN( ) functions return the largest and smallest account values found in the table.
To simply count the number of records in a table (or result set), apply COUNT( ) to either every column or every column that’s guaranteed to have a value:
SELECT COUNT(*) FROM accounts
The AVG( ), COUNT( ), and SUM( ) functions can also use the DISTINCT keyword so that the aggregation only applies to distinct values. For example, SELECT COUNT(customer_id) FROM accounts will return the number of accounts, but SELECT COUNT(DISTINCT customer_ID) FROM accounts will return the number of customers that have accounts ![]() .
.
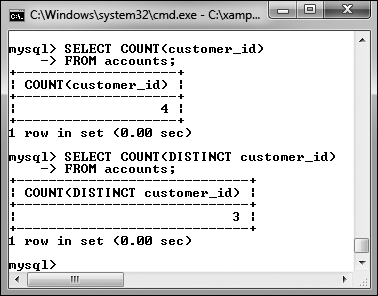
![]() The
The COUNT( ) function, with or without the DISTINCT keyword, simply counts the number of records in a record set.
The aggregate functions as used on their own return individual values (as in ![]() ,
, ![]() , and
, and ![]() ). When the aggregate functions are used with a
). When the aggregate functions are used with a GROUP BY clause, a single aggregate value will be returned for each row in the result set ![]() :
:
SELECT AVG(balance), customer_id FROM accounts GROUP BY customer_id
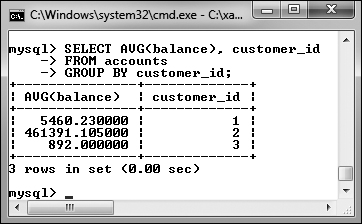
![]() Use the
Use the GROUP BY clause with an aggregating function to group the aggregate results.
You can apply combinations of WHERE, ORDER BY, and LIMIT conditions to a GROUP BY, structuring your query like this:
SELECT what_columns FROM table
WHERE condition GROUP BY column
ORDER BY column LIMIT x, y
A GROUP BY clause can also be used in a join. Remember that a join returns a new, virtual table of data, so any grouping would then apply to that virtual table.
To group data
1. Connect to MySQL and select the banking database.
2. Count the number of registered customers ![]() :
:
SELECT COUNT(*) FROM customers;
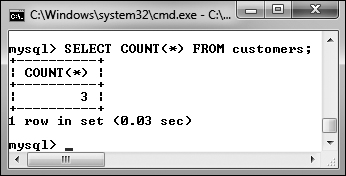
![]() This aggregating query counts the number of records in the customers table.
This aggregating query counts the number of records in the customers table.
COUNT( ) is perhaps the most popular grouping function. With it, you can quickly count records, like the number of records in the customers table here. The COUNT( ) function can be applied to any column that’s certain to have a value, such as * (i.e., every column) or customer_id, the primary key.
Notice that not all queries using the aggregate functions necessarily have GROUP BY clauses.
3. Find the total balance of all accounts by customer, counting the number of accounts in the process ![]() :
:
SELECT SUM(balance) AS Total,
COUNT(account_id) AS Number, customer_id
FROM accounts
GROUP BY (customer_id);
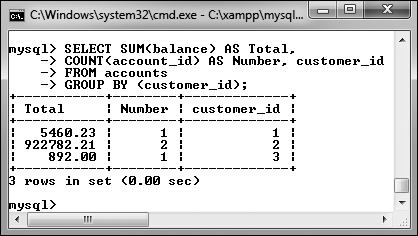
![]() This
This GROUP BY query aggregates all of the accounts by customer_id, returning the sum of each customer’s accounts and the total number of accounts the customer has, in the process.
This query is an extension of that in Step 2, but instead of counting just the customers, it counts the number of accounts associated with each customer and totals the account balances, too.
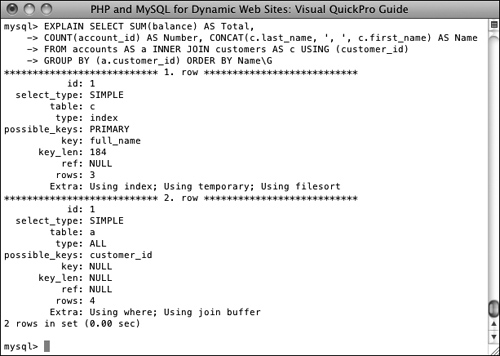
4. Repeat the query from Step 3, selecting the customer’s name instead of their ID ![]() :
:
SELECT SUM(balance) AS Total,
COUNT(account_id) AS Number,
CONCAT(c.last_name, ', ', c.first_name) AS Name
FROM accounts AS a
INNER JOIN customers AS c
USING (customer_id)
GROUP BY (a.customer_id)
ORDER BY Name;
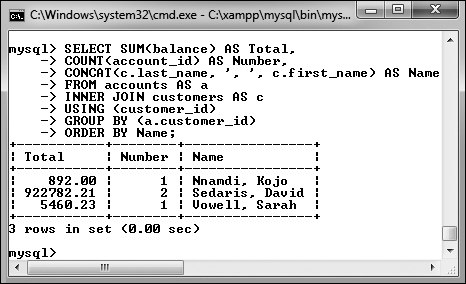
![]() This
This GROUP BY query is like that in ![]() , but also returns the customer’s name, and sorts the results by name (which requires a join).
, but also returns the customer’s name, and sorts the results by name (which requires a join).
To retrieve the customer’s name, instead of his or her ID, a join is required: INNER JOIN customers USING (customer_id). Next, aliases are added for easier references, and the GROUP BY clause is modified to specify to which customer_id field the grouping should be applied. Thanks to the join, the customer’s name can be selected as the concatenation of the customer’s first and last names, a comma, and a space. And finally, the results can be sorted by the customer’s name (note that another reference to the alias is used in the ORDER BY clause).
Remember that if you used an outer join instead of an inner join, you could then retrieve customers who did not have account balances.
5. Concatenate each customer’s balance into a single string ![]() :
:
SELECT GROUP_CONCAT(balance),
CONCAT(c.last_name, ', ', c.first_name) AS Name
FROM accounts AS a
INNER JOIN customers AS c
USING (customer_id)
GROUP BY (a.customer_id)
ORDER BY Name;
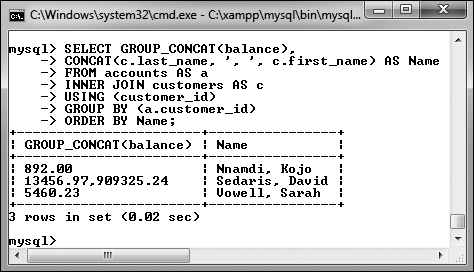
![]() A variation on the query in
A variation on the query in ![]() , this query retrieves the concatenation of all account balances for each customer.
, this query retrieves the concatenation of all account balances for each customer.
The GROUP_CONCAT( ) function is a useful and often overlooked aggregating tool. As you can see in the figure, by default this function concatenates values, separating each with a comma.
NULL is a peculiar value, and it’s interesting to know that GROUP BY will group NULL values together, since they have the same nonvalue.
You have to be careful how you apply the COUNT( ) function, as it only counts non-NULL values. Be certain to use it on either every column (*) or on columns that will never contain NULL values (like the primary key).
The GROUP BY clause, and the functions listed here, take some time to figure out, and MySQL will report an error whenever your syntax is inapplicable. Experiment within the mysql client or phpMyAdmin to determine the exact wording of any query you might want to run from a PHP script.
You cannot apply SUM( ) and AVG( ) to date or time values. Instead, you’ll need to convert date and time values to seconds, perform the SUM( ) or AVG( ), and then convert that value back to a date and time.
Advanced Selections
The previous two sections of the chapter present more advanced ways to select data from complex structures. But even with the use of the aggregate functions, the data being selected is comparatively straightforward. Sometimes, though, you’ll need to select data conditionally, as if you were using an if-else clause within the query itself. This is possible in SQL thanks to the control flow and advanced comparison functions.
To start, GREATEST( ) returns the largest value in a list ![]() :
:
SELECT GREATEST(col1, col2) FROM table
SELECT GREATEST(235, 1209, 59)
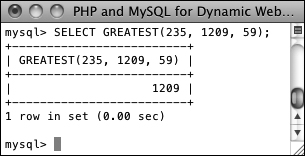
![]() The
The GREATEST( ) function returns the biggest value in a given list.
LEAST( ) returns the smallest value in a list:
SELECT LEAST(col1, col2) FROM table
SELECT LEAST(235, 1209, 59)
Note that unlike the aggregate functions, which apply to a list of values found in the same column over multiple rows, the comparison and control flow functions apply to multiple columns within the same row (or list of values).
Another useful comparison function is COALESCE( ). It returns the first non-NULL value in a list:
SELECT COALESCE(col1, col2) FROM table
If none of the listed items has a value, the function returns NULL (you’ll see an example in the step sequence to follow).
Whereas COALESCE( ) simply returns the first non-NULL value, you can use IF( ) to return any value, based upon a condition:
SELECT IF (condition, return_if _true, return_if _false)
If the condition is true, the second argument to the function is returned, otherwise the third argument is returned. As an example, assuming a table stored the values M or F in a gender column, a query could select Male or Female instead ![]() :
:
SELECT IF(gender='M', 'Male', 'Female') FROM people;
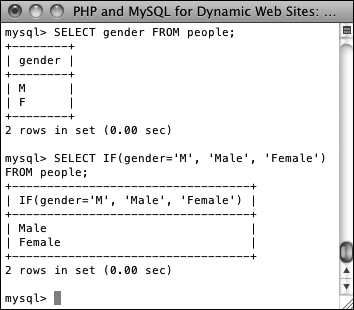
![]() The
The IF( ) function can dictate the returned value based upon a conditional.
As these functions return values, they could even be used in other query types:
INSERT INTO people (gender) VALUES (IF(something='Male', 'M', 'F'))
The CASE( ) function is a more complicated tool that can be used in different ways. The first approach is to treat CASE( ) like PHP’s switch conditional:
SELECT CASE col1 WHEN value1 THEN return_this ELSE return_that END FROM table
The gender example could be rewritten as:
SELECT CASE gender WHEN 'M' THEN 'Male' ELSE 'Female' END FROM people
The CASE( ) function can have additional WHEN clauses. The ELSE is also always optional:
SELECT CASE gender WHEN 'M' THEN 'Male' WHEN 'F' THEN 'FEMALE' END FROM people
If you’re not looking to perform a simple equality test, you can write conditions into a CASE( ) ![]() :
:
SELECT message_id, CASE WHEN date_entered > NOW( ) THEN 'Future' ELSE 'PAST' END AS Posted FROM messages
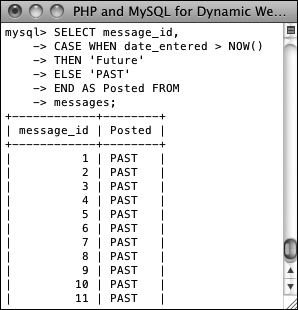
![]()
CASE( ) can be used like IF( ) to customize the returned value.
Again, you can add multiple WHEN...THEN clauses as needed, and omit the ELSE, if that’s not necessary.
To practice using these functions, let’s run a few more queries on the forum database (as a heads up, they’re going to get a little complicated).
To perform advanced selections
1. Connect to MySQL and select the forum database.
2. For each forum, find the date and time of the most recent post, or return N/A if the forum has no posts ![]() :
:
SELECT f.name,
COALESCE(MAX(m.date_entered), 'N/A') AS last_post
FROM forums AS f
LEFT JOIN messages AS m
USING (forum_id)
GROUP BY (m.forum_id)
ORDER BY m.date_entered DESC;

![]() The
The COALESCE( ) function is used to turn NULL values into the string N/A (see the last record).
To start, in order to find both the forum name and the date of the latest posting in that forum, a join is necessary. Specifically, an outer join, as there may be forums without postings. To find the most recent posting in each forum, the aggregating MAX( ) function is applied to the date_entered column, and the results have to be grouped by the forum_id (so that MAX( ) is applied to each subset of postings within each forum).
The results at that point, without the COALESCE( ) function call, would return NULL for any forum without any messages in it. The final step is to apply COALESCE( ) so that the string N/A is returned should MAX(m.date_entered) have a NULL value.
3. For each message, append the string (REPLY) to the subject if the message is a reply to another message ![]() :
:
SELECT message_id,
CASE parent_id WHEN 0 THEN subject
ELSE CONCAT(subject, ' (Reply)') END AS subject
FROM messages;
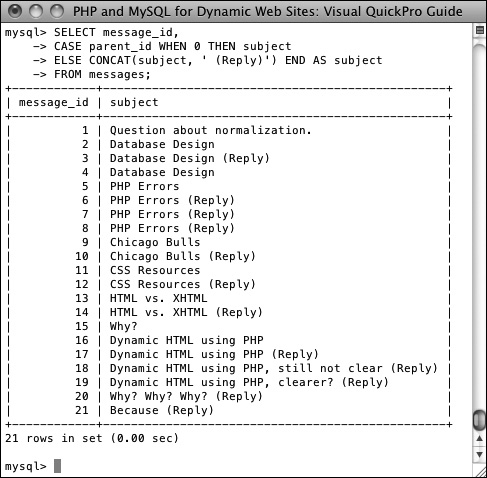
![]() Here, the string (Reply) is appended to the subject of any message that is a reply to another message.
Here, the string (Reply) is appended to the subject of any message that is a reply to another message.
The records in the messages tables that have a parent_id other than 0 are replies to existing messages. For these messages, let’s append (REPLY) to the subject value to indicate such. To accomplish that, a CASE statement returns just the subject, unadulterated, if the parent_id value equals 0. If the parent_id value does not equal 0, the string (REPLY) is concatenated to the subject, again thanks to CASE. This whole construct is assigned the alias of subject, so it’s still returned under the original “subject” heading.
4. For each user, find the number of messages they’ve posted, converting zeros to the string None ![]() :
:
SELECT u.username,
IF(COUNT(message_id) > 0, COUNT(message_id), 'None') AS Posts
FROM users AS u
LEFT JOIN messages AS m
USING (user_id)
GROUP BY (u.user_id);
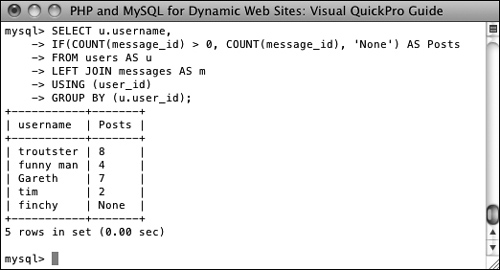
![]() Thanks to an
Thanks to an IF( ) call, the count of posted messages is displayed as None for any user that has not yet posted a message.
This is somewhat of a variation on the query in Step 2. A left join bridges users and messages, in order to grab both the username and the count of messages posted. To perform the count, the results are grouped by users. user_id. The query to this point would return 0 for every user that has not yet posted ![]() . To convert those zeros to the string None, while maintaining the non-zero counts, the
. To convert those zeros to the string None, while maintaining the non-zero counts, the IF( ) function is applied. That function’s first argument establishes the condition: if the count is greater than zero. The second argument says that the count should be returned when that condition is true. The third argument says that the string None should be returned when that condition is false.
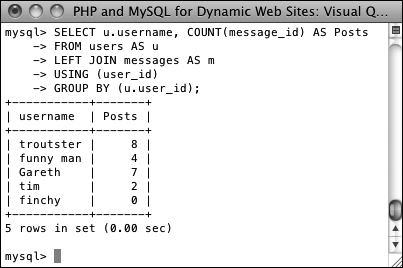
![]() What the query results would look like (compare with
What the query results would look like (compare with ![]() ) without using
) without using IF( ).
The IFNULL( ) function can sometimes be used instead of COALESCE( ). Its syntax is:
IFNULL(value, return_if_null)
If the first argument, such as a named column, has a NULL value, then the second argument is returned. If argument does not have a NULL value, the value of that argument is returned.
Performing FULLTEXT Searches
In Chapter 5, the LIKE keyword was introduced as a way to perform somewhat simple string matches like
SELECT * FROM users
WHERE last_name LIKE 'Smith%'
This type of conditional is effective enough but is still very limiting. For example, it would not allow you to do Google-like searches using multiple words. For those kinds of situations, you need FULLTEXT searches. Over the next several pages, you’ll learn everything you need to know about FULLTEXT searches (and you’ll learn some more SQL tricks in the process).
Creating a FULLTEXT Index
To start, FULLTEXT searches require a FULLTEXT index. This index type, as previewed in Chapter 6, “Database Design,” can only be created on a MyISAM table. These next examples will use the messages table in the forum database. The first step, then, is to add a FULLTEXT index on the body and subject columns. Adding indexes to existing tables requires use of the ALTER command, as described in the sidebar.
To add a FULLTEXT index
1. Connect to MySQL and select the forum database, if you have not already.
2. Confirm the messages table’s type ![]() :
:
SHOW TABLE STATUSG
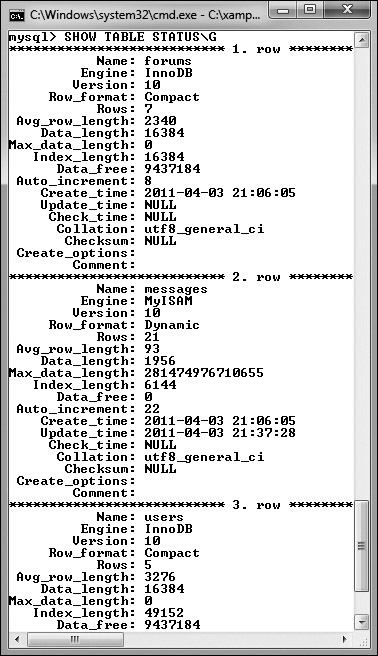
![]() To confirm a table’s type, use the
To confirm a table’s type, use the SHOW TABLE STATUS command.
The SHOW TABLE STATUS query returns a fair amount of information about each table in the database, including the table’s storage engine. Because so much information is returned by the query, the command concludes with G instead of a semicolon. This tells the mysql client to return the results as a vertical list instead of a table (which is sometimes easier to read). If you’re using phpMyAdmin or another interface, you can omit the G (just as you can omit concluding semicolons).
To just find the information for the messages table, you can use the query SHOW TABLE STATUS LIKE 'messages'.
3. If the messages table is not of the MyISAM type, change the storage engine:
ALTER TABLE messages ENGINE = MyISAM;
Again, this is only necessary if the table isn’t currently of the correct type.
4. Add the FULLTEXT index to the messages table ![]() :
:
ALTER TABLE messages ADD FULLTEXT (body, subject);
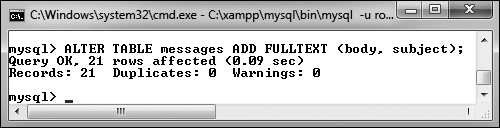
![]() The
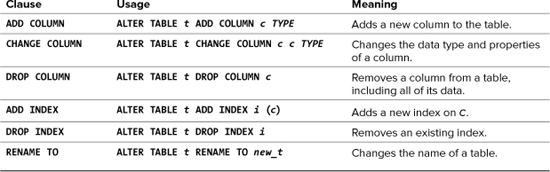
The FULLTEXT index is added to the messages table.
The syntax for adding any index, regardless of type, is ALTER TABLE tablename ADD INDEX_TYPE index_name (columns). The index name is optional.
Here, the body and subject columns get a FULLTEXT index, to be used in FULLTEXT searches later in this chapter.
Inserting records into tables with FULLTEXT indexes can be much slower because of the complex index that’s required.
FULLTEXT searches can successfully be used in a simple search engine. But a FULLTEXT index can only be applied to a single table at a time, so more elaborate Web sites, with content stored in multiple tables, would benefit from using a more formal search engine.
Performing Basic FULLTEXT Searches
Once you’ve established a FULLTEXT index on a column or columns, you can start querying against it, using MATCH...AGAINST in a WHERE conditional:
SELECT * FROM tablename WHERE MATCH
(columns) AGAINST (terms)
MySQL will return matching rows in order of a mathematically calculated relevance, just like a search engine. When doing so, certain rules apply:
• Strings are broken down into their individual keywords.
• Keywords less than four characters long are ignored.
• Very popular words, called stopwords, are ignored.
• If more than 50 percent of the records match the keywords, no records are returned.
This last fact is problematic to many users as they begin with FULLTEXT searches and wonder why no results are returned. When you have a sparsely populated table, there just won’t be sufficient records for MySQL to return relevant results.
To perform FULLTEXT searches
1. Connect to MySQL and select the forum database, if you have not already.
2. Thoroughly populate the messages table, focusing on adding lengthy bodies.
Once again, SQL INSERT commands can be downloaded from this book’s corresponding Web site.
3. Run a simple FULLTEXT search on the word database ![]() :
:
SELECT subject, body FROM messages
WHERE MATCH (body, subject)
AGAINST('database'),
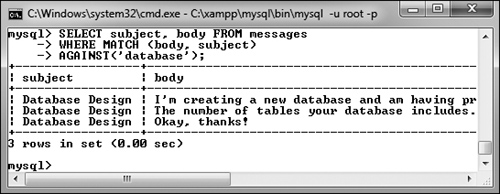
![]() A basic
A basic FULLTEXT search.
This is a very simple example that will return some results as long as at least one and less than 50 percent of the records in the messages table have the word “database” in their body or subject. Note that the columns referenced in MATCH must be the same as those on which the FULLTEXT index was made. In this case, you could use either body, subject or subject, body, but you could not use just body or just subject ![]() .
.

![]() A
A FULLTEXT query can only be run on the same column or combination of columns that the FULLTEXT index was created on. With this query, even though the combination of body and subject has a FULLTEXT index, attempting to run the match on just subject will fail.
4. Run the same FULLTEXT search while also showing the relevance ![]() :
:
SELECT subject, body, MATCH (body,
subject) AGAINST('database') AS R
FROM messages WHERE MATCH (body, subject) AGAINST('database')G
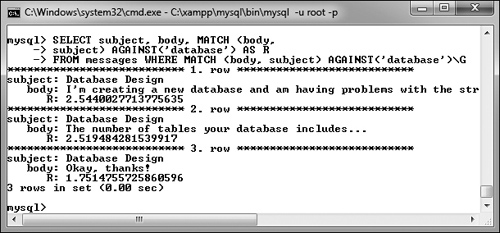
![]() The relevance of a
The relevance of a FULLTEXT search can be selected, too. In this case, you’ll see that the two records with the word “database” in both the subject and body have higher relevance than the record that contains the word in just the subject.
If you use the same MATCH...AGAINST expression as a selected value, the actual relevance will be returned. As in the previous section of the chapter, to make the results easier to view in the mysql client, the query is terminated using G, thereby returning the results as a vertical list.
5. Run a FULLTEXT search using multiple keywords ![]() :
:
SELECT subject, body FROM messages
WHERE MATCH (body, subject)
AGAINST('html xhtml'),
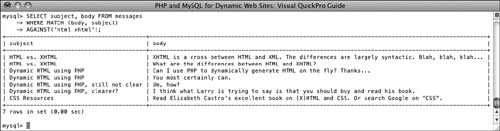
![]() Using the
Using the FULLTEXT search, you can easily find messages that contain multiple keywords.
With this query, a match will be made if the subject or body contains either word. Any record that contains both words will be ranked higher.
Remember that if a FULLTEXT search returns no records, this means that either no matches were made or that over half of the records match.
For sake of simplicity, all of the queries in this section are simple SELECT statements. You can certainly use FULLTEXT searches within joins or more complex queries.
MySQL comes with several hundred stopwords already defined. These are part of the application’s source code.
The minimum keyword length—four characters by default—is a configuration setting you can change in MySQL.
Performing Boolean FULLTEXT Searches
The basic FULLTEXT search is nice, but a more sophisticated FULLTEXT search can be accomplished using its Boolean mode. To do so, add the phrase IN BOOLEAN MODE to the AGAINST clause:
SELECT * FROM tablename WHERE
MATCH(columns) AGAINST('terms' IN BOOLEAN
MODE)
Boolean mode has a number of operators (Table 7.3) to tweak how each keyword is treated:
SELECT * FROM tablename WHERE
MATCH(columns) AGAINST('+database
-mysql' IN BOOLEAN MODE)
Table 7.3. Boolean Mode Operators
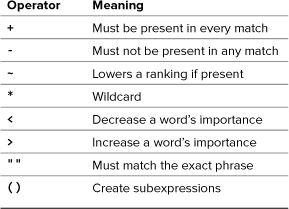
In that example, a match will be made if the word database is found and mysql is not present. Alternatively, the tilde (~) is used as a milder form of the minus sign, meaning that the keyword can be present in a match, but such matches should be considered less relevant.
The wildcard character (*) matches variations on a word, so cata* matches catalog, catalina, and so on. Two operators explicitly state what keywords are more (>) or less (<) important. Finally, you can use double quotation marks to hunt for exact phrases and parentheses to make subexpressions (just be certain to use single quotation marks to wrap the keywords, then).
The following query would look for records with the phrase Web develop with the word html being required and the word JavaScript detracting from a match’s relevance:
SELECT * FROM tablename WHERE
MATCH(columns) AGAINST('>"Web develop"
+html ~JavaScript' IN BOOLEAN MODE)
When using Boolean mode, there are several differences as to how FULLTEXT searches work:
• If a keyword is not preceded by an operator, the word is optional but a match will be ranked higher if it is present.
• Results will be returned even if more than 50 percent of the records match the search.
• The results are not automatically sorted by relevance.
Because of this last fact, you’ll also want to sort the returned records by their relevance, as demonstrated in the next sequence of steps. One important rule that’s the same with Boolean searches is that the minimum word length (four characters by default) still applies. So trying to require a shorter word using a plus sign (+php) still won’t work.
To perform FULLTEXT Boolean searches
1. Connect to MySQL and select the forum database, if you have not already.
2. Run a simple FULLTEXT search that finds HTML, XHTML, or (X)HTML ![]() :
:
SELECT subject, body FROM
messages WHERE MATCH(body, subject)
AGAINST('*HTML' IN BOOLEAN MODE)G
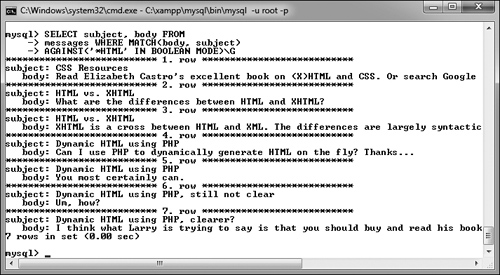
![]() A simple Boolean-mode
A simple Boolean-mode FULLTEXT search.
The term HTML may appear in messages in many formats, including HTML, XHTML, or (X)HTML. This Boolean mode query will find all of those, thanks to the wildcard character (*).
To make the results easier to view, I’m using the G trick mentioned earlier in the chapter, which tells the mysql client to return the results vertically, not horizontally.
3. Find matches involving databases, with an emphasis on normal forms ![]() :
:
SELECT subject, body FROM messages
WHERE MATCH (body, subject)
AGAINST('>"normal form"* +database*'
IN BOOLEAN MODE)G
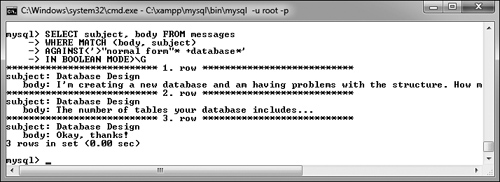
![]() This search looks for variations on two different keywords, ranking the one higher than the other.
This search looks for variations on two different keywords, ranking the one higher than the other.
This query first finds all records that have database, databases, etc. and normal form, normal forms, etc. in them. The database* term is required (as indicated by the plus sign), but emphasis is given to the normal form clause (which is preceded by the greater-than sign).
4. Repeat the query from Step 2, with a greater importance on XHTML, returning the results in order of relevance ![]() :
:
SELECT subject, body, MATCH(body, subject)
AGAINST('*HTML >XHTML' IN BOOLEAN MODE) AS R FROM
messages WHERE MATCH(body, subject)
AGAINST('*HTML >XHTML' IN BOOLEAN MODE) ORDER BY R DESCG
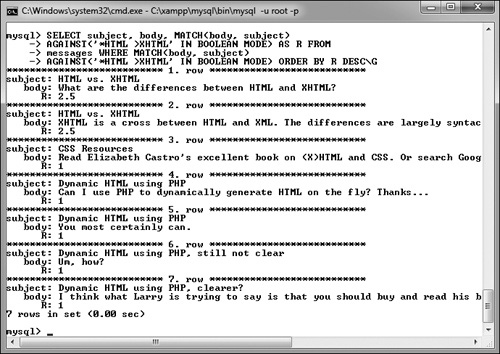
![]() This modified version of an earlier query selects, and then sorts the results by, the relevance.
This modified version of an earlier query selects, and then sorts the results by, the relevance.
This is similar to the earlier query, but now XHTML is specifically given extra weight. This query additionally selects the calculated relevance, and the results are returned in that order.
MySQL 5.1.7 added another FULLTEXT search mode: natural language. This is the default mode, if no other mode (like Boolean) is specified.
The WITH QUERY EXPANSION modifier can increase the number of returned results. Such queries perform two searches and return one result set. It bases a second search on terms found in the most relevant results of the initial search. While a WITH QUERY EXPANSION search can find results that would not otherwise have been returned, it can also return results that aren’t at all relevant to the original search terms.
Optimizing Queries
Once you have a complete and populated database, and have a sense as to what queries will commonly be run on it, it’s a good idea to take some steps to optimize your queries and your database as a whole. Doing so will ensure you’re getting the best possible performance out of MySQL (and therefore, your Web site)
To start, the sidebar reemphasizes key design ideas that have already been suggested in this book. Along with these tips, there are two simple techniques for optimizing existing tables. One way to improve MySQL’s performance is to run an OPTIMIZE command on occasion. This query will rid a table of any unnecessary overhead, thereby improving the speed of any interactions with it:
OPTIMIZE TABLE tablename
Running this command is particularly beneficial after changing a table via an ALTER command, or after a table has had lots of DELETE queries run on it, leaving virtual gaps among the records.
Second, you can occasionally use the ANALYZE command:
ANALYZE TABLE tablename
Executing this command updates the indexes on the table, thereby improving their usage in queries. You could execute it whenever massive amounts of data stored in the table changes (e.g., via UPDATE or INSERT commands).
Speaking of queries, as you’re probably realizing by now, there are often many different ways of accomplishing the same goal. To find out the most efficient approach, it helps to understand how exactly MySQL will run that query. This can be accomplished using the EXPLAIN SQL keyword. Explaining queries is a very advanced topic, but I’ll introduce the fundamentals here, and you can always see the MySQL manual or search the Web for more information.
To explain a query
1. Find a query that may be resource-intensive.
Good candidates are queries that do any of the following:
• Join two or more tables
• Use groupings and aggregate functions
• Have WHERE clauses.
For example, this query from earlier in the chapter meets two of these criteria:
SELECT SUM(balance) AS Total,
COUNT(account_id) AS Number, CONCAT(c.last_name, ', ', c.first_name) AS Name
FROM accounts AS a INNER JOIN customers AS c USING (customer_id)
GROUP BY (a.customer_id) ORDER BY Name;
2. Connect to MySQL and select the applicable database, if you have not already.
3. Execute the query on the database, prefacing it with EXPLAIN ![]() :
:
EXPLAIN SELECT SUM(balance) AS Total,
COUNT(account_id) AS Number, CONCAT(c.last_name, ', ', c.first_name) AS Name
FROM accounts AS a INNER JOIN customers AS c USING (customer_id)
GROUP BY (a.customer_id) ORDER BY NameG
![]() This
This EXPLAIN output reveals how MySQL will go about processing the query.
If you’re using the mysql client, you’ll find it also helps to use the concluding G trick (instead of the semicolon), to make the output more legible. The output itself will be one row of information for every table used in the query. The tables are listed in the same order that MySQL must access them to execute the query.
I’ll walk through the key parts of the output, but to begin, the select_type value should be SIMPLE for most SELECT queries, and would be different if the query involves a UNION or subquery (see the MySQL manual for more on either UNIONs or subqueries).
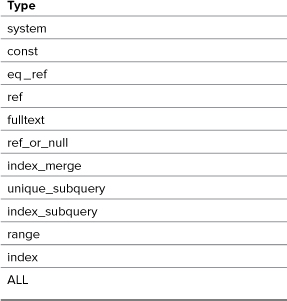
Table 7.4 lists the different type values, from best to worst. The MySQL manual discusses what each means in detail but understand first that eq_ref is the best you’ll commonly see and ALL is the worst. A type of eq_ref means that an index is being properly used and an equality comparison is being made.
Note that you’ll sometimes see ALL because the table has very few records in it, in which case it’s more efficient for MySQL to scan the table rather than use an index. This is presumably the case with ![]() , as the accounts table only has four records.
, as the accounts table only has four records.
5. Check out the possible_keys value.
The possible_keys value indicates which indexes exist that MySQL might be able to use to find the corresponding rows in this table. If you have a NULL value here, there are no indexes that MySQL thinks would be useful. Therefore, you might benefit from creating an index on that table’s applicable columns.
6. Check out the key, key_len, and ref values.
Whereas possible_keys indicates what indexes might be usable, key says what index MySQL will actually use for that query. Occasionally, you’ll find a value here that’s not listed in possible_keys, which is okay. If no key is being used, that almost always indicates a problem that can be remedied by adding an index or modifying the query.
The key_len value indicates the length (i.e., the size) of the key that MySQL used. Generally, shorter is better here, but don’t worry about it too much.
The ref column indicates which columns MySQL compared to the index named in the key column.
7. Check out the rows value.
This column provides an estimate of how many rows in the table MySQL thinks it will need to examine. Once again, lower is better. In fact, on a join, a rough estimate of the efficiency can be determined by multiplying all the rows values together.
Often in a join, the number of rows to be examined should go from more to less, as in ![]() .
.
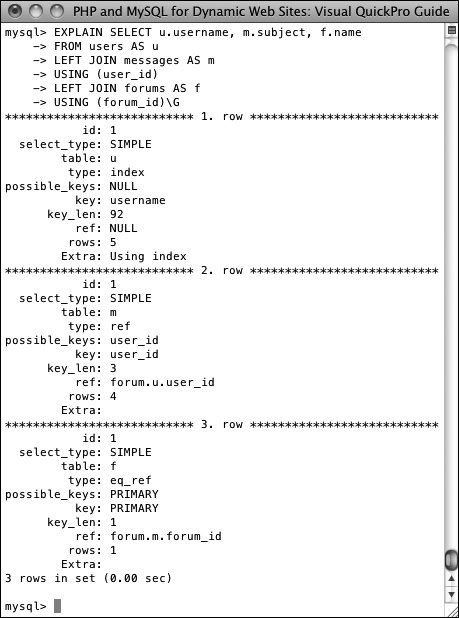
![]() Another explanation of a query, this one a join across three tables.
Another explanation of a query, this one a join across three tables.
8. Check out the Extra value.
Finally, this column reports any additional information about how MySQL will execute the query that may be useful. Two phrases you don’t want to find here are: Using filesort and Using temporary. Both mean that extra steps are required to complete the query (e.g., a GROUP BY clause often requires MySQL creates a temporary table).
If Extra says anything along the lines of Impossible X or No matching Y, that means your query has clauses that are always false and can be removed.
9. Modify your table or queries and repeat!
If the output suggests problems with how the query is being executed, you can consider doing any of the following:
• Changing the particulars of the query
• Changing the properties of a table’s columns
• Adding or modifying a table’s indexes
Remember that the validity of the explanation will depend, in part, on how many rows are in the involved tables (as explained in Step 4, MySQL may skip indexes for small tables). Also understand that not all queries are fixable. Simple SELECT queries and even joins can sometimes be improved, but there’s little one can do to improve the efficiency of a GROUP BY query, considering everything MySQL must do to aggregate data.
The EXPLAIN EXTENDED command provides a few more details about a query:
EXPLAIN EXTENDED SELECT...
Problematic queries can also be found by enabling certain MySQL logging features, but that requires administrative control over the MySQL server.
In terms of performance, MySQL deals with more, smaller tables better than it does fewer, larger tables. That being said, a normalized database structure should always be the primary goal.
Performing Transactions
A database transaction is a sequence of queries run during a single session.
For example, you might insert a record into one table, insert another record into another table, and maybe run an update. Without using transactions, each individual query takes effect immediately and cannot be undone (the queries, by default, are automatically committed). With transactions, you can set start and stop points and then enact or retract all of the queries between those points as needed (for example, if one query failed, all of the queries can be undone).
Commercial interactions commonly require transactions, even something as basic as transferring $100 from my bank account to yours. What seems like a simple process is actually several steps:
• Confirm that I have $100 in my account.
• Decrease my account by $100.
• Verify the decrease.
• Increase the amount of money in your account by $100.
• Verify that the increase worked.
If any of the steps failed, all of them should be undone. For example, if the money couldn’t be deposited in your account, it should be returned to mine until the entire transaction can go through.
The ability to execute transactions depends upon the features of the storage engine in use. To perform transactions with MySQL, you must use the InnoDB table type (or storage engine).
To begin a new transaction in the mysql client, type
START TRANSACTION;
Once your transaction has begun, you can now run your queries. Once you have finished, you can either enter COMMIT to enact all of the queries or ROLLBACK to undo the effect of all of the queries.
After you have either committed or rolled back the queries, the transaction is considered complete, and MySQL returns to an autocommit mode. This means that any queries you execute take immediate effect. To start another transaction, just type START TRANSACTION.
It is important to know that certain types of queries cannot be rolled back. Specifically, those that create, alter, truncate (empty), or delete tables or that create or delete databases cannot be undone. Furthermore, using such a query has the effect of committing and ending the current transaction.
Second, you should understand that transactions are particular to each connection. So one user connected through the mysql client has a different transaction than another mysql client user, both of which are different than a connected PHP script.
Finally, you cannot perform transactions using phpMyAdmin. Each submission of a query through phpMyAdmin’s SQL window or tab is an individual and complete transaction, which cannot be undone with subsequent submissions.
With this in mind, let’s use transactions with the banking database to perform the already mentioned task. In Chapter 19, “Example—E-Commerce,” transactions will be run through a PHP script.
To perform transactions
1. Connect to MySQL and select the banking database.
2. Begin a transaction and show the table’s current values ![]() :
:
START TRANSACTION;
SELECT * FROM accounts;
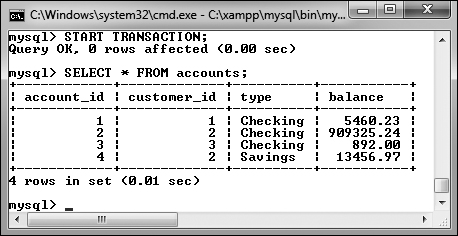
![]() A transaction is begun and the existing table records are shown.
A transaction is begun and the existing table records are shown.
3. Subtract $100 from David Sedaris’ (or any user’s) checking account.
UPDATE accounts
SET balance = (balance-100)
WHERE account_id=2;
Using an UPDATE query, a little math, and a WHERE conditional, you can subtract 100 from a balance. Although MySQL will indicate that one row was affected, the effect is not permanent until the transaction is committed.
4. Add $100 to Sarah Vowell’s checking account:
UPDATE accounts
SET balance = (balance+100)
WHERE account_id=1;
This is the opposite of Step 3, as if $100 were being transferred from the one person to the other.
5. Confirm the results ![]() :
:
SELECT * FROM accounts;
![]() Two
Two UPDATE queries are executed and the results are viewed.
As you can see in the figure, the one balance is 100 more and the other is 100 less than they originally were ![]() .
.
6. Roll back the transaction:
ROLLBACK;
To demonstrate how transactions can be undone, let’s undo the effects of these queries. The ROLLBACK command returns the database to how it was prior to starting the transaction. The command also terminates the transaction, returning MySQL to its autocommit mode.
SELECT * FROM accounts;
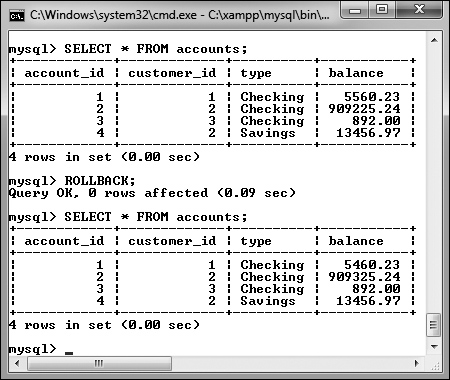
![]() Because the
Because the ROLLBACK command was used, the potential effects of the UPDATE queries were ignored.
![]() Invoking the
Invoking the COMMIT command makes the transaction’s effects permanent.
The query should reveal the contents of the table as they originally were.
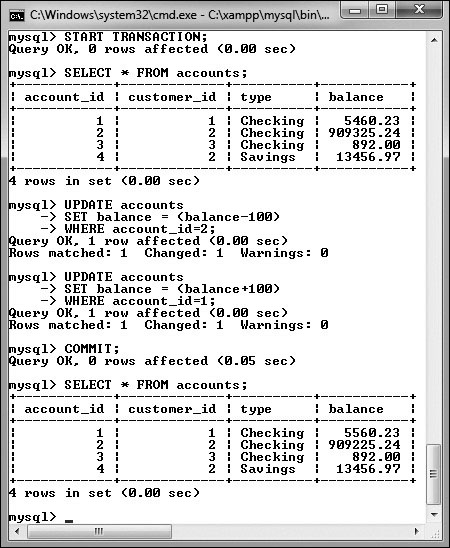
8. Repeat Steps 2 through 4.
To see what happens when the transaction is committed, the two UPDATE queries will be run again. Be certain to start the transaction first, though, or the queries will automatically take effect!
9. Commit the transaction and confirm the results:
COMMIT;
SELECT * FROM accounts;
Once you enter COMMIT, the entire transaction is permanent, meaning that any changes are now in place. COMMIT also ends the transaction, returning MySQL to autocommit mode.
One of the great features of transactions is that they offer protection should a random event occur, such as a server crash. Either a transaction is executed in its entirety or all of the changes are ignored.
To alter MySQL’s autocommit nature, type
SET AUTOCOMMIT=0;
Then you do not need to type START TRANSACTION and no queries will be permanent until you type COMMIT (or use an ALTER, CREATE, etc., query).
You can create savepoints in transactions:
SAVEPOINT savepoint_name;
Then you can roll back to that point:
ROLLBACK TO SAVEPOINT savepoint_name;
Database Encryption
Up to this point, pseudo-encryption has been accomplished in the database using the SHA1( ) function. In the sitename and forum databases, the user’s password has been stored after running it through SHA1( ). Although using this function in this way is perfectly fine (and quite common), the function doesn’t provide real encryption: the SHA1( ) function returns a representation of a value (called a hash), not an encrypted version of the value. By storing the hashed version of some data, comparisons can still be made later (such as upon login), but the original data cannot be retrieved from the database. If you need to store data in a protected way while still being able to view the data in its original form at some later point, other MySQL functions are necessary.
MySQL has several encryption and decryption functions built into the software. If you require data to be stored in an encrypted form that can be decrypted, you’ll want to use AES_ENCRYPT( ) and AES_DECRYPT( ). The AES_ENCRYPT( ) function is considered to be the most secure encryption option.
These functions take two arguments: the data being encrypted or decrypted and a salt argument. The salt argument is a string that helps to randomize the encryption. Let’s look at the encryption and decryption functions first, and then I’ll return to the salt.
To add a record to a table while encrypting the data, the query might look like
INSERT INTO users (username, pass)
VALUES ('troutster', AES_ENCRYPT ('mypass', 'nacl19874salt!'))
The encrypted data returned by the AES_ENCRYPT( ) function will be in binary format. To store that data in a table, the column must be defined as one of the binary types (e.g., VARBINARY or BLOB).
To run a login query for the record just inserted (matching a submitted username and password against those in the database), you would write
SELECT * FROM users WHERE
username='troutster' AND
AES_DECRYPT(pass, 'nacl19874salt!') = 'mypass'
This is equivalent to:
SELECT * FROM users WHERE
username = 'troutster' AND
AES_ENCRYPT('mypass', 'nacl19874salt!') = pass
Returning to the issue of the salt, the exact same salt must be used for both encryption and decryption, which means that the salt must be stored somewhere as well. Contrary to what you might think, it’s actually safe to store the salt in the database, even in the same row as the salted data. This is because the purpose of the salt is to make the encryption process harder to crack (specifically, by a “rainbow” attack). Such attacks are done remotely, using brute force. Conversely, if someone can see everything stored in your database, you have bigger problems to worry about (i.e., all of your data has been breached).
Finally, to get the maximum benefit from “salting” the stored data, each piece of stored data should use a unique salt, and the longer the salt the better.
To put all this together, let’s add PIN and salt columns to the banking.customers table, and then store an encrypted version of each customer’s PIN.
To encrypt and decrypt data
1. Access MySQL and select the banking database:
2. Add the two new columns to the customers table ![]() :
:
ALTER TABLE customers ADD COLUMN pin VARBINARY(16) NOT NULL;
ALTER TABLE customers ADD COLUMN nacl CHAR(20) NOT NULL;
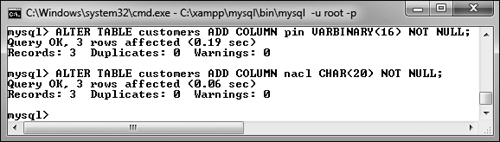
![]() Two columns are added to the customers table.
Two columns are added to the customers table.
The first column, pin, will store an encrypted version of the user’s PIN. As AES_ENCRYPT( ) returns a binary value 16 characters long, the pin column is defined as VARBINARY(16). The second column stores the salt, which will be a string 20 characters long.
3. Update the first customer’s PIN ![]() :
:
UPDATE customers
SET nacl = SUBSTRING(MD5(RAND( )), -20)
WHERE customer_id=1;
UPDATE customers
SET pin=AES_ENCRYPT(1234, nacl)
WHERE customer_id=1;
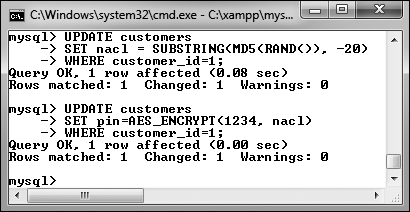
![]() A record is updated, using an encryption function to protect the PIN.
A record is updated, using an encryption function to protect the PIN.
The first query updates the customer’s record, adding a salt value to the nacl column. That random value is obtained by applying the MD5( ) function to the output from the RAND( ) function. This will create a string 32 characters long, such as 4b8bb06aea7f3d162ad5b4d83687e3ac. Then the last 20 characters are taken from this string, using SUBSTRING( ).
The second query stores the customer’s PIN—1234, using the already-stored nacl value as the salt.
4. Retrieve the PIN in an unencrypted form ![]() :
:
SELECT customer_id, AES_DECRYPT(pin,
nacl) AS pin FROM customers
WHERE customer_id=1;
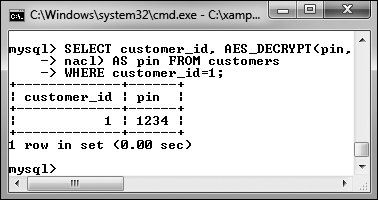
![]() The record has been retrieved, decrypting the PIN in the process.
The record has been retrieved, decrypting the PIN in the process.
This query returns the decrypted PIN for the customer with a customer_id of 1. Any value stored using AES_ENCRYPT( ) can be retrieved (and matched) using AES_DECRYPT( ), as long as the same salt is used.
5. Check out the customer’s record without using decryption ![]() :
:
SELECT * FROM customers
WHERE customer_id=1;
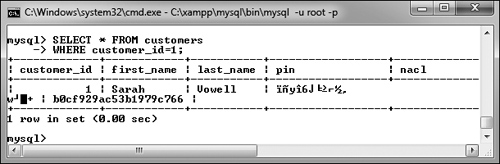
![]() Encrypted data is stored in an unreadable format (here, as a binary string of data).
Encrypted data is stored in an unreadable format (here, as a binary string of data).
As you can see in the figure, the encrypted version of the PIN is unreadable.
As a rule of thumb, use SHA1( ) for information that will never need to be viewable, such as passwords and perhaps usernames. Use AES_ENCRYPT( ) for information that needs to be protected but may need to be viewable at a later date, such as credit card information, Social Security numbers, addresses (perhaps), and so forth.
As a reminder, never storing credit card numbers and other high-risk data is always the safest option.
The SHA2( ) function is an improvement over SHA1( ) and should be preferred for hashing data. I only chose not to use it in this book because SHA2( ) requires MySQL 5.5.5 or later.
Be aware that data sent to the MySQL server, or received from it, could be intercepted and viewed. Better security can be had by using an SSL connection to the MySQL database.
Review and Pursue
If you have any problems with the review questions or the pursue prompts, turn to the book’s supporting forum (www.LarryUllman.com/forums/).
Review
• What are the two primary types of joins?
• Why are aliases often used with joins?
• Why is it considered often necessary and at least a best practice to use the table.column syntax in joins?
• What impact does the order of tables used have on an outer join?
• How do you create a self-join?
• What are the aggregate functions?
• What impact does the DISTINCT keyword have on an aggregate function? What impact does GROUP BY have on an aggregate function?
• What kind of index is required in order to perform FULLTEXT searches? What type of storage engine?
• What impact does it have when you conclude a SELECT query with G instead of a semicolon in the mysql client?
• How do IN BOOLEAN MODE FULLTEXT searches differ from standard FULLTEXT searches?
• What commands can you use to improve a table’s performance?
• How do you examine the efficiency of a query?
• Why doesn’t the forum database support transactions?
• How do you begin a transaction? How do you undo the effects of a transaction in progress? How do you make the effects of the current transaction permanent?
• What kind of column type is required to store the output from the AES_ENCRYPT( ) function?
• What are the important criteria for the salt used in the encryption process?
Pursue
• Come up with more join examples for the forum and banking databases. Perform inner joins, outer joins, and joins across all three tables.
• Check out the MySQL manual pages if you’re curious about the UNION SQL command or about subqueries.
• Perform some more grouping exercises on the banking or forum databases.
• Practice running FULLTEXT searches on the forum database.
• Examine other queries to see the results.
• Read the MySQL manual pages, and other online tutorials, on explaining queries and optimizing tables.
• Play with transactions some more.
• Research the subjects of salting passwords and rainbow attacks to learn more.