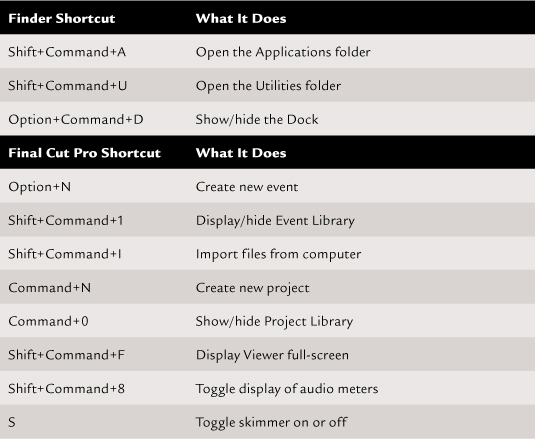
2. Get Started Editing
I know you’re in a hurry to get started. That’s what this chapter is about. It introduces the interface, defines several key concepts, and covers the process of creating a new Event, creating a new Project, and making a simple edit. I’ll show you how to set system preferences, and, at the end, I’ll present some essential keyboard shortcuts and how to create new ones.
There’s a lot to learn, but the purpose of this chapter is to give you a sufficient overview to help you start editing quickly. Later chapters will go into all these subjects in much more detail.
Learning About Events and Projects
Making the transition into Final Cut Pro X requires learning new concepts. Two of them are Events and Projects. An Event is a collection of media files. A Project is how you want those media files edited together.
The power of Final Cut Pro X is that both Events and Projects are stored in two separate databases, and both databases are stored in different locations. Any piece of media is now instantly available to any project. Unlike working with Final Cut Pro 7, you don’t run into problems from using too many clips. No more relinking offline media. No more importing media into a project before you can even start editing. That was the old way of doing things; welcome to the new world of Final Cut Pro X.
The databases make all the difference. The Final Cut Events folder contains all the media and metadata captured from a camera, imported from a card, or imported from the Finder. And this includes metadata that is autogenerated by Final Cut Pro X. Inside the Final Cut Events folder are individual folders for each new Event you create.
Events can be shared between Projects, can be merged into a single Event, can be moved from one disk to another, and can even be deleted, all from within Final Cut Pro X. By default, the Final Cut Events folder is stored on your boot disk in the [Home directory] > Movies folder. But you can easily choose to store it on a different drive, which is something I strongly recommend.
You can use FCP X to move Events, you can use the Finder, or (my personal favorite) you can use a separate utility to move and organize your Events.
In the initial release of FCP X, Events and Projects could be stored only on locally attached storage, either an internal drive, an external drive, or a RAID. However, with the release of FCP X version 10.0.1, full Xsan support is now available. This new release allows storing media, Events, and Projects on network devices. Media can be shared simultaneously by multiple editors. While Events and Projects can be shared between editors, only one editor can use an Event or Project at a time. FCP X provides a simple menu choice allowing editors to move Events and Projects into, or out of, the app.
Final Cut Pro is managing all this information using databases. The power of a database means that Final Cut Pro can organize your files faster and better than the Finder can. To help in that organization, media can either be copied or be linked to the Events folder. Linking points to the file, similar to the way that Final Cut Pro 7, or Final Cut Express 4, works. Copying duplicates the file and moves the copy into the Events folder.
The Final Cut Pro default is to copy all media files into an Events folder. For new users, the default setting of copy is probably the best choice. However, if you’re an experienced editor, linking more closely resembles how Final Cut Pro 7 works with media. Linking also avoids duplicating media, which reduces your storage needs.
Note: What’s the Boot Drive?
The boot drive is a technical term that describes the hard disk that holds your Applications folder and operating system. Unless you’ve changed the name of the drive, it’s called Macintosh HD, and if you display hard drives on your desktop, it is generally displayed in the top-right corner of your Desktop.
This drive is the main workhorse for your operating system and applications, but for performance reasons, the boot drive is not the best place to store either the Final Cut Events folder or the Final Cut Projects folder. Instead, I recommend you use an attached second drive, either an internal or external device.
My recommendation is to store all Events and Projects on a second hard drive. This consolidates all your media files in one place. (I’ll show you how to do this in Chapter 3.) You can create a Final Cut Events folder for each hard drive or RAID attached to your computer. However, you’re allowed only one Final Cut Events folder per drive.
The Final Cut Projects folder is another database, this one containing edit instructions along with render files, waveforms, thumbnails, and other supporting files for your Projects. Just as Events are stored in the Final Cut Events folder, Projects are stored in the Final Cut Projects folder. Each Final Cut Projects folder can store an unlimited number of individual Projects. Each Project contains exactly one sequence, which is different from Final Cut Pro 7 where you could have an unlimited number of sequences in one Project. There is no practical limit to the number of clips, layers, or duration of a Project.
Projects are associated with one specific Event but can use media from multiple Events. One of the nice things is that using media in more than one Project does not duplicate media.
By default, the Final Cut Projects folder is also stored on your boot drive in the [Home directory] > Movies folder. As with Events, you can change Project locations using Final Cut Pro X, which I also recommend you do. I’ll explain how to do this in Chapter 3.
Don’t rename anything in the Final Cut Projects folder. And, as with the Final Cut Events folder, you can have only one Final Cut Projects folder per drive. These two folders can both be stored on the same drive, or they can be stored on different drives. The Final Cut Events folder will almost always require more storage space than the Final Cut Projects folder.
Starting Final Cut Pro X
You can start Final Cut Pro X in three ways:
• Double-click the FCP X icon in the Applications folder of your hard disk.
• Click the FCP X icon in the Dock.
• Click the Final Cut Pro X icon in the Launchpad (requires Mac OS X 10.7).
You used to open Final Cut Pro by double-clicking any project file. But, since projects are now stored in a database, that option is no longer available. (A fast way to open the Applications folder is to press Shift+Command+A.)
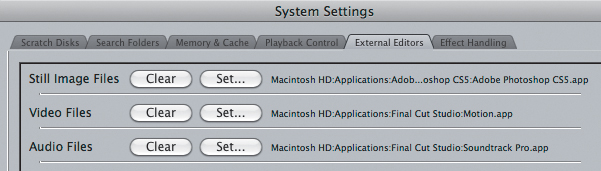
Figure 2.1 Once FCP X is installed, you need to change the External Editors settings in Final Cut Pro 7 to get round-tripping working again.
Touring the Interface
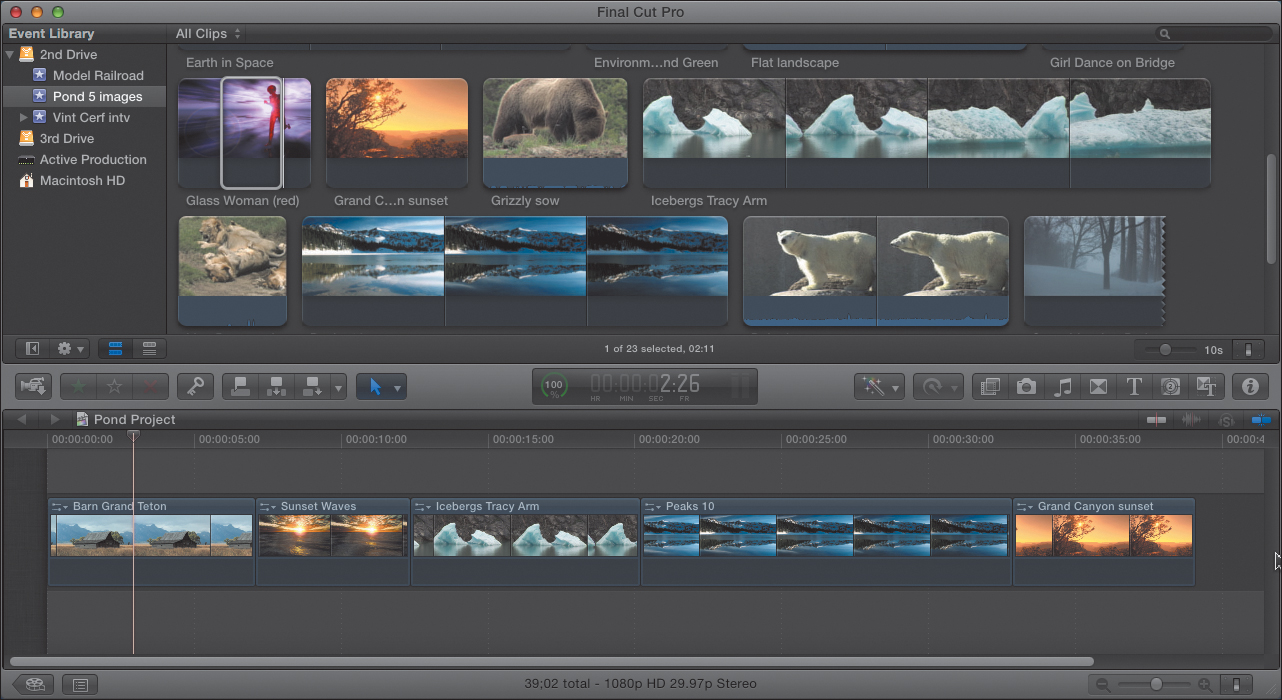
Final Cut Pro X has one window with three visible sections (Figure 2.2). In the upper left is the Event Library and Event Browser, which are where media is stored, organized, and previewed.
Figure 2.2 The Final Cut Pro X interface.
The Viewer is in the upper right. This is a context-sensitive window that displays whatever is the selected clip.
Note: Colors Mean Something
If an icon is blue, that feature, such as skimming, is turned on. If the icon is gray, that feature is turned off. Blue is used throughout the application to indicate that something is turned on, or enabled.
The Timeline covers the entire lower half of the interface. This is where you build your edits. Think of the Timeline as the architectural view of your edit, while the Viewer is a photograph of the finished building.
There are also several hidden areas to the interface: Inspector, Color Board, Video Scopes, Effects Browsers, and Import windows.
An area that is not hidden is the bar running horizontally across the middle of the interface. This is called the toolbar and is an area where you can quickly access many of the tools within FCP X.
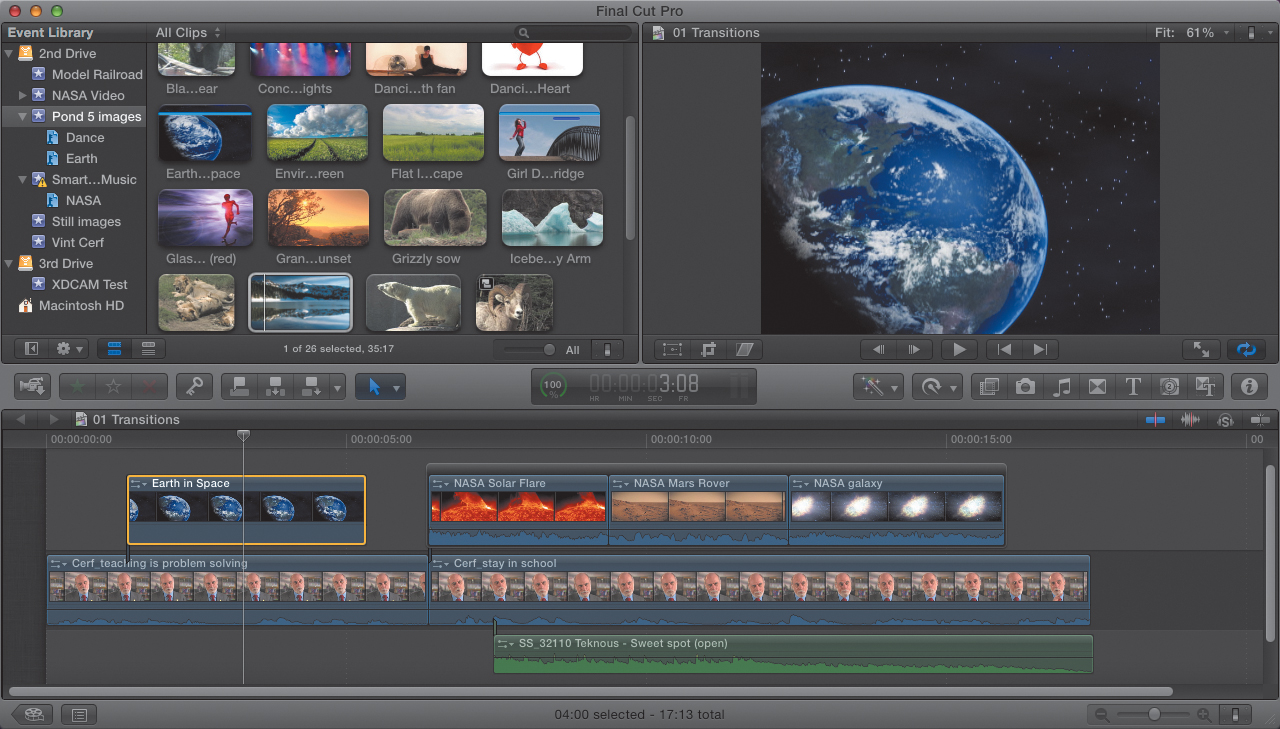
A new feature in FCP X is the skimmer. (Keyboard shortcut: S.) This turns your cursor into an instant playback device. When skimming is on, you instantly see whatever clip is under your cursor in the Viewer. You don’t even need to press the mouse button. The gray button to the right of the video skimmer turns audio skimming on or off (Figure 2.3). Video skimming is on by default, while audio skimming is turned off.
Figure 2.3 The skimmer can be turned on or off using this button.
FCP X offers two ways to view a clip: You can roll over it with the skimmer, or you can select the clip, press the spacebar, and play it. When we play a clip, the vertical line with the small triangle on the top, the playhead, shows what part of a clip, or the Timeline, is playing. (Oh, you stop playback by pressing spacebar again.) FCP also supports gestures, such as swipes, but we won’t be covering them in this book.
Note: Here’s a Cool Skimmer Feature
When skimming audio, the audio is pitch-shifted, which means no matter how fast or slow you move the skimmer, the audio pitch remains constant.
The Viewer
The Viewer, that large image in the upper-right corner, provides a wealth of controls for media playback and manipulation. This context-sensitive window displays whatever clip is under either the skimmer or the playhead.
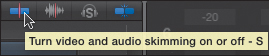
The Fit button at the top of the Viewer controls the scaling of the image in the Viewer. Until you get into effects, this is best left in the Fit position (Figure 2.4). You can also press Command+[plus key] or Command+[minus key] to zoom into or out of an image. My favorite keyboard shortcut is Shift+Z, which fits the image into the frame.
Figure 2.4 The Scale pop-up menu adjusts the scale of the image in the Viewer; this affects only the display, not the actual image size.
The Viewer playback buttons control, well, play back (Figure 2.5). From left to right, these are “Go back one frame,” “Go forward one frame,” Play, “Go to previous edit,” and “Go to next edit.” While these are very nice and all, I never use them. I use keyboard shortcuts instead. The keyboard equivalents are left arrow, right arrow, spacebar, up arrow, and down arrow—in that order.
Figure 2.5 The Viewer playback controls.
Tip: A Quick Way to Go Full-Screen
There’s also a fast keyboard shortcut to play your video full-screen. Press Shift+Command+F. To get back, press Escape.
The two buttons shown in Figure 2.6 provide additional playback control. The left button displays your video full-screen (press Escape to return to the normal interface). The right button toggles loop playback. When this is on—in other words, blue—the Timeline, or selected range within the Timeline, repeats continuously until you stop playback.
Figure 2.6 The left button plays the Viewer image full-screen. The right button loops playback from start to end over and over.
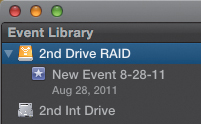
Event Library and Event Browser
That brings us to the Event Library and the Event Browser (Figure 2.7). The Event Library, on the left, lists all the hard drives that are attached (and turned on) to the computer. In this example, the 2nd Drive has Event media on it, while the 3rd Drive and Active Production, at the bottom, are not used for Events at all. Notice that there are no Events listed for either of them.
Figure 2.7 The Event Library, left, and Event Browser. These store and display all media.
The Event Browser, on the right, displays all the clips in the Event folder that is selected in the Event Library. (You can select multiple Events in the Event Library.)
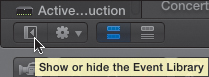
Once you’ve selected an Event folder, you can hide the Event Library to free up some screen real estate. Click this button in the lower-left corner of the Event window to toggle the display of the Event Library (Figure 2.8). (Keyboard shortcut: Shift+Command+1.)
Figure 2.8 This button toggles the display of the Event.
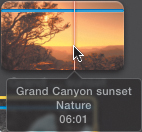
The Event Browser allows you to browse individual clips. When you skim a clip, you have the option of displaying additional information about the clip.
For example, in Figure 2.9, the small info box tells you the name of the clip, the keywords assigned to the clip, and the timecode position of the skimmer. This skimmer info box can be turned on and off either with a menu choice or with a keyboard shortcut. To toggle this on or off, choose View > Show Skimmer Info. It is off by default. (Keyboard shortcut: Control+Y.)
Figure 2.9 You can turn on skimmer info by pressing Control+Y.
The Toolbar
Speaking of timecode, you can also see timecode in the Dashboard; it’s part of the toolbar in the center of the display (Figure 2.10). The Dashboard contains three elements, from left to right: the background task status, current timecode, and audio meters. Background tasks include importing, rendering, transcoding, and exporting. To open the Background Tasks window, click the percentage clock on the left. (Keyboard shortcut: Command+9.)
Figure 2.10 The Dashboard displays the timecode associated with a clip or the Timeline.
This Dashboard actually has some very cool things about it. For instance, if you want to jump to a specific time in the Timeline, make sure nothing is selected, then click the timecode numbers once and type the time you want to jump to. For instance, type 500, and the playhead jumps to exactly five seconds and no frames from the start of your Timeline. Or type 1.. (note the two periods after the one), and it jumps to exactly one minute, no seconds, and no frames. (The period is the same as entering two zeros.) You don’t even have to figure out the math. Typing 99 is the same as typing 3:09 (assuming your project runs at 30 frames per second). Or, typing 45 is the same as typing 1:15, again assuming the project is at 30 fps.
You can even move in increments which I call “timecode offsets.” To move back 20 frames, type -20. You don’t need to click anywhere; just type. Negative numbers move the playhead backward (to the left). Positive numbers move right. For instance, type +200 to move two seconds to the right.
Continuing our tour of the interface, the toolbar in the middle, which houses the Dashboard, has two other button groups. To the right are the Effects Browsers, with the far-right button opening the Inspector. On the left are editing and keyword buttons, which are covered in this chapter and the next.
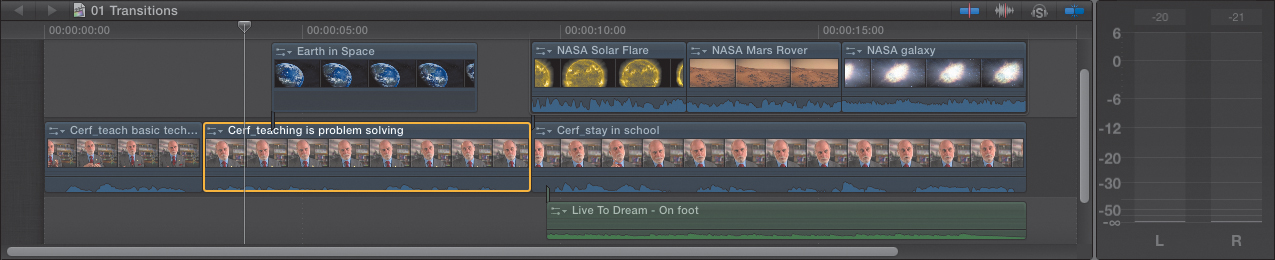
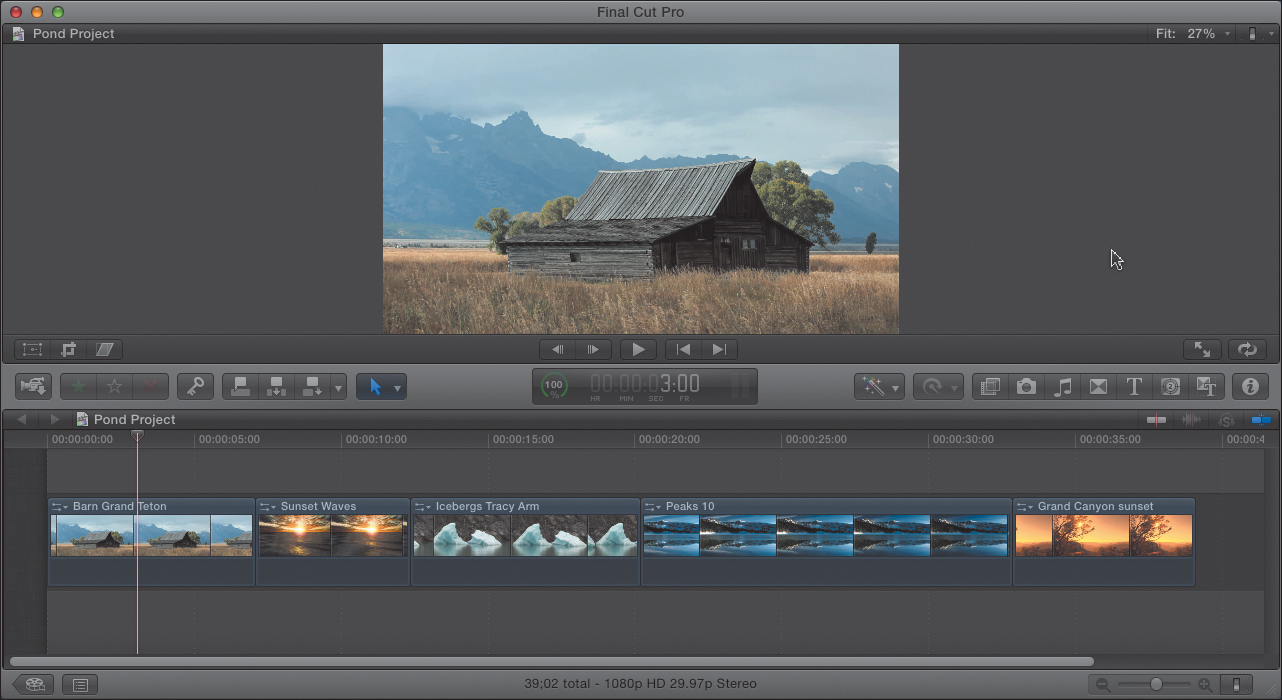
The Timeline
Below the toolbar is the Project Timeline (Figure 2.11). The Timeline is where you build your projects. This window has four sections in it and two sets of buttons at the bottom.
Figure 2.11 The Project Timeline. There is one Timeline per Project.
The slider in the lower right controls the horizontal scale of the clips in a project; however, I prefer to use the keyboard shortcuts of Shift+Z, Command+[plus key], or Command+[minus key] to scale the Timeline to fit, zoom in, or zoom out, respectively.
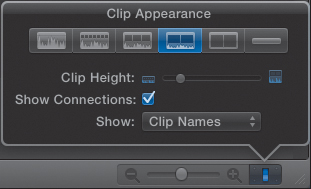
The Switch controls the contents of thumbnails, sets the vertical height of clips, and toggles on or off connection display (Figure 2.12). Click one of the six icons to set the Timeline thumbnails to display from audio only, to a mix of audio and video, to video only. The far-right icon displays what I call “lozenges,” which is very useful for seeing your Timeline in miniature.
Figure 2.12 The slider controls the horizontal scale of Timeline clips. The Switch controls the display of clips in the Timeline.
These two buttons on the lower left of the Timeline opens two more Timeline windows (Figure 2.13). The left button opens the Project Library; you can also press Command+0, which is a collection of all your projects, grouped by the hard disk they are stored on, and the right button displays the Timeline Index.
Figure 2.13 Located in the lower-left corner of the Timeline, the left button displays the Project Library, and the right button displays the Timeline Index.
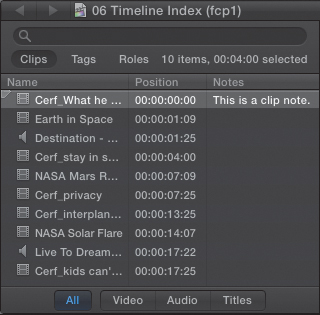
The Timeline Index is a list of all the clips, transitions, keywords, markers, and To-Dos in the currently active Timeline (Figure 2.14). This is a very cool feature that allows you to quickly navigate, search, hide, or delete elements within the Timeline. This becomes increasingly useful as your project size increases.
Figure 2.14 The Timeline Index is new with Final Cut Pro X.
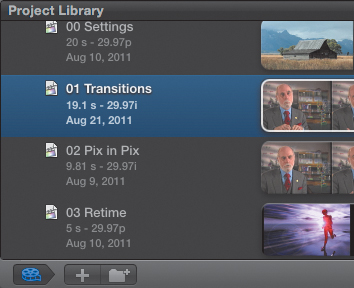
The Project Library
The Project Library is where you store and manage all your projects (Figure 2.15). Projects are sorted alphabetically, by hard disk. There is no limit to the number of projects you can access inside Final Cut Pro X. All projects are stored inside the Final Cut Projects folder on your hard disk, where each project has its own folder.
Figure 2.15 The Project Library stores all Projects. Only one Project can be open at a time.
Tip: The Problem with Folders
The idea of storing projects in folders is a good one. The only problem is that when you drag a project into a folder to store it, FCP X often does not scroll the Library window as you drag the clip.
This makes placing projects in folders really, really tricky.
When you are in the Project Library, three buttons appear in the lower-left corner. The left button toggles you into, or out of, the Project Library. The middle button creates a new project. And the right button creates a new folder, or bin as they were called in FCP 7, in which you can store projects.
There are other interface elements:
• Tool palette
• Keyword editor
• Inspector
• Color Boards
• Video Scopes
• Import windows
• and tons of contextual menus (these are what appear when you right-click something)
Tip: The Number-One Interface Rule
That reminds me that the number-one interface rule for Final Cut Pro X is this: “Select something, and do something to it.” This may not be as deep as “I think; therefore I am.” But inevitably you’re going to ask “How do I do X?” And the answer is: Select something, and do something to it.
Just watch. I’ll prove this to you.
But, for now, that’s enough of an orientation to get you started. Also, as you are discovering, there are a plethora of keyboard shortcuts. At the end of each chapter, I’ll summarize some of the more important ones that I discuss during the chapter.
There is a ton of control here that’s hidden until you need it. Final Cut Pro invites an attitude of “What happens if I click this?” There is far more to the interface than appears at first glance. Virtually everything is clickable.
Note: Definition Reminder—Event
An Event is a collection of media files that are stored inside your computer—specifically an Events folder in the Final Cut Events folder. You can import media from a wide variety of sources.
So, give yourself permission to click stuff, and watch what happens.
Creating a New Event
In this section, you’ll learn a simple way to create a new Event. In the next section, you’ll see how to create a new Project. Chapter 3 goes into Events and Projects in detail; this is just to get you started.
Although you can start by first creating a new project, it’s generally easier to start by creating a new Event, importing media into it, and then creating the Project. This is because Projects must be linked to Events. So, creating the Event first simplifies the process.
Note: Where Does FCP X Store Stuff?
Final Cut Pro X stores everything in two folders: Final Cut Events and Final Cut Projects. These two folders can be stored in your Home directory (the default), on any locally attached hard drive or RAID, or, with the 10.0.1 update, on a server. Also, each of these folders can be stored on different drives.
Each Event is stored in its own folder inside the Final Cut Events folder. Likewise, each Project is stored in its own folder inside the Final Cut Projects folder.
Events store media. Media files can be video, audio, or still images. Files can be imported from cameras, hard drives, media cards, or other applications, such as iMovie and iPhoto. By default, the Events folder is stored in the Home directory of your boot drive. However, I recommend that all Events be stored on a second drive. Storing media on a second drive provides better performance and, potentially, greater storage. But, frankly, the real reason is speed.
The Basic Steps
The fastest way to create a new Event is to choose File > New Event (or press Option+N). However, a much better way is to first select the hard drive where you want to store the event in the Event Library and then create the new Event. (If the Event Library is hidden, press Shift+Command+1 to display it.) Selecting the hard drive first allows you to control where the new Event will be created and your media stored.
For instance, the drive 2nd Drive RAID was selected for the location of a new Event. Then, choose File > New Event (or press Option+N).
The new Event now appears under the name of your hard disk, and the hard disk has a little right-pointing triangle next to it (Figure 2.16). I call these twirl-downs—indicating that there are Events stored on that hard disk.
Figure 2.16 Select the hard disk to hold the new Event, and then press Option+N to create a new Event. A new Event is assigned a default name with today’s date.
By default, this Event is named New Event followed by today’s date. While you can rename an Event at any time, I like renaming a new Event as soon as I create it. This way, I know what it is supposed to contain. So, I’m going to call this Model Railroads. (If you can’t enter text, select the Event and press the Enter key, or just click to select the name.)
Using Two Computer Monitors
Although Final Cut Pro looks great on a single monitor, you can really expand your view of a Project using two computer monitors.
Note: Can Final Cut Pro Output to a Video Monitor?
Not at this point—Apple says this feature will be coming in the near future. Final Cut Pro is designed to output video to a computer monitor. For best results, use a computer monitor that supports ColorSync to provide a consistent color display from initial capture through to final output.
When you have a second computer monitor attached to your system, two new menu items become available in the Window menu.
Window > Show Events on Second Display: This moves the Event Library and Event Browser to the second monitor.
Window > Show Viewer on Second Display: This moves the Viewer and related controls to the second monitor.
Window > Revert to Original Layout: This is available for both single- and dual-monitor displays and is a fast way to return to the default window layout, where all elements are contained in a single window on the main computer display.
Figure 2.17 shows what the main window looks like, with Events moved to the second window.
Figure 2.17 The main monitor display, when Events are moved to a second monitor.
Note: Can You Change the Layout?
Yes, but not the way in which you expect. You can’t move windows or tabs, but you can resize elements. Put your cursor on the dividing line between two elements, for example, between the Event Browser and the Viewer, and drag. As you drag, you can resize both windows. To return to the original layout, choose Window > Revert to Original Layout.
And Figure 2.18 shows how the main window looks when the Viewer is displayed on a second monitor.
Figure 2.18 The main monitor display, when the Viewer is moved to a second monitor.
Tip: Here’s a Tip to Make Your Monitor Look Great
While it is beyond the scope of this book to provide step-by-step instructions, to get the best results from your second monitor, be sure to calibrate it using System Preferences > Display > Color.
Importing Media
Since Events store media, let’s import some media into that Event before creating a new Project. (Chapters 3 and 4 cover this in detail, so you’ll just import a few files to get started.)
There are three broad categories of media you can import into Final Cut Pro:
• Files imported directly from a camera or memory card
• Files imported from a folder on your hard disk
• Files imported from iMovie
The difference between these three categories is whether the files need to be converted to play on your computer. If QuickTime can play the file, then it is converted, and all you need to do is import it. If QuickTime can’t play the file, you’ll need to read Chapter 3 to learn how to bring the file into FCP X.
For now, you’ll simply import a few files stored in a folder on your computer. Since QuickTime can play these files, all we need to do is import them.
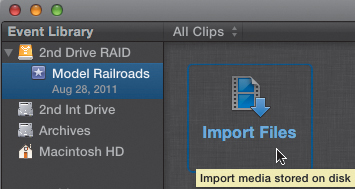
1. There are several ways to import files. The easiest, provided you haven’t imported any media yet, is to click the Import Files icon in the center of the Event Browser (Figure 2.19).
Figure 2.19 Click this icon to import files from your hard disk.
However, if you, or someone you know, has already imported media into this system, that Import Files icon will no longer be displayed, in which case you can either choose File > Import > Files or press Shift+Command+I.
This opens the Import Files dialog. I’ll go into more detail on importing in Chapter 4. For now, I’ll just keep it simple.
2. In the Import Files dialog, select the hard drive containing the files you want to import, and then select the files you want to import.
As with all Mac applications, there are different ways to select files. You can click a single file to select it, click the first file, and then Shift-click the last file to select a range of files, or you can hold the Command key and select whatever files you click. (Holding the Command key and clicking is also called selecting an arbitrary number of files.)
You can also select the folder containing the files, in which case Final Cut Pro X will bring in all the files contained in the folder. (If one of the files is a format that FCP X doesn’t support, Final Cut Pro will pop up a warning about that incompatible file but import everything else.)
3. Once you have your files selected, it’s time to decide how you want Final Cut Pro to import them. In this case, I want to bring in some model railroad footage (thanks, Miles, for sharing these!). So, I select the folder that contains the files I want. FCP will bring in the entire contents of the folder automatically.
However, the choices at the bottom of this dialog have been known to scare small children (Figure 2.20). Again, Chapter 4 talks about this in detail, so here are the settings I’m currently recommending.
Figure 2.20 This is the bottom half of the standard import file picker window, where you set import settings.

4. For now, just copy these settings and click Import.
Almost instantly, small icons of all your files appear in the Event Browser. The Event Browser displays the contents of a single Event (Figure 2.21).
Figure 2.21 The Event Library (left) and Event Browser (right) that shows the clips you just imported.
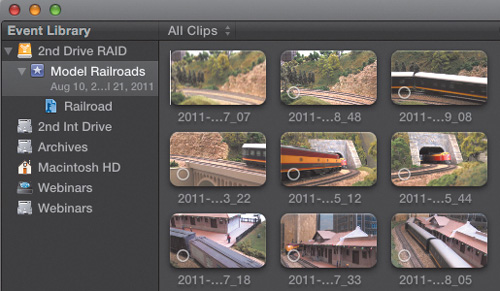
So, just to repeat, the Event Library displays all your Events. The Event Browser displays all the clips associated with a single Event. When you select an Event in the Event Library, its contents are immediately displayed in the Event Browser.
Although the contents of the Event are displayed immediately, behind the scenes Final Cut Pro is doing a lot of work. In the past, you needed to wait for FCP to finish before you could start working, but the new version delegates all these housekeeping chores to what’s called background processing.
In the center of the screen is the Dashboard. On the left side is a small clock icon. This is your gateway into discovering what Final Cut Pro is doing in the background. Click the small clock face once, and the Background Task window appears (Figure 2.22).
Figure 2.22 The Background Tasks window shows all active background tasks.

This window shows all the different tasks that Final Cut Pro is running in the background. In this case, FCP is busily calculating thumbnails, which are the small icons that show what your clips look like; importing the files; analyzing them for color problems; and converting them into optimized media. This means faster renders, improved effects, and faster exports.
Now that you’ve imported some files, we can move to the third step, which is creating a new Project.
Creating a New Project
Just as you need to select a hard drive to hold Events, you also need to select a hard drive to store Projects. By default, FCP X puts Projects in the Home directory of your boot drive.
Just as FCP needs a place to display all your Events, it also needs a place to display all your Projects. And that place is called the Project Library. You can see it on the left side of the Timeline. If it is hiding, press Command+0 to display it.
Select the hard disk you want to use to store your Projects; in this example, I selected 2nd Int Drive. Remember, when creating either Events or Projects, select the hard drive first, and then create the new Event or Project.
1. Just as with Events, there are multiple ways to create a new Project. The easiest, provided you haven’t created any Projects yet, is to click the Create Project icon in the center of where the Timeline will be. Or, if someone has already created a project, which means this icon is no longer visible, you can choose File > New Project or press Command+N.
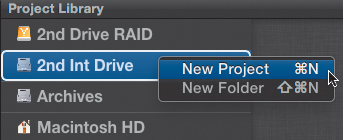
You can also take advantage of a contextual menu. I would not normally tell you this now, but I would be really embarrassed if you heard about this from a “friend” first, so here goes.
Right-click the name of the hard disk where you want to create a new Event or Project. A contextual menu appears (Figure 2.23). These puppies are scattered everywhere in this program. Choose New Event, or New Project from the contextual menu, and you are good to go.
Figure 2.23 Right-click an object to display a contextual menu, such as the name of a hard disk in the Project Library to create a new Project. (You can do the same thing to create a new Event in the Event Browser.)
2. However you decide to create a new Project, the new Project dialog appears. At the top of the dialog, give your Project a name (Figure 2.24). I recommend you use something that makes sense to you, rather than a cryptic code. In this case, I called it Model Rail Project.
Figure 2.24 Always name a new Project and link it to an Event. The ability to set starting timecode is a new feature in FCP X 10.0.1. The default audio setting creates a surround mix.
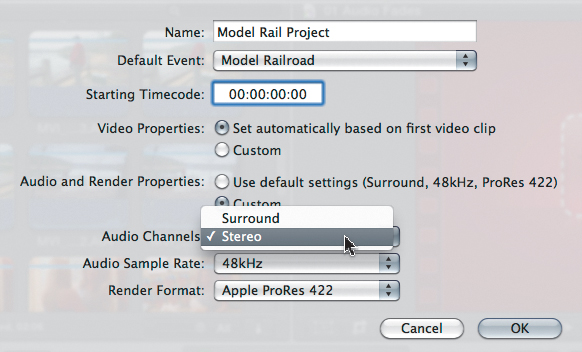
Note: FCP Remembers Current Audio Setting
Although it is nice that FCP X supports surround sound, most Projects will be stereo. It would be good if Apple supplied a default for this setting, but it doesn’t. However, Final Cut Pro remembers the current audio setting so that when you create a new Project, and change the Audio and Render Properties radio button to Custom, FCP X will remember the audio setting according to the last new project you created.
3. All Projects must be linked to an Event—remember, both Events and Projects are, ultimately, databases—so I set the default event to our Model Railroad footage. You can actually use footage from any Event in any Project. This window also allows you to change the starting timecode of a Project; I’ll talk more about this in Chapter 3.
4. The two radio buttons at the bottom need a short comment. The top one is set correctly for most projects. For now, leave it alone. However, the bottom set of preferences can lead to confusion, and while the default can’t be changed, the setting can. Click the Custom radio button for Audio and Render Properties and change the default audio setting from Surround (six tracks of audio) to Stereo.
And that’s it! You are now ready to edit.
Creating a Simple Edit
Your media is stored in a new Event, and you have a new Project ready to go.
The time has come to create a simple edit. In this case, you’ll create a very simple scene where Miles Hale is showing how to build a piece of railroad scenery. Then, you’ll add a connected clip, what some editors would call B-roll, that illustrates what the scenery looks like when he is done.
Here’s the editing process:
1. Preview a clip to decide whether you want to use it.
2. Mark the clip with a Start point and an End point (also called In and Out).
3. Edit the clip to the Project Timeline to add it to your story.
4. Adjust the audio level so you can hear it properly.
5. Repeat until your story is complete.
Previewing the Clip
In general, it is easiest to build your entire story for content; this is called creating the radio script. Then, go back and add the pictures that illustrate your story, using connecting clips. Then, go back a third time to add transitions, titles, and effects.
What you discover in going back over the same material is that you find ways to improve it by adding new clips, adjusting or removing existing clips, and rethinking the order of how all your clips fit together. Just like practicing a speech makes it better, reviewing your edits improves the final project.
There is no one perfect way to edit anything—which can be both a joy and a frustration. Every story is different. But, like any good story you tell to your friends, the more you practice and polish it, the better it gets.
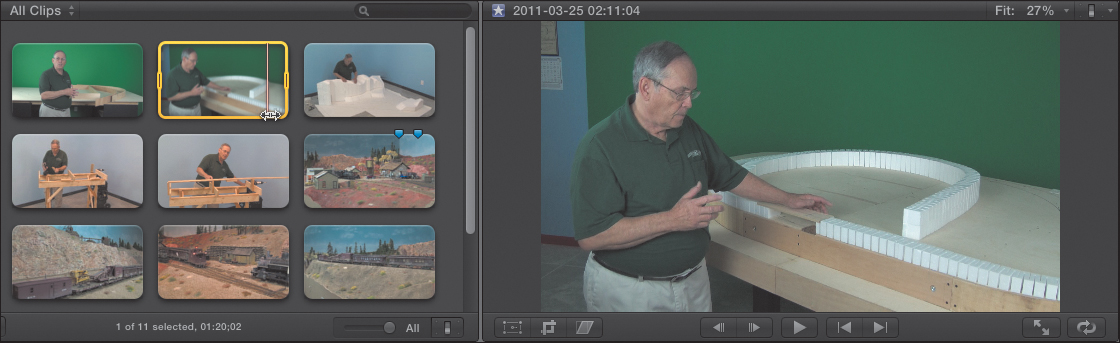
1. Double-click the name of a Project in the Project Library to open it in the Timeline.
Clips that you can select for this Project are displayed in the Event Browser (Figure 2.25). Meet Miles Hale, of Model Railroad Builders. He is showing you how to construct scenery for a model train layout.
Figure 2.25 The Event Browser, left, allows you to quickly look over all your clips; the Viewer, right, allows you to see one clip in more detail.
2. To preview a clip, either move the skimmer across the clip to watch it in high speed or click the skimmer at the beginning of the clip (which sets the position of the playhead) and press the spacebar to play the clip in real time.
Either way, you watch the clip in the large Viewer window on the right and listen to it on your speakers.
Marking Start and End Points
Once you decide what your first clip will be, follow these steps:
1. Click the clip to select it.
2. Drag the left edge of the yellow box to the right (Figure 2.26). This sets a selection that will determine the Start (In) and the End (Out) of a clip. (The Start is on the left, and the End is on the right.)
Figure 2.26 Click a clip to display the yellow boundary. Drag the left edge to set the Start, and drag the right edge to set the End.
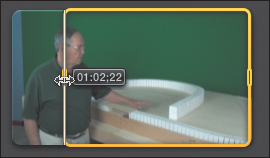
As you drag, you’ll see the shot change in the Viewer. The small numbers you see changing along the left edge of the yellow rectangle you are dragging is the timecode (the frame identifier) that represents the timecode address of the current frame under the yellow boundary that you are setting as the Start.
3. Once you have the In, um, I mean the Start set, do the same thing with the right edge of the clip—drag it to the left until you find the frame where you want the clip to end. This sets the End of the shot you will edit to the Timeline.
This process of setting the Start and the End is often called marking a clip. The keyboard shortcut to set the Start is I, and to set the End it is O. This marked area is also called the selected range.
Editing the Clip to the Project Timeline
Next up is editing the marked clip.
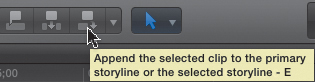
Click the Append edit button (or press E) to edit the selected range of a clip into the Project Timeline (Figure 2.27). The Project Timeline is almost always just called the Timeline, mainly because, by definition, the Timeline can contain only one Project.
Figure 2.27 Click the Append edit button to edit the selected clip to the end of the Timeline.
Instantly, the clip you selected in the Event Browser appears at the beginning of the Timeline, and the playhead jumps to the end of the clip.
This process of editing continues in this same manner—preview a clip, set the Start, set the End, and edit to the Timeline (Figure 2.28).
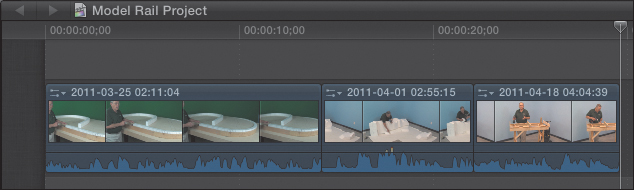
Figure 2.28 Three clips edited to the end of the Timeline—note that the playhead is at the end of the three clips.
Adjusting the Audio
In this example, I have three different clips edited into the Timeline. Generally, for documentary, news, or nonfiction work, I edit all the clips that have audio (also called sound bites) into the Timeline to make a complete story. Then, I go back and add pictures and other elements to make it look pretty. But I focus my initial edit on getting the story told in the best way possible before I worry about images, titles, or effects.
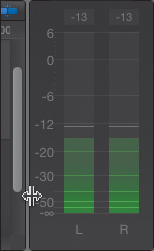
Notice in the Dashboard there are two very small audio meters. This allows you to see what your audio levels look like. However, they are darn near impossible to see. Click the small audio meters in the Dashboard once, and the large audio meters appear (Figure 2.29). (You can resize these meters by dragging the left edge to the left or right.)
Figure 2.29 The larger audio meters; drag the left edge to resize them.
I love the size of these new meters; they’re much better than anything we had in Final Cut Pro 7. I also really, really like that you can resize them.
To adjust your audio levels, drag the black volume lines near the bottom of each clip (also called black rubber bands) up to make the audio louder or down to make the audio softer (Figure 2.30). You should be able to clearly hear what they are saying without driving your audio levels over 0 dB as measured on the audio meters. (Chapter 9 covers audio in more detail.)
Figure 2.30 Drag the black horizontal line in the audio portion of the clip to adjust audio volume.

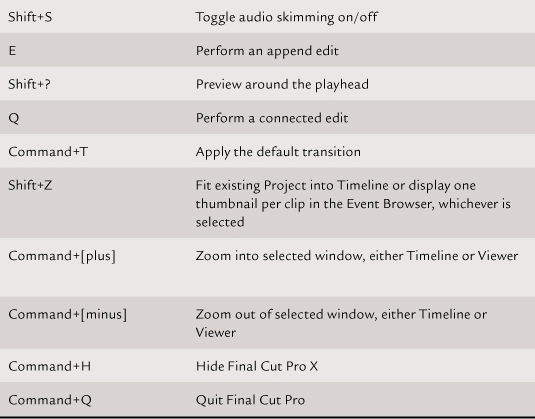
Using Shortcuts for Faster Editing
Now that you have a few clips edited to the Timeline, here are some shortcuts that can be helpful.
• To preview an edit, put your playhead, or skimmer, near what you want to preview and press Shift+?—this backs the playhead up a few seconds and then plays for the next several seconds before resetting the playhead position. This allows you to determine whether the edit makes sense. (Chapter 8 covers trimming, which is the process of adjusting where two clips touch.)
• If you want to move vertically within the Timeline, you can use the scroll wheel on your mouse or drag vertically on your trackpad.
• To display the Viewer full-screen so you can watch your story unfold, press Shift+Command+F. To return to the interface, press Esc.
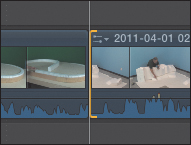
• To add a dissolve between two clips, click where the two clips touch (Figure 2.31). This turns the edge of one of the clips yellow. (If an edge turns red, you may not be able to add a transition. This is covered in more detail in Chapter 8.) By the way, it doesn’t make a difference which edge changes color. All you are doing is selecting the edit point (the place where two clips touch) so that Final Cut Pro knows where to apply the transition.
Figure 2.31 Select an edit point, where two clips touch, and one edge highlights with a yellow bar.
• To add the transition, press Command+T. There are more than 100 transitions you can add to your Projects. However, this keyboard shortcut applies the most popular: a one-second cross-dissolve. (Chapter 10 covers transitions in detail.)
Creating B-roll
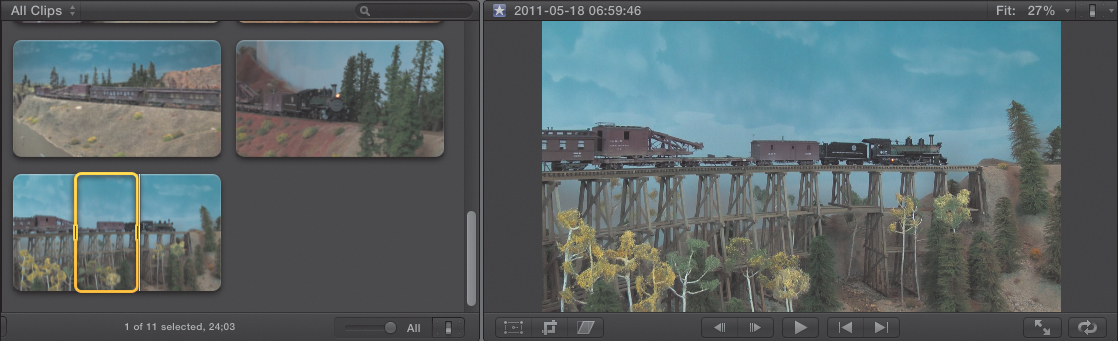
B-roll, cutaways, and inserts are all words that describe images that illustrate what the person on camera is talking about or doing (Figure 2.32). For example, if you interview an astronomer, B-roll would be video of the stars. In this book, I’ll use the term B-roll to refer to the wide variety of ways you can illustrate what someone is speaking about.
Figure 2.32 B-roll are pictures that illustrate a piece of dialogue or interview.
In this case, you want to add some B-roll that shows a train rolling through the scenery that Miles is constructing. You do this using a connected clip.
As with any clip, find the clip you want to use in the Event Browser, and add a Start and an End (In and Out).
Then, unlike editing a clip into the primary storyline, you need to tell Final Cut Pro where this connected clip should start (Figure 2.33). You have two options:
• If skimming is active, the position of the skimmer determines the Start point of the clip in the Timeline.
• If skimming is inactive or if the skimmer is not in the Timeline area of the interface, the playhead determines the Start of the connected clip.
Figure 2.33 Position the playhead in the Timeline where you want the B-roll clip to start.
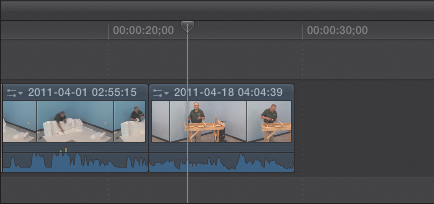
In this case, I’m using the playhead to set the position in the middle of the last clip.
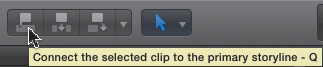
Click the Connected Edit icon (or press Q), and the selected clip in the Event Browser is connected to the primary storyline at the position of the playhead (Figure 2.34).
Figure 2.34 Click the Connected Edit button, or press Q, to edit the clip into the Timeline as a connected clip.
Notice that, by default, if a connected clip is video, it’s placed above the primary storyline. If it’s audio, it’s placed below the primary storyline (Figure 2.35).
Figure 2.35 A connected clip is attached to the primary storyline. In this case it’s video so it’s placed above the primary storyline.
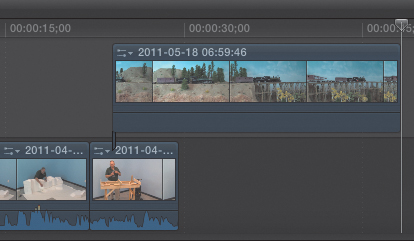
If you look really carefully, at the very start of a connected clip (and a connected storyline, for that matter), you’ll see a small hook connecting the clip into the clip in the primary storyline. This connection is, by default, at the first frame of the connected clip, and it always hooks into the primary storyline. This is how each clip on the primary storyline knows what clips are connected to it.
What you’ve just done is typical of many editing projects where you have someone on camera talking and then illustrate what he is talking about using B-roll. You’ll follow this same workflow hundreds of times in your projects.
Summary
Sometimes you just want to get started—and that’s where this chapter can help. You now know how to create a new Event, create a new Project, and perform a simple edit. Now it’s time to go beyond a superficial overview and get into the details of how, and why, the software works.
The hardest part of any journey is the first step. You now have a basic understanding of the interface and the key concepts behind Final Cut Pro X. The rest of this book guides you in the adventure of exploring the application and learning how to put its power to work for you.
At the end of each chapter, I’ll provide a list of the keyboard shortcuts that are relevant to the chapter. Here’s the list for this chapter on the next page.
Keyboard Shortcuts