3. Managing Events, Projects, and Shortcuts
As you make the transition to Final Cut Pro X, it’s important to understand two things in order to use the software effectively.
You were introduced to them in the previous chapter: Events and Projects. But there are still a lot of unanswered questions. For instance, how can you move, copy, rearrange, or delete Events? What about doing the same for Projects? Can you customize keyboard shortcuts? In fact, where do you find keyboard shortcuts?
In this chapter, I’ll answer those questions, as well as illustrate a step-by-step process you can use to create your own customized keyboard shortcuts and shortcut groups.
All About Events
An Event is a collection of media. Generally, the media is all related to a similar subject, but, truthfully, that isn’t necessary. Just like a drawer will hold whatever you throw into it, an Event will store whatever media you give it. The benefit of an Event over a drawer is that the Event is stored in a database, which makes keeping track of what’s in it a lot easier than just tossing stuff in a drawer.
Most of the time, an Event will contain media related to a single production, visual theme, or shooting date.
What’s in a Name?
The word Event is used in a variety of ways in Final Cut Pro X. Let me define how I’m using it here:
Event: This is a collection of media, video, audio, and/or stills, listed in the Event Library and stored in the Final Cut Events folder on a hard disk.
Event Library: Inside Final Cut Pro X, this is a list of all the different Events and hard disks that Final Cut can access.
Event Browser: Inside Final Cut Pro X, this displays all the clips for a single Event, selected in the Event Library.
Final Cut Events folder: In the Finder, this is the “master” folder stored on one hard disk that contains individual Event folders. There is only one Final Cut Events folder per hard disk connected to your computer.
Event folder: This is a single folder, stored inside the Final Cut Events folder on your hard disk, that contains all the media, and the database, related to a single Event. There is no limit to the number of Event folders that can be stored inside a single Final Cut Events folder.
Media: This is what’s stored inside an Events folder. This can be video, audio, or stills.
You can have only one Final Cut Events folder per hard disk. However, you can have a separate Final Cut Events folder on each hard disk. One Final Cut Events folder holds an unlimited number of specific Event folders, and each Event can hold an unlimited number of clips.
Tip: Events Are Always on Top
The Final Cut Events folder is always stored at the root, or top, level of a hard disk. You can’t put this folder inside another folder.
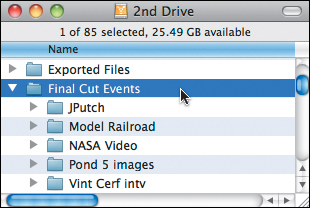
Events are stored in the Final Cut Events folder (Figure 3.1). By default, this is in the Home directory of your boot drive. (That’s the drive that also holds your Applications folder.) But you can choose to store this folder at the root level of your boot drive or any other hard drive, RAID, or server that is attached to your computer and turned on.
Figure 3.1 Media is stored in Event folders that are stored in the Final Cut Events folder.
In fact, as you learned in the previous chapter, I strongly recommend storing this folder on an attached hard disk.
The key phrase is “attached to...and turned on.” Final Cut Pro X expects to have access to all Events and all Projects all the time.
This can be a real problem if you are doing work for different clients. You don’t want one client seeing media or projects from a second client. While you could rename the Event inside Final Cut, the media is still available and could be displayed accidentally. A better approach is to use the Finder for two simple workarounds outside of Final Cut: the simple way and the cool way.
The simple way is as follows:
1. Quit Final Cut Pro X.
2. Create a second folder to store all the Events you don’t want to use on the same drive as the Final Cut Pro Events folder.
For example, in Figure 3.2, I created a folder called Final Cut Events Not in Use.
Figure 3.2 To prevent an Event from appearing in FCP X, move it into a folder you create called Final Cut Events Not in Use.
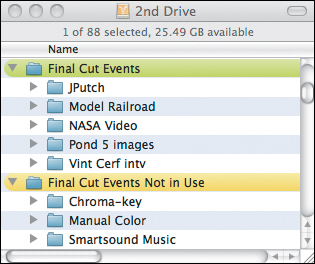
3. Then, using the Finder, drag any Events that you want to remove from the Event Library in FCP X from the Final Cut Events folder into the Final Cut Events Not in Use folder.
This does not delete any media, but it does make that media unavailable to Final Cut Pro, or any project that uses that media.
Note: Critical Note for Moving Folders
Always quit Final Cut Pro before moving folders.
Always drag the entire Event folder from one location to another. Never drag individual files from the folder.
It’s simple, and it works fine. But it’s kinda boring.
A very cool, and inexpensive, alternative is a program called Event Manager X, published by Intelligent Assistance (www.intelligentassistance.com) (Figure 3.3). This simple utility tracks all your Events and Projects across all your hard disks and makes them active, or inactive, to Final Cut Pro.
Figure 3.3 Event Manager X is a very helpful utility for managing FCP X Events and Projects.
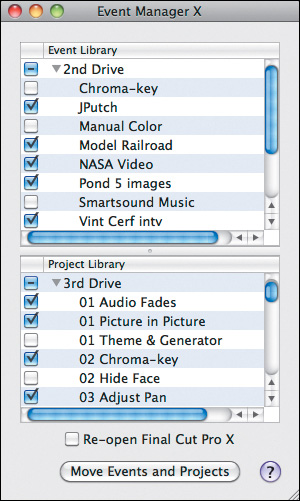
Additionally, it tracks Events and Projects for hard disks that are not currently connected or turned on. This allows you to see where you stored files, without needing to keep all your hard disks running at the same time. There’s also a very neat Find utility to help you find the Project or Event you want to work on.
The ideal solution is to have Final Cut Pro handle all Event and Project management. But, until it does, Event Manager X fills the bill. I used it constantly in writing this book, plus in my training and editing with FCP X.
Event Management
The Event Library inside Final Cut Pro X lists all the Events stored on all hard disks that are currently connected to your computer. And the Event Browser displays all the media contained by a single Event selected in the Event Library.
The previous chapter showed how to create an Event by first selecting the hard drive where you want to store the Event and then choosing File > New Event (or pressing Option+N).
Now, let me show you how to use the Event Library to copy an Event to a different hard disk, move an Event to a different hard disk, merge two Events into a single Event, and delete an Event. Then, we’ll use the Event Browser to rename a clip and to delete a clip.
Copy an Event
To copy an Event to another hard disk, select the Event name in the Event Library, and then choose File > Duplicate Event or press Command+D.
Note: One Events Folder per Hard Disk
Remember, since you can have only one Final Cut Events folder per hard disk, Final Cut doesn’t allow you to copy an Event to the same hard disk upon which that Event is already stored.
This displays the Duplicate Event dialog. Within this menu, you can give the Event a new name (it can be the same as, or different from, the existing Event) and pick a hard disk where you want the Event stored. There’s no need to pick a folder within that hard disk, because Events are always stored in the Final Cut Events folder at the top level of the selected hard disk.
Pick the location you want the Event copied to, and click OK.
That’s the dull, boring way to duplicate an Event. It works fine, but it isn’t sexy. Here’s the secret way to duplicate an Event: Drag the name of the Event from the Event Library to the name of the hard disk in the Event Library where you want to copy the Event.
Poof! The Duplicate dialog instantly appears. Much cooler.
The best part of this is, because of the power of background processing, Final Cut Pro X allows you to view, edit, trim, or play clips that you are currently copying while the copying is still going on! So, you don’t have to wait for the copy to finish before you get back to work.
Move an Event
The difference between copying an Event and moving an Event is that when you copy you have media in more than one place. When you move, all the media packs up and leaves its old location and takes up residence in the new. (I have fun picturing all these files with feet moving from one hard disk to another....)
To move an Event, select the Event in the Event Library, and then choose File > Move Event. (There isn’t a keyboard shortcut for this option.)
In the resulting dialog, choose the hard disk where you want to move the Event (Figure 3.4). You’ll notice, when you do this, that the hard disk where the Event is currently stored is not listed. This is because it doesn’t make any sense to move the Event to the same location where it already is. So, FCP removes that option.
Figure 3.4 This dialog allows moving an Event from one hard drive to another.
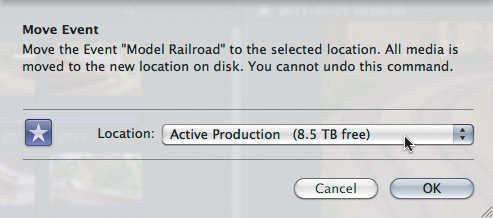
Yawn...another nice technique, but wouldn’t it be neat if there were a secret way to do this, too? Don’t tell anyone, but there is: Hold down the Command key and drag the name of the Event you want to move from the Event Library to the name of the hard disk where you want to move the Event. The Move dialog then appears. Cool—and it’s faster than going to the File menu.
Organize the Media for an Event
It sounds as if you are throwing a massive party. But, nope, you are just collecting all your media in one spot.
As you’ll learn in the next chapter, when you import media, you have the option of copying it into the Event folder or pointing to its current location. The benefit of pointing is that you save disk space. The benefit to copying is that all your media is in one spot, which makes managing it a lot easier.
Figure 3.5 The latest version of FCP X allows storing media, Events, and Projects on a network device.
If you decide to simply point to the existing location of your media during import and then change your mind later, selecting File > Organize Event Files will copy all your media from wherever it is to the appropriate Event folder inside Final Cut Events.
This is especially helpful if you have media scattered across multiple drives and want to consolidate it all into one folder.
To move files from outside the Event folder into the Event folder, select the Event you want to organize in the Event Library, and then choose File > Organize Event Files. (Remember, don’t use the Finder to move files into an Event folder.)
The Organize Event Files dialog appears, reminding you that it will copy all media from outside the Event folder into the Event folder (Figure 3.6).
Figure 3.6 Organizing is very helpful when media is scattered across multiple hard disks.
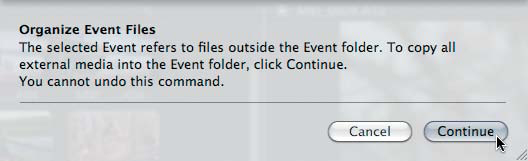
Note the key word copy. It is not moving your original files; it’s merely making a copy of them. This is a safe way to gather your media together, but it also means that your storage requirements are going to increase because now you have two copies of your files: one in the original location and a copy in the Events folder.
Note: On Copying
For those of us raised before digital devices became omnipresent, copying something always meant a decrease in quality. Today, when dealing with media files, you can copy the same file as many times as you want without degrading quality. So, don’t worry about making multiple copies of the same file. When you compare them, they will all look, and be, identical.
Merge Two, or More, Events
Sometimes, Projects get so big that the media can’t be contained on a single hard disk. Or, perhaps, you have several small hard disks and finally have the money to buy a RAID big enough to store everything. What you need to do now is merge the media from more than one Event so that everything gets gathered together in one place.
That’s what the Merge Events menu is all about: getting everything together so you can take it on the road.
For Merge Events to work, you must select more than one Event folder, before choosing File > Merge Events. Those folders can be stored either on the same hard drive or on multiple hard drives (Figure 3.7).
Figure 3.7 Notice the two selected Event folders on two different hard drives. Select the folders before choosing File > Merge Events.
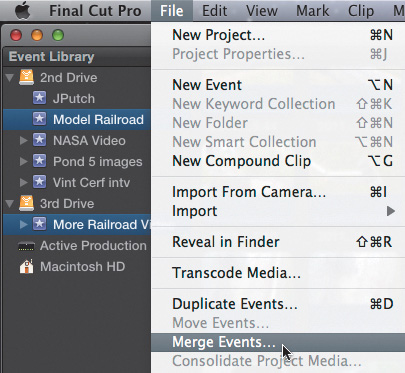
In this example, I have two Events filled with Model Railroad footage. One is on the 2nd Drive, and the other is on the 3rd Drive. Both Events are selected. However, this option also works if both Events are stored on the same hard drive. The key is to select all the Events you want to merge prior to selecting the menu.
When the menu is selected, the Merge Events dialog appears, asking you to give the newly merged file a name and pick the location where you want all these different files gathered together.
Merging Is a Great Way to Consolidate Files
Merging your Events is a great way to consolidate them from multiple hard drives, as well as move them from a linked location into a single location. Unlike organizing, which copies your files, merging moves your files. This saves on storage space. Plus, if you have a bunch of linked files, merging moves them from where they were to the new Event folder that you selected in the Merge dialog.
A caution, though: If you are using the same file in multiple Projects, FCP will update all necessary internal links during the merge so none of your projects loses track of the file. However, if you are linking to those files from other applications, such as Final Cut Pro 7 or After Effects, those other applications don’t have any way to know what FCP X is doing, which means the links in those applications will break.
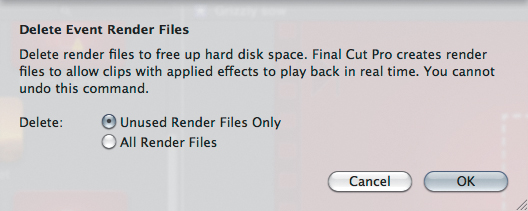
Delete Event Render Files
When a clip is analyzed or has effects applied to it in the Event Browser, Final Cut creates render files for that clip. These render files take up space, which, after a while, you may want to get back.
(There are actually two sets of render files: one for the Event and one for the Project. This section talks about Event render files; I’ll cover Project render files in a few pages. In general, Project render files will take more space.)
To delete render files associated with an Event, select the name of the Event in the Event Library and choose File > Delete Event Render Files.
Select the choice that’s most appropriate:
• You can delete render files that are not being used by any Project.
• You can delete all render files associated with this Event.
The good news is that if you delete too many render files, Final Cut will just re-create the ones it needs in the background while you go about the process of editing your project (Figure 3.8).
Figure 3.8 Delete render files only when projects are complete.
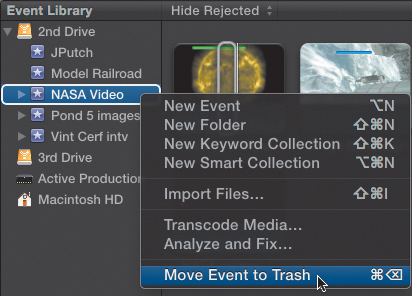
Trash an Event
You can also move an event to the Trash. This is not the same as deleting the Event, but it’s pretty darn close. Moving an Event to the Trash allows you to change your mind and bring the files back before they are permanently erased either using Undo (Command+Z) or using the Finder to go into the Trash and drag the files back into the Final Cut Events folder.
There are three options to trash a no-longer-needed Event:
• Right-click the name of the Event in the Event Library and select Move to Trash.
• Select the name of the Event and press Command+Delete.
• Select the name of the Event you want to delete and choose File > Move to Trash.
Whichever one you pick, the Event is immediately removed from the Event Library and moved to the Trash (Figure 3.9).
Figure 3.9 Trashing Events moves files to the Trash, which allows recovering an inadvertently trashed file, if necessary, by pulling it out of the Trash.
If you switch out of Final Cut and look inside the Trash, you’ll see the entire Event folder and all its contents. If you change your mind, drag the folder out of the Trash and back into the Final Cut Events folder. If you really do want it gone, just empty the Trash.
Most of the time, after you create an Event and import your media, you won’t need to do much with your Events except use them to organize your media. But, when you need to do more, now you know how.
All About Projects
Like Events, Projects are tracked using a database and stored in a master folder. The Project folder is called Final Cut Projects. Inside this master folder is a folder for each individual Project. Inside each Project folder is the database for that Project, along with render files and other technical elements that FCP X needs for its own purposes.
This Project database is new with FCP X and provides a solid foundation upon which to build your edit. Because both Events and Projects use databases for tracking their elements, managing Projects is very similar to managing Events.
In this section, I will show you all the different ways you can manage a Project, from creation to archiving.
There are three elements to the Timeline:
• Project Library (Keyboard shortcut: Command+0)
• Timeline Index (Keyboard shortcut: Shift+Command+2)
• Timeline (Keyboard shortcut: Command+0)
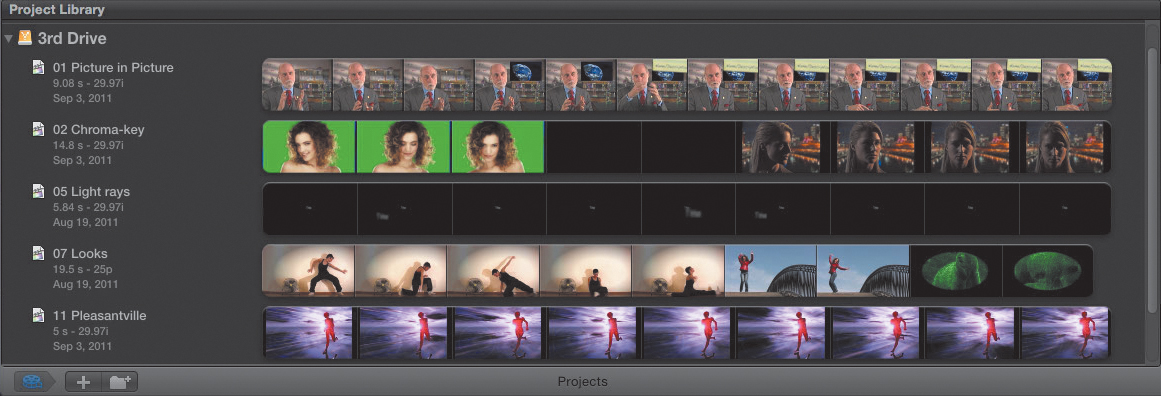
The Project Library, like the Event Library, is a list of all the different Projects you’ve created in Final Cut Pro X (Figure 3.11). Like Events, all Projects are always online, but only one Project can be loaded to the Timeline at any given time.
Figure 3.11 This is the Project Library, displaying five different Projects.
While there is no limit to the number of Projects you can create, each Project can contain only one sequence, or collection of clips. You can work around this limitation either by using compound clips, which we will talk about in Chapter 5, or by duplicating Projects, which I’ll talk about shortly. According to Apple, there is no limit to the number of clips that can be edited into a Project.
Create a New Project
Before you create a new Project, select the hard disk where you want the project stored (Figure 3.12). (This is exactly the same process you go through when creating a new Event to make sure the Event is stored on the correct hard drive.)
Figure 3.12 There are several ways to create a new Project—clicking one of the highlighted icons or pressing Command+N.
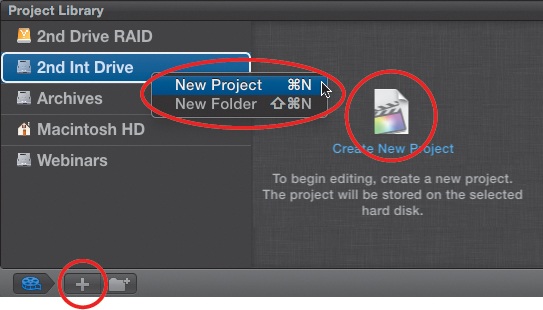
Once you have the hard drive selected, there are five (yup, five!) ways to create a new Project:
• Right-click inside the Project Library and choose New Project.
• Choose File > New Project.
• Press Command+N.
• Click the + (plus) key at the bottom of the Project Library.
• If you are running FCP X for the first time, click the New Project icon.
Whichever option you select, the New Project dialog appears (Figure 3.13). Give your project a name and select the Event that you want to link it to.
Figure 3.13 This is the standard New Project dialog from version 10.0.1.
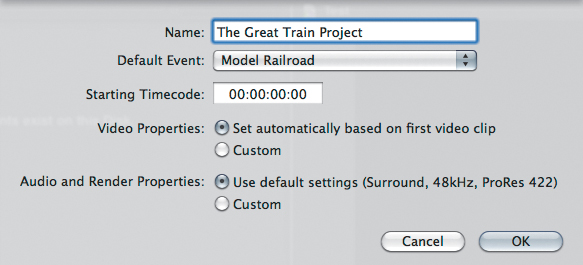
After you link your Project to an Event, you still have three more choices to make:
• New with version 10.0.1 is the ability to specify the starting timecode. Virtually all professional projects in North America start at 01:00:00:00. However, if you and your clients don’t care about timecode, you can leave the default setting at 00:00:00:00.
• Set the video properties for the Project.
• Set the audio and render settings.
Note: Linking Projects to Events
Databases need connections. Because both the Event and the Project use databases for tracking their elements, Final Cut Pro X requires that the Project database be linked to an Event. This simply ensures that all the database connections are properly maintained. Once this initial link is established, which you do when you create the Project, you never need to worry about it again. And, even though you’ve linked to one Event, you can use media from any Event. (See the “Changing the Event Reference Simplifies Sharing Projects” section.)
As a general rule, I use the default setting for the top radio button: “Set automatically based on first video clip.” This works similarly to Final Cut Pro 7 and Express, where the Timeline will autoconfigure itself based upon the first clip you edit into the Project. Since FCP X edits most video formats natively, this will be a good option for most projects (Figure 3.14).
Figure 3.14 Video properties can be customized for each project.
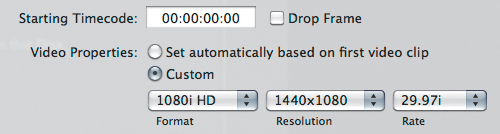
If, on the other hand, you need to create a Project to meet specific technical settings, you can configure them here by selecting the Custom radio button and setting the Format, Resolution, and Rate pop-up menus.

The second radio button, though, hides a trap (Figure 3.16). By default, it mixes your audio to a surround (5.1) mix. This means that whenever you export your project, you are exporting six audio tracks.
Figure 3.16 In almost all cases, you should change the audio setting from Surround to Stereo.
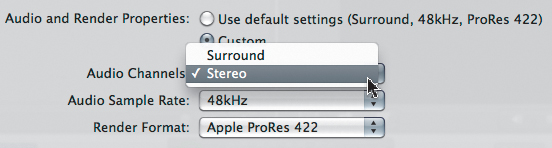
Perhaps in the future everyone wants to hear our audio in surround format. But, since most of us just need a stereo mix, exporting in surround means that you are exporting two audio tracks with audio and four empty audio tracks. This wastes space and extends download time.
Since this cannot be controlled by a preference setting, I make a point to reset this in the pop-up menu to Stereo whenever I create a new Project.
The other two settings for 48 kHz audio and render files using ProRes 422 are both fine, and I leave them alone.
Click OK, and your new Project is created and opened in the Timeline, ready to edit. (I promise, we will get to this...in Chapter 5.)
Duplicate Projects
One of the strengths of FCP X is also a weakness: It is always saving your Project files. This means that as soon as you make a change, Final Cut immediately saves it. No more losing files because of a power failure or system crash.
This is great news...except that when you open a Project to review what’s in it, if you make any changes to the Project, they are immediately saved to the file.
Duplicating projects allows you to protect a copy of your Project from accidental changes. It also makes it easy to save incremental edits, in case you need to go back in time.
There are three ways you can duplicate a Project (Figure 3.17):
Figure 3.17 The three options for duplicating a project.
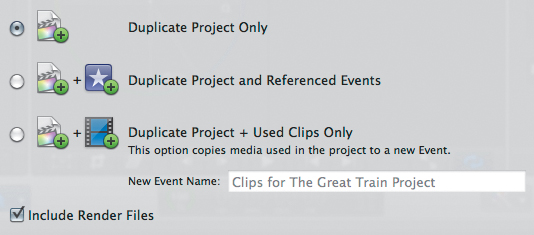
Duplicate Project Only. This is a great way to make a protection copy of your Project. It requires the least amount of additional hard disk space and can be processed quickly. In virtually every case when duplicating just the Project file, I recommend not duplicating render files; FCP can re-create them if it needs them.
Note: What’s a Handle?
Handles are extra video before the Start (In) of a clip and after the End (Out). Handles are generally necessary when trimming a clip or adding transitions. We’ll talk more about handles in Chapter 8.
Duplicate Project and Referenced Events. This duplicates the Project file, all Events referenced by the Project file, and all of the media in the referenced Events. In other words, it duplicates darn near everything. This is the best choice when you need to make an archive of a Project where you want to keep as much source material as possible. Again, I recommend against duplicating render files, just to save space, because FCP will re-create them if it needs them.
Duplicate Project and Used Clips Only. This duplicates the Project file and only the media files that are used within that Project. However, for Timeline clips, Final Cut duplicates the entire clip that’s stored on your hard drive, not just the media used in the Timeline. So, while you don’t need to worry about specifying handles, your storage requirements will be higher because entire media clips are being duplicated, not just the portion used in the Timeline.
With that as background, the actual process of duplicating a Project is easy; do one of the following:
• Select the Project and choose File > Duplicate.
• Select the Project and press Command+D.
• Right-click the name of a Project and select Duplicate Project.
Whichever you choose, the Duplicate Project dialog opens allowing you to give your new project a name and specify what you want to duplicate. (As a note, uncheck Include Render Files to save hard disk space.)
When you have the settings to your liking, click OK.
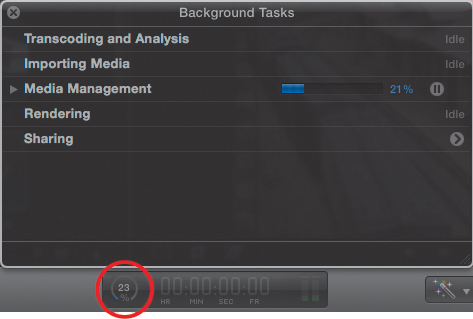
Like most media tasks in Final Cut Pro, duplicating projects runs in the background. This means you can immediately get back to editing while Final Cut Pro is busy duplicating everything.
To check the status of any background task, click the small “clock” face in the Dashboard, or press Command+9. This opens the Background Tasks window (Figure 3.18). The window provides a summary of all background tasks. To get more detail, twirl down one of the right-pointing triangles on the left side of the window.
Figure 3.18 The Background Tasks window monitors background activity, allowing you to pause or cancel it.
Organize Multiple Projects Using Folders
Once you have a lot of Projects created—especially if you have lots of versions of the same Project—grouping them into folders can make your life a lot easier.
To create a new folder for storing Projects, go to the Project Library (Command+0), select the hard disk where you want the folder to appear, and then do one of the following:
• Choose File > New Folder.
• Press Shift+Command+N.
• Click the New Folder icon at the bottom-left corner of the Project Library.
• Right-click the name of the hard disk and select New Folder.
• Right-click the name of the Project and select New Folder.
Whew! There are a lot of ways to do the same thing. Whichever option you choose creates a new folder (surprisingly named New Folder) and indents it under the name of the hard disk.
• To move a Project into the folder, just drag it in. To move the Project out of a folder, drag the Project out of the folder and on top of the name of the hard disk.
• To hide the Projects inside a folder, click the twirl arrow (the right-pointing triangle next to the name of the folder).
• To reveal the Projects inside a folder, click the twirl arrow.
• To delete a folder, either right-click the name of the folder and select Move Folder to Trash or press Command+Delete.
Share Projects with Event Reference
As you discovered in Chapter 2, projects are connected to the media of a specific Event. Most of the time, one editor works with one Event. However, there’s a special way to connect media, called an Event reference, that allows you to connect to similar media stored in a different place.
An example of this, say, is an editor and a producer who want to send Project files back and forth, without also sharing media.
An Event reference is the ability to take a Project and point it to media in a different Event. What you are doing is changing the media that is connected to a Project by changing the Event reference.
Say you have an editor and a producer who are in different locations. The editor sends the producer the media, Event folder, and Project folder to start the project.
The producer makes changes to the Event for their own organizational needs—say adding keywords, changing clip names in the Event Browser, and flagging clips as Rejected using ratings. (I’ll explain all of this in the next chapter.) But they are not changing the media itself.
Then, the producer sends just the Project folder back to the editor. The original Event folder and media remain with the editor. A copy of the Event folder and media are now also with the producer—and the producer’s Event folder contains those revised keywords and ratings. If the editor were to open the Project sent to her by the producer, all the clips would be offline, because the Project is still linked to the Event folder on the producer’s system.
Instead, the editor copies the Project folder to her local system in the Final Cut Projects folder. Opening Final Cut Pro X, she selects the Project in the Project Library, without opening it in the Timeline.
With the Project selected, the editor chooses File > Project Properties (or presses Command+J). She clicks Modify Event Reference and navigates to the Event folder stored locally on her system (Figure 3.20). The editor’s Project now connects to this local media, rather than the media on the producer’s system.
Figure 3.20 Modify Event References allows changing the Event connected to a Project by pointing to a different Event folder.
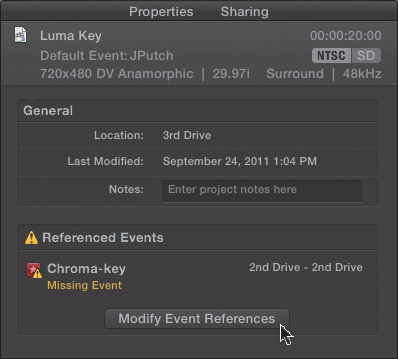
Both the producer and the editor have their copy of the Event folder and media stored locally. Changing Event References allows repointing a Project from one Event folder to another.
This is a very robust use of the media management in FCP X because it easily allows changing the Event that is referenced by a Project.
Archive Projects and Media by Consolidating
As you move from videotape to tapeless media, the problems of archiving become increasingly challenging. Gone are the days of storing your final masters on tape. Now, you need to figure out how to store digital files for the long term.
This is the short answer: Never use hard disks for long-term storage, especially if they are unplugged. After a few years, your data will slowly disappear from the surface of the hard drive, in a process called bit flux.
This is the longer answer: We haven’t figured out the best way to store digital assets for the longer term. However, the best option, today, is a form of magnetic tape called LTO. As of the time I write this, the current version of LTO is version 5, abbreviated as LTO-5.
This provides the best combination of long-term storage—about 25 years per tape, the same as videotape—reasonable price, and full support for Macintosh systems. It is beyond the scope of this book to go into detail on LTO archiving; however, if you want to keep your projects and media for longer than a year or two, you need to find a way to move them off your hard disks and onto something much more permanent.
That being said, the best way to archive the elements of a Project is to use the Duplicate Project and referenced Events option we just talked about. (I still wouldn’t duplicate render files, though.)
The best way to archive a completed Project is to export it as a QuickTime movie (Share > Export Media). While there is a large debate within the professional archiving community on the best codecs to use for archiving for extremely long periods of time, exporting your files using your Project settings should be fine for the next 5 to 15 years.
To get ready to archive a Project, especially large Projects, you should consider consolidation. As Projects get bigger, they start to spill over onto multiple hard disks. This makes the process of archiving much more complex, especially if files are being pulled from a variety of different Events, each on different hard disks.
Note: Consolidation Isn’t Always Necessary
Consolidation is necessary only if your media is stored on multiple hard disks. If all your media is stored on one drive, Consolidate Project Media will be grayed out.
That’s where Project consolidation can help.
What consolidating a Project does is gather all the media used in a single Project from multiple hard disks and puts it all in one spot.
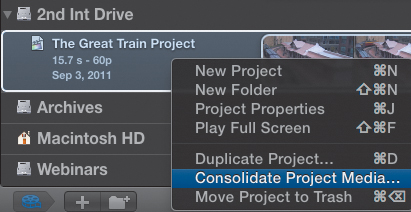
To consolidate a Project, select the Project name in the Project Library and choose Consolidate Project Media (Figure 3.21).
Figure 3.21 A fast way to consolidate the media for a Project is to pick it from the contextual menu.
The Consolidation dialog provides three choices:
• Copy Referenced Events
• Move Referenced Events
• Copy Used Clips Only
Copy Referenced Events. This is the best choice when you are still using the media in other projects or other applications. This makes a copy of all Events referenced by your Project, and all the clips stored in those Events, and stores them at the location of your Project. The only disadvantage of copying is that it requires more disk space to store the duplicated files.
Note: Give Yourself Room
If you are consolidating a Project, move your Project to a hard disk with enough room to hold all your consolidated media. Consolidated media is stored on the same hard disk as your Project.
Move Referenced Events. This is the best choice for media related to a single project where you want to get it off the drives it is on and put it in one spot. This is the best choice as well when you are adding a new, larger hard drive, or RAID, to your system and want to move files from the older drives to the newer and bigger drive. This moves all Events, and the media they contain, from the old location to a new location.
Copy Used Clips Only. This copies just the media you are using in your Project. However, it copies the entire media file, not just the portion used in your Timeline. This is the best option when you want to save hard disk space at the new consolidation location. This also gives you the option to name the new Event.
Another Way to Archive
Final Cut Pro allows you to create a camera archive for both tape and tapeless media. I explain how this works in Chapter 4, so let me just give you a summary here.
Camera archives are backup copies of your existing media. You can back up tape or tapeless media. You can create archives as a stream directly from the camera or by copying files already on the hard disk.
Camera archives provide a browsable “near-line” archive of media that you can view in the Import from Camera window, without first having to import it into Final Cut Pro. Because this is generally used as a backup to your existing media, make a point to store it on a different hard disk than the one(s) you are using for editing. Both Chapter 4 and the Final Cut Pro user manual go into this in more detail.
Delete Project Render Files
Just as Events have render files for effects applied to clips in the Event Browser, Projects have render files. And, in most cases, the Project render files will take more space.
In general, never delete render files for a Project you are currently working on. However, when the Project is complete, you can delete render files to save hard disk space. To do so, open the Project Library (Command+0) and select the Project with the render files you want to delete. Choose File > Delete Project Render Files.
Select the option that best applies to your Project:
• Delete Unused Render Files Only: This deletes files not used by the current Project.
• Delete All Render Files: This deletes all render files associated with that Project.
For those who worry about making mistakes, if you make the wrong choice and delete too many render files, Final Cut will simply rebuild the render files it needs in the background as you continue your editing.
Trash a Project
When the time comes to send your Project to the big digital archive in the sky, you need to know how to delete a Project.
By now, you should know the drill:
1. Go to the Project Library.
2. Select the Project you want to delete.
3. Press Command+Delete, or right-click the Project name and select Move Project to Trash.
4. Then, when the time comes, empty the Trash.
If you change your mind prior to emptying the Trash and need to resuscitate your Project, switch to the Finder, drag it out of the Trash, and move it into any available Final Cut Projects folder.
Creating Keyboard Shortcuts
I don’t really know where to talk about keyboard shortcuts, so here is as good a place as any. Apple has totally reengineered the interface for creating keyboard shortcuts. You’ll find it in Final Cut Pro > Commands.
The Command Editor window opens (Figure 3.22). The top half of the Editor displays the layout of the keyboard currently connected to your computer, while the bottom half displays a variety of lists of keyboard shortcuts. This lower half displays all menu items, whether or not there is a keyboard shortcut associated with it.
Figure 3.22 How you change keyboard shortcuts has been totally redesigned for FCP X.
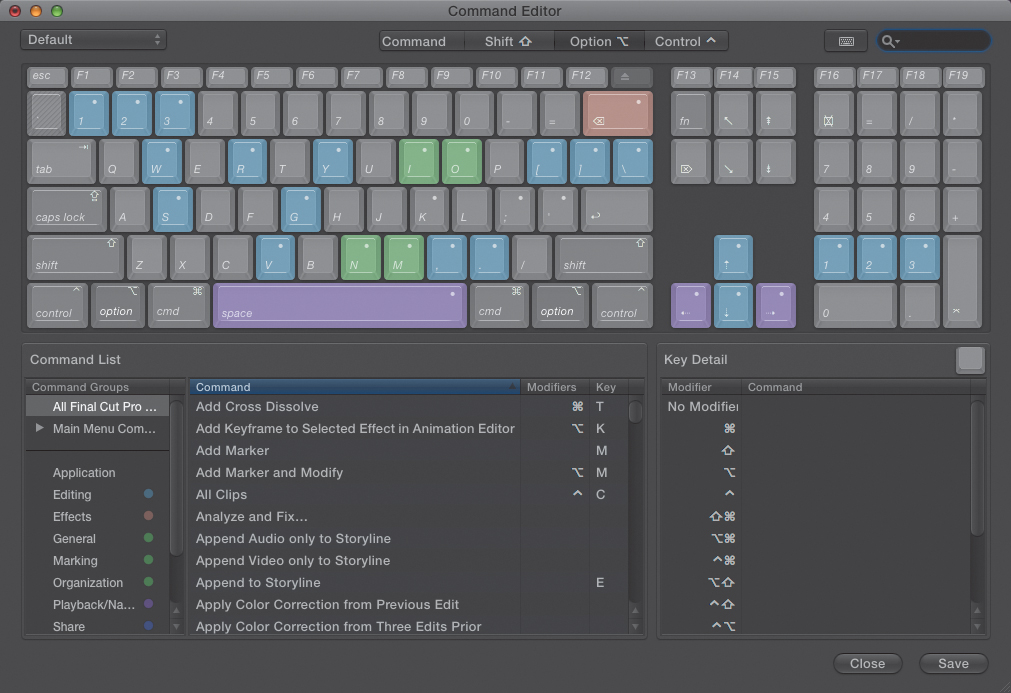
Keyboard shortcuts are stored in groups. The default keyboard group is called Default (I kid you not) and can’t be modified. As you will learn in the next few pages, creating new keyboard shortcuts and shortcut groups is very easy.
For instance, click the word Editing in the Command List in the lower left of this window. All the keyboard shortcuts that relate to editing are displayed in the middle Command window. Notice that all the keys that have editing keyboard shortcuts assigned to them glow with a light blue color. (I must admit, this is pretty cool!)
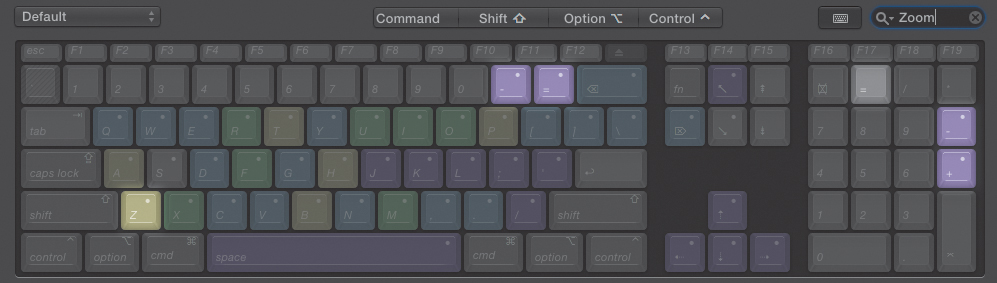
Another way to find related keyboard shortcuts is using the Search box in the top-right corner. For example, in Figure 3.23, I had typed Zoom. All the menu commands that relate to zooming are displayed in the Commands window at the bottom.
Figure 3.23 Enter text in the Search box in the top right to find all commands related to a search entry. Then, highlight all keys related to that search by clicking the small “keyboard” button just to the left of the Search text box.
Let’s create our own keyboard shortcut and see how this new interface works. I’ve decided to create a shortcut for Modify > Analyze and Fix. Let’s see first whether it has a shortcut.
1. We could go up to the Modify menu and check to see whether a shortcut is assigned to Analyze and Fix, but that’s the boring and obvious route. Instead, go back to the Search text box in the top-right corner and type Analyze.
Tip: Keyboard Highlight button
See that small box to the left of the Search text entry in the top-right corner? That’s called the Keyboard Highlight button. Click it, and all the keys that have keyboard shortcuts assigned to them for all the commands listed in the Commands window will glow with color. Another very neat trick.
2. Only two menu commands refer to analyzing. And Analyze and Fix doesn’t have a keyboard shortcut assigned to it.
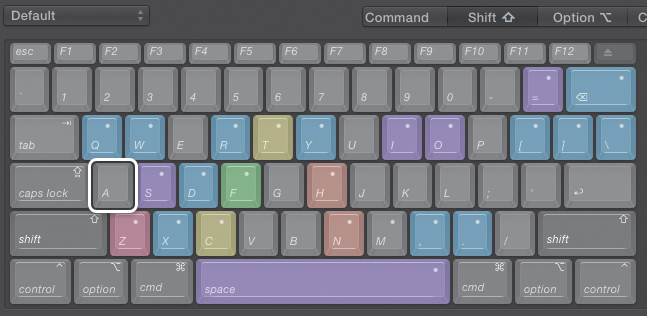
The easiest way to see whether a key is available to use as a keyboard shortcut is to click it. In this case, I’ll click the letter A, which is what I want to use for the shortcut.
3. In the Key Detail pane, all the different key combinations linked to a specific keyboard key are displayed, along with any assigned keyboard shortcuts (Figure 3.24). My first choice, Control+A, is not available since it is being used to toggle the display of Audio Animation. While I could easily replace this shortcut with a new one, I’ll be polite and use a different combination. Shift+A is available; there’s no shortcut next to those symbols.
Figure 3.24 The Key Detail pane, on the right, shows every combination of shortcuts linked to a specific keyboard key.
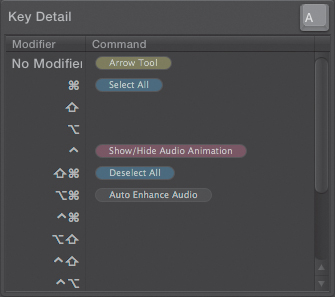
4. At the top of the screen are buttons for the four modifier keys: Command, Shift, Option, and Control. I click Shift, which makes the button go slightly darker, indicating that I want to use the Shift modifier for this shortcut.
As soon as I click Shift, all the keys that have shortcuts assigned to them using Shift as a modifier glow with color. Fortunately, the letter A is gray, meaning it is available (Figure 3.25).
Figure 3.25 All keys that have shortcuts assigned to them with that modifier glow with color. Available keys stay gray. Notice the Shift button at the top is dark.
5. Grab the Analyze and Fix command from the Commands list at the bottom, and drag it up to the letter A and drop it on the key.
6. A warning appears, indicating that you can’t modify Apple’s default keyboard shortcut set. Since you want to create a new set, click Make Copy.
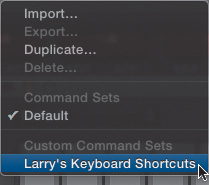
7. Give the new shortcut set a name you’re likely to remember...um, ah! I chose Larry’s Keyboard Shortcuts. Then click OK.
Look back down to the Key List, and there’s the new shortcut, listed next to Shift+A!
8. Click the Default pop-up menu in the top-left corner to see the newly created keyboard shortcut set listed at the bottom (Figure 3.26).
Figure 3.26 Also, the new command set is listed in the pop-up menu in the top-left corner.
9. Click Save at the bottom-right corner of the window to save all your newly created keyboard shortcuts and sets. There’s no limit to how many shortcuts you can create or how many sets you can use.
What makes all these different sets even easier to use is that you only need to go to Final Cut Pro > Commands and select the set you want to use from that initial menu, rather than needing to reopen the Command Editor to change sets.
Summary
Whew! A huge amount of territory was covered in this chapter. And a lot of it was pretty heavy lifting. Fortunately, once you understand how Events and Projects work, they become almost second nature, and you’ll only need to refer to this chapter for the cool keyboard shortcuts that you can create to go even faster.
As you make the transition into Final Cut Pro X, Events and Projects are two of the new concepts that you really need to understand to make the most of this software.
There are two other significantly new concepts still to go, and each has its own chapter: working with media and working with keywords. Both are new, and I’ll cover media next.
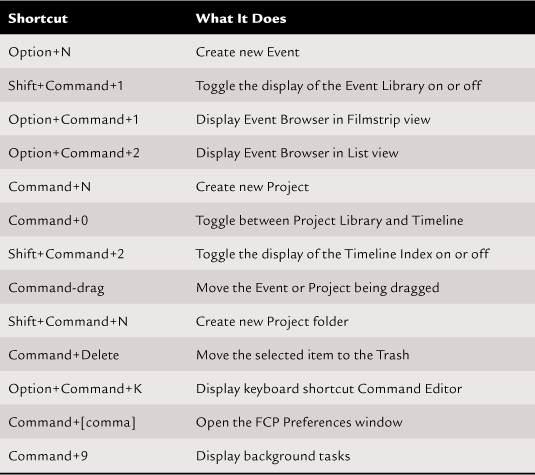
Keyboard Shortcuts