Hour 9. Connecting a GUI to Code
What You’ll Learn in This Hour:
• The code that supports outlets, properties, and actions
• How to use the Connections Inspector
• The process for making outlet and action connections
• How Xcode can generate connection code for you
After the preceding hour’s lesson, you know how to make an interface. But how do you make it do something? As mentioned previously, connecting an interface to code is just a matter of “connecting the dots.” In this hour, you learn how to do just that: take an graphical user interface (GUI) and connect it to the code that makes it into a functional application. You also learn how to automatically create the outlets and actions in your code that make these connections possible.
Outlet, Actions, and Properties: A Review
Although covered in previous hours, let’s quickly review the purpose of outlets and actions, how they relate to properties, and the additional code that you must write when creating an outlet or an action.
Outlets and Properties
An outlet connects a property to an interface object. For example, if you had created a field in the Interface Builder editor intending that it would be used to collect a user’s name, you might want to create an outlet for it in your controller’s interface file (.h) called userName. Using this outlet and the corresponding property, you could then access or change the contents of the field:
@property (strong, nonatomic) IBOutlet UITextField *userName;
A property also requires a corresponding @synthesize line be added to the start of your implementation file to create the property’s accessors. (This can also define the name of the instance variable that the property references.)
For example, to synthesize accessors for the userName property and set its instance variable name to _userName, I could add this line to my controller’s implementation file (.m) file:
@synthesize userName=_userName;
Finally, in your controller’s cleanup method, you also need to add code that removes the property’s reference to your object, freeing it to be removed from memory:
[self setUserName:nil];
As you can see, not much code is involved, but interfaces can be complex, and the number of outlets (and corresponding properties) you need in your code will likely be much more than you see in the simple examples in this book. These things add up quickly, so the more code you can have Xcode write for you, the better (more on that in a minute).
Did You Know?
Advanced development projects can take advantage of IBOutletCollections rather than IBOutlets. These are simply an NSArray that enables us to reference all of a particular type of object simultaneously. For a tutorial on how this can be used with iOS switches, visit http://useyourloaf.com/blog/2011/3/28/interface-builder-outlet-collections.html.
Actions
An action is a method within your code that is called when an event takes place. Certain objects, such as buttons and switches, can trigger actions when a user interacts with them through an event (such as clicking or, in iOS, touching) When you define actions in your code, Interface Builder can make them available to the onscreen objects.
To define an action, doCalculation, that is triggered from my UI, I could add this to my controller’s interface file (.h):
-(IBAction)doCalculation:(id)sender;
Obviously, for the action, there must be a real method implementation in the controller’s implementation (.m) file. But presumably that is why you want to be a developer: to write code that actually does something.
Let Xcode Do It for You
Now that outlets and actions and properties synthesize, and all this interrelated “stuff” are fresh in your mind, let’s get to the point.
We all want to concentrate on writing code that does interesting things. Managing properties, outlets, synthesize statements, and keeping track of the syntax of it all is busy-work, and Xcode will do it for us. Using the Interface Builder editor’s Connections Inspector and the Xcode Assistant Editor, you can create your outlets, properties, instance variables, cleanup calls, and method stubs—with only a drag and a drop.
This hour contains two tutorials. In the first, you connect to outlets and actions that are already defined to your controller class’s interface (.h) file. In the second, you use the Interface Builder Editor to write the outlet and action code automatically. The best way to see how both of these processes work is to walk through the steps of making the connections with an actual application, so that’s exactly what we do next.
Making Connections to Outlets and Actions
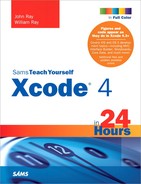
For the first tutorial, we use the OS X project named Disconnected contained within the Hour 9 OS X Projects folder. Open the folder and double-click the Disconnected.xcodeproj file to open the project in Xcode, as shown in Figure 9.1.
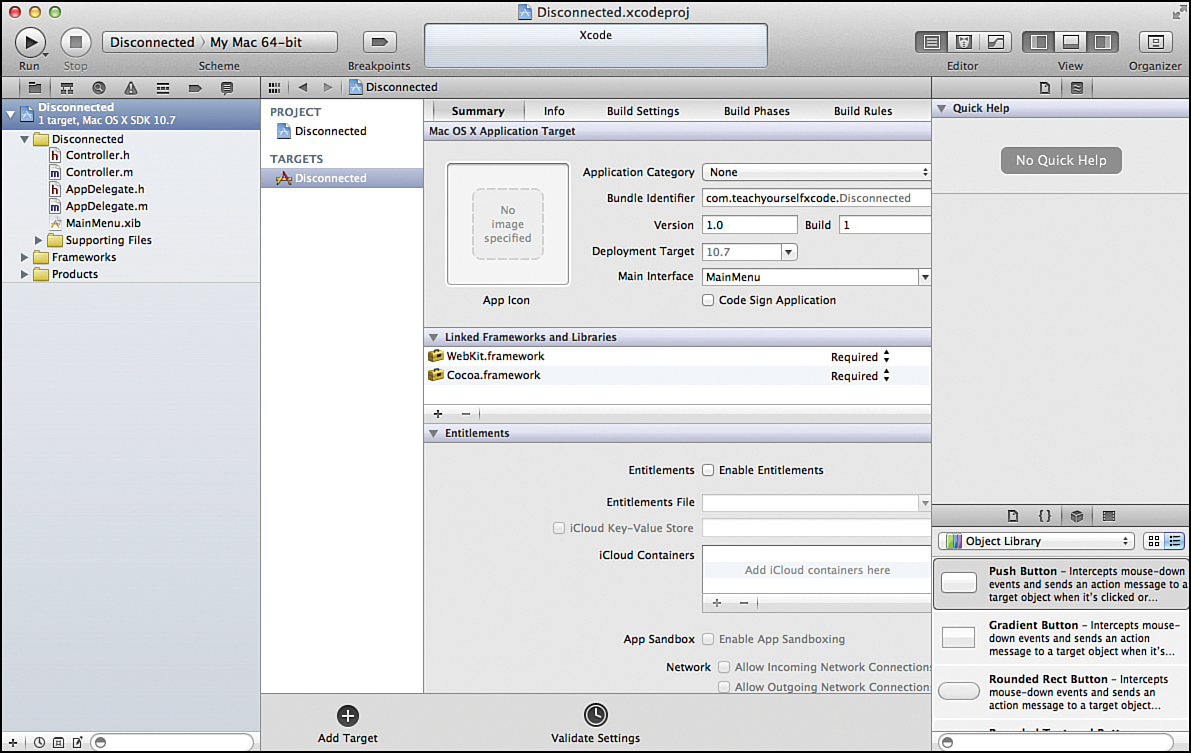
Figure 9.1. To begin, open the project in Xcode.
After the project is loaded, expand the project code group (Disconnected) and click the MainMenu.xib file. This contains the window and view that this application displays as its interface. Xcode refreshes and displays the objects in the Interface Builder Editor, as shown in Figure 9.2.
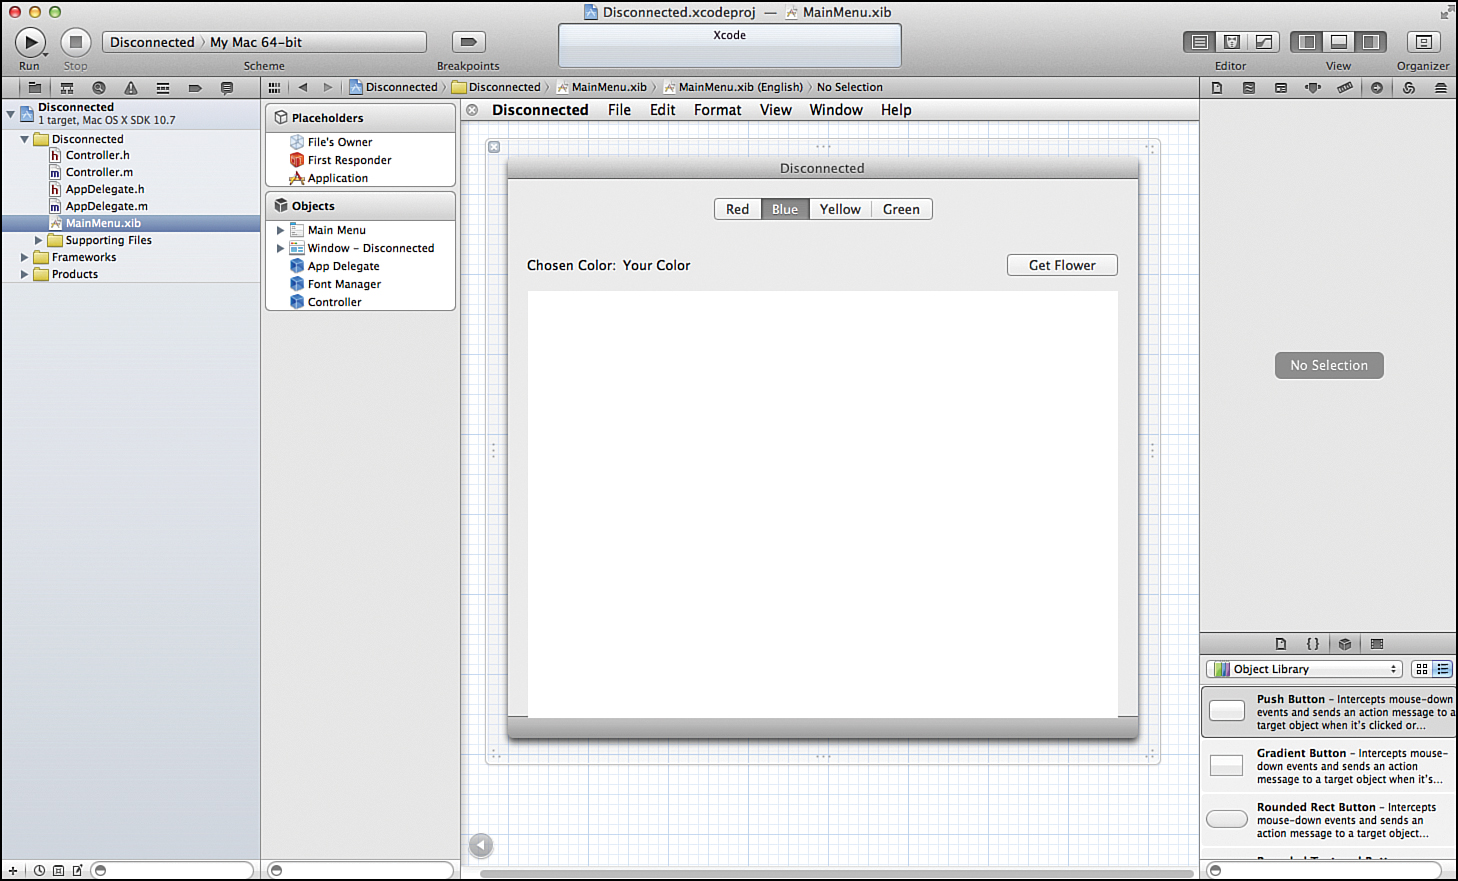
Figure 9.2. The Interface Builder Editor displays the scene and corresponding interface for the application.
Implementation Overview
The interface contains four interactive elements: a button bar (called a segmented control), a push button, an output label (a text field), and a web view (an integrated web browser component). Together, these controls interface with application code to enable a user to pick a flower color, click the Get Flower button, and then display the chosen color in the static text field along with a matching flower photo fetched from the website http://www.floraphotographs.com. Figure 9.3 shows the final result.
Figure 9.3. The finished application enables a user to choose a color and have a flower image returned that matches that color.
Right now, the application does nothing. The interface is not connected to any application code, so it is hardly more than a pretty picture. To make it work, we must create connections to outlets and actions that have been defined using IBOutlet and IBAction in the application controller’s interface file (Controller.h).
Identifying the Outlets and Actions
For the Disconnected app to function, we need to create connections to the predefined outlets and actions. Let’s step through each of the outlets and actions as I’ve named them in the code:
• colorChoice: An outlet created for the segmented control in order to access the color the user has selected
• chosenColor: An outlet for the label that will be updated by getFlower to show the name of the chosen color
• flowerView: An outlet for the web view that will be updated by getFlower to show the image
• getFlower: An action that retrieves a flower from the Web, displays it, and updates a static text field label with the chosen color
Now that we know what object is connecting to what outlet, it’s time to go ahead and make some connections. Make sure that the Interface Builder Editor is open and that you can see as much of the application interface on your screen as possible.
Creating Connections to Outlets
To create a connection from an interface item to an outlet, Control-drag from the controller object’s icon in the Document Outline to either the visual representation of the object in the view or in the Document Outline. Try this with the segmented control:
1. Pressing Control, click and drag from the object named Controller in the Document Outline.
2. Drag to the onscreen image of the segmented control.
A line will appear as you drag, enabling you to easily point to the object that you want to use for the connection, as shown in Figure 9.4.
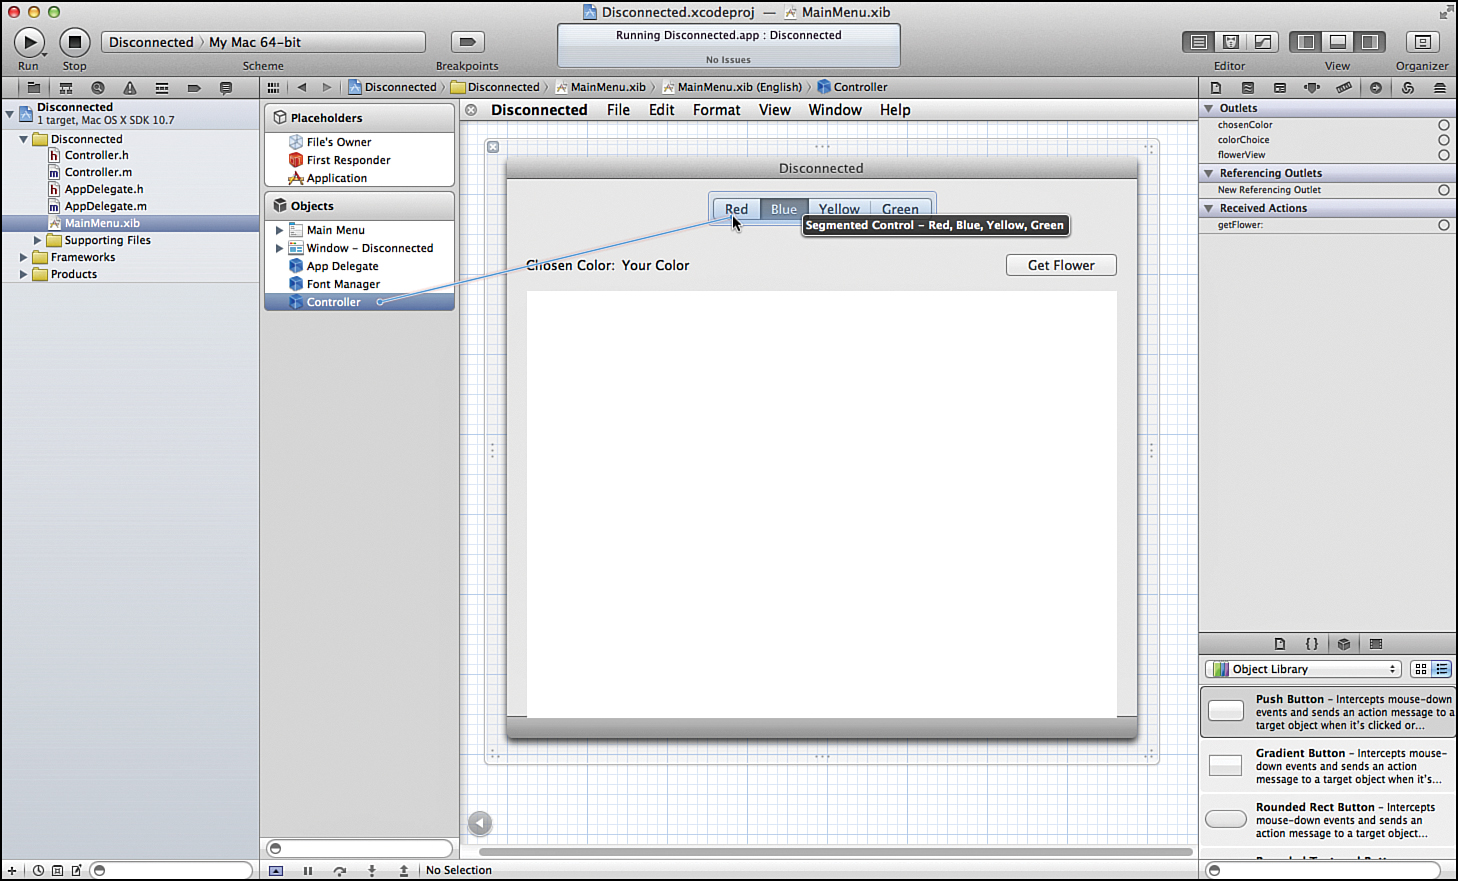
Figure 9.4. Control-drag from the controller object to the segmented control.
3. Release the mouse button after pointing to the segmented control.
The available connections are shown in a pop-up menu (see Figure 9.5).
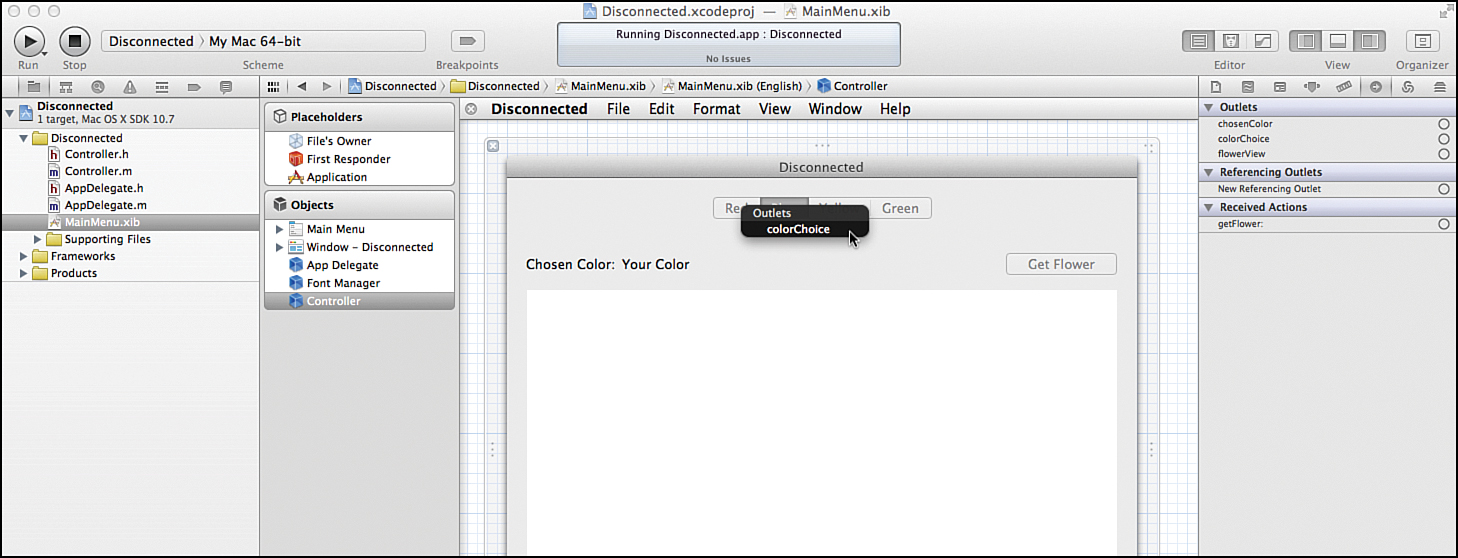
Figure 9.5. Choose from the outlets available for the targeted object.
4. Pick colorChoice to make your connection.
By the Way
Interface Builder knows what type of object is allowed to connect to a given outlet, so it displays only the outlets appropriate for the connection you are trying to make.
Repeat this process for the static text field with the text Your Color, connecting it to the chosenColor outlet, and the web view, connecting to flowerView.
Connecting to Actions
Connecting to actions is a bit different. An object’s events trigger actions (methods) in your code. So, the connection direction reverses; you connect from the object invoking an event to the view controller of its scene.
Although it is possible to Control-drag and create a connection in the same manner you did with outlets, this is not recommended for iOS apps. Many objects have more than a single possible event associated with them (putting your find down on a button versus picking it up, for example). In OS X development, objects typically connect to an action via a single selector (a named method), so the process is more straightforward.
To create your connection, select the object that will be connecting to the action and open the Connections Inspector by clicking the arrow icon at the top of the Xcode Utility area. You can also show the inspector by choosing View, Utilities, Show Connections Inspector (or by pressing Option+Command+6).
The Connections Inspector, shown in Figure 9.6, shows a list of the events that the object, or, in the case of an NSButton, a selector under Sent Actions. Beside the event (or selector) is an open circle. To connect to an action in your code, click and drag from one of these circles to the controller object in the Document Outline.

Figure 9.6. Use the Connections Inspector to view existing connections and to make new ones.
For example, to connect the Get Flower button to the getFlower method, follow these steps:
1. Select the button.
2. Open the Connections Inspector (Option+Command+6).
3. Drag from the circle beside the Sent Action selector to the Controller object, as demonstrated in Figure 9.7.
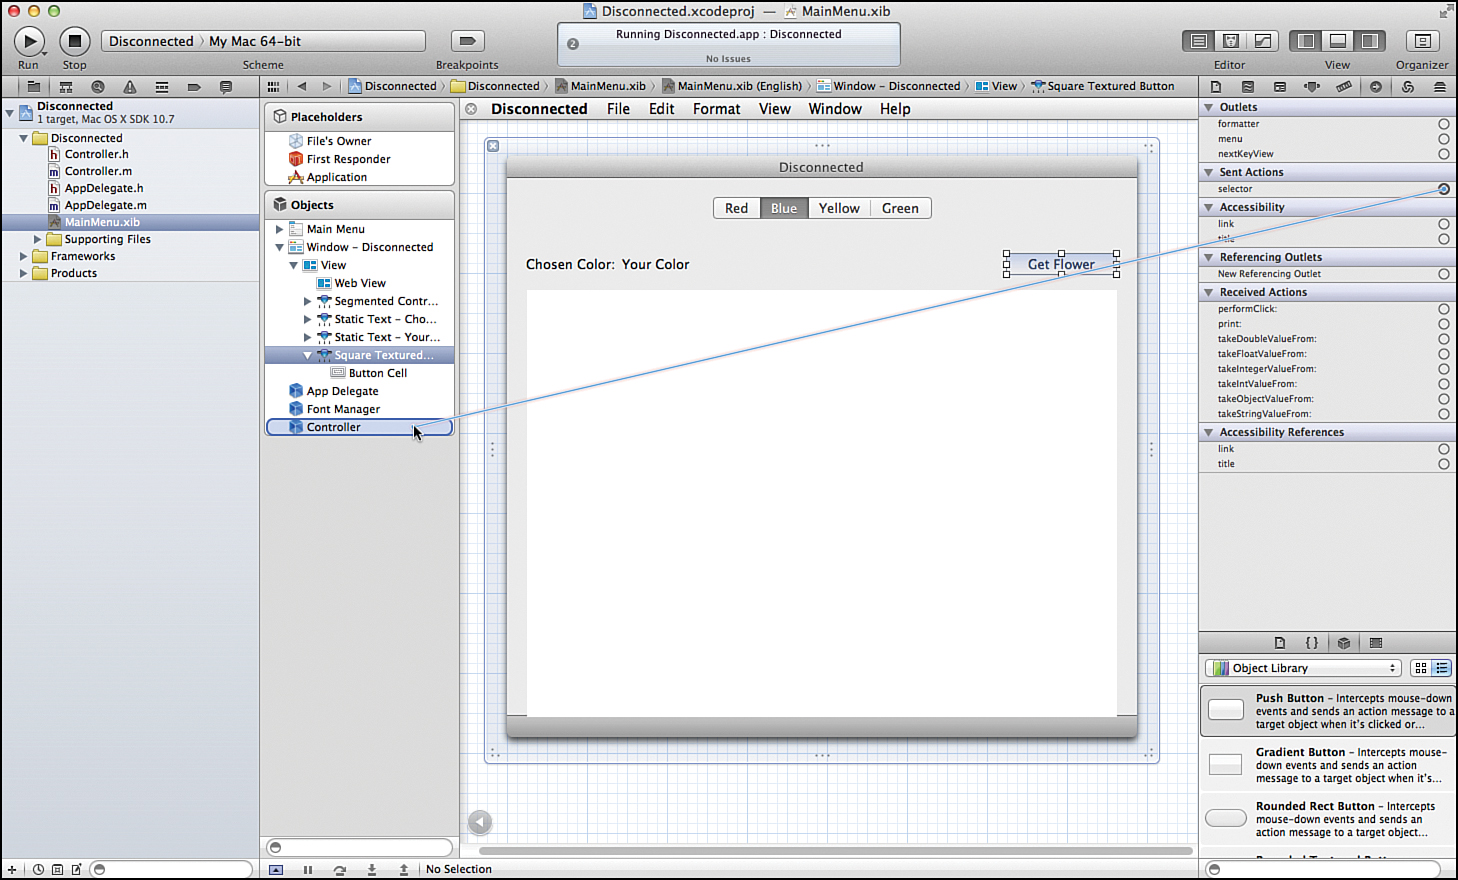
Figure 9.7. Drag from the selector or event to the controller.
4. When prompted, choose the getFlower action, shown in Figure 9.8.
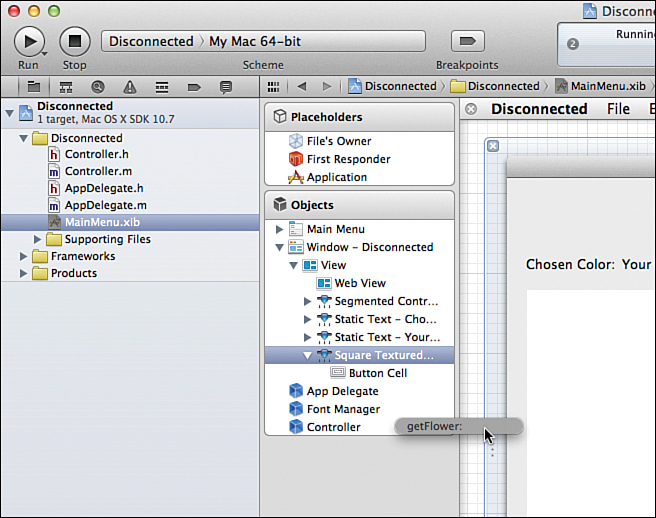
Figure 9.8. Choose the action you want the interface element to invoke.
Repeat this same process for the segmented control, connecting its selector to the same getFlower action. This adds functionality so that when users update their color selection, a new flower is grabbed without users having to click the Get Flower button.
After a connection has been made, the inspector updates to show the event and the action that it calls, as shown in Figure 9.9. If you click other already-connected objects, you’ll notice that the Connections Inspector shows their connections to outlets and actions (under the Referencing Outlets section).
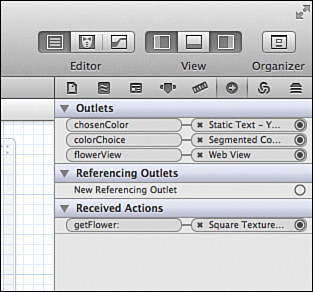
Figure 9.9. The Connections Inspector updates to show the actions and outlets that an object references (here, the controller).
Well done! You have just linked an interface to the code that supports it. Click Run on the Xcode toolbar to build and run the application.
Prebuilt Actions
Although most of your connections in Interface Builder will be between objects and outlets and actions you have defined in your code, certain objects implement built-in actions that do not require you to write a single line of code. These are listed in the Connections Inspector as received actions.
The web view, for example, implements actions, including goForward and goBack. Using these actions, you could add basic navigation functionality to a web view by dragging from a button’s event or selector directly to the web view object (rather than dragging to the controller itself). As described previously, you are prompted for the action to connect to, but this time, it isn’t an action you have had to code yourself.
Did You Know?
The Accessibility sections within the Connections Inspector are used for creating applications accessible to those with special needs. Unfortunately, developing for accessibility is beyond the scope of this book, but you’ll find plenty of information available by searching for “accessibility” in the Xcode documentation.
Editing Connections with the Quick Inspector
One of the errors that I commonly make when connecting my interfaces is creating a connection that I didn’t intend. A bit of overzealous dragging, and suddenly your interface is wired up incorrectly and won’t work. To review the connections that are in place, you select an object and use the Connections Inspector discussed previously, or you can open the Quick Inspector by right-clicking any object in the Interface Builder editor or Document Outline. This opens a floating window that contains all the outlets and actions either referenced or received by the object, as shown in Figure 9.10.
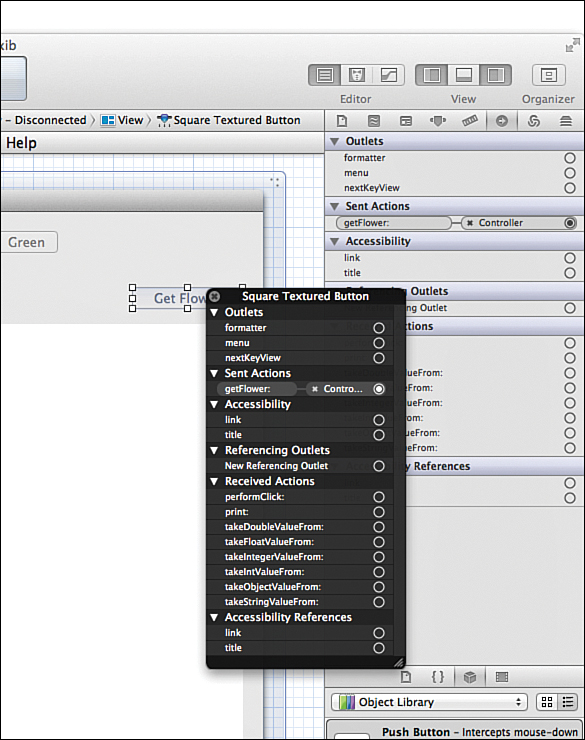
Figure 9.10. Right-click to quickly inspect any object connections.
Besides viewing the connections that are in place, you can remove a connection by clicking the X next to a connected object (see Figure 9.10). You can even create new connections using the same “click and drag from the circle to an object” approach that you performed with the Connections Inspector. Click the X in the upper-left corner of the window to close the Quick Inspector.
By the Way
Clicking an object, such as a button, shows you all the connections related to that object, but it does not show you everything you have connected in the Interface Builder editor. Because almost all the connections you create will go to and from a view’s controller, choosing it and then opening the inspector (or the Quick Inspector) will give you a more complete picture of what connections you have made.
Writing Connection Code with Interface Builder
You have now created connections from user interface objects to the corresponding outlets and actions that have already been defined in code. But how did those outlet and action definitions get written? You could certainly have coded them by hand, as described earlier this hour. But why do that when Xcode will do all the setup for you?
Although it is impossible for Xcode to write your application, it will create the instance variables and properties for your app’s interface objects, as well as “stubs” of the methods your interface will trigger. All you need to do is drag and drop the Interface Builder objects into your source code files. Using this feature is completely optional, but it does help save time and avoid syntax errors. To demonstrate this process, we re-create the exact same application, but this time for the iPhone or iPad. We start with a defined interface, but no outlets, actions, or connections. After a bit of clicking and dragging, we have a full app.
Open the Hour 9 projects folder, choose either the iPad or iPhone project folders, and then drill down to the Disconnected project within. Double-click the Disconnected.xcodeproj file to open the project in Xcode. Again, expand the project code group (Disconnected), but this time, click the MainStoryboard.storyboard file. Interface Builder updates and shows the scene for the application, as shown in Figure 9.11.
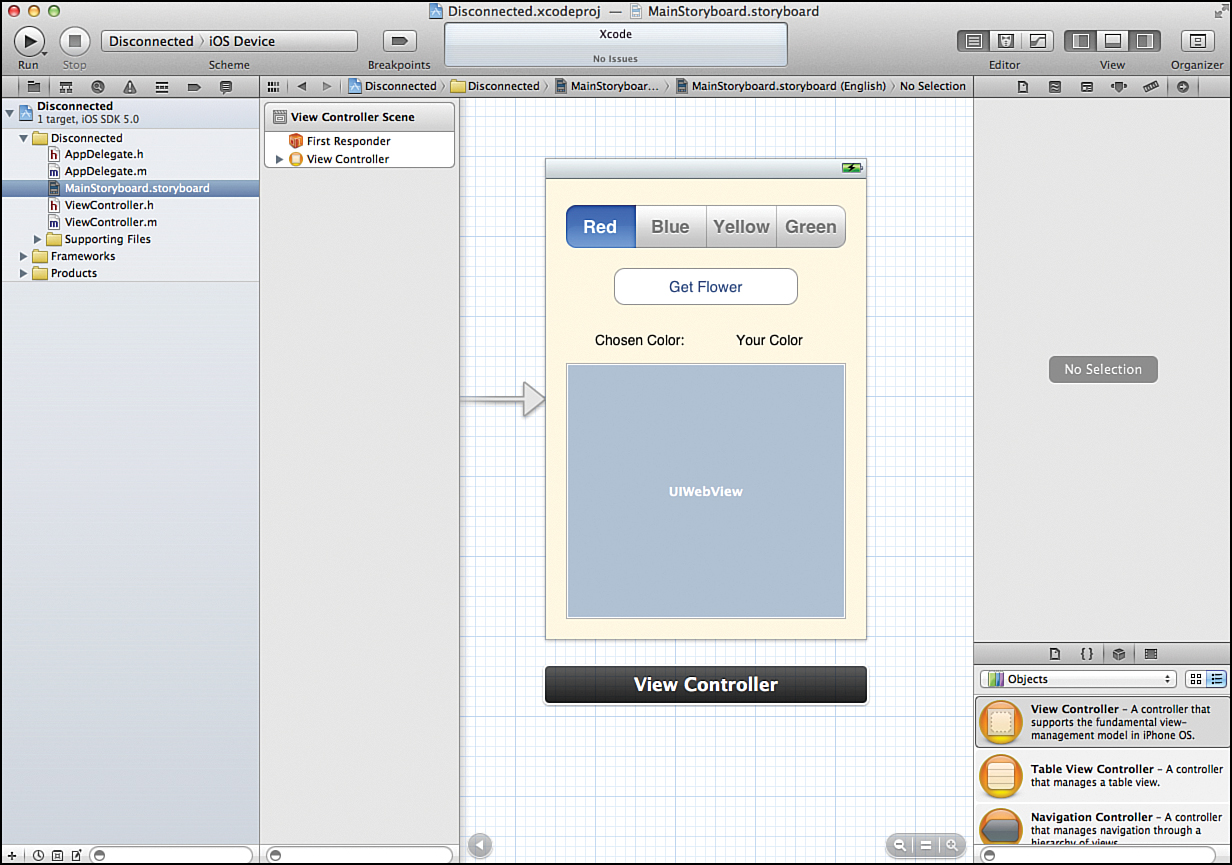
Figure 9.11. The scene for the iOS version of the application is displayed.
Implementation Overview
As with the previous tutorial, you are working with an interface that consists of a segmented button bar, a push button, text label, and a web view. This time, however, instead of just connecting to predefined outlets and actions, you actually create the outlets and actions from scratch. The project you have just opened is based on the Single View iOS application template and has had no code added to the classes; only a basic interface has been created in the storyboard.
Identifying the Outlets and Actions
In this exercise, we create outlets and actions that are identical to the ones that we used for connections earlier. To recap, we have three outlets:
• colorChoice: The segmented control
• chosenColor: The label
• flowerView: The web view
And we have a single action:
• getFlower: Triggered by the button Get Flower and by touching the segmented control
By the Way
I recommend creating a list of your XIB/storyboard objects and their corresponding properties and actions during the planning phase of your development. This will keep you on track and help make sure that you wire your interfaces correctly as you work through your implementation.
Creating Outlets
To create our outlets, we need to be able to drag from the Interface Builder editor to the area of the code where we want to add an outlet or an action. In other words, we need to be able to see the ViewController.h file at the same time we see the view that we are connecting. This is where the Assistant Editor feature of Xcode comes in very handy.
With the MainStoryboard.storyboard visible in the Interface Builder editor, click the Assistant Editor button (the middle button in the Editor section of the toolbar). The ViewController.h file automatically opens to the right of the interface because Xcode knows that is the file that you need to work with while editing the view.
How Does Xcode Know Which File Goes with the UI?
Xcode knows the class ViewController is the view controller class responsible for controlling the view. This relationship is established by selecting the View Controller object in the Document Outline and then using the Interface Builder Identity Inspector to choose which class implements the controller.
By the Way
If you’re on a MacBook, you’re likely to find your workspace a bit cramped. To conserve space, use the leftmost and rightmost “view” buttons on the toolbar to disable the Navigation and Utility areas of the Xcode window. You can also use the disclosure arrow in the lower-left corner of Interface Builder editor itself to toggle the Document Outline off.
Start by connecting the segmented control we created for choosing a color. Recall that we want this to be represented by an instance variable and corresponding property called colorChoice. When this is in place, we repeat the process for the remaining outlets:
1. Control-drag from the segmented control or its icon in the Document Outline. Drag all the way into the source editor for ViewController.h, releasing the mouse button when your cursor is just under the @interface line. As you drag, you see a visual indication of what Xcode is planning to insert when you release the button, as shown in Figure 9.12.
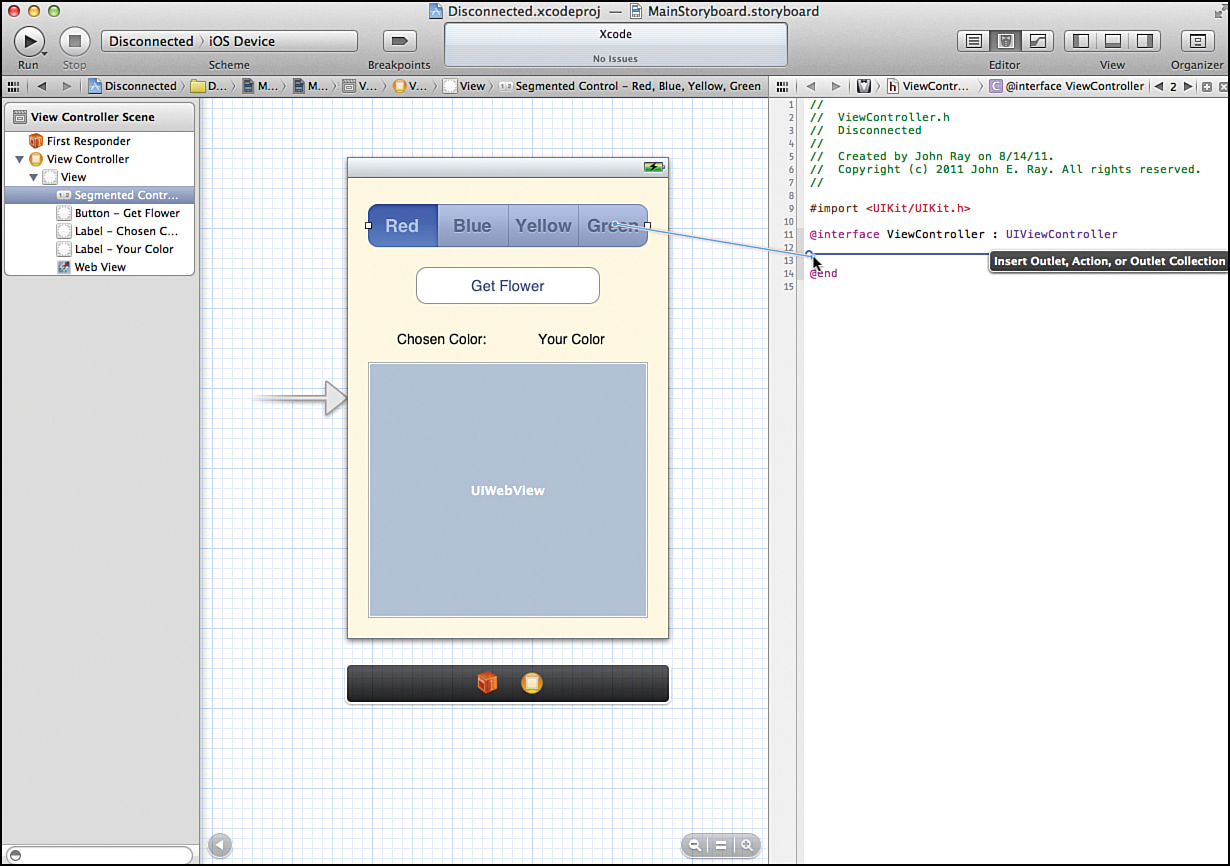
Figure 9.12. Xcode indicates where it will insert code.
2. When you release the mouse button, you are prompted to define an outlet. Be sure that the Connection menu is set to Outlet, storage is Strong, and the type is set to UISegmentedControl, because that’s what the object is. Finally, specify the name you want to use for the instance variable and property (colorChoice), and then click Connect, as shown in Figure 9.13.
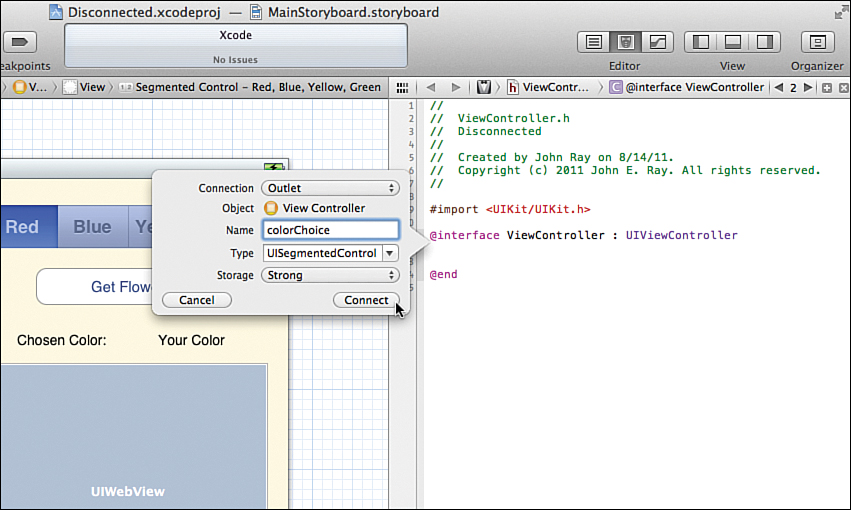
Figure 9.13. Define your outlet.
3. When you click Connect, Xcode automatically inserts the proper @property directive with IBOutlet, @synthesize directive (in ViewController.m), and cleanup code (also in ViewController.m). What’s more, it has made the connection between the outlet you just defined, and the code itself. If you want to verify this, just check the Connections Inspector or right-click the field to open the Quick Inspector, as you learned earlier this hour.
Repeat the process for the text label, dragging from it to just below the @property line that was inserted. This time choose UILabel as the type and chosenColor as the name of the outlet. And now do this one more time for the web view: Drag from it to below the last @property line. Use UIWebView as the type and flowerView as the name of the outlet.
You’ve just made all the outlets, properties, and connections for the user interface. Now let’s see how to go about creating and connecting the action.
Creating Actions
Adding the action and making the connection between the button (Get Flower) and the action follows the exact same pattern as the outlets you just added. The only difference is that actions are usually defined after properties in an interface file, so you just drag to a slightly different location:
So, to add the action and make the connection between the button and the action, follow these steps:
1. Control-drag from the button in the view to the area of the interface file (ViewController.h) just below the three @property directives that you added. Again, as you drag, you see Xcode provide visual feedback about where it is going to insert code. Release the mouse button when you’ve targeted the line where you want the action code to be inserted.
2. As with the outlets, you are prompted to configure the connection, as demonstrated in Figure 9.14. This time, be sure to choose Action as the connection type; otherwise, Xcode tries to insert another outlet.
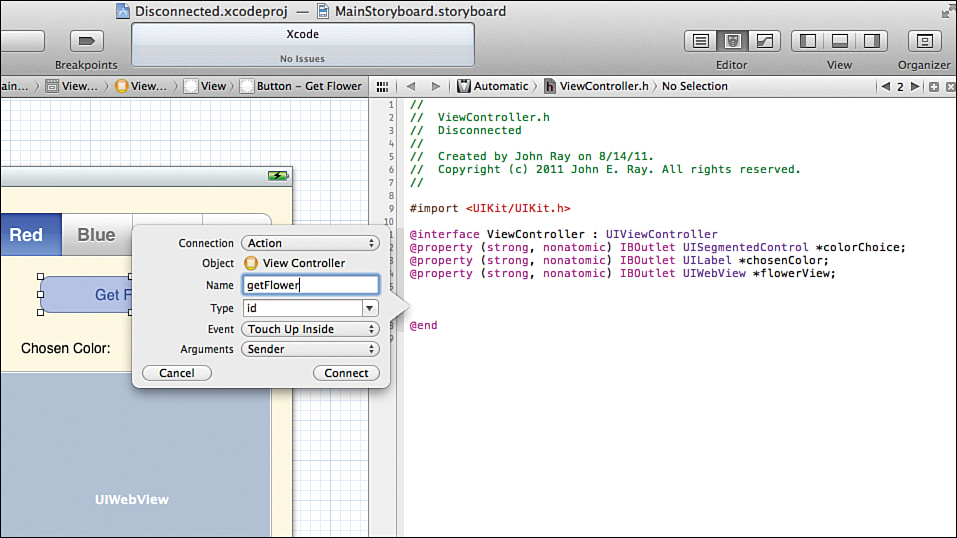
Figure 9.14. Create the action.
3. Set the name to getFlower (the method name chosen earlier).
4. Be sure that the Event pop-up menu is set to Touch Up Inside to configure the event that will trigger the action.
5. Leave the rest of the fields set to their defaults and click Connect.
That’s it. You have just set up your action. You still need to implement the logic, but the Get Flower button will now trigger the getFlower method. You’ll even find a stub for this method in the ViewController.m file.
As a final step in finishing up the UI connections, use the technique you practiced in the first tutorial to connect the Value Changed or Touch Up Inside event for the segmented control to the getFlower action you’ve created. Because the action is already defined, you need to drag from the Connections Inspector to the View Controller object; don’t redefine the method in your code. Making this connection is optional, but it does enable touches in the segmented control to retrieve a new flower image.
Implementing the getFlower Logic
To make this a fully functional application, you need to implement the getFlower method in ViewController.m. Open this file in the source editor, and edit the stub method to match the code in Listing 9.1.
Listing 9.1. A Possible getFlower Implementation
-(IBAction)getFlower:(id)sender {
NSString *outputHTML;
NSString *color;
NSString *colorVal;
int colorNum;
colorNum=colorChoice.selectedSegmentIndex;
switch (colorNum) {
case 0:
color=@"Red";
colorVal=@"red";
break;
case 1:
color=@"Blue";
colorVal=@"blue";
break;
case 2:
color=@"Yellow";
colorVal=@"yellow";
break;
case 3:
color=@"Green";
colorVal=@"green";
break;
}
chosenColor.text=[[NSString alloc] initWithFormat:@"%@",color];
outputHTML=[[NSString alloc] initWithFormat:@"<body style='margin:
0px; padding: 0px'><img height='1200'
src='http://www.floraphotographs.com/showrandom.php?color=%@'></body>"
,colorVal];
[flowerView loadHTMLString:outputHTML baseURL:nil];
}
Watch Out!: Type Without Line Breaks
To get the code to fit on the page, the outputHTML initialization and assignment line was broken across several lines in this listing. When entering this code, you must type it as a single line.
Run the application and test the interface. It should work exactly as planned, as shown in Figure 9.15.
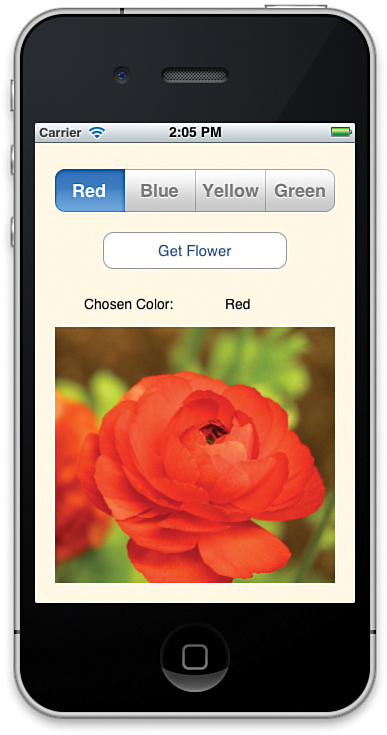
Figure 9.15. The working Disconnected iPhone app.
Summary
This was a very hands-on hour that walked you through the process of connecting objects to outlets and actions. First, you practiced using predefined outlets and actions. You learned how to use the Connections Inspector to target specific events for an object, and how to use it to see the existing connections that are already in place. You also practiced using the Xcode tools to create outlets and actions from scratch. Using the Assistant Editor, you built new outlets and properties and wired them to your interface without having to type a single line of code.
You will use these processes in nearly every project that you create, so being comfortable with them is a key piece of being a successful Xcode developer. Keep practicing, and you’ll find that making connections from Interface Builder quickly becomes second nature.
Q&A
Q. I keep seeing references to segues in the Connections Inspector. What are they?
A. Segues are used in iOS to transition from one scene to another. Revisit Hour 8, “Creating User Interfaces,” for more information.
Q. Is there a way to make all of my connections from one place?
A. Absolutely. The Connections Inspector can be your one-stop-shop for all your outlet and action connections. Instead of dragging from objects in the UI design to your interface (.h) file, you can use the Connections Inspector’s New Referencing Outlet connection as the starting point for dragging into the interface file, thereby creating a new outlet or action.
Q. How do I know what objects support what events and actions?
A. Read the documentation. Over time, you’ll start to recognize that similar controls support similar actions and events. The only way to learn what the options are, however, is to experiment with using the controls and read the documentation for their classes.
Workshop
Quiz
1. The Assistant Editor is not useful when you are creating outlets and actions. True or false?
2. Are the events supported by controls shared between iOS and OS X?
3. A single UI object can trigger actions. True or false?
Answers
1. False. The Assistant Editor enables you to insert outlets and actions by dragging from your interface into the corresponding controller code file.
2. No. Use the Connections Inspector to see what events (actions) your controls support. iOS tends to have many more possible events per UI control than OS X.
3. False. You can create connections to an action from any number of UI objects.
Activities
1. Complete the tutorials provided within this hour’s lesson, and then review the connections using the Connections Inspector. Try to remove a connection. What happens, if anything, to the underlying code? Next, try to delete the underlying code for an outlet. Does it also delete the UI connection?
2. Create a new project (OS X or iOS) and begin exploring the different UI objects that are available. Add each to a storyboard/XIB file, and then use the Connections Inspector to see what types of events (actions) they can receive or act on. Feel free to use the provided apps as a starting point for this exploration.