Hour 23. Distributing Your Applications
What You’ll Learn in This Hour:
• How to prepare your new application for distribution
• How to archive your newly built app
• How to distribute your app
• How to set up iTunes Connect to facilitate your app submission to the App Store
Well, you’ve done it: You have your application developed and debugged. You have created your developer ID (Xcode created it automatically for you when you created your first provisioning profile) for OS X applications and distribution provisioning profiles for your iOS applications. Now the App Store awaits.
In this hour, you learn about the final changes to your application code, project configuration, and build settings that enable you to distribute your iOS apps through the App Store and through Ad Hoc distribution. For your OS X applications, you learn about the process for distributing through the App Store and via direct distribution yourself. You also learn about signing applications with your developer ID so that they can be validated with Apple’s upcoming Gatekeeper software authentication system, and how to avoid signing if you prefer not to use Gatekeeper at this time.
Watch Out!: Just When You’re Getting the Hang of Things
As of this writing, Apple’s developer ID and Gatekeeper (the default mechanisms for application distribution) are still under development and so subject to change. Therefore, the exact steps you follow to use them might differ somewhat from what is shown in this book. But, from what you learn here, you’ll be able to improvise and achieve distribution. After all, Apple only makes the process easier with each change, right? You’ve made it this far in this book, so now you’ll be able to figure all this stuff out.
Your developer ID should have been created automatically when you first set up a provisioning profile, way back in Hour 1, “Xcode 4.” However, sometimes this slips through the cracks. To check whether the automatic process worked for you, open the Organizer, display the Devices tab, and then click your ID under the Teams group in the sidebar.
If you see a listing for you, with the name Developer ID Application, you’re good to go. If you do not see that item listed, you can try to convince Xcode to request a developer ID again by selecting Profiles under the Library group in the Organizer sidebar and then clicking the Refresh button in the lower right of the Organizer window. Xcode should automatically request missing IDs for you.
Finalizing Your Distribution Build
You need to make a few final tweaks to your app before it is ready for distribution. These involve adding features that are required by the App Store and configuring code signing for your apps and a few “common courtesy” fixes that you should do just to keep your users happy. The required modifications differ slightly for OS X and iOS applications.
OS X Applications
For an OS X application, you must decide whether to sign your application with your developer ID, add icons (as appropriate), and you must ensure the archive settings for your scheme are configured properly. You also want to remove any unnecessary NSLog() statements that you have left hanging around in your code.
To sign your app with your developer ID, follow these steps:
1. Open your project in Xcode, select the project in the Navigator area, and again select the project in the sidebar of the Editor area.
2. Click the Build Settings tab.
3. On the Build Settings tab, enter Code Signing in the Search field.
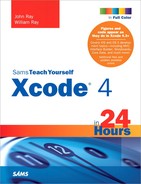
4. Find the Code Signing Identity line and click where it says Don’t Code Sign.
5. In the pop-up that appears, select your developer ID signing certificate. Several options appear in the dialog, as shown in Figure 23.1. Apple’s developer ID documentation indicates that the correct value is your Developer ID Application certificate. We expect that in the future the value that Xcode recommends will default to this certificate, but at the moment the recommended default does not appear to work.
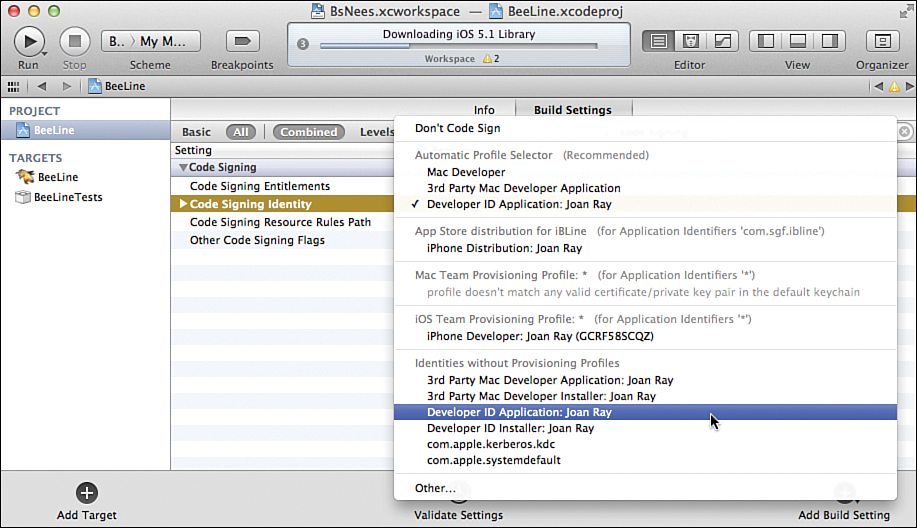
Figure 23.1. Selecting the Developer ID Application identity to sign the app.
If you do not want to sign your app with your developer ID, you can just leave the Code Signing setting alone.
Confirming Archive Settings in Your Scheme
Because you haven’t been archiving your apps for distribution so far (if you have been archiving them at all), you need to check the settings for the Archive build in your scheme. If you’re like me, you can and probably have gotten away with some settings for your own archive purposes that are not acceptable for distribution archives. To make sure that your scheme is configured properly, follow these steps:
1. Open your project in Xcode, select the project in the Navigator area, and again select the project in the sidebar of the Editor area.
2. Choose Edit Scheme from the Product menu.
3. Open the Build pseudo-action, and make sure that the target you’re planning to distribute is the only thing selected for the Archive action, as shown for the BeeLine app in Figure 23.2.
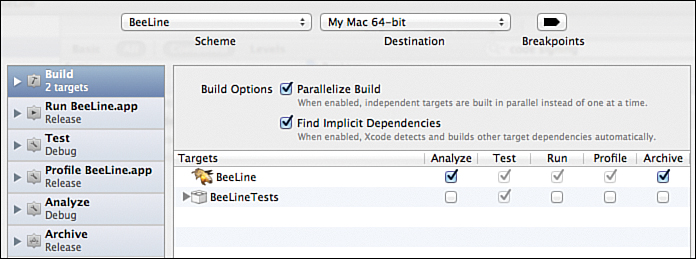
Figure 23.2. Making sure that the target we plan to distribute is the only item selected for the Archive action.
Open the Archive action and make sure that Build Configuration is set to Release and that an appropriate archive name is specified. Make sure that the Reveal Archive in Organizer check box is checked, and then click Done, as shown in Figure 23.3.
Figure 23.3. In the Archive action, we set Build Configuration to Release, make sure that the archive name is appropriate, and check the Reveal Archive in Organizer box.
Final Code Cleanup
It’s that time: Those last lingering NSLog() statements that are still hanging around like a security blanket have got to go. Your users do not want their system logs filled with notes about traversals of your data structures and congratulatory exclamations that your application successfully launched. Either delete them completely, comment them out, or wrap them in conditionals dependent on a variable that you can globally configure in your header to turn them all on or off simultaneously. You can use the Find, Find in Workspace item under the Edit menu to locate all the NSLog() instances across your entire project. If you want to comment them out, you can do that using a Find and Replace, replacing NSLog(with //NSLog(across the entire workspace.
Also, remember to go back and either connect or remove any interface components that do not currently have attached functionality (for example, menu items that were created in the default menu in the NIB that are not relevant to your application).
Attending to Additional Details
The last thing you need to do is add those little touches that make your application fit in with the flock of other OS X applications. These include adding application icons, screenshots, and any other metadata that is required for distribution and installation of your application. Mac users expect a certain look, feel, and style to your application icons and onscreen presentation; and although you can get away without providing these polishing touches for simple distribution to a local circle of friends, if you want your application to shine in the App Store, providing high-quality graphics is a near necessity. Providing minimally acceptable graphics is an absolute requirement; after all, Apple won’t accept an App Store submission without them.
Did You Know?
Despite Xcode apparently wanting, and accepting, a PNG file dropped into the App Icon space on the Summary tab for OS X application targets, what it really needs you to put there is a ICNS file built from your PNG files. To construct the ICNS file, launch the Icon Composer by picking Open Developer Tool, Icon Composer from the Xcode menu. Then, drag appropriately sized copies of your icon image into the provided slots in Icon Composer. Next, from the File menu, choose Save As and save the collection to an ICNS file. You can then drag this file into the App Icon space on the Summary tab for your application, to properly configure its App Icon resources.
You can find the full details about what Apple requires for submission in the iTunes Connect documentation available from https://itunesconnect.apple.com/docs/iTunesConnect_DeveloperGuide.pdf.
Building Your App Archive
After you have collected these final bits for your application, it is time to build an archive for your application so that you can submit it to the App Store (or distribute it outside of the App Store to your users). Building an archive is no different from invoking the build actions that you have done many times already while working through each hour’s projects in this book, with the sole difference being that the Archive build action does not appear as an option under the Run button on the Xcode toolbar. Instead of the Run button, to invoke an Archive build action, pick the appropriate scheme and architecture from the Xcode toolbar, and then choose the Archive item from the Product menu. Xcode builds an archive, and if you elected to code-sign your application, prompts you for access to a keychain key with which to sign the archive. Allow it access to the keychain key, and you should (after Xcode finishes building, linking, and archiving) be greeted with a new archive for your application in the Organizer.
If You Don’t Get a Clean Archive Build
Your OS X application might not build cleanly when you try to archive it. For some reason, despite using the Release build configuration for archiving and a having a Release build configuration that’s perfectly functional when you Build for Running, the Build for Archiving action sometimes gets confused and loses track of the autodiscovered framework dependencies.
By far the easiest way to solve this problem is as follows:
1. Select the scheme for your embedded framework on the toolbar, and make sure that it is set to use the Release configuration for building.
2. From the Product menu, choose Build For, Running.
3. Select the scheme for your application on the Toolbar, and again choose Build For, Running from the Product menu.
4. From the Product menu, choose Archive.
The archive should build cleanly now.
This issue seems to have something to do with the same framework location issue mentioned in Hour 20, “Keeping Things Organized: Shared Workspaces,” where the location of the BetterList.framework in the Linked Frameworks and Libraries group of the Summary Tab for the BeeLine target changed depending on how the framework was added to the list. You might want to experiment with removing your framework from the list and adding it back using different methods, such as directly from the + button in the Linked Frameworks and Libraries group, or dragging it, or in the Link Binary with Libraries group in the Build phases. If you experiment with this, remember that you must add the new framework back to the Copy Files build phase so that it will be embedded in the final application.
At this point, from the Archives tab of the Organizer you are ready to select the application archive and distribute it, depending on your preference, via the App Store, as a code-signed (or unsigned) directly distributable application, or as an Xcode archive for other people to use in Xcode.
iOS Applications
As with OS X applications, you must change a few of your iOS application’s build settings and configuration details to ready it for distribution. For instance, remove any unnecessary NSLog() invocations and confirm that your the Archive build action in your scheme is configured properly. Unlike with OS X applications, you have no choice about code signing. You also need to attend to a couple of details that are not necessary for OS X distribution archives.
To configure code signing for your iOS application, follow these steps:
1. Open your project in Xcode, select the iOS project in the Navigator area, and again select the project in the sidebar of the Editor area.
2. Click Build Settings for the iOS project. Enter Code Signing into the Search field for the build settings.
3. Locate the Code Signing Identity group and expand it.
4. For the Release identity, click the value setting to the right and configure it for the recommended Automatic Profile Selector iPhone Distribution, as shown in Figure 23.4.
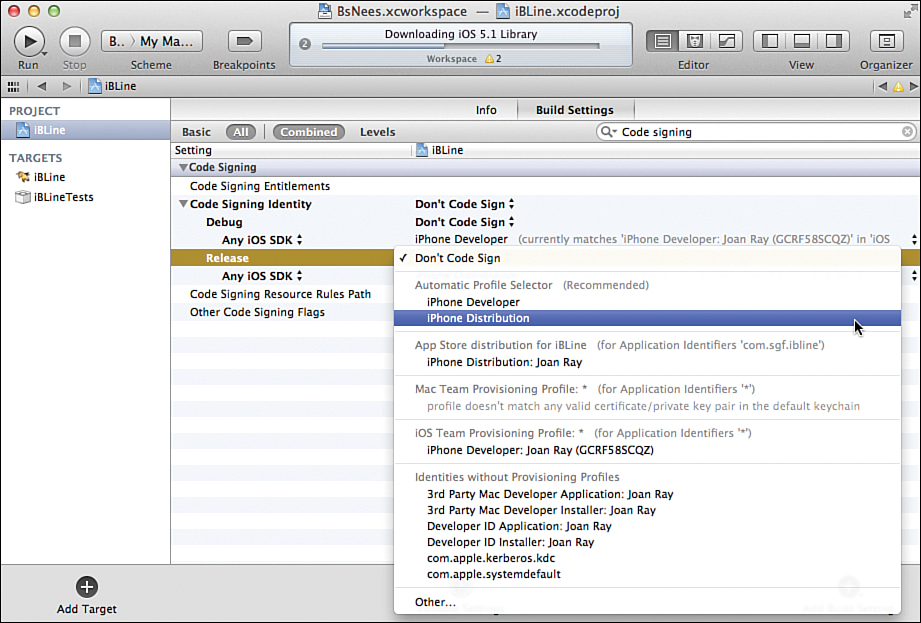
Figure 23.4. Selecting iPhone Distribution for the Release identity.
5. For the Any iOS SDK code-signing identity, click the Value setting and configure it for the same iPhone Distribution certificate.
To configure your scheme settings for proper archiving, follow these steps:
1. From the Product menu, choose Edit Scheme.
2. From the Scheme selector at the top of the Scheme Editor dialog that appears, select the scheme for your iOS target.
3. Select iOS Device for the destination at the top of the Scheme Editor dialog.
By the Way
If you see your iPhone or other hardware iOS device listed in the pop-up list of destinations, rather than the generic destination iOS Device, unplug your iOS device. For some reason, the generic iOS Device destination sometimes disappears when a hardware iOS device is available.
4. Select the Build pseudo-action and verify that your iOS app target is the only target selected for the Archive action.
5. Select the Run build action and configure it to use the Debug build configuration.
6. Select the Archive build action and configure it to use the Release build configuration, make sure that it has an acceptable archive name specified, and then select the option to Reveal Archive in Organizer. Click Done to close the Scheme Editor dialog.
If for some reason you really need your Run build action to use the Release configuration, and you want it to use your development provisioning profile instead of your distribution provisioning profile, you can configure the Run build action as you want and create another build configuration with which to apply the distribution provisioning profile. To do this, create a new build configuration (on the Info tab for the project, under Configurations) for your iOS application and set up code signing with your distribution provisioning profile with it. Then add a new scheme dedicated to archiving that uses your new build configuration in its Archive build action.
You can also use this trick to set up an iOS target so that it can be built for either Ad Hoc distribution or App Store distribution simply by changing schemes. In this case, you add two new build configurations for the project (on the Info tab for the project, under Configurations), one for Ad Hoc distribution and one for App store distribution, and then assign the appropriate distribution provisioning profiles to each configuration (on the Build Settings tab for the target, under Code Signing). Then, two new schemes are required, with each selecting the appropriate build configuration for its Archive build action.
Final Code Cleanup
If you did not get rid of any remaining NSLog() invocations in your iOS app when you globally cleaned your OS X application, do so now.
Also, remember to check your interface layout on all the devices that your app supports, and for all the device rotations that are enabled.
Attending to Additional Details
As with your OS X application, your iOS application needs icons and screenshots. It also needs one or more launch images. Unlike OS X applications, instead of specifying these images by providing a collected group of them in an ICNS file, for iOS applications Xcode requires you to add the plethora of images required directly to the target’s Summary tab into many scattered image-drop spaces. Hover over each of the image-drop spaces to bring up its tooltip hint, to find out what the resolution requirements are for each image.
You can find the full details about what Apple requires to submit iOS apps in the iTunes Connect documentation available at https://itunesconnect.apple.com/docs/iTunesConnect_DeveloperGuide.pdf.
Also unlike OS X apps, which really can contain just about anything in their internal directory structure, iOS apps for distribution are more rigorously constrained in what they can contain. Therefore, it is possible to have an iOS app that builds and runs fine, both in the simulator and on development hardware, but that cannot build an archive that is acceptable for either Ad Hoc or App Store distribution.
Building Your App Archive
After you have collected the final bits for your application, it is time to build an archive so that you can submit it to the App Store (or outside of the App Store via Ad Hoc distribution). The process is identical to building an archive for an OS X application:
1. Set the scheme as appropriate for your iOS application and set the architecture to iOS Device on the Xcode toolbar.
2. From the Product menu, choose Archive.
If your changes to the code or other configuration details require that the app be rebuilt, Xcode builds it, and then it constructs the archive and puts it in the Organizer. If Xcode asks for permission to access a key from your keychain during the build, click Allow so that it can properly sign the app archive. After Xcode is finished building, signing, and archiving your app, the Organizer opens, and you should be greeted with a new archive of your iOS app.
Derived Data Interference
If, when you try to build your app for archiving, you get a silly error about not being able to find files in directories that look suspiciously like the name of an iPhone, or you get complaints that build directories that should be standard (such as build/Release-iphoneos/) are missing, it is because you have, or recently had, an iOS device plugged in.
For reasons known only to Apple, some parts of the automagically constructed derived data path take cues from the name of the device that’s plugged in, while other parts of the automatic dependency discovery and linking mechanism ignore the device information. As a result, certain orderings of build steps and device connections and disconnections can leave Xcode with a completely confused notion of the derived data directory structure.
If this happens to you, plug in your device, select the appropriate scheme, and from the Product menu choose Clean. Unplug your device and repeat the cleaning step. Then, make sure the architecture is listed as just a generic iOS device on the Xcode toolbar and retry the Archive build action. If you have multiple iOS hardware devices, you might need to repeat the connect-and-clean step for each device.
If the archive of your iOS app looks like a spiral-bound notebook in the Organizer’s list of archives, as shown for iBLine in Figure 23.5, rather than like a typical rounded-square iOS app icon, the format of the archive is not correct. To diagnose the problem, follow these steps:
1. Click the Distribute button on the Organizer.
2. Use the Save Built Products option to save the archive to your desktop.
3. Open the archive and find out what it contains other than your intended iOS app. From this information, you should be able to figure out what portion of the build process is including the unneeded information.
If you try this with the iBLine iOS app from the BsNees workspace from Hour 20, you’ll find that what gets saved to your desktop contains a directory hierarchy and a copy of the BetterList.h header. Embedded headers are meaningless to iOS applications, and it turns out that there is an erroneous Copy Headers build phase set up for the BetterListLib target in the BetterList project in BsNees. Removing the Copy Headers phase for that target and rebuilding the archive will fix the archive structure and cause iBLine to appear properly in the Organizer.
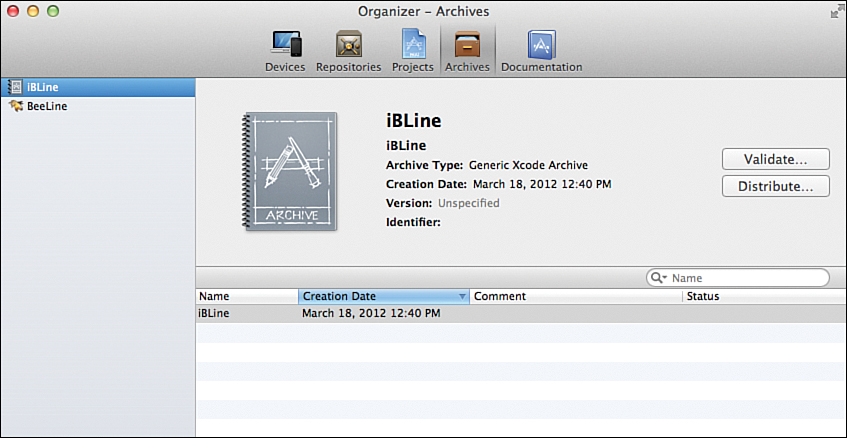
Figure 23.5. A successful archive of an iOS app that can’t be successfully distributed, looks like a spiral-bound notebook.
Configuring an iTunes Connect Application Record
You need to set up iTunes Connect records only if you plan to distribute your OS X or iOS applications via the App Store. iTunes Connect is a moving target, and full documentation fills several volumes of Apple’s Developer Documentation, making it impossible to do more than touch on the highlights here. Apple’s current introduction to the documentation is stored in a PDF file that you can download from http://itunesconnect.apple.com/docs/iTunesConnect_DeveloperGuide.pdf.
To get started with iTunes Connect and create your first application record, follow these steps:
1. Open https://itunesconnect.apple.com in your web browser. Enter your Apple developer user ID and password. Click Sign In.
2. If you need to set up a contract so that you can receive payments for your app through the App Store, click the Contracts, Tax, and Banking link in the main body of the page.
At the top of the page that opens, you can request new contracts for regional or worldwide distribution. The iTunes Connect Developer Guide contains information on how to properly configure requests for contracts.
If you plan to distribute your app for free, you can use the free distribution contract that was autocreated for you when you joined the Developer Program, so you do not need to request a new contract.
3. Click the Manage Your Applications link in the main body of the iTunes Connect page. A new page opens listing your current apps and most recent activity with your submitted applications.
4. Click the Add New App button in the upper left of the Manage Your Apps page. If you have not previously added an app to iTunes Connect, a page opens requesting that you specify a company name.
Did You Know?
Think carefully about what you enter for the company name. Like App IDs, company names are forever. The one you configure this first time will apply to all applications that you submit to the App Store in the future.
They’re also much more public. The company name you enter is exactly the company name that will be shown for your app in the App Store. This is also the value that the App Store uses to collect all the apps that you submit so that users can find other software that you have written, so it is both an important field for organizing your submissions and highly visible public information.
5. After you have configured your company name (or immediately after clicking the Add New App button, if you configured your company name previously), you are launched into the App Information Entry process.
This process is documented in detail in the iTunes Connect Developer Guide. As part of this process, you specify many details about your application, such as the range of devices on which it can be installed, the pricing information, variable rights for different territories, educational discounts, version information, screenshots to be included in the App Store listings for the app, and numerous other pieces of information.
As the App Store evolves and new iOS devices with new capabilities and new OS X technologies become available, the information that Apple requires changes. Download and read the iTunes Connect Developer Guide sections that apply to your application carefully. You should download and peruse this document before each app submission, just to be sure that you are working with the most current version of the document and understand Apple’s requirements at the time of submission.
While you’re configuring your app record in iTunes Connect, you need to provide your app name. Things will go more smoothly if you can use the app name exactly as you have named the target in Xcode. If that app name is already taken, you should probably edit your Xcode project to use a different name, instead of playing games with renaming the application binary after Xcode builds the archive. You also need to configure your bundle identifier exactly as it is set for your app in Xcode and upload all your image assets for the app when requested.
After all your app details are filled in, you reach a page that shows an overview of your app information and which shows a status of Waiting for Upload. When you get here, you’re ready to distribute your archived application via the App Store distribution method.
Watch Out!: It’s All in the Details
Make sure that you are very familiar with the current requirements when you’re submitting your apps. Many seemingly minor details in the submission configuration and requirements can come back to haunt you if you aren’t thoroughly familiar with them. For example, the Developer Guide contains a note pointing out that after you have created a new app submission record, future versions can expand the list of supported devices but can never revoke existing device support. As a result, if you accidentally create an app record that specifies that it supports a device that you do not actually intend to support, you will end up being forced to add support for that device to your program. Apple won’t add apps to the App Store that do not support all the devices that their submission record lists, and there is no way to get rid of the erroneous specification (both now and forever in the future).
Distributing Your Archived Application
Now that you have your OS X or iOS application archived, it is time to take that last big step and distribute it. For direct distribution with OS X applications, this is really no step at all; you just need to give your application to someone, and you have just distributed it. For Ad Hoc distribution of iOS applications, you give out copies of an application.ipa file, and your users install it through iTunes, which is hardly any more difficult. For Enterprise distribution of iOS applications, you need to add a few steps to the Ad Hoc distribution, but if you can edit a web page, enterprise distribution is easy enough. Finally, for App Store distribution, the steps get quite lengthy, for both OS X and iOS applications. Regardless of which type of application or what distribution process you choose, distribution starts in the Organizer. To distribute your apps, follow these steps:
1. Open the Organizer and go to the Archives tab.
2. Select the app that you want to distribute from the sidebar on the left, and select the appropriate build of the app from the list that loads in the Organizer window.
3. Click the Distribute button beside the description of the app and build you just selected.
4. In the dialog that appears, choose the type of distribution that you want for your app. As outlined in the following subsections, several different distribution types are available, depending on the type of app you have selected for distribution.
Distributing Unsigned OS X Applications
To directly distribute unsigned OS X applications, follow these steps:
1. Choose the Export As, Xcode Archive option and click Next.
2. Save the archive to your desktop, and then locate it on the desktop in the Finder and right-click it to Show Package Contents.
3. Open the Products directory, and then open the Applications directory.
4. Drag your application from there out to your desktop.
Now you have a file you can distribute any way that you see fit. You can zip it up and put it on a web page, create an installer package, or put it on a CD or thumb drive and physically hand it to your users.
Watch Out!: Exports Damaged in Transit
Yes, you should be able to simply export an unsigned application using the Export As option for either the Application type or the Installer Package type, resulting in an easier process for getting to your app for distribution. Unfortunately, this currently does not work. Apple’s evolving developer ID system seems to have gotten its fingers in here where they don’t really belong, and the Organizer attempts to validate the code signature on unsigned archives and, of course, fails to do so, making these options currently useless.
Distributing Signed OS X Applications
To distribute signed OS X applications, follow these steps:
1. Choose the Export Developer ID-Signed Application option and click Next.
2. In the next dialog, confirm that the same developer ID is configured in this dialog as was configured to code-sign the application in the build settings, and then click Next.
3. Xcode asks you for permission to access your keychain (perhaps once, perhaps a dozen times). Click the Allow button, and keep clicking it until Xcode stops presenting that dialog and brings up a Save As dialog instead.
4. Give your application a name and save it where you can find it.
Did You Know?
Yes, for some reason even though you have code signing turned on in the project, you have to do it here again. If you did not code-sign during the build, it is not clear what will happen if try to code sign now (and it is even less clear that what does happen is the intended behavior). If you code-sign with a different developer ID here than you did within the project itself, we have no idea what Gatekeeper is going to think.
Using Ad Hoc Distribution for iOS Applications
To distribute your iOS applications via Ad Hoc distribution, follow these steps:
1. Choose Save for Enterprise or Ad-Hoc Deployment, and then click Next.
2. In the dialog that follows, select the appropriate code-signing identity. This should match the code-signing identity that was used when creating your Ad Hoc distribution provisioning profile (and should match the owner of your distribution certificate).
3. Click Next, provide a filename, and then click Save.
A file with the extension .ipa is created. You can distribute this file however you want to distribute it, via the web, CDs, or even email. When your users click it, your iOS app loads into their iTunes library for installation on their device.
Did You Know?
An Ad Hoc distribution can be installed only on the iOS devices that were selected for it when the Ad Hoc distribution provisioning profile was created. Users with other devices can install it in the iTunes library, but they cannot install it on their devices.
Using Enterprise Distribution for iOS Applications
Enterprise distributions are loaded directly to iOS devices through links on web pages. So to use this option, you must first save your iOS app archive, and then upload it and some associated resources to a web server. Then, you must construct a web page with a link that your users can click to download your app.
To save the app for Enterprise distribution and upload it and some associated resources to a web server, follow these steps:
1. Choose Save for Enterprise or Ad-Hoc Deployment, and then click Next.
2. In the dialog that follows, select the appropriate code-signing identity. This should match the code-signing identity that was used when you created your Ad Hoc distribution provisioning profile.
3. Click Next, provide a filename, and then click Save.
4. At the bottom of the dialog, check the Save for Enterprise Distribution check box, and fill in the various fields that appear. Provide the URL where you are going to store your iOS app for your users to download. You also need to make a large and small application image available on a web server and provide URLs for those in this dialog, too. Then, add a title and a subtitle if appropriate, and if you want Xcode to automatically add the canonical iOS icon “shine” to your images, check the box for that option. Then click Save.
Two files are created: one named appname.ipa, the other named appname.plist.
Figure 23.6 shows the Save for Enterprise Distribution dialog filled out for iBLine, to be distributed from the iOSapps directory on my server at someguysfarm.com.
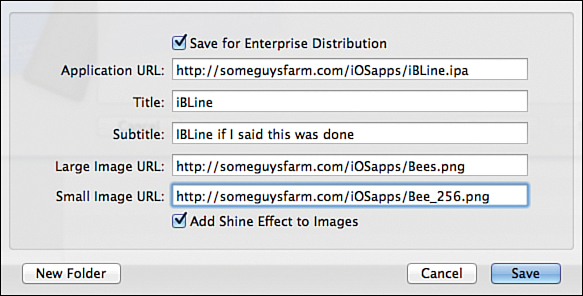
Figure 23.6. Filling out the details in the Save for Enterprise Distribution dialog.
By the Way
If at some point later time you need to change the URLs that you used here, you can edit the plist file and change them there, instead of re-exporting the archive from the Organizer.
5. Upload both the application (.ipa) file and the plist file so that they are available at the URL you specified in the Save for Enterprise Distribution dialog.
If you specified that your application URL was http://mycompany.com/dir1/myApp.ipa, you need to download the file from that URL, and you need to download the associated plist file from http://mycompany.com/dir1/myApp.plist.
You also need to upload a 512 x 512 PNG app image URL to be available from the URL specified for the Large Image URL, and a 72x72 PNG app image to be available from the URL specified for the Small Image URL.
Now you must construct a web page with a link that your users can click to download your app, as follows:
1. Construct a link with the following syntax:
<a class="nounder" href="itms-services://?action=download-manifest&url=itms-services:
//?action=download-manifest&url=<URL for your plist>" id="text">Download My App</a>
2. Embed it in a simple HTML page, such as the following:
<HTML>
<H1>BZZZZZZ! Get your Bs in Line!</H1>
<a class="nounder" href="itms-services://?action=download-manifest&url=itms-services://
?action=download-manifest&url=http://someguysfarm.com/iOSapps/iBLine.plist" id="text">Tap
Here to install iBLine</a>
<hr>
Now Buzz on!
</HTML>
3. Upload the HTML page to your web server and share the URL for that page with your users so that they can install your iOS app.
When users visit that page on their iOS device, they can click the link to download and install the application on their device.
Did You Know?
Remember that unless you have an Enterprise Developer account, users can install your Enterprise distribution app only on devices that were specifically included in the Ad Hoc distribution provisioning profile when you configured it in the Provisioning Portal.
Distributing Applications via the App Store (OS X or iOS)
You cannot proceed with the App Store submission process unless you have already configured an application record in the iTunes Connect system. If you have an application record configured in iTunes Connect, follow these simple steps:
1. Select Submit to the (Mac or iOS) App Store and click Next.
2. On the next dialog that opens, provide your iOS developer username and password.
Your app then begins its journey into the App Store validation process, and you interact with iTunes Connect from here on out, to configure additional information about your app, such as the purchasing options and so on.
Summary
Congratulations. You have finished your journey through Xcode’s twists and turns, and have developed both an OS X application and an iOS app from start to finish in Xcode. You now have a lot of details to remember, and several of Apple’s developer guides will be your constant companions in the future. But, you’re ready to submit your apps to the App Store, or distribute them through other means, and enter the wide world of professional developers building high-quality applications for Macs, iPhones, and iPads. There’s a world of opportunity out there. Make a BeeLine for it!
Q&A
Q. What’s this gatekeeper thing mentioned in conjunction with the developer ID?
A. Gatekeeper is a new technology that Apple is currently testing that provides users a way to validate the origin of OS X applications that they receive. As currently envisioned, when enabled for a user account, the user of that account will only be able to install apps that are signed with a valid developer ID. The exact details of Gatekeeper seem likely to change as it nears final release, but the mechanism of developer IDs to use with Gatekeeper appears to be relatively stable, even if it is hit or miss that Xcode creates your developer ID automatically when it should.
Q. Is there any way to add more iOS devices where an already provisioned Ad Hoc distribution can be installed?
A. Not without resorting to some undocumented tricks that may not work in the future. The approved route is to create a new Ad Hoc distribution provisioning profile in the Provisioning Portal and create a new, signed build of your app.
Workshop
Quiz
1. How can you obtain a runnable, distributable copy of your unsigned OS X application?
2. Why doesn’t the PNG app icon that you added to your OS X app show up when you look at the app in the Finder?
3. Why do some devices refuse to install the Enterprise distribution (download) of your iOS app?
Answers
1. Unfortunately, the obvious answers like exporting an unsigned application or installer are broken at the moment because Xcode tries to sign them even if you ask it not to. As of Xcode 4.3.1, you need to save an Xcode archive of your unsigned app and dig the actual application out of the archive bundle that Xcode creates. Hopefully, the unsigned-export options will begin working again in the future.
2. The PNG app icon that you added to your OS X app does not show up when you look at the app in the Finder because Xcode accepts a PNG for the app icon in the interface but cannot actually use one to build an icon for the application. You need to use Icon Composer to build an ICNS format collection of PNG files and add them to the app icon slot instead.
3. This can be for a number of reasons. The most likely is that those devices were not included in the Ad Hoc distribution provisioning profile. However, they also might not be compatible with, or have installed, the versions of iOS that you have required for your app, or perhaps they are not listed in your app’s list of compatible devices.
Activities
1. Set up schemes to create both App Store and Ad Hoc distributions for your iOS app.
2. Create an Ad Hoc distribution archive, and then set it up for distribution via the Enterprise distribution (download) from a web server. Install it on your team’s iOS devices wirelessly.
3. Create your company ID and an app record in iTunes Connect, and then submit your built application archive to the App Store for validation and distribution.