
Hour 20. Keeping Things Organized: Shared Workspaces
What You’ll Learn in This Hour:
• How to use workspaces to manage projects with shared components
• How to create workspaces
• How to add projects to workspaces
• How to adapt projects built outside workspaces into workspace members
Workspaces are Apple’s new way of trying to reduce the clutter and difficult-to-maintain, manually specified path information that inevitably gets hard-coded into large projects composed of many independent parts. An Xcode workspace is a collection of projects and other documents that are developed together.
In several previous hours, you set up projects where a primary application project contained a subproject for a library or framework. If you’re like most programmers, you quickly recognized that the machinations that were necessary to configure header search paths or locations for loading libraries were a recipe for disaster if files or projects were moved. The Xcode 4 workspace concept simplifies such co-development designs by recognizing implicit dependencies between the projects and doing much of the work of configuring the build process so that the compiler can find the necessary files without having to build explicit paths into the projects.
This makes the build process much more resilient to rearrangement of code content and files, while simultaneously reducing the amount of configuration work you need to do. It’s a clear win, all around, or at least it would be if it actually worked properly. Unfortunately, Apple still has some work to do in this area, and the process is not as smooth as it should be. Still, it is a good-sized step in the right direction, and it seems reasonable to assume that Apple will polish up the rough edges as time goes by. In the meantime, it is still worth enjoying the benefits of the parts that do work.
Don’t confuse Xcode 4 workspaces with the identically named workspaces concept from earlier versions of Xcode. Before Xcode 4 and its single-window design, Apple used the term workspace to mean the collection of windows and tools that were used together in developing a project under Xcode. There’s even an official Apple Xcode Workspace Guide that you’ll encounter in many places around the Web. Don’t read it; it is no longer relevant to Xcode 4.
Watch Out!: Slow Down, Construction Ahead
Xcode’s workspace functionality is still a work in progress, and many minor details are all in flux (such as the exact naming of choices in dialogs, the existence of some dialog confirmation buttons, and the placement of some details). If you encounter a step where what you’re looking at on your screen does not match what is written here, it is almost certainly because Apple changed something to make your life easier. The functionality is still there, and if you look in the most natural place for it, you should find it easily.
Using Workspaces
Taking advantage of the workspace concept in Xcode is simple. You just create a new workspace, add projects to it, and build them. This is quite similar to what you’ve already done several times before. Where things differ is in the amount of information that you have to give Xcode about where you have put things. Specifically, for workspaces, you mostly have to explicitly not tell Xcode where you put things, so that it can find them itself. With workspaces, the more information you give Xcode, the more narrow its search strategy for finding interdependent parts. Therefore, in general, the less specifics you provide, the better the automatic dependency finding performs.
To see how this works in real life, let’s deconstruct our BeeLine OS X and iBLine iOS projects, which previously both contained references to the BetterList framework and static library. Let’s build a workspace that contains the BetterList project, the BeeLine project, and the iBLine project, all as peer projects within the workspace.
To get started, copy the BetterList2, BeeLine2, and iBLine2 project folders from the Hour 20 folder in the code archive from http://teachyourselfxcode.com, and then follow these steps:
1. First, remove the implicit BetterList subprojects from BeeLine and iBLine. Launch Xcode and open the BeeLine.xcodeproj file in the BeeLine2 directory.
2. Open the Project Navigator and select the BetterList project in it.
3. Right-click the BetterList project in the Project Navigator, and from the pop-up menu that appears, choose Delete, as shown in Figure 20.1.
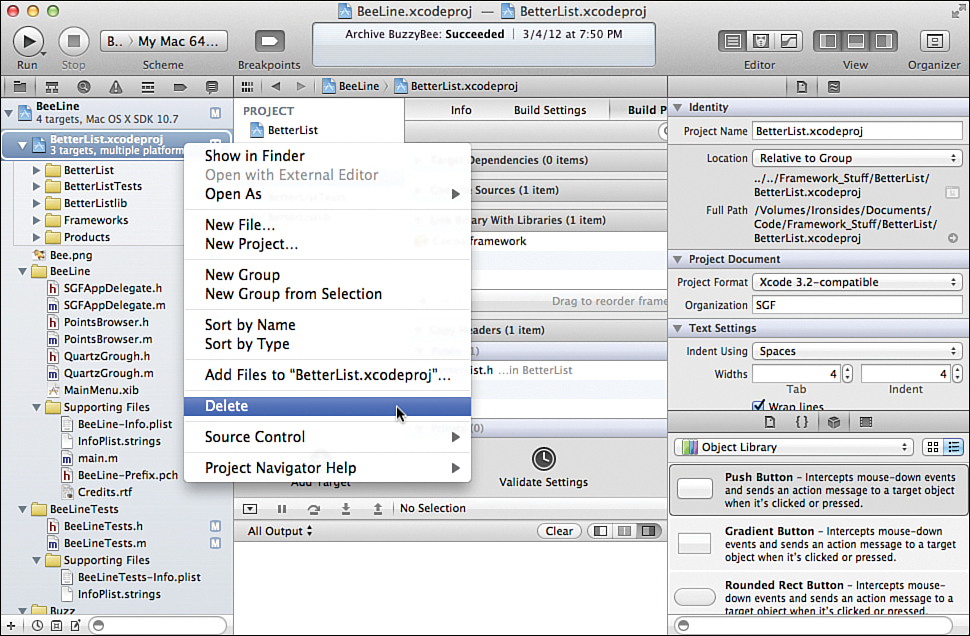
Figure 20.1. Deleting the BetterList project.
4. If Xcode can find both the BeeLine project and the BetterList project, a dialog appears asking if you want to actually delete the file or just the reference. If this dialog appears, click the Remove Reference Only button, as shown in Figure 20.2. Otherwise, if Xcode cannot find both projects simultaneously, it just asks if you want to delete BetterList, without giving you the option of deleting the reference. In this case, it is safe to tell it to go ahead with the delete.
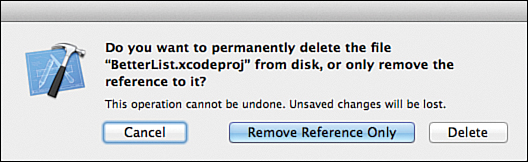
Figure 20.2. Clicking the Remove Reference Only button.
By the Way
It is almost always safer to delete the reference in Xcode, even if you really want to also remove the files from disk. This way you can go to the directory in the Finder and delete the files that you want to delete and be sure that you’re removing the ones that you intend. If you ask Xcode to delete the files for you, it might delete something that you had not intended (which occurs about half the time, in my experience).
5. Select the BeeLine project in the Navigator, and the BeeLine target in the sidebar of the Editor area.
6. Open the Build Settings tab.
7. Enter BetterList in to the Search box, to find places where we have previously hard-coded paths to the framework.
8. The list of options should reduce down to a single line showing Framework Search Paths. Double-click the path that is displayed.
9. In the dialog that appears, select the path line that starts with $(SRCROOT), and click the – button at the bottom of the dialog to remove that path, as shown in Figure 20.3, and then click Done or close the window using the standard title bar controls.
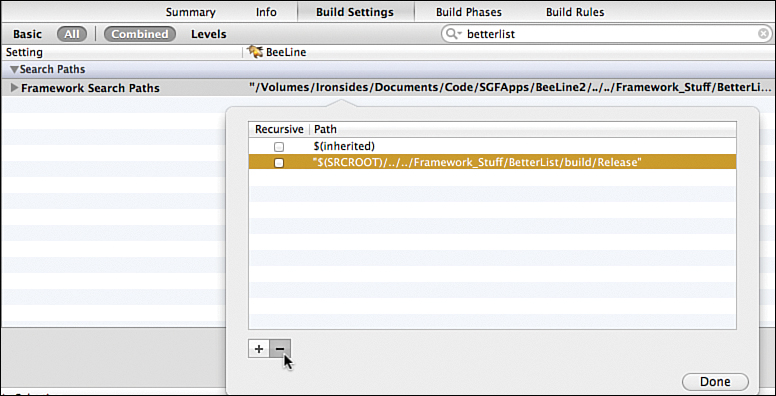
Figure 20.3. Removing the path that starts with $(SRCROOT).
10. Display the Build Phases tab and open the Target Dependencies, Compile Sources, and Link Binary with Libraries groups. Verify that BetterList does not appear in any of them, as shown in Figure 20.4.
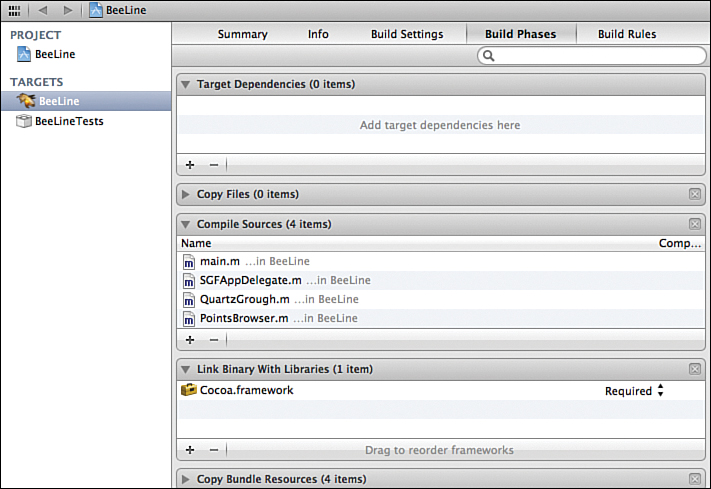
Figure 20.4. Verifying that BetterList does not appear in Target Dependencies, Compile Sources, and Link Binary with Libraries groups of the build phases.
11. Choose File, Project Settings from the menu. The dialog for configuring the Derived Data Location will appear, as shown in Figure 20.5. In all likelihood, it will show a path that is not actually the correct derived data location. Click the Advanced button.
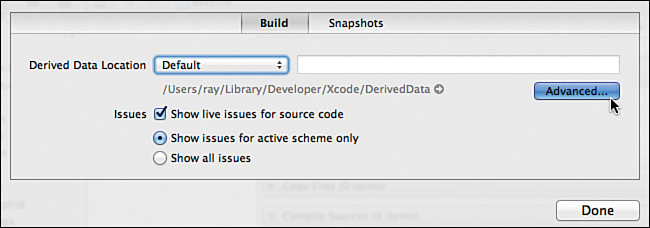
Figure 20.5. Clicking the Advanced button to configure the derived data location.
12. In the Advanced Build Locations dialog that appears, you need to configure the build location to work with the derived data location. Depending on the version of Xcode that you have, you might see a dialog like that shown in Figure 20.6, or like that shown in Figure 20.12. If you have the Figure 20.6 version, select the option for a shared folder of Xcode’s derived data location, and leave the optional field value at its default. If you have the Figure 20.12 version, select the Derived Data Location option.
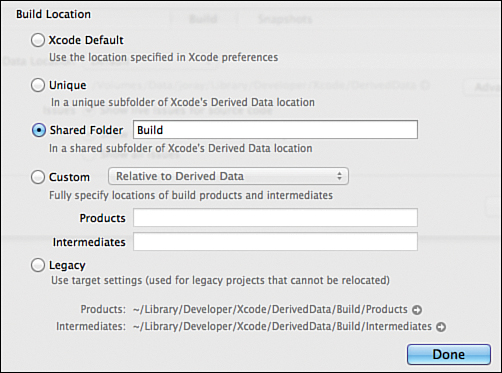
Figure 20.6. Selecting Derived Data Location as the build location.
Yes, when working on libraries and frameworks and building your first OS X and iOS applications in Hours 14 through 16, you learned that using the Locations Specified by Targets option is the way to keep a sane build hierarchy. This is true if you’re going to manage the build hierarchy yourself. However, Xcode workspaces perform this task for you automagically. For the magic to work, though, you have to give up control of the build hierarchy.
13. Click Done, and then click Done again to finish removing all traces of BetterList from the BeeLine project.
14. Just to confirm that BetterList is really gone, and that BeeLine no longer builds, try building the project from the Product menu or by clicking the Run button on the Xcode toolbar. You should be greeted with a collection of errors similar to that shown in Figure 20.7. Clearly, BeeLine is no longer a complete and functional project.
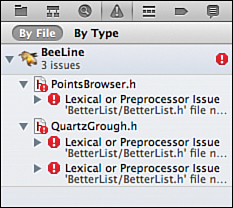
Figure 20.7. BeeLine has errors now.
Now it is time to perform the same cleanup on iBLine. To do this you need to open the iBLine.xcodeproj file in the iBline2 directory and retrace the same steps that you took for BeeLine. After you delete (remember to just remove the reference) the BetterList subproject, the iBLine build phases should appear as shown in Figure 20.8.
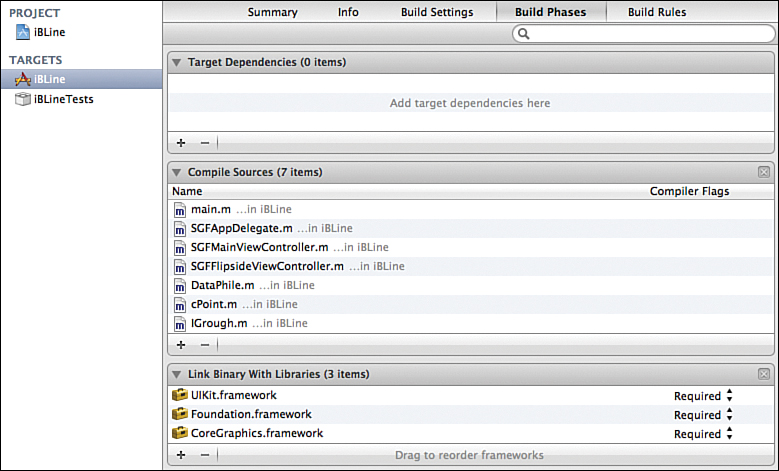
Figure 20.8. Showing how the iBLine build phases look after removing the reference to the BetterList subproject.
Remember to delete the header search path for BetterList, as shown in Figure 20.9. If you had to add an explicit library search path for your static library subproject (we did not for libBetterList in the example, but depending on several factors, you might in your code), remember to search for it and delete it, too. If you use a search that will catch both the header and the library in the Build Settings Search box, you can see from the search results whether you have any other build settings to edit.
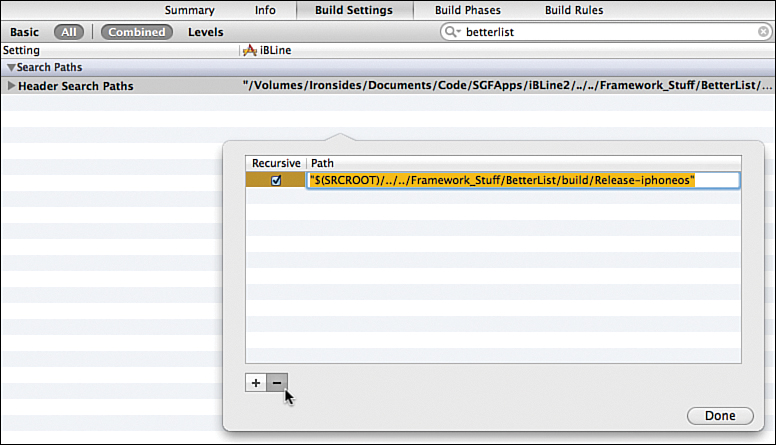
Figure 20.9. Deleting the header file search path for BetterList.
Creating a Workspace
After you have finished cleaning iBLine, it is time to build and populate a workspace. To do so, follow these steps:
1. Close any open Xcode projects.
2. Choose File, New, Workspace from the Xcode menu bar.
3. In the dialog that appears, pick a name for your new workspace and a place to store it. As shown in Figure 20.10, we use BsNees in this example. I recommend keeping your workspaces all collected in one directory for neatness. Click Save when you’re satisfied with the name and location.
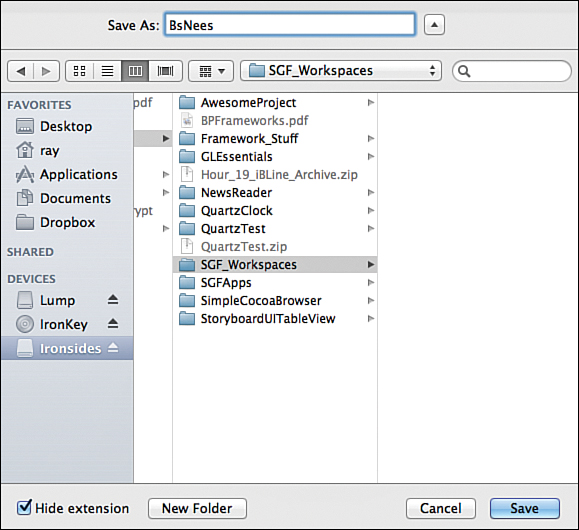
Figure 20.10. Giving the new workspace a name.
The main Xcode window opens. All three of the main Xcode content areas are empty, as shown in Figure 20.11, because the workspace is just a container and you haven’t added any content yet.

Figure 20.11. Now we have a completely empty workspace.
4. Just to make sure that the workspace will operate consistently, choose File, Workspace Settings from the Xcode menu to bring up the dialog for the derived data location for the workspace. Click the Advanced button, and make sure that the build location is set to the derived data location and that the default subfolder is selected, as shown in Figure 20.12. Alternatively, your version of Xcode might show a dialog like that shown in Figure 20.6. In this case, the correct option is again the Shared Folder of the derived data location.
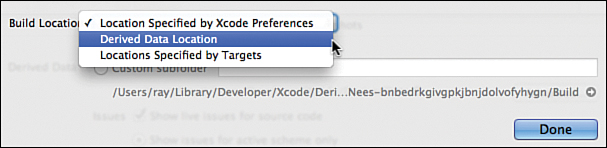
Figure 20.12. Verifying that the build location is set to the Derived Data Location.
5. Click Done, and then click Done again to finish setting up the workspace.
At this point, you have a workspace built and appropriate defaults configured so that you can start adding projects and have them behave properly in cooperation with each other. In the next section, you fill that workspace with some active projects and configure them to use the workspace features.
Adding Projects to the Workspace
Having created a workspace, you can now add files. If you have new project content, you can do that by choosing File, New, Project from the Xcode menu and developing your new project just as you have in previous hours. If you’re moving old projects into a coordinated workspace, however, you need to complete a few more-involved steps.
We walk through those for the BetterList, BeeLine, and iBLine projects now. First, we add the BetterList project in steps 1–3, which builds both a framework and a static Cocoa Touch library. We repeat these three steps for BeeLine and IBLine before moving on to step 4:
1. Choose File, Add Files to BsNees from the Xcode menu bar, as shown in Figure 20.13.
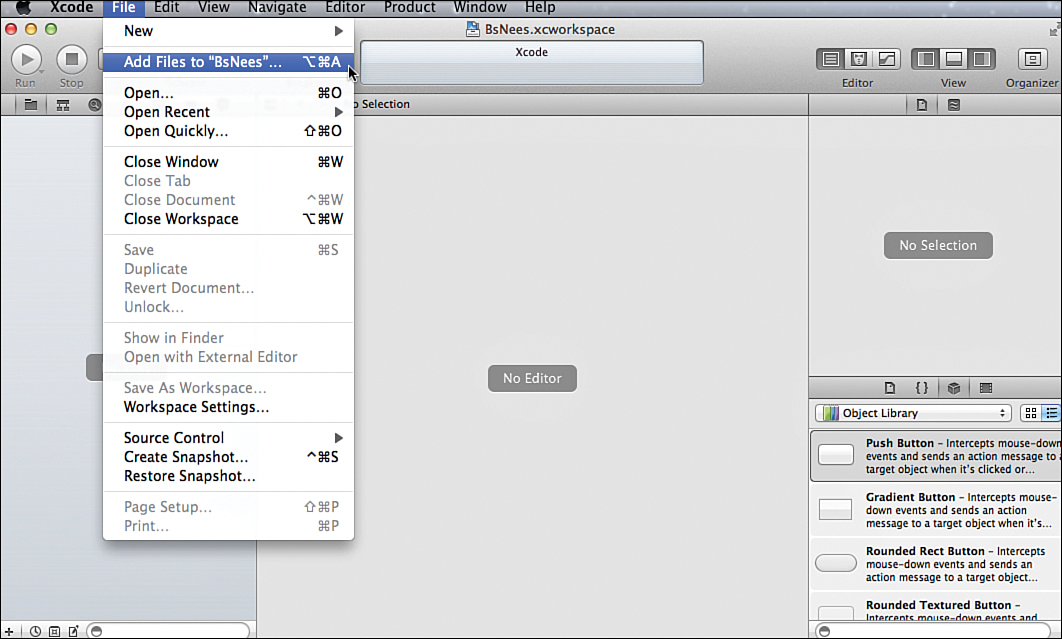
Figure 20.13. Starting to add files to the new workspace.
2. Navigate to the BetterList2 directory, open it, and select the BetterList.xcodeproj file in it.
3. Check the Copy Items into Destination check box, and then click Add, as shown in Figure 20.14.
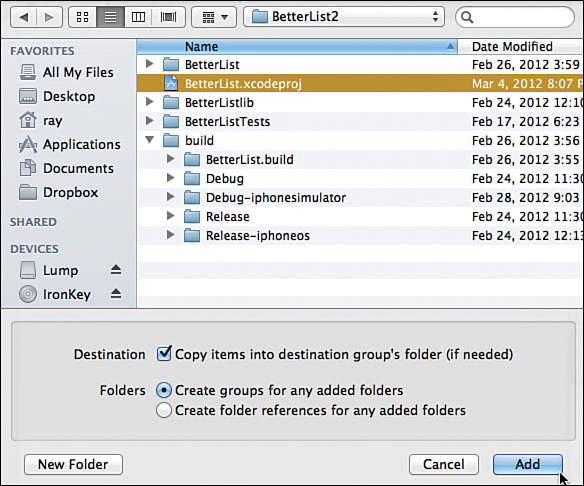
Figure 20.14. Adding the BetterList.xcode proj to the workspace, with the Copy Items into Destination check box checked.
Repeat steps 1–3 for the BeeLine.xcodeproj file in the BeeLine2 directory and for the iBLine.xcodeproj in the iBLine2 directory. After doing so, if you reveal the contents of each project in the workspace Project Navigator and reveal the contents of each project’s Products group, your Xcode window and workspace should look something like what is shown in Figure 20.15. If your projects are not all peers (at the same level of the hierarchy in the Project Navigator), delete any that are subprojects and re-add them to the workspace. Note that all the products are red, indicating that none of them are current.

Figure 20.15. After adding more projects, we see that all of them are red, indicating that none of them are current.
4. Choose Product, Manage Schemes from the Xcode menu bar, clean up any extraneous schemes you have laying around, and set all of the main project schemes to Shared. When you have finished, the Scheme Manager dialog should look similar to what is shown in Figure 20.16.
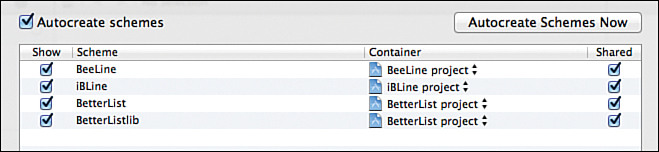
Figure 20.16. Setting all the main project schemes to Shared.
Configuring the OS X Project to Work in the Workspace
In an ideal world, Xcode’s automatic detection of dependencies would recognize when linking to the library and framework is necessary (for example, if BeeLine and iBline include the header from BetterList and call methods from the BetterList class). Unfortunately, this is not currently possible, but it is probably not Xcode’s fault. The Betterlist.framework and the libBetterListlib.a static library both define the same library routines, so it is not really possible for Xcode to choose between them for you. Instead, you still have a little bit of work to do:
1. Select the BeeLine project in the Project Navigator and the BeeLine target in the Editor area.
2. Display the Build Phases tab for the BeeLine target, and open the Link Binary With Libraries group, as shown in Figure 20.17.
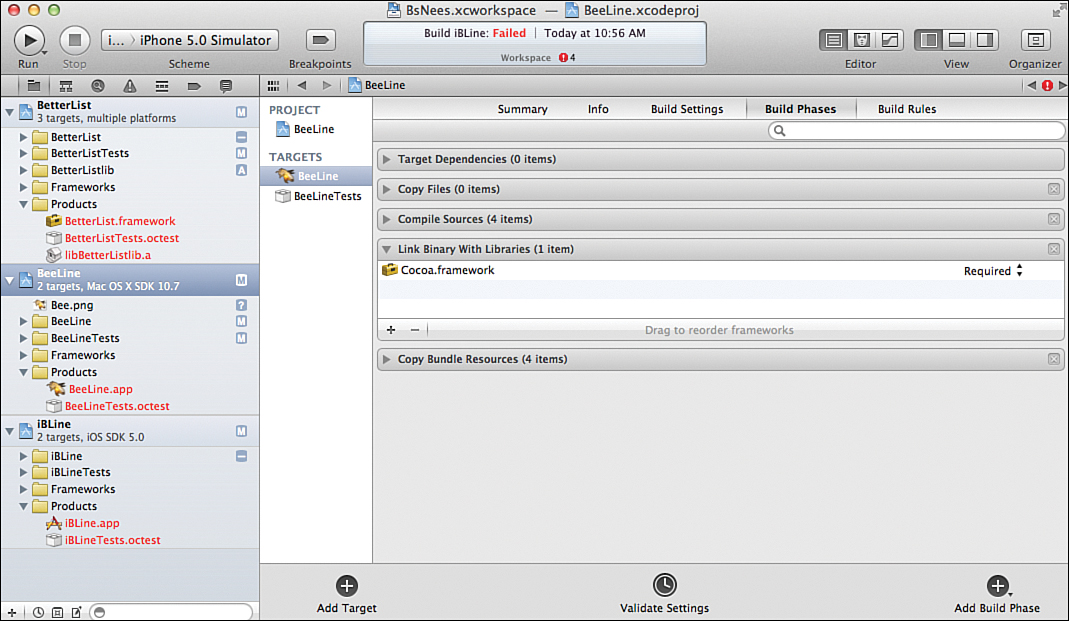
Figure 20.17. Opening the Link Binary with Libraries group of the Build Phases section for the BeeLine target.
3. Click the + button at the bottom of the Link Binaries with Libraries group.
4. From the dialog that appears, select BetterList.framework, as shown in Figure 20.18. Then click Add.
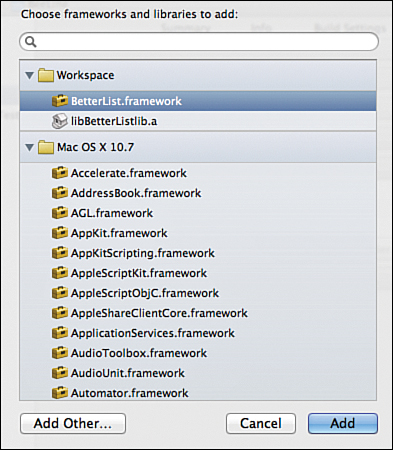
Figure 20.18. Adding BetterList. framework.
5. In the Scheme drop-down on the Xcode toolbar, select the BeeLine scheme and your appropriate build architecture, as shown in Figure 20.19.
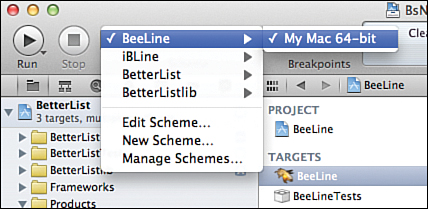
Figure 20.19. Selecting the BeeLine scheme and build architecture.
6. Choose Product, Build from the Xcode menu bar. If all goes well, you receive a Build Succeeded notification. Note, as well, that the BetterList.framework product in BetterList and the BeeLine.app product in BeeLine have turned from red to black, as shown in Figure 20.20, indicating that the build has gone according to plan.

Figure 20.20. After these changes, the build is successful.
If all does not go according to plan, you may be greeted by anything from a BeeLine program that runs, but an Xcode notification that it failed, to strange errors in the Xcode interface, to an Xcode indication that everything went fine, but a BeeLine application that crashes. The most likely source of this difficulty is an inconsistency where Xcode thinks it is supposed to find the framework for which you added a dependency in step 3.
To determine whether this is the problem, follow these steps:
2. Select the BetterList.framework product from the BetterList project in the Project Navigator.
3. Observe the location and full path that is shown for the BetterList.framework in the Identity area of the Utilities, as shown in Figure 20.21.
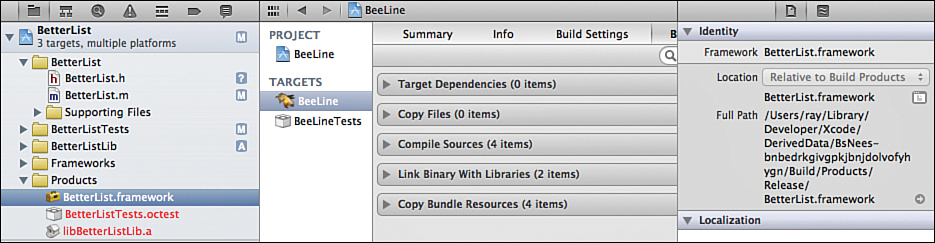
Figure 20.21. Noting the location and full path settings.
4. Select the BeeLine project in the Project Navigator and the BetterList.framework framework that is linked within it. Again observe the location and full path that is shown for the framework in the Identity area of the Utilities area. If a framework location mismatch is the problem, you will see something different for the linked framework than what you observed for the actual framework in BetterList, as shown in Figure 20.22.
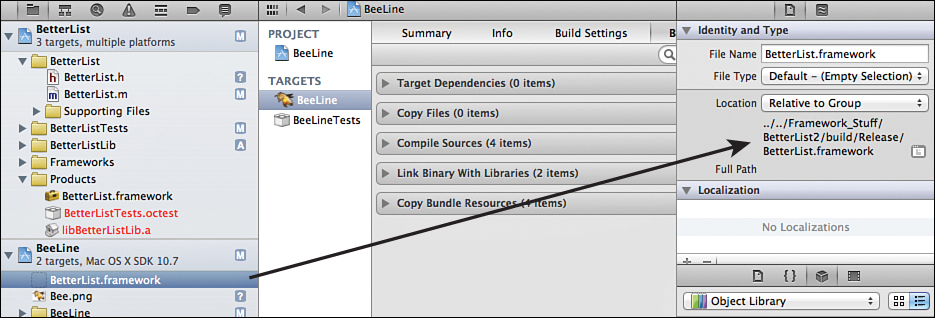
Figure 20.22. You could experience a framework mismatch.
5. To correct this, display the Build Phases tab for BeeLine and open the Link Binary with Libraries group within the build phases. Select the BetterList. framework in the Link Binary with Libraries group and click the – button to remove it. Then click the BetterList.framework in the Products group of BetterList and drag it into the Link Binary with Libraries group for BeeLine, as shown in Figure 20.23.
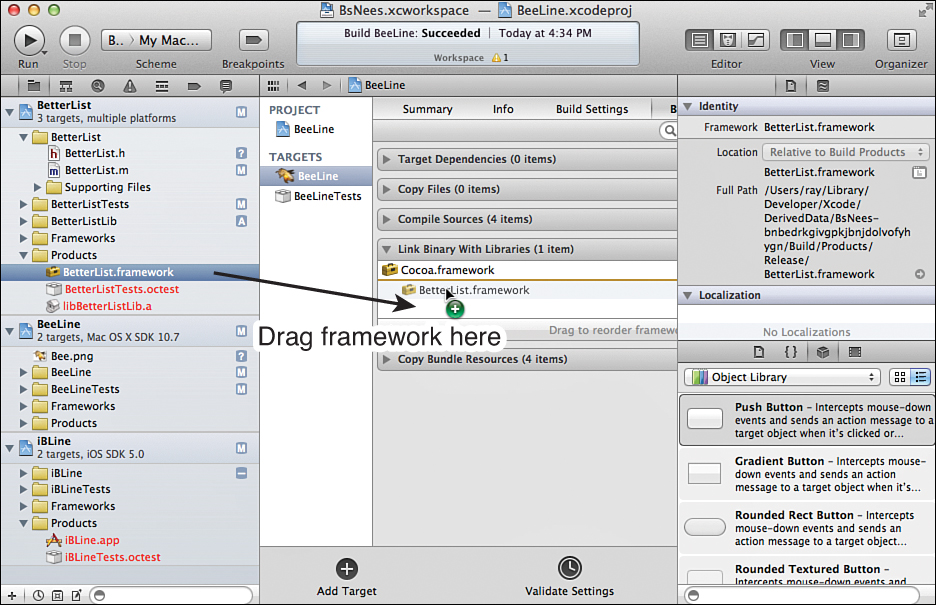
Figure 20.23. Fixing a framework mismatch.
Watch Out!: One Click Is Good, Two Is Not Better
Do not single-click and release on the BetterList.framework product before you start your click and drag; otherwise, the Editor area will switch to the appropriate view for the framework rather than the build settings for the BeeLine target. You need to do the click and drag in a single smooth action after removing the offending framework version. (We would recommend this process for all the steps that require adding a library or framework if we were better at remembering this and weren’t constantly having to open the build settings twice.)
By the Way
You’ll have better luck clicking and dragging it if you click the name of the framework rather than on the icon for it.
6. Try building again. This time you should be rewarded with a successful build and a runnable BeeLine application.
7. Even though BeeLine runs in Xcode, you have one more step to do before you can run BeeLine in the Finder. As before, when you were building your first OS X application in Hour 15, you need to add a Copy Files phase to the Build phases for BeeLine, and add the BetterList framework to the list of files to copy. For reference, this should look exactly as shown in Figures 15.42 and 15.43.
You now have rebuilt your BeeLine project, using BetterList as a peer project in the workspace rather than as a subproject within BeeLine. For a single project and single library/framework, this has little advantage. However, as you accumulate more projects that use the same underlying frameworks and libraries, and that share other resources and code, the advantages begin to pile up quickly. One of the most significant is that with BetterList as a peer in the workspace you can have multiple projects that use it open at the same time, and not have one of them constantly complaining about the BetterList resources already being in use.
In the next section, you add a second project to the workspace to demonstrate this convenient feature, and you learn about configuring different peer projects to make use of different components out of the framework/library project.
Configuring the iOS Project to Work in the Workspace
Configuring the iBLine iOS project to work with the automatically discovered dependencies in the workspace is quite similar to the process for the OS X BeeLine project. However, the fact that the iOS project uses a static library rather than a framework makes things work just slightly differently. Unfortunately, some of these differences seem to be Xcode bugs.
To start, you follow the same procedure that you did to connect BeeLine to the BetterList framework, only this time you select the libBetterListlib.a static library, as follows:
1. Select the iBLine project in the Project Navigator and the iBLine target in the Editor area.
2. Display the Build Phases tab in the Editor area for iBLine and open the Link Binary with Libraries group, as shown in Figure 20.24.
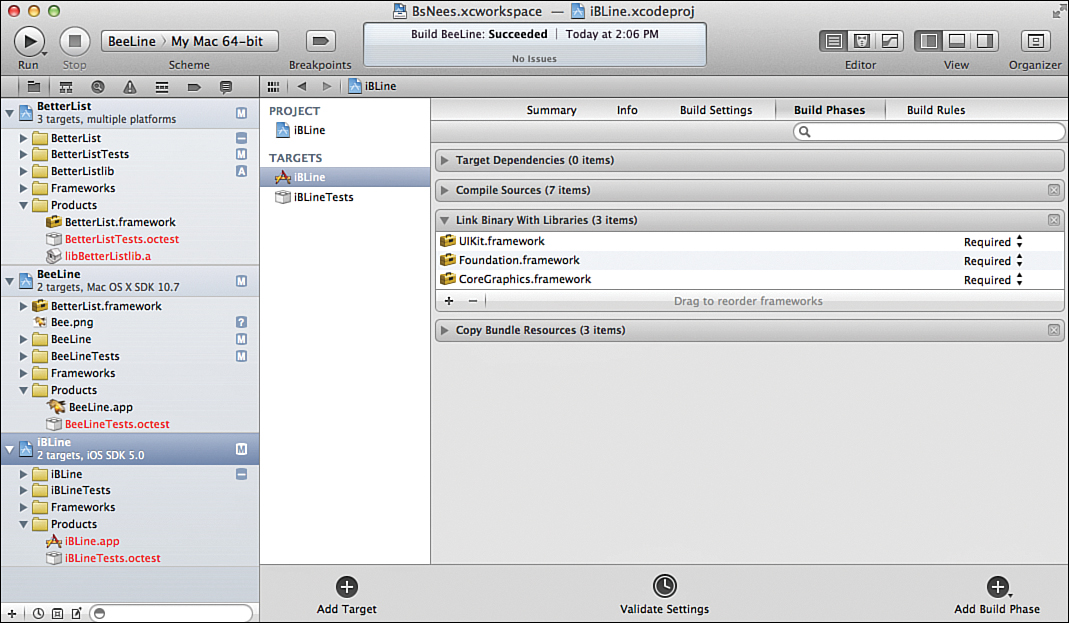
Figure 20.24. Opening the Link Binary with Libraries group for target iBLine.
3. Click the + button at the bottom of the Link Binary with Libraries group.
4. In the dialog that appears, select libBetterListlib.a from the BetterList project, as shown in Figure 20.25, and then click Add.
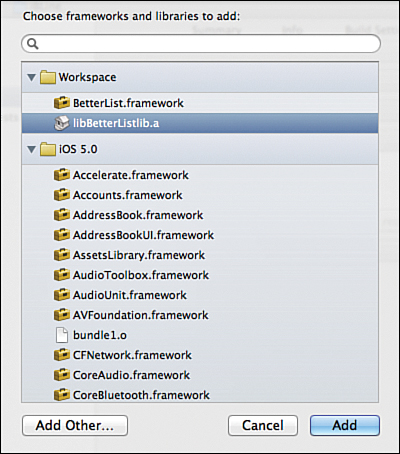
Figure 20.25. Adding the libBetterListlib.a from the BetterList project to the iBLine target.
Did You Know?
Yes, we are aware that we just told you that dragging the product from the BetterList project could avoid problems with Xcode confusing itself about locations. Unfortunately, that works only for the framework. Because of what appears to be a bug in Xcode, BetterList will never believe that the static library is actually built (it will always remain red), and dragging the unbuilt red static library produces random crashes as of this writing.
5. In the Scheme drop-down on the Xcode toolbar, select iBLine and the iPhone simulator, as shown in Figure 20.26. Build iBLine by choosing Build from the Product menu. It won’t work.
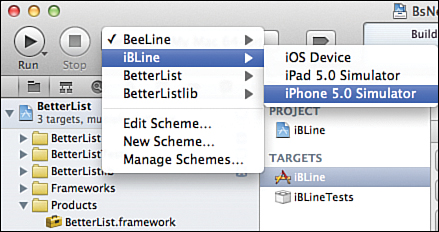
Figure 20.26. Selecting iBLine and the iPhone simulator.
6. Examine the errors that appear in the Issue Inspector. You should see several complaints about not being able to find BetterList.h, as shown in Figure 20.27. (Actually, you shouldn’t see them, but Xcode’s ability to find the implicit dependencies falls down on the job here.)
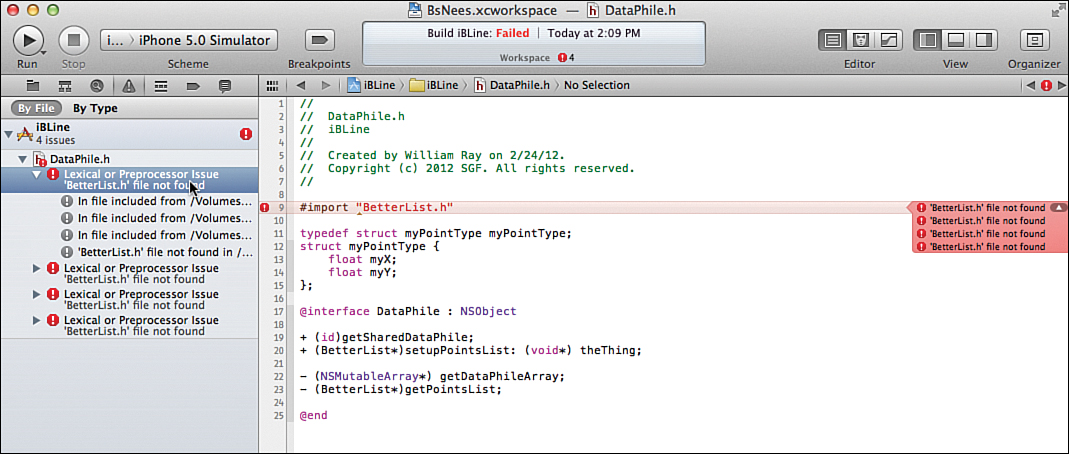
Figure 20.27. A number of errors involving not being able to find BetterList.h appear after the build.
To correct Xcode’s difficulty in finding the headers, and the resultant failure to find the libBetterListlib.a static library itself, we need to add a few settings in the build settings for iBLine. To do so, follow these steps:
1. Select the iBLine project from the Project Navigator and the iBLine target in the Editor area.
2. Open the Build Settings tab for the iBLine target.
3. Enter header search into the Search box for the build settings. This should limit the displayed settings to just a few, including header search paths.
4. Double-click in the value area for the header search paths.
5. In the pop-up dialog that appears, click the + button to add another search path, and then enter the value $(BUILT_PRODUCTS_DIR) and select the Recursive option (which might not actually have a column header for Recursive but only an unlabeled column of check boxes, depending on your Xcode version—probably another bug), as shown in Figure 20.28. Then click Done.
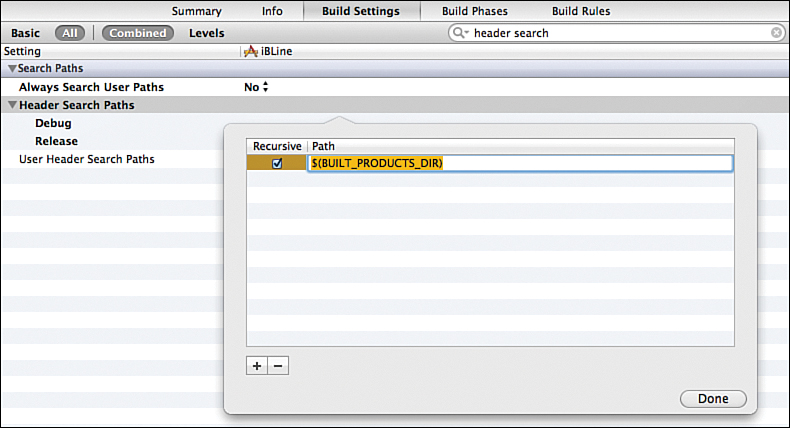
Figure 20.28. Adding a recursive header search path.
6. Change your search to library search in the Search box. The list of displayed settings should change to a list including library search paths.
7. Double-click in the value area for the library search paths.
8. In the pop-up dialog that appears, click the + button to add another search path, and then enter the value $(BUILT_PRODUCTS_DIR) and select the Recursive option, as shown in Figure 20.29. Then click Done, or dismiss the dialog by clicking outside it.

Figure 20.29. Adding $(BUILT_PRODUCTS_DIR) to the library search path.
9. Again, select the iBLine scheme and iPhone simulator from the Scheme pop-up on the Xcode toolbar, and then choose Build from the Product menu. You should be rewarded with a report that the build succeeded, as shown in Figure 20.30.
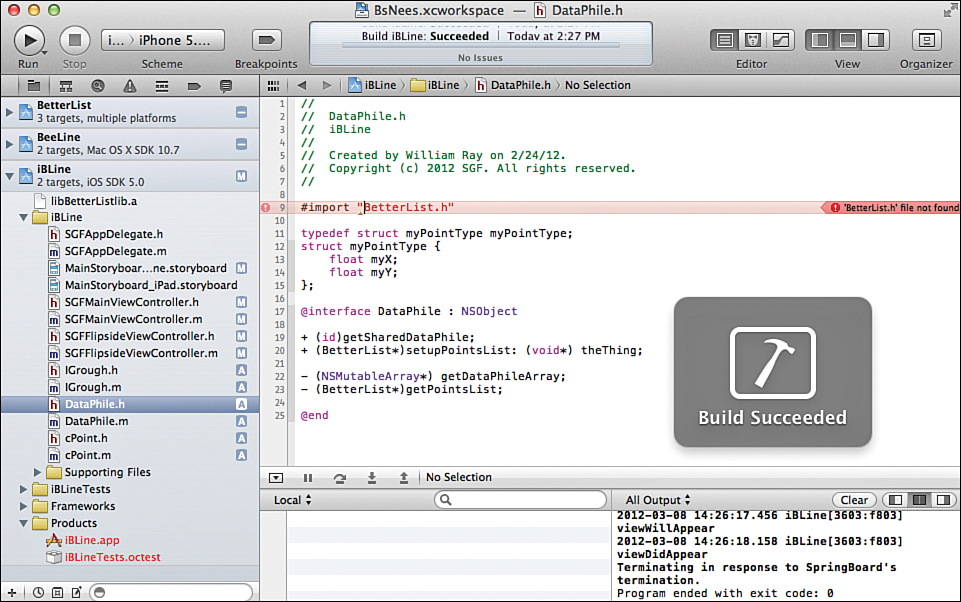
Figure 20.30. This time the build succeeded.
Bizarrely, even though that build will succeed, if you examine the interface, there’s a good chance you’ll see that Xcode is simultaneously reporting no issues and complaining that it still cannot find BetterList.h. Chalk up another bug. If you try to use code completion for methods and variables that are within BetterList, you’re likely to find that they do not work properly either. Make that two bugs.
If you’re happy enough that the build is succeeding and do not need code completion, and aren’t bothered by spurious complaints about not being able to find things that are clearly being found, you can stop here. If you want to make code completion work, and silence the erroneous errors, however, you can do something rather hackish instead. This makes your project and workspace a bit less elegant, and requires you to remember to do more maintenance if you change files or file contents around in the future, so there is a tradeoff. If that sounds like an acceptable tradeoff to you, here’s a simple trick that will work until Apple fixes the bugs:
1. Add a new group to the iBLine project, by right-clicking the iBLine project and selecting New Group from the pop-up menu that appears, as shown in Figure 20.31.
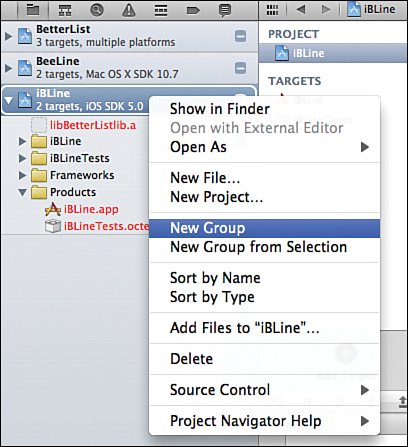
Figure 20.31. Right-clicking the iBLine project to get the menu with the New Group option.
2. Double-click your new group in the Project Navigator under iBLine and change the name. This example uses the name BustedCruft.
By the Way
In what I’ll call yet another bug, causing the group name to become editable by double-clicking it isn’t as easy as double-clicking the name of a file in the Finder (or other slow-double-click processes you’re probably already familiar with). I know it sounds silly, but try “scrubbing” your mouse back and forth while double-clicking the name. For reasons probably not even known to Apple, this seems to produce the desired results much more reliably than a standard double-click.
3. Reveal the contents of the BetterList project and the BetterList group within it.
4. Click the BetterList.h file in the BetterList group, drag it to your new BustedCruft group in iBLine, and drop it there, as shown in Figure 20.32.
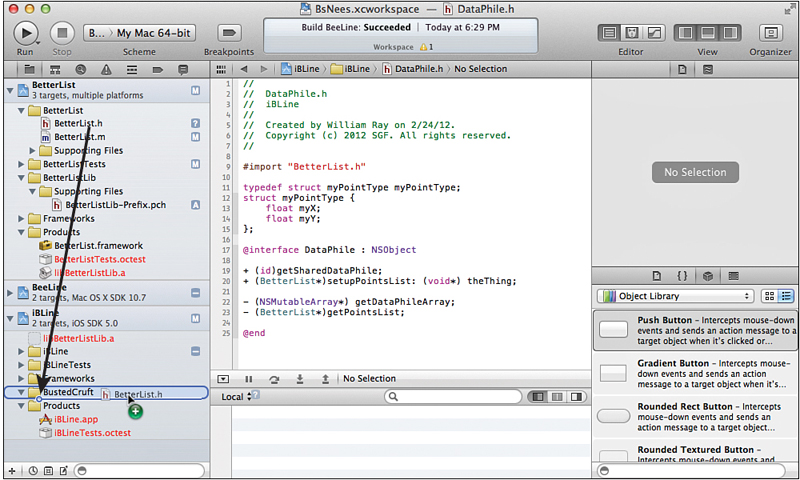
Figure 20.32. Adding BetterList.h to the new group, BustedCruft.
5. In the dialog that appears, deselect all targets in the Add to Targets list, and then click Finish, as shown in Figure 20.33.
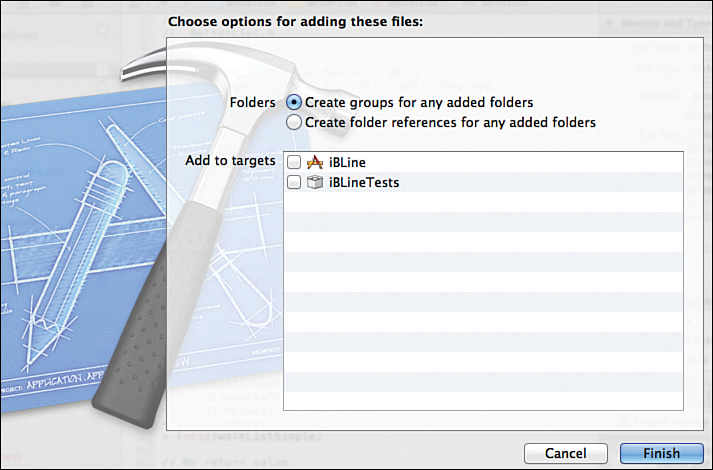
Figure 20.33. Deselecting all targets and clicking Finish in the dialog.
Did You Know?
Since you’ve gone down this rabbit hole, if you have to change the name of BetterList.h, or add other headers to BetterList and rearrange method definitions, or otherwise modify things so that BetterList.h no longer completely defines the interface for code in the libBetterListlib.a static library, you’ll need to revisit the headers you’ve referenced here.
iBLine will build now, code completion will work properly, and it will not complain about missing headers that it can really find.
Summary
In this hour, you learned a better way of managing projects that share components. Managing each component as an independent project is sometimes your only choice if you want to share development with others but keep some code private. However, if you are not obliged to partition your projects by such external concerns, the ability of workspaces to automatically deal with dependencies can save you a lot of headaches.
Q&A
Q. Can projects that are members of workspaces also be opened as standalone projects outside the workspace?
A. Yes, though you’re running a risk if you try to open a project in a workspace and also open it separately. In addition, if you open a project independently outside of its workspace, it won’t receive all the benefits of the workspace’s automatic dependency resolution. This might require you to do some additional manual configuration for some tasks.
Q. Can projects in workspaces contain subprojects?
A. Yes. Subprojects within other projects in workspaces are especially useful in keeping your workspace organized. You could, for example, have a Frameworks project in which you keep all the frameworks that you develop and use. And, with more and more varied projects around, BeeLine and iBLine probably start looking more like they should be two subproject peers in a parent project that contains them.
Workshop
Quiz
1. What incantation enables you to replace explicit search paths to other in-workspace projects’ products?
2. If code completion is not working for members of a framework or library that is in your workspace, how can you fix it?
3. If you add a shared framework to a sister project in a workspace and it continues to act like the framework is missing, what is the likely problem?
Answers
1. $(BUILT_PRODUCTS_DIR)
2. Create a new group in the project that’s having difficulty resolving the symbols, and make reference copies of the headers for the problematic library or framework. Hopefully, this won’t be necessary for very long.
3. Xcode probably added the wrong path to the framework. Try deleting it from the Link Binary with Libraries group and then dragging it back in directly from the framework project.
Activities
1. Download Apple’s GLEssentials project from https://developer.apple.com/library/ios/samplecode/GLEssentials/GLEssentials.zip. This project contains a pair of Xcode projects, one for OS X and one for iOS, that implement the same program and that share a lot of code through the somewhat dangerous mechanism of both living among the shared files on disk. (Consider what happens if you delete a file from one without realizing that it is used by the other.) Convert these two independent projects into a pair of sister projects under a workspace, and using shared code resources from the workspace instead of each compiling and linking the shared files independently.
2. Try splitting the libBetterListLib product out of the BetterList2 project in the BsNees workspace and make it another peer in the workspace. Single projects that can build multiple targets for different purposes, such as the original BettterList/BetterList2 project that built both a framework and a library, are a great way to keep your functionality together and organize features when you’re stuck working with a bunch of independent projects. Under the workspace model, however, they actually place unnecessary restrictions on the way you work. Breaking out the static libBetterListLib library and dynamic BetterList framework into their own sibling projects, both using the same code resources, is a much more flexible solution when using workspaces. If you think about it a bit, you might be able to figure out how to make one of them function as a wrapper project that simply includes the product of the other to build its target.