
5. Audio Restoration
• Remove hiss, like tape hiss or preamp noise
• Reduce the level of clicks and pops automatically
• Minimize or even remove constant background noises like hum, air conditioning, ventilation system noise, and the like
• Remove undesired artifacts, like someone coughing in the middle of a live recording
• Do highly effective manual click and pop removal
• Use restoration tools to completely modify a drum loop
Audition offers tools for reducing hiss, hum, clicks, pops, and other types of noise. But you can also remove undesired artifacts by defining sections to be removed based on amplitude, time, and frequency.
About audio restoration
Sometimes you’ll work with audio that needs restoration, like music from vinyl or cassette, or audio with hum, hiss, or other artifacts. Audition has multiple tools for solving these problems, including specialized signal processors and graphic waveform editing options.
However, audio restoration involves trade-offs. For example, removing the crackles from vinyl recordings may remove part of the sound that occurs during the crackles. So you may have to reconcile solving a problem with the infamous “law of unintended consequences.”
Nonetheless, as these lessons demonstrate, it’s possible to clean up audio significantly while retaining sound quality.
Reducing hiss
Hiss is a natural by-product of electronic circuits, particularly high-gain circuits. Analog tape recordings always had some inherent hiss, but so do mic preamps and other signal sources. Audition provides two ways of reducing hiss (also see the section “Reducing noise”); we’ll start with the easiest option.
1. With Audition open to the Waveform Editor, choose File > Open, navigate to the Lesson05 folder, and open the file Hiss.wav.
Tip
When mixing music that will be mastered, don’t trim a file up to the beginning; leave some of the track before the music begins. This can provide a noise floor reference if noise reduction is needed.
2. Click the Transport Play button, and you’ll hear obvious hiss, especially during quiet sections. Click the Transport Stop button.
3. Select the first two seconds of the audio file, which contain only noise (the “noise floor”). Audition will take a “noise print” (like a noise “fingerprint”) of this signal and subtract audio with only these hiss characteristics from the audio file.
4. Choose Effects > Noise Reduction/Restoration > Hiss Reduction (process).
5. Click the Capture Noise Floor button. A curve appears that shows the noise’s spectral distribution.
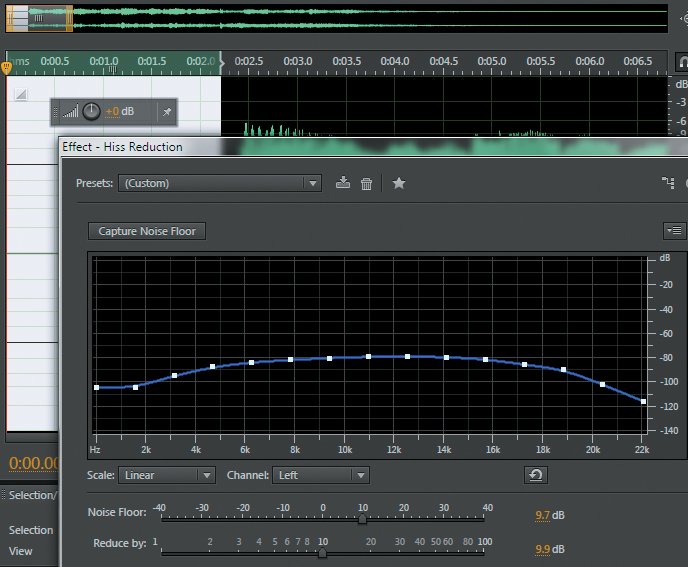
6. Extend the audio selection in the Waveform Editor to around 5 seconds, and click the Transport Loop button. This also turns on the Hiss Reduction dialog box’s Loop button.
Tip
You typically adjust the Reduce by parameter first to set the overall amount of noise reduction, and then adjust the Noise Floor parameter to determine the noise reduction characteristics. However, re-tweaking each slider can optimize the sound further. Also note that selecting Output Noise Only will play back only what’s being removed from the audio. This can help determine whether any desirable audio is being removed along with the hiss.
7. Click the Hiss Reduction dialog box’s Play button. You’ll hear less noise.
8. You generally want to use the minimum acceptable amount of noise reduction to avoid altering the rest of the signal; reducing hiss may also reduce high frequencies. Move the Reduce by slider to the left and the hiss will return. Move it right to 100dB, and although there will be no hiss, the transients will lose some high frequencies.
9. Move the Reduce by slider to find a compromise setting between noise reduction and high-frequency response. For now, leave it at 10dB.
10. The Noise Floor slider tells Audition where to draw the line between the noise floor and the signal. As with the Reduce by slider, moving the slider farther to the left increases noise and farther to the right reduces noise and high-frequency response. Leave it set to 10dB for now.
11. Revisit the Reduce by slider and move it to 20dB. The hiss is gone, but there’s a little less “snap” to the transients compared to the 10dB setting. You’ll need to decide which quality is more important to you, but for now choose 15dB as a compromise setting.
12. Click the Transport Stop button. Turn off the Transport Loop button, click once within the Waveform Editor to deselect the loop, and then choose Edit > Select > Select All.
13. Click the Transport Play button. Enable and disable the Hiss Reduction dialog box’s Power State button to hear the file with and without noise reduction; the difference is significant, especially at the beginning and end where there’s no signal to mask the hiss. Stop playback.
14. Click the Hiss Reduction dialog box’s Close button.
15. If there’s no noise floor, Audition can still help remove noise. While still in the Waveform Editor, choose File > Open, navigate to the Lesson05 folder, and open the file HissTruncated.wav.
16. Choose Effects > Noise Reduction/Restoration > Hiss Reduction (process).
17. Click the Transport Play button. Despite not capturing a noise print, you can verify that there’s less noise by clicking the Hiss Reduction dialog box’s Power State button to listen to the enabled and bypassed states.
18. Move the Reduce by slider to around 20dB, which is a typical amount for noise reduction. Now vary the Noise Floor slider for the best compromise between hiss reduction and high-frequency response; -2dB is a good choice.
19. Click the Hiss Reduction dialog box’s Power State button to listen to the enabled and bypassed states. Although the noise reduction doesn’t have quite the finesse obtainable by working with a noise print, it still makes a huge improvement without any significant audio degradation.
20. Close the Hiss Reduction dialog box, and stop playback in preparation for the next lesson.
Reducing clicks
Clicks can consist of the little ticks and pops you hear with vinyl recordings, occasional digital clocking errors in digital audio signals, a bad physical audio connection, and so on. Although it’s difficult to remove these completely without affecting the audio, Audition can help attenuate lower-level clicks and crackles.
1. With Audition open to the Waveform Editor, choose File > Open, navigate to the Lesson05 folder, and open the file Crackles.wav.
2. Click the Transport Loop and Play buttons, and you’ll hear clicks and crackles, especially during the quiet parts between drum hits in the beginning.
3. Choose Effects > Noise Reduction/Restoration > Automatic Click Remover.
4. The Threshold slider sets the sensitivity to clicks; lower values will “trap” more clicks but may also reduce lower-level transients you want to keep. Move the Threshold slider to 0; the processor will interpret almost anything as a click, so you’ll hear the program sputter as it tries to make an excessive number of real-time calculations. Conversely, a setting of 100 lets through too many clicks. Choose a setting of 20 to reduce most clicks while minimally affecting the audio.
5. Complexity sets how complex a click Audition will process. Higher settings allow Audition to recognize more complex clicks but requires more computation and may degrade the audio somewhat. This is not a real-time control, so you need to adjust it, play the audio, adjust, play, and so on. For now, click the Transport Stop button, and then move the slider to 80.
6. Click the Transport Play button. Because this is a computation-intensive process, during real-time playback Audition may not be able to process a click prior to playing it back. The only way to be certain how processing will affect the sound is to click the Automatic Click Remover dialog box’s Apply button; click it now. Note that this closes the Automatic Click Remover processor.
7. Click the Transport Play button. Although the clicks are lower in volume, the removal process affects the audio, so we’ll try again. Choose Edit > Undo Automatic Click Remover.
8. Choose Effects > Noise Reduction/Restoration > Automatic Click Remover; the settings will be as you left them. If Complexity is grayed out, click the Automatic Click Remover dialog box’s Play button and then the Stop button. Move the complexity slider to 35, and click Apply again.

9. Click the Transport Play button. The new setting produces better results than the original default value of 16 or the higher value you tried of 80. To compare the “repaired” sound with the original, choose Edit > Undo Automatic Click Remover, and then choose Edit > Redo Automatic Click Remover. Click the Transport Stop button when you’re done comparing the two.
Note
There’s not a lot of difference between minor Complexity setting variations. For example, if you had chosen 40 or 30 instead of 35, you probably wouldn’t notice any difference compared to a setting of 35.
Reducing noise
Although you can reduce hiss with the Hiss Reduction effect, there are other types of noise you’ll want to reduce as well, like hum, air conditioning noise, and ventilation sounds. If these sounds are relatively constant, Audition can reduce or remove them using the Noise Reduction process. This process can also reduce hiss and allow for more detailed editing compared to the Hiss Reduction option.
1. With Audition open to the Waveform Editor, choose File > Open, navigate to the Lesson05 folder, and open the file Hum.wav.
2. Click the Transport Play button to hear the hum that was caused by a bad electrical connection (this kind of hum can also occur with unbalanced audio cables and high-gain circuits).
3. Select the first second of the audio file, which contains only hum. As with reducing hiss, Audition will take a noise print of the hum and subtract only this objectionable noise from the file.
4. Choose Effects > Noise Reduction/Restoration > Noise Reduction (process).
5. Click the Capture Noise Print button. A curve appears that shows the noise floor’s spectral distribution.
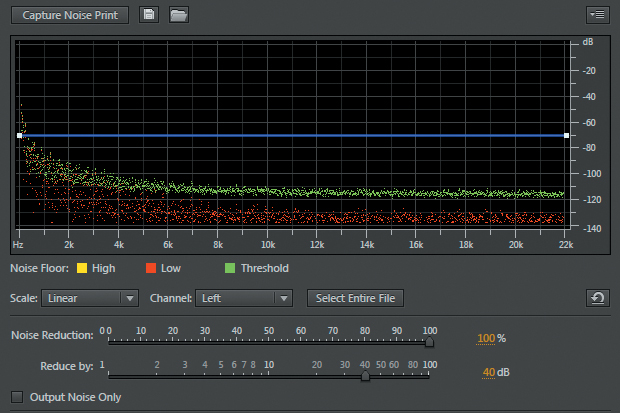
6. Select about the first 20 seconds of the file, and click the Transport Loop button if it is not already enabled.
7. Click the Noise Reduction dialog box’s Play button. The hum will be gone during silent sections.
8. You may hear a little hum immediately after a drum sound decays. The reason is that noise reduction doesn’t apply as much reduction when the sound is being masked and takes some time to return to full reduction when audio is no longer present. To remove more of the hum, move the Noise Reduction slider all the way to 100%.
9. The Reduce by slider sets the amount by which the noise will be reduced. A setting between 10 and 20dB is a good compromise between affecting the audio and reducing the noise. Set this slider to 15dB for now.
10. You’ll still hear a little hum after a drum sound decays. Click the Advanced disclosure triangle for more options.
11. The Spectral Decay Rate parameter determines how long it takes for the noise reduction to return to maximum when the audio goes from signal to silence. Reduce the Spectral Decay Rate to 20% to speed up the noise reduction response, thus eliminating the hum at the end of the drum sounds.
12. Toggle the Noise Reduction dialog box’s Power State button, and you’ll hear the effectiveness of the noise reduction process. Close Audition without saving anything (click No to All) in preparation for the next lesson.
Removing artifacts
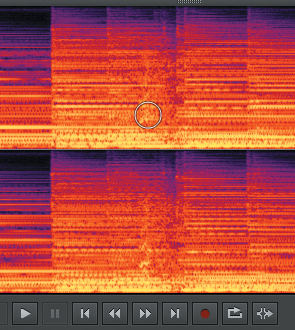
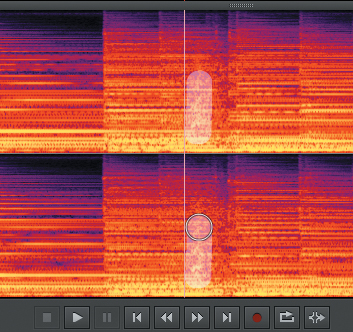
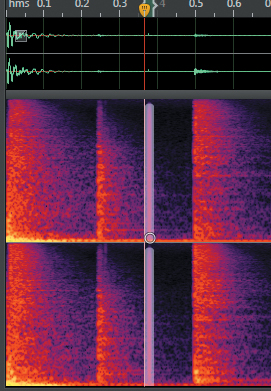
Sometimes particular sounds will need to be removed, like a cough in the middle of a live performance. Audition can do this using the Spectral Frequency Display, which allows for editing based on not just amplitude and time (as with the standard Waveform Editor), but also frequency. You can switch between these two displays by pressing Shift+D. This exercise shows you how to remove a cough in a performance by classical harpsichordist Kathleen McIntosh.
1. Open Audition to the Waveform Editor, choose File > Open, navigate to the Lesson05 folder, and open the file Cough.wav.
2. Click the Transport Play button, and you’ll hear a cough in the background at around 1.65 seconds.
3. Choose View > Show Spectral Frequency Display. Because you’ll be doing detailed work, make the Waveform Editor window as large as possible by dragging the horizontal and vertical dividers.
4. Zoom in and look closely at the spectrum at around 1.65 seconds. Unlike the linear bands of audio in various frequencies you see in the rest of the file, there’s something that looks almost like a “cloud”; that’s the cough.

5. Choose the rightmost button in the top toolbar (Spot Healing Brush tool), or type B to choose it. A circular cursor (that looks somewhat like a bandage icon) appears.
6. Upon selecting the Spot Healing Brush tool, a Size parameter appears next to the Spot Healing Brush tool’s toolbar button. Adjust the size so that the circular cursor is as wide as the cough.
Note
The required Size parameter setting will vary depending on the Spectral Frequency Display’s zoom level.
7. In one channel, drag the circular cursor over the area with the cough; the same area will be selected automatically in the other channel. The area over which you dragged with be “ghosted” in white. Be careful to drag over only the cough.
Tip
To drag in a straight line, hold down the computer keyboard’s Shift key while dragging.
8. Release the mouse button, and then click the Transport Play button. The cough will be gone, and Audition will have “healed” (reconstructed) the audio behind the cough. (The healing process takes audio on either side of the deleted audio, and through a complex process of copying and crossfading, fills in the gap caused by removing the artifact.)
Tip
If you don’t remove all of an artifact with this process, you can try multiple times, or even use this process on successive, small selections of an artifact.
9. Close Audition without saving anything in preparation for the next lesson.
Alternate click removal
You can use the Spectral Frequency Display to remove clicks. Although this is a manual process that is more time-consuming than using the Automatic Click Remover effect, the removal process will be more accurate and have less impact on the audio quality.
1. Open Audition to the Waveform Editor, choose Edit > File > Open, navigate to the Lesson05 folder, and open the file Crackles.wav.
2. Because you had the Spectral Frequency Display open in the previous lesson, Audition should open with the Spectral Frequency Display visible. If not, choose View > Show Spectral Frequency Display (or press Shift+D).
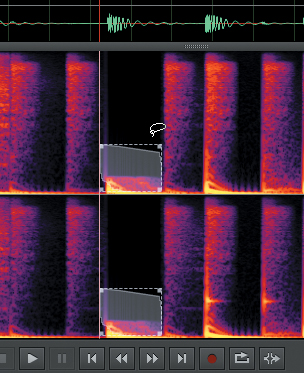
3. Zoom in until you can see the clicks toward the file’s beginning as thin, solid vertical lines (outlined in white in the screen shot for clarity).
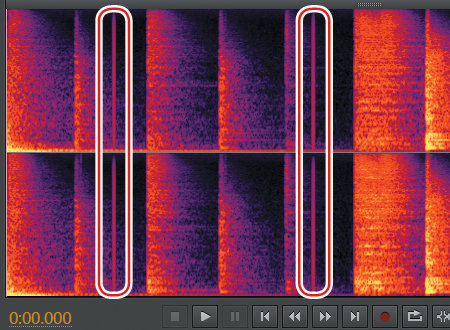
4. Type B to choose the Spot Healing Brush tool, and set its pixel size to the same width as a click.
5. Hold down the Shift key, and then click at the top of the click (noise) and drag down. This selects the noise in both channels.
6. Release the mouse button; the click will be gone and the audio behind it “healed.” Repeat steps 5 and 6 for each click you want to remove.
7. Return the playhead to the beginning of the file if necessary, and then click the Transport Play button. The file sounds as if the clicks had never been there.
8. Keep Audition open in preparation for the next lesson.
Creative removal
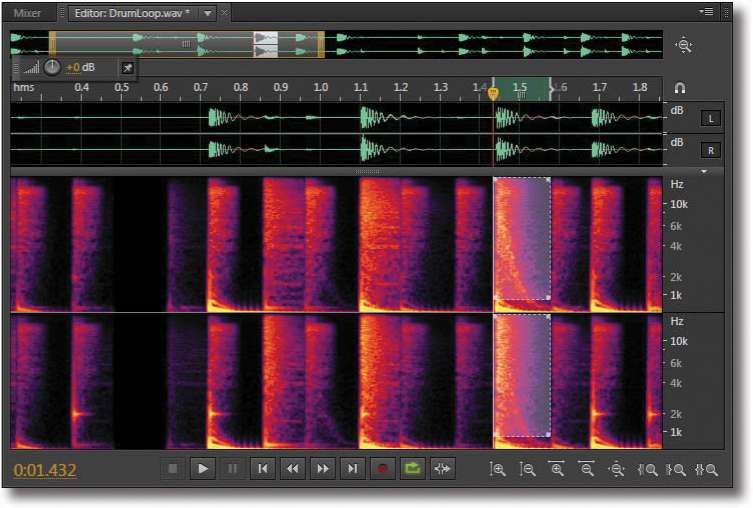
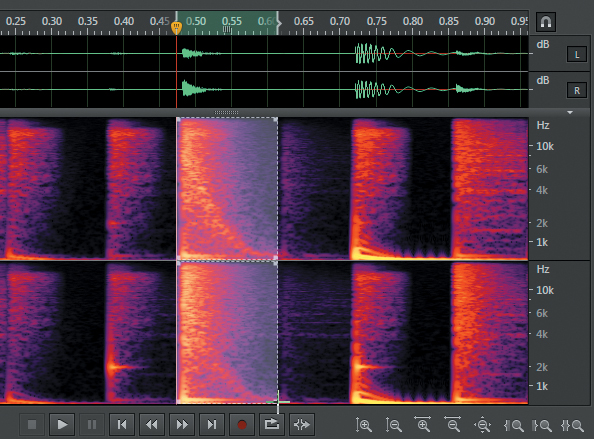
Audition’s restoration tools aren’t just for fixing problems; you can also use them in creative ways and for sound design. This lesson takes a drum loop and uses the Spectral Frequency Display to remove four drum hits.
1. With Audition open to the Waveform Editor, choose File > Open, navigate to the Lesson05 folder, and open the file DrumLoop.wav.
2. Click the Transport Play button. Note that there are four white noise “hits” at about 0.47, 1.45, 2.39, and 3.35 seconds. We’ll remove them.
3. As with the previous lessons, zoom in until the hit you want to remove is big enough so it’s easy to define.
4. Because we want to remove the audio completely, not “heal” it in the context of other audio, choose the Marquee Selection tool from the Waveform Editor’s top toolbar, or type E.
5. Draw a rectangle around the first drum hit.
6. Choose Effects > Amplitude and Compression > Amplify. Move both Gain sliders full left, and click Apply.
7. Locate the second hit, and again draw a rectangle around it, but this time don’t include the yellow section at the bottom of the hit, because that represents the kick drum sound.
8. Choose Effects > Amplitude and Compression > Amplify. With both Gain sliders full left, click Apply.
9. Draw a rectangle around the third drum hit, as you did in step 5.
10. Choose Effects > Amplitude and Compression > Amplify. With both Gain sliders full left, click Apply.
11. Locate the fourth hit, and again draw a rectangle around it, but as in step 7 don’t include the yellow section at the bottom of the hit, which is the kick drum sound.
12. Choose Effects > Amplitude and Compression > Amplify. With both Gain sliders full left, click Apply.
13. Click in the Waveform Editor outside of the area you selected to deselect it. Return the playhead to the file’s beginning, and then click the Transport Play button. Most of the sound from the hits is gone, but you can still hear a little bit of noise on the second and fourth hits.
14. Choose the Lasso Selection tool from the Waveform Editor’s upper toolbar, or type D.
15. Go to the second hit, and carefully draw a lasso around the red/violet part of the waveform that sits above the yellow kick drum audio.
16. Choose Edit > Cut, or press the Delete key.
17. Go to the fourth hit, and carefully draw a lasso around the violet part of the waveform that sits above the yellow kick drum audio. Then choose Edit > Cut, or press the Delete key.
18. Click the Transport Play button. The drum loop is the same as the original but without the four hits.
Note
The technique of drawing a lasso around artifacts can remove sounds like finger squeaks on guitar strings, clicks or pops, breathing while a person plays an instrument, and many other artifacts. It takes experience to recognize what’s an artifact and what’s part of the sound, and also whether to choose the Spot Healing Brush tool and drag across the sound or choose the Lasso tool and either cut or reduce the artifact level. However, with sufficient practice, this type of restoration is extremely effective.
Review questions
1. Which is more effective, automatic or manual click removal?
2. What is a “noise print”?
3. Is noise reduction good only for removing hiss?
4. What does “healing” do?
5. Are Audition’s restoration tools amazing, or what? Name two ways other than restoration where these tools can be useful.
Review answers
1. Automatic click removal is faster, but manual click removal can be more effective.
2. It’s like a “fingerprint” that represents the specific sonic character of a section of noise. Subtracting this from the audio file removes the noise.
3. Noise reduction can minimize or even remove any constant background sound, as long as there’s an isolated section where you can capture a noise print.
4. “Healing” replaces audio removed by the Spot Healing Brush tool with crossfaded, “good” audio from either side of the artifact.
5. Indeed they are; not only can you use them for fixing audio problems, but you can even use them in highly creative ways, like removing specific drum hits from drum loops or doing sound design.