
11. Editing Clips
• Use crossfading—both symmetrical and asymmetrical—to create remixes from individual clips
• Export the mix as a single file
• Pan individual clips on a per-clip basis
• Edit a clip to fit a specific length of time (e.g., for a commercial)
• Apply global clip stretching to fine-tune a piece of music’s specific length
• Change volume on a per-clip basis
• Add effects to individual clips
• Extend a clip via looping
You can apply a variety of operations to individual clips, including combining them with crossfading to create a perfect DJ-style continuous mix of music, and then bounce the mix to a single file suitable for exporting, burning to CD, uploading to the web, and so on.
Creating a DJ-style continuous music mix with crossfading
Crossfading between clips can provide for smooth transitions between the end of one clip and the start of another. However, crossfading is also a crucial element of creating a DJ mix. Here, you’ll take five clips and create a dance mix.
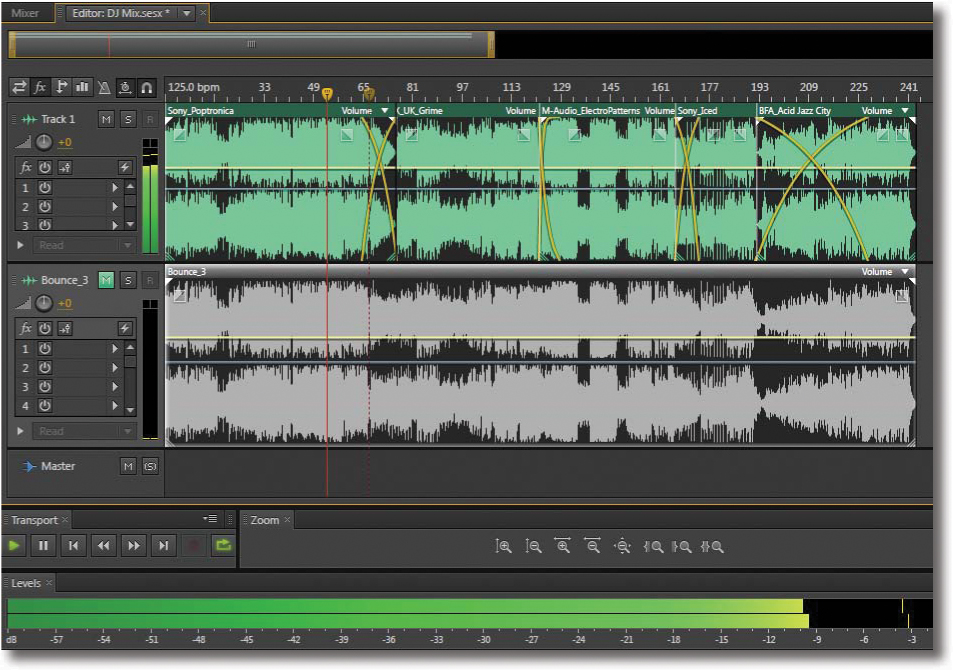
1. With Audition open, navigate to the Lesson11 folder, and open the Multitrack Session DJ Mix.sesx located in the DJ Mix folder.
2. With the Editor panel open, right-click (Control-click) on the timeline and choose Time Display > Bars and Beats.
3. Right-click (Control-click) on the timeline and choose Time Display > Edit Tempo. Enter 120 in the Tempo field and then click OK.
4. Click on any clip, and then verify that Automatic Crossfades Enabled (Clip > Automatic Crossfades Enabled) is selected so that overlapping one clip with another creates a crossfade in the overlapping section.
Note
The name for each piece of music in the Multitrack Session DJ Mix lesson starts with the name of the company that created the song and released the sound library; the song title is the name of the library.
5. Place the playhead at the project’s beginning and click Play. Listen to the song “Poptronica,” and as you listen, make a mental note of where you might like another song to start playing. The theme returns at measure 57 and then repeats at measure 65 before fading out. So, measure 65 is a good candidate for another song to kick in.
6. Now listen to the song “UK Grime.” The first eight measures are an introduction; the main part of the song doesn’t start until measure 9.
Tip
If snapping seems ineffective, zoom in to increase the resolution and thus the snapping “sensitivity.” It’s very important in the crossfading lesson that clips snap precisely to the beat, or you’ll hear what DJs refer to as a “train wreck” transition because the clips are out of sync with each other where they overlap. When you move a clip, zoom in to verify that the edge is aligned with a beat.
7. Enable snapping by clicking the Snap button (indicated by a magnet icon) to the left of the timeline. Drag “UK Grime” into Track 1 so it overlaps “Poptronica” starting at measure 65. This is ideal, because “Poptronica” will fade out over eight measures, “UK Grime” will fade in over eight measures, and when “Poptronica” finishes fading out, the main part of “UK Grime” will start.
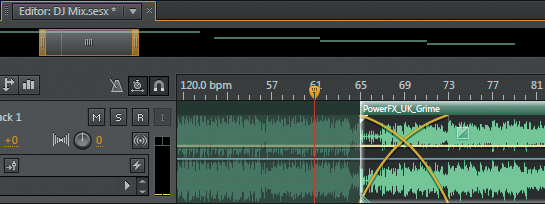
8. Position the playhead before measure 65, and then click the Play button to hear the transition.
9. Proceed to creating the next transition. Listen to the end of “UK Grime”; it goes on for a long time, so you’ll probably want to trim it. As the song starts getting repetitive at measure 122, you’ll have the clip end at measure 130 to allow for an eight-measure crossfade.
10. Hover over the right edge of the “UK Grime” clip so the cursor turns into a Trim tool (a red right bracket). Drag left until the right edge of “UK Grime” snaps to measure 130.
11. Move the playhead to the beginning of the song “Electro Patterns,” and then click Play to hear it. With “Electro Patterns,” the first eight measures would be good for a fade in, because the main theme starts at the beginning of the ninth measure.
12. Drag “Electro Patterns” into Track 1 so it overlaps “UK Grime” starting at measure 122. Play this transition.
13. It would sound stronger if the kick in “Electro Patterns” came in sooner and was louder. You can alter the crossfade to do this. Click the Fade In control square in the “Electro Patterns” file, and drag it straight up so the tooltip displays Fade In Linear Value: 100.
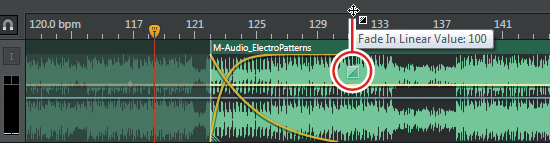
14. Click Play and listen to the transition; it’s much stronger.
15. Listen to the end of “Electro Patterns” and the beginning of “Iced.” “Iced” doesn’t really get going until after 16 measures, whereas the ending for “Electro Patterns” starts at measure 166. From a musical standpoint, the “Electro Patterns” measures that play after measure 166 are kind of heavy and bassy, whereas the first part of “Iced” is “lighter.” It’s unclear what would make a good transition, so drag “Iced” into Track 1 starting at measure 166 so it overlaps “Electro Patterns,” and you’ll tweak it from there.
16. Click on “Electro Patterns” to select it. Hover over its right edge so the cursor turns into a Trim tool. Drag left to trim the clip, but leave enough to make a good transition area into the next clip; I recommend dragging left to measure 174.
17. For the final transition, you’ll try a “mashup” (i.e., two pieces of music playing at the same time for a fairly long amount of time). Drag “Acid Jazz City” into Track 1 starting at measure 192. Return the playhead to the beginning, click Play, and enjoy your mix.

18. Keep this project open, so you can save your work as a single file in the next lesson.
Mixing or exporting a collection of clips as a single file
When creating a DJ mix or chopping up a clip to fit it to a specific length (as covered in the next lesson), you might want to save a collection of edited clips as a single file that incorporates all the edits you’ve made.
You have two options for doing this. The first option, which converts the clips into a single file that appears in the Waveform Editor, is ideal if you want to make some overall tweaks on the final, composite file.
1. Right-click (Control-click) in an empty space in the track (in this case, Track 1) containing the clips you want to bounce (mix) together into a single, new clip.
2. Choose Mixdown Session to New File > Entire Session. This creates a new file in the Waveform Editor and automatically switches to the Waveform Editor.
The second option exports the mix as a single file to your desktop or other designated folder without going through the Multitrack Editor. Exporting is covered in more detail in Lesson 15, “Mixing,” because in almost all cases you’ll want to export a final mix to a mono, stereo, or surround file.
1. Right-click (Control-click) in an empty space in the track containing the clips you want to bounce (mix) together.
2. Choose Export Mixdown > Entire Session.
A dialog box appears in which you can specify several attributes of the mixed file, such as the folder location where the file will be stored, format, sample rate, bit resolution, and the like.
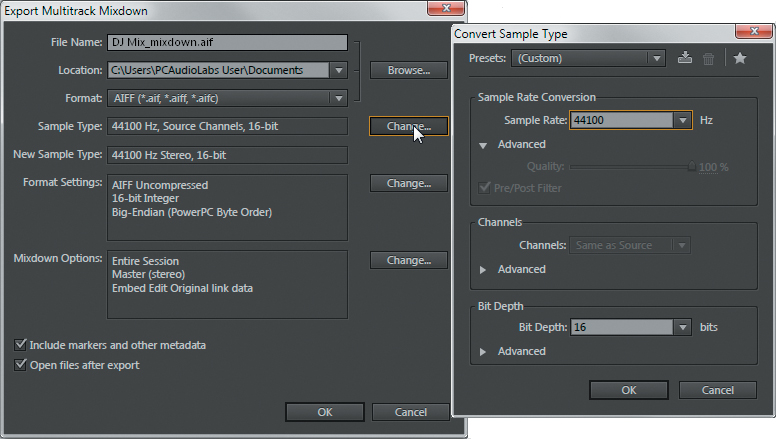
3. Select the desired attributes in the dialog box, and then click OK.
4. Close Audition, and when the Save Changes dialog box appears, click No To All.
Editing for length
Music often needs to be cut to fit a specific amount of time—for example, a 30-second commercial. In this lesson, you’ll use many of Audition’s clip editing tools to trim down a 45-second music clip to make the background for a 30-second commercial.
1. With Audition open, navigate to the Lesson11 folder, and open the Multitrack Session 30SecondSpot.sesx located in the 30SecondSpot folder.
2. Right-click (Control-click) on the timeline and choose Time Display > Decimal (mm:ss.ddd) to verify that the music is about 45 seconds long. Then right-click (Control-click) on the timeline and choose Time Display > Bars and Beats for editing.
3. Right-click (Control-click) on the timeline and choose Time Display > Edit Tempo. Enter 125 in the Tempo field, and then click OK.
Note
To edit a piece of music so that it’s a particular length, you’ll want to alternate the time display between Decimal—to see how edits to the music affect length—and then return to Bars and Beats—for editing the music so you can reference musical time.
The first two measures and next four measures are similar except that there’s a bass in measures 3 and 4 that leads well into the next section. So, you’ll delete the first two measures.
4. Choose the Time Selection tool or press T.
5. If necessary, click the Snap button to enable snapping.
6. Click at measure 3:1 and drag left to select the first two measures. Zoom in far enough to ensure accurate snapping.
Note
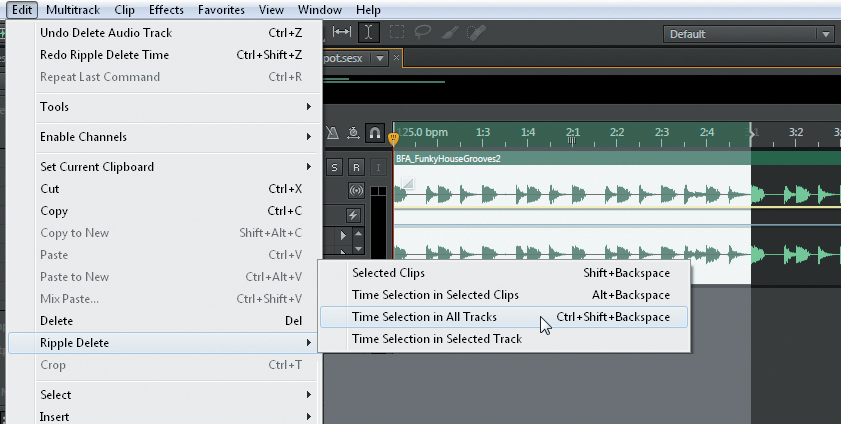
Ripple Delete removes the selected section of a file; in addition, the section to the right of the selection moves left to where the selection started, thus closing the “hole” left by deletion.
7. Choose Edit > Ripple Delete > Time Selection in All Tracks.
The section of the music that starts at measure 7 is similar to the section that starts at measure 11. So, let’s eliminate measures 7–10.
8. Click at the beginning of measure 11:1, and drag left until measure 7:1.
9. Choose Edit > Ripple Delete > Time Selection in All Tracks.
10. Keep this project open for the next lesson.
Editing individual clips in the Waveform Editor
Although the Multitrack Editor has many useful editing tools, for detailed or unusual edits, it’s easy to flip a clip between Waveform and Multitrack Editors.
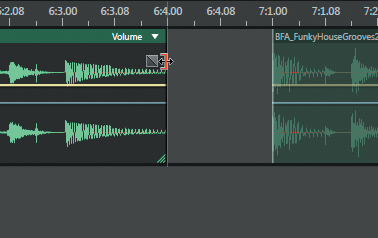
1. The bass slide starting at 6:3 is good, but the slide ends too soon. Shortening the bass slide and repeating it might sound more interesting, so start by trimming the bass note. Hover the cursor over the end of the first clip until the cursor turns into a red right bracket. Click and drag left to 6:4. This trims the last beat of the bass slide.
2. Choose the Razor Selected Clips tool or press R.
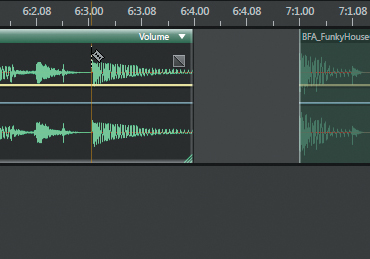
3. Position the Razor tool so that there’s a line at the beginning of the bass slide at 6:3, and then click to split the bass note from the rest of the clip.
4. Choose the Move tool or press V.
5. Alt-click (Option-click) the name header at the top of the bass slide clip you just split, and drag right so that the copied clip starts at measure 6:4.
6. Place the playhead around the beginning of measure 6, and then click Play to hear the result of the two bass parts playing in a row.
That’s more interesting, but let’s make it even more interesting by processing the second slide independently from the first slide. However, a copied clip defaults to referencing the original clip, so any change you make to either clip changes both clips.
7. To convert the second slide into a unique clip, right-click (Control-click) the second slide and choose Convert To Unique Copy. Although the unique copy takes up additional disk space, you can edit it without affecting any other clips.
8. Click the Waveform Editor button to edit the second slide.
9. Choose Edit > Select > Select All or press Ctrl+A (Command+A).
10. Choose Effects > Reverse to play the bass slide backward, so it slides up instead of down.
11. Click the Multitrack Editor button to return to the Multitrack Session. The reversed section will default to being selected, so click anywhere in Track 1 other than the selected section to deselect it.
12. Position the playhead around the beginning of measure 6, and then click Play to hear how the two slides sound when played together. Keep the project open for the next lesson.
Panning individual clips
Although Lesson 14, “Automation,” covers clip automation in detail, now is an appropriate time to introduce the subject by altering the stereo position of the two bass clips. Let’s take the bass processing one step further with panning, which is the process of altering a sound’s position in the stereo field (left, right, center, or anywhere in between).
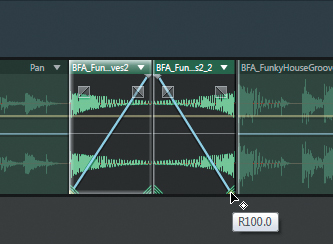
1. For each bass slide clip (forward and backward), click the right and left ends of the blue Pan line (just inside the clip edges) to create control points at the Pan line ends.
2. Click the first bass slide’s left control point, and drag it all the way down. Then click the right control point and drag it all the way up. Click on the second bass slide’s left control point and drag it all the way up, and then click on the right control point and drag it all the way down.
3. Position the playhead near the beginning of measure 6, and then click Play to hear how the two slides move in the stereo field.
Combining Ripple Delete and crossfading
The file still needs one more ripple edit, but that would remove part of the audio that’s worth keeping. However, it’s possible to use crossfading to compensate for deletions caused by the effects of a ripple edit.
1. Change the Time Display to Decimal, and note that the file still needs to be a little shorter. Change the Time Display back to Bars and Beats for editing.
2. Position the playhead at measure 7 and click Play. The music gets a little quieter at measure 9, but then there’s an interesting harmonic note at 10:3. So, using the Time Selection tool, select 8:3 to 10:3 and do a ripple delete, as in step 7 at the beginning of the “Editing for Length” section.
Although a ripple delete removes audio, you can use crossfading to alter the clip length and reintroduce some of the audio that was deleted—yet still not add to the total length.
3. Position the playhead just before the previous transition, and then click Play.
The transition sounds OK, but originally there was a nice little drum fill in the two beats before 10:3. Now the fill is gone because it was in the section that was subjected to the ripple delete. You can reintroduce them.
4. To restore the drum fill, trim the clip starting at 8:3 and make it longer by hovering the cursor over the left edge of the clip until it turns into a red left bracket. Click and drag left to 8:1. Now the section with the drum fill has been crossfaded with the end of the preceding clip.

Note
When you trim a clip using the trim handles, you have not permanently altered the clip but merely changed how Audition plays back the clip in RAM. You can always re-trim to go back to the original length or a different length.
Using global clip stretching to make fine length adjustments
Global clip stretching can stretch all clips proportionately to fine-tune their total, combined length. Although extreme amounts of stretching can sound unnatural, relatively small changes alter the sound quality imperceptibly, if at all.
1. Change the Time Display to Decimal; as luck would have it, the music is just a little over 30 seconds—very close to the goal. So, use global clip stretching to reduce the length slightly. Begin by pressing Ctrl+A (Command+A) to select all clips.
2. Click the Global Clip Stretching button (to the immediate left of the snap function’s magnet icon).
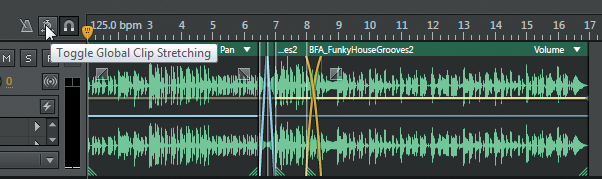
3. Zoom in so you can see the difference clearly between where the music ends and the 30-second mark. Click on the white stretch triangle toward the upper right of the clip, just below the name heading, and drag left until the end of the audio snaps to exactly 30 seconds.
All clips have been stretched proportionately so that the audio track is now 30 seconds long.
4. Position the playhead at the beginning of the file, and then click Play to listen to the entire 30-second music bed.
Clip edits: split, trim, volume
Digital audio editing allows for sound-warping options that would be difficult or even impossible to implement in any other way. Several of these involve isolating specific sections of a clip and processing them individually; the Split function is ideal for doing this. However, this lesson also employs other editing techniques to alter a clip.
1. With Audition open, navigate to the Lesson11 folder, and open the Multitrack Session StutterEdits.sesx from the StutterEdits folder.
2. Place the playhead at the beginning of the file, and click the Transport Play button to hear the BoringDrums clip.
3. Right-click (Control-click) on the timeline and choose Time Display > Bars and Beats.
4. Right-click (Control-click) on the timeline and choose Time Display > Edit Tempo. Enter 100 in the Tempo field, and then click OK.
5. Choose Edit > Snapping > Snap to Rule (Fine). Because you’ll be zooming in quite a bit during this lesson, “fine” snapping will allow for snapping to finer resolutions, like eighth notes.
6. Click the Transport Loop Playback button.
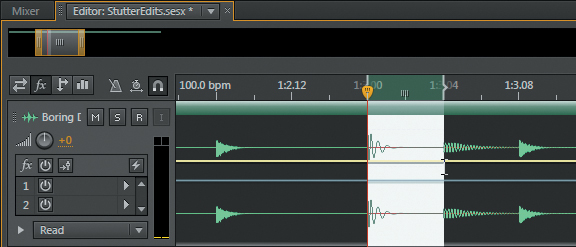
7. Having two 16th note kick drum hits at the end would make a better lead-in back to the beginning. To isolate a kick drum, zoom in until you can see both 1:3.00 and 1:3.04 in the timeline.
8. Choose the Time Selection tool or press T.
9. Click at 1:3.00 and drag right to 1:3.04. Because Fine snapping was selected, the selection should snap to these times on the timeline. This selects the kick drum hit.
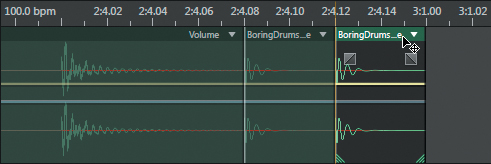
11. Go to the end of the clip, and use the Trim tool to bring the end from 3:1.00 to 2:4.08.
12. To make a copy of the clip, Alt-click (Option-click) on the isolated kick hit’s name heading, and then drag right until the kick clip’s left edge snaps to the end of the clip.
13. Alt-click (Option-click) on the name heading of the kick hit you just moved, and then drag right until the newly copied kick clip’s left edge snaps to the end of the previously copied kick hit. There should now be two kick hits between 2:4.08 and 3:1.00.
14. If necessary, click outside of any selected area so it won’t loop, and then click Play. You’ll now hear the clip with the double kick lead-in at the end.
15. Now add some dynamics by making the first copied kick hit a little softer. Click on the clip’s yellow volume line, and then drag down to around -9dB. Click Play to hear how the two kicks have become more dynamic.
Stutter edits
“Stutter” edits, which are commonly used in a variety of pop music, including dance music and hip-hop, slice and dice clips into pieces and then reassemble them in a different and usually rhythmic order. This lesson shows you how to “stutter edit” a hi-hat hit.
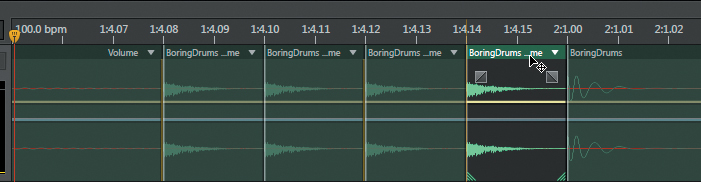
1. Similarly to how you isolated the kick by splitting the clip, zoom in with the Time Selection tool still selected, click on 1:4:08, drag to 1:4:10, and then choose Clip > Split to isolate the hi-hat.
2. Trim the portion of the clip to the right of the hi-hat so that it starts at 2:1.00 instead of 1:4.10.
3. Alt-click (Option-click) and drag the isolated hi-hat four times so there are four hi-hat hits between 1:4.08 and 2:1.00 (starting at 1:4.10, 1:4.12, and 1:4.14).
4. For a crazy stereo effect, click on the first of the four hi-hat hit’s blue pan line, and drag all the way up to L100. Click on the second of the four hi-hat hit’s blue pan line, and drag up to L32.2. Click on the third hi-hat hit’s blue pan line, and drag up to R32.2. Click on the fourth hi-hat hit’s blue pan line, and drag up to R100. Click Play to hear how this affects the loop.
Adding effects to individual clips
Although adding effects to an entire track is convenient for making sweeping real-time changes, it’s also possible to apply one or more effects to an individual clip, no matter how short it is.
1. To add an effect to individual clips, let’s put a big reverb on the snare that hits at 1:4.00. To do this, isolate the snare; click at 1:4.0, drag to 1:4.08, and then choose Clip > Split.
2. Click the Effects Rack tab if needed, and then click the Clip Effects tab. With the isolated snare clip still selected, click the right arrow in the Clip Effects’ Insert 1 slot, and choose Reverb > Studio Reverb.
3. In the Studio Reverb dialog box, select Drum Plate (large) from the Presets menu, and change the Wet slider to 50. Now when the drum loop plays, the snare will have reverb on it.
4. Suppose you like the reverb so much you wish all the snare hits had it. Simply copy it three times (Alt-click [Option-click] on the clip name, and then drag) so that the start of this clip snaps to 1:2.00, 2:2.00, and 2:4.00. Because the snare hit is “on top” of the clip below, it will play back instead of what’s in the clip underneath.
Tip
It’s possible to play a clip on top and the clip underneath it simultaneously by choosing Edit > Preferences > Multitrack and selecting “Play overlapped portions of clips.”
5. If you’re not sure whether you like having the reverb effect on all snare hits, there’s an easy way to try different options. For example, if you want to hear what the loop sounds like without the reverb effect on the first and third snare hits, right-click (Control-click) on the first snare hit (the one that starts at 1:2.00) and choose Send Clip to Back. Next, right-click (Control-click) on the third snare hit (that starts at 2:2.00) and choose Send Clip to Back. Leave this as is for now, but if you want the snares to come back, you just need to right-click (Control-click) on the clip covering the snare, and choose Send Clip to Back. Remember that with layered clips, the upper layer on top has priority over the one underneath (unless you selected “Play overlapped portions of clips” after choosing Edit > Preferences > Multitrack).
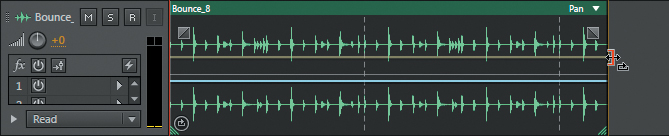
6. Bounce all these clips to a new track so that all these changes are consolidated into a single file. Right-click (Control-click) in the selected track, and choose Bounce to New Track > Selected Track. (If there was other material in this track you didn’t want to bounce, you could select only these clips and choose Bounce to New Track > Selected Clips Only.) A new file appears in the track below that incorporates all your edits.
Note
The Volume control for the track being bounced and the Master Output bus Volume control will affect the level of the bounced track. For example, if either control is set to -3dB, the bounced track will be 3dB lower in volume than the original track with the edits.
7. Keep the project open in preparation for the next lesson.
Extending a clip via looping
Any clip can be turned into a loop and extended for as many iterations as desired using the following procedure.
1. To convert the bounced clip created in the previous lesson to a loop, first verify that the clip start and loop end points are snapped exactly on measure or beat boundaries. If a clip is slightly short or long, any errors will accumulate as you create more iterations of the loop.
2. Right-click (Control-click) anywhere in the clip (except for a fade control square, Volume automation line, or Pan automation line) and choose Loop. A small loop icon appears in the clip’s lower left.
3. Position the cursor over the clip’s right edge. It turns into the Trim tool (red right bracket) but also shows a loop symbol. Drag right to extend the clip for the desired length. A vertical dashed line indicates the end of one iteration and the beginning of another.
Tip
To extend a clip earlier compared to where it starts, you can click on the left edge and drag to the left.
Review questions
1. When crossfading clips to create a DJ mix, aside from having a common tempo, what else is extremely important?
2. What is a ripple delete?
3. How do you apply an effect to something like a single drum hit?
4. What’s the solution if snapping doesn’t seem to work?
5. How can all clips be stretched proportionately to shorten or lengthen a piece of music?
Review answers
1. Make sure clips snap precisely to the beat. Otherwise, the clips can be out of sync with each other during the crossfaded section.
2. A ripple delete removes a selected section of a file; in addition, the section to the right of the selection moves left to where the selection started, which closes the “hole” left by the deletion.
3. Isolate the hit by splitting it into a separate clip, and then insert an effect for only that clip.
4. Zoom in further for higher resolution; you might also need to select “Fine” snapping.
5. Turn on Global Clip Stretching, click on the right edge of the last clip, and then drag it to the desired length.