
3. Basic Editing
• Select a portion of a waveform for editing
• Cut, copy, paste, mix, and remove silence audio. Learn to eliminate unwanted sounds
• Use multiple clipboards to assemble final audio from individual clips
• Extend and shorten pieces of music
• Add new sounds to an existing piece of music using Mix Paste
• Create loops with music files
• Fade audio regions to create smooth transitions, and remove pops and clicks
Audition makes it easy to cut, paste, copy, trim, fade, and perform other processes on audio files. You can zoom in to make extremely precise edits, while seeing a zoomed-out version in the overview window at the top.
Opening a file for editing
You can open multiple files in Adobe Audition, which are stacked behind each other in the main Waveform view. Individual files are selected via the Editor panel drop-down menu.
1. Choose File > Open, navigate to the Lesson03 folder, select the file Narration01, and then click Open.
2. To open multiple files simultaneously, choose File > Open, and navigate to the Lesson03 folder. Select Narration02, and then Shift-click on Narration05. Four files are selected. (To select noncontiguous files, press Ctrl-click [Command-click] on each file you want to load.)
3. Click Open. Audition loads the selected files.
4. Click the Editor panel’s file selector drop-down menu (just above the upper left of the waveform) to see a list of the files you loaded. Click on any of these files to select it and open it in the Waveform view. Or, click Close to close the current file in the stack (that is, the one visible in the Editor panel).
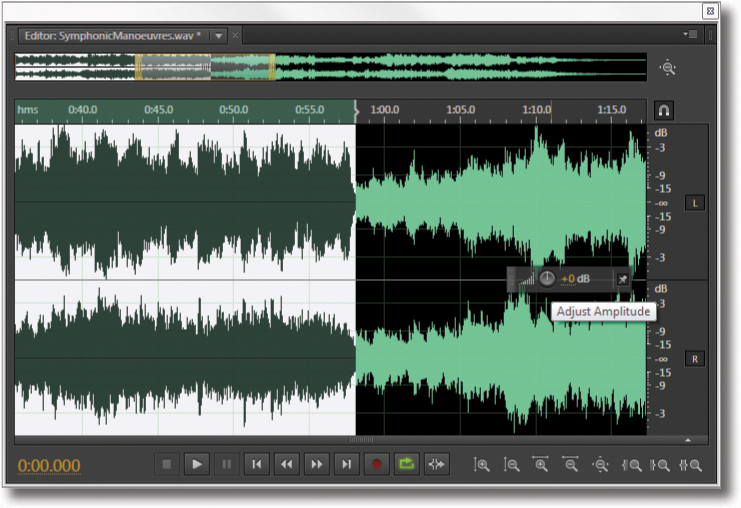
Selecting a region for editing and changing its level
To begin editing your audio, you need to start by choosing a file and specifying which parts of that file you want to edit. This process is called selection.
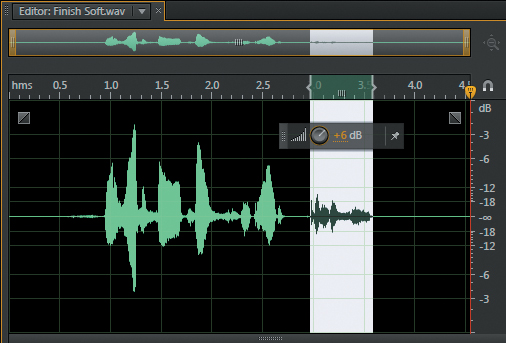
1. Click on the Editor panel drop-down submenu to see a list of recent files loaded into Audition. Select Finish Soft.wav, and it will load into the Editor panel.
2. Click the Transport Play button to hear the file play from start to finish.
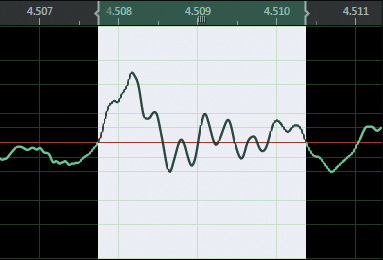
3. Note how the words “to finish” are softer than the other words. Sometimes when recording narration, a drop in volume can occur at the end of phrases. You can fix this in Audition CS6.
4. Click at the beginning of the words, and then drag to the end (or click at the end and drag to the beginning). You’ve now selected those words for editing, as indicated by a white background. You can fine-tune the selection by clicking on the region’s right or left border, either in the Waveform view or timeline, and dragging. Note that upon selecting a region, a heads-up display with a small volume control appears automatically.
5. Click on the volume control and drag upward to increase the volume level to +6dB. To audition this change, click in the timeline above the waveform. Click several seconds before the words you just edited so you can hear them in context, and then click Play.
6. If the level is good, you’re done. If not, choose Edit > Undo Amplify, or press Ctrl+Z (Command+Z). Or, vary the level and audition the results again, as you did in the previous step.
Tip
Double-click anywhere within a file to select the entire file. This also returns the playhead to the file beginning.
7. When you’re satisfied with the level, click anywhere in the waveform to deselect the region but retain the level changes.
Cutting, deleting, and pasting audio regions
Cutting, deleting, and pasting audio regions is particularly useful with narration audio files because you can remove unwanted sounds from your narration, like coughs or “umms,” tighten up spaces, increase spaces between words and phrases, and even rearrange the dialogue if needed. In this lesson you’ll edit the following narration (file Narration05) so it flows logically and doesn’t have unwanted sounds:
“First, once the files are loaded, select the file you, uh, want to edit from the drop-down menu. Well actually, you need to go to the File menu first, select open; then choose the file you want to edit. Remember; you can (clears throat) open up, uh, multiple files at once.”
You’ll get rid of the uhs and throat clearing, and rearrange the narration to say:
“Go to the File menu first; select open; then choose the file you want to edit. Remember that you can open up multiple files at once. Once the files are loaded, select the file you want to edit from the drop-down menu.”
1. The file Narration05 should still be open. If not, reopen the file from the Lessons03 folder. If necessary, select the file Narration05 for editing from the Editor panel drop-down submenu. If you’ve closed and reopened Audition, choose File > Open Recent and then choose Narration05, or navigate to the Lesson03 folder and open Narration05.
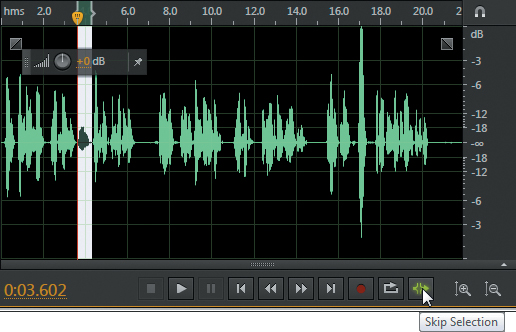
2. Play the file until you reach the first “uh.” Stop the transport, and click and drag across the “uh” to select it.
3. To hear what the file will sound like after you delete the “uh,” click in the timeline several seconds prior to the region, and then click Skip Selection (the rightmost transport button). The file will play up to the region start, and then seamlessly skip to the region end and resume playback. If you hear a click, refer to the sidebar “About zero-crossings.”
4. Choose Edit > Delete to delete the “uh.”
Note
There’s a difference between Edit > Cut and Edit > Delete. Cut removes the region but places the region in the currently selected clipboard so it can be pasted elsewhere if desired. Delete also removes the region but does not place it in the clipboard, and leaves whatever is in the clipboard intact.
When you invoke this command, you may not see any visual difference when zoomed out, because the adjustments are often very minor. However, Audition is indeed moving the region boundaries as defined by the command; you can verify this by zooming in to the waveform so you can see the results with more accuracy.
5. Now you’ll remove the unwanted throat clearing. If you trim right up to the throat-clearing boundaries, when you click the Skip Selection transport button you’ll hear a gap. So, select a region that starts somewhat before and ends slightly after the actual throat clearing to tighten that gap. Then choose Edit > Delete.
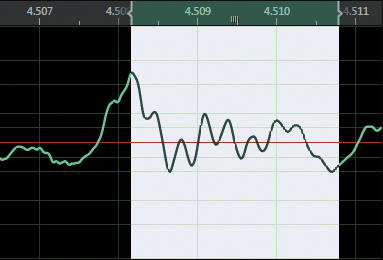
• Adjust selection inward. Moves the region boundaries closer together so each falls on the nearest zero-crossing.
• Adjust selection outward. Moves the region boundaries farther apart so each falls on the nearest zero-crossing.
• Adjust left side to left. Moves the left region boundary to the nearest zero-crossing to the left.
• Adjust left side to right. Moves the left region boundary to the nearest zero-crossing to the right.
• Adjust right side to left. Moves the right region boundary to the nearest zero-crossing to the left.
• Adjust right side to right. Moves the left region boundary to the nearest zero-crossing to the right.
6. Now let’s remove the second “uh” that’s in the audio. Notice that removing this “uh” results in too tight a transition between the words before and after the “uh” (you also have to be careful not to cut off too much of the beginning of the word “multiple”). So, undo your last cut. Instead of deleting the “uh,” you’ll insert silence instead to produce a better result. To do this, select the “uh” and choose Edit > Insert > Silence. A dialog box appears denoting the length of the silence, which will equal the region length you defined. Click OK.
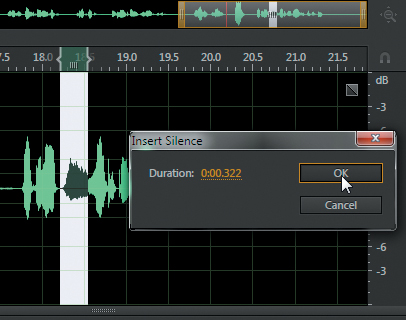
7. The silent gap between words is too long, so define part of the silence as a region. Click Skip Selection to test whether you’ve deleted the right amount. Lengthen or shorten the silence as needed, and then choose Edit > Delete. The gap is now shorter.
Now that you’ve fixed some of the verbal glitches, let’s change the sentence structure into a more coherent narration. Keep this file open; if you need to interrupt this lesson, choose File > Save As, and save the file as Narration05_edit.
Cutting and pasting with multiple clipboards
You’re probably familiar with the computer’s clipboard. In a word processing program, you typically copy a sentence to the clipboard and then paste it from the clipboard to somewhere else in the text. Audition’s clipboard works similarly but offers five clipboards so you can temporarily store up to five different pieces of audio for later pasting. You’ll put that feature to good use when further fixing the Narration05 file beyond just removing the “uhs” and throat clearing.
1. Select the part of the file that says, “Once the files are loaded, select the file you want to edit from the drop-down menu.”
2. Choose Edit > Set Current Clipboard and select Clipboard 1. You can also select this clipboard by pressing Ctrl+1 (Command+1).
3. To remove the phrase and store it in Clipboard 1, choose Edit > Cut or press Ctrl+X (Command+X) to place the phrase in Clipboard 1. The word (Empty) will no longer appear next to the Clipboard 1 name.
4. Select the part of the file that says, “Go to the file menu first; select open; then choose the file you want to edit.”
5. Press Ctrl+2 (Command+2) to make Clipboard 2 the current clipboard (you could also choose Edit > Set Current Clipboard and select Clipboard 2).
6. Choose Edit > Cut to place the phrase in Clipboard 2.
7. Select the part of the file that says, “Remember; you can open up multiple files at once.”
8. Press Ctrl+3 (Command+3) to make Clipboard 3 the current clipboard.
9. Choose Edit > Cut to place the phrase in Clipboard 3. Keep the Narration05 file open.
Now you have a separate clip for each phrase, which will make it easy to place the phrases in a different order. The goal is to end up with “Go to the file menu first; select open; then choose the file you want to edit. Remember; you can open up multiple files at once. Once the files are loaded, select the file you want to edit from the drop-down menu.”
1. Select all the leftover bits of audio in the Narration05 file (or simply press Ctrl+A [Command+A]) and press the Delete key. This clears all the audio and places the playhead at the file’s beginning.
2. Clipboard 2 contains the introduction you want. Press Ctrl+2 (Command+2) to select that clipboard, and then choose Edit > Paste or press Ctrl+V (Command+V).
3. Play the file to confirm you have the desired audio. The playhead will stop at the file’s end if Skip Selection is disabled or return to the file beginning if Skip Selection is enabled.
4. Click within the Waveform view to deselect the pasted audio. Otherwise, subsequent pasting will replace the selected region.
5. Click where you want to insert the next phrase. For this lesson, you’ll place it at the end of the audio file.
6. Clipboard 3 has the desired middle section for this project. Press Ctrl+3 (Command+3), and then press Ctrl+V (Command+V).
7. Repeat steps 4 and 5.
8. Clipboard 1 has the desired ending for this project. Press Ctrl+1 (Command+1), and then press Ctrl+V (Command+V).
Play the file to hear the rearranged audio. For further practice, you can:
• Tighten up spaces between words by selecting a region and pressing Ctrl+X (Command+X) or Delete, or choosing Edit > Cut.
• Add more space between words by placing the playhead where you want to insert silence (don’t drag, just click), and then choose Edit > Insert > Silence. When a dialog box appears, enter the desired duration of silence in the format minutes:seconds.hundredths of a second.
Extending and shortening musical selections
Background music often needs to be lengthened or shortened to fit a video’s duration. In this lesson you’ll lengthen a piece of music by copying one verse and extending it to create two verses.
1. Navigate to the Lesson03 folder, and open the file Ueberschall_PopCharts.wav. (“Pop Charts” is the name of a commercially available sound library from Ueberschall you can use to create your own royalty-free sound tracks and needledrop music.)
2. Start playback. The verse starts at about 7.5 seconds and ends around 23.2 seconds, where it changes key and goes into a bridge.
3. You need to define the precise verse beginning and end, copy that, and then insert it at the end of the first verse. Place the playhead at the approximate beginning of the verse (around 7.5 seconds).
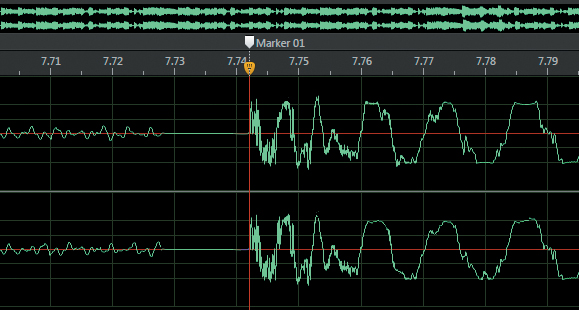
4. Zoom in until you can see an obvious pulse at 7.74 seconds; this corresponds to the downbeat where the kick drum is prominent. Click at the beginning of the downbeat, and then press M to place a marker there.
5. Zoom out and locate the end of the verse (around 23.2 seconds).
6. Again, zoom in and place a marker at the beat that happens just after 23.2 seconds.
7. Zoom out until you can see both markers. Choose Edit > Snapping; select Enabled and verify that Snap to Markers is currently enabled.
8. Select the region between the two markers. Note that because you enabled snapping, the markers have a virtual “magnetic field” that “snaps” the region boundaries to the markers when those boundaries are within a certain distance of the markers.
9. Press Ctrl+C (Command+C) or choose Edit > Copy to copy the selected region to the current clipboard.
10. Click within the waveform to deselect the current region, and then click on the second marker. If you click right on the marker, the playhead will snap to it because snapping is enabled. Another option is to click somewhat before the second marker, and then click the transport’s Move Playhead to Next button (or press Ctrl+right arrow [Command+right arrow]) to move the playhead directly on top of the marker.
11. Press Ctrl+V (Command+V) or choose Edit > Paste. The pasted verse now follows the first verse before going into the bridge. Play the file from the beginning to verify this.
You can use a similar concept to shorten music. Suppose you want to change the intro’s length to half its current length. Note that the intro repeats twice, from 0 seconds to 3.872 seconds and from 3.872 seconds up to the first marker. Here’s how to shorten the intro.
1. Place a marker halfway through the intro (this happens at 3.872 seconds). Remember that the marker needs to go at the precise beginning of the beat.
2. Zoom out and select the region between this new marker and the marker that indicates the start of the first verse.
3. Press Ctrl+X (Command+X) or press the Delete key.
4. Play the file to verify that the beginning is now half the original length.
Keep the edited Ueberschall_PopCharts.wav file open and continue. If you need to interrupt this lesson, choose File > Save As and save the file as Ueberschall_edit.
Simultaneous mixing and pasting
Let’s add a cymbal to the place where the pasted, second verse begins.
1. With the edited Ueberschall_PopCharts.wav file still open, choose File > Open, navigate to the Lesson03 folder, and open the file Cymbal.wav.
2. Press Ctrl+A (Command+A) to select the entire cymbal sound.
3. Press Ctrl+C (Command+C) to copy the cymbal sound to the current clipboard.
4. From the Editor panel’s file selector drop-down menu, choose the Ueberschall_PopCharts.wav file.
5. Click on Marker 01 at 3.5 seconds, which indicates the start of the second verse (the one you pasted in previously).
Note
The reason for adjusting the mix of the pasted and existing audio is to avoid distortion. If you try to mix two audio files that are already at 100% or maximum volume, you would need to reduce each one by 50% to avoid distortion, because the mixed levels would exceed the maximum available headroom.
6. Choose Edit > Mix Paste. A dialog box appears where you can adjust the levels of the copied audio and existing audio.
7. Because you probably don’t want an overbearing cymbal sound, set the Copied Audio volume to about 70%, and then click OK.
8. Play the file to hear the cymbal mixed with the original audio to introduce the second verse. Save this file, and then close it before proceeding.
Repeating part of a waveform to create a loop
Many elements in music are repetitive. A loop is a piece of music that lends itself to repetition, like a drum pattern; many companies offer sound libraries of loops that are suitable for creating sound tracks (Lesson 12, “Creating Music with Sound Libraries,” covers how to create sound tracks in Audition by using loops). However, it’s also possible to create your own loops by extracting a loop from a longer piece of audio.
1. Choose File > Open, navigate to the Lesson03 folder, and open the file Ueberschall_PopCharts.wav.
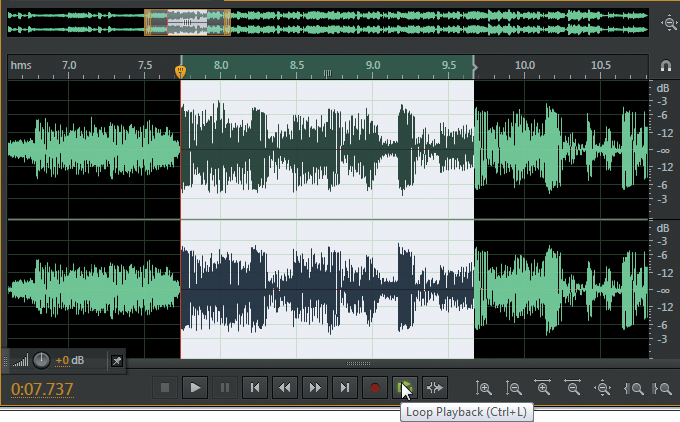
2. Click the Transport’s Loop Playback button, or press Ctrl+L (Command+L).
3. Try to select a region that makes musical sense when looped. You can move the region boundaries during playback. If you have a hard time finding good loop points, set a region to start at 7.742 seconds and end at 9.673. You’ll need to zoom in to set these timings accurately.
4. Once you’ve located and selected a suitable loop, choose Edit > Copy to New or press Shift+Alt+C (Shift+Option+C) to copy your loop to a new file that appears in the Editor panel.
You can select between this loop and the original file from which it came using the Editor panel’s file selector drop-down menu.
5. With the loop displayed in the Editor panel, choose Edit > Save As or press Shift+Ctrl+S (Shift+Command+S) and navigate to where you want to save the loop. Now you have a loop you can use in other pieces of music.
Tip
There are several others ways to save an individual selection. Choose File > Save Selection As to save the selection immediately to disk without having it appear as a file within Audition’s Editor panel or be accessible in the Editor panel’s file selector drop-down menu. However, note that it’s saved to the current clipboard. You can also cut or copy a selection (which of course is saved to the current clipboard), and then choose Edit > Paste to New. This creates a new file that’s accessible in the Editor panel’s file selector drop-down menu.
Fading regions to reduce artifacts
Audio may have unintended noises, such as hum or hiss, that are masked when audio like narration is playing but are audible when the narration stops. Other unintended noises can also occur, like “p-pops” (a “popping” sound that happens from the sudden burst of air associated with plosive sounds like “b” or “p”), clicks, mouth noises, and so on. Audition has advanced techniques for removing noise and doing audio restoration, but for simple problems, a fade is often all you need.
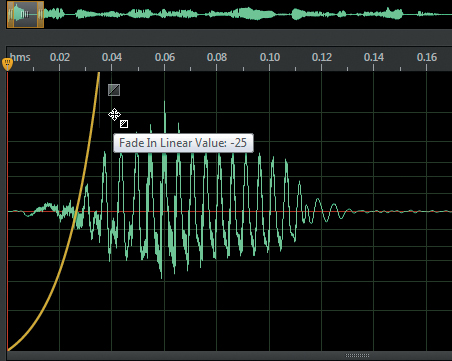
1. Choose File > Open, navigate to the Lesson03 folder, and open the file PPop.wav.
2. Zoom in and move the playhead to the start of the file. The keyboard shortcut to do this is Ctrl+left arrow (Command+left arrow). Note the spike at the beginning that corresponds to the “pop.”
3. Click the small, square Fade In button in the upper-left corner and drag to the right. You can see the fade attenuating the spike. Dragging the Fade In button up or down alters the fade’s shape (up for convex, down for concave). A concave fade is an ideal choice here, because it gets rid of the most objectionable part of the pop but still leaves in the “p” sound.
4. There’s also another, less objectionable pop at 0.20 seconds. Although you could cut this file to the clipboard, create a new file, add a fade-in, and paste it back into place, an easier solution is simply to select the pop sound as a region and use the HUD’s volume control to drop the level by 8 or 9dB.
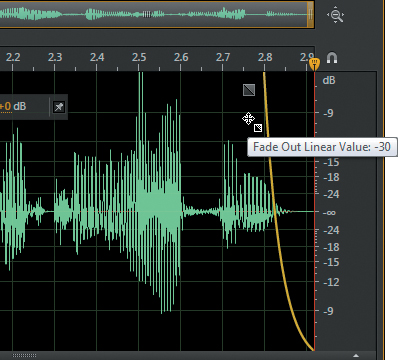
5. Suppose you want to shorten the file to end with “...that can happen” instead of “that can happen when recording.” Zoom in and go to the end of the file. Locate the part that says “when recording,” select it as a region, and then press the Delete key.
6. However, now “happen” doesn’t end elegantly; there’s an audible artifact at the end. You’ll use the Fade Out button to reduce this.
7. Click the Fade Out button and drag left to 2.8 seconds. Then drag down to about -30 and release the mouse button to make the fade “stick.”
Tip
If a file doesn’t begin or end on a zero-crossing and you hear a click, adding a very slight fade time will reduce or eliminate the click. Use a convex fade for this application.
8. Play the file to hear that the artifact at the end is gone.
Review questions
1. What is the easiest way to change level for a selection?
2. Why is it important to have selection boundaries on zero-crossing?
3. How many clipboards does Audition offer?
4. What’s the most effective way to eliminate a “p-pop”?
Review answers
1. As soon as you make a selection, a heads-up display opens with a volume control that lets you change level.
2. Cutting and pasting with selections bounded by zero-crossings tend to minimize clicks.
3. Audition has five individual clipboards that can hold five independent pieces of audio.
4. Placing a fade-in on top of a p-pop lets you determine how much of the pop to minimize and how much to minimize it.