I. GUI Components and Event Handling
Objectives
In this appendix you’ll learn:
• How to use Java’s cross-platform Nimbus look-and-feel.
• To build GUIs and handle events generated by user interactions with GUIs.
• To use nested classes and anonymous inner classes to implement event handlers.
I.3 Text Fields and an Introduction to Event Handling with Nested Classes
I.4 Common GUI Event Types and Listener Interfaces
I.7 JComboBox; Using an Anonymous Inner Class for Event Handling
Self-Review Exercises | Answers to Self-Review Exercises | Exercises
I.1. Introduction
A graphical user interface (GUI) presents a user-friendly mechanism for interacting with an app. A GUI (pronounced “GOO-ee”) gives an app a distinctive “look-and-feel.” GUIs are built from GUI components, such as labels, buttons, textboxes, menus scrollbars and more. These are sometimes called controls or widgets—short for window gadgets. A GUI component is an object with which the user interacts via the mouse, the keyboard or another form of input, such as voice recognition. In this appendix, we introduce a few basic GUI components and how to respond to user interactions with them—a technique known as event handling. We also discuss nested classes and anonymous inner classes, which are commonly used for event handling in Java and Android apps.
I.2. Nimbus Look-and-Feel
In our screen captures, we use Java’s elegant Nimbus cross-platform look-and-feel. There are three ways that you can use Nimbus:
1. Set it as the default for all Java apps that run on your computer.
2. Set it as the look-and-feel at the time that you launch an app by passing a command-line argument to the java command.
3. Set it as the look-and-feel programatically in your app.
We set Nimbus as the default for all Java apps. To do so, you must create a text file named swing.properties in the lib folder of both your JDK installation folder and your JRE installation folder. Place the following line of code in the file:
swing.defaultlaf=com.sun.java.swing.plaf.nimbus.NimbusLookAndFeel
For more information on locating these installation folders visit
bit.ly/JavaInstallationInstructions
In addition to the standalone JRE, there is a JRE nested in your JDK’s installation folder. If you’re using an IDE that depends on the JDK, you may also need to place the swing.properties file in the nested jre folder’s lib folder.
If you prefer to select Nimbus on an app-by-app basis, place the following command-line argument after the java command and before the app’s name when you run the app:
-Dswing.defaultlaf=com.sun.java.swing.plaf.nimbus.NimbusLookAndFeel
I.3. Text Fields and an Introduction to Event Handling with Nested Classes
Normally, a user interacts with an app’s GUI to indicate the tasks that the app should perform. For example, when you write an e-mail in an e-mail app, clicking the Send button tells the app to send the e-mail to the specified e-mail addresses. GUIs are event driven. When the user interacts with a GUI component, the interaction—known as an event—drives the program to perform a task. Some common user interactions that cause an app to perform a task include clicking a button, typing in a text field, selecting an item from a menu, closing a window and moving the mouse. The code that performs a task in response to an event is called an event handler, and the overall process of responding to events is known as event handling.
Let’s consider two GUI components that can generate events—JTextFields and JPasswordFields (package javax.swing). Class JTextField extends class JTextComponent (package javax.swing.text), which provides many features common to Swing’s text-based components. Class JPasswordField extends JTextField and adds methods that are specific to processing passwords. Each of these components is a single-line area in which the user can enter text via the keyboard. Apps can also display text in a JTextField (see the output of Fig. I.2). A JPasswordField shows that characters are being typed as the user enters them, but hides the actual characters with an echo character, assuming that they represent a password that should remain known only to the user.
When the user types in a JTextField or a JPasswordField, then presses Enter, an event occurs. Our next example demonstrates how a program can perform a task in response to that event. The techniques shown here are applicable to all GUI components that generate events.
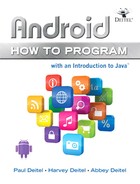
The app of Figs. I.1–I.2 uses classes JTextField and JPasswordField to create and manipulate four text fields. When the user types in one of the text fields, then presses Enter, the app displays a message dialog box containing the text the user typed. You can type only in the text field that’s “in focus.” When you click a component, it receives the focus. This is important, because the text field with the focus is the one that generates an event when you press Enter. In this example, you press Enter in the JPasswordField, the password is revealed. We begin by discussing the setup of the GUI, then discuss the event-handling code.
1 // Fig. I.1: TextFieldFrame.java
2 // JTextFields and JPasswordFields.
3 import java.awt.FlowLayout;
4 import java.awt.event.ActionListener;
5 import java.awt.event.ActionEvent;
6 import javax.swing.JFrame;
7 import javax.swing.JTextField;
8 import javax.swing.JPasswordField;
9 import javax.swing.JOptionPane;
10
11 public class TextFieldFrame extends JFrame
12 {
13 private JTextField textField1; // text field with set size
14 private JTextField textField2; // text field constructed with text
15 private JTextField textField3; // text field with text and size
16 private JPasswordField passwordField; // password field with text
17
18 // TextFieldFrame constructor adds JTextFields to JFrame
19 public TextFieldFrame()
20 {
21 super( "Testing JTextField and JPasswordField" );
22 setLayout( new FlowLayout() ); // set frame layout
23
24 // construct textfield with 10 columns
25 textField1 = new JTextField( 10 );
26 add( textField1 ); // add textField1 to JFrame
27
28 // construct textfield with default text
29 textField2 = new JTextField( "Enter text here" );
30 add( textField2 ); // add textField2 to JFrame
31
32 // construct textfield with default text and 21 columns
33 textField3 = new JTextField( "Uneditable text field", 21 );
34 textField3.setEditable( false ); // disable editing
35 add( textField3 ); // add textField3 to JFrame
36
37 // construct passwordfield with default text
38 passwordField = new JPasswordField( "Hidden text" );
39 add( passwordField ); // add passwordField to JFrame
40
41 // register event handlers
42 TextFieldHandler handler = new TextFieldHandler();
43 textField1.addActionListener( handler );
44 textField2.addActionListener( handler );
45 textField3.addActionListener( handler );
46 passwordField.addActionListener( handler );
47 } // end TextFieldFrame constructor
48
49 // private inner class for event handling
50 private class TextFieldHandler implements ActionListener
51 {
52 // process text field events
53 public void actionPerformed( ActionEvent event )
54 {
55 String string = ""; // declare string to display
56
57 // user pressed Enter in JTextField textField1
58 if ( event.getSource() == textField1 )
59 string = String.format( "textField1: %s",
60 event.getActionCommand() );
61
62 // user pressed Enter in JTextField textField2
63 else if ( event.getSource() == textField2 )
64 string = String.format( "textField2: %s",
65 event.getActionCommand() );
66
67 // user pressed Enter in JTextField textField3
68 else if ( event.getSource() == textField3 )
69 string = String.format( "textField3: %s",
70 event.getActionCommand() );
71
72 // user pressed Enter in JTextField passwordField
73 else if ( event.getSource() == passwordField )
74 string = String.format( "passwordField: %s",
75 event.getActionCommand() );
76
77 // display JTextField content
78 JOptionPane.showMessageDialog( null, string );
79 } // end method actionPerformed
80 } // end private inner class TextFieldHandler
81 } // end class TextFieldFrame
Fig. I.1. JTextFields and JPasswordFields.
1 // Fig. 14.10: TextFieldTest.java
2 // Testing TextFieldFrame.
3 import javax.swing.JFrame;
4
5 public class TextFieldTest
6 {
7 public static void main( String[] args )
8 {
9 TextFieldFrame textFieldFrame = new TextFieldFrame();
10 textFieldFrame.setDefaultCloseOperation( JFrame.EXIT_ON_CLOSE );
11 textFieldFrame.setSize( 350, 100 ); // set frame size
12 textFieldFrame.setVisible( true ); // display frame
13 } // end main
14 } // end class TextFieldTest
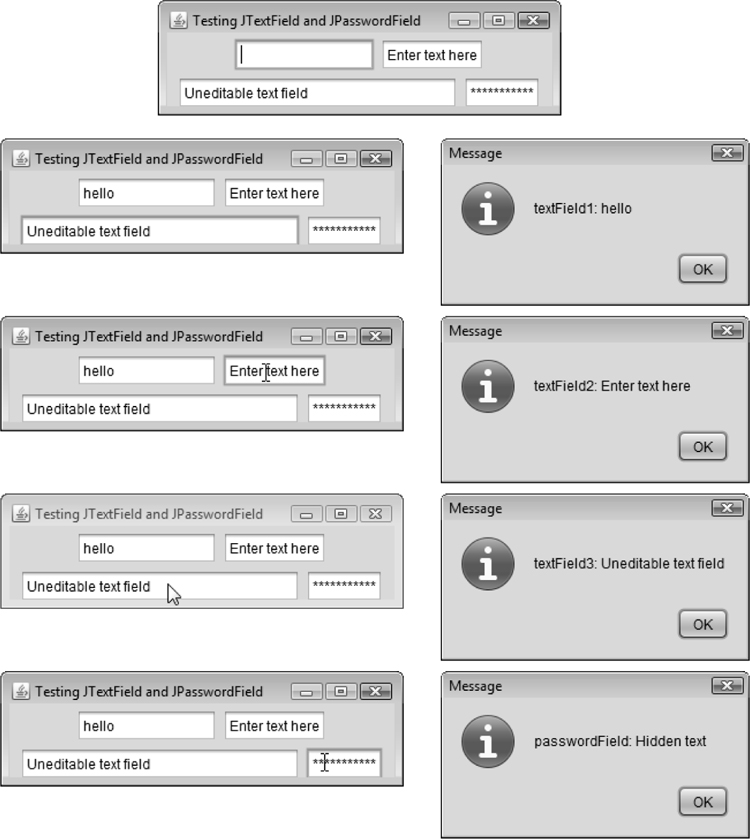
Fig. I.2. Testing TextFieldFrame.
Lines 3–9 import the classes and interfaces we use in this example. Class TextFieldFrame extends JFrame and declares three JTextField variables and a JPasswordField variable (lines 13–16). Each of the corresponding text fields is instantiated and attached to the TextFieldFrame in the constructor (lines 19–47).
Specifying the Layout
When building a GUI, you must attach each GUI component to a container, such as a window created with a JFrame. Also, you typically must decide where to position each GUI component—known as specifying the layout. Java provides several layout managers that can help you position components.
Many IDEs provide GUI design tools in which you can specify components’ exact sizes and locations in a visual manner by using the mouse; then the IDE will generate the GUI code for you. Such IDEs can greatly simplify GUI creation.
To ensure that our GUIs can be used with any IDE, we did not use an IDE to create the GUI code. We use Java’s layout managers to size and position components. With the FlowLayout layout manager, components are placed on a container from left to right in the order in which they’re added. When no more components can fit on the current line, they continue to display left to right on the next line. If the container is resized, a FlowLayout reflows the components, possibly with fewer or more rows based on the new container width. Every container has a default layout, which we’re changing for TextFieldFrame to a FlowLayout (line 22). Method setLayout is inherited into class TextFieldFrame indirectly from class Container. The argument to the method must be an object of a class that implements the LayoutManager interface (e.g., FlowLayout). Line 22 creates a new FlowLayout object and passes its reference as the argument to setLayout.
Creating the GUI
Line 25 creates textField1 with 10 columns of text. A text column’s width in pixels is determined by the average width of a character in the text field’s current font. When text is displayed in a text field and the text is wider than the field itself, a portion of the text at the right side is not visible. If you’re typing in a text field and the cursor reaches the right edge, the text at the left edge is pushed off the left side of the field and is no longer visible. Users can use the left and right arrow keys to move through the complete text. Line 26 adds textField1 to the JFrame.
Line 29 creates textField2 with the initial text "Enter text here" to display in the text field. The width of the field is determined by the width of the default text specified in the constructor. Line 30 adds textField2 to the JFrame.
Line 33 creates textField3 and calls the JTextField constructor with two arguments—the default text "Uneditable text field" to display and the text field’s width in columns (21). Line 34 uses method setEditable (inherited by JTextField from class JTextComponent) to make the text field uneditable—i.e., the user cannot modify the text in the field. Line 35 adds textField3 to the JFrame.
Line 38 creates passwordField with the text "Hidden text" to display in the text field. The width of the field is determined by the width of the default text. When you execute the app, notice that the text is displayed as a string of asterisks. Line 39 adds passwordField to the JFrame.
Steps Required to Set Up Event Handling for a GUI Component
This example should display a message dialog containing the text from a text field when the user presses Enter in that text field. Before an app can respond to an event for a particular GUI component, you must:
1. Create a class that represents the event handler and implements an appropriate interface—known as an event-listener interface.
2. Indicate that an object of the class from Step 1 should be notified when the event occurs—known as registering the event handler.
Using a Nested Class to Implement an Event Handler
All the classes discussed so far were so-called top-level classes—that is, they were not declared inside another class. Java allows you to declare classes inside other classes—these are called nested classes. Nested classes can be static or non-static. Non-static nested classes are called inner classes and are frequently used to implement event handlers.
An inner-class object must be created by an object of the top-level class that contains the inner class. Each inner-class object implicitly has a reference to an object of its top-level class. The inner-class object is allowed to use this implicit reference to directly access all the variables and methods of the top-level class. A nested class that’s static does not require an object of its top-level class and does not implicitly have a reference to an object of the top-level class.
Nested Class TextFieldHandler
The event handling in this example is performed by an object of the private inner class TextFieldHandler (lines 50–80). This class is private because it will be used only to create event handlers for the text fields in top-level class TextFieldFrame. As with other class members, inner classes can be declared public, protected or private. Since event handlers tend to be specific to the app in which they’re defined, they’re often implemented as private inner classes or as anonymous inner classes (Section I.7).
GUI components can generate many events in response to user interactions. Each event is represented by a class and can be processed only by the appropriate type of event handler. Normally, a component’s supported events are described in the Java API documentation for that component’s class and its superclasses. When the user presses Enter in a JTextField or JPasswordField, an ActionEvent (package java.awt.event) occurs. Such an event is processed by an object that implements the interface ActionListener (package java.awt.event). The information discussed here is available in the Java API documentation for classes JTextField and ActionEvent. Since JPasswordField is a subclass of JTextField, JPasswordField supports the same events.
To prepare to handle the events in this example, inner class TextFieldHandler implements interface ActionListener and declares the only method in that interface—actionPerformed (lines 53–79). This method specifies the tasks to perform when an ActionEvent occurs. So, inner class TextFieldHandler satisfies Step 1 listed earlier in this section. We’ll discuss the details of method actionPerformed shortly.
Registering the Event Handler for Each Text Field
In the TextFieldFrame constructor, line 42 creates a TextFieldHandler object and assigns it to variable handler. This object’s actionPerformed method will be called automatically when the user presses Enter in any of the GUI’s text fields. However, before this can occur, the program must register this object as the event handler for each text field. Lines 43–46 are the event-registration statements that specify handler as the event handler for the three JTextFields and the JPasswordField. The app calls JTextField method addActionListener to register the event handler for each component. This method receives as its argument an ActionListener object, which can be an object of any class that implements ActionListener. The object handler is an ActionListener, because class TextFieldHandler implements ActionListener. After lines 43–46 execute, the object handler listens for events. Now, when the user presses Enter in any of these four text fields, method actionPerformed (line 53–79) in class TextFieldHandler is called to handle the event. If an event handler is not registered for a particular text field, the event that occurs when the user presses Enter in that text field is consumed—i.e., it’s simply ignored by the app.
 Software Engineering Observation I.1
The event listener for an event must implement the appropriate event-listener interface.
 Common Programming Error I.1
Forgetting to register an event-handler object for a particular GUI component’s event type causes events of that type to be ignored.
Details of Class TextFieldHandler’s actionPerformed Method
In this example, we’re using one event-handling object’s actionPerformed method (lines 53–79) to handle the events generated by four text fields. Since we’d like to output the name of each text field’s instance variable for demonstration purposes, we must determine which text field generated the event each time actionPerformed is called. The event source is the GUI component with which the user interacted. When the user presses Enter while one of the text fields or the password field has the focus, the system creates a unique ActionEvent object that contains information about the event that just occurred, such as the event source and the text in the text field. The system passes this ActionEvent object to the event listener’s actionPerformed method. Line 55 declares the String that will be displayed. The variable is initialized with the empty string—a String containing no characters. The compiler requires the variable to be initialized in case none of the branches of the nested if in lines 58–75 executes.
ActionEvent method getSource (called in lines 58, 63, 68 and 73) returns a reference to the event source. The condition in line 58 asks, “Is the event source textField1?” This condition compares references with the == operator to determine if they refer to the same object. If they both refer to textField1, the user pressed Enter in textField1. Then, lines 59–60 create a String containing the message that line 78 displays in a message dialog. Line 60 uses ActionEvent method getActionCommand to obtain the text the user typed in the text field that generated the event.
In this example, we display the text of the password in the JPasswordField when the user presses Enter in that field. Sometimes it’s necessary to programatically process the characters in a password. Class JPasswordField method getPassword returns the password’s characters as an array of type char.
Class TextFieldTest
Class TextFieldTest (Fig. I.2) contains the main method that executes this app and displays an object of class TextFieldFrame. When you execute the app, even the uneditable JTextField (textField3) can generate an ActionEvent. To test this, click the text field to give it the focus, then press Enter. Also, the actual text of the password is displayed when you press Enter in the JPasswordField. Of course, you would normally not display the password!
This app used a single object of class TextFieldHandler as the event listener for four text fields. It’s possible to declare several event-listener objects of the same type and register each object for a separate GUI component’s event. This technique enables us to eliminate the if...else logic used in this example’s event handler by providing separate event handlers for each component’s events.
I.4. Common GUI Event Types and Listener Interfaces
In Section I.3, you learned that information about the event that occurs when the user presses Enter in a text field is stored in an ActionEvent object. Many different types of events can occur when the user interacts with a GUI. The event information is stored in an object of a class that extends AWTEvent (from package java.awt). Figure I.3 illustrates a hierarchy containing many event classes from the package java.awt.event. Additional event types are declared in package javax.swing.event.
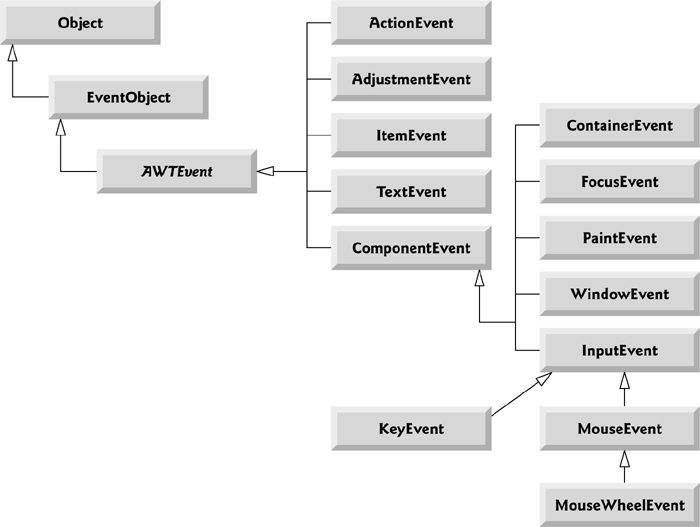
Fig. I.3. Some event classes of package java.awt.event.
Let’s summarize the three parts to the event-handling mechanism that you saw in Section I.3—the event source, the event object and the event listener. The event source is the GUI component with which the user interacts. The event object encapsulates information about the event that occurred, such as a reference to the event source and any event-specific information that may be required by the event listener for it to handle the event. The event listener is an object that’s notified by the event source when an event occurs; in effect, it “listens” for an event, and one of its methods executes in response to the event. A method of the event listener receives an event object when the event listener is notified of the event. The event listener then uses the event object to respond to the event. This event-handling model is known as the delegation event model—an event’s processing is delegated to an object (the event listener) in the app.
For each event-object type, there’s typically a corresponding event-listener interface. An event listener for a GUI event is an object of a class that implements one or more of the event-listener interfaces.
Each event-listener interface specifies one or more event-handling methods that must be declared in the class that implements the interface. Recall from Section G.12 that any class which implements an interface must declare all the abstract methods of that interface; otherwise, the class is an abstract class and cannot be used to create objects.
When an event occurs, the GUI component with which the user interacted notifies its registered listeners by calling each listener’s appropriate event-handling method. For example, when the user presses the Enter key in a JTextField, the registered listener’s actionPerformed method is called. How did the event handler get registered? How does the GUI component know to call actionPerformed rather than another event-handling method? We answer these questions and diagram the interaction in the next section.
I.5. How Event Handling Works
Let’s illustrate how the event-handling mechanism works, using textField1 from the example of Fig. I.1. We have two remaining open questions from Section I.3:
1. How did the event handler get registered?
2. How does the GUI component know to call actionPerformed rather than some other event-handling method?
The first question is answered by the event registration performed in lines 43–46 of Fig. I.1. Figure I.4 diagrams JTextField variable textField1, TextFieldHandler variable handler and the objects to which they refer.
Fig. I.4. Event registration for JTextField textField1.
Registering Events
Every JComponent has an instance variable called listenerList that refers to an object of class EventListenerList (package javax.swing.event). Each object of a JComponent subclass maintains references to its registered listeners in the listenerList. For simplicity, we’ve diagramed listenerList as an array below the JTextField object in Fig. I.4.
When line 43 of Fig. I.1
textField1.addActionListener( handler );
executes, a new entry containing a reference to the TextFieldHandler object is placed in textField1’s listenerList. Although not shown in the diagram, this new entry also includes the listener’s type (in this case, ActionListener). Using this mechanism, each lightweight Swing GUI component maintains its own list of listeners that were registered to handle the component’s events.
Event-Handler Invocation
The event-listener type is important in answering the second question: How does the GUI component know to call actionPerformed rather than another method? Every GUI component supports several event types, including mouse events, key events and others. When an event occurs, the event is dispatched only to the event listeners of the appropriate type. Dispatching is simply the process by which the GUI component calls an event-handling method on each of its listeners that are registered for the event type that occurred.
Each event type has one or more corresponding event-listener interfaces. For example, ActionEvents are handled by ActionListeners, MouseEvents by MouseListeners and MouseMotionListeners, and KeyEvents by KeyListeners. When an event occurs, the GUI component receives (from the JVM) a unique event ID specifying the event type. The GUI component uses the event ID to decide the listener type to which the event should be dispatched and to decide which method to call on each listener object. For an ActionEvent, the event is dispatched to every registered ActionListener’s actionPerformed method (the only method in interface ActionListener). For a MouseEvent, the event is dispatched to every registered MouseListener or MouseMotionListener, depending on the mouse event that occurs. The MouseEvent’s event ID determines which of the several mouse event-handling methods are called. All these decisions are handled for you by the GUI components. All you need to do is register an event handler for the particular event type that your app requires, and the GUI component will ensure that the event handler’s appropriate method gets called when the event occurs. We discuss other event types and event-listener interfaces as they’re needed with each new component we introduce.
I.6. JButton
A button is a component the user clicks to trigger a specific action. A Java app can use several types of buttons, including command buttons, checkboxes, toggle buttons and radio buttons. Figure I.5 shows the inheritance hierarchy of the Swing buttons we cover in this appendix. As you can see, all the button types are subclasses of AbstractButton (package javax.swing), which declares the common features of Swing buttons. In this section, we concentrate on buttons that are typically used to initiate a command.
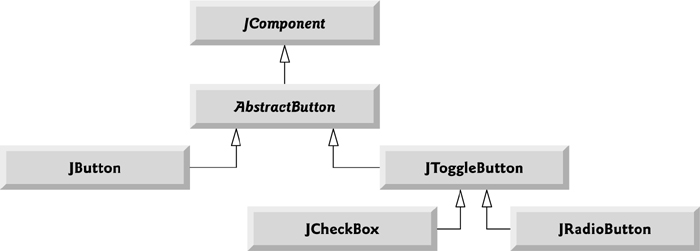
Fig. I.5. Swing button hierarchy.
A command button (see Fig. I.7’s output) generates an ActionEvent when the user clicks it. Command buttons are created with class JButton. The text on the face of a JButton is called a button label. A GUI can have many JButtons, but each button label should be unique in the portion of the GUI that’s currently displayed.
 Look-and-Feel Observation I.1
Having more than one JButton with the same label makes the JButtons ambiguous to the user. Provide a unique label for each button.
The app of Figs. I.6 and I.7 creates two JButtons and demonstrates that JButtons support the display of Icons. Event handling for the buttons is performed by a single instance of inner class ButtonHandler (lines 39–47).
1 // Fig. 14.15: ButtonFrame.java
2 // Command buttons and action events.
3 import java.awt.FlowLayout;
4 import java.awt.event.ActionListener;
5 import java.awt.event.ActionEvent;
6 import javax.swing.JFrame;
7 import javax.swing.JButton;
8 import javax.swing.Icon;
9 import javax.swing.ImageIcon;
10 import javax.swing.JOptionPane;
11
12 public class ButtonFrame extends JFrame
13 {
14 private JButton plainJButton; // button with just text
15 private JButton fancyJButton; // button with icons
16
17 // ButtonFrame adds JButtons to JFrame
18 public ButtonFrame()
19 {
20 super( "Testing Buttons" );
21 setLayout( new FlowLayout() ); // set frame layout
22
23 plainJButton = new JButton( "Plain Button" ); // button with text
24 add( plainJButton ); // add plainJButton to JFrame
25
26 Icon bug1 = new ImageIcon( getClass().getResource( "bug1.gif" ) );
27 Icon bug2 = new ImageIcon( getClass().getResource( "bug2.gif" ) );
28 fancyJButton = new JButton( "Fancy Button", bug1 ); // set image
29 fancyJButton.setRolloverIcon( bug2 ); // set rollover image
30 add( fancyJButton ); // add fancyJButton to JFrame
31
32 // create new ButtonHandler for button event handling
33 ButtonHandler handler = new ButtonHandler();
34 fancyJButton.addActionListener( handler );
35 plainJButton.addActionListener( handler );
36 } // end ButtonFrame constructor
37
38 // inner class for button event handling
39 private class ButtonHandler implements ActionListener
40 {
41 // handle button event
42 public void actionPerformed( ActionEvent event )
43 {
44 JOptionPane.showMessageDialog( ButtonFrame.this, String.format(
45 "You pressed: %s", event.getActionCommand() ) );
46 } // end method actionPerformed
47 } // end private inner class ButtonHandler
48 } // end class ButtonFrame
Fig. I.6. Command buttons and action events.
1 // Fig. 14.16: ButtonTest.java
2 // Testing ButtonFrame.
3 import javax.swing.JFrame;
4
5 public class ButtonTest
6 {
7 public static void main( String[] args )
8 {
9 ButtonFrame buttonFrame = new ButtonFrame(); // create ButtonFrame
10 buttonFrame.setDefaultCloseOperation( JFrame.EXIT_ON_CLOSE );
11 buttonFrame.setSize( 275, 110 ); // set frame size
12 buttonFrame.setVisible( true ); // display frame
13 } // end main
14 } // end class ButtonTest
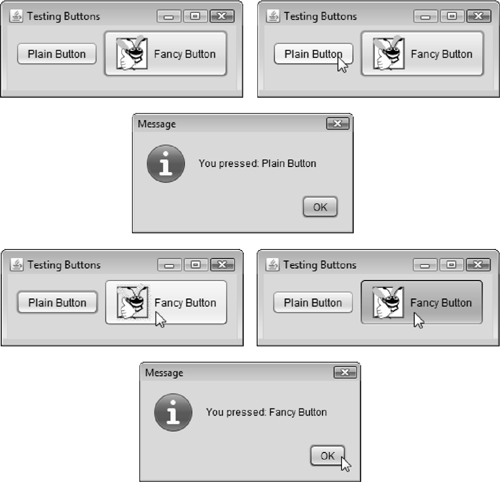
Fig. I.7. Testing ButtonFrame.
Lines 14–15 of Fig. I.6 declare JButton variables plainJButton and fancyJButton. The corresponding objects are instantiated in the constructor. Line 23 creates plainJButton with the button label "Plain Button". Line 24 adds the JButton to the JFrame.
A JButton can display an Icon. To provide the user with an extra level of visual interaction with the GUI, a JButton can also have a rollover Icon—an Icon that’s displayed when the user positions the mouse over the JButton. The icon on the JButton changes as the mouse moves in and out of the JButton’s area on the screen. Lines 26–27 (Fig. I.6) create two ImageIcon objects that represent the default Icon and rollover Icon for the JButton created at line 28. Both statements assume that the image files are stored in the same directory as the app. Images are commonly placed in the same directory as the app or a subdirectory like images). These image files have been provided for you with the example.
Line 28 creates fancyButton with the text "Fancy Button" and the icon bug1. By default, the text is displayed to the right of the icon. Line 29 uses setRolloverIcon (inherited from class AbstractButton) to specify the image displayed on the JButton when the user positions the mouse over it. Line 30 adds the JButton to the JFrame.
Because class AbstractButton supports displaying text and images on a button, all subclasses of AbstractButton also support displaying text and images.
Using rollover icons for JButtons provides users with visual feedback indicating that when they click the mouse while the cursor is positioned over the JButton, an action will occur.
JButtons, like JTextFields, generate ActionEvents that can be processed by any ActionListener object. Lines 33–35 create an object of private inner class ButtonHandler and use addActionListener to register it as the event handler for each JButton. Class ButtonHandler (lines 39–47) declares actionPerformed to display a message dialog box containing the label for the button the user pressed. For a JButton event, ActionEvent method getActionCommand returns the label on the JButton.
Accessing the this Reference in an Object of a Top-Level Class From a Nested Class
When you execute this app and click one of its buttons, notice that the message dialog that appears is centered over the app’s window. This occurs because the call to JOptionPane method showMessageDialog (lines 44–45 of Fig. I.6) uses ButtonFrame.this rather than null as the first argument. When this argument is not null, it represents the so-called parent GUI component of the message dialog (in this case the app window is the parent component) and enables the dialog to be centered over that component when the dialog is displayed. ButtonFrame.this represents the this reference of the object of top-level class ButtonFrame.
Software Engineering Observation I.2
When used in an inner class, keyword this refers to the current inner-class object being manipulated. An inner-class method can use its outer-class object’s this by preceding this with the outer-class name and a dot, as in ButtonFrame.this.
I.7. JComboBox; Using an Anonymous Inner Class for Event Handling
A combo box (sometimes called a drop-down list) enables the user to select one item from a list (Fig. I.9). Combo boxes are implemented with class JComboBox, which extends class JComponent. JComboBoxes generate ItemEvents just as JCheckBoxes and JRadioButtons do. This example also demonstrates a special form of inner class that’s used frequently in event handling. The app (Figs. I.8–I.9) uses a JComboBox to provide a list of four image-file names from which the user can select one image to display. When the user selects a name, the app displays the corresponding image as an Icon on a JLabel. Class ComboBoxTest (Fig. I.9) contains the main method that executes this app. The screen captures for this app show the JComboBox list after the selection was made to illustrate which image-file name was selected.
1 // Fig. I.8: ComboBoxFrame.java
2 // JComboBox that displays a list of image names.
3 import java.awt.FlowLayout;
4 import java.awt.event.ItemListener;
5 import java.awt.event.ItemEvent;
6 import javax.swing.JFrame;
7 import javax.swing.JLabel;
8 import javax.swing.JComboBox;
9 import javax.swing.Icon;
10 import javax.swing.ImageIcon;
11
12 public class ComboBoxFrame extends JFrame
13 {
14 private JComboBox imagesJComboBox; // combobox to hold names of icons
15 private JLabel label; // label to display selected icon
16
17 private static final String[] names =
18 { "bug1.gif", "bug2.gif", "travelbug.gif", "buganim.gif" };
19 private Icon[] icons = {
20 new ImageIcon( getClass().getResource( names[ 0 ] ) ),
21 new ImageIcon( getClass().getResource( names[ 1 ] ) ),
22 new ImageIcon( getClass().getResource( names[ 2 ] ) ),
23 new ImageIcon( getClass().getResource( names[ 3 ] ) ) };
24
25 // ComboBoxFrame constructor adds JComboBox to JFrame
26 public ComboBoxFrame()
27 {
28 super( "Testing JComboBox" );
29 setLayout( new FlowLayout() ); // set frame layout
30
31 imagesJComboBox = new JComboBox( names ); // set up JComboBox
32 imagesJComboBox.setMaximumRowCount( 3 ); // display three rows
33
34 imagesJComboBox.addItemListener(
35 new ItemListener() // anonymous inner class
36 {
37 // handle JComboBox event
38 public void itemStateChanged( ItemEvent event )
39 {
40 // determine whether item selected
41 if ( event.getStateChange() == ItemEvent.SELECTED )
42 label.setIcon( icons[
43 imagesJComboBox.getSelectedIndex() ] );
44 } // end method itemStateChanged
45 } // end anonymous inner class
46 ); // end call to addItemListener
47
48 add( imagesJComboBox ); // add combobox to JFrame
49 label = new JLabel( icons[ 0 ] ); // display first icon
50 add( label ); // add label to JFrame
51 } // end ComboBoxFrame constructor
52 } // end class ComboBoxFrame
Fig. I.8. JComboBox that displays a list of image names.
1 // Fig. I.9: ComboBoxTest.java
2 // Testing ComboBoxFrame.
3 import javax.swing.JFrame;
4
5 public class ComboBoxTest
6 {
7 public static void main( String[] args )
8 {
9 ComboBoxFrame comboBoxFrame = new ComboBoxFrame();
10 comboBoxFrame.setDefaultCloseOperation( JFrame.EXIT_ON_CLOSE );
11 comboBoxFrame.setSize( 350, 150 ); // set frame size
12 comboBoxFrame.setVisible( true ); // display frame
13 } // end main
14 } // end class ComboBoxTest
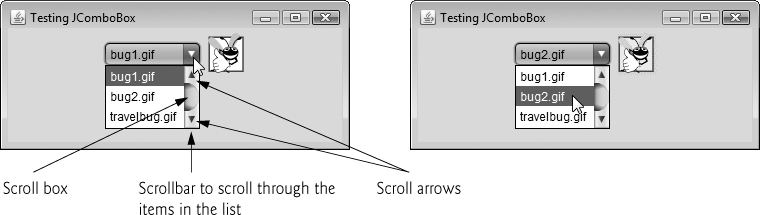

Fig. I.9. Testing ComboBoxFrame.
Lines 19–23 (Fig. I.8) declare and initialize array icons with four new ImageIcon objects. String array names (lines 17–18) contains the names of the four image files that are stored in the same directory as the app.
At line 31, the constructor initializes a JComboBox object with the Strings in array names as the elements in the list. Each item in the list has an index. The first item is added at index 0, the next at index 1 and so forth. The first item added to a JComboBox appears as the currently selected item when the JComboBox is displayed. Other items are selected by clicking the JComboBox, then selecting an item from the list that appears.
Line 32 uses JComboBox method setMaximumRowCount to set the maximum number of elements that are displayed when the user clicks the JComboBox. If there are additional items, the JComboBox provides a scrollbar (see the first screen) that allows the user to scroll through all the elements in the list. The user can click the scroll arrows at the top and bottom of the scrollbar to move up and down through the list one element at a time, or else drag the scroll box in the middle of the scrollbar up and down. To drag the scroll box, position the mouse cursor on it, hold the mouse button down and move the mouse. In this example, the drop-down list is too short to drag the scroll box, so you can click the up and down arrows or use your mouse’s wheel to scroll through the four items in the list.
Set the maximum row count for a JComboBox to a number of rows that prevents the list from expanding outside the bounds of the window in which it’s used.
Line 48 attaches the JComboBox to the ComboBoxFrame’s FlowLayout (set in line 29). Line 49 creates the JLabel that displays ImageIcons and initializes it with the first ImageIcon in array icons. Line 50 attaches the JLabel to the ComboBoxFrame’s FlowLayout.
Using an Anonymous Inner Class for Event Handling
Lines 34–46 are one statement that declares the event listener’s class, creates an object of that class and registers it as the listener for imagesJComboBox’s ItemEvents. This event-listener object is an instance of an anonymous inner class—an inner class that’s declared without a name and typically appears inside a method declaration. As with other inner classes, an anonymous inner class can access its top-level class’s members. However, an anonymous inner class has limited access to the local variables of the method in which it’s declared. Since an anonymous inner class has no name, one object of the class must be created at the point where the class is declared (starting at line 35).
Software Engineering Observation I.3
An anonymous inner class declared in a method can access the instance variables and methods of the top-level class object that declared it, as well as the method’s final local variables, but cannot access the method’s non-final local variables.
Lines 34–46 are a call to imagesJComboBox’s addItemListener method. The argument to this method must be an object that is an ItemListener (i.e., any object of a class that implements ItemListener). Lines 35–45 are a class-instance creation expression that declares an anonymous inner class and creates one object of that class. A reference to that object is then passed as the argument to addItemListener. The syntax ItemListener() after new begins the declaration of an anonymous inner class that implements interface ItemListener. This is similar to beginning a class declaration with
public class MyHandler implements ItemListener
The opening left brace at 36 and the closing right brace at line 45 delimit the body of the anonymous inner class. Lines 38–44 declare the ItemListener’s itemStateChanged method. When the user makes a selection from imagesJComboBox, this method sets label’s Icon. The Icon is selected from array icons by determining the index of the selected item in the JComboBox with method getSelectedIndex in line 43. For each item selected from a JComboBox, another item is first deselected—so two ItemEvents occur when an item is selected. We wish to display only the icon for the item the user just selected. For this reason, line 41 determines whether ItemEvent method getStateChange returns ItemEvent.SELECTED. If so, lines 42–43 set label’s icon.
Software Engineering Observation I.4
Like any other class, when an anonymous inner class implements an interface, the class must implement every method in the interface.
The syntax shown in lines 35–45 for creating an event handler with an anonymous inner class is similar to the code that would be generated by a Java IDE. Typically, an IDE enables you to design a GUI visually, then it generates code that implements the GUI. You simply insert statements in the event-handling methods that declare how to handle each event.
I.8. Adapter Classes
Many event-listener interfaces, such as MouseListener and MouseMotionListener, contain multiple methods. It’s not always desirable to declare every method in an event-listener interface. For instance, an app may need only the mouseClicked handler from MouseListener or the mouseDragged handler from MouseMotionListener. Interface WindowListener specifies seven window event-handling methods. For many of the listener interfaces that have multiple methods, packages java.awt.event and javax.swing.event provide event-listener adapter classes. An adapter class implements an interface and provides a default implementation (with an empty method body) of each method in the interface. You can extend an adapter class to inherit the default implementation of every method and subsequently override only the method(s) you need for event handling.
Software Engineering Observation I.5
When a class implements an interface, the class has an is-a relationship with that interface. All direct and indirect subclasses of that class inherit this interface. Thus, an object of a class that extends an event-adapter class is an object of the corresponding event-listener type (e.g., an object of a subclass of MouseAdapter is a MouseListener).
I.9. Wrap-Up
In this appendix, you learned about a few Java GUI components and how to implement event handlers using nested classes and anonymous inner classes. You saw the special relationship between an inner-class object and an object of its top-level class. You also learned how to create apps that execute in their own windows. We discussed class JFrame and components that enable a user to interact with an app.
Self-Review Exercises
I.1 Fill in the blanks in each of the following statements:
a. A(n) __________ arranges GUI components in a Container.
b. The add method for attaching GUI components is a method of class __________.
c. GUI is an acronym for __________.
d. Method __________ is used to specify the layout manager for a container.
I.2 Specify whether the folowing statement is true or false and if false, explain why: Inner classes are not allowed to access the members of the enclosing class.
Answers to Self-Review Exercises
a. layout manager.
b. Container.
c. graphicaluser interface.
d. setLayout.
I.2 False. Inner classes have access to all members of the enclosing class declaration.
Exercises
I.3 (Temperature Conversion) Write a temperature-conversion app that converts from Fahrenheit to Celsius. The Fahrenheit temperature should be entered from the keyboard (via a JTextField). A JLabel should be used to display the converted temperature. Use the following formula for the conversion:
I.4 (Temperature-Conversion Modification) Enhance the temperature-conversion app of Exercise I.3 by adding the Kelvin temperature scale. The app should also allow the user to make conversions between any two scales. Use the following formula for the conversion between Kelvin and Celsius (in addition to the formula in Exercise I.3):
Kelvin = Celsius + 273.15
I.5 (Guess-the-Number Game) Write an app that plays “guess the number” as follows: Your app chooses the number to be guessed by selecting an integer at random in the range 1–1000. The app then displays the following in a label:
I have a number between 1 and 1000. Can you guess my number?
Please enter your first guess.
A JTextField should be used to input the guess. As each guess is input, the background color should change to either red or blue. Red indicates that the user is getting “warmer,” and blue, “colder.” A JLabel should display either "Too High" or "Too Low" to help the user zero in. When the user gets the correct answer, "Correct!" should be displayed, and the JTextField used for input should be changed to be uneditable. A JButton should be provided to allow the user to play the game again. When the JButton is clicked, a new random number should be generated and the input JTextField changed to be editable.