
2. HTML5 Primer
HTML is the coding language used to mark content types on the page and add structure using tags. Over the past 20 years or so, the language has changed—some tags were added, some removed, and some stayed exactly the same. HTML5 is the most recent version, adding tags to improve the ability to structure pages semantically, insert audio and video clips, and create more meaningful forms. Although mostly supported by all major Web browsers, there are still plenty of older browsers out there that do not support HTML5 at all. Fortunately, you can do something about that.
First, let’s take a look at what markup languages are and how HTML5 fits into the new world order.
What Is HTML?
The HyperText Markup Language is a system of code tags that define elements on the page, which create the structure of a document for use on the Web. For example, you take a block of text ![]() and add HTML tags, as follows:
and add HTML tags, as follows: ![]()
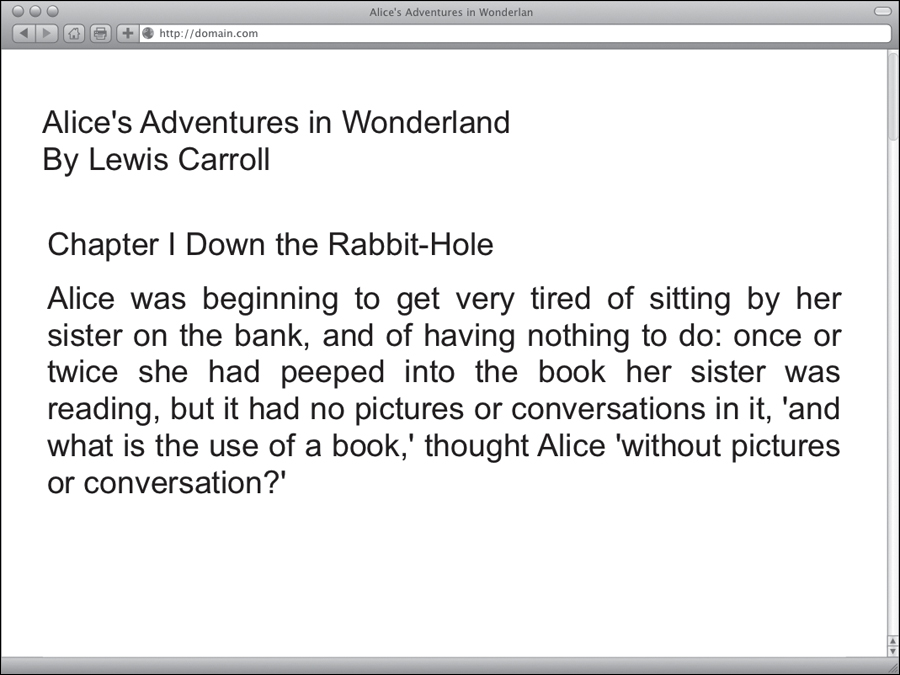
![]() Plain text without any markup.
Plain text without any markup.
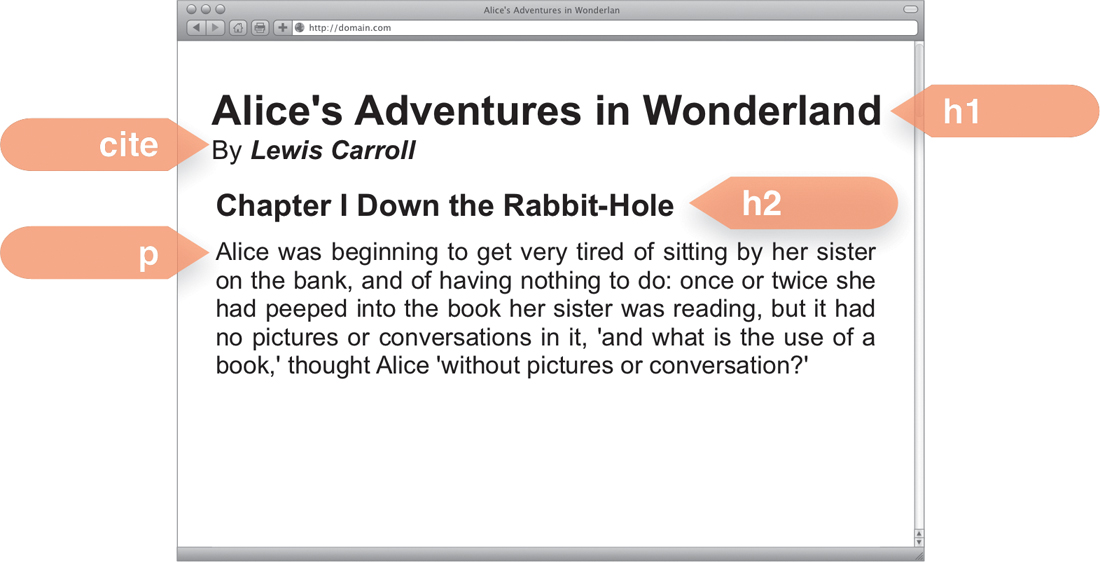
![]() The same text content with HTML tags applied.
The same text content with HTML tags applied.
<h1>Alice's Adventures in Wonderland</h1>
Here, you’ve used the <h1> tag to create a header element, which is the most important header for the page: the level 1 header. Different tags are used to tag different kinds of content, and tags can be placed within other tags. For example:
<p>I wonder if I shall fall right <em>through</em> the earth!</p>
These tags tell the browser that the text is a paragraph, and the word “through” should be presented with emphasis, probably by displaying it in italics.
Basic HTML document structure
All HTML documents have similar basic structure, which includes the following elements:
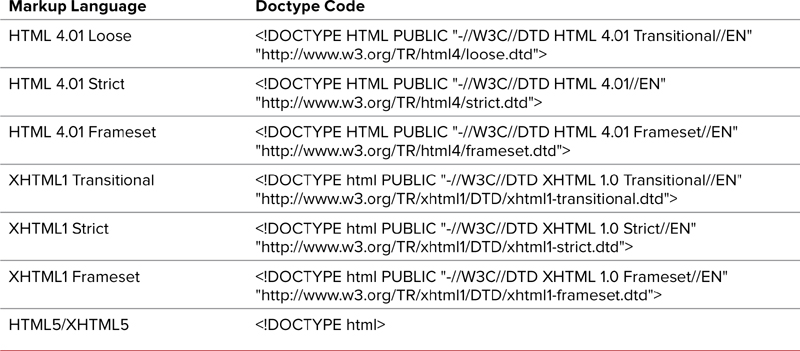
• Doctype (<!DOCTYPE>) sets the type of markup language the document is using (Table 2.4). This is important to include so that the browser can quickly and accurately interpret the HTML code.
• Head (<head>) includes information about the page, such as the title and meta tags. You should also place links to external CSS and JavaScript files in this area. The head should not be confused with a page header. Nothing in the head of the page will be directly displayed in the Web page.
• Body (<body>) contains the elements you actually see in the Web browser page, such as navigation, headers, paragraphs, lists, tables, images, and much more.
HTML properties
HTML elements can be modified by placing HTML properties within the tag. Some properties are optional, some affect the performance of the element, and some are needed for an element to work properly. For example, the anchor tag (<a>) uses the href property to define where a link is pointing:
<a href="http://www.jasonspeaking.com">Jason</a>
Properties are also used to connect an HTML element to styles using the style, class, or id properties:
<p style="color: red;">Alice</a>
<p class="hilight char names">Alice</a>
<p id="name01">Alice</a>
Every tag has one or more properties that can be applied to them. These become especially important when we start using CSS to style tags based on property values, as explained in Chapter 4.
Browser inherited styles
Most HTML tags have browser inherited styles associated with them. These default styles are actually defined by the Web browser developer. Because the browser developer has added them, you need to remember that they are there and will affect your design. For example, the <em> tag will italicize text on most browsers. No cosmic constant dictates that emphasized text is italicized; it’s just that the guys and gals programming the browser software decided to do it that way. The good news is that you can use CSS to override the default browser styles.
For the most part, default styles are consistent from browser to browser, although some noticeable differences exist, especially with margins and font size. Many designers will start “from scratch” by resetting as many of the defaults as possible using a CSS reset (see Chapter 14).
Types of HTML Elements
HTML includes a large number of elements, each with its own specific tag and use for structuring documents. Elements can generally be sorted into two categories or display types:
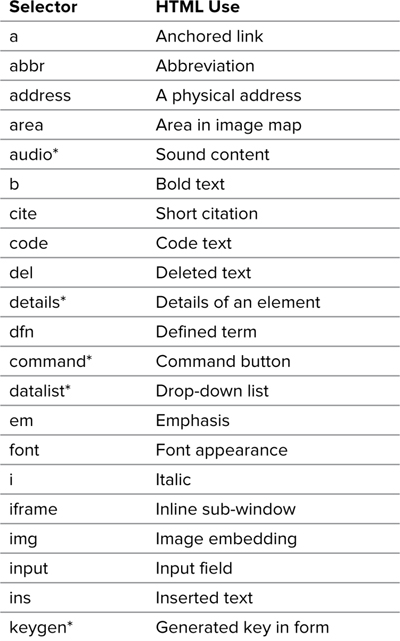
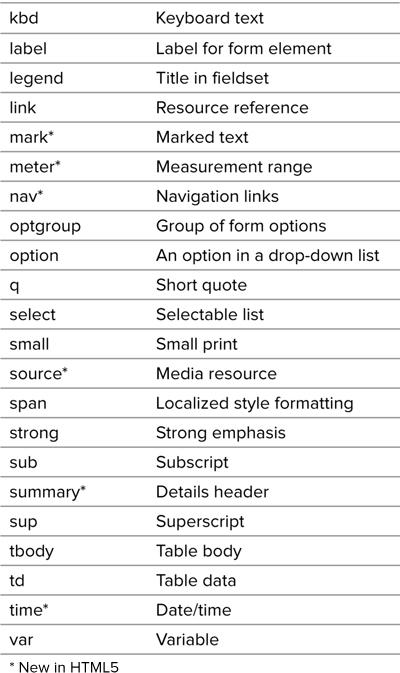
• Inline elements have no line breaks associated with the element ![]() . Table 2.1 lists the inline-tag selectors that CSS can use.
. Table 2.1 lists the inline-tag selectors that CSS can use.
![]() Inline elements flow horizontally using a soft line break when reaching the edge of their parent element.
Inline elements flow horizontally using a soft line break when reaching the edge of their parent element.
Table 2.1. HTML Selectors for Inline Elements
• Block-level elements place a line break before and after the element ![]() . Table 2.2 lists the block-level element selectors that CSS can use.
. Table 2.2 lists the block-level element selectors that CSS can use.
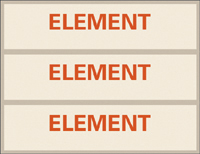
![]() Block-level elements stack vertically on top of each other.
Block-level elements stack vertically on top of each other.
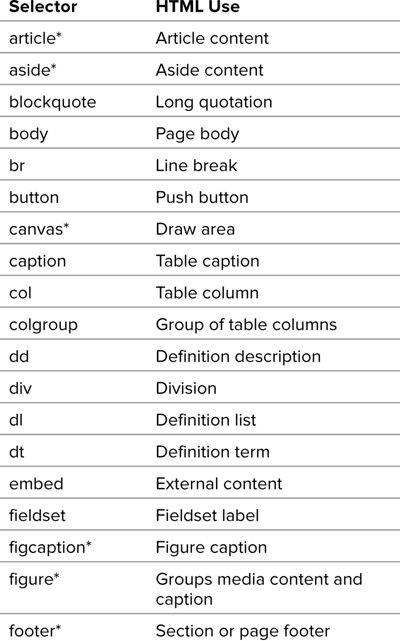
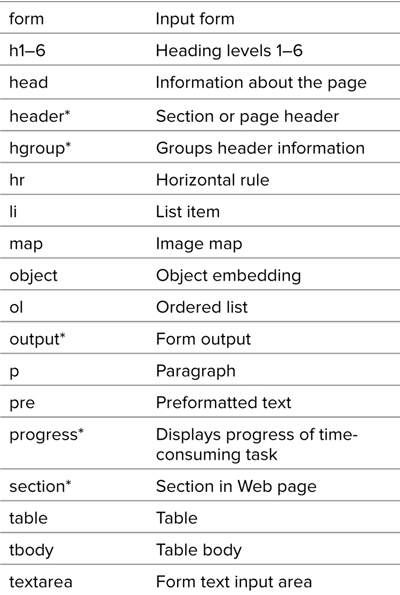
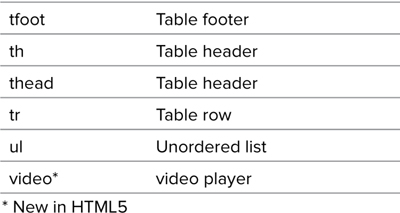
Table 2.2. HTML Selectors for Block-level Elements
Not all CSS definitions can be applied to all HTML elements. Whether a particular CSS property can be applied (or not) depends on the nature of the element. For the most part, it’s fairly obvious when a property can be applied.
For example, you wouldn’t expect the text-indent property, which indents the first line of a paragraph, to apply to an inline tag such as <strong>. In fact, it can’t be applied, unless you use CSS to change the display type.
When you do need help in this area, see Appendix A to determine the CSS properties that can be applied to specific HTML elements.
The Evolution of HTML5
HTML5 is the next step in Web markup and will take over from XHTML. Although XHTML2 was in development for almost eight years, it was laid to rest in 2009 in favor of HTML5.
To understand how this happened, let’s take a little trip back to the halcyon days of the Web at the end of the twentieth century—1997, to be precise. It was still a Web 1.0 world, although we didn’t yet know to call it that. The dotcom bubble was just starting to inflate, and everyone was surfing the Web with Netscape Navigator. Into that landscape the World Wide Web Consortium (W3C) introduced HTML 4.0 (HTML4).
HTML4 was a vast improvement, because for the first time it was created by a standards body that gave everyone a seat at the table and believed that Web pages should display the same across all available browsers.
And then came XHTML
XHTML1 (released in 2001) is a rewriting of the HTML 4.01 standard using XML, and was intended to bring the power of XML to Web page development. XHTML uses the XML Doctype. XHTML employs all the same tags as HTML, but the code will still work with a browser that does not understand XML.
Although XHTML2 was primarily meant to be a transitional technology to a brave new Web technology, from its very beginning, something went horribly wrong.
The problem with XHTML2
It was quickly realized that even XHTML1 was not enough to evolve the Web from its relatively static “page” nature into a truly interactive and universal environment of applications. XHTML2 was meant to change all of that. Starting in August 2002, the authors of the XHTML standard began crafting a new language that they hoped would completely retool Web markup for the twenty-first century, bringing about a golden age of semantic Web pages, interactivity, internationalization, device independence, and tapioca pudding for everyone! But they forgot one thing: XHTML2 was not written to be backward compatible with older Web markup languages. Existing browsers would not be able to run this whiz-bang new markup language. Web developers would have to develop one version of their site for older browsers and another for the XHTML2 standard.
And then there was HTML5
In June 2003, HTML5 started life as Web Applications 1.0 and was created by the Web HyperText Application Technology Working Group (WHATWG), an organization that was not associated with the W3C. Instead, this independent group, frustrated with the slow pace and errant direction that XHTML2 was taking, began working on an alternative standard that would be backward compatible, more suitable for writing applications and pages, and would also address many practical issues that Web developers faced.
For several years, both languages were developed simultaneously. But in 2007, seeing that Web Applications 1.0 was further along than XHTML2, the W3C adapted it as the starting point for a new HTML5 standard, publishing the “First Public Working Draft” of the specification on January 22, 2008. To focus attention on HTML5, the W3C did not renew the XHTML Working Group’s charter and XHTML2 was no more.
Is it HTML5 or XHTML5?
Although XHTML2 has disappeared, the need to unify XML and HTML has not. Therefore, a parallel initiative exists to create XHTML5. To be clear, this is not a new or different markup language; it is simply HTML5 written using XML rules and is similar to XHTML.
If you know XHTML, then learning XHTML5 should not be difficult. They differ primarily in the ways they treat tags. Some of the most important differences are listed in Table 2.3.
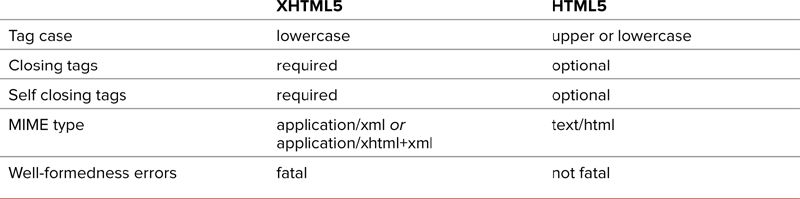
Whether you choose to use HTML5 or XHTML5 is your call, but they will both work in modern browsers. For my part, I’m enjoying the more forgiving nature of HTML5, and it’s what I use for the code in this book.
What’s New in HTML5?
HTML5 makes important structural changes to Web pages. For example, you can specify common elements such as headers, footers, articles, and asides. In addition, HTML5 introduces many features natively (that is, features built into the browser) that used to require plug-ins and/or scripting in the form of new elements and APIs:
• The Canvas element allows scriptable bitmap editing.
• Document editing permits users to edit content directly in Web pages.
• Web forms self validate and include more input types.
• Drag-and-drop allows the manipulation of elements without scripting.
• Audio and Video Timed media playback enables native control of media files without plug-ins.
• New structural elements remove the burden of using <div> tags with classes and IDs to create common elements such as headers and footers.
How Does HTML5 Structure Work?
One of the most significant changes in HTML5 is the addition of structural elements that will greatly enhance the semantic philosophy behind Web markup ![]() . Most of the new structural tags are self-explanatory, but a few require some elaboration:
. Most of the new structural tags are self-explanatory, but a few require some elaboration:
• <header> can be used for page headers, section headers, article headers, or an aside header.
• <hgroup> is used for a grouping of header elements (h1, h2, h3, and so on) that are related, generally as title and subtitle.
• <nav> can be included independently or as part of the header and/or footer.
• <section> defines the main parts of a page, generally one that includes articles.
• <article> is an individual blog entry or blog entry abstract.
• <figure> is used to contain images, audio, and video that are embedded in the page.
• <figcaption> contains a caption for the figure tag it is in.
• <dialog> replaces the <dl> element to contain conversation transcripts.
• <aside> is used for support content on a page, such as related links, secondary navigation, and of course, ads.
• <footer> is similar to the header and can be placed at the bottom of other elements.
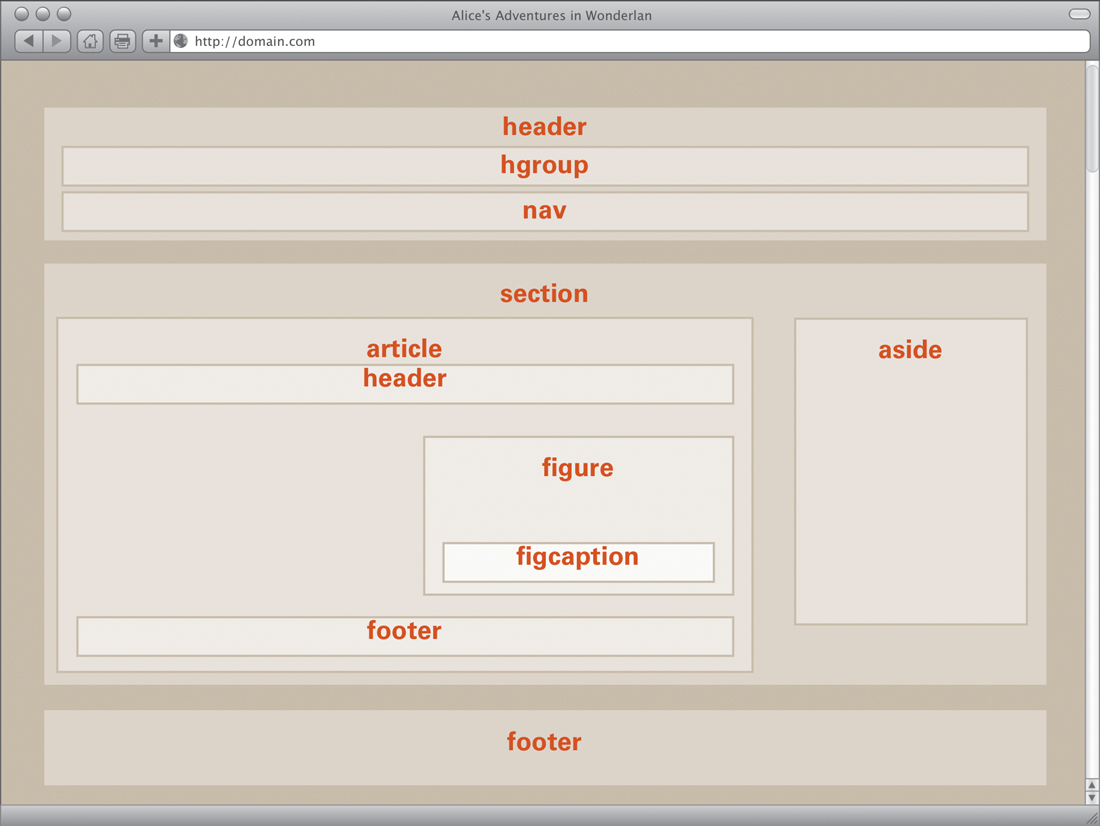
![]() The wireframe of a typical HTML5 document.
The wireframe of a typical HTML5 document.
Unfortunately, not all browsers are equipped to understand HTML5 without a little help.
Using HTML5 Structure Now
I’ll let you in on a little secret: You can use the HTML5 syntax to structure your Web pages and combine it with CSS3 (or older versions of CSS). HTML5 is implemented on most current browsers (including Internet Explorer), and you should start using it now.
Although CSS can be applied to any version of HTML in use today—including XHTML1 and HTML 4.01—I’ll be using HTML5 throughout this book. This book is by no means an exhaustive resource of HTML5. However, I want to show you how to set up the basic Web document that I’ll reference in future chapters.
Code 2.1. HTML5page.html—This shows a typical HTML5 page that is structured to use a header, navigation, article, aside, and footer for the layout grid.
<!DOCTYPE html>
<html dir="ltr" lang="en-US">
<head>
<meta charset="utf-8">
<title>HTML5</title>
</head>
<body>
<header>
<hgroup></hgroup>
<nav></nav>
</header>
<section>
<article>
<header></header>
<figure>
<figcaption></figcaption>
</figure>
<footer></footer>
</article>
<dialog><dialog>
</section>
<aside></aside>
<footer></footer>
</body>
</html>
Setting up a basic HTML5 document
1. Add the HTML5 doctype (Table 2.4). Notice that the new !DOCTYPE for HTML5 is much simpler than the complex and hard-to-decipher HTML and XHTML doctypes in use today (Code 2.1). It simply tells the browser to use HTML.
<!DOCTYPE html>
2. Add the HTML tag, including the intended language and the language direction (generally ltr for left-to-right text).
<html dir="ltr" lang="en-US">...</html>
3. Add the head to your document, which is where you will specify information about this document, including the title and the character set used by the text. I recommend using UTF-8 for best results.
<head>...</head>
4. Add the body to your document. This is where all the content to be displayed is added. I recommend giving every body element in your site at least one unique class name and others to identify its location in the site. By doing so, you can add styles on a per-page and per-section basis without including multiple CSS files.
<body class="section Name pageName">...</body>
5. Add the header tag for your page. This is not the same as the head tag in step 3. This is where you put all the content that is displayed in your Web page’s header. You can also include the navigation here or include it separately, depending on your design needs.
<header>...</header>
6. Add the navigation tag, and include links to the top-level pages in your site.
<nav>...</nav>
7. Add one or more article tags, which will contain the important content on this page. Many Web browsers and RSS newsreaders will now allow the user to focus on the articles to get to the main content of the page. Figures and sections fit well here.
<article>...</article>
8. Add the aside tag, which is where supplemental content to the article is placed. This is also sometimes called a sidebar or rail, depending on who you talk to. It can include anything you want, but I like putting comments and dialogue over here.
<aside>...</aside>
9. Finally, add a footer tag at the bottom of the page. This generally includes redundant top-level navigation, copyrights, and other small print.
<footer>...</footer>
And that’s it. You are ready to start using HTML5 tags. Go crazy. Oh, wait, that’s right: it works in everything but Internet Explorer, which just happens to make up the majority of browsers in use today. So, what do you do?
Making HTML5 work in older versions of Internet Explorer
Although Internet Explorer does not know HTML5 tags, there is a partial fix (or kludge) that involves using JavaScript to create the HTML5 elements:
document.createElement('header'),
Referred to as the “HTML5 Shiv,” this will “teach” Internet Explorer 6 (and later versions) that these elements exist, and that they should be treated as HTML tags. You can add one of these lines of JavaScript for each of the HTML5 elements you need.
To make it simple to add these new tags, create an external JavaScript file (Code 2.2) and link to it from your HTML document using the IE conditional (Code 2.3), which you’ll explore in greater detail in Chapter 13.
Code 2.2. HTML5forIE.js—This adds a blank HTML tag for each of the HTML5 tags that Internet Explorer is missing.
/*** CSS VQS - Chapter 2 - HTML5forIE.js ***/
document.createElement('abbr'),
document.createElement('article'),
document.createElement('aside'),
document.createElement('audio'),
document.createElement('bb'),
document.createElement('canvas'),
document.createElement('datagrid'),
document.createElement('datalist'),
document.createElement('details'),
document.createElement('dialog'),
document.createElement('eventsource'),
document.createElement('figure'),
document.createElement('footer'),
document.createElement('header'),
document.createElement('hgroup'),
document.createElement('mark'),
document.createElement('menu'),
document.createElement('meter'),
document.createElement('nav'),
document.createElement('output'),
document.createElement('progress'),
document.createElement('section'),
document.createElement('time'),
document.createElement('video'),
If you want to get fancy, replace Code 2.2 with the JavaScript loop shown in Code 2.4. This has the same effect but is more compact.
Code 2.3. HTML5page.html—This includes a link to the JavaScript in Code 2.2.
<!DOCTYPE html>
<html dir="ltr" lang="en-US">
<head>
<meta charset="utf-8">
<title>HTML5</title>
<!--[if IE ]>
<script src="script/HTML5forIE.js" type="text/javascript"></script>
<![endif]-->
</head>
<body class="pageName">
<header></header>
<nav></nav>
<article>
<figure></figure>
<section></section>
</article>
<aside>
<dialog></dialog>
</aside>
<footer></footer>
</body>
</html>
The document in this example has been structured to address my needs, but you needn’t follow hard and fast rules for tag placement and nesting. You can place the navigation in the header, the footer, the article, or aside. Similarly, figures can go in the aside or the head. The preceding example is just a basic common Web page structure.
Code 2.4. HTML5forIE.js—This does the same job as Code 2.2 but uses a JavaScript loop, making the code more compact.
/*** CSS VQS - Chapter 2 - HTML5forIE.js ***/
(function(){if(!/*@cc_on!@*/0)return;var e = "abbr,article,aside,audio,bb,canvas,datagrid,datalist,details,dialog,eventsource,figure,footer,header,hgroup,mark,menu,meter,nav,output,progress,section,time,video".split(','), for(var i=0;i<e.length;i++) {document.createElement(e[i])}})()