Hour 4. Inside Cocoa Touch
,What You’ll Learn in This Hour:
![]() What Cocoa Touch is and what makes it unique
What Cocoa Touch is and what makes it unique
![]() The technology layers that make up the iOS platform
The technology layers that make up the iOS platform
![]() A basic iOS application life cycle
A basic iOS application life cycle
![]() Classes and development techniques you’ll be using throughout this book
Classes and development techniques you’ll be using throughout this book
![]() How to find help using the Apple developer documentation
How to find help using the Apple developer documentation
When computers first started to appear in households almost 30 years ago, applications rarely shared common interface elements. It took an instruction manual just to figure out the key sequence to exit from a piece of software. Today, user interfaces (UIs) have been standardized so that moving from application to application doesn’t require starting from scratch.
What has made this possible? Not faster processors or better graphics, but frameworks that enforce consistent implementation of the features provided by the devices they’re running on. In this hour, we take a look at the frameworks you’ll be using in your iOS applications.
What Is Cocoa Touch?
In the preceding hour, you learned about the Objective-C language, the basic syntax, and what it looks like. Objective-C will form the functional skeleton of your applications. It will help you structure your applications, make logical decisions during the life cycle of your application, and enable you to control how and when events take place. What Objective-C doesn’t provide, however, is a way to access what makes your iDevice the compelling touch-driven platform that it is.
Consider the following Hello World application:
int main(int argc, char *argv[]) {
printf("Hello World");
}
This code is typical of a beginner Hello World application written in C. It compiles and executes on your iPhone or iPad, but because iOS relies on Cocoa Touch for creating interfaces and handling user input and output, this version of Hello World is quite meaningless. Cocoa Touch is the collection of software frameworks that is used to build iOS applications and the runtime that those applications are executed within. Cocoa Touch includes hundreds of classes for managing everything from buttons and uniform resource locators (URLs) to manipulating photos and performing facial recognition.
Cocoa Touch is the highest of several “layers” of services in the iOS and isn’t necessarily the only layer that you’ll be developing in. That said, you don’t need to worry too much about where Cocoa Touch begins and ends; the development will be the same, regardless. Later in this hour, you get a complete overview of iOS service layers.
Returning to the Hello World example, if we had defined a text label object named iOSOutput within a project, we could set it to read "Hello World" using Objective-C and the appropriate Cocoa Touch class text property like this:
iOSOutput.text=@"Hello World";
Seems simple enough, as long as we know that the UILabel object has a text property, right?
Keeping Your Cool in the Face of Overwhelming Functionality
The questions that should be coming to most beginners right about now include these: I know there are many different features provided through iOS applications; how in the world will this book document all of them? How will I ever find what I need to use for my own applications?
These are great questions, and probably some of the biggest concerns that I’ve heard from those who want to program for the platform but have no idea where to start. The bad news is that we can’t document everything. We can cover the fundamentals that you need to start building, but even in a multivolume set of “teach yourself” books, there is so much depth to what is provided by Cocoa Touch that it isn’t feasible to create a complete how-to reference.
The good news is that Cocoa Touch and the Apple developer tools encourage exploration. In Hour 6, “Model-View-Controller Application Design,” you start building interfaces visually using Xcode’s Interface Builder (IB) tools. As you drag objects (buttons, text fields, and so on) to your interface, you create instances of Cocoa Touch classes. The more you “play,” the quicker you will begin to recognize class names and properties and the role they play in development. Even better, Xcode developer documentation provides a complete reference to Cocoa Touch, enabling you to search across all available classes, methods, properties, and so on. We take a look at the documentation features later in this hour.
Young, Yet Mature
One of the most compelling advantages to programming using Cocoa Touch versus platforms such as Android is that although the iOS family is a “young” platform for Apple, the Cocoa frameworks are amazingly mature. Cocoa was borne out of the NeXTSTEP platform—the environment that was used by NeXT computers in the mid-1980s. In the early 1990s, NeXTSTEP evolved into the cross-platform OpenStep. Finally, in 1996, Apple purchased NeXT Computer, and over the next decade, the NeXTSTEP/OpenStep framework became the de facto standard for Macintosh development and was renamed Cocoa. You’ll notice that there are still signs of Cocoa’s origins in class names that begin with NS.
Exploring the iOS Technology Layers
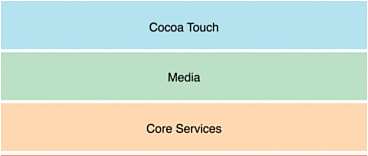
Apple describes the technologies implemented within the iOS as a series of layers, with each layer being made up of different frameworks that can be used in your applications. As you might expect, the Cocoa Touch layer is at the top (see Figure 4.1).
Let’s review some of the most important frameworks that make up each of the layers. If you want a comprehensive guide to all frameworks, just search for each layer by its name in the Apple Xcode documentation.
The Cocoa Touch Layer
The Cocoa Touch layer is made up of several frameworks that will provide the core functionality for your applications, including multitasking and advertising. UIKit could be described as the “rock star” of this layer, delivering much more than the UI in its name implies.
UIKit
UIKit covers a wide range of functionality. It is responsible for application launching and termination, controlling the interface and multitouch events, and providing access to common views of data (including web pages and Word and Excel documents, among others).
UIKit is also responsible for many intra-iOS integration features. Accessing the Media Library, Photo Library, and accelerometer is also accomplished using the classes and methods within UIKit.
Map Kit
The Map Kit framework enables developers to add Apple’s map views to any application, including annotation, location, and event-handling features.
Game Kit
The Game Kit framework adds network-interactivity to iOS applications. Game Kit supplies mechanisms for creating and using peer-to-peer networks, including session discovery, mediation, and voice chat. These features can be added to any application or game (or not).
Message UI/Address Book UI/Event Kit UI
Apple is sensitive to the need for integration between iOS applications. The Message UI, Address Book UI, and Event UI frameworks can be used to access mail, contacts, and calendar events from any application you develop.
iAd
The iAd framework supports the addition of ads to your applications. iAds are interactive advertising pieces that can be added to your software with a simple drag and drop. You do not need to manage iAds interactions in your application; Apple does this for you.
The Media Layer
When Apple makes a computing device, you’d better believe that they put some thought into the media capabilities. The iDevice family can create complex graphics, play back audio and video, and even generate real-time 3D graphics. The Media layer’s frameworks handle it all.
AV Foundation
The AV Foundation framework can be used to manage complex sound and video playback and editing. This should be used for implementing advanced features, such as movie recording, track management, and audio panning.
Core Audio
The Core Audio framework exposes methods for handling basic playback and recording of audio. It includes the AudioToolbox framework, which can be used for playing alert sounds or generating short vibrations, and the AudioUnit.framework for processing sounds.
Core Image
With the Core Image framework, developers can add advanced image and video processing capabilities to their applications without needing to understand the complex math behind them. Core Image, for example, provides facial-detection and image-filtering features that can easily be added to any application.
Core Graphics
Use the Core Graphics framework to add 2D drawing and compositing features to your applications. Although most of this book will use existing interface classes and images in its applications, you can use core graphics to programmatically manipulate the view.
Core Text
This provides precise positioning and control over text that is displayed on the screen. Core Text should be used in mobile text-processing applications and software that requires high-quality and fast presentation and manipulation of styled text.
Image I/O
The Image I/O framework can be used to import and export both image data and image metadata for any file format supported by iOS.
Media Player
The Media Player framework provides you, the developer, with an easy way to play back movies with typical onscreen controls. The player can be invoked directly from your application.
OpenGL ES
OpenGL ES is a subset of the popular OpenGL framework for embedded systems (ES). OpenGL ES can be used to create 2D and 3D animation in your apps. Using OpenGL requires additional development experience beyond Objective-C but can generate amazing scenes for a handheld device—similar to what is possible on modern game consoles.
Quartz Core
The Quartz Core framework is used to create animations that will take advantage of the hardware capabilities of your device. This includes the feature set known as Core Animation.
The Core Services Layer
The Core Services layer is used to access lower-level operating system services, such as file access, iCloud storage, networking, and many common data object types. You’ll make use of core services frequently by way of the Foundation framework.
Accounts
Because of their always-connected nature, iOS devices are frequently used to store account information for many different services. The Accounts framework simplifies the process of storing and authenticating users.
Address Book
The Address Book framework is used to directly access and manipulate address book information. This is used to update contact information and display it within your applications.
CFNetwork
The CFNetwork framework provides access to BSD sockets, HTTP and FTP requests, and Bonjour discovery.
Core Data
The Core Data framework can be used to create the data model of an iOS application. Core Data provides a relational data model based on SQLite and can be used to bind data to interface objects to eliminate the need for complex data manipulations in code.
Core Foundation
Core Foundation provides much of the same functionality of the Foundation framework, but it is a procedural C framework and therefore requires a different development approach that is, arguably, less efficient than Objective-C’s object-oriented model. You should probably avoid Core Foundation unless you absolutely need it.
Foundation
The Foundation framework provides an Objective-C wrapper around features in Core Foundation. Manipulation of strings, arrays, and dictionaries is handled through the Foundation framework, as are other fundamental application necessities, including managing application preferences, threads, and internationalization.
Event Kit
The Event Kit framework is used to access calendar information stored on the iOS device. It also enables the developer to create new events within a calendar, including alarms.
Core Location
The Core Location framework can be used to obtain latitude and longitude information from the iPhone and iPad (3G/LTE) GPS (WiFi-based location service is available in non-3G/LTE devices, but is much less precise) along with a measurement of precision.
Core Motion
The Core Motion framework manages most motion-related events on the iOS platform, such as using the accelerometer or gyroscope.
Newsstand
Use this framework to create periodical digital media, such as newspapers or magazines. The Newsstand framework supports automatic content updating, ensuring your customers see the most recent content without needing to manually update.
Pass Kit
The Pass Kit framework, coupled with web services, can provide electronic coupons, boarding passes, tickets, and other transaction information to the user.
Quick Look
The Quick Look framework implements file viewing within an application, even if the application does not “know” how to open a specific file type. This is intended for viewing files downloaded to the device.
Social
Rather than requiring developers to create Twitter and Facebook integration from scratch, Apple includes a framework for these popular social networking sites. Using this framework, you can write applications that access Twitter and Facebook without needing to manage account information or understand their proprietary network protocols.
Store Kit
The Store Kit framework enables developers to create in-application transactions for purchasing content without exiting the software. All interactions take place through the App Store, so no financial data is requested or transmitted through the Store Kit methods.
System Configuration
Use the System Configuration framework to determine the current state of a device’s network configuration—what network it is connected to (if any) and what other devices are reachable.
The Core OS Layer
The Core OS layer, as you’d expect, is made up of the lowest-level services in the iOS. These features include threads, complex math, hardware accessories, and cryptography. You should only need to access these frameworks in rare circumstances.
Accelerate
The Accelerate framework simplifies complete calculations and large-number manipulation. This includes digital signal processing capabilities.
Core Bluetooth
The Core Bluetooth framework provides connectivity for low-energy Bluetooth devices. This is a unique class of Bluetooth peripheral that can communicate with extremely low power requirements.
External Accessory
The External Accessory framework is used to develop interfaces to accessories connected via the dock connector or Bluetooth.
Security
The Security framework provides functions for performing cryptographic functions (encrypting/decrypting data). This includes interacting with the iOS keychain to add, delete, and modify items.
System
The System framework gives developers access to a subset of the typical tools they would find in an unrestricted UNIX development environment.
Tracing the iOS Application Life Cycle
To help you get a sense for where your “work” in developing an iOS application fits in, it helps to look at the application life cycle. Figure 4.2 shows Apple’s simplified diagram of the life cycle.
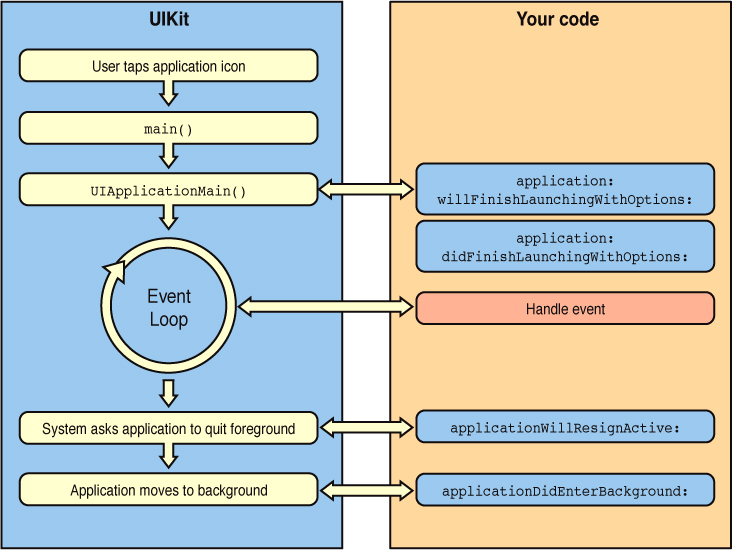
Let’s try to put some context around what you’re looking at, starting on the left side of the diagram. As you’ve learned, UIKit is a component of the Cocoa Touch that provides much of the foundation of iOS applications: UI management, event management, and overall application execution management. When you create an application, UIKit handles the setup of the application object via the main and UIApplicationMain functions, neither of which you should need to touch.
Once the application is started, an event loop begins. This loop receives the events such as screen touches, and then hands them off to your own methods. The loop continues until the application is asked to move to the background (usually through the user pressing the Home button).
Your code comes into play on the right side of the diagram. Xcode automatically sets up your iOS projects to include an application delegate class. This class can implement the methods application:willFinishLaunchingWithOptions, application:didFinishLaunchingWithOptions, and applicationDidEnterBackground (among others) so that your program can execute its own custom code when the application launches and when it is suspended by pressing the Home button.
After an application finishes launching, the delegate object typically creates a view controller object and view and adds them to the iOS “window.” You learn more about these concepts in the next hour, but for now, think of a view as what is being displayed on the device’s screen and the view controller as an object that can be programmed to respond when it receives an event notification (such as touching a button) from the event loop.
The majority of your work will take place within the view controller. You’ll receive events from the Cocoa Touch interface and react to them by writing Objective-C code that manipulates other objects within the view. Of course, things can get a bit more complex than a single view and a single view controller, but the same basic approach can be applied in most cases.
Now that you have a better picture of the iOS service layers and application life cycle, let’s take a look at some of the classes that you’ll be seeing throughout this book.
Cocoa Fundamentals
Thousands of classes are available in the iOS software development kit (SDK), but most of your applications will be using a small set of classes to implement 90% of their features. To familiarize you with the classes and their purposes, let’s review some of the names you’re going to be seeing very, very often over the next few hours. Before we begin, keep these few key points in mind:
![]() Apple sets up much of the structure of your application for you in Xcode. Therefore, even though you need some of these classes, you won’t have to lift a finger to use them. Just create a new Xcode project and they’re added for you.
Apple sets up much of the structure of your application for you in Xcode. Therefore, even though you need some of these classes, you won’t have to lift a finger to use them. Just create a new Xcode project and they’re added for you.
![]() You’ll be adding instances of many of these objects to your projects just by dragging icons in Xcode’s IB. Again, no coding needed!
You’ll be adding instances of many of these objects to your projects just by dragging icons in Xcode’s IB. Again, no coding needed!
![]() When a class is used, I tell you why it is needed, what it does, and how it is used in the project. I don’t want you to have to jump around digging for references in the book, so focus on the concepts, not memorization.
When a class is used, I tell you why it is needed, what it does, and how it is used in the project. I don’t want you to have to jump around digging for references in the book, so focus on the concepts, not memorization.
![]() In the last section of this hour’s lesson, you learn about the Apple documentation tool. This will help you find all the class, property, and method information that you could ever hope for. If it’s gritty details you want, you’ll have them at your fingertips.
In the last section of this hour’s lesson, you learn about the Apple documentation tool. This will help you find all the class, property, and method information that you could ever hope for. If it’s gritty details you want, you’ll have them at your fingertips.
Core Application Classes
When you create a new application with even the most basic user interaction, you’ll be taking advantage of a collection of common core classes. Many of these you won’t be touching, but they still perform an important role. Let’s review several of these classes now.
The Root Class (NSObject)
As you learned in Hour 3, “Discovering Objective-C: The Language of Apple Platforms,” the power of object-oriented programming is that when you create a subclass of an object you inherit that object’s functionality. The root class, from which almost all Objective-C classes inherit, is NSObject. This object defines methods common to all classes, such as alloc and init. You do not need to create NSObject instances manually in this book; instead, you use methods inherited from this class to create and manage new objects.
The Application Object (UIApplication)
Every iOS application implements a subclass of UIApplication. This class handles events, such as notification of when an application has finished loading, as well as application configuration, such as controlling the status bar and setting badges (the little red numbers that can appear on application icons). Like NSObject, you won’t need to create this yourself; just be aware it exists.
Window Objects (UIWindow)
The UIWindow class provides a container for the management and display of views. In iOS-speak, a view is more like a typical desktop application “window,” whereas an instance of UIWindow is just a container that holds the view. You use only a single UIWindow instance in this book, and it is created automatically in the project templates that Xcode provides for us.
Views (UIView)
The UIView class defines a rectangular area and manages all the onscreen display within that region—what we will refer to as a view. Most of your applications will start by adding a view to an instance of UIWindow.
Views can be nested to form a hierarchy; they rarely exist as a single object. A top-level view, for example, may contain a button and field. These controls would be referred to as subviews and the containing view as the superview. Multiple levels of views can be nested, creating a complex hierarchy of subviews and superviews. You’ll be creating almost all of your views visually in Xcode, so don’t worry: Complex doesn’t mean difficult.
Responders (UIResponder)
The UIResponder class provides a means for classes that inherit from it to respond to the touch events produced by iOS. UIControl, the superclass for nearly all onscreen controls, inherits from UIView and, subsequently, from UIResponder. An instance of UIResponder is just called a responder.
Because multiple objects could potentially respond to an event, iOS passes events up what is referred to as a chain of responders. The responder instance that can handle the event is called the first responder. When you’re editing a field, for example, the field has first responder status because it is actively handling user input. When you leave the field, it “resigns” first responder status. For most of your iOS development work, you won’t be directly managing responders in code.
Onscreen Controls (UIControl)
The UIControl class inherits from UIView and is used as the superclass for almost all onscreen controls, such as buttons, fields, and sliders. This class is responsible for handling the triggering of actions based on touch events, such as “pressing” a button.
As you’ll learn in the next hour, a button defines a handful of events that you can respond to; IB enables you to tie those events to actions that you’ve coded. UIControl is responsible for implementing this behavior behind the scenes.
View Controllers (UIViewController)
You use the UIViewController class in almost all the application projects throughout this book to manage the contents of your views. You use a UIViewController subclass, for example, to determine what to do when a user taps a button. Make a sound? Display an image? However you choose to react, the code you use to carry out your action will be implemented as part of a view controller instance. You’ll learn much more about view controllers over the next two hours.
Data Type Classes
An object can potentially hold data. In fact, most of the classes we’ll be using contain a number of properties that store information about an object. There are, however, a set of Foundation classes that you use throughout this book for the sole purpose of storing and manipulating information.
Note
If you’ve used C or C-like languages before, you might find that these data type objects are similar to data types already defined outside of Apple’s frameworks. By using the Foundation framework implementations, you gain access to a wide range of methods and features that go well beyond the C/C++ data types. You will also be able to work with the objects in Objective-C using the same development patterns as any other object.
Strings (NSString/NSMutableString)
Strings are collections of characters (numbers, letters, and symbols). Throughout this book, you’ll often use strings to collect user input and to create and format user output.
As with many of the data type objects you’ll be using, there are two string classes: NSString and NSMutableString. The difference, as the name describes, is that one of the classes can be used to create strings that can be changed (mutable). An NSString instance remains static once it is initialized, whereas an NSMutableString can be changed (lengthened, shortened, replaced, and so on).
Strings are used so frequently in Cocoa Touch applications that you can create and initialize an NSString using the notation @"<my string value>". For example, if you needed to set the text property of an object called myLabel to a new string that reads "Hello World!", you could use the following:
myLabel.text=@"Hello World!";
Strings can also be initialized with the values of other variables, such as integers, floating-point numbers, and so on.
Arrays (NSArray/NSMutableArray)
A useful category of data type is a collection. Collections enable your applications to store multiple pieces of information in a single object. An NSArray is an example of a collection data type that can hold multiple objects, accessed by a numeric index. As with strings, there is a mutable NSMutableArray class that creates an array capable of being changed after it has been created.
You can create and access arrays in two ways. We start here with the traditional manner.
You might, for instance, create an array that contains all the user feedback strings you want to display in an application:
myMessages = [[NSArray alloc] initWithObjects: @"Good Job!",@"Bad job!",nil];
A nil value is always used to end the list of objects when initializing an array. To access the strings, you use an index value. This is the number that represents a position in the list, starting with 0. To return the "Bad job!" message, we use the objectAtIndex method along with the number 1 (the second item in the list):
[myMessages objectAtIndex: 1];
The second way to initialize and access arrays was recently added to Xcode, and greatly simplifies the process. NSArrays can be now be initialized like this:
NSArray *myArray=@[<list of array objects>];
An array of NSString objects might be declared as such:
NSArray *colorArray=@[@"red",@"green",@"blue"];
You may now access arrays by appending [<index>] to the end of the array name. To access the color "green" from the colorArray, you could type colorArray[1]. Unlike the traditional initialization method, you don’t need to add nil to the end of the array elements.
NSMutableArrays work in much the same way but can be initialized with this format:
NSMutableArray *myArray=[@[<list of array objects>] mutableCopy];
Dictionaries (NSDictionary/NSMutableDictionary)
Like arrays, dictionaries are another collection data type, but with an important difference. Whereas the objects in an array are accessed by a numeric index, dictionaries store information as object/key pairs. The key is an arbitrary string, whereas the object can be anything you want, such as a string. If the previous myMessages array were to be created as an NSDictionary instead, it might look like this:
myMessages = [[NSDictionary alloc] initwithObjectsAndKeys:@"Good Job!",
@"positive",@"Bad Job!",@"negative",nil];
Now, instead of accessing the strings by a numeric index, they can be accessed by the keys "positive" and "negative" with the objectForKey method, as follows:
[myMessages objectForKey:@"negative"]
Dictionaries are useful because they let you store and access data in abstract ways rather than in a strict numeric order. Once again, the mutable form of the dictionaries, NSMutableDictionary, can be modified after it has been created.
Like arrays, there is also a new and simple way to declare and initialize dictionaries. You can easily initialize NSDictionary objects by using the following format:
NSDictionary *myDictionary = @{<key>:<value>,...};
For example, to declare a dictionary with cities and ZIP codes, I might use the following:
NSDictionary *zipCodes = @{@"Wakeman":@44889,@"Delaware":@43015};
To access the ZIP code for Delaware, I reference zipCodes[@"Delaware"]. Mutable dictionaries change the initialization syntax just slightly, like this:
NSMutableDictionary *myDictionary = [@{<key>:<value>,...} mutableCopy];
Numbers (NSNumber/NSDecimalNumber)
We can store strings and collections of objects, but what about numbers? In general, if you need to work with an integer, you use the C data type int, and for floating-point numbers, float. You won’t need to worry about classes and methods and object-oriented programming at all.
So, what about the classes that refer to numbers? The purpose of the NSNumber class is to take a numeric C data type and store it as an NSNumber object. The following line creates a number object with the value 100:
myNumberObject = [[NSNumber alloc] numberWithInt: 100];
You can then work with the number as an object—adding it to arrays, dictionaries, and so on. NSDecimalNumber, a subclass of NSNumber, can be used to perform decimal arithmetic on very large numbers, but will be needed only in special cases.
Guess what! NSNumbers have also seen a recent revision in Xcode and also benefit from a new shorthand notation. To initialize an integer, for example, I can now just type the following:
NSNumber *birthYear=@1971;
Or, for a floating-point number, I use this:
NSNumber *[email protected];
Although I encourage you to learn and use the new Xcode shortcuts for NSArray, NSDictionary, and NSNumber, it’s important to know the long form as well. People have been using the long form for decades now. Apple tutorials still use that format, and nearly all projects you find online will, too. New is good, but new takes a while to become the standard.
Dates (NSDate)
If you’ve ever tried to work with a date manually (interpreting a date string in a program, or even just doing date arithmetic by hand), you know it can be a great cause of headaches. How many days were there in September? Was this a leap year? And so on. The NSDate class provides a convenient way to work with dates as an object.
For example, assume you have a user-provided date (userDate) and you want to use it for a calculation, but only if it is earlier than the current date, in which case, you want to use that date. Typically, this would be a bunch of nasty comparisons and assignments. With NSDate, you would create a date object with the current date in it (provided automatically by the date method):
myDate=[NSDate date];
And then grab the earlier of the two dates using the earlierDate method:
[myDate earlierDate: userDate]
Obviously, you can perform many other operations, but you can avoid much of the ugliness of data and time manipulation using NSDate objects.
URLs (NSURL)
URLs are certainly a different type of data from what we’re accustomed to thinking about, but on an Internet-connected device like the iPhone and iPad, you’ll find that the ability to manipulate URLs comes in handy. The NSURL class enables you to manage URLs with ease. For example, suppose you have the URL http://www.floraphotographs.com/index.html and want to get just the machine name out of the string. You could create an NSURL object:
MyURL=[[NSURL alloc] initWithString:
@"http://www.floraphotographs.com/index.html"];
Then use the host method to automatically parse the URL and grab the text www.floraphotographs.com:
[MyURL host]
This will come in handy as you start to create Internet-enabled applications. Of course, many more data type objects are available, and as mentioned earlier, some objects store their own data, so you won’t, for example, need to maintain a separate string object to correspond to the text in labels that you have onscreen.
Speaking of labels, let’s round out our introduction to common classes with a quick look at some of the UI elements that you’ll be adding to your applications.
Interface Classes
Part of what makes the iPhone and iPad such fun to use are the onscreen touch interfaces that you can create. In iOS 7, this is doubly true, as the traditional iOS controls have been replaced with sleeker, more refined versions of themselves. As we explore Xcode’s IB in the next hour, you’ll get your first hands-on experience with some of these interface classes. Something to keep in mind as you read through this section is that many UI objects can take on very different visual appearances based on how they are configured—so there is quite a bit of flexibility in your presentation.
Labels (UILabel)
You’ll be adding labels to your applications both to present static text onscreen (as a typical label) and as a controllable block of text that can be changed as needed by your program (see Figure 4.3).
Buttons (UIButton)
Buttons are one of the simplest user input methods that you’ll be using. Buttons can respond to a variety of touch events and give your users an easy way to make onscreen choices. As of iOS 7, buttons are now, by default, borderless, relying on their size, color, and location to make them an obvious control (see Figure 4.4).

Switches (UISwitch)
A switch object can be used to collect “on” and “off” responses from a user. It is displayed as a simple toggle and is often used to activate or deactivate application features (see Figure 4.5).

Segmented Control (UISegmentedControl)
A segmented control creates an elongated touchable bar with multiple named selections (Category 1, Category 2, and so on). Touching a selection activates it and can trigger your application to perform an action, such as updating the screen to hide or show other controls (see Figure 4.6).
Sliders (UISlider)
A slider provides the user with a draggable bobble for the purpose of choosing a value from across a range. Sliders, for example, are used to control volume, screen brightness, and other inputs that should be presented in an “analog” fashion (see Figure 4.7).
Steppers (UIStepper)
Similar to a slider is a stepper (UIStepper). Like a slider, a stepper offers a means of inputting a number from a range of values visually (see Figure 4.8). Pushing a side of the control decrements or increments an internal property.
Text Fields (UITextField/UITextView)
Text fields are used to collect user input through the onscreen (or Bluetooth) keyboard. The UITextField is a single-line field, similar to what you’d see on a web page order form. The UITextView class, on the other hand, creates a larger multiline text entry block for more lengthy compositions (see Figure 4.9).
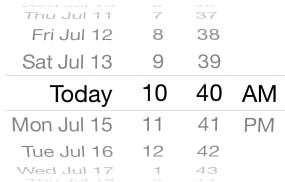
Pickers (UIDatePicker/UIPicker)
A picker is an interesting interface element that vaguely resembles a slot machine display. By letting the user change each segment on the wheel, it can be used to enter a combination of several different values. Apple has implemented one complete picker for you: the UIDatePicker class. With this object, a user can quickly enter dates and times. You can also implement your own arbitrary pickers with the UIPicker class (see Figure 4.10).
Popovers (UIPopoverController)
Unique to the iPad, popovers are both a UI element and a means of displaying other UI elements. They allow you to display a view on top of any other view for the purpose of making a choice. The iPad’s Safari browser, for example, uses a popover to present the user with a list of bookmarks to choose from, as shown in Figure 4.11.
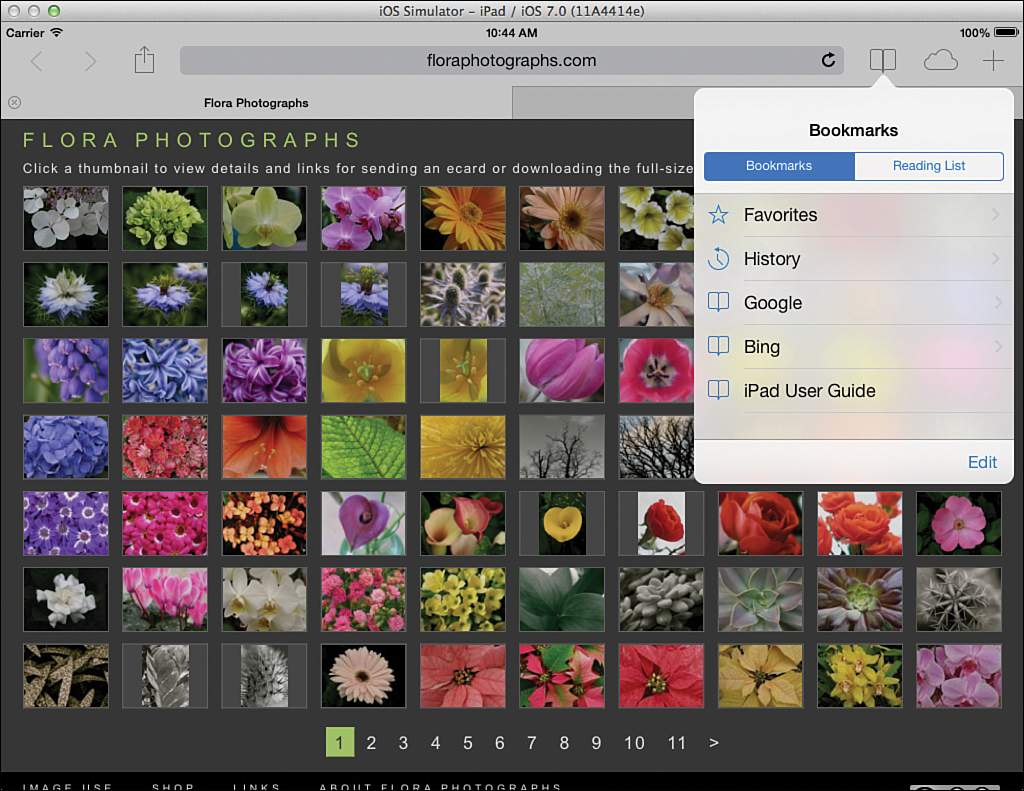
Popovers will become very handy as you start to create applications that use the full-screen real estate of the iPad.
These are only a sampling of the classes that you can use in your applications. We explore these and many others in the hours to come.
Exploring the iOS Frameworks with Xcode
So far in this hour, you’ve learned about dozens of frameworks and classes. Each framework could be made up of dozens of classes, and each class with hundreds of methods, and so on. In other words, there’s a ridiculous amount of information available about the iOS frameworks.
One of the most efficient ways to learn more is to pick an object or framework you’re interested in and then turn to the Xcode documentation system. Xcode provides an interface to the immense Apple development library in both a searchable browser-like interface (even with video tutorials!) and a context-sensitive Research Assistant. Let’s take a look at both of these features now so that you can start using them immediately.
Xcode Documentation
Xcode is capable of connecting to the Internet and retrieving documentation on-the-fly, but it’s much easier (and faster) to keep a copy of the documentation relevant to your development stored on your Mac. Let’s start our look at the documentation system by making sure we have copies of the documents we want.
Setting Up Documentation Downloads
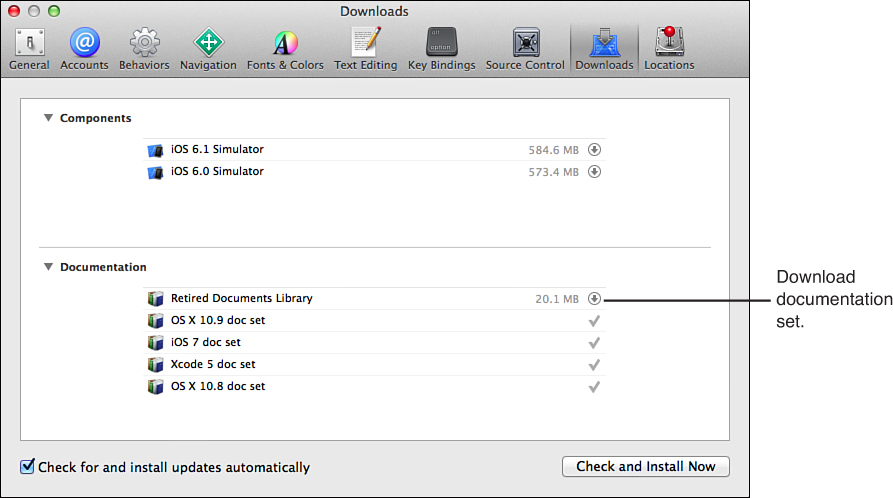
The Xcode documentation system is kept up-to-date by receiving feeds of document sets from Apple. Document sets are broad categories of documents that cover development for specific OS X versions, Xcode itself, and the iOS releases. To ensure that you have the latest and greatest iOS and Xcode docs stored locally, follow these steps:
1. Open the Xcode Preferences (Xcode, Preferences from the menu bar).
2. Click the Downloads icon on the preference window toolbar.
3. Make sure “Check for and install updates automatically” is checked.
4. Click the download icon beside each documentation set that you want to retrieve, as shown in Figure 4.12.
5. Close the Xcode preferences when finished.
Documentation sets take up a surprising amount of room, so if you’re space conscious, only configure downloads of the sets you need. Now you’re ready to read.
Tip
You can force a manual update of the documentation using the Check and Install Now button.
Searching Documentation
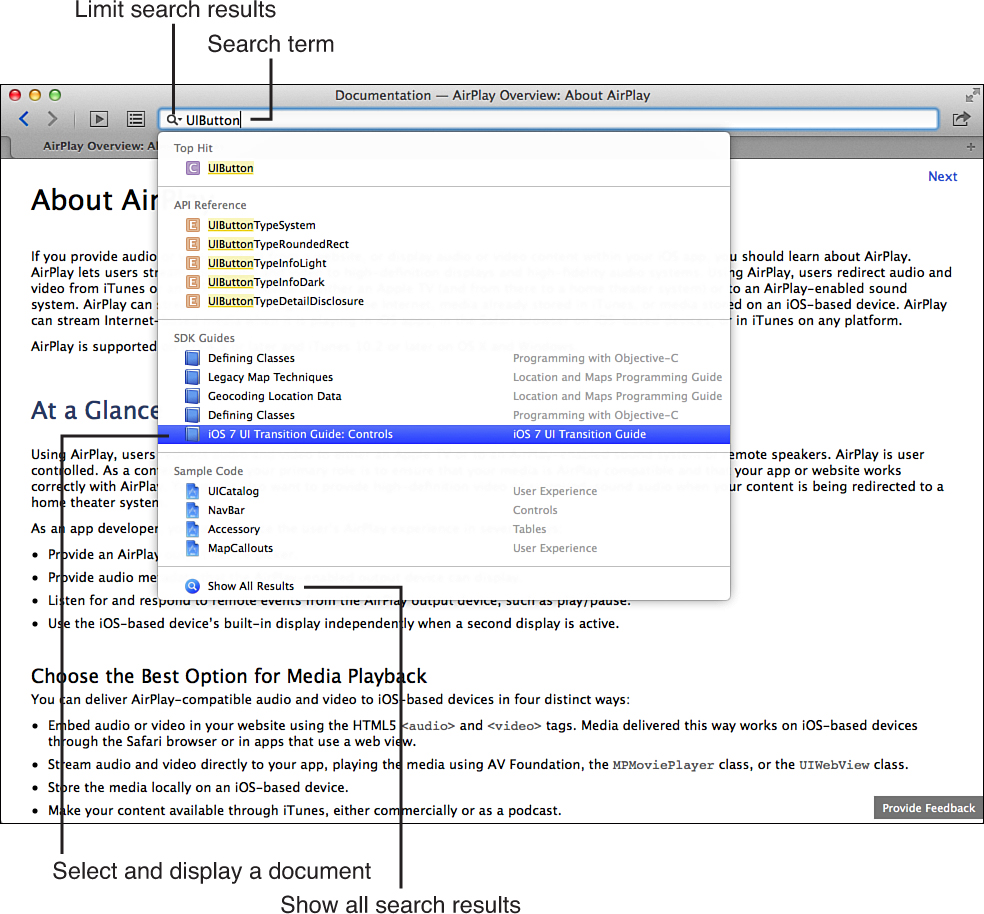
To open the Xcode documentation application, choose Help, Documentation and API Reference from the menu bar. The help system will launch, with a very browser-like appearance. Begin typing a topic of interest into the search field, and, as you type, a list of results appear, as shown in Figure 4.13.
The results are divided into categories:
![]() API Reference: Documents that describe the technical details of a feature, such as the methods and properties a class makes available
API Reference: Documents that describe the technical details of a feature, such as the methods and properties a class makes available
![]() SDK Guides: Tutorial-like documentation that takes a more high-level view of a feature and describes how it could/should be used
SDK Guides: Tutorial-like documentation that takes a more high-level view of a feature and describes how it could/should be used
![]() Sample Code: Xcode projects that you can download and use to see a feature demonstrated
Sample Code: Xcode projects that you can download and use to see a feature demonstrated
Clicking a result in the list will take you directly to the document you selected. Alternatively, you can click the Show All Results entry to see all possible matches for your search term.
Tip
You can fine-tune your search criteria by clicking the magnifying glass located within the search field. This displays a pop-up menu with selections for limiting your search to specific document sets.
Browsing Documentation
In addition to searching for help, you can also browse all of the available documents within your document sets, including online video and sample code. To do this, follow these steps:
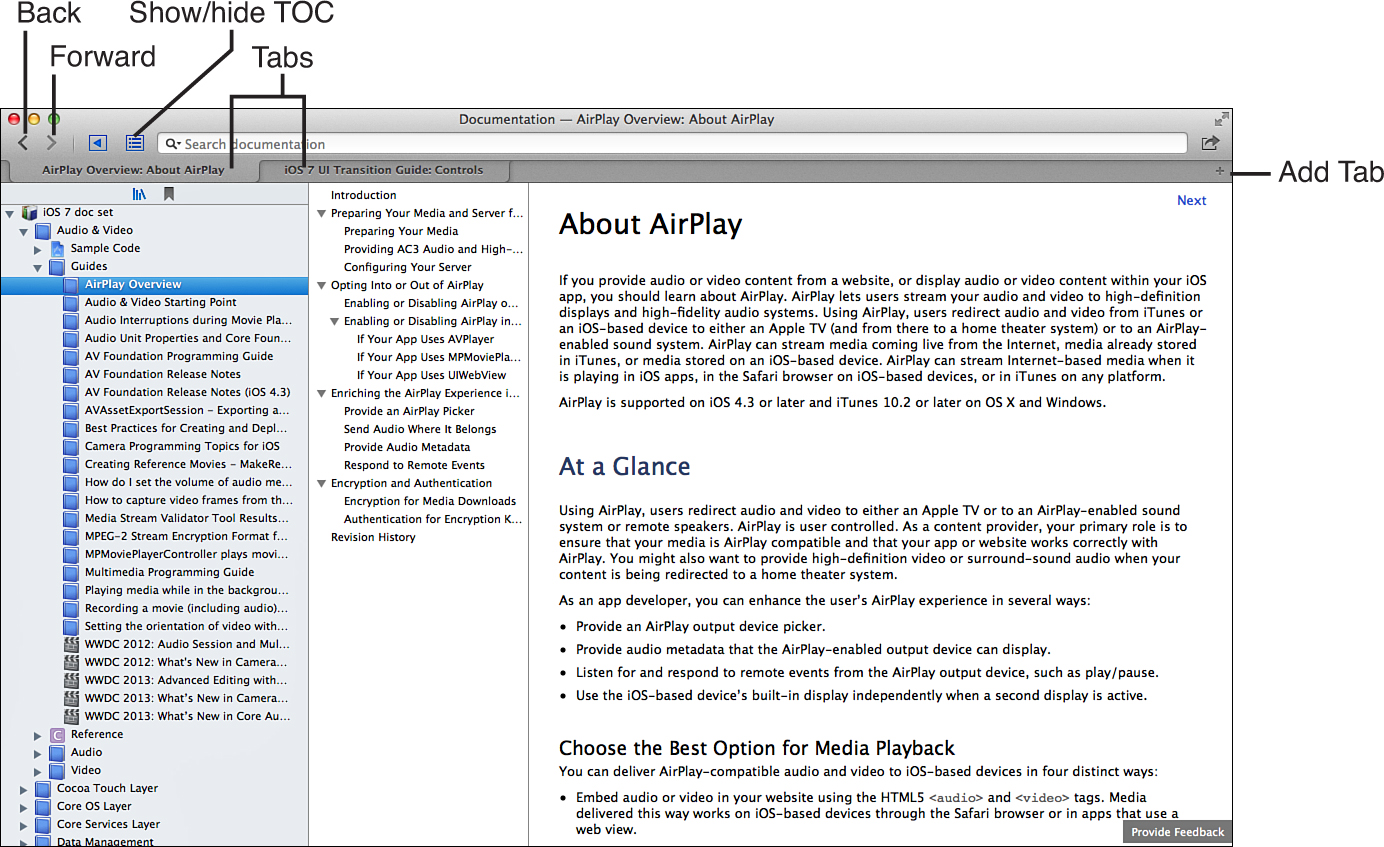
1. Click the disclosure arrow in the toolbar. A sidebar will appear in the window.
2. Click the documentation set icon (books on a shelf) to see all the available resources.
3. Drill down into the docs until you find what you’re interested in, as demonstrated in Figure 4.14.

Navigating Documents
When you’ve arrived at a document that you’re interested in, regardless of whether you searched or browsed to find it, you can read and navigate within the document using the blue links. You can also move forward and backward between documents using the arrow buttons located above the content. Tabs are added by clicking the + icon at the far right of the documentation window. Command-clicking a link automatically opens it in a new tab, similar to Safari.
To speed up navigation within a document, you can click the table of contents icon in the toolbar to show a TOC (if available) for the document you are currently viewing, as demonstrated in Figure 4.15. Clicking an entry within the TOC jumps to the appropriate location within the document.
Setting Bookmarks
If you find a particularly interesting piece of information, you can bookmark it. To create a bookmark, you use the Share Sheet in the toolbar or simply click the Bookmark icon beside the content that interests you.
To access all your documentation bookmarks, make sure that the sidebar is visible, and then click the bookmark icon, as shown in Figure 4.16.
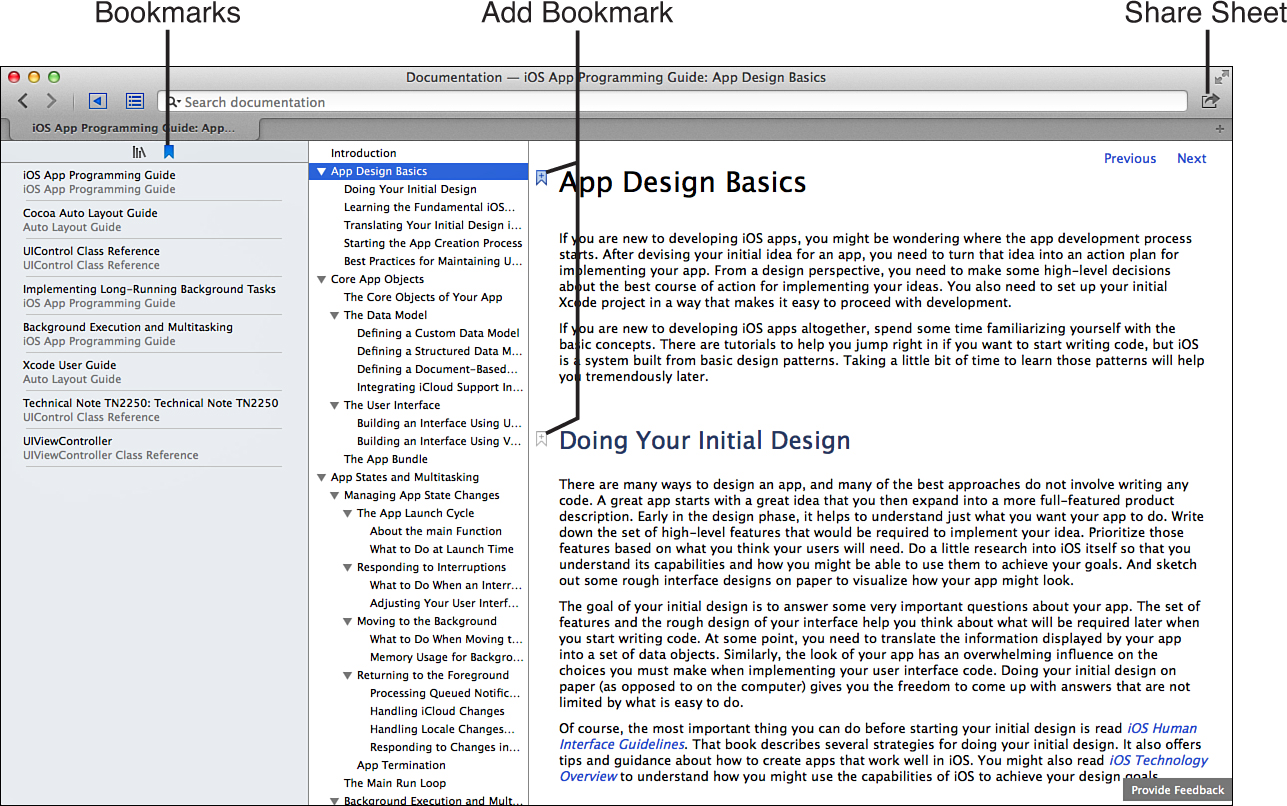
Sharing Documents
In addition to adding bookmarks, the sharing icon in the documentation system’s toolbar can be used to send yourself a documentation link in email or iMessage or to open a PDF copy of what you’re currently reading.
Quick Help
One of the easiest and fastest ways to get help while coding is through the Xcode Quick Help assistant. To open the assistant, hold down Option and click a symbol in Xcode (for example, a class name or method name) or choose Help, Quick Help. A small window opens with basic information about the symbol, as well as links to other documentation resources.
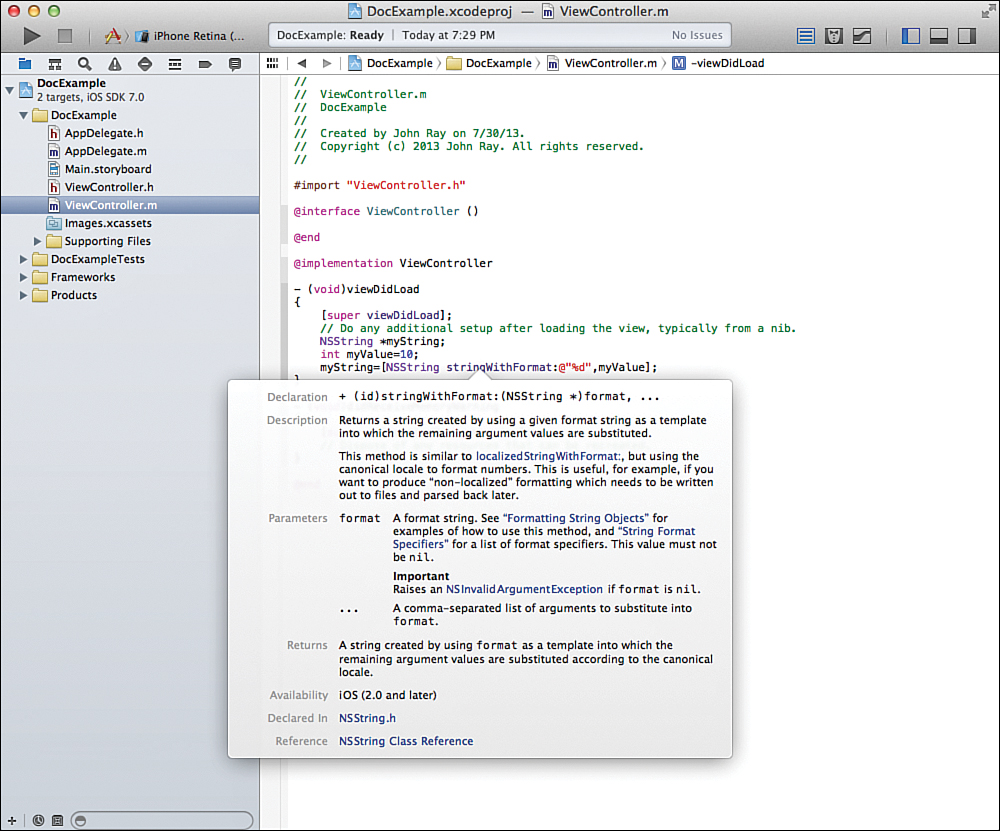
Using Quick Help
Consider the following line that allocates and initializes a string with the contents of an integer variable:
myString=[NSString initWithString:@"%d",myValue];
In this example, there is a class (NSString) and a methods (initWithString). To get information about the initWithString: method, hold down Option, and then click initWithString:. The Quick Help popover appears, as shown in Figure 4.17.
Click any of the hyperlinks in Quick Help results to jump to a specific piece of documentation or code.
Note
You can tell when you’re hovering over an item that you can click for Quick Help because it will be displayed with a blue dashed underline in the Xcode editor and your mouse cursor will change to show a ?.
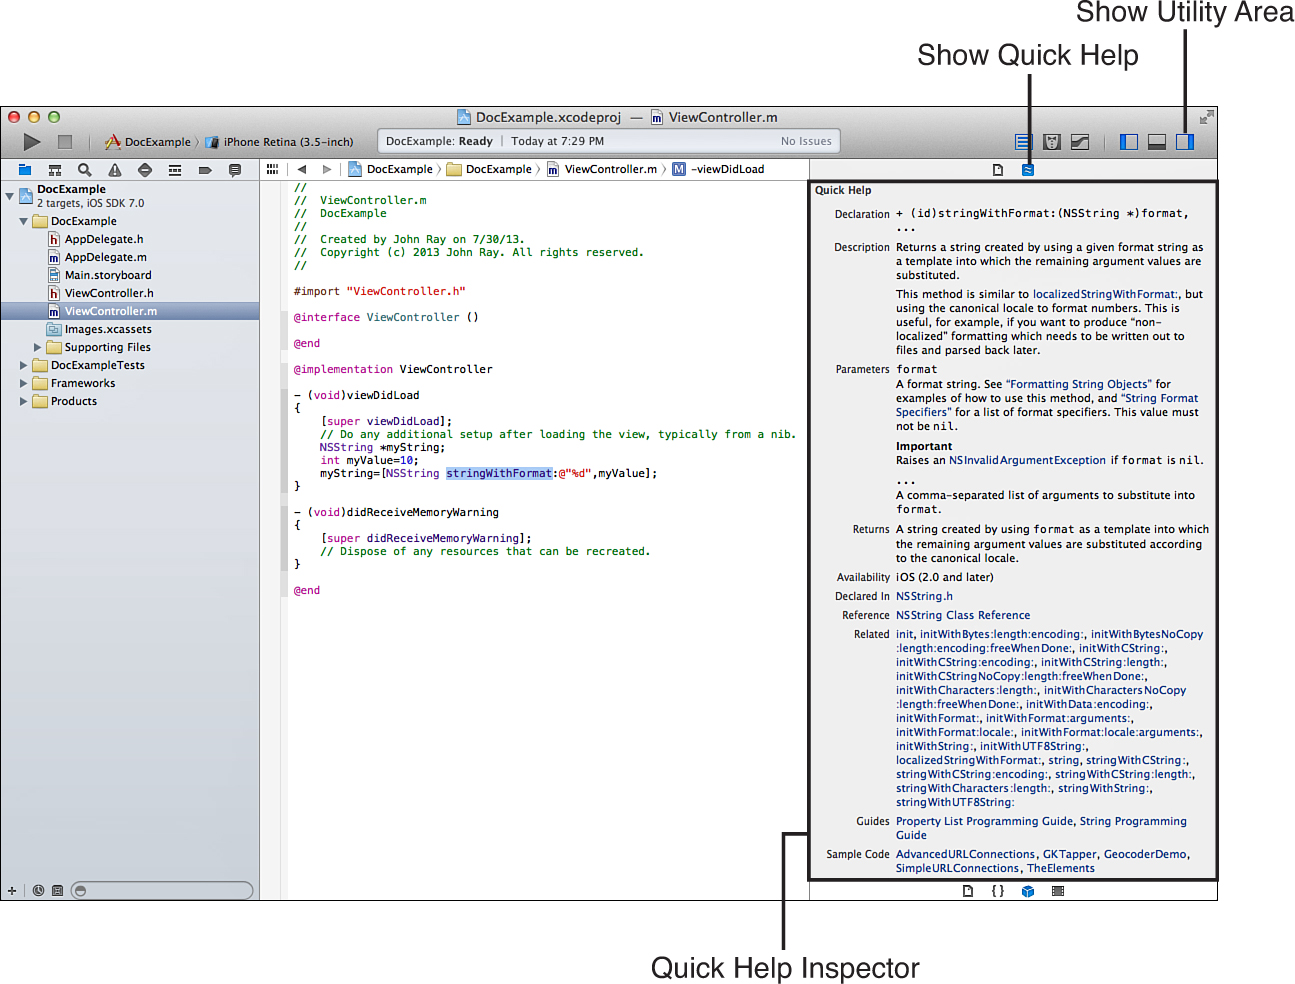
Activating the Quick Help Inspector
If you find Quick Help useful and wish you could access it even faster, you’re in luck. The Quick Help Inspector can be used to display help information all the time. Xcode actually displays context-aware help for whatever you’re typing, as you type it.
To display the Quick Help Inspector, open the utility area of the Xcode window using the third (rightmost) View button. Next, click the show Quick Help Inspector icon (wavy lines in a dark square), located at the top of the utility area, as shown in Figure 4.18. Quick Help automatically displays a reference for whatever code your text-entry cursor is located in.
Interpreting Quick Help Results
Quick Help displays context-sensitive information related to your code in up to eight different sections. What you see depends on the type of symbol (code) you have selected. A class property, for example, doesn’t have a return type, but a class method does:
![]() Declaration: The structure of a method or definition of a data type
Declaration: The structure of a method or definition of a data type
![]() Description: A few sentences describing the feature that the class, method, or other symbol provides
Description: A few sentences describing the feature that the class, method, or other symbol provides
![]() Parameters: The required or option information that can be provided to a method
Parameters: The required or option information that can be provided to a method
![]() Returns: What information will be returned by a method when it completes
Returns: What information will be returned by a method when it completes
![]() Availability: The versions of the operating system where the feature is available
Availability: The versions of the operating system where the feature is available
![]() Declared In: The file that defines the selected symbol
Declared In: The file that defines the selected symbol
![]() Reference: The official reference documentation for the system
Reference: The official reference documentation for the system
![]() Related: Other methods within the same class as your selected method
Related: Other methods within the same class as your selected method
![]() Guides: Additional tutorial documentation that references the selected symbol
Guides: Additional tutorial documentation that references the selected symbol
![]() Sample Code: Sample code files that include examples of class/method/property use
Sample Code: Sample code files that include examples of class/method/property use
Quick Help simplifies the process of finding the right method to use with an object. Instead of trying to memorize dozens of instance methods, you can learn the basics and let Quick Help act as an on-demand reference of all of an object’s exposed methods.
Further Exploration
To say that Cocoa Touch is “big” is an understatement. Every year, Apple releases a major update of iOS and adds thousands of new classes and methods. I try to cover the highlights in this book, but there is much more to explore. To get a taste for the number of frameworks and classes available, I recommend starting with the iOS Technology Overview document, and work through the items under the each layer. This will show you what functionality is built into the OS and let you focus on the topics that are important to your individual development efforts.
Summary
In this hour, you explored the layers that make up the iOS: Cocoa Touch, Media, Core Services, and Core OS. You learned the structure of a basic application: what objects it uses and how iOS manages the application life cycle. We also reviewed the common classes that you’ll encounter as you begin to work with Cocoa, including data types and UI controls.
To give you the tools you need to find class and method references on your own, this hour introduced you to two features in Xcode. The first, the Xcode documentation window, offers a browser-like interface to the complete iOS documentation. The second, Quick Help, finds help for the class or method you are working with, automatically, as you type. Ultimately, it will be these tools that help you dive deeper into the Apple development environment.
Q&A
Q. Why are the operating system services layered? Doesn’t that add complexity?
A. Using the upper-level frameworks reduces the complexity of your code. By providing multiple levels of abstraction, Apple has given developers the tools they need to easily use iOS features and the flexibility to highly customize their application’s behavior by using lower-level services more closely tied to the OS.
Q. What do I do if I can’t find an interface object I want?
A. Chances are, if you’re writing a “normal” iOS application, Apple has provided a UI class to fill your need. If you find that you’d like to do things differently, you can always subclass an existing control and modify its behavior as you see fit—or create a completely new control.
Workshop
Quiz
1. How many layers are there in the simplified Apple iOS architecture?
2. How often will you be manually creating the UIApplication object in your applications?
3. What helpful feature can watch your typing and show relevant help articles?
Answers
1. Four. Cocoa Touch, Media, Core Services, and Core OS.
2. If you’re building using Apple’s application templates, the initial setup of the UIApplication object is automatic. You don’t need to do a thing.
3. Quick Help offers interactive help as you code.
Activities
1. Using the Apple Xcode Documentation utility, explore the NSString class and instance methods. Identify the methods you’d use to compare strings, create a string from a number, and change a string to uppercase and lowercase.
2. Open Xcode and create a new, empty application. Expand the main code group and click the file named AppDelegate.m. When the contents of the file appear, open Quick Help by holding Option and clicking inside the class name UIApplication. Review the results. Try clicking other symbols in the Xcode class file and see what happens.