Hour 22. Building Background-Ready Applications
,What You’ll Learn in This Hour:
![]() How iOS supports background tasks
How iOS supports background tasks
![]() What types of background operations are supported
What types of background operations are supported
![]() How to disable backgrounding
How to disable backgrounding
![]() Ways to execute code in the background
Ways to execute code in the background
![]() How to implement background data fetching
How to implement background data fetching
“Real multitasking” claims the commercial for a competitor’s tablet. “Unlike Apple, you can run multiple things at once,” chides another ad. As a developer and a fan of iOS, I’ve found these threads amusing in their naiveté and somewhat confusing. iDevices have always run multiple applications simultaneously in the background, but they were limited to Apple’s applications. This restriction has been to preserve the user experience of the device instead of letting it bog down to the point of being unusable. Rather than an “anything goes” approach, Apple has taken steps to ensure that iOS devices remain responsive at all times.
In iOS 7, Apple has dramatically opened up background processing with many new capabilities. Unlike the competitors, however, Apple has been cautious in its backgrounding approach—preventing a single process from completely taking over the operating system. In this hour’s lesson, you learn several of the multitasking techniques that you can implement in your applications.
Understanding iOS Backgrounding
As you’ve built the tutorials in this book, you might have noticed that when you quit the applications on your device or in the iOS Simulator, they still show up in the iOS task manager, and unless you manually stop them, they tend to pick up right where they left off. The reason for this is that projects are background ready as soon as you click the Run button. That doesn’t mean that they will run in the background, just that they’re aware of the background features and will take advantage with a little bit of help.
Before we examine how to enable backgrounding (also called multitasking) in our projects, let’s first identify exactly what it means to be a background-aware application, starting with the types of backgrounding supported and then the application life cycle methods you can tie into.
Types of Backgrounding
We explore five primary types of backgrounding in iOS: application suspension, local notifications, task-specific background processing, task completion, and background fetches.
Suspension
When an application is suspended, it ceases executing code but is preserved exactly as the user left it. When the user returns to the application, it appears to have been running the whole time. In reality, all tasks are stopped, keeping the app from using up your device’s resources. Any application that you compile will, by default, support background suspension. You should still handle cleanup in the application if it is about to be suspended (see the “Background-Aware Application Life Cycle Methods” section, later in this hour), but beyond that, it “just works.”
In addition to performing cleanup as an application is being suspended, it is your responsibility to recover from a background suspended state and update anything in the application that should have changed while it was suspended (time/date changes and so on).
Local Notifications
The second type of background processing is the scheduling of local notifications (UILocalNotification). If you’ve ever experienced a push notification, local notifications are the same but are generated by the applications that you write. An application, while running, can schedule notifications to appear onscreen at a point in time in the future. For example, the following code initializes a notification (UILocationNotification), configures it to appear in five minutes, and then uses the application’s scheduleLocalNotification method to complete the scheduling:
UILocalNotification *futureAlert;
futureAlert = [[UILocalNotification alloc] init];
futureAlert.fireDate = [NSDate dateWithTimeIntervalSinceNow:300];
futureAlert.timeZone = [NSTimeZone defaultTimeZone];
[[UIApplication sharedApplication] scheduleLocalNotification:futureAlert];
These notifications, when invoked by iOS, can show a message, play a sound, and even update your application’s notification badge. They cannot, however, execute arbitrary application code. In fact, it is likely that you will simply allow iOS to suspend your application after registering your local notifications. A user who receives a notification can click the View button in the notification window to return to your application.
In iOS 7, remote notifications can be sent to an iOS device and trigger applications to activate and begin processing. This can be useful for asking an application to retrieve new information when it becomes available (having it instantly appear when the user next opens the app). Using remote notifications requires you to have a server infrastructure set up to track and communicate with your user’s iOS devices (which, unfortunately, is beyond the scope of this book). Learn more by reading the document Local and Push Notification Programming Guide found in the Xcode 5 help system.
Task-Specific Background Processing
Before Apple decided to implement background processing, it did some research on how users worked with their handhelds. What Apple found was that people needed specific types of background processing. First, they needed audio to continue playing in the background; this is necessary for applications like Pandora. Next, location-aware software needed to update itself in the background so that users continued to receive navigation feedback. Finally, VoIP applications like Skype needed to operate in the background to handle incoming calls.
These three types of tasks are handled uniquely and elegantly in iOS. By declaring that your application requires one of these types of background processing, you can, in many cases, enable your application to continue running with little alteration. To declare your application capable of supporting any (or all) of these tasks, you will add the Required Background Modes (UIBackgroundModes) key to the project’s plist file and then add values of App Plays Audio (Audio), App Registers for Location Updates (Location), or App Provides Voice over IP Services (VoIP).
Task Completion for Long-Running Tasks
The fourth type of backgrounding that we’ll use is task completion. Using task-completion methods, you can “mark” the tasks in your application that will need to finish before the application can be safely suspended (file upload/downloads, massive calculations, and so on).
For example, to mark the beginning of a long-running task, first declare an identifier for the specific task:
UIBackgroundTaskIdentifier myLongTask;
Then use the application’s beginBackgroundTaskWithExpirationHandler method to tell iOS that you’re starting a piece of code that can continue to run in the background:
myLongTask = [[UIApplication sharedApplication]
beginBackgroundTaskWithExpirationHandler:^{
// If you're worried about exceeding 10 minutes, handle it here
}];
And finally, mark the end of the long-running task with the application endBackgroundTask method:
[[UIApplication sharedApplication] endBackgroundTask:myLongTask];
Each task you mark will have roughly 10 minutes (total) to complete its actions, which is plenty of time for most uses. After the time completes, the application is suspended and treated like any other suspended application.
Background Fetches
The fifth and final multitasking feature we review this hour is background fetches. Using the iOS 7 background fetch feature, your application can periodically launch and execute a method that retrieves and processes update data. Scheduling of the updates happens automatically based on a user’s usage. If a user starts an app and uses it each morning, iOS will make sure that a background fetch occurs before the time the user is typically using it. In addition, iOS prevents multiple applications from attempting background fetches at the same time, thus keeping the device responsive even if background processing is taking place.
As a developer, you need to do just two things to implement background updates. First, you must edit the application:didFinishLaunchingWithOptions method in the application delegate (AppDelegate.m) to set the minimum amount of time between fetches. This consists of a single line:
[[UIApplication sharedApplication]
setMinimumBackgroundFetchInteval:UIApplicationBackgroundFetchIntervalMinimum];
The constant UIApplicationBackgroundFetchIntervalMinimum tells the application that you want updates to happen as often as they can. If you have a specific interval in mind, you can provide a number in seconds instead. You aren’t guaranteed an interval by iOS; it is intended to be scheduled around a user’s activities.
The second step is to implement the background fetch itself. To do this, you add the following method to the application delegate:
-(void)application:(UIApplication *)application
performFetchWithCompletionHandler:(void (^)(UIBackgroundFetchResult))completionHandler
{
//Do something useful.
//Indicate completion
completionHandler(UIBackgroundFetchResultNewData);
}
This method has 30 seconds to execute and perform the background fetch. When completed, it should call completionHandler(UIBackgroundFetchResultNewData) to indicate success.
Background-Aware Application Life Cycle Methods
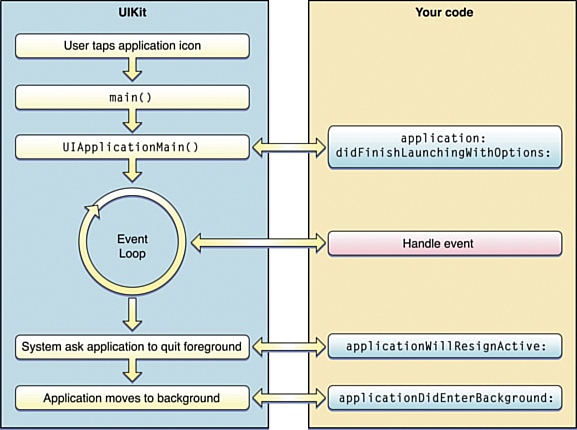
In Hour 4, “Inside Cocoa Touch,” you started learning about the application life cycle, shown in Figure 22.1. You learned that applications should clean up after themselves in the applicationDidEnterBackground delegate method. This replaces applicationWill Terminate in earlier versions of the OS, or as you’ll learn shortly, in applications that you’ve specifically marked as not capable (or necessary) to run in the background.
In addition to applicationDidEnterBackground, you should implement several other methods to be a proper background-aware iOS citizen. For many small applications, you do not need to do anything with these other than leave them as is in the application delegate. As your projects increase in complexity, however, make sure that your apps move cleanly from the foreground to background (and vice versa), avoiding potential data corruption and creating a seamless user experience.
Caution: Your Application Can Terminate at Any Time
It is important to understand that iOS can terminate your applications, even if they’re backgrounded, if it decides that the device is running low on resources. You can expect that your applications will be fine, but plan for a scenario where they are forced to quit unexpectedly.
If you’re interested in implementing background fetching, you can take advantage of the methods we discuss here, but they aren’t necessary. You’re only required to set the minimum fetch time, then define a method for handling the data fetching itself. We’ll implement some simple background fetching later this hour.
Apple expects to see the following methods in your background-aware apps:
![]() application:didFinishLaunchingWithOptions: Called when your application first launches. If your application is terminated while suspended or purged from memory, it needs to restore its previous state manually. (You did save it to your user’s preferences, right?)
application:didFinishLaunchingWithOptions: Called when your application first launches. If your application is terminated while suspended or purged from memory, it needs to restore its previous state manually. (You did save it to your user’s preferences, right?)
![]() applicationDidBecomeActive: Called when an application launches or returns to the foreground from the background. This method can be used to restart processes and update the user interface, if needed.
applicationDidBecomeActive: Called when an application launches or returns to the foreground from the background. This method can be used to restart processes and update the user interface, if needed.
![]() applicationWillResignActive: Invoked when the application is requested to move to the background or to quit. This method should be used to prepare the application for moving into a background state, if needed.
applicationWillResignActive: Invoked when the application is requested to move to the background or to quit. This method should be used to prepare the application for moving into a background state, if needed.
![]() applicationDidEnterBackground: Called when the application has become a background application. This largely replaces
applicationDidEnterBackground: Called when the application has become a background application. This largely replaces applicationWillTerminate, which was used when an application quit. You should handle all final cleanup work in this method. You may also use it to start long-running tasks and use task-completion backgrounding to finish them.
![]() applicationWillEnterForeground: Called when an application returns to an active state after being backgrounded.
applicationWillEnterForeground: Called when an application returns to an active state after being backgrounded.
![]() applicationWillTerminate: Invoked when an application on a nonmultitasking version of iOS is asked to quit or when iOS determines that it needs to shut down an actively running background application.
applicationWillTerminate: Invoked when an application on a nonmultitasking version of iOS is asked to quit or when iOS determines that it needs to shut down an actively running background application.
Method stubs for all of these exist in your application delegate implementation files. If your application needs additional setup or teardown work, just add the code to the existing methods. As you’ll see shortly, many applications, such as the majority of those in this book, require few changes.
Now that you have an understanding of the background-related methods and types of background processing available to you, let’s look at how they can be implemented. To do this, we reuse tutorials that we’ve built throughout the book (with two exceptions). We do not cover how these tutorials were built, so be sure to refer to the earlier hours if you have questions on the core functionality of the applications.
Disabling Backgrounding
We start with the exact opposite of enabling backgrounding: disabling it. If you think about it, there are many different “diversion” apps that don’t need to support background suspension or processing. These are apps that you use and then quit. They don’t need to hang around in your task manager afterward.
For example, consider the HelloNoun application in Hour 6, “Model-View-Controller Application Design.” There’s no reason that the user experience would be negatively affected if the application started from scratch each time you ran it. To implement this change in the project, follow these steps:
1. Open the project in which you want to disable backgrounding (such as HelloNoun).
2. Choose the main project group and click the HelloNoun target, and then expand the Custom iOS Target Properties under the Info tab. Or open the project’s plist file in the Supporting Files group (HelloNoun-Info.plist).
3. Add an additional row to the displayed property list (right-click the list, choose Add Row), selecting Application Does Not Run in Background (UIApplicationExitsOnSuspend) from the Key pop-up menu.
4. Choose Yes from the pop-up menu at the right side of the Value column, as shown in Figure 22.2.
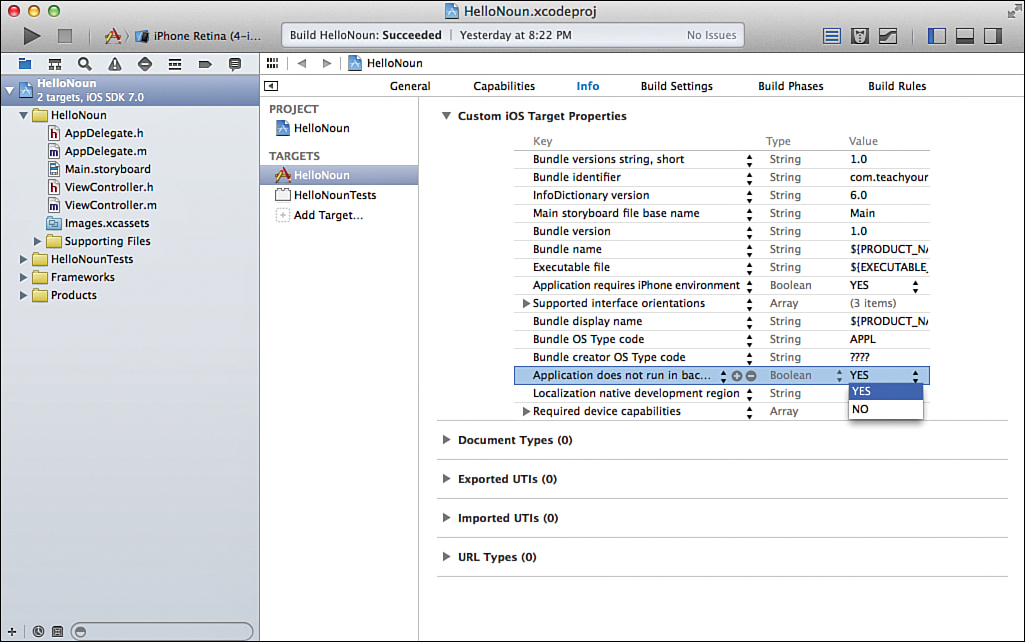
FIGURE 22.2 Add the Application Does Not Run in Background (UIApplicationExitsOnSuspend) key to the project.
By default, the plist editor shows the “developer friendly” names for plist entries. To see the underlying keys/values, right-click on the list and choose Show Raw Keys & Values from the menu.
Run the application on your device or in the iOS Simulator. When you exit the application with the Home button, it will not be suspended, and it will restart fresh when you launch it the next time.
Handling Background Suspension
In the second tutorial, we handle background suspension. As previously noted, you don’t have to do anything to support this other than build your project with the iOS development tools. That said, we use this example as an opportunity to prompt users when they return to the application after it was backgrounded.
For this example, we update the ImageHop application from Hour 8, “Handling Images, Animation, Sliders, and Steppers.” It is conceivable (work with me here, folks) that a user will want to start the bunny hopping, exit the application, and then return to exactly where it was at some time in the future.
To alert the user when the application returns from suspension, we edit the application delegate method applicationWillEnterForeground. Recall that this method is invoked only when an application is returning from a backgrounded state. Open AppDelegate.m and implement the method, as shown in Listing 22.1.
LISTING 22.1 Implementing the applicationWillEnterForeground Method
1: - (void)applicationWillEnterForeground:(UIApplication *)application
2: {
3: UIAlertView *alertDialog;
4: alertDialog = [[UIAlertView alloc]
5: initWithTitle: @"Yawn!"
6: message:@"Was I asleep?"
7: delegate: nil
8: cancelButtonTitle: @"Welcome Back"
9: otherButtonTitles: nil];
10: [alertDialog show];
11: }
Within the method, we declare, initialize, show, and release an alert view, exactly as we did in the Getting Attention tutorial in Hour 10, “Getting the User’s Attention.” After updating the code, run the application. Start the ImageHop animation, and then use the Home button to background the app.
After waiting a few seconds (just for good measure), open ImageHop again using the task manager or its application icon (not with Xcode’s Run). When the application returns to the foreground, it should pick up exactly where it left off and present you with the alert shown in Figure 22.3.
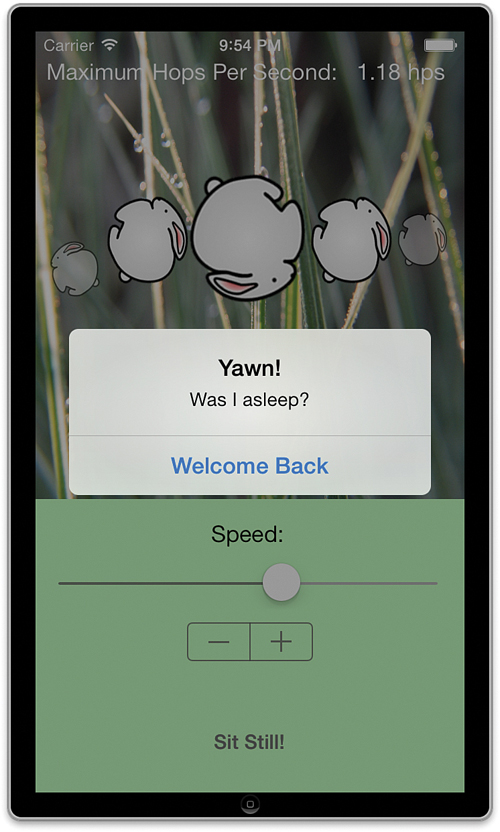
FIGURE 22.3 The applicationWillEnterForeground method is used to display an alert upon returning from the background.
Implementing Local Notifications
Earlier in this lesson, you saw a short snippet of the code necessary to generate a local notification (UILocalNotification). As it turns out, there’s not much more you need beyond those few lines. To demonstrate the use of local notifications, we update Hour 10’s doAlert method. Instead of just displaying an alert, it also shows a notification 5 minutes later and then schedules local notifications to occur every day thereafter.
Common Notification Properties
You want to configure several properties when creating notifications. A few of the more interesting of these include the following:
![]() applicationIconBadgeNumber: An integer that is displayed on the application icon when the notification is triggered.
applicationIconBadgeNumber: An integer that is displayed on the application icon when the notification is triggered.
![]() fireDate: An
fireDate: An NSDate object that provides a time in the future for the notification to be triggered.
![]() timeZone: The time zone to use for scheduling the notification.
timeZone: The time zone to use for scheduling the notification.
![]() repeatInterval: How frequently, if ever, the notification should be repeated.
repeatInterval: How frequently, if ever, the notification should be repeated.
![]() soundName: A string (
soundName: A string (NSString) containing the name of a sound resource to play when the notification is triggered.
![]() alertBody: A string (
alertBody: A string (NSString) containing the message to be displayed to the user.
Creating and Scheduling a Notification
Open the GettingAttention application and edit the doAlert method so that it resembles Listing 22.2. (Bolded lines are additions to the existing method.) Once the code is in place, we walk through it together.
LISTING 22.2 Updating doAlert to Register a Local Notification
1: - (IBAction)doAlert:(id)sender {
2: UIAlertView *alertDialog;
3: UILocalNotification *scheduledAlert;
4:
5: alertDialog = [[UIAlertView alloc]
6: initWithTitle: @"Alert Button Selected"
7: message:@"I need your attention NOW (and in a little bit)!"
8: delegate: nil
9: cancelButtonTitle: @"Ok"
10: otherButtonTitles: nil];
11: [alertDialog show];
12:
13: [[UIApplication sharedApplication] cancelAllLocalNotifications];
14: scheduledAlert = [[UILocalNotification alloc] init];
15: scheduledAlert.applicationIconBadgeNumber=1;
16: scheduledAlert.fireDate = [NSDate dateWithTimeIntervalSinceNow:300];
17: scheduledAlert.timeZone = [NSTimeZone defaultTimeZone];
18: scheduledAlert.repeatInterval = NSDayCalendarUnit;
19: scheduledAlert.soundName=@"soundeffect.wav";
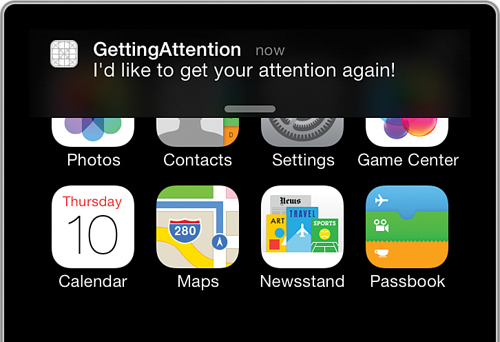
20: scheduledAlert.alertBody = @"I'd like to get your attention again!";
21:
22: [[UIApplication sharedApplication]
23: scheduleLocalNotification:scheduledAlert];
24: }
First, in line 3, we declare scheduledAlert as an object of type UILocalNotification. This local notification object is what we set up with our desired message, sound, and so on and then pass off to the application to display sometime in the future.
In line 13, we use [UIApplication sharedApplication] to grab our application object and then call the UIApplication method cancelAllLocalNotifications. This cancels any previously scheduled notifications that this application may have made, giving us a clean slate.
Line 14 allocates and initializes the local notification object scheduledAlert.
In line 15, we configure the notification’s applicationIconBadgeNumber property so that when the notification is triggered, the application’s badge number is set to 1 to show that a notification has occurred.
Line 16 uses the fireDate property along with the NSDate class method DateWithTime IntervalSinceNow to set the notification to be triggered 300 seconds in the future.
Line 17 sets the timeZone for the notification. This should almost always be set to the local time zone, as returned by [NSTimeZone defaultTimeZone].
Line 18 sets the repeatInterval property for the notification. This can be chosen from a variety of constants, such as NSDayCalendarUnit (daily), NSHourCalendarUnit (hourly), and NSMinuteCalendarUnit (every minute). You can find the full list in the NSCalendar class reference in the Xcode developer documentation.
In Line 19, we set a sound to be played along with the notification. The soundName property is configured with a string (NSString) with the name of a sound resource. Because we already have soundeffect.wav available in the project, we can use that without further additions.
Line 20 finishes the notification configuration by setting the alertBody of the notification to the message we want the user to see.
When the notification object is fully configured, we schedule it using the UIApplication method scheduleLocalNotification (lines 22–23). This finishes the implementation.
Choose Run to compile and start the application on your device or in the iOS Simulator. After GettingAttention is up and running, click the Alert Me! button. After the initial alert is displayed, click the Home button to exit the application. Go get a drink, and come back in about 4 minutes and 59 seconds. At exactly 5 minutes later, you’ll receive a local notification, as shown in Figure 22.4.
Using Task-Specific Background Processing
So far, we haven’t actually done any real background processing. We’ve suspended an application and generated local notifications, but in each of these cases, the application hasn’t been doing any processing. Let’s change that. In our final two examples, we execute real code behind the scenes while the application is in the background. Although it is well beyond the scope of this book to generate a VoIP application, we can use our Cupertino application from the preceding hour’s lesson, with some minor modifications, to show background processing of location and audio.
Preparing the Cupertino Application for Audio
When we finished off the Cupertino application in the preceding hour, it told us how far away Cupertino was and presented straight, left, and right arrows on the screen to indicate the direction the user should be traveling to reach the mothership. We can update the application to audio using SystemSoundServices, just as we did in Hour 10’s GettingAttention application.
The only tricky thing about our changes is that we won’t want to hear a sound repeated if it was the same as the last sound we heard. To handle this requirement, we use a constant for each sound: 1 for straight, 2 for right, and 3 for left, and store this in a variable called lastSound each time a sound is played. We can then use this as a point of comparison to make sure that what we’re about to play isn’t the same thing we did just play.
Adding the AudioToolbox Framework
To use System Sound Services, we need to first add the AudioToolbox framework. Open the Cupertino (with compass implementation) project in Xcode. Select the ViewController.h file and add an @import line for AudioToolbox after the existing import of the Core Location framework:
@import AudioToolbox;
Adding the Audio Files
Within the Cupertino Audio Compass project folder included with this hour’s lesson, you’ll find an Audio folder containing simple direction sounds: straight.wav, right.wav, and left.wav. Drag the audio folder to the main project code group within the Xcode project. Choose to copy the files and create groups when prompted.
Adding System Sound ID Properties
Next, we need to update the @interface block in ViewController.m to declare four new private properties for three SystemSoundIDs referencing our sound files (soundStraight, soundLeft, and soundRight) and a fourth (lastSound) to hold the last SystemSoundID we played. These aren’t objects, so the properties won’t need a weak or strong attribute. Add the four SystemSoundID properties to ViewController.m now. The finished block should look like this:
@interface ViewController ()
@property (weak, nonatomic) IBOutlet UILabel *distanceLabel;
@property (weak, nonatomic) IBOutlet UIView *waitView;
@property (weak, nonatomic) IBOutlet UIView *distanceView;
@property (weak, nonatomic) IBOutlet UIImageView *directionArrow;
@property (strong, nonatomic) CLLocationManager *locMan;
@property (strong, nonatomic) CLLocation *recentLocation;
@property (nonatomic) SystemSoundID soundStraight;
@property (nonatomic) SystemSoundID soundRight;
@property (nonatomic) SystemSoundID soundLeft;
@property (nonatomic) SystemSoundID lastSound;
-(double)headingToLocation:(CLLocationCoordinate2D)desired
current:(CLLocationCoordinate2D)current;
@end
The setup is complete; we’re ready to implement the code to generate the audio directions for the application.
Implementing the Cupertino Audio Directions
To add sound playback to the Cupertino application, we need to modify two of our existing ViewController methods. The viewDidLoad method will give us a good place to load all three of our sound files and set the soundStraight, soundRight, and soundLeft references appropriately. We also use it to initialize the lastSound property to 0, which won’t match any of the assigned sound IDs. This ensures that whatever the first sound is, it will play.
Edit ViewController.m and update the first half of viewDidLoad to match Listing 22.3.
LISTING 22.3 Initializing the Sound File References in viewDidLoad
- (void)viewDidLoad
{
[super viewDidLoad];
NSString *soundFile;
SystemSoundID tempSound;
soundFile = [[NSBundle mainBundle] pathForResource:@"straight"
ofType:@"wav"];
AudioServicesCreateSystemSoundID((__bridge CFURLRef)
[NSURL fileURLWithPath:soundFile]
,&tempSound);
self.soundStraight=tempSound;
soundFile = [[NSBundle mainBundle] pathForResource:@"right"
ofType:@"wav"];
AudioServicesCreateSystemSoundID((__bridge CFURLRef)
[NSURL fileURLWithPath:soundFile]
,&tempSound);
self.soundRight=tempSound;
soundFile = [[NSBundle mainBundle] pathForResource:@"left"
ofType:@"wav"];
AudioServicesCreateSystemSoundID((__bridge CFURLRef)
[NSURL fileURLWithPath:soundFile]
,&tempSound);
self.soundLeft=tempSound;
self.lastSound=0;
// Do any additional setup after loading the view, typically from a nib.
self.locMan = [CLLocationManager new];
self.locMan.delegate = self;
self.locMan.desiredAccuracy = kCLLocationAccuracyThreeKilometers;
self.locMan.distanceFilter = 1609; // a mile
[self.locMan startUpdatingLocation];
if ([CLLocationManager headingAvailable]) {
self.locMan.headingFilter = 10; // 10 degrees
[self.locMan startUpdatingHeading];
}
}
If you are having difficulties understanding the sound playback process, refer back to the Hour 10 tutorial.
The final logic that we need to implement is to play each sound when there is a heading update. The ViewController.m method that implements this is locationManager:didUpdate Heading. Each time the arrow graphic is updated in this method, we prepare to play the corresponding sound with the AudioServicesPlaySystemSound function. Before we do that, however, we check to make sure it isn’t the same sound as lastSound; this helps prevent a Max Headroom stuttering effect as one sound file is played repeatedly over top of itself. If lastSound doesn’t match the current sound, we play it and update lastSound with a new value. For the left arrow, for example, we might use this code fragment to play the sound and set the lastSound property:
if (self.lastSound!=self.soundLeft) {
AudioServicesPlaySystemSound(self.soundLeft);
self.lastSound=self.soundLeft;
}
Edit the locationManager:didUpdateHeading method as described. Your final result should look similar to Listing 22.4.
LISTING 22.4 Adding Audio Feedback When the Heading Updates
- (void)locationManager:(CLLocationManager *)manager
didUpdateHeading:(CLHeading *)newHeading {
if (self.recentLocation != nil && newHeading.headingAccuracy >= 0) {
CLLocation *cupertino = [[CLLocation alloc]
initWithLatitude:kCupertinoLatitude
longitude:kCupertinoLongitude];
double course = [self headingToLocation:cupertino.coordinate
current:self.recentLocation.coordinate];
double delta = newHeading.trueHeading - course;
if (abs(delta) <= 10) {
self.directionArrow.image = [UIImage imageNamed:
@"up_arrow.png"];
if (self.lastSound!=self.soundStraight) {
AudioServicesPlaySystemSound(self.soundStraight);
self.lastSound=self.soundStraight;
}
}
else
{
if (delta > 180) {
self.directionArrow.image = [UIImage imageNamed:
@"right_arrow.png"];
if (self.lastSound!=self.soundRight) {
AudioServicesPlaySystemSound(self.soundRight);
self.lastSound=self.soundRight;
}
}
else if (delta > 0) {
self.directionArrow.image = [UIImage imageNamed:
@"left_arrow.png"];
if (self.lastSound!=self.soundLeft) {
AudioServicesPlaySystemSound(self.soundLeft);
self.lastSound=self.soundLeft;
}
}
else if (delta > -180) {
self.directionArrow.image = [UIImage imageNamed:
@"right_arrow.png"];
if (self.lastSound!=self.soundRight) {
AudioServicesPlaySystemSound(self.soundRight);
self.lastSound=self.soundRight;
}
}
else {
self.directionArrow.image = [UIImage imageNamed:
@"left_arrow.png"];
if (self.lastSound!=self.soundLeft) {
AudioServicesPlaySystemSound(self.soundLeft);
self.lastSound=self.soundLeft;
}
}
}
self.directionArrow.hidden = NO;
} else {
self.directionArrow.hidden = YES;
}
}
The application is now ready for testing. Click Run to install the updated Cupertino application on your device, and then try moving around. As you move, it will speak “Right,” “Left,” and “Straight” to correspond to the onscreen arrows. Try exiting the applications and see what happens. Surprise. It won’t work. That’s because we haven’t yet updated the project to allow background processing.
Tip
If you’re testing the application and it still seems a bit “chatty” (playing the sounds too often), you might want to update locMan.headingFilter to a larger value (like 15 or 20) in the viewDid Load method. This will help cut down on the number of heading updates.
Adding the Background Modes
Our application performs two tasks that should remain active when in a background state. First, it tracks our location. Second, it plays audio to give us a general heading. We need to add both audio and location background mode capabilites to the application for it to work properly. Update the Cupertino project by following these steps:
1. Choose the main project group and click the Cupertino target, and then expand the Background Modes section under the Capabilities tab.
2. Click the switch to turn on Background Modes.
3. Check both the “Audio and Airplay” and “Location updates” checkboxes, as shown in Figure 22.5.
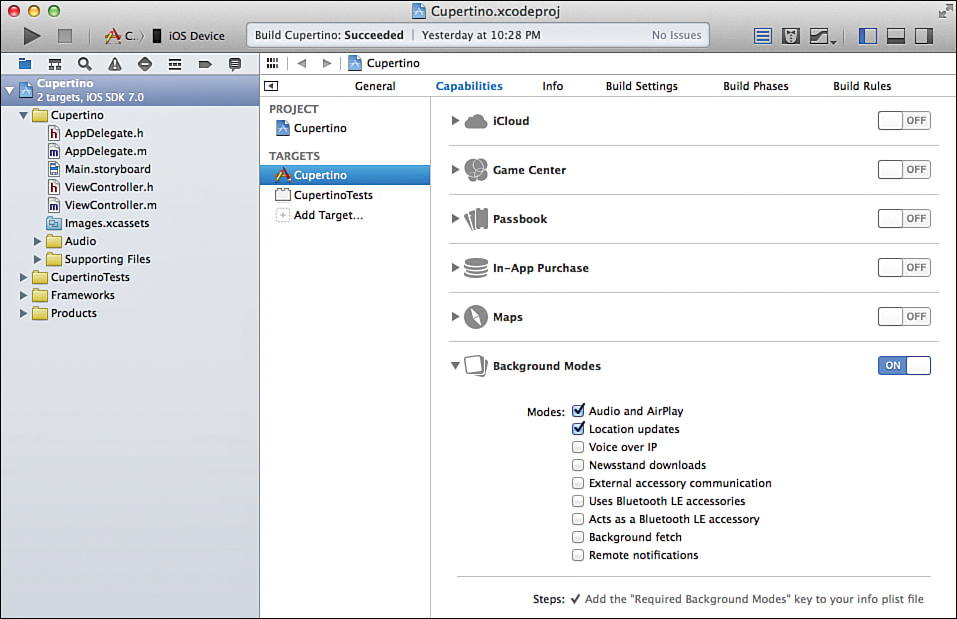
After updating the capabilities, install the updated application on your device and try again. This time, when you exit the application, it will continue to run. As you move around, you’ll hear spoken directions as Cupertino continues to track your position behind the scenes.
By declaring the location and audio background modes, your application is able to use the full services of Location Manager and iOS’s many audio playback mechanisms when it is in the background.
Completing a Long-Running Background Task
In our next tutorial of the hour, we need to create a project from scratch. Our book isn’t about building applications that require a great deal of background processing, so we need to be creative to demonstrate this feature. Sure, we could add code to an existing project that would allow a method to run in the background, but we don’t have any long-running methods that could make use of it.
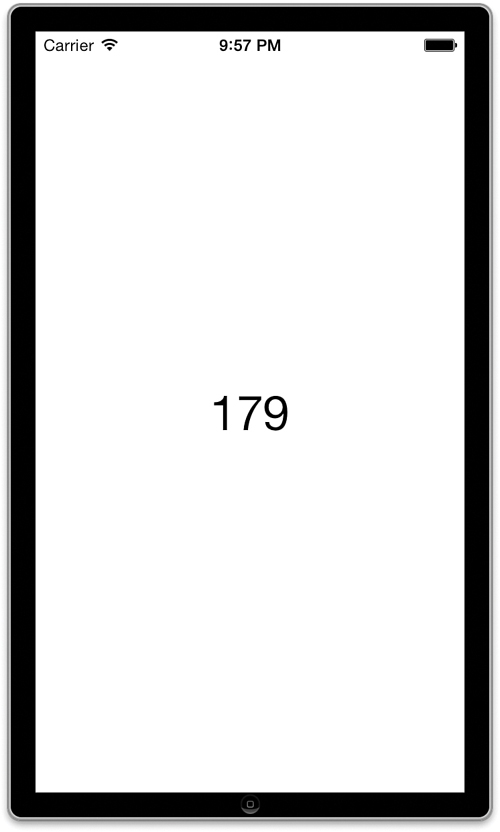
Implementation Overview
To demonstrate how we can tell iOS to allow something to run in the background, we create a new application, SlowCount, that does nothing but count to 1,000—slowly. We use the task-completion method of background to make sure that, even when the application is in the background, it continues to count until it reaches 1,000 (as shown in Figure 22.6).
Setting Up the Project
Create a new single-view application named SlowCount. We move through development fairly quickly because, as you can imagine, this application is pretty simple.
Planning the Properties and Connections
The application has a single outlet, a UILabel named theCount, which we use to present the counter onscreen. In addition, it needs several private properties: an integer to use as a counter (count), an NSTimer object that triggers the counting at a steady interval (theTimer), and a UIBackgroundTaskIdentifier variable (not an object) that we use to reference the task we have running in the background (counterTask).
Every task that you want to enable for background task completion needs its own UIBackgroundTaskIdentifier. This is used along with the UIApplication method endBackgroundTask to identify which background task has just ended.
Designing the Interface
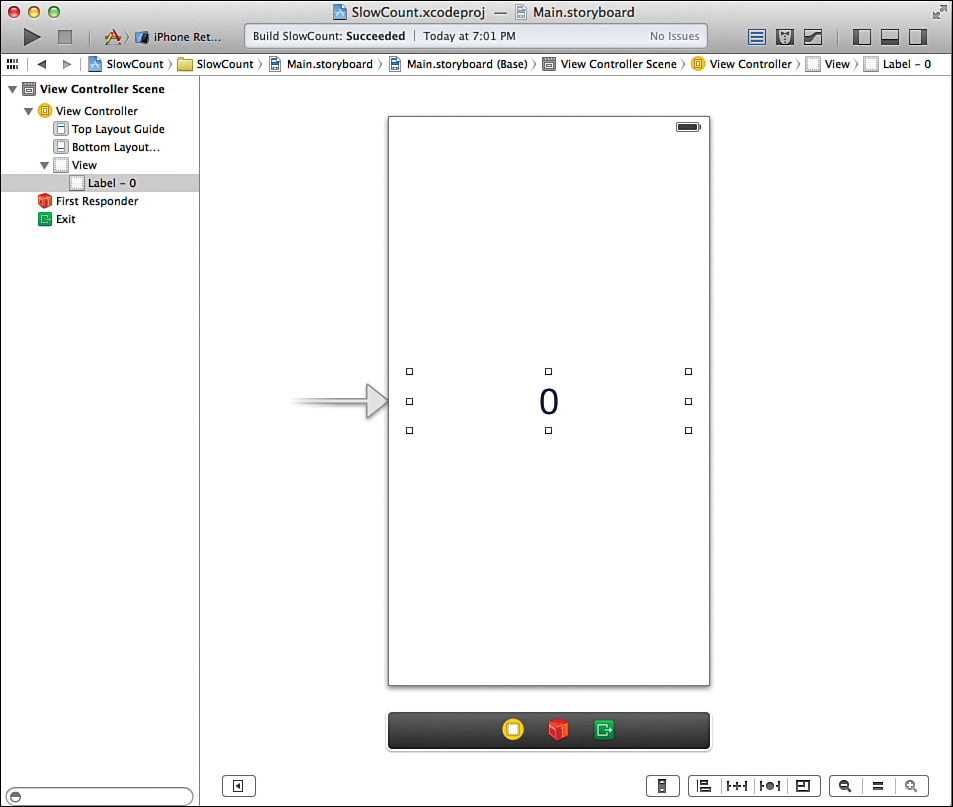
It’s a bit of a stretch to claim that this application has a “user interface” (UI), but we still need to prepare Main.storyboard to show the theCount label on the screen.
Open the initial scene, and drag a label (UILabel) into the center of the view. Set the label’s text to read 0. With the label selected, use the Attributes Inspector (Option-Command-4) to set the label alignment to center and the font size to something a bit bigger. Finally, align the right and left sides of the label with the right and left sizing guides. You’ve just created a UI masterpiece, as shown in Figure 22.7.
Creating and Connecting the Outlet
We’ve got one UI object to connect to a single outlet. Switch to the assistant editor, and then Control-drag from the label to below the @interface line in ViewController.m. Name the outlet theCount when prompted to make the connection.
Implementing the Application Logic
To finish our application’s core functionality (counting), we need to declare and deal with the additional private properties: the counter (count), the NSTimer object to give us a nice delay while counting (theTimer), and a UIBackgroundTaskIdentifier to track the task (counterTask).
In addition, we implement a method that does the counting (and nothing else) called countUp. To avoid any Xcode warnings, we should add a method prototype for this in the ViewController.m while defining the additional properties.
Update the ViewController.m file’s @interface block to declare the private properties and prototype:
@interface ViewController ()
@property (weak, nonatomic) IBOutlet UILabel *theCount;
@property (nonatomic) int count;
@property (nonatomic) UIBackgroundTaskIdentifier counterTask;
@property (nonatomic,weak) NSTimer *theTimer;
- (void)countUp;
@end
With most of the prep work done, there are two more things left to complete. First, we need to set the counter (count) to 0 and allocate and initialize NSTimer to fire at a regular interval. Second, when the timer fires, we ask it to invoke a second method, countUp. In the countUp method, we check to see whether count is 1000. If it is, we turn off the timer and we’re done; if not, we update count and display it in our UILabel theCount.
Initializing the Timer and Counter
Let’s start with initializing the counter and timer. What better place to do this than in SlowCount.m’s viewDidLoad method? Implement viewDidLoad as shown in Listing 22.5.
LISTING 22.5 Scheduling a Timer When the Application Starts
1: - (void)viewDidLoad
2: {
3: [super viewDidLoad];
4: self.count=0;
5: self.theTimer=[NSTimer scheduledTimerWithTimeInterval:0.1
6: target:self
7: selector:@selector(countUp)
8: userInfo:nil
9: repeats:YES];
10: }
Line 4 initializes our integer counter, count, to 0.
Lines 5–9 initialize and allocate the theTimer NSTimer object with an interval of 0.1 seconds. The selector is set to use the method countUp, which we write next. The timer is set to keep repeating with repeats:YES.
All that remains is to implement countUp so that it increments the counter and displays the result.
Updating the Counter and Display
Add the countUp method, as shown in Listing 22.6, in ViewController.m. This should be quite straightforward: If the count equals 1000, we’re done and it’s time to clean up (we can set the timer property to nil); otherwise, we count.
LISTING 22.6 Updating the Counter
1: - (void)countUp {
2: if (self.count==1000) {
3: [self.theTimer invalidate];
4: self.theTimer=nil;
5: } else {
6: self.count++;
7: NSString *currentCount;
8: currentCount=[NSString stringWithFormat:@"%d", self.count];
9: self.theCount.text=currentCount;
10: }
11: }
Lines 2–4 handle the case where we’ve reached the limit of our counting (count==1000). When that occurs, we use the timer’s invalidate method to stop it and then set the property to nil because it isn’t needed anymore.
Lines 6–9 handle the actual counting and display. Line 6 updates the count property. Line 7 declares the currentCount string, which is then allocated and populated in line 8. Line 9 updates our theCount label with the currentCount string.
Run the application. It should do exactly what you expect: count slowly until it reaches 1,000. Unfortunately, if you background the application, it will suspend. The counting will cease until the application returns to the foreground.
Enabling the Background Task Processing
To enable the counter to run in the background, we need to mark it as a background task. We use this code snippet to mark the beginning of the code we want to execute in the background:
self.counterTask = [[UIApplication sharedApplication]
beginBackgroundTaskWithExpirationHandler:^{
// If you're worried about exceeding 10 minutes, handle it here
}];
And we use this code snippet to mark the end:
[[UIApplication sharedApplication] endBackgroundTask:self.counterTask];
If you are worried about the application not finishing the background task before it is forced to end (roughly 10 minutes), you could implement the optional code in the beginBackgroundTaskWith ExpirationHandler block. You can always check to see how much time is remaining by checking the UIApplication property backgroundTimeRemaining.
Let’s update our viewDidLoad and countUp methods to include these code additions. In view DidLoad, we start the background task right before we initialize the counter. In countUp, we end the background task after count==1000 and the timer is invalidated and cleared out.
Update viewDidLoad as shown in Listing 22.7 (lines 4–7).
LISTING 22.7 Setting the Start of Background Processing
1: - (void)viewDidLoad
2: {
3: [super viewDidLoad];
4: self.counterTask = [[UIApplication sharedApplication]
5: beginBackgroundTaskWithExpirationHandler:^{
6: // If you're worried about exceeding 10 minutes, handle it here
7: }];
8: self.count=0;
9: self.theTimer=[NSTimer scheduledTimerWithTimeInterval:0.1
10: target:self
11: selector:@selector(countUp)
12: userInfo:nil
13: repeats:YES];
14: }
Then make the corresponding additions to countUp (line 5), as demonstrated in Listing 22.8.
LISTING 22.8 Setting the End of Background Processing
1: - (void)countUp {
2: if (self.count==1000) {
3: [self.theTimer invalidate];
4: self.theTimer=nil;
5: [[UIApplication sharedApplication] endBackgroundTask:self.counterTask];
6: } else {
7: self.count++;
8: NSString *currentCount;
9: currentCount=[NSString stringWithFormat:@"%d", self.count];
10: self.theCount.text=currentCount;
11: }
12: }
That’s all it takes. Your project should now be able to run in the background.
Building the Application
Run the application on your device or in the Simulator. After the counter starts counting, press the Home button to move the application to the background. Wait a minute or so, and then reopen the application through the task manager or the application icon. The counter will have continued to run in the background.
Obviously, this isn’t a very compelling project itself, but the implications for what can be achieved in real-world apps is definitely exciting.
Performing a Background Fetch
The final tutorial of this hour is, in your author’s opinion, one of the most interesting: implementing a background fetch. If you recall from the introduction, this is the ability of an application to periodically activate and retrieve information without the user needing to do a thing. We’ll make this happen in the final project (and with just a surprisingly small amount of code).
Implementation Overview
The purpose of our new application, BackgroundDownload, is to download and display a new background image using a background fetch. Depending on how often a user uses the application, he’ll see a new image each time it starts (without having to wait for it to download). There isn’t a UI to speak of, beyond the UIImageView used as the background, as shown in Figure 22.8.

FIGURE 22.8 The background fetch will periodically download a new image, even when the application isn’t running.
Setting Up the Project
As always, create a new single-view application named BackgroundDownload. This application is even simpler than the last, so we’ll be finished before you know it.
And we’re done.
Not really.
Planning the Properties and Connections
BackgroundDownload will have a single outlet/property, a UIImageView named background Image, which will contain the background image. Unlike most of our previous projects, this is defined in ViewController.h because we need to access the view from the AppDelegate class. In other words, it will be public, not private.
Designing the Interface
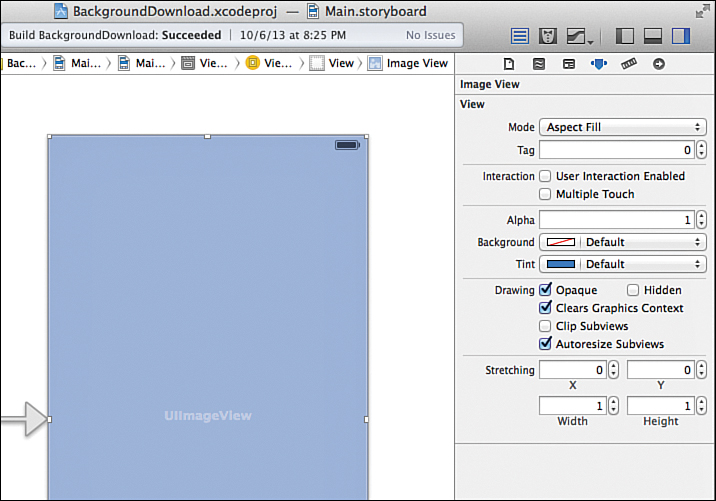
Open the Main. Storyboard file and drag a UIImageView into the initial scene’s view. Size it to cover the entire view, and then open the Attributes Inspector and set the image view’s View mode to Aspect Fill, as shown in Figure 22.9.
Creating and Connecting the Outlet
Like the last project, there’s a single UI element (the UIImageView) that we need to connect to an outlet (backgroundImage). Switch to the assistant editor, and be sure to select the ViewController.h file on the right. Remember, the property needs to be defined in the interface file (ViewController.h) because it will need to be accessed by another class.
Control-drag from the UIImageView to below the @interface line in ViewController.h. Name the outlet backgroundImage when prompted to make the connection.
Implementing the Application Logic
To add the background fetching functionality, we will be making some edits in the AppDelegate class. Because the application delegate must access the property in the view controller, begin by including the ViewController.h file in the application delegate interface, AppDelegate.h. Add this line following the existing #import statement:
#import "ViewController.h"
Next, we’ll define the minimum frequency with which the application requests background fetches. This consists of a single line within application:didFinishLaunchingWith Options. Open AppDelegate.m and edit the method as shown in Listing 22.9.
LISTING 22.9 Defining the Minimum Background Fetch Interval
- (BOOL)application:(UIApplication *)application
didFinishLaunchingWithOptions:(NSDictionary *)launchOptions
{
[[UIApplication sharedApplication]
setMinimumBackgroundFetchInterval:
UIApplicationBackgroundFetchIntervalMinimum];
return YES;
}
The method setMinimumBackgroundFetchInterval defines the minimum amount of time between fetches. Rather than setting an exact time, we use the constant UIApplicationBackgroundFetchIntervalMinimum to tell iOS that we want the fetch to occur as often as possible.
Now that the application knows we want to perform background updates, we must implement the method application:performFetchWithCompletionHandler. The method will retrieve an image from a website, then use it to set the image property of the backgroundImage ViewController property.
Implement the application:performFetchWithCompletionHandler using Listing 22.10 as your guide. We’ll go through the details afterward.
LISTING 22.10 Finishing the Background Fetch by Implementing application:performFetchWithCompletionHandler
1: -(void)application:(UIApplication *)application
2: performFetchWithCompletionHandler:(void (^)(UIBackgroundFetchResult))completionHandler
3: {
4: NSURL *url = [NSURL URLWithString:@"http://www.floraphotographs.com/randomimage.php"];
5: NSData *data = [NSData dataWithContentsOfURL:url];
6: UIImage *imageData = [UIImage imageWithData:data];
7: ViewController *myViewController=(ViewController *)self.window.rootViewController;
8: myViewController.backgroundImage.image=imageData;
9:
10: //Indicate completion
11: completionHandler(UIBackgroundFetchResultNewData);
12: }
Line 4 allocates an NSURL object with a web address that will return a random image from Floraphotographs.com. Line 5 reads the data returned by the URL into an NSData object named data. In Line 6, that data is transformed into a UIImage using the UIImage class method imageWithData. At this point, we’ve performed the background fetch, we just need to do something with the image we’ve downloaded!
In Line 7, we take advantage of the fact that the window object defined in the application delegate has a reference to the active view controller through the property rootViewController. This is cast as an instance of our ViewController class and stored in myViewController so that it’s easier to access.
Line 8 accesses the backgroundImage public property of ViewController and sets its image property to the image we downloaded.
Line 11 is a required function call to completionHandler tell iOS that we’ve successfully completed a background fetch operation. Depending on the outcome, we might also pass the constant UIBackgroundFetchResultFailed (to indicate a failure)or UIBackgroundFetch ResultNoData (if nothing has changed).
Adding the Background Fetch Mode
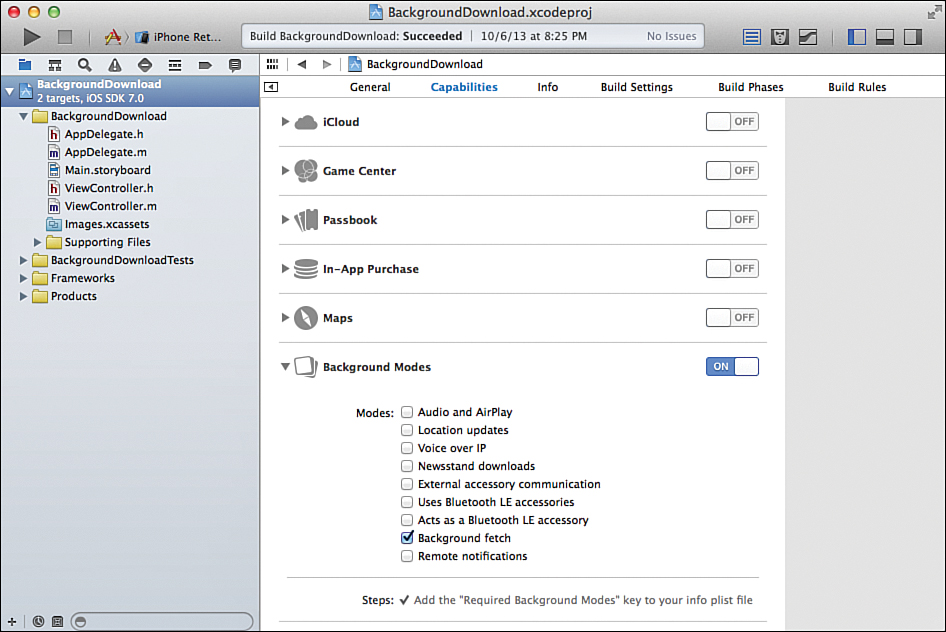
Only one thing remains before we can give this a try:setting the Background Fetch background mode. Update the BackgroundDownload project by completing these steps:
1. Choose the main project group and click the BackgroundDownload target, and then expand the Background Modes section under the Capabilities tab.
2. Click the switch to turn on Background Modes.
3. Check the Background Fetch check box, as shown in Figure 22.10.
Building the Application
Go ahead and run the finished BackgroundDownload application in the iOS Simulator. You’ll notice that it does absolutely nothing! The reason you won’t see a background image is because we’ve only implemented fetching of an image when the application is in the background. You can either move the app to the background and wait, or you can choose Debug, Simulate Background Fetch from the Debug menu in Xcode. This automatically exits the app and forces it to perform a fetch. The next time you start it, the background image will be set.
Further Exploration
When I sat down to write this lesson, I was torn. Background tasks/multitasking is definitely the “must have” feature of iOS, but it’s a challenge to demonstrate anything meaningful in the span of a dozen or two pages. What I hope we’ve achieved is a better understanding of how iOS multi-tasking works and how you might implement it in your own applications. Keep in mind that this is not a comprehensive guide to background processing; there are many more features available and many ways that you can optimize your background-enabled apps to maximize battery life and speed.
As a next step, you should read the sections “App States and Multitasking” and “Background Execution and Multitasking” in Apple’s iOS Application Programming Guide (available through the Xcode documentation).
As you review Apple’s documentation, pay close attention to the tasks that your application should be completing as it works in the background. There are implications for games and graphic-intensive applications that are well beyond the scope of what we can discuss here. How well you adhere to these guidelines will determine whether Apple accepts your application or kicks it back to you for optimization.
Summary
Background applications on iOS devices are not the same as background applications on your Macintosh. There are well-defined rules that background-enabled applications must follow to be considered “good citizens” of iOS. In this hour’s lesson, you learned about the different types of backgrounding available and the methods available to support background tasks. Over the course of six tutorial applications, you put these techniques to the test, creating everything from notifications triggered when an application isn’t running to a navigation app with background voice prompting and an application that automatically updates its content when it isn’t actively running.
You should now be well prepared to create your own background-aware apps and take full advantage of the powerful hardware in your iPhone, iPad, or iPod.
Q&A
Q. Why can’t I run any code I want in the background?
A. Someday I suspect you will, but for now the platform is constrained to the specific types of background processing we discussed. The security and performance implications of running anything and everything on a device that is always connected to the Internet are enormous. Apple intends to ensure that your device remains operational in any conditions, unlike the competitors, where anything goes.
Q. If my application handles background operations, do I need to worry about iOS forcing my app to quit?
A. Absolutely. The currently executing application (in the foreground) always has priority. Your application should be prepared to exit at any time if resources are constrained.
Workshop
Quiz
1. Background tasks can be anything you want in iOS. True or false?
2. Any application you compile for iOS will continue to run when the user exits it. True or false?
3. Only a single long-running background task can be marked for background completion. True or false?
Answers
1. False. Apple has a well-defined set of rules for implementing background processing.
2. False. Applications will suspend in the background by default. To continue processing, you must implement background tasks as described in this hour’s lesson.
3. False. You can mark as many long-running tasks as you’d like, but all of them must complete within a relatively short period of time (around 10 minutes).
Activities
1. Return to a project in an earlier hour and properly enable it for background processing.
2. Test to see what happens when an application with background processing attempts to run longer than 10 minutes. Is it suspended? Terminated? How do you recover from this if your application does not finish its task?