1. Introduction
My son is a computer hacker but, as he likes to say, part of the “old school.” Those hackers were people who didn’t break into systems and steal personal information; rather, they were the ones who took things apart to see what made them work and then reassembled them into new and useful forms. We all know about digital prints—there is little challenge in getting a high-quality image out of a desktop printer these days. Cameras are getting nearly as good, and the combination means that technical proficiency, while necessary, no longer makes a difference. Instead, we need to take things apart, figure out how they work, and then put them back together in new and original ways.
We can do this is by hacking the image—before actually clicking the camera’s shutter. Fluid filters, distortion lenses, and other ways to manipulate reality as it passes through the camera create images that are not easily replicated in the computer.
This book shows an alternate way to capture and print a photograph—a redefinition of what it means to be a photographer. It’s a hybrid of analog and digital, merging those technologies to add materiality to an image and altering a moment in time. A photograph is a two-dimensional representation of a three-dimensional world. We can restore the third dimension by using materials like slate, granite, wood, or metal that have heft, mass, and texture, or even by taking our photographs and applying them to a 3D-printed model of a real—or fantastical—object.
In 1987 I was visiting my parents in Chicago when a local restaurant burned down. After the fire was out, my son and I went to look at the charred structure since he was beginning to explore photography and we thought there would be interesting subjects to explore. Among the remains was a melted radio with a cassette tape still in it. On a whim, I picked it out of the trash pile and brought it home. That led to a history of looking to altered reality in my artwork.
The radio had been distorted but was still recognizable. Yes, you can create similar effects with digital tools today, but there’s still something that’s not quite the same—capturing altered reality is different than altering captured reality. And that’s the theme of the first part of the book—altering images before you capture them (Figure 1.1).
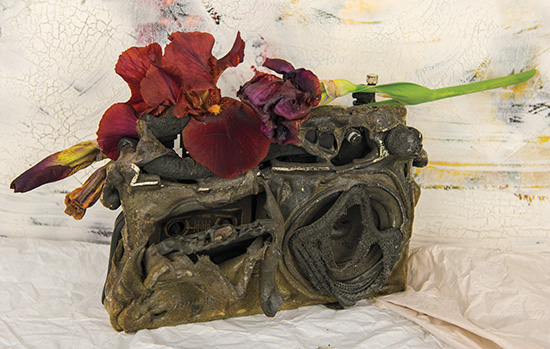
FIGURE 1.1 Still life photographs aren’t always flowers and fruit; other interesting modified objects like this radio in Hot Tunes are also good subjects.
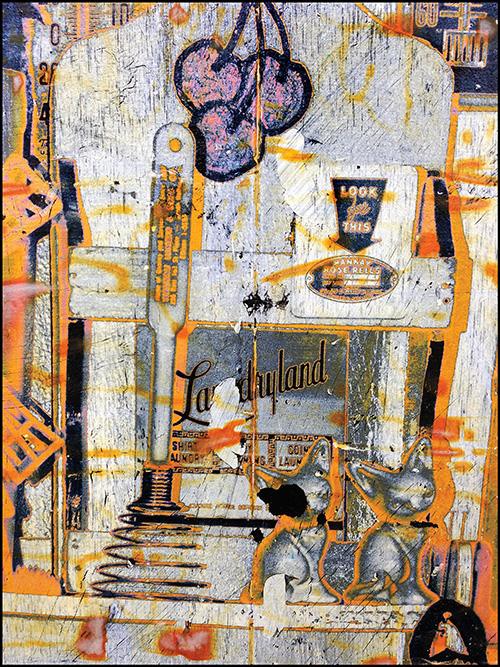
Those images can be printed using traditional techniques—a distorted version of reality, captured by the camera. I’ll also extend the processes in my previous books, Digital Alchemy and The Last Layer, and show you how to put those images on glass and other substrates. Or we can go further and create skins that can be layered and used in mixed-media works (Figure 1.2). That’s hacking the digital print for sure.

But if we really want to capture the spirit of the early hackers, we need to reassemble our images in completely new ways. So with the latter part of the book we’ll push our flat images into the third dimension and print them using a 3D printer. I’ll talk about lithophanes and colorized 3D models—photographic sculptures, if you will. Last, I’ll share the exciting new developments with small UV printers—ones that are now priced for even small print shops and so are becoming very accessible in most major cities.
These are leading-edge technologies that today are affordable and available to the masses, including through online services like Shapeways (www.shapeways.com) that will print your 3D models for a reasonable fee. And 3D printers are now appearing in elementary schools and will be as much a part of these art classes as the pug mill and acrylic paints were a part of mine. I talked in The Last Layer about the importance of returning the hand of the artist or photographer to the creative process. The technologies in this book almost require that...after all, the first thing someone does when they see a 3D print is pick it up (Figure 1.3).
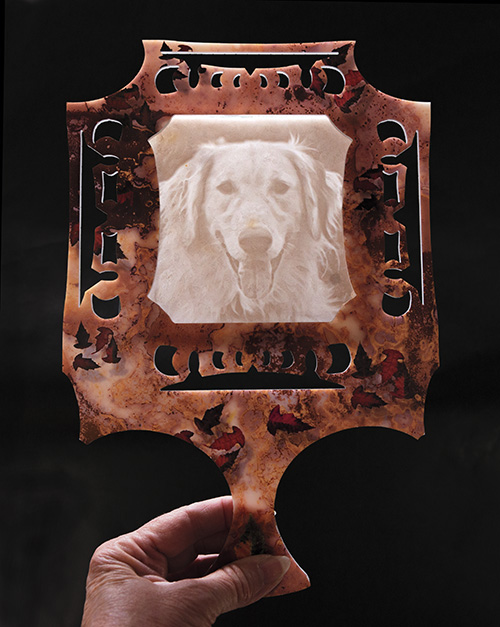
FIGURE 1.3 I used a grayscale image to create a lithophane. Techniques like this, using a laser, UV printer, or 3D printer, bring physicality to your work beyond just pixels on a screen.
So I invite you to come along on this melding of technology and classic technique, to explore how you might express your creative vision and hack your own digital prints.
For those of you who have read my previous books, Chapters 2 and 3 will cover familiar ground. But because I’ve continued to experiment and have learned more tips and tricks, I’ve updated those sections, so please take a quick look. Everything else in the book involves new processes that take you out of the camera and computer and into the physical world (Figure 1.4).
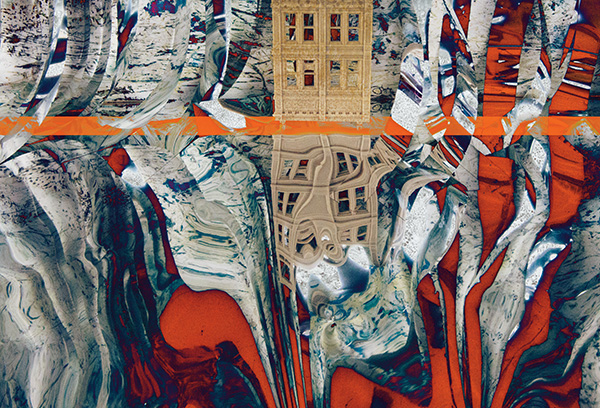
FIGURE 1.4 Works like this can’t be done with only a camera and computer—the unique quality of the hand is an important component of this work, titled Red Rain.
Who Is This Book For?
I have designed this book for artists and photographers who enjoy serendipitous discoveries—those intuitive accidents that lead to new discoveries and possibilities, or, as I like to put it, solutions in search of a problem. In this book, I share a number of new solutions and show some of the problems for which I use these solutions to solve. But as you read it, think about how you can hack these techniques for your own problems. There are people using the processes from my earlier books in ways I’d never have guessed or expected—and that’s the most exciting part of my work. I love to see what other creative minds put together.
You don’t need to know Photoshop, 3D modeling, computer-aided design (CAD), or even how to deal with color profiles and printing. Advances in software and tools in just the past few years make all of that unnecessary to leverage these processes (and the processes in my previous books). It’s now possible to shoot a photograph with your iPhone, send it over Wi-Fi to an Epson printer, and easily print your image on the transfer film—without purchasing any special software at all. I’ll talk more about 3D work in Section 4, but there are free applications available that allow you to take a series of photographs around an object and will automatically turn them into a 3D model for you. Sure, knowing more advanced software solutions opens up additional options, but it’s absolutely not a requirement.
Likewise, let me share a word on equipment. For most of the processes I’ll show you here, the only equipment required is a desktop inkjet printer that uses pigment inks, and a handful of readily available materials and supplies. At a recent photography show, I was struck by how few of the prints were actually done by the artist—most of the photographers outsourced their prints to a service bureau. For a less expensive option, most FedEx office locations will print your image for you. Call ahead to make sure they have a printer with pigment inks (they can give you the model number; you may have to do the research yourself) and if it will take sheets or rolled film. Just bring in the film (make sure you show them the right side to print on!) and tell them to use a Photo Gloss profile if you want Photo Black ink or a Watercolor profile if you want Matte Black ink.
Now for the 3D work, you’ll either need access to a 3D printer locally or use a service like Shapeways that will print on demand—or maybe you can use the techniques I’ll show you over a hand-sculpted model instead of a 3D printed one (if that’s what your hacker heart thinks would be fun). For the UV printing work, you’ll need to do what I do—use a service provider to print your images using a UV printer. These printers are expensive; I don’t own one, and frankly, I’m not sure I’d want one in my studio anyway—the maintenance and technical skills are more than I have time to deal with. So just like repairing my car, I hire out my UV printing—and it’s a lot cheaper than car repairs!
In other words, this book is for anyone and everyone who wants to push the boundaries, explore and experiment with new options and new dimensions, and really differentiate themselves in unique and exciting ways.
Navigating This Book
To use this book, your only prerequisite is the knowledge to create an image (either photography or artwork) and print it on an inkjet printer using pigment inks. Everything I’ll show you here begins after that step.
I’ve organized this book in such a way that you can move mostly at your will throughout the chapters—but with three caveats.
First, read Section 1 in its entirety as it contains preliminary information and procedures you need to move safely on to the sections that follow. (As I’ve mentioned, if you’ve read Digital Alchemy or The Last Layer, please reread Chapters 2 and 3 as there are some new concepts there.) As for 3D printing, I’ll address its unique features in Section 4.
Second, for each of the process chapters in Sections 2 through 4, you can choose any process in any order so long as you first read the related introduction chapter that’s at the section’s beginning.
Third, for each process I recommend you read through the entire set of procedures before beginning the project. Not only will you need to have everything ready in advance for the time-sensitive steps, but you’ll also find that some of the steps assume you have items already prepared (including materials and tools).
You can use Hacking the Digital Print as a standalone work, though if you haven’t already read Digital Alchemy or The Last Layer, you may be interested in doing so as these two books provide additional basic methods of working in digital mixed media processes.
Being Singular
At a time when the manipulation of a digital image is routine and computer skills are becoming ubiquitous—or automated through ever more sophisticated applications and plugins—it’s more difficult than ever to set your work apart. So many photographs now look similar because they’ve all gone through the same workflow; we’re left with compositional differences as the only way to really express our creative voice.
That’s why I’ve spent the past two decades creating processes and techniques that allow artists and photographers to build a body of work with their own singular style. My use of the processes in my own work will be different from other people’s uses because the hand is involved in the process—and that’s inherently variable.
You’ll find themes in your work that come and go—the threads of which bind it together over time. The LANDSAT photographs from the 1980s inspired me to develop cast paper and mixed media artwork that had a similar look and feel. Now I’m working with a quadcopter to do aerial photography and printing using these new processes. That view from above has been a constant theme throughout my career.
In this book I share processes to make skins that you can apply in mixed media work. Those skins have their root in the monographic transfers I did in the 1990s. That’s another of my own themes—taking old things and using them in new ways. And you’ll never know what will trigger these ideas. Take a step back from your own portfolio and look for themes—colors, composition, subjects, even elements of technique.
The idea of a body of work is something that’s all too often missing, especially since we all end up with thousands of images captured over time, and our voice gets lost in the clutter. By leveraging processes like the ones in this book, you can combine portions of those images—some distorted, some not—into something that does belong as part of a cohesive collection of your work.
And that’s the goal—to have the people who see your work know it’s your work. That’s where you’ve become singular. A Rembrandt, Picasso, or Monet looks like a Rembrandt, Picasso, or Monet. Don’t misunderstand—there are plenty of other artists who produce works that are similar, but when we look at, say, a Van Gogh, we can tell it really is a Van Gogh.
I took classes in sculpture and mosaic tiles as an undergraduate, and while you’ll never see a tiled table in one of my shows, you will see repeating patterns, small images making up larger ones, and primary colors used to evoke emotion in the paintings and photographs I now produce. My body of work is me—it’s my creative vision, my voice, my life, my experiments, my accidents, my attempts to try new things that sometimes work and sometimes don’t. But every one of those add to the rich fiber of who I am—it’s what makes me singular.
Final Word
Accidents are a gift, and you’ll have plenty as you try some of these processes. If a fluid filter gets sticky and coated in sand in the ocean breeze or it gets covered with grass clippings as your teenager mows the lawn, well, try shooting images through it anyway. You might be surprised at what you get. As you do experiments and try new things, make sure you keep notes in case you want to go back and replicate something from the past. The methods in this book are often a result of remembering what went wrong (or what I thought was wrong) and, with a couple of tweaks, finding a new tool to use in my work.
There are many ways to see what isn’t really there—I use handmade filters and digital techniques. Other artists—and you—may find a different path. Robert Buelteman’s work is composed by hand using electricity—he calls it a light jet print. I really admire this creative approach to photography; it has a mystery that draws the viewer in and compels one to ask, “What exactly am I looking at?” (Figure 1.5).
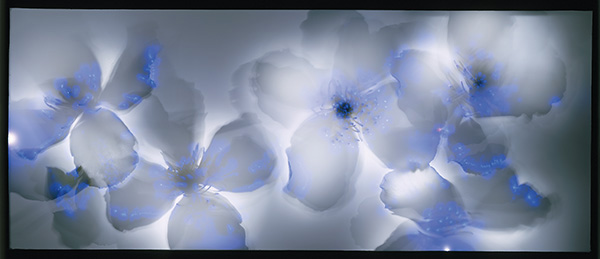
FIGURE 1.5 White Christmas is a 31" × 72" chromogenic development print by Robert Buelteman, made by the combined energy of electricity and lights. These white clematis blossoms, grown by Robert for the purpose of his art, were rendered as an energetic photogram by placing them on a large sheet of film, connecting them to an 80,000-volt circuit, and then illuminating them by hand-delivered fiber-optic light.
So try these processes, and the ones in Digital Alchemy and The Last Layer, and learn them using the steps I share, but then take them further, making them your own. Even these aren’t enough to be truly singular—have your own accidents, eureka moments, wonderful failures, and creative disasters. Go into your studio with an open mind, and come out covered in paint and ink—and holding a precious piece of your body of work, with a singular smile shining in your eyes.