
Chapter 10. Communicating with the Outside World
What is it that makes a smartwatch “smart”? When your authors were but young lads of fewer than 10 years, one had a digital watch that, as well as telling the current time in his chosen alternate time zone, had an alarm function, included a couple of very basic games, and could be used as a calculator—complete with a fiddly, rubbery keypad! Best of all—unless you were a schoolteacher, that is—it could be set to play two quick pips at the top of every hour.
At the time, that author and his peers thought that watch was pretty smart. (Let’s be honest. We still do.) But it was no smartwatch. The defining characteristic of the modern smartwatch is its communication with the outside world, particularly via the Internet.
In this chapter, we examine how watchOS enables your watch apps to communicate with the world outside the watch itself. There are two aspects to this: making network requests via the Internet, and communicating with the host iOS app installed on the user’s iPhone. By the end of this chapter, your apps will be merrily doing both.
Network Requests with NSURLSession
Apple introduced the NSURLSession networking API with iOS 7, updating the longstanding, familiar NSURLConnection—which is deprecated as of iOS 9. This being the case, NSURLSession is the API available for use by watchOS apps.
The Cocoa URL loading system is flexible and powerful, but in this chapter we cover only the basics of making network requests from Apple Watch. For more on all you can do with this family of APIs, check out Apple’s documentation on the URL loading system, at http://bit.ly/bwa-url.
The Watch and the Network
Apple Watch’s primary connection with the outside world is via its host iPhone, connected over Bluetooth. The phone’s network connection, whether Wi-Fi or cellular, is available to the watch to make requests to any server accessible over that connection. Additionally, if the watch is in range of a known Wi-Fi network, it can connect directly without communicating via its host phone. (These “known networks” are those that the watch’s host phone is able to connect to automatically.)
Many use cases require an app to connect to a server for which you, as the developer of both the client and the server, control the response that is returned. Where that is the case, there are a couple of things to think about as you define the communication between your app and your server.
![]() Reduce the information in the response to only that needed by the watch app. Receiving and decoding data takes time and power, and the less of each you can use, the better the experience will be for your users.
Reduce the information in the response to only that needed by the watch app. Receiving and decoding data takes time and power, and the less of each you can use, the better the experience will be for your users.
![]() App Transport Security, introduced with iOS 9 and watchOS 2, requires that all network requests be made over HTTPS, with servers supporting TLS 1.2. Although it is possible to exclude requests from the oversight of App Transport Security—and developers using third-party APIs may need to do so—you have no excuse for not ensuring that your own servers meet the requirements of the system.
App Transport Security, introduced with iOS 9 and watchOS 2, requires that all network requests be made over HTTPS, with servers supporting TLS 1.2. Although it is possible to exclude requests from the oversight of App Transport Security—and developers using third-party APIs may need to do so—you have no excuse for not ensuring that your own servers meet the requirements of the system.
![]() As with any network-connected app, remember to handle the case where the server is unreachable, whether the watch and its host phone are out of range of a connection or the server itself is down.
As with any network-connected app, remember to handle the case where the server is unreachable, whether the watch and its host phone are out of range of a connection or the server itself is down.
Making the Request
A great number of moving parts are involved in requesting and receiving data from a remote server, but NSURLSession makes the most common cases very quick and easy for the developer.
Requests are managed by an NSURLSession and its delegate and are represented as tasks. A task is a subclass of NSURLSessionTask and may be of one of three types:
![]()
NSURLSessionDataTask sends and receives arbitrary data, working with instances of NSData.
![]()
NSURLSessionDownloadTask saves its received data to a file.
![]()
NSURLSessionUploadTask provides the ability to use a file as the source of its request body, such as when uploading a file or storage.
Initializing an NSURLSession requires an NSURLSessionConfiguration object, which provides a great deal of control over the behavior of the session. Additionally, for even more control, it is possible to provide a custom delegate to the session. However, the simplest uses are satisfied by using the system shared session, obtained by calling NSURLSession.sharedSession(). This shared session uses the system session delegate, which is also available to your app’s own NSURLSession instances. Some forms of the various NSURLSessionTasks take completion handler blocks; these are the forms that must be used if not providing a custom delegate.
To try out the basic use of NSURLSession, create a simple app with the following steps:
1. Open Xcode, and create a new WatchKit App project. Deselect the options for Notification, Glance, Complication, Unit Testing, and UI Testing. We named this project Humoji, for reasons that will become clear.
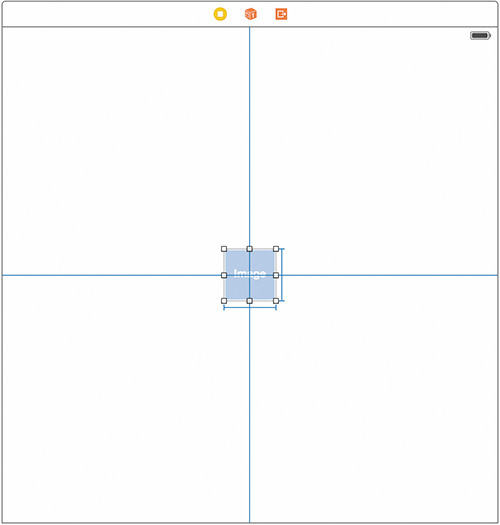
2. In the WatchKit App’s Interface.storyboard, select the interface controller scene, and add an image and a picker as in Figure 10.1.
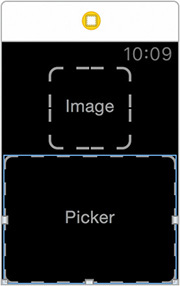
Here, the image is configured to Center-Top and the picker to Center-Bottom. The image has a fixed width and height of 64pt in each dimension.
3. In the WatchKit Extension group, open InterfaceController.swift and replace its contents with the following empty implementation:
import WatchKit
import Foundation
class InterfaceController: WKInterfaceController {
}
// MARK: Emoji list loading
extension InterfaceController {
}
// MARK: Emoji image loading
extension InterfaceController {to
}
Note that this project won’t be an example of perfectly architected software. We’re keeping everything together in one class for ease of demonstration and using Swift extensions to break it up into logical parts.
4. Add the following two @IBOutlets to the main class block, and connect them to the interface objects in the storyboard scene:
@IBOutlet var image: WKInterfaceImage!
@IBOutlet var picker: WKInterfacePicker!
Now you need to add a few more properties and a couple of methods to coordinate the behavior of the interface and the loading content.
5. Add the following properties to the main class block of InterfaceController:
private var pickerIndex = 0
private var imageLoadTimer: NSTimer?
private var emojiList: [(String, String)] = []
private var pickerItems: [WKPickerItem] = [] {
didSet {
picker.setItems(pickerItems)
picker.focus()
}
}
You’re using Swift’s didSet feature on the pickerItems property so that when it is set it will automatically update the items on the picker itself.
6. Add the following @IBAction method to the class block, and connect it to the picker in the storyboard scene:
@IBAction func emojiSelected(value: Int) {
pickerIndex = value
imageLoadTimer?.invalidate()
imageLoadTimer = NSTimer(
timeInterval: 0.3,
target: self,
selector: "imageTimerFired:",
userInfo: nil,
repeats: false
)
NSRunLoop.mainRunLoop().addTimer(imageLoadTimer!, forMode: NSDefaultRunLoopMode)
}
7. Add the method that the timer calls:
func imageTimerFired(timer: NSTimer) {
timer.invalidate()
loadImageFromAddress(emojiList[pickerIndex].1)
}
To keep this example simple, you’ll be triggering the download of an image depending on the value of the picker. This timer makes sure that the download isn’t triggered for each value as the user scrolls the picker; instead, it inhibits the action by putting a 0.3-second delay on the start of the download.
8. Complete the implementation of the main class by adding the following three methods:
override func awakeWithContext(context: AnyObject?) {
super.awakeWithContext(context)
if pickerItems.isEmpty {
pickerItems = [loadingPickerItem()]
requestData()
}
}
private func loadingPickerItem() -> WKPickerItem {
let item = WKPickerItem()
item.title = "Loading..."
return item
}
private func pickerItems(emoji: [(String, String)]) -> [WKPickerItem] {
return emoji.map { (name, _) in
let item = WKPickerItem()
item.title = name
return item
}
}
At this point, Xcode will be complaining about some unknown methods. To fill out the functionality here, you need to complete the two extensions in InterfaceController.swift.
The first extension handles making a request to the GitHub API. The endpoint you’re using is unauthenticated and returns a JSON dictionary of the names and URLs of all the emoji supported in GitHub’s issues and comments.
9. Add the following method to the Emoji list loading extension.
It handles the data received from the API request and uses it to populate the picker with the names of the emoji.
private func processData(data: NSData?, error: NSError?) {
guard let data = data else {
if let error = error {
print(error.description)
}
return
}
do {
if let receivedEmojiList = try NSJSONSerialization. JSONObjectWithData(data, options:.AllowFragments) as? [String:String] {
emojiList = receivedEmojiList.map { name, address in (name, address) }
picker.setItems(pickerItems(emojiList))
}
}
catch {
print("Error decoding emoji list")
}
}
The JSON is an array of dictionaries of the form {“emoji_name”: “emoji_image_url”}, which this method maps to an array of tuples containing the names and URLs.
The other method to add to this extension is the one that makes the actual API request.
10. Add the following method to make the API request:
private func requestData() {
let url = NSURL.init(string: "https://api.github.com/emojis")!
let urlSession = NSURLSession.sharedSession()
let task = urlSession.dataTaskWithURL(url) { data, response, error in
self.processData(data, error: error)
}
task.resume()
}
This method gets the shared NSURLSession and then uses it to create an NSURLSessionDataTask. This is the simplest use of NSURLSession: The data task asynchronously performs an HTTP GET to the URL provided, then passes the response to the completion handler provided. Note that all NSURLSessionTasks are created in a suspended state and must be started with a call to their resume() method.
The second extension to the InterfaceController class handles the loading and display of the emoji images in the WKInterfaceImage added earlier to the storyboard scene.
11. Add the following method to the Emoji image loading extension:
private func loadImageFromAddress(address: String?) {
guard let address = address else {
image.setImage(nil)
return
}
let url = NSURL.init(string: address)!
let urlSession = NSURLSession.sharedSession()
let task = urlSession.downloadTaskWithURL(url) { tempFileUrl, response, error in
if let tempFileUrl = tempFileUrl,
imageData = NSData.init(contentsOfURL:tempFileUrl),
downloadedImage = UIImage.init(data:imageData) {
self.image.setImage(downloadedImage)
} else {
self.image.setImage(nil)
}
}
task.resume()
}
This method creates an NSURLSessionDownloadTask used to download the image for the currently chosen emoji. Although the data task in the code passes an instance of NSData to its completion handler, a download task provides the URL of a temporary file in which the download is stored. The file is not guaranteed to be available at the temporary URL when the completion handler has finished executing, so you need to make sure that you have processed the downloaded file before the handler returns. This will often mean copying the file to a more permanent location (your app’s Documents, or Caches, directory). For simplicity in demonstration, this implementation simply loads the downloaded image into memory and sets it to the WKInterfaceImage.
You can run the app is it now stands, but when the emoji list loads, no image displays until you have scrolled the picker.
12. To load the first image in the list when it becomes available, add the following in the body of the processData(_:error:) method:
do {
if let receivedEmojiList = try NSJSONSerialization. JSONObjectWithData(data, options:.AllowFragments) as? [String:String] {
emojiList = receivedEmojiList.map { name, address in (name, address) }
picker.setItems(pickerItems(emojiList))
loadImageFromAddress(emojiList[0].1)
}
}
catch {
print("Error decoding emoji list")
}
Now you can run the app and explore all the emoji options available to GitHub users (Figure 10.2). We, being cheerful authors, are particularly fond of expressionless.

Although any production app would give more attention to a number of obvious areas than we have in this example (caching of the downloaded data and images, for one), we really should go into one detail specifically.
Handling Premature Deactivation
Because of the nature of Apple Watch and watchOS, it is possible—even likely—that your app will be deactivated at some time. With the basic use of the default NSURLSession shown here, this would mean that the completion handler isn’t called and the received data is never processed.
One option to handle this situation is to use a custom background NSURLSession and treat the request as a download, but there is another approach whereby your app can request a little extra time to complete the task before it exits. NSProcessInfo provides the method performExpiringActivityWithReason(_:usingBlock:), which asks the system to allow the provided block to complete execution before suspending the process. This block, as with the completion handlers of the NSURLSessionTasks earlier, is executed asynchronously on a concurrent queue. Consequently, a little bit of work is required to coordinate the execution of the different blocks.
Return to the example project, and make the following updates:
1. Add the following property to the main class block of InterfaceController:
private var emojiListDataTask: NSURLSessionDataTask?
This property will be used to store the task that is in progress. Checking the state of this task makes it possible to avoid creating a repeat task for one that is already in progress.
 Note
Note
For the purposes of this demonstration, we will be updating only the behavior of the initial request for the emoji list. The image downloads would be better handled by a background NSURLSession working together with a sensible approach to caching the downloaded images.
2. Add the following two methods to the Emoji list loading extension:
private func beginBackgroundTask(semaphore: dispatch_semaphore_t) {
NSProcessInfo.processInfo().performExpiringActivityWithReason ("emojiListRequest") { expired in
if !expired {
let fifteenSecondsFromNow = dispatch_time(DISPATCH_TIME_NOW, Int64(15 * NSEC_PER_SEC))
dispatch_semaphore_wait(semaphore, fifteenSecondsFromNow)
} else {
print("No more background activity permitted")
self.endBackgroundTask(semaphore)
}
}
}
private func endBackgroundTask(semaphore: dispatch_semaphore_t) {
dispatch_semaphore_signal(semaphore)
}
The closure provided for execution simply blocks until a provided semaphore is signaled. If the signal is sent when the data task and its completion handler have finished, this closure waits to return until that task’s asynchronous work is done. The 15-second delta provided to dispatch_semaphore_wait is an effective timeout for the request. If that period passes and the process is suspended, then it will be as if the request never happened.
The closure passed to performExpiringActivityWithReason(_:usingBlock:) takes a Boolean parameter named expired. This parameter is used to indicate to the closure whether its work can be extended into the background. The same closure may be called a second time if the process is to be suspended, so you should handle that case. In this example, this situation is handled by signaling the semaphore.
Now, you need to make use of this mechanism.
3. Make the following updates to the requestData() method:
private func requestData() {
guard emojiListDataTask?.state != .Running else {return}
let semaphore = dispatch_semaphore_create(0)
beginBackgroundTask(semaphore)
let url = NSURL.init(string: "https://api.github.com/emojis")!
let urlSession = NSURLSession.sharedSession()
emojiListDataTask = urlSession.dataTaskWithURL(url) { data, response, error in
self.processData(data, error: error)
self.endBackgroundTask(semaphore)
}
emojiListDataTask?.resume()
}
The initial guard clause in this implementation makes sure that a request in progress is allowed to carry on rather than being duplicated.
Running the app now will demonstrate apparently unchanged behavior. However, the request to the GitHub API is now much more robust in the face of process suspension.
The most complicated aspect of this approach to sustaining an NSURLSessionTask is the coordination of the two asynchronously executed blocks of code. However, in this case where there are only two blocks to be coordinated, semaphores provide a straightforward and simple way to manage the problem.
NSURLSession has many capabilities beyond those demonstrated in this simple app, ranging from highly configurable handling of authentication challenges and encrypted connections to making download requests in the background and pausing and resuming downloads. It’s an API that is definitely worth getting to know well.
Talking to the Phone with WatchConnectivity
With watchOS 2 and iOS 9, Apple introduced a new way for the WatchKit extension running on an Apple Watch to communicate with its companion app on the watch’s host iPhone: the WatchConnectivity framework. (Although the communication is with the WatchKit extension running on the Apple Watch, for brevity we will mostly refer to it as the app.)
Note
In order to use WatchConnectivity, the framework must be available to both the WatchKit extension and the iOS app. This means that it is only possible if the watch is running at least watchOS version 2 and the host iPhone is running at least iOS version 9.
It is pleasingly straightforward to use WatchConnectivity for inter-device communication. The process relies on both the WatchKit extension and the iOS app each maintaining a WCSession and providing it with a delegate (conforming to the WCSessionDelegate protocol). Because each app sends data via the WCSession, its counterpart receives that data and acts on it via calls to its session delegate.
Note
All calls to methods specified in the WCSessionDelegate protocol are guaranteed to be made on a background queue. Remember to make sure that any code called in response to a received transfer is executed on the correct queue (for example, if UI updates are necessary or if a Core Data model will be involved).
Communication using WatchConnectivity can take place when one or both apps are in the background on their respective devices, or can also be run in real time using the message-sending methods. The key characteristics of the two types are as follows:
![]() Background transfer is for cases where the information isn’t needed immediately by the counterpart app. With a little care, this can cover most cases for data transfer between devices.
Background transfer is for cases where the information isn’t needed immediately by the counterpart app. With a little care, this can cover most cases for data transfer between devices.
![]() Background transfers are handled by the OS, which means that once the call to the
Background transfers are handled by the OS, which means that once the call to the WCSession has been made, the sending app can be safely backgrounded or terminated and the transfer will still take place.
![]() Background transfers are handled by the OS, so the system optimizes the sending of data by considering device battery levels, current device load and user activity, and the use pattern of the app.
Background transfers are handled by the OS, so the system optimizes the sending of data by considering device battery levels, current device load and user activity, and the use pattern of the app.
![]() When background transfers are made to a receiving app that is inactive, they are queued and the receiving delegate methods are called when the app is launched and its
When background transfers are made to a receiving app that is inactive, they are queued and the receiving delegate methods are called when the app is launched and its WCSession is activated. (On the host iPhone side, this doesn’t necessarily mean the app is in the foreground.)
![]() Live message sending can take place when the app on the watch is running in the foreground. If a message is sent to the iPhone app and it is not running, it will be launched in the background to receive the message.
Live message sending can take place when the app on the watch is running in the foreground. If a message is sent to the iPhone app and it is not running, it will be launched in the background to receive the message.
![]() Both types of communication allow for the transmission of dictionaries, which makes it trivial to send any property list–compatible type. Because this includes
Both types of communication allow for the transmission of dictionaries, which makes it trivial to send any property list–compatible type. Because this includes NSData, it is possible to send anything you can encode as such. Additionally, the background transfer type has methods that allow for the convenient sending of files referenced by local file URLs, and the live messaging methods can take NSData instances without wrapping them in dictionaries.
Background Transfer
Three types of background transfer are available: Application context updates are useful for synchronizing application state; user info transfer permits the transmission of dictionaries of arbitrary data; and file transfer simplifies sending files.
Application context updates
An application context update is sent with updateApplicationContext(_:) method of WCSession and triggers a call to the receiving WCSessionDelegate’s session(_:didReceiveApplicationContext:) method. The context to send is a dictionary of the form [String : AnyObject].
The WCSession has two properties related to the application context: applicationContext is the last context dictionary sent to the app’s counterpart, and receivedApplicationContext is the last context dictionary received from the app’s counterpart. If a context update is called while a previous update is queued to send, then the most recent call replaces the previous one. In this way, the application context is best used as some state that can be updated.
User info transfer
Similarly to the application context, user info transfer allows your apps to send dictionaries of arbitrary data to their counterparts. Unlike with the application context method, successive transfers are queued for delivery in order when the receiving app is launched.
User info dictionaries are sent via the WCSession using its transferUserInfo(_:) method. On delivery, the WCSessionDelegate method session(_:didReceiveUserInfo:) is called.
A call to transferUserInfo(_:) returns an instance of WCSessionUserInfoTransfer that can be used to monitor the status of the transfer and cancel it if necessary. Additionally, when a transfer finishes (either successfully or in failure), the sending app’s session delegate will receive a call to session(_:didFinishUserInfoTransfer:error:).
File transfer
Although it would be perfectly possible to transfer files between devices by reading them into memory and storing them as NSData in a transmitted user info dictionary, WCSession provides a method to directly send a file referenced by URL: transferFile(_:metadata:).
File transfers are queued in a manner similar to user info transfers, with the difference that in the case of files, the order of delivery is not guaranteed.
When creating a file transfer, the metadata parameter accepts an optional dictionary to deliver alongside the file, and the method returns a WCSessionFileTransfer object that can be used to monitor and, if necessary, cancel the transfer. When the file has been transferred, the sending app’s session delegate will receive a call to its session(_:didFinishFileTransfer:error) method and the receiving app’s delegate will be informed with a call to session(_:didReceiveFile:).
When the receiving delegate method is called, the URL it receives (contained, along with any metadata dictionary, in a WCSessionFile instance) refers to a temporary copy of the received file, which will be deleted when the delegate method returns. As a consequence, the file must be read or moved to more permanent storage before the method exits and the URL becomes invalid. (This behavior is very similar to that of the completion handler on an NSURLSessionDownloadTask, as discussed earlier in this chapter.)
As with the other background transfer methods, queued file transfers are handled by the system with sympathy to current system state and activity. Larger files will, of course, take longer to transfer and expend more energy doing so.
Live Message Transmission
Although background transfers are queued and delivered at the system’s discretion, it is also possible to use the WatchConnectivity session to send messages for immediate delivery. In order to do so, the recipient device must be available to receive the message. This is determined with WCSession’s reachable property, which will be true if the paired device is able to receive a message, and false otherwise.
Reachability depends on two factors:
![]() For the app on the phone to be reachable from the watch, the phone and the watch need to be connected. If the companion app on the phone is not running, it will be launched in the background to receive the incoming message.
For the app on the phone to be reachable from the watch, the phone and the watch need to be connected. If the companion app on the phone is not running, it will be launched in the background to receive the incoming message.
![]() For the watch app to receive a message from the app running on the iPhone, not only must the devices currently be connected and in range, but the watch app must be running in the foreground. (Unlike iOS apps, WatchKit extensions do not have a background execution state.)
For the watch app to receive a message from the app running on the iPhone, not only must the devices currently be connected and in range, but the watch app must be running in the foreground. (Unlike iOS apps, WatchKit extensions do not have a background execution state.)
Attempting to send a message for delivery to a companion app that is not reachable will result in an error, with a call to any error handler provided to the message-sending method. It is, of course, also possible for a counterpart that was reachable to become unreachable while a message is being sent, which will result in the same call to the error handler.
When multiple messages are sent in sequence, they are delivered in the order that they are sent.
Two methods on WCSession may be used to send messages. The first method, sendMessage(_:replyHandler:errorHandler:), takes a dictionary to send, and the other, sendMessageData(_:replyHandler:errorHandler:), takes an instance of NSData to send to the counterpart app. The replyHandler and errorHandler parameters are optional, and if handlers are provided, they are used as follows:
![]() The reply handler is a block with a signature of either
The reply handler is a block with a signature of either ([String : AnyObject]) -> Void or (NSData) -> Void that is called if the receiving app’s WatchConnectivity session delegate sends a reply—in the form of the dictionary passed to this handler.
![]() The error handler is a block of the form
The error handler is a block of the form (NSError) -> Void, called if an error occurs when sending the message.
Receipt of a message will result in a call to one of four methods on the WCSessionDelegate:
![]() If the message was in the form of a dictionary, the possible methods are
If the message was in the form of a dictionary, the possible methods are session(_:didReceiveMessage:) and session(_:didReceiveMessage:replyHandler:).
![]() If the message was an
If the message was an NSData object, then the methods are session(_:didReceiveMessageData:) and session(_:didReceiveMessageData:replyHandler:).
In each case, the shorter form is used when the sender did not provide a reply handler, and the longer form is called when a reply handler was provided. The reply handler will accept either a dictionary or an instance of NSData according to the form of the message that was received, and the delegate method must call the reply handler if one is provided.
Preparing the iPhone app
In order to try out WatchConnectivity-based messaging between devices, you will return to the Humoji project from earlier in this chapter and build a basic companion iPhone app.
1. From the iPhone app’s group in the Project Navigator, open Main.storyboard (Figure 10.3).
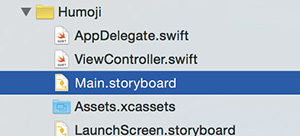
The storyboard will contain one blank scene, corresponding to the ViewController class created from the project template.
2. Add an image view to this blank scene by dragging an image view from the Object Library.
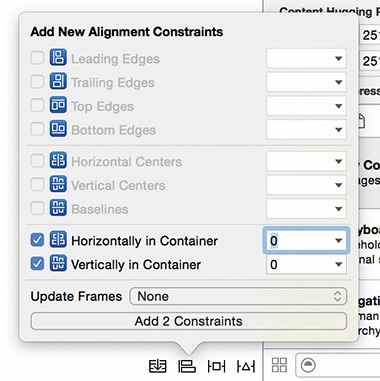
3. Select the image view and apply layout constraints to center it in its containing view. Do this by clicking the Align button at the bottom of the canvas pane and selecting both Horizontally in Container and Vertically in Container. Then click the Add 2 Constraints button (Figure 10.4).
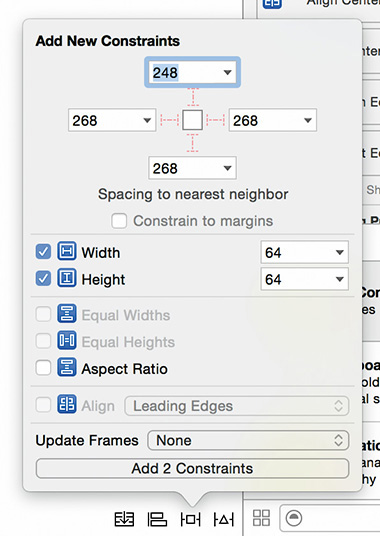
4. Again, select the image view. To apply constraints to give it a fixed width and height, click the Pin button (next to the Align button). Select the options for Width and Height and set the value for each to 64. Click the Add 2 Constraints button (Figure 10.5).
Selecting the image view will cause its constraints to show, and the scene should appear as in Figure 10.6.
5. Open ViewController.swift, and replace the contents with the following:
import UIKit
class ViewController: UIViewController {
@IBOutlet weak var imageView: UIImageView!
}
6. Connect the image view in the storyboard scene to the @IBOutlet in ViewController.
Receiving WatchConnectivity messages
We now have a very simple iPhone app that displays an image. The phone app will receive the image in a WatchConnectivity message from the watch.
Note
Although the two apps will be using different methods of the WatchConnectivity delegate, in this simple example we’ll keep them together in one class that is present in both apps.
1. Create a new group at the top level of the project, and name it Inter-Device Communication. Create a new Swift file in this group, and name it CommunicationManager.swift.
2. Replace the contents of CommunicationManager.swift with the following:
import Foundation
import WatchConnectivity
class CommunicationManager : NSObject {
static let sharedInstance = CommunicationManager()
private override init() {
super.init()
}
}
This class will act as the delegate to the app’s WCSession—and because there can be only one instance of WCSession, this implementation ensures that you will always know where to find its delegate.
3. Add the following property to CommunicationManager:
var session: WCSession?
4. Add the following extension to the file:
extension CommunicationManager : WCSessionDelegate {
private func setupSession() {
if (WCSession.isSupported()) {
session = WCSession.defaultSession()
if let session = session {
session.delegate = self
session.activateSession()
}
} else {
print("WCSession unsupported")
}
}
}
5. Add the following to the class’s initializer:
private override init() {
super.init()
setupSession()
}
6. Make sure that CommunicationManager.swift belongs to both the iPhone app’s target and to the WatchKit Extension target by selecting the file in the Project Navigator and ensuring that the File inspector matches Figure 10.7.

7. Return to ViewController.swift, and add the following property to the ViewController class:
internal var communicationManager: CommunicationManager?
8. In AppDelegate.swift, add the following to the implementation of application(_:didFinishLaunchingWithOptions:):
if let rootViewController = window?.rootViewController as? ViewController {
rootViewController.communicationManager = CommunicationManager. sharedInstance
}
9. Returning to CommunicationManager.swift, add the following property to the class block:
var onReceivedMessageData: (NSData -> Void)?
10. Add the following method to the extension:
func session(session: WCSession, didReceiveMessageData messageData: NSData) {
onReceivedMessageData?(messageData)
}
11. In ViewController.swift, add the following didSet block to the communicationManager property:
internal var communicationManager: CommunicationManager? {
didSet {
communicationManager?.onReceivedMessageData = { data in
self.dataReceived(data)
}
}
}
12. To complete the work in the phone app, add the following method to ViewController.swift:
private func dataReceived(data: NSData) {
dispatch_async(dispatch_get_main_queue()) {
if let image = UIImage(data: data) {
self.imageView.image = image
}
}
}
Sending WatchConnectivity messages
With the phone app complete (we did say it was basic), you need to make a few changes to the watch app to send the image data when an emoji is selected.
1. In the WatchKit Extension group in the Project Navigator, open ExtensionDelegate.swift and add the following property:
var communicationManager: CommunicationManager?
2. Instantiate the CommunicationManager by adding the following line to the extension delegate’s applicationDidFinishLaunching() method:
func applicationDidFinishLaunching() {
communicationManager = CommunicationManager.sharedInstance
}
3. Once again, open CommunicationManager.swift and add the following method to the class block:
func sendMessageData(data: NSData) {
if let session = session where session.reachable {
session.sendMessageData(data, replyHandler: nil, errorHandler: nil)
}
}
4. Add the following property to InterfaceController.swift:
private var communicationManager: CommunicationManager?
5. Still in InterfaceController.swift, add the following to awakeWithContext(_:):
if let extensionDelegate = WKExtension.sharedExtension().delegate as? ExtensionDelegate {
communicationManager = extensionDelegate.communicationManager
}
6. Finally, in InterfaceController’s Emoji image loading extension, update loadImageFromAddress(_:) as follows:
private func loadImageFromAddress(address: String?) {
guard let address = address else {
image.setImage(nil)
return
}
let url = NSURL.init(string: address)!
let urlSession = NSURLSession.sharedSession()
let task = urlSession.downloadTaskWithURL(url) { tempFileUrl, response, error in
if let tempFileUrl = tempFileUrl,
imageData = NSData.init(contentsOfURL:tempFileUrl),
downloadedImage = UIImage.init(data:imageData) {
self.image.setImage(downloadedImage)
self.communicationManager?.sendMessageData(imageData)
} else {
self.image.setImage(nil)
}
}
task.resume()
}
Run the apps, making sure that both the phone app and the watch app are active. When an emoji image is loaded in the watch app, you will see the same image appear in the phone app. Feels good, doesn’t it?
This is the simplest demonstration of WatchConnectivity’s power. When the watch app’s interface controller downloads and displays an image, it then uses the CommunicationManager to access the app’s WCSession and send a message with the NSData-encoded image as the payload. On receipt in the counterpart app, the CommunicationManager, acting as the WCSession’s delegate, calls its onReceivedMessageData block. The called code displays the image on the phone.
Making the Most of Inter-Device Communication
If you have an app in which data received from a server needs to be shared between the Watch app and its iPhone companion app, there are a couple of possible approaches to making sure both devices have all the data they need.
Often the simplest way is for both devices to download their own copy of the information from the server and use WatchConnectivity to synchronize their state. When user-generated data is not available from the server, then it will, of course, need to be transferred directly between the devices. Another case may be that there is substantial expensive (in time or power) processing that needs to be performed on received data; in this circumstance, the most effective technique might be to download the data to the phone, process it, and then transfer it to the watch.
Perhaps most likely, a combination of these techniques could work best for your app—it all depends on what you need to achieve.
Continuing User Activity with Handoff
An Apple Watch app can communicate with its counterpart on the iPhone using Handoff, but it is quite different from WatchConnectivity in intent and in how it is put to use. Handoff is a part of the Continuity feature set introduced in iOS 8.0 and OS X 10.10 and has been available in watchOS since the Apple Watch was introduced.
Handoff allows the user to begin a task in a watch app and then seamlessly continue that task from an iPhone, as long as the devices are connected. For example, if you were to launch the Maps app on your Apple Watch and browse to find a location, then look to the lock screen on your iPhone, you would see a Handoff icon in the lower-left corner (Figure 10.8). Swiping up from that icon will launch the phone’s Maps app and open it to the location being viewed on the watch.

The key to making the most of Handoff is remembering that it is not an active communication on the part of your app. Rather, it provides the opportunity to maintain a lightweight snapshot of the user’s current activity and use it to respond appropriately if the user decides to continue that activity on another device.
In a watch app, it is very simple to make a task available to be handed off to its companion app—or even to a webpage, if that makes sense for your app. WKInterfaceController provides the method updateUserActivity(_:userInfo:webpageURL:), which your subclasses call to register the current user activity for handoff. The parameters are:
![]() A string indicating the type of activity, which will be received and used by the counterpart app to take over the activity. This string is defined by the developer and should not be blank, and Apple’s documentation recommends it be in the normal reverse-DNS style for app-specific identifiers—for example,
A string indicating the type of activity, which will be received and used by the counterpart app to take over the activity. This string is defined by the developer and should not be blank, and Apple’s documentation recommends it be in the normal reverse-DNS style for app-specific identifiers—for example, "build.watchosapps.humoji.view-emoji".
![]() A
A userInfo dictionary providing any information needed by the receiving app to correctly resume the activity. Being a dictionary, this can contain any property list–compatible type. However, the usual admonition applies: Keep this as lightweight as possible to help with transfer and decoding time.
![]() A web URL (with a scheme of either
A web URL (with a scheme of either http or https) can be provided as well as or in place of the userInfo, which will allow the handoff to take place to the browser rather than to the counterpart app.
Your app’s controller classes should call this updateUserActivity(_:userInfo:webpageURL:) method as often as necessary to keep the current registered user activity up to date and ready to be handed off to the user’s phone. Whenever the current activity state should no longer be available to hand off, the WKInterfaceController method invalidateUserActivity() should be called to cancel the activity.
 Tip
Tip
The Handoff APIs are also useful to pass information to your app when it is launched from its glance. The glance controller may also call updateUserActivity(_:userInfo:webpageURL:), and when the user taps the glance to launch the app, then the WKExtensionDelegate will receive a call to handleUserActivity(_:) with the userInfo dictionary. If the extension delegate doesn’t implement that method, then the app’s initial interface controller may do so instead.
When your watch app’s user opts to continue activity with the iPhone companion app, the phone app is notified via its UIApplicationDelegate. A number of application delegate methods may be involved:
![]() If the app is launching, it is not already in memory, and its
If the app is launching, it is not already in memory, and its application(_:willFinishLaunchingWithOptions:) and application(_:didFinishLaunchingWithOptions:) methods are called, the launchOptions dictionary will contain the UIApplicationLaunchOptionsUserActivityTypeKey and UIApplicationLaunchOptionsUserActivityDictionaryKey keys. These methods may return false to indicate that they will not be continuing the user activity. In that case, neither of the following methods will be called.
![]()
application(_:willContinueUserActivityWithType:) is called to warn your app that the user has opted to continue an activity. Note the absence of any information beyond the activity type; the data associated with the activity may not yet be available when this method is called.
![]()
application(_:continueUserActivity:restorationHandler:) is the main method for picking up an activity from Handoff. The userActivity parameter is of type NSUserActivity. This class provides a great deal of functionality useful for managing Handoff between iOS and OS X. For the purposes of a watch app, it contains the activity’s type identifier, its userInfo dictionary, and any web URL that was provided. The restorationHandler is a block that your app can call with an array of instances of UIResponder subclasses that need to be informed of the user activity (for example, UIViewControllers). Each will receive a call to restoreUserActivityState(:_). Note that it is your code’s responsibility to call the restorationHandler if needed—but it is not compulsory to do so. Indeed, if appropriate, your application code may copy the block and call it at a later date.
Beyond its use in watch apps, Handoff is a powerful and detailed feature to enable silky smooth transition between activity on iOS and OS X. If this is relevant to your apps, and even if it may be relevant in the future, we suggest digging into the documentation to learn more about how your apps can use it to delight your users.
Wrapping Up
This chapter has been a quick demonstration of the options available for getting data in and out of an Apple Watch app—at least in those cases where the data is sent and received by other devices.
There is more to the story of getting information into your app, though. Until the day when we are all assimilated into the Digital Robotic Overmind, users will also want to provide their own input directly to the apps that they use. Read on to get to know the possibilities for user input on watchOS.