Chapter 13. Deploying Java Applications
At this point, you should be comfortable with using most of the features of the Java programming language, and you’ve had a pretty thorough introduction to basic graphics programming in Java. Now that you are ready to create applications for your users, you will want to know how to package them for deployment on your users’ computers. The traditional deployment choice—which was responsible for the unbelievable hype during the first few years of Java’s life—is to use applets. An applet is a special kind of Java program that a Java-enabled browser can download from the Internet and run. The hopes were that users would be freed from the hassles of installing software and that they could access their software from any Java-enabled computer or device with an Internet connection.
For a number of reasons, applets never quite lived up to these expectations. Therefore, we will start this chapter with instructions for packaging applications. We then show how your applications can store configuration information and user preferences. You will also learn how to use the ServiceLoader class to load plug-ins into your applications.
Then, we turn to applets and show you what you need to know in case you need to create or maintain them. We also discuss Java Web Start mechanism—an alternative approach for Internet-based application delivery which is in many ways similar to applets, but more suitable for programs that do not live in a web page.
13.1 JAR Files
When you package your application, you want to give your users a single file, not a directory structure filled with class files. Java Archive (JAR) files were designed for this purpose. A JAR file can contain both class files and other file types such as image and sound files. Moreover, JAR files are compressed, using the familiar ZIP compression format.
![]() Tip
Tip
An alternative to the ZIP format is the “pack200” compression scheme that is specifically tuned to compress class files more efficiently. Oracle claims a compression rate of close to 90% for class files. See http://docs.oracle.com/javase/1.5.0/docs/guide/deployment/deployment-guide/pack200.html for more information.
13.1.1 Creating JAR files
Use the jar tool to make JAR files. (In the default JDK installation, it’s in the jdk/bin directory.) The most common command to make a new JAR file uses the following syntax:
jar cvf JARFileName File1 File2 . . .
For example:
jar cvf CalculatorClasses.jar *.class icon.gif
In general, the jar command has the following format:
jar options File1 File2 ...
Table 13.1 lists all the options for the jar program. They are similar to the options of the UNIX tar command.

You can package application programs, program components (sometimes called “beans”—see Chapter 11 of Volume II), and code libraries into JAR files. For example, the runtime library of the JDK is contained in a very large file rt.jar.
13.1.2 The Manifest
In addition to class files, images, and other resources, each JAR file contains a manifest file that describes special features of the archive.
The manifest file is called MANIFEST.MF and is located in a special META-INF subdirectory of the JAR file. The minimum legal manifest is quite boring—just
Manifest-Version: 1.0
Complex manifests can have many more entries. The manifest entries are grouped into sections. The first section in the manifest is called the main section. It applies to the whole JAR file. Subsequent entries can specify properties of named entities such as individual files, packages, or URLs. Those entries must begin with a Name entry. Sections are separated by blank lines. For example:
Manifest-Version: 1.0
lines describing this archive
Name: Woozle.class
lines describing this file
Name: com/mycompany/mypkg/
lines describing this package
To edit the manifest, place the lines that you want to add to the manifest into a text file. Then run
jar cfm JARFileName ManifestFileName . . .
For example, to make a new JAR file with a manifest, run
jar cfm MyArchive.jar manifest.mf com/mycompany/mypkg/*.class
To update the manifest of an existing JAR file, place the additions into a text file and use a command such as
jar ufm MyArchive.jar manifest-additions.mf
![]() Note
Note
See http://docs.oracle.com/javase/8/docs/technotes/guides/jar for more information on the JAR and manifest file formats.
13.1.3 Executable JAR Files
You can use the e option of the jar command to specify the entry point of your program—the class that you would normally specify when invoking the java program launcher:
jar cvfe MyProgram.jar com.mycompany.mypkg.MainAppClass files to add
Alternatively, you can specify the main class of your program in the manifest, including a statement of the form
Main-Class: com.mycompany.mypkg.MainAppClass
Do not add a .class extension to the main class name.
![]() Caution
Caution
The last line in the manifest must end with a newline character. Otherwise, the manifest will not be read correctly. It is a common error to produce a text file containing just the Main-Class line without a line terminator.
With either method, users can simply start the program as
java -jar MyProgram.jar
Depending on the operating system configuration, users may even be able to launch the application by double-clicking the JAR file icon. Here are behaviors for various operating systems:
• On Windows, the Java runtime installer creates a file association for the “.jar” extension that launches the file with the javaw -jar command. (Unlike the java command, the javaw command doesn’t open a shell window.)
• On Solaris, the operating system recognizes the “magic number” of a JAR file and starts it with the java -jar command.
• On Mac OS X, the operating system recognizes the “.jar” file extension and executes the Java program when you double-click a JAR file.
However, a Java program in a JAR file does not have the same feel as a native application. On Windows, you can use third-party wrapper utilities that turn JAR files into Windows executables. A wrapper is a Windows program with the familiar .exe extension that locates and launches the Java virtual machine (JVM) or tells the user what to do when no JVM is found. There are a number of commercial and open source products, such as Launch4J (http://launch4j.sourceforge.net) and IzPack (http://izpack.org).
On the Macintosh, the situation is a bit easier. The Jar Bundler utility that is a part of XCode lets you turn a JAR file into a first-class Mac application.
13.1.4 Resources
Classes used in both applets and applications often have associated data files, such as:
• Image and sound files
• Text files with message strings and button labels
• Files with binary data—for example, to describe the layout of a map
In Java, such an associated file is called a resource.
![]() Note
Note
In Windows, the term “resource” has a more specialized meaning. Windows resources also consist of images, button labels, and so on, but they are attached to the executable file and accessed by a standard programming interface. In contrast, Java resources are stored as separate files, not as part of class files. It is up to each program to access and interpret the resource data.
For example, consider a class AboutPanel that displays a message such as the one in Figure 13.1.

Of course, the book title and copyright year in the panel will change for the next edition of the book. To make it easy to track this change, we will put the text inside a file and not hardcode it as a string.
But where should you put a file such as about.txt? Of course, it would be convenient to simply place it with the rest of the program files inside the JAR file.
The class loader knows how to search for class files until it has located them somewhere on the class path, or in an archive, or on a web server. The resource mechanism gives you the same convenience for files that aren’t class files. Here are the necessary steps:
1. Get the Class object of the class that has a resource—for example, AboutPanel.class.
2. If the resource is an image or audio file, call getResource(filename) to get the resource location as a URL. Then read it with the getImage or getAudioClip method.
3. For resources other than images or audio files, use the getResourceAsStream method to read the data in the file.
The point is that the class loader remembers how to locate the class, so it can then search for the associated resource in the same location.
For example, to make an icon with the image file about.gif, do the following:
URL url = ResourceTest.class.getResource("about.gif");
Image img = new ImageIcon(url).getImage();
That means “locate the about.gif file in the same place where you found the ResourceTest class.”
To read in the file about.txt, use these commands:
InputStream stream = ResourceTest.class.getResourceAsStream("about.txt");
Scanner in = new Scanner(stream, "UTF-8");
Instead of placing a resource file inside the same directory as the class file, you can place it in a subdirectory. You can then use a hierarchical resource name such as
data/text/about.txt
This resource name is interpreted relative to the package of the class that loads the resource. Note that you must always use the / separator, regardless of the directory separator on the system that actually stores the resource files. For example, on the Windows file system, the resource loader automatically translates / to separators.
A resource name starting with a / is called an absolute resource name. It is located in the same way a class inside a package would be located. For example, a resource
/corejava/title.txt
is located in the corejava directory which may be a subdirectory of the class path, inside a JAR file, or, for applets, on a web server.
Automating the loading of files is all the resource loading feature does. There are no standard methods for interpreting the contents of resource files. Each program must have its own way of interpreting its resource files.
Another common application of resources is the internationalization of programs. Language-dependent strings, such as messages and user interface labels, are stored in resource files, with one file per language. The internationalization API, which is discussed in Chapter 5 of Volume II, supports a standard method for organizing and accessing these localization files.
Listing 13.1 is a program that demonstrates resource loading. Compile, build a JAR file, and execute it:
javac resource/ResourceTest.java
jar cvfm ResourceTest.jar resource/ResourceTest.mf resource/*.class resource/*.gif resource/*.txt
java -jar ResourceTest.jar
Move the JAR file to a different directory and run it again to check that the program reads the resource files from the JAR file, not from the current directory.
Listing 13.1 resource/ResourceTest.java
1 package resource;
2
3 import java.awt.*;
4 import java.io.*;
5 import java.net.*;
6 import java.util.*;
7 import javax.swing.*;
8
9 /**
10 * @version 1.41 2015-06-12
11 * @author Cay Horstmann
12 */
13 public class ResourceTest
14 {
15 public static void main(String[] args)
16 {
17 EventQueue.invokeLater(() -> {
18 JFrame frame = new ResourceTestFrame();
19 frame.setTitle("ResourceTest");
20 frame.setDefaultCloseOperation(JFrame.EXIT_ON_CLOSE);
21 frame.setVisible(true);
22 });
23 }
24 }
25
26 /**
27 * A frame that loads image and text resources.
28 */
29 class ResourceTestFrame extends JFrame
30 {
31 private static final int DEFAULT_WIDTH = 300;
32 private static final int DEFAULT_HEIGHT = 300;
33
34 public ResourceTestFrame()
35 {
36 setSize(DEFAULT_WIDTH, DEFAULT_HEIGHT);
37 URL aboutURL = getClass().getResource("about.gif");
38 Image img = new ImageIcon(aboutURL).getImage();
39 setIconImage(img);
40
41 JTextArea textArea = new JTextArea();
42 InputStream stream = getClass().getResourceAsStream("about.txt");
43 try (Scanner in = new Scanner(stream, "UTF-8"))
44 {
45 while (in.hasNext())
46 textArea.append(in.nextLine() + "
");
47 }
48 add(textArea);
49 }
50 }
13.1.5 Sealing
We mentioned in Chapter 4 that you can seal a Java language package to ensure that no further classes can add themselves to it. You would want to seal a package if you use package-visible classes, methods, and fields in your code. Without sealing, other classes can place themselves into the same package and thereby gain access to its package-visible features.
For example, if you seal the package com.mycompany.util, then no class outside the sealed archive can be defined with the statement
package com.mycompany.util;
To achieve this, put all classes of the package into a JAR file. By default, packages in a JAR file are not sealed. You can change that global default by placing the line
Sealed: true
into the main section of the manifest. For each individual package, you can specify whether you want the package sealed or not, by adding another section to the JAR file manifest, like this:
Name: com/mycompany/util/
Sealed: true
Name: com/mycompany/misc/
Sealed: false
To seal a package, make a text file with the manifest instructions. Then run the jar command in the usual way:
jar cvfm MyArchive.jar manifest.mf files to add
13.2 Storage of Application Preferences
Users of your applications will usually expect that their preferences and customizations are saved and later restored when the application starts again. First, we will cover the simple approach that Java applications have traditionally taken—storing configuration information in property files. We then turn to the preferences API that provides a more robust solution.
13.2.1 Property Maps
A property map is a data structure that stores key/value pairs. Property maps are often used for storing configuration information. Property maps have three particular characteristics:
• The keys and values are strings.
• The map can easily be saved to a file and loaded from a file.
• There is a secondary table for default values.
The Java class that implements a property map is called Properties.
Property maps are useful in specifying configuration options for programs. For example:
Properties settings = new Properties();
settings.setProperty("width", "200");
settings.setProperty("title", "Hello, World!");
Use the store method to save map list of properties to a file. Here, we just save the property map in the file program.properties. The second argument is a comment that is included in the file.
OutputStream out = new FileOutputStream("program.properties");
settings.store(out, "Program Properties");
The sample set gives the following output:
#Program Properties
#Mon Apr 30 07:22:52 2007
width=200
title=Hello, World!
To load the properties from a file, use
InputStream in = new FileInputStream("program.properties");
settings.load(in);
It is customary to store program properties in a subdirectory of the user’s home directory. The directory name is often chosen to start with a dot—on a UNIX system, this convention indicates a system directory which is hidden from the user. Our sample program follows this convention.
To find the user’s home directory, you can call the System.getProperties method, which, as it happens, also uses a Properties object to describe the system information. The home directory has the key "user.home". There is also a convenience method to read a single key:
String userDir = System.getProperty("user.home");
It is a good idea to provide defaults for our program properties, in case a user edits the file by hand. The Properties class has two mechanisms for providing defaults. First, whenever you look up the value of a string, you can specify a default that should be used automatically when the key is not present.
String title = settings.getProperty("title", "Default title");
If there is a "title" property in the property map, title is set to that string. Otherwise, title is set to "Default title".
If you find it too tedious to specify the default in every call to getProperty, you can pack all the defaults into a secondary property map and supply that map in the constructor of your primary property map.
Properties defaultSettings = new Properties();
defaultSettings.setProperty("width", "300");
defaultSettings.setProperty("height", "200");
defaultSettings.setProperty("title", "Default title");
...
Properties settings = new Properties(defaultSettings);
Yes, you can even specify defaults to defaults if you give another property map parameter to the defaultSettings constructor, but it is not something one would normally do.
Listing 13.2 shows how you can use properties for storing and loading program state. The program remembers the frame position, size, and title. You can also manually edit the file .corejava/program.properties in your home directory to change the program’s appearance to the way you want.
![]() Caution
Caution
For historical reasons, the Properties class implements Map<Object, Object>. Therefore, you can use the get and put methods of the Map interface. But the get method returns the type Object, and the put method allows you to insert any object. It is best to stick with the getProperty and setProperty methods that work with strings, not objects.
Properties are simple tables without a hierarchical structure. It is common to introduce a fake hierarchy with key names such as window.main.color, window.main.title, and so on. But the Properties class has no methods that help organize such a hierarchy. If you store complex configuration information, you should use the Preferences class instead—see the next section.
Listing 13.2 properties/PropertiesTest.java
1 package properties;
2
3 import java.awt.EventQueue;
4 import java.awt.event.*;
5 import java.io.*;
6 import java.util.Properties;
7
8 import javax.swing.*;
9
10 /**
11 * A program to test properties. The program remembers the frame position, size,
12 * and title.
13 * @version 1.01 2015-06-16
14 * @author Cay Horstmann
15 */
16 public class PropertiesTest
17 {
18 public static void main(String[] args)
19 {
20 EventQueue.invokeLater(() -> {
21 PropertiesFrame frame = new PropertiesFrame();
22 frame.setVisible(true);
23 });
24 }
25 }
26
27 /**
28 * A frame that restores position and size from a properties file and updates
29 * the properties upon exit.
30 */
31 class PropertiesFrame extends JFrame
32 {
33 private static final int DEFAULT_WIDTH = 300;
34 private static final int DEFAULT_HEIGHT = 200;
35
36 private File propertiesFile;
37 private Properties settings;
38
39 public PropertiesFrame()
40 {
41 // get position, size, title from properties
42
43 String userDir = System.getProperty("user.home");
44 File propertiesDir = new File(userDir, ".corejava");
45 if (!propertiesDir.exists()) propertiesDir.mkdir();
46 propertiesFile = new File(propertiesDir, "program.properties");
47
48 Properties defaultSettings = new Properties();
49 defaultSettings.setProperty("left", "0");
50 defaultSettings.setProperty("top", "0");
51 defaultSettings.setProperty("width", "" + DEFAULT_WIDTH);
52 defaultSettings.setProperty("height", "" + DEFAULT_HEIGHT);
53 defaultSettings.setProperty("title", "");
54
55 settings = new Properties(defaultSettings);
56
57 if (propertiesFile.exists())
58 try (InputStream in = new FileInputStream(propertiesFile))
59 {
60 settings.load(in);
61 }
62 catch (IOException ex)
63 {
64 ex.printStackTrace();
65 }
66
67 int left = Integer.parseInt(settings.getProperty("left"));
68 int top = Integer.parseInt(settings.getProperty("top"));
69 int width = Integer.parseInt(settings.getProperty("width"));
70 int height = Integer.parseInt(settings.getProperty("height"));
71 setBounds(left, top, width, height);
72
73 // if no title given, ask user
74
75 String title = settings.getProperty("title");
76 if (title.equals(""))
77 title = JOptionPane.showInputDialog("Please supply a frame title:");
78 if (title == null) title = "";
79 setTitle(title);
80
81 addWindowListener(new WindowAdapter()
82 {
83 public void windowClosing(WindowEvent event)
84 {
85 settings.setProperty("left", "" + getX());
86 settings.setProperty("top", "" + getY());
87 settings.setProperty("width", "" + getWidth());
88 settings.setProperty("height", "" + getHeight());
89 settings.setProperty("title", getTitle());
90 try (OutputStream out = new FileOutputStream(propertiesFile))
91 {
92 settings.store(out, "Program Properties");
93 }
94 catch (IOException ex)
95 {
96 ex.printStackTrace();
97 }
98 System.exit(0);
99 }
100 });
101 }
102 }
java.util.Properties 1.0
• Properties()
creates an empty property map.
• Properties(Properties defaults)
creates an empty property map with a set of defaults.
• String getProperty(String key)
gets a property. Returns the string associated with the key, or the string associated with the key in the default table if it wasn’t present in the table, or null if the key wasn’t present in the default table either.
• String getProperty(String key, String defaultValue)
gets a property with a default value if the key is not found. Returns the string associated with the key, or the default string if it wasn’t present in the table.
• Object setProperty(String key, String value)
sets a property. Returns the previously set value of the given key.
• void load(InputStream in) throws IOException
loads a property map from an input stream.
• void store(OutputStream out, String header) 1.2
saves a property map to an output stream.
![]() Note
Note
You can find the names of the freely accessible system properties in the file security/java.policy in the directory of the Java runtime.
13.2.2 The Preferences API
As you have seen, the Properties class makes it simple to load and save configuration information. However, using property files has these disadvantages:
• Some operating systems have no concept of a home directory, making it difficult to find a uniform location for configuration files.
• There is no standard convention for naming configuration files, increasing the likelihood of name clashes as users install multiple Java applications.
Some operating systems have a central repository for configuration information. The best-known example is the registry in Microsoft Windows. The Preferences class provides such a central repository in a platform-independent manner. In Windows, the Preferences class uses the registry for storage; on Linux, the information is stored in the local file system instead. Of course, the repository implementation is transparent to the programmer using the Preferences class.
The Preferences repository has a tree structure, with node path names such as /com/mycompany/myapp. As with package names, name clashes are avoided as long as programmers start the paths with reversed domain names. In fact, the designers of the API suggest that the configuration node paths match the package names in your program.
Each node in the repository has a separate table of key/value pairs that you can use to store numbers, strings, or byte arrays. No provision is made for storing serializable objects. The API designers felt that the serialization format is too fragile for long-term storage. Of course, if you disagree, you can save serialized objects in byte arrays.
For additional flexibility, there are multiple parallel trees. Each program user has one tree; an additional tree, called the system tree, is available for settings that are common to all users. The Preferences class uses the operating system notion of the “current user” for accessing the appropriate user tree.
To access a node in the tree, start with the user or system root:
Preferences root = Preferences.userRoot();
or
Preferences root = Preferences.systemRoot();
Then access the node. You can simply provide a node path name:
Preferences node = root.node("/com/mycompany/myapp");
A convenient shortcut gets a node whose path name equals the package name of a class. Simply take an object of that class and call
Preferences node = Preferences.userNodeForPackage(obj.getClass());
or
Preferences node = Preferences.systemNodeForPackage(obj.getClass());
Typically, obj will be the this reference.
Once you have a node, you can access the key/value table with methods
String get(String key, String defval)
int getInt(String key, int defval)
long getLong(String key, long defval)
float getFloat(String key, float defval)
double getDouble(String key, double defval)
boolean getBoolean(String key, boolean defval)
byte[] getByteArray(String key, byte[] defval)
Note that you must specify a default value when reading the information, in case the repository data is not available. Defaults are required for several reasons. The data might be missing because the user never specified a preference. Certain resource-constrained platforms might not have a repository, and mobile devices might be temporarily disconnected from the repository.
Conversely, you can write data to the repository with put methods such as
put(String key, String value)
putInt(String key, int value)
and so on.
You can enumerate all keys stored in a node with the method
String[] keys()
There is currently no way to find out the type of the value of a particular key.
Central repositories such as the Windows registry traditionally suffer from two problems:
• They turn into a “dumping ground,” filled with obsolete information.
• Configuration data gets entangled into the repository, making it difficult to move preferences to a new platform.
The Preferences class has a solution for the second problem. You can export the preferences of a subtree (or, less commonly, a single node) by calling the methods
void exportSubtree(OutputStream out)
void exportNode(OutputStream out)
The data are saved in XML format. You can import them into another repository by calling
void importPreferences(InputStream in)
Here is a sample file:
<?xml version="1.0" encoding="UTF-8"?>
<!DOCTYPE preferences SYSTEM "http://java.sun.com/dtd/preferences.dtd">
<preferences EXTERNAL_XML_VERSION="1.0">
<root type="user">
<map/>
<node name="com">
<map/>
<node name="horstmann">
<map/>
<node name="corejava">
<map>
<entry key="left" value="11"/>
<entry key="top" value="9"/>
<entry key="width" value="453"/>
<entry key="height" value="365"/>
<entry key="title" value="Hello, World!"/>
</map>
</node>
</node>
</node>
</root>
</preferences>
If your program uses preferences, you should give your users the opportunity of exporting and importing them, so they can easily migrate their settings from one computer to another. The program in Listing 13.3 demonstrates this technique. The program simply saves the position, size, and title of the main window. Try resizing the window, then exit and restart the application. The window will be just like you left it when you exited.
Listing 13.3 preferences/PreferencesTest.java
1 package preferences;
2
3 import java.awt.*;
4 import java.io.*;
5 import java.util.prefs.*;
6
7 import javax.swing.*;
8 import javax.swing.filechooser.*;
9
10 /**
11 * A program to test preference settings. The program remembers the frame
12 * position, size, and title.
13 * @version 1.03 2015-06-12
14 * @author Cay Horstmann
15 */
16 public class PreferencesTest
17 {
18 public static void main(String[] args)
19 {
20 EventQueue.invokeLater(() -> {
21 PreferencesFrame frame = new PreferencesFrame();
22 frame.setDefaultCloseOperation(JFrame.EXIT_ON_CLOSE);
23 frame.setVisible(true);
24 });
25 }
26 }
27
28 /**
29 * A frame that restores position and size from user preferences and updates the
30 * preferences upon exit.
31 */
32 class PreferencesFrame extends JFrame
33 {
34 private static final int DEFAULT_WIDTH = 300;
35 private static final int DEFAULT_HEIGHT = 200;
36 private Preferences root = Preferences.userRoot();
37 private Preferences node = root.node("/com/horstmann/corejava");
38
39 public PreferencesFrame()
40 {
41 // get position, size, title from preferences
42
43 int left = node.getInt("left", 0);
44 int top = node.getInt("top", 0);
45 int width = node.getInt("width", DEFAULT_WIDTH);
46 int height = node.getInt("height", DEFAULT_HEIGHT);
47 setBounds(left, top, width, height);
48
49 // if no title given, ask user
50
51 String title = node.get("title", "");
52 if (title.equals(""))
53 title = JOptionPane.showInputDialog("Please supply a frame title:");
54 if (title == null) title = "";
55 setTitle(title);
56
57 // set up file chooser that shows XML files
58
59 final JFileChooser chooser = new JFileChooser();
60 chooser.setCurrentDirectory(new File("."));
61 chooser.setFileFilter(new FileNameExtensionFilter("XML files", "xml"));
62
63 // set up menus
64
65 JMenuBar menuBar = new JMenuBar();
66 setJMenuBar(menuBar);
67 JMenu menu = new JMenu("File");
68 menuBar.add(menu);
69
70 JMenuItem exportItem = new JMenuItem("Export preferences");
71 menu.add(exportItem);
72 exportItem
73 .addActionListener(event -> {
74 if (chooser.showSaveDialog(PreferencesFrame.this) == JFileChooser.APPROVE_OPTION)
75 {
76 try
77 {
78 savePreferences();
79 OutputStream out = new FileOutputStream(chooser
80 .getSelectedFile());
81 node.exportSubtree(out);
82 out.close();
83 }
84 catch (Exception e)
85 {
86 e.printStackTrace();
87 }
88 }
89 });
90
91 JMenuItem importItem = new JMenuItem("Import preferences");
92 menu.add(importItem);
93 importItem
94 .addActionListener(event -> {
95 if (chooser.showOpenDialog(PreferencesFrame.this) == JFileChooser.APPROVE_OPTION)
96 {
97 try
98 {
99 InputStream in = new FileInputStream(chooser
100 .getSelectedFile());
101 Preferences.importPreferences(in);
102 in.close();
103 }
104 catch (Exception e)
105 {
106 e.printStackTrace();
107 }
108 }
109 });
110
111 JMenuItem exitItem = new JMenuItem("Exit");
112 menu.add(exitItem);
113 exitItem.addActionListener(event -> {
114 savePreferences();
115 System.exit(0);
116 });
117 }
118
119 public void savePreferences()
120 {
121 node.putInt("left", getX());
122 node.putInt("top", getY());
123 node.putInt("width", getWidth());
124 node.putInt("height", getHeight());
125 node.put("title", getTitle());
126 }
127 }
13.3 Service Loaders
Sometimes, you develop an application with a plug-in architecture. There are platforms that encourage this approach, such as OSGi (http://osgi.org), which are used in development environments, application servers, and other complex applications. Such platforms go well beyond the scope of this book, but the JDK also offers a simple mechanism for loading plug-ins, which we describe here.
Often, when providing a plug-in, a program wants to give the plug-in designer some freedom of how to implement the plug-in’s features. It can also be desirable to have multiple implementations to choose from. The ServiceLoader class makes it easy to load plug-ins that conform to a common interface.
Define an interface (or, if you prefer, a superclass) with the methods that each instance of the service should provide. For example, suppose your service provides encryption.
package serviceLoader;
public interface Cipher
{
byte[] encrypt(byte[] source, byte[] key);
byte[] decrypt(byte[] source, byte[] key);
int strength();
}
The service provider supplies one or more classes that implement this service, for example
package serviceLoader.impl;
public class CaesarCipher implements Cipher
{
public byte[] encrypt(byte[] source, byte[] key)
{
byte[] result = new byte[source.length];
for (int i = 0; i < source.length; i++)
result[i] = (byte)(source[i] + key[0]);
return result;
}
public byte[] decrypt(byte[] source, byte[] key)
{
return encrypt(source, new byte[] { (byte) -key[0] });
}
public int strength() { return 1; }
}
The implementing classes can be in any package, not necessarily the same package as the service interface. Each of them must have a no-argument constructor.
Now add the names of the classes to a UTF-8 encoded text file in a file in the META-INF/services directory whose name matches the fully qualified class name. In our example, the file META-INF/services/serviceLoader.Cipher would contain the line
serviceLoader.impl.CaesarCipher
In this example, we provide a single implementing class. You could also provide multiple classes and later pick among them.
With this preparation done, the program initializes a service loader as follows:
public static ServiceLoader<Cipher> cipherLoader = ServiceLoader.load(Cipher.class);
This should be done just once in the program.
The iterator method of the service loader returns an iterator through all provided implementations of the service. (See Chapter 9 for more information about iterators.) It is easiest to use an enhanced for loop to traverse them. In the loop, pick an appropriate object to carry out the service.
public static Cipher getCipher(int minStrength)
{
for (Cipher cipher : cipherLoader) // Implicitly calls cipherLoader.iterator()
{
if (cipher.strength() >= minStrength) return cipher;
}
return null;
}
13.4 Applets
Applets are Java programs that are included in an HTML page. The HTML page must tell the browser which applets to load and where to put each applet on the web page. As you might expect, the tag needed to use an applet must tell the browser where to get the class files and how the applet is positioned on the web page (size, location, and so on). The browser then retrieves the class files from the Internet (or from a directory on the user’s machine) and automatically runs the applet.
When applets were first developed, you had to use Sun’s HotJava browser to view web pages that contained applets. Naturally, few users were willing to use a separate browser just to enjoy a new web feature. Java applets became popular when Netscape included a Java virtual machine in its Navigator browser. Microsoft Internet Explorer followed suit. Unfortunately, the Java support in Internet Explorer support soon fell behind and only worked with outdated Java versions, before being dropped altogether.
To solve this problem, Sun Microsystems developed the “Java Plug-in.” Using browser extension mechanisms, it plugs in to a variety of browsers and enables them to execute Java applets by using an external Java runtime environment.
For a number of years, this solution was adequate, and applets were commonly used for educational tools, corporate applications, and some games. Unfortunately, Sun Microsystems and, after its demise, Oracle were slow in fixing security vulnerabilities in the Java Virtual Machine that were discovered and exploited from time to time. Since an insecure JVM puts users at real risk, browser manufacturers made it harder to use Java. Some blocked all but the latest versions of the Java Plug-in, and others discontinued support of the plug-in architecture. Oracle’s reaction was similarly disappointing. It started requiring that all applets are digitally signed (see Section 13.4.9, “Signed Code,” on p. 822).
Nowadays, it is a challenge for developers to deploy Java applets, and for users to run them. Therefore, we believe that the sections that follow will be mostly of interest to readers who need to maintain legacy applets.
![]() Note
Note
To run the applets in this chapter in a browser, you need to install the current version of the Java Plug-in and make sure your browser is connected with the plug-in. For testing applets, you also need to configure the plug-in so that it trusts local files. See Section 2.5, “Building and Running Applets,” on p. 33 for instructions.
13.4.1 A Simple Applet
For tradition’s sake, let’s write a NotHelloWorld program as an applet. An applet is simply a Java class that extends the java.applet.Applet class. In this book, we will use Swing to implement applets. All of our applets will extend the JApplet class, the superclass for Swing applets. As you can see in Figure 13.2, JApplet is an immediate subclass of the ordinary Applet class.

![]() Note
Note
If your applet contains Swing components, you must extend the JApplet class. Swing components inside a plain Applet don’t paint correctly.
Listing 13.4 shows the code for an applet version of “Not Hello World.”
Notice how similar this is to the corresponding program from Chapter 10. However, since the applet lives inside a web page, there is no need to specify a method for exiting the applet.
Listing 13.4 applet/NotHelloWorld.java
1 package applet;
2
3 import java.awt.*;
4 import javax.swing.*;
5
6 /**
7 * @version 1.24 2015-06-12
8 * @author Cay Horstmann
9 */
10 public class NotHelloWorld extends JApplet
11 {
12 public void init()
13 {
14 EventQueue.invokeLater(() -> {
15 JLabel label = new JLabel("Not a Hello, World applet",
16 SwingConstants.CENTER);
17 add(label);
18 });
19 }
20 }
To execute the applet, carry out three steps:
1. Compile your Java source files into class files.
2. Package the classes into a JAR file (see Section 13.1.1, “Creating JAR files,” on p. 780).
3. Create an HTML file that tells the browser which class file to load first and how to size the applet.
Here are the contents of the file:
<applet class="applet/NotHelloWorld.class" archive="NotHelloWorld.jar" width="300" height="300">
</applet>
Before you view the applet in a browser, it is a good idea to test it in the applet viewer program that is a part of the JDK. To use the applet viewer with our example, enter
appletviewer NotHelloWorldApplet.html
on the command line. The command-line argument for the applet viewer program is the name of the HTML file, not the class file. Figure 13.3 shows the applet viewer displaying this applet.

The applet viewer is good for the first stage of testing, but at some point you need to run your applets in a real browser to see them as a user might see them. In particular, the applet viewer program shows you only the applet, not the surrounding HTML text. If your HTML file contains multiple applet tags, the applet viewer pops up multiple windows.
To properly view the applet, simply load the HTML file into the browser (see Figure 13.4). If the applet doesn’t show up, you need to install the Java Plug-in and allow it to load unsigned local applets, as described in Section 2.5, “Building and Running Applets,” on p. 33.

If you make a change to your applet and recompile, you need to restart the browser so that it loads the new class files. Simply refreshing the HTML page will not load the new code. This is a hassle when you are debugging an applet. You can avoid the painful browser restart from the Java console. Launch the console and issue the x command, which clears the classloader cache. Then you can reload the HTML page, and the new applet code is used. Under Windows, open the Java Plug-in control in the Windows control panel. Under Linux, run jcontrol and request that the Java console be displayed. The console will pop up whenever an applet is loaded.
It is easy to convert a graphical Java application into an applet that you can embed in a web page. Essentially, all of the user interface code can stay the same. Here are the specific steps:
1. Make an HTML page with the appropriate tag to load the applet code.
2. Supply a subclass of the JApplet class. Make this class public. Otherwise, the applet cannot be loaded.
3. Eliminate the main method in the application. Do not construct a frame window for the application. Your application will be displayed inside the browser.
4. Move any initialization code from the frame window constructor to the init method of the applet. You don’t need to explicitly construct the applet object—the browser instantiates it for you and calls the init method.
5. Remove the call to setSize; for applets, sizing is done with the width and height parameters in the HTML file.
6. Remove the call to setDefaultCloseOperation. An applet cannot be closed; it terminates when the browser exits.
7. If the application calls setTitle, eliminate the call to the method. Applets cannot have title bars. (You can, of course, title the web page itself, using the HTML title tag.) /
8. Don’t call setVisible(true). The applet is displayed automatically.
13.4.2 The applet HTML Tag and Its Attributes
In its most basic form, an example applet tag looks like this:
<applet code="applet/NotHelloWorld.class" archive="NotHelloWorld.jar"
width="300" height="100"></applet>
You can use the following attributes within the applet tag:
• width, height
These attributes are required and give the width and height of the applet, measured in pixels. In the applet viewer, this is the initial size of the applet. You can resize any window that the applet viewer creates. In a browser, you cannot resize the applet. You will need to make a good guess about how much space your applet requires to show up well for all users.
• align
This attribute specifies the alignment of the applet. The attribute values are the same as for the align attribute of the HTML img tag.
• vspace, hspace
These optional attributes specify the number of pixels above and below the applet (vspace) and on each side of the applet (hspace).
This attribute gives the name of the applet’s class file.
The path name must match the package of the applet class. For example, if the applet class is in the package com.mycompany, then the attribute is code="com/mycompany/MyApplet.class". The alternative code="com.mycompany.MyApplet.class" is also permitted.
The code attribute specifies only the name of the class that contains the applet class. Of course, your applet may contain other class files. Once the browser’s class loader loads the class containing the applet, it will realize that it needs more class files and will load them.
• archive
This attribute lists the JAR file or files containing classes and other resources for the applet. These files are fetched from the web server before the applet is loaded. JAR files are separated by commas. For example:
<applet code="MyApplet.class"
archive="MyClasses.jar,corejava/CoreJavaClasses.jar"
width="100" height="150">
• codebase
This attribute is the URL from which JAR files (and, in earlier days, class files) are loaded.
• object
This obsolete attribute specifies the name of a file that contains a serialized applet object, which was intended for persisting applet state. Since there is no way of signing a serialized file, this feature is no longer useful.
• alt
You can use the alt attribute to display a message when Java is disabled.
If a browser cannot process applets at all, it ignores the unknown applet and param tags. All text between the <applet> and </applet> tags is displayed by the browser. Conversely, Java-aware browsers do not display any text between the <applet> and </applet> tags. You can display messages between these tags for those poor folks. For example:
<applet . . . alt="If you activated Java, you would see my applet here">
If your browser could show Java, you would see my applet here.
</applet>
Scripters can give the applet a name attribute that they can use to refer to the applet when scripting. Both Netscape and Internet Explorer let you call methods of an applet on a page through JavaScript.
To access an applet from JavaScript, you first have to give it a name.
<applet ... name="mine"></applet>
You can then refer to the object as document.applets.appletname. For example:
var myApplet = document.applets.mine;
You can then call applet methods:
myApplet.init();
The name attribute is also essential when you want two applets on the same page to communicate with each other directly. Specify a name for each current applet instance and pass this string to the getApplet method of the AppletContext interface. We discuss this mechanism, called inter-applet communication, later in this chapter.
![]() Note
Note
In www.javaworld.com/javatips/jw-javatip80.html, Francis Lu uses JavaScript-to-Java communication to solve an age-old problem: how to resize an applet so that it isn’t bound by hardcoded width and height attributes. This is a good example of the integration between Java and JavaScript.
13.4.3 Use of Parameters to Pass Information to Applets
Just as applications can use command-line information, applets can use parameters that are embedded in the HTML file. This is done by the HTML tag called param along with attributes that you define. For example, suppose you want to let the web page determine the style of the font to use in your applet. You could use the following HTML tags:
<applet code="FontParamApplet.class" ...>
<param name="font" value="Helvetica"/>
</applet>
You can then pick up the value of the parameter using the getParameter method of the Applet class:
public class FontParamApplet extends JApplet
{
public void init()
{
String fontName = getParameter("font");
...
}
...
}
![]() Note
Note
You can call the getParameter method only in the init method of the applet, not in the constructor. When the applet constructor is executed, the parameters are not yet prepared. Since the layout of most nontrivial applets is determined by parameters, we recommend that you don’t supply constructors to applets. Simply place all initialization code into the init method.
Parameters are always returned as strings. You need to convert the string to a numeric type if that is what is called for. You do this in the standard way by using the appropriate method, such as parseInt of the Integer class.
For example, if we want to add a size parameter for the font, the HTML code might look like this:
<applet code="FontParamApplet.class" ...>
<param name="font" value="Helvetica"/>
<param name="size" value="24"/>
</applet>
The following source code shows how to read the integer parameter:
public class FontParamApplet extends JApplet
{
public void init()
{
String fontName = getParameter("font");
int fontSize = Integer.parseInt(getParameter("size"));
...
}
}
![]() Note
Note
A case-insensitive comparison is used when matching the name attribute value in the param tag and the argument of the getParameter method.
In addition to ensuring that the parameters match in your code, you should find out whether or not the size parameter was left out. You can do this with a simple test for null. For example:
int fontsize;
String sizeString = getParameter("size");
if (sizeString == null) fontSize = 12;
else fontSize = Integer.parseInt(sizeString);
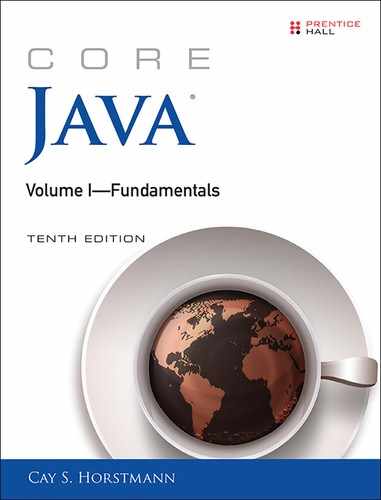
Here is a classic applet that uses parameters to draw a bar chart, shown in Figure 13.5.
This applet takes the labels and the heights of the bars from the param values in the HTML file. Here is what the HTML file for Figure 13.5 looks like:
<applet code="Chart.class" width="400" height="300">
<param name="title" value="Diameters of the Planets"/>
<param name="values" value="9"/>
<param name="name.1" value="Mercury"/>
<param name="name.2" value="Venus"/>
<param name="name.3" value="Earth"/>
<param name="name.4" value="Mars"/>
<param name="name.5" value="Jupiter"/>
<param name="name.6" value="Saturn"/>
<param name="name.7" value="Uranus"/>
<param name="name.8" value="Neptune"/>
<param name="name.9" value="Pluto"/>
<param name="value.1" value="3100"/>
<param name="value.2" value="7500"/>
<param name="value.3" value="8000"/>
<param name="value.4" value="4200"/>
<param name="value.5" value="88000"/>
<param name="value.6" value="71000"/>
<param name="value.7" value="32000"/>
<param name="value.8" value="30600"/>
<param name="value.9" value="1430"/>
</applet>
You could have set up an array of strings and an array of numbers in the applet, but there are two advantages to using the parameter mechanism instead. You can have multiple copies of the same applet on your web page, showing different graphs: Just put two applet tags with different sets of parameters on the page. And you can change the data that you want to chart. Admittedly, the diameters of the planets will stay the same for quite some time, but suppose your web page contains a chart of weekly sales data. It is easy to update the web page because it is plain text. Editing and recompiling a Java file weekly is more tedious.
In fact, there are commercial JavaBeans components (beans) that make much fancier graphs than the one in our chart applet. If you buy one, you can drop it into your web page and feed it parameters without ever needing to know how the applet renders the graphs.
Listing 13.5 is the source code of our chart applet. Note that the init method reads the parameters, and the paintComponent method draws the chart.
1 package chart;
2
3 import java.awt.*;
4 import java.awt.font.*;
5 import java.awt.geom.*;
6 import javax.swing.*;
7
8 /**
9 * @version 1.34 2015-06-12
10 * @author Cay Horstmann
11 */
12 public class Chart extends JApplet
13 {
14 public void init()
15 {
16 EventQueue.invokeLater(() -> {
17 String v = getParameter("values");
18 if (v == null) return;
19 int n = Integer.parseInt(v);
20 double[] values = new double[n];
21 String[] names = new String[n];
22 for (int i = 0; i < n; i++)
23 {
24 values[i] = Double.parseDouble(getParameter("value." + (i + 1)));
25 names[i] = getParameter("name." + (i + 1));
26 }
27
28 add(new ChartComponent(values, names, getParameter("title")));
29 });
30 }
31 }
32
33 /**
34 * A component that draws a bar chart.
35 */
36 class ChartComponent extends JComponent
37 {
38 private double[] values;
39 private String[] names;
40 private String title;
41
42 /**
43 * Constructs a ChartComponent.
44 * @param v the array of values for the chart
45 * @param n the array of names for the values
46 * @param t the title of the chart
47 */
48 public ChartComponent(double[] v, String[] n, String t)
49 {
50 values = v;
51 names = n;
52 title = t;
53 }
54
55 public void paintComponent(Graphics g)
56 {
57 Graphics2D g2 = (Graphics2D) g;
58
59 // compute the minimum and maximum values
60 if (values == null) return;
61 double minValue = 0;
62 double maxValue = 0;
63 for (double v : values)
64 {
65 if (minValue > v) minValue = v;
66 if (maxValue < v) maxValue = v;
67 }
68 if (maxValue == minValue) return;
69
70 int panelWidth = getWidth();
71 int panelHeight = getHeight();
72
73 Font titleFont = new Font("SansSerif", Font.BOLD, 20);
74 Font labelFont = new Font("SansSerif", Font.PLAIN, 10);
75
76 // compute the extent of the title
77 FontRenderContext context = g2.getFontRenderContext();
78 Rectangle2D titleBounds = titleFont.getStringBounds(title, context);
79 double titleWidth = titleBounds.getWidth();
80 double top = titleBounds.getHeight();
81
82 // draw the title
83 double y = -titleBounds.getY(); // ascent
84 double x = (panelWidth - titleWidth) / 2;
85 g2.setFont(titleFont);
86 g2.drawString(title, (float) x, (float) y);
87
88 // compute the extent of the bar labels
89 LineMetrics labelMetrics = labelFont.getLineMetrics("", context);
90 double bottom = labelMetrics.getHeight();
91
92 y = panelHeight - labelMetrics.getDescent();
93 g2.setFont(labelFont);
94
95 // get the scale factor and width for the bars
96 double scale = (panelHeight - top - bottom) / (maxValue - minValue);
97 int barWidth = panelWidth / values.length;
98
99 // draw the bars
100 for (int i = 0; i < values.length; i++)
101 {
102 // get the coordinates of the bar rectangle
103 double x1 = i * barWidth + 1;
104 double y1 = top;
105 double height = values[i] * scale;
106 if (values[i] >= 0)
107 y1 += (maxValue - values[i]) * scale;
108 else
109 {
110 y1 += maxValue * scale;
111 height = -height;
112 }
113
114 // fill the bar and draw the bar outline
115 Rectangle2D rect = new Rectangle2D.Double(x1, y1, barWidth - 2, height);
116 g2.setPaint(Color.RED);
117 g2.fill(rect);
118 g2.setPaint(Color.BLACK);
119 g2.draw(rect);
120
121 // draw the centered label below the bar
122 Rectangle2D labelBounds = labelFont.getStringBounds(names[i], context);
123
124 double labelWidth = labelBounds.getWidth();
125 x = x1 + (barWidth - labelWidth) / 2;
126 g2.drawString(names[i], (float) x, (float) y);
127 }
128 }
129 }
13.4.4 Accessing Image and Audio Files
Applets can handle both images and audio. As we write this, images must be in GIF, PNG, or JPEG form, audio files in AU, AIFF, WAV, or MIDI. Animated GIFs are supported, and the animation is displayed.
Specify the locations of image and audio files with relative URLs. The base URL is usually obtained by calling the getDocumentBase or getCodeBase method. The former gets the URL of the HTML page in which the applet is contained, the latter the URL specified by the applet’s codebase attribute.
Give the base URL and the file location to the getImage or getAudioClip method. For example:
Image cat = getImage(getDocumentBase(), "images/cat.gif");
AudioClip meow = getAudioClip(getDocumentBase(), "audio/meow.au");
You saw in Chapter 10 how to display an image. To play an audio clip, simply invoke its play method. You can also call the play method of the Applet class without first loading the audio clip.
play(getDocumentBase(), "audio/meow.au");
13.4.5 The Applet Context
An applet runs inside a browser or the applet viewer. An applet can ask the browser to do things for it—for example, fetch an audio clip, show a short message in the status line, or display a different web page. The ambient browser can carry out these requests, or it can ignore them. For example, if an applet running inside the applet viewer asks the applet viewer program to display a web page, nothing happens.
To communicate with the browser, an applet calls the getAppletContext method. That method returns an object that implements an interface of type AppletContext. You can think of the concrete implementation of the AppletContext interface as a communication path between the applet and the ambient browser. In addition to getAudioClip and getImage, the AppletContext interface contains several useful methods, which we discuss in the next few sections.
13.4.6 Inter-Applet Communication
A web page can contain more than one applet. If a web page contains multiple applets from the same codebase, they can communicate with each other. Naturally, this is an advanced technique that you probably will not need very often.
If you give name attributes to each applet in the HTML file, you can use the getApplet method of the AppletContext interface to get a reference to the applet. For example, if your HTML file contains the tag
<applet code="Chart.class" width="100" height="100" name="Chart1">
then the call
Applet chart1 = getAppletContext().getApplet("Chart1");
gives you a reference to the applet. What can you do with the reference? Provided you give the Chart class a method to accept new data and redraw the chart, you can call this method by making the appropriate cast.
((Chart) chart1).setData(3, "Earth", 9000);
You can also list all applets on a web page, whether or not they have a name attribute. The getApplets method returns an enumeration object. Here is a loop that prints the class names of all applets on the current page:
Enumeration<Applet> e = getAppletContext().getApplets();
while (e.hasMoreElements())
{
Applet a = e.nextElement();
System.out.println(a.getClass().getName());
}
An applet cannot communicate with an applet on a different web page.
13.4.7 Displaying Items in the Browser
You have access to two areas of the ambient browser: the status line and the web page display area. Both use methods of the AppletContext interface.
You can display a string in the status line at the bottom of the browser with the showStatus message. For example:
showStatus("Loading data ... please wait");
![]() Tip
Tip
In our experience, showStatus is of limited use. The browser is also using the status line, and, more often than not, it will overwrite your precious message with chatter like “Applet running.” Use the status line for fluff messages like “Loading data ... please wait,” but not for something the user cannot afford to miss.
You can tell the browser to show a different web page with the showDocument method. There are several ways to do this. The simplest is a call to showDocument with one argument, the URL you want to show.
URL u = new URL("http://horstmann.com/index.html");
getAppletContext().showDocument(u);
The problem with this call is that it opens the new web page in the same window as your current page, thereby displacing your applet. To return to your applet, the user must click the Back button of the browser.
You can tell the browser to show the document in another window by giving a second parameter in the call to showDocument (see Table 13.2). If you supply the special string "_blank", the browser opens a new window with the document, instead of displacing the current document. More importantly, if you take advantage of the frame feature in HTML, you can split a browser window into multiple frames, each having a name. You can put your applet into one frame and have it show documents in other frames. We show you an example of how to do this in the next section.

![]() Note
Note
The applet viewer does not show web pages. The showDocument method is ignored in the applet viewer.
13.4.8 The Sandbox
Whenever code is loaded from a remote site and then executed locally, security becomes vital. Visiting a web page automatically starts all applets on the page. Clicking a single link can launch a Java Web Start application. If visiting a web page or clicking a link could execute arbitrary code on the user’s computer, criminals would have an easy time stealing confidential information, accessing financial data, or taking over users’ machines to send spam.
To ensure that the Java technology cannot be used for nefarious purposes, Java has an elaborate security model that we discuss in detail in Volume II. A security manager checks access to all system resources. By default, it only allows those operations that are harmless. To allow additional operations, the user must explicitly approve the applet or application.
What can remote code do on all platforms? It is always OK to show images and play sounds, get keystrokes and mouse clicks from the user, and send user input back to the host from which the code was loaded. That is enough functionality to show facts and figures or to interact with an educational program or game. The restricted execution environment is often called the “sandbox.” Code that plays in the sandbox cannot alter the user’s system or spy on it.
In particular, programs in the sandbox have the following restrictions:
• They can never run any local executable program.
• They cannot read from or write to the local computer’s file system.
• They cannot find out any information about the local computer, except for the Java version used and a few harmless operating system details. In particular, code in the sandbox cannot find out the user’s name, e-mail address, and so on.
• Remotely loaded programs need user consent to communicate with any host other than the server from which they were downloaded; that server is called the originating host. This rule is often called “remote code can only phone home.” The rule protects users from code that might try to spy on intranet resources.
• All pop-up windows carry a warning message. This message is a security feature to ensure that users do not mistake the window for a local application. The fear is that an unsuspecting user could visit a web page, be tricked into running remote code, and then type in a password or credit card number, which can be sent back to the web server. In early versions of the JDK, that message was very ominous: “Untrusted Java Applet Window.” Every successive version watered down the warning a bit: “Unauthenticated Java Applet Window,” then “Warning: Java Applet Window.” Now it is a minuscule warning triangle that only the most observant users will notice.
The sandbox concept is no longer as meaningful as it used to be. In the past, anyone could deploy sandboxed code, and only code that needed permissions beyond the sandbox needed to be digitally signed. Nowadays all code executed through the Java Plug-in, whether it runs in the sandbox or not, must be digitally signed.
13.4.9 Signed Code
The JAR files of an applet or Java Web Start application must be digitally signed. A signed JAR file carries with it a certificate that indicates the identity of the signer. Cryptographic techniques ensure that such a certificate cannot be forged, and that any effort to tamper with the signed file will be detected.
For example, suppose you receive an application that is produced and digitally signed by yWorks GmbH, using a certificate issued by Thawte (see Figure 13.6). When you receive the application, you will be assured of the following:
1. The code is exactly as it was when it was signed; no third party has tampered with it.
2. The signature really is from yWorks.
3. The certificate really was issued by Thawte. (The Java Plug-in knows how to check certificates from Thawte and a number of other certificate vendors, and it is also possible to install alternative “root certificates”.)

If you click on the “More Information” link, you are told that the application will run without the security restrictions normally provided by Java. Should you install and run the application? That really depends on your trust in yWorks GmbH.
Getting a certificate from one of the supported vendors costs hundreds of dollars per year, and some certificate issuers require proof of incorporation or a business license. In the past, some Java developers simply generated their own certificates and used them for code signing. Of course, the Java Plug-in has no way of checking the accuracy of these certificates. In the past, the Java Plug-in nevertheless presented the certificate to the user for approval. This was quite worthless since few users understood the difference between secure and insecure certificates. Insecure certificates are no longer supported.
If you want to distribute a Java applet or Web Start application, you no longer have a choice. You must obtain a certificate from a certificate issuer that is supported by the Java Plug-in and use it to sign your JAR files.
If you work for a company, it is likely that your company already has an established relationship with a certificate vendor, and you can simply order a Java code signing certificate. If not, it pays to shop around since prices vary widely, and some vendors are more relaxed about issuing certificates to individuals.
Your certificate will come with instructions to install it into a Java keystore—a password-protected file from where it can be retrieved during the signing process. Keep the keystore file and the password safe.
Next, you need to decide what permissions you want. You have the choice between sandbox permissions and all permissions. Make a manifest file (see Section 13.1.2, “The Manifest,” on p. 781).
Include either the line Permissions: sandbox or Permissions: all-permissions, for example:
Manifest-Version: 1.0
Permissions: all-permissions
Run the jar tool:
jar cvfm MyApplet.jar manifest.mf mypackage/*.class
The applet element of your HTML file should have an attribute archive="MyApplet.jar".
Finally, sign the JAR file. The command looks like this:
jarsigner -keystore keystorefile -tsa timestampURL MyApplet.jar keyalias
You need to ask your certificate issuer about the URL for time stamping. The key alias was assigned by your certificate issuer. Run the command
keytool -keystore keystorefile -list
to find out what it was. You can also change it with the -changealias option of the keytool command. (For more information on keytool, turn to Chapter 9 of Volume II.)
Now place the signed JAR file and the HTML file with the applet element on your web server.
![]() Note
Note
It is possible to control in great detail which rights to grant a Java application; we discuss this in Chapter 12 of Volume II. However, that system was never put to use in a way that is meaningful to consumers. The Java Plug-in only offers two security levels: sandbox or all permissions.
13.5 Java Web Start
Java Web Start is a technology for delivering applications over the Internet. Java Web Start applications have the following characteristics:
• They are typically delivered through a browser. Once a Java Web Start application has been downloaded, it can be started without using a browser.
• They do not live inside a browser window. The application is displayed in its own frame, outside the browser.
• They do not use the Java implementation of the browser. The browser simply launches an external application whenever it loads a Java Web Start application descriptor. That is the same mechanism used to launch other helper applications such as Adobe Acrobat or RealAudio.
• Digitally signed applications can be given arbitrary access rights on the local machine. Unsigned applications run in a “sandbox” which prohibits potentially dangerous operations.
13.5.1 Delivering a Java Web Start Application
To prepare an application for delivery by Java Web Start, package it in one or more JAR files. Then, prepare a descriptor file in the Java Network Launch Protocol (JNLP) format. Place these files on a web server.
You also need to ensure that your web server reports a MIME type of application/x-java-jnlp-file for files with extension .jnlp. (Browsers use the MIME type to determine which helper application to launch.) Consult your web server documentation for details.
![]() Tip
Tip
To experiment with Java Web Start, install Tomcat from http://jakarta.apache.org/tomcat. Tomcat is a container for servlets and JSP pages, but it also serves web pages. It is preconfigured to serve the correct MIME type for JNLP files. In the following instructions, we assume that you use Tomcat.
Let’s try out Java Web Start to deliver the calculator application from Chapter 12. Follow these steps:
1. Compile the program.
javac -classpath .:jdk/jre/lib/javaws.jar webstart/*.java
2. Produce a JAR file with the command
jar cvfe Calculator.jar webstart.Calculator webstart/*.class
3. Prepare the launch file Calculator.jnlp with the following contents:
<?xml version="1.0" encoding="utf-8"?>
<jnlp spec="1.0+" codebase="http://localhost:8080/calculator/" href="Calculator.jnlp">
<information>
<title>Calculator Demo Application</title>
<vendor>Cay S. Horstmann</vendor>
<description>A Calculator</description>
<offline-allowed/>
</information>
<resources>
<java version="1.6.0+"/>
<jar href="Calculator.jar"/>
</resources>
<application-desc/>
</jnlp>
(Note that the version number must be 1.6.0, not 6.0.)
The launch file format is fairly self-explanatory. For a full specification, see www.oracle.com/technetwork/java/javase/javawebstart.
4. Make a directory tomcat/webapps/calculator from which to serve the application. Here tomcat is the base directory of your Tomcat installation. Make a subdirectory tomcat/webapps/calculator/WEB-INF, and place the following minimal web.xml file inside the WEB-INF subdirectory:
<?xml version="1.0" encoding="utf-8"?>
<web-app version="2.5" xmlns="http://java.sun.com/xml/ns/j2ee"
xmlns:xsi="http://www.w3.org/2001/XMLSchema-instance"
xsi:schemaLocation="http://java.sun.com/xml/ns/j2ee
http://java.sun.com/xml/ns/j2ee/web-app_2_5.xsd">
</web-app>
5. Place the JAR file and the launch file into the tomcat/webapps/calculator directory.
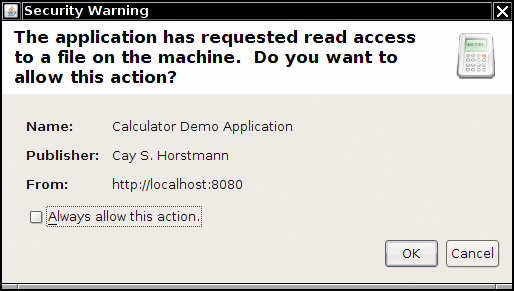
6. Following the process described in Section 2.5, “Building and Running Applets,” on p. 33, add the URL http://localhost:8080 to the list of trusted sites in the Java Control Panel. Alternatively, you can sign the JAR file as described in Section 13.4.9, “Signed Code,” on p. 822.
7. Start Tomcat by executing the startup script in the tomcat/bin directory.
8. Point your browser to the JNLP file. For example, if you use Tomcat, go to http://localhost:8080/calculator/Calculator.jnlp. If your browser has been configured for Java Web Start, you should see the launch window for Java Web Start (see Figure 13.7).

If your browser does not know how to deal with JNLP files, it may offer you the option of associating them with an application. If so, choose jdk/bin/javaws. Otherwise, figure out how to associate the MIME type application/x-java-jnlp-file with the javaws application. You can also try reinstalling the JDK which is supposed to do that for you.
9. Soon afterward, the calculator should come up, with a border marking it as a Java application (see Figure 13.8).

10. When you access the JNLP file again, the application is retrieved from the cache. You can review the cache content by using the Java Plug-in control panel (see Figure 13.9). In Windows, look for the Java Plug-in control inside the Windows control panel. Under Linux, run jdk/jre/bin/ControlPanel.

If you don’t want to run a web server while you are testing your JNLP configuration, you can temporarily override the codebase URL in the launch file by running
javaws -codebase file://programDirectory JNLPfile
For example, in UNIX, you can simply issue this command from the directory containing the JNLP file:
javaws -codebase file://`pwd` Calculator.jnlp
Of course, you don’t want to tell your users to launch the cache viewer whenever they want to run your application again. You can have the installer offer to install desktop and menu shortcuts. Add these lines to the JNLP file:
<shortcut>
<desktop/>
<menu submenu="Accessories"/>
</shortcut>
When the user first downloads the application, a “desktop integration warning” is displayed (see Figure 13.10).

You should also supply an icon for the menu shortcut and the launch screen. Oracle recommends that you supply a 32 × 32 and a 64 × 64 icon. Place the icon files on the web server, together with the JNLP and JAR files. Add these lines to the information section of the JNLP file:
<icon href="calc_icon32.png" width="32" height="32" />
<icon href="calc_icon64.png" width="64" height="64" />
Note that these icons are not related to the application icon. If you want the application to have an icon, you need to add a separate icon image into the JAR file and call the setIconImage method on the frame class. (See Listing 13.1 for an example.)
13.5.2 The JNLP API
As an advantage over applets, Java Web Start has an API for sandboxed applications that provides useful services. The JNLP API allows sandboxed applications to access local resources in a secure way. For example, there are services to load and save files. The application can’t look at the file system and it can’t specify file names. Instead, a file dialog is popped up, and the user selects the file. But before the file dialog is popped up, the user is alerted and must agree to proceed (see Figure 13.11). Furthermore, the API doesn’t actually give the program access to a File object. In particular, the application has no way of finding out the file location. Thus, programmers are given the tools to implement “file open” and “file save” actions, but as much system information as possible is hidden from untrusted applications.
The API provides the following services:
• Loading and saving files
• Accessing the clipboard
• Printing
• Downloading a file
• Displaying a document in the default browser
• Storing and retrieving persistent configuration information
• Ensuring that only a single instance of an application executes
To access a service, use the ServiceManager, like this:
FileSaveService service = (FileSaveService) ServiceManager.lookup("javax.jnlp.FileSaveService");
This call throws an UnavailableServiceException if the service is not available.
![]() Note
Note
You must include the file javaws.jar in the class path if you want to compile programs that use the JNLP API. That file is included in the jre/lib subdirectory of the JDK.
We now discuss the most useful JNLP services. To save a file, provide suggestions for the initial path name and file extensions for the file dialog, the data to be saved, and a suggested file name. For example:
service.saveFileDialog(".", new String[] { "txt" }, data, "calc.txt");
The data must be delivered in an InputStream. That can be somewhat tricky to arrange. The program in Listing 13.6 uses the following strategy:
1. It creates a ByteArrayOutputStream to hold the bytes to be saved.
2. It creates a PrintStream that sends its data to the ByteArrayOutputStream.
3. It prints the information to be saved to the PrintStream.
4. It creates a ByteArrayInputStream to read the saved bytes.
5. It passes that stream to the saveFileDialog method.
You will learn more about streams in Chapter 1 of Volume II. For now, you can just gloss over the details in the sample program.
To read data from a file, use the FileOpenService instead. Its openFileDialog receives suggestions for the initial path name and file extensions for the file dialog and returns a FileContents object. You can then call the getInputStream and getOutputStream methods to read and write the file data. If the user didn’t choose a file, the openFileDialog method returns null.
FileOpenService service = (FileOpenService) ServiceManager.lookup("javax.jnlp.FileOpenService");
FileContents contents = service.openFileDialog(".", new String[] { "txt" });
if (contents != null)
{
InputStream in = contents.getInputStream();
...
}
Note that your application does not know the name or location of the file. Conversely, if you want to open a specific file, use the ExtendedService:
ExtendedService service = (ExtendedService) ServiceManager.lookup("javax.jnlp.ExtendedService");
FileContents contents = service.openFile(new File("c:\autoexec.bat"));
if (contents != null)
{
OutputStream out = contents.getOutputStream();
...
}
The user of your program must agree to the file access (see Figure 13.12).

To display a document in the default browser, use the BasicService interface. Note that some systems may not have a default browser.
BasicService service = (BasicService) ServiceManager.lookup("javax.jnlp.BasicService");
if (service.isWebBrowserSupported())
service.showDocument(url);
else ...
A rudimentary PersistenceService lets an application store small amounts of configuration information and retrieve it when the application runs again. The mechanism is similar to HTTP cookies. The persistent store uses URLs as keys. The URLs don’t have to point to a real web resource. The service simply uses them as a convenient hierarchical naming scheme. For any given URL key, an application can store arbitrary binary data. (The store may restrict the size of the data block.)
For applications to be isolated from each other, each application can only use URL keys that start with its codebase (as specified in the JNLP file). For example, if an application is downloaded from http://myserver.com/apps, it can only use keys of the form http://myserver.com/apps/subkey1/subkey2/... Attempts to access other keys will fail.
An application can call the getCodeBase method of the BasicService to find its codebase.
Create a new key with the create method of the PersistenceService.
URL url = new URL(codeBase, "mykey");
service.create(url, maxSize);
To access the information associated with a particular key, call the get method. That method returns a FileContents object through which you can read and write the key data. For example:
FileContents contents = service.get(url);
InputStream in = contents.getInputStream();
OutputStream out = contents.getOutputStream(true); // true = overwrite
Unfortunately, there is no convenient way to find out whether a key already exists or whether you need to create it. You can hope that the key exists and call get. If the call throws a FileNotFoundException, you need to create the key.
![]() Note
Note
Both Java Web Start applications and applets can print, using the normal printing API. A security dialog pops up, asking the user for permission to access the printer. For more information on the printing API, turn to Chapter 7 of Volume II.
The program in Listing 13.6 is a simple enhancement of the calculator application. This calculator has a virtual paper tape that keeps track of all calculations. You can save and load the calculation history. To demonstrate the persistent store, the application lets you set the frame title. If you run the application again, it retrieves your title choice from the persistent store (see Figure 13.13).
Listing 13.6 webstart/CalculatorFrame.java
1 package webstart;
2
3 import java.io.BufferedReader;
4 import java.io.ByteArrayInputStream;
5 import java.io.ByteArrayOutputStream;
6 import java.io.FileNotFoundException;
7 import java.io.IOException;
8 import java.io.InputStream;
9 import java.io.InputStreamReader;
10 import java.io.OutputStream;
11 import java.io.PrintStream;
12 import java.net.MalformedURLException;
13 import java.net.URL;
14
15 import javax.jnlp.BasicService;
16 import javax.jnlp.FileContents;
17 import javax.jnlp.FileOpenService;
18 import javax.jnlp.FileSaveService;
19 import javax.jnlp.PersistenceService;
20 import javax.jnlp.ServiceManager;
21 import javax.jnlp.UnavailableServiceException;
22 import javax.swing.JFrame;
23 import javax.swing.JMenu;
24 import javax.swing.JMenuBar;
25 import javax.swing.JMenuItem;
26 import javax.swing.JOptionPane;
27
28 /**
29 * A frame with a calculator panel and a menu to load and save the calculator history.
30 */
31 public class CalculatorFrame extends JFrame
32 {
33 private CalculatorPanel panel;
34
35 public CalculatorFrame()
36 {
37 setTitle();
38 panel = new CalculatorPanel();
39 add(panel);
40
41 JMenu fileMenu = new JMenu("File");
42 JMenuBar menuBar = new JMenuBar();
43 menuBar.add(fileMenu);
44 setJMenuBar(menuBar);
45
46 JMenuItem openItem = fileMenu.add("Open");
47 openItem.addActionListener(event -> open());
48 JMenuItem saveItem = fileMenu.add("Save");
49 saveItem.addActionListener(event -> save());
50
51 pack();
52 }
53
54 /**
55 * Gets the title from the persistent store or asks the user for the title if there is no prior
56 * entry.
57 */
58 public void setTitle()
59 {
60 try
61 {
62 String title = null;
63
64 BasicService basic = (BasicService) ServiceManager.lookup("javax.jnlp.BasicService");
65 URL codeBase = basic.getCodeBase();
66
67 PersistenceService service = (PersistenceService) ServiceManager
68 .lookup("javax.jnlp.PersistenceService");
69 URL key = new URL(codeBase, "title");
70
71 try
72 {
73 FileContents contents = service.get(key);
74 InputStream in = contents.getInputStream();
75 BufferedReader reader = new BufferedReader(new InputStreamReader(in));
76 title = reader.readLine();
77 }
78 catch (FileNotFoundException e)
79 {
80 title = JOptionPane.showInputDialog("Please supply a frame title:");
81 if (title == null) return;
82
83 service.create(key, 100);
84 FileContents contents = service.get(key);
85 OutputStream out = contents.getOutputStream(true);
86 PrintStream printOut = new PrintStream(out);
87 printOut.print(title);
88 }
89 setTitle(title);
90 }
91 catch (UnavailableServiceException | IOException e)
92 {
93 JOptionPane.showMessageDialog(this, e);
94 }
95 }
96
97 /**
98 * Opens a history file and updates the display.
99 */
100 public void open()
101 {
102 try
103 {
104 FileOpenService service = (FileOpenService) ServiceManager
105 .lookup("javax.jnlp.FileOpenService");
106 FileContents contents = service.openFileDialog(".", new String[] { "txt" });
107
108 JOptionPane.showMessageDialog(this, contents.getName());
109 if (contents != null)
110 {
111 InputStream in = contents.getInputStream();
112 BufferedReader reader = new BufferedReader(new InputStreamReader(in));
113 String line;
114 while ((line = reader.readLine()) != null)
115 {
116 panel.append(line);
117 panel.append("
");
118 }
119 }
120 }
121 catch (UnavailableServiceException e)
122 {
123 JOptionPane.showMessageDialog(this, e);
124 }
125 catch (IOException e)
126 {
127 JOptionPane.showMessageDialog(this, e);
128 }
129 }
130
131 /**
132 * Saves the calculator history to a file.
133 */
134 public void save()
135 {
136 try
137 {
138 ByteArrayOutputStream out = new ByteArrayOutputStream();
139 PrintStream printOut = new PrintStream(out);
140 printOut.print(panel.getText());
141 InputStream data = new ByteArrayInputStream(out.toByteArray());
142 FileSaveService service = (FileSaveService) ServiceManager
143 .lookup("javax.jnlp.FileSaveService");
144 service.saveFileDialog(".", new String[] { "txt" }, data, "calc.txt");
145 }
146 catch (UnavailableServiceException e)
147 {
148 JOptionPane.showMessageDialog(this, e);
149 }
150 catch (IOException e)
151 {
152 JOptionPane.showMessageDialog(this, e);
153 }
154 }
155 }

This concludes our discussion of Java software deployment. In the final chapter of this volume, we will cover the important topic of concurrent programming.