
Chapter 7
Audio
Though sometimes overlooked, audio is an important part of games. Whether it’s to provide audio cues for gameplay situations or enhance the overall atmosphere, quality sound adds a lot to games.
Leveraging the powerful FMOD API, this chapter covers how to bootstrap an audio system that goes well beyond simply playing sound files. Covered topics include using sound events, adding positional 3D audio, mixing sounds, and adding effects.
Bootstrapping Audio
A rudimentary game audio system loads and plays back standalone sound files (such as WAV or OGG files) as needed. Although this approach is functional—and might be perfectly acceptable for a simple 2D game—it has limitations. In many cases, a single game action does not correspond to a single sound file. Suppose a game features a character that runs around. Every time the character’s foot hits the ground, a footstep sound should play. If there were only a single footstep sound file played repeatedly, it would quickly become repetitive.
At the very least, rather than having a single footstep sound file, you might want 10 different sound files for variety. Each time the player takes a step, the game might want to randomly pick one of these 10 footstep sound files. Or maybe the player can walk on different surfaces, and a footstep on grass sounds different than a footstep on concrete. In this case, the game needs a way to choose from the correct set of footstep sounds based on the surface the player is walking on.
Another consideration is that the game can only play a limited number of sounds simultaneously. You use sound channels to track the sounds that are playing, and there is some limit on the number of channels. Imagine a game where there are several enemies onscreen at any one time. If each enemy individually plays footstep sounds, it not only overwhelms the ear of the player but may also take up all available channels. Certain sounds, such as the player character attacking the enemy, are far more important than an enemy’s footstep. Different sounds might therefore need different priorities.
Now consider a 3D game with a fireplace. Imagine that as the player character moves through the game world, the fireplace sound plays at the same volume level from all speakers. It doesn’t matter if the player stands right next to the fireplace or is hundreds of feet away; the sound plays at the same level. Not only is this annoying, but it’s unrealistic. The game needs to account for the distance between the player and the fireplace and calculate a volume based on this distance.
So even though games need sound files to play audio, they also need additional information to play these sounds correctly. Ideally, the decision-making power of what sounds “correct” shouldn’t be the audio programmer’s. Much like how a 3D artist creates models in a specialized modeling program, ideally sound designers construct dynamic sounds using external tools designed for their skill sets.
FMOD
Designed by Firelight Technologies, FMOD (https://fmod.com) is a popular sound engine for video games. FMOD supports any realistic game platform, including Windows, Mac, Linux, iOS, Android, HTML5, and every modern console. The current version of FMOD has two distinct components: FMOD Studio, which is an external authoring tool for sound designers, and the FMOD API (application programming interface), which integrates into games that use FMOD.
The FMOD Studio tool grants a lot of power to sound designers and can implement many of the features discussed earlier. A sound event can correspond to one or more sound files, and these events can have parameters that dynamically drive the behavior of the sound events. FMOD Studio also allows designers to control how the different sounds mix together. For example, the designer can place music and sound effects on separate tracks and then adjust the volume of the tracks separately.
note
This chapter doesn’t cover how to use FMOD Studio, but there are excellent references available on the official FMOD website, among other places. For interested readers, the FMOD Studio project file used for the audio content in this chapter is in the GitHub repository, in the FMODStudio/Chapter07 directory.
The FMOD API has two parts. The FMOD Low Level API is the foundation for FMOD. It contains functionality to load and play sounds, manage channels, update sounds in a 3D environment, add digital effects to sound, and more. It’s possible to use the Low Level API by itself, but then any events created in FMOD Studio are not usable. Supporting FMOD Studio requires the FMOD Studio API, which builds on the Low Level API. However, using the FMOD Studio API does not preclude an audio programmer from accessing the Low Level API if needed. For the most part, this chapter uses the FMOD Studio API.
Installing FMOD
Because of FMOD’s licensing terms, the book’s source code on GitHub does not include the FMOD library and header files. Luckily, FMOD is free to download and has very favorable licensing terms for commercial projects. (See the FMOD site for details.) To download the FMOD library, go to the FMOD site (https://fmod.com) and create an account.
Once you have an account on the FMOD website, click the Download link. From here, find the downloads for the FMOD Studio API. Make sure you select the version 1.09.09 from the Version dropdown. (Version 1.10.x or newer may not work with this chapter’s code.) Next, select Windows if you’re developing on Windows or Mac if you’re developing on Mac.
On Windows, run the installer and choose the default installation directories. Choosing a different directory doesn’t work out of the box because the Visual Studio project file points directly to the default directories. However, if you really want to install the FMOD API to another directory, you can change the project file (which means changing the include directories, the library directories, and the post-build step that copies DLL files to the executable directory).
On Mac, the FMOD API download is a DMG package file. Open this package file and copy all its contents into the External/FMOD directory in your copy of the book’s source code. You should end up with an External/FMOD/FMOD Programmers API directory after copying.
To make sure the installation worked properly, try opening the Chapter07/Chapter07-Windows.sln file on a PC or Chapter07-mac.xcodeproj on a Mac and make sure you can compile and run the code.
note
With the exception of Chapter 8, “Input Systems,” every chapter after this one also uses the audio code from this chapter. Therefore, it’s important to ensure that you install FMOD properly, or none of the subsequent chapters’ projects will run.
Creating an Audio System
Much as the Renderer class is separate from the Game, it’s sensible to create a new AudioSystem class that handles audio. This helps ensure that the FMOD API calls aren’t all over the codebase.
Listing 7.1 shows the initial declaration of AudioSystem. The declarations of the Initialize, Shutdown, and Update functions are standard at this point. The member variables include pointers to the FMOD Studio system as well as the Low Level API system. You’ll mostly use the mSystem pointer, but this listing includes a mLowLevelSystem pointer as well.
Listing 7.1 Initial AudioSystem Declaration
class AudioSystem
{
public:
AudioSystem(class Game* game);
~AudioSystem();
bool Initialize();
void Shutdown();
void Update(float deltaTime);
private:
class Game* mGame;
// FMOD studio system
FMOD::Studio::System* mSystem;
// FMOD Low-level system (in case needed)
FMOD::System* mLowLevelSystem;
};
The header fmod_studio.hpp defines the FMOD Studio API types. However, to avoid this include, AudioSystem.h instead creates forward declarations of the FMOD types. This way, you only need to include the FMOD header in AudioSystem.cpp.
Initializing FMOD, which is handled in AudioSystem::Initialize, involves several steps. First, call Debug_Initialize to set up error logging:
FMOD::Debug_Initialize(
FMOD_DEBUG_LEVEL_ERROR, // Log only errors
FMOD_DEBUG_MODE_TTY // Output to stdout
);
The first parameter to Debug_Initialize controls the verbosity of the logging messages. (The default is quite verbose.) The second parameter specifies where to write log messages. In this case, log messages write to stdout. For games that have custom debug code, it’s also possible to declare a custom callback function for all FMOD log messages.
note
Initializing debug logging is relevant only if you’re using the logging build of FMOD, as is the case in this chapter. Enabling error logging is extremely useful during development, but a shipped version of a game shouldn’t include logging.
Next, construct an instance of an FMOD Studio system with this code:
FMOD_RESULT result;
result = FMOD::Studio::System::create(&mSystem);
if (result != FMOD_OK)
{
SDL_Log("Failed to create FMOD system: %s",
FMOD_ErrorString(result));
return false;
}
Note that the function call returns an FMOD_RESULT. An FMOD function always returns a result value to let the caller know if everything went okay. The FMOD_ErrorString function converts the error code into a human-readable message. In this case, if the system fails to create, AudioSystem::Initialize returns false.
After constructing the system, the next step is to call initialize on the FMOD system:
result = mSystem->initialize(
512, // Max number of concurrent sounds
FMOD_STUDIO_INIT_NORMAL, // Use default settings
FMOD_INIT_NORMAL, // Use default settings
nullptr // Usually null
);
// Validate result == FMOD_OK...
The first parameter here specifies the maximum number of channels. The next two parameters can adjust the behavior of both the FMOD Studio and FMOD Low Level APIs. For now, stick to the default parameters. You use the last parameter if you want to use extra driver data, but because you usually don’t, this parameter usually is nullptr.
note
FMOD uses a naming convention in which member functions begin with a lowercase letter. This is different from this book’s naming convention, which uses an uppercase letter for the first letter of a member function.
Finally, you grab and save the Low Level system pointer to complete initialization:
mSystem ->getLowLevelSystem(&mLowLevelSystem);
For now, AudioSystem’s Shutdown and Update functions each make a single function call. Shutdown calls mSystem ->release(), while Update calls mSystem ->update(). FMOD requires calling the update function once per frame. This function performs actions such as updating 3D audio calculations.
As with Renderer, you then add an AudioSystem pointer as a member variable to Game:
class AudioSystem* mAudioSystem;
Game::Initialize then creates and calls mAudioSystem ->Initialize(), UpdateGame calls mAudioSystem ->Update(deltTime), and Shutdown calls mAudioSystem ->Shutdown.
For convenience, a Game::GetAudioSystem function returns the AudioSystem pointer.
With these functions, FMOD now initializes and updates. Of course, no sounds are playing yet.
Banks and Events
In FMOD Studio, events correspond to sounds played in the game. An event can have multiple associated sound files, parameters, information about the event’s timing, and so on. Rather than play back sound files directly, the game plays these events.
A bank is a container for events, sample data, and streaming data. Sample data is the raw audio data that events reference. This data comes from the sound files that the sound designer imports into FMOD Studio (such as WAV or OGG files). At runtime, sample data is either preloaded or loaded on demand. However, an event cannot play until its associated sample data is in memory. Most in-game sound effects use sample data. Streaming data is sample data that streams into memory in small pieces at a time. Events using streaming data can start playing without preloading the data. Music and dialogue files typically use streaming data.
A sound designer creates one or more banks in FMOD Studio. Then the game runtime needs to load in these banks. After it loads the banks, the events contained within are accessible.
There are two different classes associated with events in FMOD. EventDescription contains information about an event, such as its associated sample data, volume settings, parameters, and so on. EventInstance is an active instance of an event, and it is what plays the event. In other words, EventDescription is like a type of event, while EventInstance is an instance of that type. For example, if there’s an explosion event, it will globally have one EventDescription, but it can have any number of EventInstances based on the number of active explosion instances.
To track loaded banks and events, you add two maps to the private data in AudioSystem:
// Map of loaded banks
std::unordered_map<std::string, FMOD::Studio::Bank*> mBanks;
// Map of event name to EventDescription
std::unordered_map<std::string, FMOD::Studio::EventDescription*> mEvents;
Both maps have strings for their keys. The string in mBanks is the filename of the bank, while the string in mEvents is the name assigned by FMOD for the event. FMOD events have names in the form of a path—for example, event:/Explosion2D.
Loading/Unloading Banks
Loading a bank minimally requires calling the loadBank function on the mSystem object. However, this does not load the sample data and does not give easy access to the event descriptions. It makes sense to create a new function in AudioSystem called LoadBank, as shown in Listing 7.2, that does a bit more than the minimum loadBank call. Once the bank loads, you add the bank to the mBanks map. You then load the sample data for the bank. Then use getEventCount and getEventList to get the list of all event descriptions in the bank. Finally, you add each of these event descriptions to the mEvents map so they are easily accessible.
Listing 7.2 AudioSystem::LoadBank Implementation
void AudioSystem::LoadBank(const std::string& name)
{
// Prevent double-loading
if (mBanks.find(name) != mBanks.end())
{
return;
}
// Try to load bank
FMOD::Studio::Bank* bank = nullptr;
FMOD_RESULT result = mSystem ->loadBankFile(
name.c_str(), // File name of bank
FMOD_STUDIO_LOAD_BANK_NORMAL, // Normal loading
&bank // Save pointer to bank
);
const int maxPathLength = 512;
if (result == FMOD_OK)
{
// Add bank to map
mBanks.emplace(name, bank);
// Load all non-streaming sample data
bank ->loadSampleData();
// Get the number of events in this bank
int numEvents = 0;
bank ->getEventCount(&numEvents);
if (numEvents > 0)
{
// Get list of event descriptions in this bank
std::vector<FMOD::Studio::EventDescription*> events(numEvents);
bank ->getEventList(events.data(), numEvents, &numEvents);
char eventName[maxPathLength];
for (int i = 0; i < numEvents; i++)
{
FMOD::Studio::EventDescription* e = events[i];
// Get the path of this event (like event:/Explosion2D)
e ->getPath(eventName, maxPathLength, nullptr);
// Add to event map
mEvents.emplace(eventName, e);
}
}
}
}
Similarly, you create an AudioSystem::UnloadBank function. This function first removes all the bank’s events from the mEvents banks, unloads the sample data, unloads the bank, and removes the bank from the mBanks map.
For easy cleanup, you also create an AudioSystem::UnloadAllBanks function. This function just unloads all banks and clears out mEvents and mBanks.
Every FMOD Studio project has two default bank files named "Master Bank.bank" and "Master Bank.strings.bank". The FMOD Studio runtime does not have access to any other banks or events unless it loads in the two master banks first. Because the master banks always exist, you load them in AudioSystem::Initialize with the following code:
// Load the master banks (strings first)
LoadBank("Assets/Master Bank.strings.bank");
LoadBank("Assets/Master Bank.bank");
Note how the code loads the master strings bank first. The master strings bank is a special bank that contains the human-readable names of all events and other data in the FMOD Studio project. If you don’t load this bank, the names are inaccessible in code. Without the names, the code needs to use GUIDs (globally unique IDs) to access all the FMOD Studio data. This means that, technically, loading the master strings bank is optional, but loading the strings makes the AudioSystem easier to implement.
Creating and Playing Event Instances
Given an FMOD EventDescription, the createInstance member function creates an FMOD EventInstance for that event. Once you have an EventInstance, the start function begins playing it. So, a first pass of a PlayEvent function in AudioSystem might look like this:
void AudioSystem::PlayEvent(const std::string& name)
{
// Make sure event exists
auto iter = mEvents.find(name);
if (iter != mEvents.end())
{
// Create instance of event
FMOD::Studio::EventInstance* event = nullptr;
iter ->second ->createInstance(&event);
if (event)
{
// Start the event instance
event ->start();
// Release schedules destruction of the event
// instance when it stops.
// (Non-looping events automatically stop.)
event ->release();
}
}
}
Although this version of PlayEvent is simple to use, it does not expose much FMOD functionality. For example, if the event is a looping event, there’s no way to stop the event. There’s also no way to set any event parameters, change the volume of the event, and so on.
It might be tempting to return the EventInstance pointer directly from PlayEvent. Then, the caller can access all the FMOD member functions. However, this is not ideal because it exposes FMOD API calls outside the audio system. This means that any programmer who wants to simply play and stop sounds would need some knowledge of the FMOD API.
Exposing the raw pointer also might be dangerous because of the way FMOD cleans up memory for event instances. After calling the release function, FMOD destroys the event sometime after the event stops. If a caller has access to the EventInstance pointer, dereferencing it after destruction might cause a memory access violation. Skipping the release call is also not a great idea because then the system will leak memory over time. Therefore, you need a more robust solution.
The SoundEvent Class
Rather than directly return an EventInstance pointer from PlayEvent, you can track each active event instance via an integer ID. Next, you can create a new class called SoundEvent that allows manipulation of the active events, using the integer IDs to reference events. PlayEvent then returns an instance of SoundEvent.
To track event instances, AudioSystem needs a new map of unsigned integers to event instances:
std::unordered_map<unsigned int,
FMOD::Studio::EventInstance*> mEventInstances;
You also add a static sNextID variable that’s initialized to 0. Each time PlayEvent creates an event instance, it increments sNextID and adds the event instance to the map with that new ID. Then PlayEvent returns a SoundEvent with the associated ID, as in Listing 7.3. (The declaration of SoundEvent is forthcoming.)
Listing 7.3 AudioSystem::PlayEvent Implementation with Event IDs
SoundEvent AudioSystem::PlayEvent(const std::string& name)
{
unsigned int retID = 0;
auto iter = mEvents.find(name);
if (iter != mEvents.end())
{
// Create instance of event
FMOD::Studio::EventInstance* event = nullptr;
iter->second->createInstance(&event);
if (event)
{
// Start the event instance
event->start();
// Get the next id, and add to map
sNextID++;
retID = sNextID;
mEventInstances.emplace(retID, event);
}
}
return SoundEvent(this, retID);
}
Because sNextID is an unsigned int, IDs start repeating after more than 4 billion calls to PlayEvent. This should not be an issue, but it’s something to keep in mind.
Note that PlayEvent no longer calls release on the event instance. Instead, AudioSystem::Update now handles cleaning up event instances that are no longer needed. Every frame, Update checks the playback state of each event instance in the map by using getPlayBackState. It releases any event instances in the stopped state and then removes them from the map. This assumes that stopping an event means freeing it is okay. A caller who wants to keep an event around can pause it instead of stopping it. Listing 7.4 shows the implementation of Update.
Listing 7.4 AudioSystem::Update Implementation with Event IDs
void AudioSystem::Update(float deltaTime)
{
// Find any stopped event instances
std::vector<unsigned int> done;
for (auto& iter : mEventInstances)
{
FMOD::Studio::EventInstance* e = iter.second;
// Get the state of this event
FMOD_STUDIO_PLAYBACK_STATE state;
e->getPlaybackState(&state);
if (state == FMOD_STUDIO_PLAYBACK_STOPPED)
{
// Release the event and add id to done
e->release();
done.emplace_back(iter.first);
}
}
// Remove done event instances from map
for (auto id : done)
{
mEventInstances.erase(id);
}
// Update FMOD
mSystem->update();
}
Next, you add a GetEventInstance helper function to AudioSystem that takes in an ID. If the ID exists in the map, this function returns the corresponding EventInstance pointer. Otherwise, GetEventInstance returns nullptr. To prevent every class from accessing event instances, GetEventInstance is in the protected section of AudioSystem. But because SoundEvent needs access to this function, SoundEvent is declared as a friend of AudioSystem.
Listing 7.5 gives the declaration of SoundEvent. Most notably, its member data includes a pointer to the AudioSystem and the ID. Note that while the default constructor is public, the constructor with parameters is protected. Because AudioSystem is a friend of SoundEvent, only AudioSystem has access to this constructor. This ensures that only AudioSystem can assign IDs to SoundEvents. The rest of the functions in SoundEvent are wrappers for various event instance functionality, such as pausing sound events, changing their volume, and setting event parameters.
Listing 7.5 SoundEvent Declaration
class SoundEvent
{
public:
SoundEvent();
// Returns true if associated FMOD event instance exists
bool IsValid();
// Restart event from beginning
void Restart();
// Stop this event
void Stop(bool allowFadeOut = true);
// Setters
void SetPaused(bool pause);
void SetVolume(float value);
void SetPitch(float value);
void SetParameter(const std::string& name, float value);
// Getters
bool GetPaused() const;
float GetVolume() const;
float GetPitch() const;
float GetParameter(const std::string& name);
protected:
// Make this constructor protected and AudioSystem a friend
// so that only AudioSystem can access this constructor.
friend class AudioSystem;
SoundEvent(class AudioSystem* system, unsigned int id);
private:
class AudioSystem* mSystem;
unsigned int mID;
};
The implementations for most of the SoundEvent member functions have very similar syntax. They call GetEventInstance to get an EventInstance pointer and then call some function on the EventInstance. For example, the implementation of SoundEvent::SetPaused is as follows:
void SoundEvent::SetPaused(bool pause)
{
auto event = mSystem ?
mSystem->GetEventInstance(mID) : nullptr;
if (event)
{
event->setPaused(pause);
}
}
Note how the code validates that both the mSystem and event pointer are non-null. This ensures that even if the ID is not in the map, the function will not crash. Similarly, the SoundEvent::IsValid function returns true only if mSystem is non-null and the ID is in the event instance map in AudioSystem.
With this code hooked up, it’s now possible to control events after they start playing. For example, the following starts playing an event called Music and saves the SoundEvent in mMusicEvent:
mMusicEvent = mAudioSystem ->PlayEvent("event:/Music");
Elsewhere, you can toggle the pause state of the music event with this:
mMusicEvent.SetPaused(!mMusicEvent.GetPaused());
With the addition of SoundEvent, you now have a reasonable integration of FMOD for 2D audio.
3D Positional Audio
For 3D games, most sound effects are positional. This means that an object in the world, such as a fireplace, emits a sound. The game has a listener, or a virtual microphone, that picks up this sound. For example, if the listener faces the fireplace, it should sound like the fireplace is in front. Similarly, if the listener has his or her back to the fireplace, the fireplace should sound like it’s behind.
Positional audio also means that as the listener gets farther away from a sound, the volume of the sound decreases, or attenuates. A falloff function describes how the volume of the sound attenuates as the listener gets farther away. In FMOD Studio, 3D sound events can have user-configurable falloff functions.
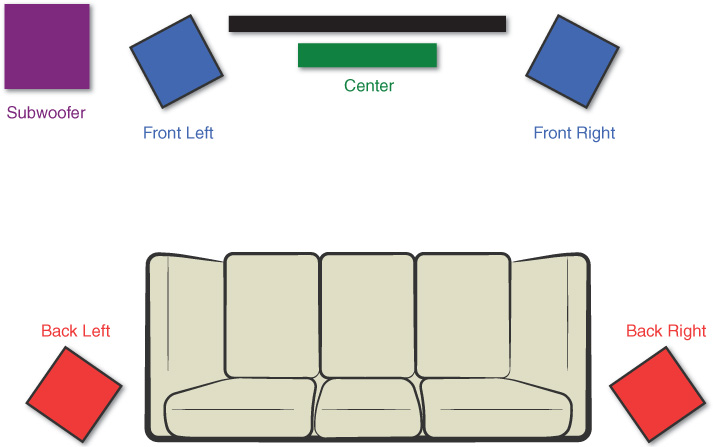
The effect of positional audio is most apparent in a surround sound configuration where there are more than two speakers as output devices. For example, the common 5.1 configuration (see Figure 7.1) features front-left, front-center, front-right, back-left, and back-right speakers as well as a subwoofer (or LFE) for low frequency sounds. For the example of the in-game fireplace, if the player faces the fireplace on screen, he or she expects the sound to come out of the front speakers.
Luckily, FMOD has built-in support for positional audio. To integrate this into a game, you must provide position and orientation data for both the listener and any active 3D event instances. There are three parts to this: setting up the listener, adding positional functionality to SoundEvent, and creating an AudioComponent to associate actors with sound events.
Setting Up a Basic Listener
A common approach is to use the camera as the listener. In this case, the position of the listener is the position of the camera in the world, and the orientation of the listener is the orientation of the camera. This approach works great for games with a first-person camera, such as this chapter’s game project. However, third-person cameras have additional issues to consider, as discussed later in this section.
A trap to watch out for when using any 3D positional audio library (not just FMOD) is that the library may use a different coordinate system than the game. For example, FMOD uses a left-handed coordinate system with +z forward, +x right, and +y up. However, our game uses a left-handed coordinate system with +x forward, +y right, +z up. So, when passing position and directions from the game to FMOD, you must convert the coordinates. This just involves switching around some components when converting between a Vector3 and FMOD’s vector type, FMOD_VECTOR. To help with this, declare a VecToFMOD helper function:
FMOD_VECTOR VecToFMOD(const Vector3& in)
{
// Convert from our coordinates (+x forward, +y right, +z up)
// to FMOD (+z forward, +x right, +y up)
FMOD_VECTOR v;
v.x = in.y;
v.y = in.z;
v.z = in.x;
return v;
}
Next, you add a function called SetListener to AudioSystem. This function, as shown in Listing 7.6, takes in the view matrix and sets the listener’s position, forward, and up vectors from the view. This means the same code that sets the renderer’s view matrix can also call SetListener. This process involves a little bit of math. Recall that the view matrix transforms from world space to view space. However, the listener requires a world space position and orientation.
Extracting this information from the view matrix requires several steps. First, you invert the view matrix. Given this inverted view matrix, the first three components of the fourth row (returned by GetTranslation) correspond to the world space position of the camera. The first three components of the third row (returned by GetZAxis) correspond to the forward vector, and the first three components of the second row (returned by GetYAxis) correspond to the up vector. You use VecToFMOD on all three of these vectors to convert them to the FMOD coordinate system.
Listing 7.6 AudioSystem::SetListener Implementation
void AudioSystem::SetListener(const Matrix4& viewMatrix)
{
// Invert the view matrix to get the correct vectors
Matrix4 invView = viewMatrix;
invView.Invert();
FMOD_3D_ATTRIBUTES listener;
// Set position, forward, up
listener.position = VecToFMOD(invView.GetTranslation());
// In the inverted view, third row is forward
listener.forward = VecToFMOD(invView.GetZAxis());
// In the inverted view, second row is up
listener.up = VecToFMOD(invView.GetYAxis());
// Set velocity to zero (fix if using Doppler effect)
listener.velocity = {0.0f, 0.0f, 0.0f};
// Send to FMOD (0 = only one listener)
mSystem->setListenerAttributes(0, &listener);
}
Note that SetListener currently sets the velocity parameter of FMOD_3D_ATTRIBUTES to all zeros. The velocity parameter matters only when enabling the Doppler effect on sound events, as discussed later in this section.
Adding Positional Functionality to SoundEvent
Each EventInstance has 3D attributes that describe its world position and orientation. It makes sense to integrate this into the existing SoundEvent class with two new functions, Is3D and Set3DAttributes, both in Listing 7.7.
When you create a sound event in FMOD Studio, the event can be 2D or 3D. The Is3D function returns true if the event is 3D, and it returns false otherwise.
The Set3DAttributes function takes in a world transform matrix and converts it into FMOD’s 3D attributes. This makes it simple to pass in the world transform matrix of an Actor to update the position and orientation of the event. Note that this function does not need to invert the matrix because the matrix is already in world space. However, it’s still necessary to convert between the game and FMOD coordinate systems.
Listing 7.7 SoundEvent’s Is3D and Set3DAttributes Implementation
bool SoundEvent::Is3D() const
{
bool retVal = false;
auto event = mSystem ? mSystem->GetEventInstance(mID) : nullptr;
if (event)
{
// Get the event description
FMOD::Studio::EventDescription* ed = nullptr;
event->getDescription(&ed);
if (ed)
{
ed->is3D(&retVal); // Is this 3D?
}
}
return retVal;
}
void SoundEvent::Set3DAttributes(const Matrix4& worldTrans)
{
auto event = mSystem ? mSystem->GetEventInstance(mID) : nullptr;
if (event)
{
FMOD_3D_ATTRIBUTES attr;
// Set position, forward, up
attr.position = VecToFMOD(worldTrans.GetTranslation());
// In world transform, first row is forward
attr.forward = VecToFMOD(worldTrans.GetXAxis());
// Third row is up
attr.up = VecToFMOD(worldTrans.GetZAxis());
// Set velocity to zero (fix if using Doppler effect)
attr.velocity = { 0.0f, 0.0f, 0.0f };
event->set3DAttributes(&attr);
}
}
Creating an AudioComponent to Associate Actors with Sound Events
The premise behind an AudioComponent class is to associate sound events with specific actors. This way, when the actor moves, AudioComponent can update the associated event’s 3D attributes. Furthermore, if an actor dies, any sound events associated with the actor can stop.
Listing 7.8 gives the declaration of AudioComponent. Note that it has two different std::vector collections: one for 2D events and one for 3D events. The only member functions not inherited from Component are PlayEvent and StopAllEvents.
Listing 7.8 AudioComponent Declaration
class AudioComponent : public Component
AudioComponent(class Actor* owner, int updateOrder = 200);
~AudioComponent();
void Update(float deltaTime) override;
void OnUpdateWorldTransform() override;
SoundEvent PlayEvent(const std::string& name);
void StopAllEvents();
private:
std::vector<SoundEvent> mEvents2D;
std::vector<SoundEvent> mEvents3D;
};
The AudioComponent::PlayEvent function first calls PlayEvent on the AudioSystem. You then check whether the event is 3D to determine which of the two vectors should store the SoundEvent. Finally, if the event is 3D, call Set3DAttributes on it:
SoundEvent AudioComponent::PlayEvent(const std::string& name)
{
SoundEvent e = mOwner->GetGame()->GetAudioSystem()->PlayEvent(name);
// Is this 2D or 3D?
if (e.Is3D())
{
mEvents3D.emplace_back(e);
// Set initial 3D attributes
e.Set3DAttributes(mOwner->GetWorldTransform());
}
else
{
mEvents2D.emplace_back(e);
}
return e;
}
The AudioComponent::Update function (omitted here) removes any of the events in mEvents2D or mEvents3D that are no longer valid. (IsValid returns false.)
Next, you add an override of OnUpdateWorldTransform. Recall that every time the owning actor computes its world transform matrix, it notifies each component by calling this function. For the AudioComponent, it needs to update the 3D attributes of any 3D events in mEvents3D every time the world transform changes:
void AudioComponent::OnUpdateWorldTransform()
{
Matrix4 world = mOwner->GetWorldTransform();
for (auto& event : mEvents3D)
{
if (event.IsValid())
{
event.Set3DAttributes(world);
}
}
}
Finally, AudioComponent::StopAllEvents (also omitted here) simply calls stop on every event in both vectors and clears out the vectors. The destructor of AudioComponent calls this function, but there may be other situations in which a game wants to just stop the sound events for an actor.
With these additions, you can attach an AudioComponent to an actor and play sound events on the audio component. The AudioComponent then automatically updates the 3D attributes of the associated events as needed.
The Listener in a Third-Person Game
The listener directly using the camera position and orientation works great for first-person games where the camera is from the perspective of the player’s character. However, things are not quite as simple for a third-person game where the camera follows the player character. Figure 7.2 illustrates the side view of a third-person game. The player character is at position P, and the camera is at position C. Position A represents a sound effect right next to the player character. Position B is a sound effect close to the camera.
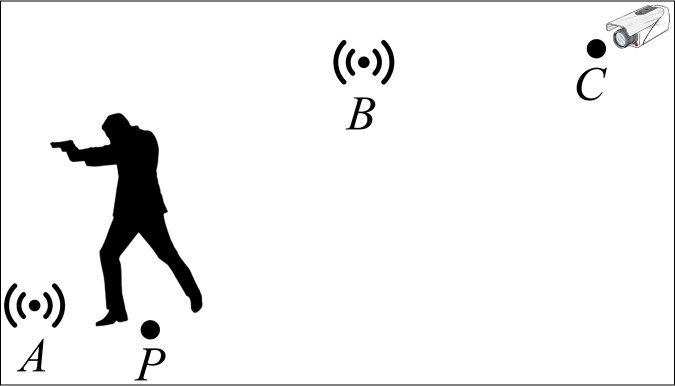
Now suppose the listener uses the camera position and orientation, as in the preceding code. In this case, both sounds A and B will sound like they’re in front. This is good because both sound effects are visible onscreen, so you as the player should perceive the sounds in front. However, sound B will sound closer than sound A. This seems weird because you expect sounds right next to the player to be louder. And even if there were no sound B, any sounds right next to (or even on) the player will always have some attenuation applied to them, which may be frustrating for the sound designer.
If instead the listener uses the player position and orientation, then sound A will be louder than sound B. However, sound B then sounds like it’s behind because it’s positioned behind the player. This is very weird because the sound is onscreen, so you expect it to sound like it’s in front.
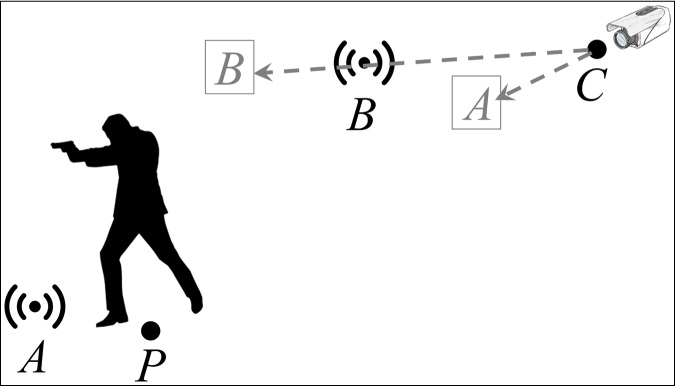
What you effectively want is an attenuation based on the player position but an orientation based on the camera. Guy Somberg describes a great solution to this problem (his book is listed in the “Additional Reading” section at the end of the chapter), which involves just a little bit of vector math. Given the player at position P, the camera at position C, and a sound at position S, first compute two vectors—one vector from camera to sound and the other vector from player to sound:
![]()
The length of the PlayerToSound vector is the desired distance for attenuation. The normalized CameraToSound vector is the correct heading. Scalar multiplying the normalized CameraToSound vector by the length of PlayerToSound yields a virtual position for the sound:
This virtual position, illustrated in Figure 7.3, yields both the correct attenuation and the correct orientation of the sound. The listener itself then directly uses the camera, as before.
Note that this approach may be untenable if true world positions of sounds are necessary for other calculations (such as for occlusion, discussed later in this chapter).
The Doppler Effect
Imagine standing on a street corner. While the police car is approaching, the pitch of the siren sound is increased. Conversely, after the police car passes, the pitch of the sound decreases. This is the Doppler effect in action, and it is illustrated in Figure 7.4.
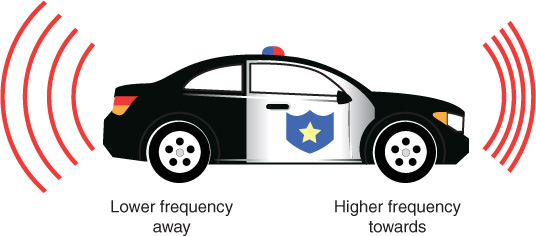
The Doppler effect (or Doppler shift) occurs because sound waves take time to travel through the air. As the police car gets closer, each sound wave starts closer, which means the waves arrive closer together. This causes a perceived increase in frequency, leading to the heightened pitch. The true pitch of the sound is audible when the car is right next to the listener. Finally, as the car travels off, the opposite effect occurs: The sound waves arrive farther apart, yielding a lower pitch. The Doppler effect applies to all types of waves, but sound waves are the most easily observable.
In a game, the Doppler effect can create more realistic sounds for objects such as vehicles. FMOD can automatically calculate Doppler pitch shifts; it just requires passing in the correct velocities both in setListenerAttributes and set3DAttributes. This means the game likely needs a more correct physics-based movement approach with forces, as briefly discussed in Chapter 3, “Vectors and Basic Physics.”
There also are some additional Doppler parameters accessible through the Low Level API. The set3DSettings function sets these parameters:
mLowLevelSystem->set3DSettings(
1.0f, // Doppler scale, 1 = normal, higher exaggerates effect
50.0f, // How many game units = 1 meter (our game is ~50)
1.0f // (Not for Doppler, leave at 1)
);
Mixing and Effects
One of the advantages of digitized sounds is that manipulation during playback is easy. You’ve already manipulated sounds as they play to account for the sound’s position relative to the listener. The term digital signal processing (DSP) refers to computational manipulation of a signal. For audio, adjusting the volume or pitch of the signal is a type of DSP.
Two other common DSP effects in games are reverb and equalization. Reverb simulates sound bouncing in an enclosed area. For example, sound effects while inside a cave have an echo because of waves bouncing off the walls. Equalization, on the other hand, tries to normalize the volume levels of sounds into a set range.
FMOD Studio allows configuration of chains of DSP effects. In other words, a sound can pass through multiple stages that modify the signal prior to output. Although each sound event can have its own DSP chain, a more common approach is to group sounds into types. Then, different groups can have different effects applied to them.
Buses
In FMOD Studio, a bus is a grouping of sounds. For example, you might have a bus for sound effects, a bus for music, and a bus for dialogue. Each bus can individually have different DSP effects attached to it, and at runtime you can adjust buses. For instance, many games offer separate volume sliders for different categories of sound. This is straightforward to implement with buses.
By default, every project has a master bus, specified by the root path bus:/. However, a sound designer can add any number of additional buses. So, much as with loading in event descriptions on bank load, you can load in buses at the same time. First, you add a map of buses to AudioSystem:
std::unordered_map<std::string, FMOD::Studio::Bus*> mBuses;
Then, when loading in a bank, call getBusCount and getBusList on the bank to get the list of buses to add to mBuses. (This is very similar to the code for event descriptions, so this chapter omits that code.)
Next, add functions to AudioSystem to control the buses:
float GetBusVolume(const std::string& name) const;
bool GetBusPaused(const std::string& name) const;
void SetBusVolume(const std::string& name, float volume);
void SetBusPaused(const std::string& name, bool pause);
The implementations of these functions are similar—and aren’t surprising. For example, SetVolume is as follows:
void AudioSystem::SetBusVolume(const std::string& name, float volume)
{
auto iter = mBuses.find(name);
if (iter != mBuses.end())
{
iter->second->setVolume(volume);
}
}
In this chapter’s game project, there are three buses in all: master, SFX, and music. The sound effects, including footsteps, the fire loop, and the explosion sound, go through the SFX bus, while the background music goes through the music bus.
Snapshots
In FMOD, snapshots are special types of events that control buses. Because they’re just events, they use the same event interface that already exists, and the existing PlayEvent function works with them. The only difference is that their paths begin with snapshot:/ instead of event:/.
Note that the game project in this chapter uses a snapshot to enable reverb on the SFX bus. Use the R key to enable or disable reverb.
Occlusion
Imagine living in a small apartment when there’s a party next door. The music at the party is very loud and travels through your wall. You’ve heard the song before, but it sounds different when listening through the wall. The bass is more dominant, and it’s tough to hear the high-frequency parts. This is sound occlusion, as illustrated in Figure 7.5(a).
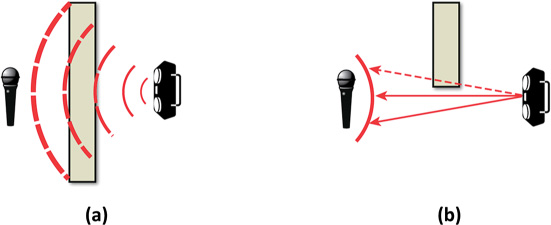
Sound occlusion occurs when a sound does not have a direct path from emitter to listener. Instead, the sound must travel through some material to reach the listener. The predominant result of sound occlusion is a low-pass filter, which means a reduction in volume of higher-frequency sounds.
Implementing occlusion involves two separate tasks: detection of occlusion and modification of occluded sounds. One approach for detection is to draw line segments between the emitter and an arc around the listener, as in Figure 7.5(b). If all line segments can reach the listener without hitting any objects, there is no occlusion. If only some line segments reach, there’s partial occlusion, and if none reach, there’s full occlusion. This style of detection requires the collision calculations covered in Chapter 10, “Collision Detection.”
Modifying occluded sounds in FMOD is simple. However, it requires calls into the Low Level API. First, when initializing FMOD, you enable software low-pass filtering:
result = mSystem->initialize(
512, // Max number of concurrent sounds
FMOD_STUDIO_INIT_NORMAL, // Use default settings
FMOD_INIT_CHANNEL_LOWPASS, // Initialize low-pass filter
nullptr // Usually null
);
Next, each event instance affected by occlusion needs to set occlusion parameters. For example, the following code enables occlusion for event:
// Flush commands to ensure channel group is available
mSystem->flushCommands();
// Get channel group from event
FMOD::ChannelGroup* cg = nullptr;
event->getChannelGroup(&cg);
// Set occlusion factor - occFactor ranges
// from 0.0 (no occlusion) to 1.0 (full occlusion)
cg->set3DOcclusion(occFactor, occFactor);
Game Project
This chapter’s game project demonstrates most of the audio features covered in this chapter. The code is available in the book’s GitHub repository, in the Chapter07 directory. Open Chapter07-windows.sln on Windows and Chapter07-mac.xcodeproj on Mac. The FMOD Studio project corresponding to this chapter’s content is in FMODStudio/Chapter07.
A music track plays in the background. As the player walks around, a footstep event triggers. The sphere emits a positional fire loop sound.
As before, use WASD to move around. The following keys provide additional behavior:
E—Play the explosion (2D) soundM—Pause/unpause the music eventR—Enable/disable reverb on the SFX bus (via a snapshot)1—Set footstep parameter to default2—Set footstep parameter to grass−—Reduce master bus volume+—Increase master bus volume
All the corresponding function calls for these behaviors are in Game::HandleKeyPress.
The sound files used in this chapter come from https://opengameart.org and http://freesound.org, both great websites for finding quality sounds for games.
Summary
Most games require audio systems that go beyond simply playing sound files. Using the FMOD API, this chapter shows how to implement a production-quality sound system into the game. The audio system loads in banks and plays back events. The SoundEvent class tracks outstanding event instances and allows manipulation of these instances.
Positional audio simulates sounds in a 3D environment. By setting the properties of the listener and every 3D event instance, the audio behaves as it would in a real 3D environment. While a first-person game can directly use the camera orientation and position for the listener, a third-person game is more complex. For fast-moving objects, the Doppler effect shifts the pitch of the sound as it approaches or leaves.
Mixing adds more control to the sound environment. Buses group different sounds into independently controllable categories. Snapshots can also dynamically change the buses at runtime, such as enabling DSP effects like reverb. Finally, occlusion simulates sounds traveling through surfaces.
Additional Reading
Until recently, it was difficult to find references for aspiring game audio programmers. However, Guy Somberg’s excellent book has articles from many experienced developers. This book provides the most complete coverage of game audio currently available.
Somberg, Guy, Ed. Game Audio Programming: Principles and Practices. Boca Raton: CRC Press, 2016.
Exercises
This chapter’s exercises build on the audio features implemented in the chapter. In the first exercise you add support for the Doppler effect, while in the second exercise you implement virtual positions for a third-person listener.
Exercise 7.1
Adjust the listener and event instance attribute code so that it correctly sets the velocity parameters. Then make the sphere actor (created in Game::LoadData) move quickly back and forth to test the Doppler effect. Use set3DSettings to adjust the intensity of the effect as needed. The Doppler effect should be perceptible for the fire loop audio sound once it’s working correctly.
Exercise 7.2
Implement virtual positions for event instances as per the third-person listener formulas in this chapter. Replace the CameraActor class in the Chapter 7 game project with the CameraActor class in Exercise/7.2 on GitHub. This version of the CameraActor implements a basic third-person camera for testing purposes.