Chapter 4. Understanding and Configuring DNSSEC
This chapter covers the following subjects:
![]() DNSSEC planning: This section gives a short overview of the most important topics involved in planning the deployment of DNSSEC.
DNSSEC planning: This section gives a short overview of the most important topics involved in planning the deployment of DNSSEC.
![]() Enabling DNSSEC: You learn about the different possibilities for enabling DNSSEC on Windows Server 2016.
Enabling DNSSEC: You learn about the different possibilities for enabling DNSSEC on Windows Server 2016.
![]() DNSSEC functionality: DNSSEC protects clients that are making DNS queries from accepting false DNS responses. You learn about the core functionality of DNSSEC.
DNSSEC functionality: DNSSEC protects clients that are making DNS queries from accepting false DNS responses. You learn about the core functionality of DNSSEC.
![]() DNSSEC Zone Signing Wizard: The DNSSEC Zone Signing Wizard simplifies DNSSEC configuration. The wizard enables you to choose the zone signing parameters step by step.
DNSSEC Zone Signing Wizard: The DNSSEC Zone Signing Wizard simplifies DNSSEC configuration. The wizard enables you to choose the zone signing parameters step by step.
![]() Trust anchors: A trust anchor for DNSSEC is represented by a public key. The TrustAnchors zone on a Windows Server 2016 DNS server stores preconfigured public keys that are associated with a specific zone.
Trust anchors: A trust anchor for DNSSEC is represented by a public key. The TrustAnchors zone on a Windows Server 2016 DNS server stores preconfigured public keys that are associated with a specific zone.
![]() KSK rollover process: This section explains the rollover update process behind the scenes and covers that subject to promote a better DNSSEC understanding.
KSK rollover process: This section explains the rollover update process behind the scenes and covers that subject to promote a better DNSSEC understanding.
![]() DNSSEC clients: This section covers configuration of DNSSEC clients through the Name Resolution Policy Table and compares the behavior of both security-aware and non-security-aware DNSSEC clients.
DNSSEC clients: This section covers configuration of DNSSEC clients through the Name Resolution Policy Table and compares the behavior of both security-aware and non-security-aware DNSSEC clients.
![]() DNSSEC and delegation: Delegations establish a chain of authentication for child zones. This section looks at DNSSEC delegation scenarios.
DNSSEC and delegation: Delegations establish a chain of authentication for child zones. This section looks at DNSSEC delegation scenarios.
![]() Chain of trust: This section covers the chain of trust and explains the dependencies among the different kinds of keys and trust anchors.
Chain of trust: This section covers the chain of trust and explains the dependencies among the different kinds of keys and trust anchors.
![]() Redesigning DNSSEC zone: Information includes details on the reconfiguration of signed DNSSEC zones in the case of re-signing.
Redesigning DNSSEC zone: Information includes details on the reconfiguration of signed DNSSEC zones in the case of re-signing.
![]() DS records configuration: This section explains the use and advantages of DS records and shows you how to add and configure DS records.
DS records configuration: This section explains the use and advantages of DS records and shows you how to add and configure DS records.
![]() DNSSEC resource records: In this section, you learn about the most important DNSSEC-relevant resource record types and their purposes.
DNSSEC resource records: In this section, you learn about the most important DNSSEC-relevant resource record types and their purposes.
This chapter covers the use, installation, and configuration of Windows Server 2016 DNSSEC. It explains DNSSEC functionality issues and all the relevant subjects you need to get a better understanding of DNSSEC and its components for real-world configuration and for the exam.
You learn how to enable DNSSEC with the DNSSEC Wizard and how to configure it with PowerShell commands. You learn about trust anchors, DNSSEC resource record types and their use, and the configuration of DNSSEC clients through the Name Resolution Policy Table.
Windows Server 2016 DNSSEC offers some DNSSEC enhancements to isolate the key management process from primary DNS servers that are not the key masters of the zone. The process of signing key generation, storage, rollover, retirement, and deletion now can be done only from the key master; other primary servers can continue the zone signing by accessing these keys. In addition, a new feature is support for AD-integrated DNS scenarios, including using the DNS dynamic update feature together with DNSSEC signed zones.
In this chapter, you learn about the updated DNSSEC standards, automated trust anchor distribution through Active Directory, and automated trust anchor rollover support per RFC 5011 and the easier extraction of the root trust anchor with Windows Server 2016.
“Do I Know This Already?” Quiz
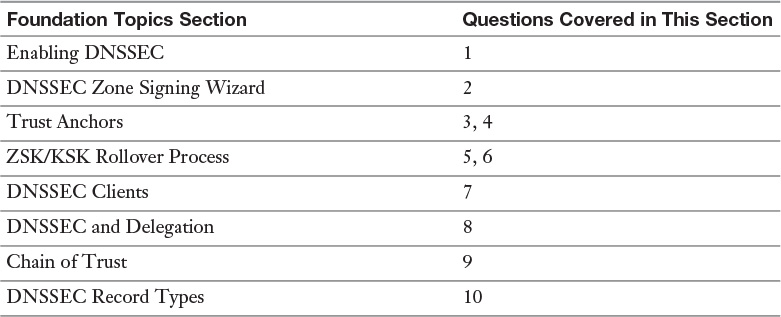
The “Do I Know This Already?” quiz enables you to assess whether you should read this entire chapter or simply jump to the “Exam Preparation Tasks” section for review. If you are in doubt, read the entire chapter. Table 4-1 outlines the major headings in this chapter and the corresponding “Do I Know This Already?” quiz questions. You can find the answers in Appendix A, “Answers to the ‘Do I Know This Already?’ Quizzes and End-of-Chapter Review Questions.”
Caution
The goal of self-assessment is to gauge your mastery of the topics in this chapter. If you do not know the answer to a question or are only partially sure of the answer, you should mark that question as wrong for purposes of the self-assessment. Giving yourself credit for an answer you correctly guess skews your self-assessment results and might provide you with a false sense of security.
1. You want to enable DNSSEC verification for your Windows Server 2016 DNS server. Which setting or command can you use?
a. Advanced tab of DNS server properties
b. (Get-DnsServer).DNSSetting.EnableDnsSec
c. Get-DnsServerDnsSecZoneSetting
d. DnsCmd.exe <servername> /Config /enableDNSSEC 2
2. You are responsible for the domain pearson.com. You don’t use hardware solutions to safeguard cryptographic keys. You have three domain controllers with the DNS server role installed: DC1, DC2, and DC3 (RODC). The DNSSEC key master DC1 for the file-based zone pearson.com goes offline. You try to transfer the DNSSEC key master role from DC1 to DC2. You get the following message: “The DNS server DC1.pearson.com is the Key Master, Status: Inactive.” DC1 cannot be recovered. You want to seize the key master role to DC2. You not want to redistribute trust anchors. From which location can DC2 get private key data for the zone?
b. Active Directory on DC2
c. Active Directory on DC3
d. HSM
3. You want to add a DS record to your Windows Server 2016 DNS server. Which of the following configuration options is not a valid solution?
a. DNSSEC Zone Signing Wizard
b. DS resource record set
c. DNS Manager
d. PowerShell
4. You unsign the zone pearson.com on a Windows Server 2016 DNS server. After doing so, you notice that validation requests fail and DNS resolution for the zone fails. Which component do you need to remove to solve the problem?
a. RRSIG records
b. Trust anchor
c. NRPT settings
d. RRset
5. You plan to roll over a DNSSEC KSK that is waiting for a parent DS update. You manually have updated the DS record in the parent zone. Now you want to force the rollover. Which PowerShell cmdlet can you use?
a. Invoke-DnsServerSigningKeyRollover
b. Step-DnsServerSigningKeyRollover
c. Enable-DnsServerSigningKeyRollover
d. Grant-HgsKeyProtectorAccess
6. You want to plan your ZSK/KSK rollover process. Select the preferred rollover method for each kind of key. (Choose two.)
a. ZSK: Prepublishing
b. ZSK: Double signing
c. KSK: Prepublishing
d. KSK: Double signing
7. You have configured both Enable DNSSEC in This Rule and Require DNS Clients to Check That Name and Address Data Has Been Validated by the DNS Server in the Default Domain Policy of your domain pearson.com. Your DNSSEC-configured DNS is named DNS1. In the Default Domain Policy, you add a rule for sec.pearson.com with DNSSEC (Validation) = “Yes” and DNSSEC (IPsec) = “No”. You want to ensure that the value for DNSSECValidationRequired is True on client1 (Windows 10). Which PowerShell command can you use? (Choose two.)
a. Gpupdate /force
b. Resolve-dnsname dc1.sec.pearson.com -server dns1 -DNSSECok
c. Get-dnsclientnrptpolicy
d. Resolve-dnsname -name sec.pearson.com -type dnskey -server dns1 -DNSSECok
8. Your environment consists of one parent domain named pearson.com and two child domains named usa.pearson.com and eu.pearson.com. You must plan the DNSSEC chain of trust, including delegations. Which statement is correct?
a. One DS trust anchor is installed for the child zone.
b. One DS trust anchor is installed for the parent zone.
c. One trust anchor is installed for every zone that a caching DNS server can validate.
d. Two trust anchors are installed for the parent zone.
9. You have one domain named pearson.com and a child domain named eu.pearson.com. You want to start with your DNSSEC chain of trust configuration. On your root Windows Server 2016 DNS server, you see in Trust Points and the root folder that no DS record exists. Which configuration can you use to install a root trust anchor using the RSA/SHA256 algorithm as the starting point of your chain of trust? (Choose two.)
a. Import-DnsServerTrustAnchor
b. Dnscmd /retrieveroottrustanchors
c. Add-DnsServerTrustAnchor -Root
d. Add-DnsServerTrustAnchor -KeyProtocol DNSSEC -CryptoAlgorithm RsaSha256
10. You want to produce a statement if you try to find a record that does not appear on your Windows Server 2016 DNS server. You also want to use hashing security for existing hosts. Which kinds of resource records do you need? (Choose two.)
a. DNSKEY
b. RRSIG
c. NSEC
d. NSEC3
e. NSEC3PARAM
Foundation Topics
DNSSEC Planning
Domain Name System Security Extensions (DNSSEC) enables a DNS zone and all records in the zone to be signed cryptographically. Clients then can validate the DNS response. DNS is often subject to attacks such as spoofing and cache tampering. DNSSEC helps protect against these threats and provides a more secure DNS infrastructure. DNSSEC protects clients that are making DNS queries from accepting false DNS responses. When a DNS server with a DNSSEC-protected zone gets a query, the server returns the digital signatures along with the requested records. A resolver or another server can obtain the public key of the public/private key pair from a trust anchor and then validate that the responses are authentic and have not been tampered with. To do this, the resolver or server must be configured with a trust anchor for either the signed zone or a parent of the signed zone. A trust anchor is an entity represented by a public key. The TrustAnchors zone stores preconfigured public keys that are associated with a specific zone.
You also need the Name Resolution Policy Table (NRPT) to control the DNS client behavior for sending DNS queries and processing the responses from those queries. Group Policy is the preferred method of configuring the NRPT.
To deploy DNSSEC for a zone on a Windows Server 2016 DNS server, you can use the DNSSEC Configuration Wizard of PowerShell.
DNSSEC Requirements
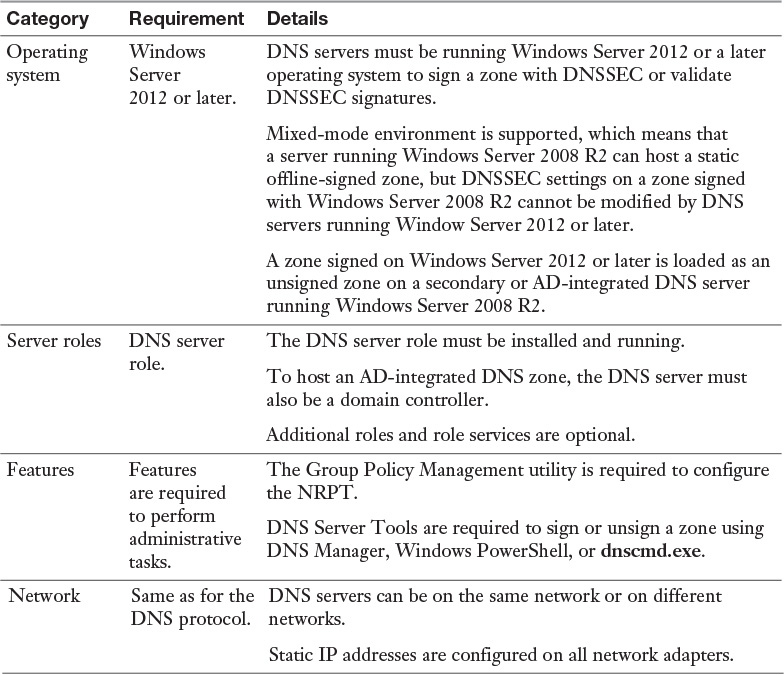
A DNSSEC deployment does not require all DNS servers to be Windows Server 2012 or a later operating system to host a signed zone. But it is recommended to have all DNS servers hosting the signed zone upgraded to a minimum of Windows Server 2012 or Windows Server 2012 R2 before validation is enabled on resolvers; only one authoritative DNS server running Windows Server 2012 or Windows Server 2012 R2 is required. For a DNS deployment, you must choose the zone to protect with DNSSEC, choose a DNSSEC key master (the server where you will initiate the DNSSEC parameter values), sign the zone, and then verify the zone signing. If the zone is an AD-integrated zone, you must verify the replication of the signed zone. You also must configure the DNS clients and which DNS clients will require DNSSEC validation to be performed for DNS queries in this zone. You must deploy the trust anchors to all nonauthoritative DNS servers that will perform validation for the zone. And you must deploy the NRPT to DNSSEC clients. In addition, you should review the impact of zone signing with DNSSEC on your DNS servers and infrastructure. Table 4-2 lists some of the most important DNSSEC requirements.

Identifying Goals
The first consideration with DNSSEC-staged deployments is to determine your goals. Possible goals follow:
![]() Security improvements: DNSSEC signing can protect against DNS spoofing attacks.
Security improvements: DNSSEC signing can protect against DNS spoofing attacks.
![]() Compliance with corporate policies: Your company might have security policies that require DNSSEC.
Compliance with corporate policies: Your company might have security policies that require DNSSEC.
![]() Government mandates: Your government might require you to use DNSSEC.
Government mandates: Your government might require you to use DNSSEC.
![]() Proof of concept: Deploy DNSSEC in a test environment to learn about the technology.
Proof of concept: Deploy DNSSEC in a test environment to learn about the technology.
DNSSEC Staging
DNSSEC deployment does not require that all DNS servers run at least Windows Server 2012 or later to host a signed zone. Only DNS servers running Windows Server 2012 or a later operating system will host a signed copy of a zone that was signed using Windows Server 2012 or Windows Server 2012 R2. Servers running earlier versions of Windows will host an unsigned version of the zone. In a mixed-mode Active Directory environment, with some DNS servers running Windows Server 2012 or a later operating system and some DNS servers running Windows Server 2008 R2 or a previous operating system, the Active Directory schema must be upgraded before signing a DNS zone. Schema update occurs automatically if you promote a computer running Windows Server 2012 or Windows Server 2012 R2 to be a domain controller.
You can use the following DNSSEC deployment steps to stage DNSSEC:
Step 1. Choose a zone. Start by signing a single zone or only a few zones. The zones should be small enough to monitor easily, but of sufficient size to enable thorough testing.
Step 2. Choose a key master. Select a primary, authoritative DNS server to be the key master for your zone. This is the server where you will initiate zone signing, and it should be online at all times.
Step 3. Choose methods and settings. Decide whether you want to use DNS Manager or Windows PowerShell to sign the zone, and document the DNSSEC parameter values that you use.
Step 4. Sign the zone. Use the methods and settings that you have chosen to initiate zone signing on the key master and to monitor progress.
Step 5. Verify zone signing. Verify that zone signing was successful on the key master. If the zone is Active Directory–integrated, verify that replication of the signed zone was successful. If secondary servers are configured, verify that zone transfers were successful. Also verify that the zone functions as expected. Signing a zone with DNSSEC does not affect your capability to add, delete, or update resource records.
Step 6. Choose DNS clients. Select which DNS clients will require DNSSEC validation performed for DNS queries in this zone. The choice of DNS clients also affects which DNS servers will require trust anchors. DNS clients that require validation must use DNS servers that have valid trust anchors for the zone.
Step 7. Deploy trust anchors. Deploy trust anchors to all nonauthoritative DNS servers that will perform validation of DNS queries for the zone. If applicable, this includes deploying DS records to DNS registrars that manage parent DNS zones.
Step 8. Configure and deploy name resolution policy. If desired, deploy name resolution policy in your environment. Configure the NRPT to require validation of DNS queries for the signed zone, and deploy this policy only to DNS clients that use DNS servers that are capable of DNSSEC validation. If some authoritative DNS servers in your environment are not capable of hosting a signed version of the zone, ensure that these DNS servers are not queried when DNSSEC validation is required.
Step 9. Verify name resolution policy. Verify that NRPT settings are applied to DNS clients and that all DNS queries were successful.
Step 10. Monitor and manage. Review the impact that zone signing has on your DNS server and support infrastructure. Initiate the key rollover process or wait for automated key rollover to occur and verify that the zone was successfully re-signed. Redistribute trust anchors as needed after key rollover.
Enabling DNSSEC
Windows Server 2016 DNS Security Extensions (DNSSEC) is an advanced security feature that provides a way to protect DNS responses to DNS client queries so that malicious users cannot tamper with them. DNSSEC does not encrypt DNS data. Instead, it enables cryptographic signing of both a DNS zone and all the records in that zone so that DNSSEC-enabled clients can validate the DNS response. DNS is often subject to various attacks, such as spoofing and cache tampering. DNSSEC helps protect against these threats and provides a more secure DNS infrastructure. In Windows Server 2016, you easily can enable and configure DNSSEC through the DNSSEC Zone Signing Wizard. Figure 4-1 displays the first page of the wizard.


Tip
Previous Windows Server versions used the Advanced tab of DNS server properties to accomplish DNSSEC validation. In Windows Server 2016, this setting is no longer present. Instead, you can verify DNSSEC status with the following PowerShell command:
(Get-DnsServer).DNSSetting.EnableDNSSEC
In this example, DNSSEC validation is disabled (Dword: 0). If you want to enable DNSSEC validation with dnscmd.exe, you must configure the value to 1.
You also can modify and check the status of this setting with the dnscmd.exe utility using the following command:
Dnscmd /info /enableDNSSEC
Query result:
Dword: 0(00000000)
Command completed successfully.
Dnscmd /config /enableDNSSEC 1
Query result:
Dword: 1(00000001)
Command completed successfully.
DNSSEC Functionality
A known attack involves intercepting DNSSEC and tampering with DNS query responses. If malicious users alter DNS responses or use spoofed responses to point clients to their own servers, they can get unwanted access to sensitive information of your organization. Any service that relies on DNS for the initial connection is vulnerable. DNSSEC protects clients that are making DNS queries from accepting false DNS responses. When a DNS server that hosts a digitally signed zone receives a query, it returns the digital signatures and requested records. A resolver or another server can obtain the public key of the public/private key pair from a trust anchor (in DNS, the trust anchor is the DNSKEY or DS resource record) and validates that the responses are authentic and have not been tampered with. To do this, you must configure the resolver or server with a trust anchor for the signed zone or for a parent of the signed zone.
DNSSEC and RODCs
In Windows Server 2008, Windows Server 2008 R2, Windows Server 2012, Windows Server 2012 R2, and also Windows Server 2016, read-only domain controllers (RODCs) host AD-integrated copies of all DNS zones, but a zone on an RODC always is read-only. A DNS server on an RODC cannot make any updates to the zone that it hosts. Updates can occur only through AD replication from other DNS servers.
When an AD-integrated zone is signed with DNSSEC, the private keys are also replicated to all DNS servers running DCs, with one exception: Private keys are not replicated to an RODC because RODCs are intended to operate in an insecure environment.
If an RODC identifies a DNSSEC-signed zone in Active Directory, it does not load the zone as an AD-integrated zone. Instead, it creates a secondary copy of the zone. Then the RODC uses the closest domain controller as the primary DNS server. The problem is, you manually have to allow a zone transfer on that primary DNS server for the DNSSEC-signed zone so that the RODC can transfer the zone data. If the zone transfer is not enabled, an error occurs. Figure 4-2 illustrates that behavior.

DNSSEC Zone Signing Wizard
Since Windows Server 2012, the DNSSEC Zone Signing Wizard helps to simplify the DNSSEC configuration and signing process and to enable online signing. Figure 4-3 shows where you can start to configure signing a zone with the DNSSEC Zone Signing Wizard.

The wizard enables you to choose the zone-signing parameters, as you saw in Chapter 2, “Creating and Configuring DNS Zones and Records.” If you choose to configure the zone-signing settings instead of using parameters from an existing zone or using default values, you can use the wizard to configure settings such as these:
![]() Key signing key (KSK) options
Key signing key (KSK) options
![]() Zone signing key (ZSK) options
Zone signing key (ZSK) options
![]() Trust anchor distribution options
Trust anchor distribution options
![]() Signing and polling parameters
Signing and polling parameters
The following figures explain the detailed settings of the DNSSEC Zone Signing Wizard.
Figure 4-4 shows the Signing Options page of the DNSSEC Zone Signing Wizard. You can choose among the following signing options:
![]() Customize Zone Signing Parameters
Customize Zone Signing Parameters
![]() Sign the Zone with Parameters of an Existing Zone
Sign the Zone with Parameters of an Existing Zone
![]() Use Default Settings to Sign the Zone
Use Default Settings to Sign the Zone

Figure 4-4 Signing Options Page of the DNSSEC Zone Signing Wizard on a Windows Server 2016 DNS Server
If you select Use Default Settings to Sign the Zone, you get the default settings shown in Figures 4-5 through 4-9.


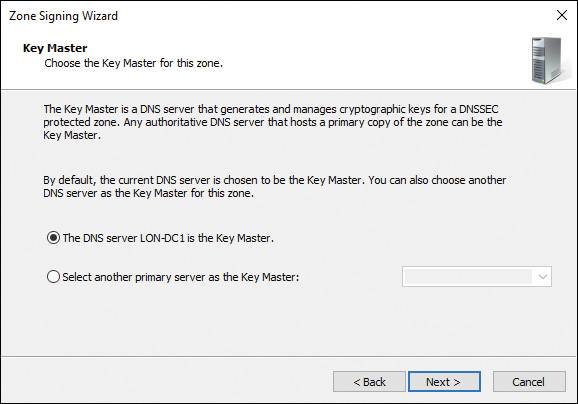
Key Master
The key master is the server that generates/maintains keys for a signed DNS zone. Each signed zone has one key master, and a single server can be the key master for multiple zones. After a zone has been signed, the key master role can be moved to another DNS server. This new server must meet the following requirements:
![]() It is running Windows Server 2012 or later.
It is running Windows Server 2012 or later.
![]() It is authoritative for the zone in question.
It is authoritative for the zone in question.
![]() It hosts a primary (writeable) copy of the zone.
It hosts a primary (writeable) copy of the zone.
Figure 4-10 shows the Key Master page of the DNSSEC Zone Signing Wizard. You can choose your DNS server or another DNS server as the key master.
Transferring the Key Master
You can transfer the DNSSEC key master role to another DNS server. The new key master does not have to be a DC; however, this adds security for the private key data. If a non-DC becomes the new DNSSEC key master, you should ensure that only the DNS server role is installed on the server, to minimize attack possibilities. These are the two different key master transferring scenarios:
![]() Online key master transfer
Online key master transfer
![]() Offline key master transfer
Offline key master transfer
If the zone’s key master is online, it can be transferred to another DNS server through the Use the Following DNS Server as the Key Master setting in the Key Master tab of the DNSSEC properties in DNS Manager. There you can select the appropriate server from the drop-down list or simply type the desired server’s name into the field.
If the key master goes offline and cannot be recovered, it is still possible to move the role to another server. This is known as seizing the role. When you want to seize the key master role, the new server must have access to the zone’s existing private key data. This is the case if the keys are stored in AD (only for AD-integrated zones) or another shared location, such as a certificate or hardware security module (HSM). If the zone’s private key data is not available, the role can still be seized, but new keys must be generated and the zone must be re-signed with them. Any distributed trust anchors for the zone must then be redistributed.
Suppose that you have two DCs named DC1 and DC2 with a DNS server and an AD-integrated DNSSEC-signed zone pearson.com installed. DC1 goes offline. On DC2, in the DNS Manager console in the DNSSEC properties, the following message displays after a delay:
Unable to load DNSSEC settings for zone DNSSEC-pearson.com from Key
Master DC1.pearson.com. Do you want to load DNSSEC settings from DNS
server DC1?
You know that DC1 is not online, but you select Yes. The Key Master tab appears and you see the following message:
The DNS server DC1.pearson.com is the Key Master, Status: Inactive.
Select the Use the Following DNS Server as the Key Master setting and select dc2.pearson.com as the new Key Master. After that, the following message appears:
The following is the summary of changes made on the zone
DNSSEC-pearson.com: The Key Master setting has been changed to
dc2.pearson.com. Click Yes to proceed or No to abort the operation.
If DC2 cannot locate the zone’s private key data, a dialog box appears indicating that new keys must be generated, the zone must be re-signed, and trust anchors must be redistributed. Click Yes to seize the role anyway. If you proceed, new keys will be automatically generated. You must manually re-sign the zone to generate new keys. When the role has been seized, you get the following message:
The Key master for the zone DNSSEC-pearson.com has been updated
successfully.
If DC1 (old Key Master) comes back online, it automatically discovers that it is no longer the key master and operates normally. No additional configuration is necessary.
You also can seize the key master role with the PowerShell command Reset-DnsServerZoneKey MasterRole. The following command transfers the key master role for the zone pearson.com to the server dc2.pearson.com:
Reset-DnsServerZoneKeyMasterRole -ZoneName "pearson.com"
-KeyMasterServer "dc2.pearson.com"
Key Signing Key
The KSK validates a DNSKEY record. The KSK signs the ZSK (stored in a DNSKEY record). The KSK creates an RRSIG for the DNSKEY. As with the public ZSK, the DNS server publishes the public KSK in another DNSKEY record. Both the public KSK and the public ZSK are signed by the private KSK. Resolvers can use the public KSK to validate the public ZSK. Why use separate ZSKs and KSKs? Swapping out an old or compromised KSK is difficult, whereas changing the ZSK is much easier. A smaller ZSK minimizes the amount of data that the server has to send with each response.
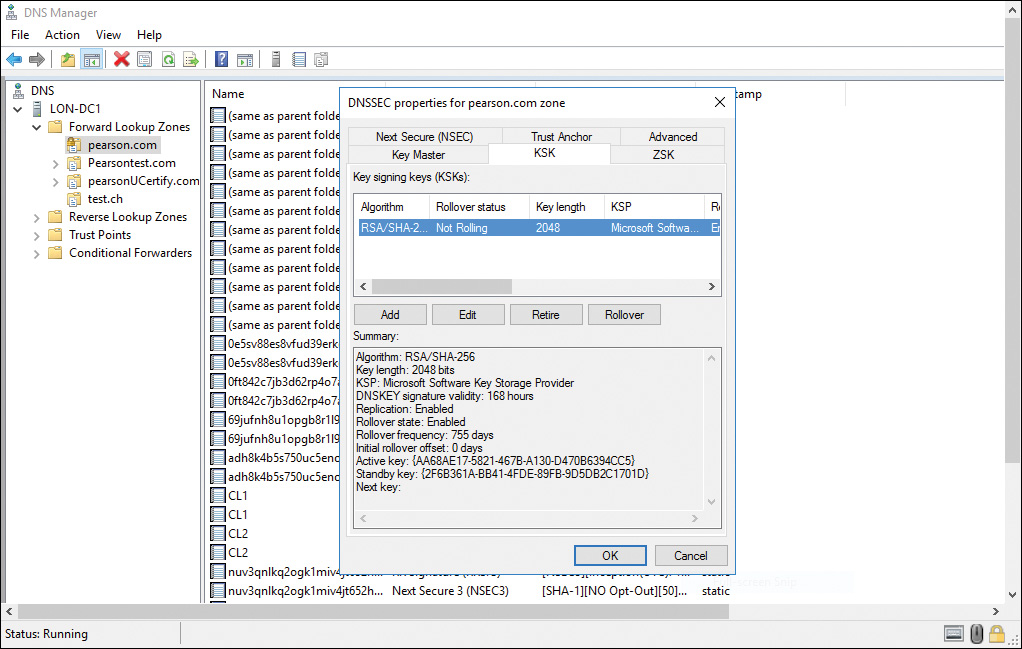
Figure 4-11 shows the Key Signing Key (KSK) Description page of the DNSSEC Zone Signing Wizard. Be sure to read the descriptive text in this figure.

Figure 4-11 Key Signing Key (KSK) Description Page of the DNSSEC Zone Signing Wizard on a Windows Server 2016 DNS Server
Figure 4-12 shows the Key Signing Key (KSK) Configuration page of the DNSSEC Zone Signing Wizard. Here you configure parameters for the KSK or add KSKs. You can specify a maximum of three KSKs.

Figure 4-12 Key Signing Key (KSK) Configuration Page of the DNSSEC Zone Signing Wizard on a Windows Server 2016 DNS Server
Figure 4-13 shows the KSK settings of the default KSK in Figure 4-12.
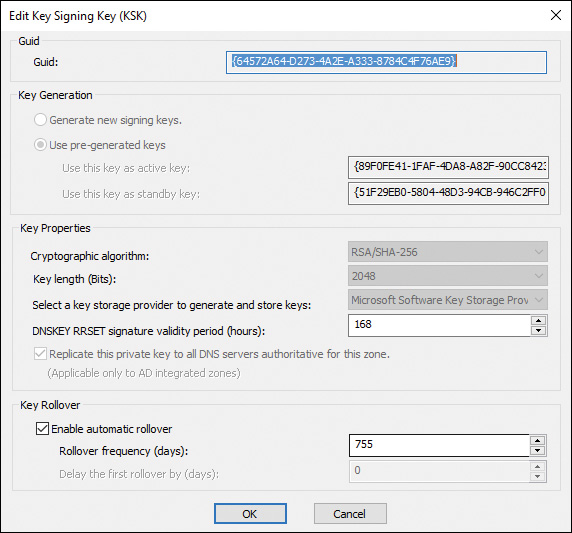
Figure 4-13 Key Signing Key (KSK) Settings Page of the DNSSEC Zone Signing Wizard on a Windows Server 2016 DNS Server
The following KSK settings are available:
![]() Guid
Guid
![]() Key Generation
Key Generation
![]() Key Properties
Key Properties
![]() Cryptographic Algorithm
Cryptographic Algorithm
![]() Key Length (Bits)
Key Length (Bits)
![]() Key Storage Provider
Key Storage Provider
![]() DNSKEY RRset Signature Validity Period (Hours)
DNSKEY RRset Signature Validity Period (Hours)
![]() Key Rollover
Key Rollover
Tip
In the Edit Key Signing Key (KSK) window, you must replicate the private key to all DNS servers that are authoritative for the zone (applicable only to AD-integrated zones) for the default KSK key. Only if you add another KSK can you disable the Replicate This Private Key to All DNS Servers Authoritative for This Zone setting so that the key will not be replicated through Active Directory to other DNS servers. If you have a primary zone without Active Directory, there is no default KSK on this page; then you can add a new KSK, but you cannot activate the Replicate This Private Key to All DNS Servers Authoritative for This Zone Setting for that KSK because the zone is not an AD-integrated zone.
Tip
When a zone on a Windows Server 2016 DNS server is signed, you cannot change the zone type and replication scope of that zone. First, you must unsign the zone. Also keep in mind that a zone that is signed on a Windows Server 2018 R2 cannot be unsigned on a Windows Server 2016 with the PowerShell cmdlet Invoke-DnsServerZoneUnsign.
Figure 4-14 shows the ZSK Description page of the DNSSEC Zone Signing Wizard. Be sure to read the descriptive text in this figure.
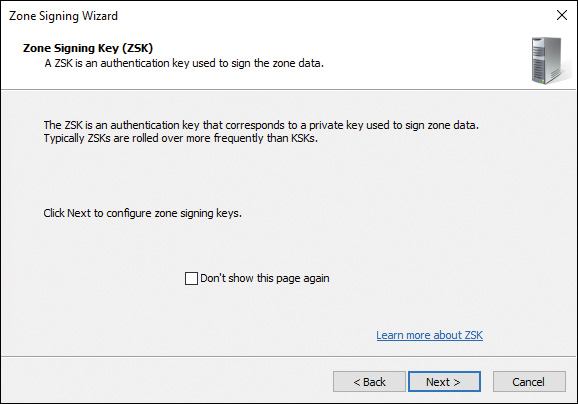
Figure 4-14 Zone Signing Key (ZSK) Description Page of the DNSSEC Zone Signing Wizard on a Windows Server 2016 DNS Server
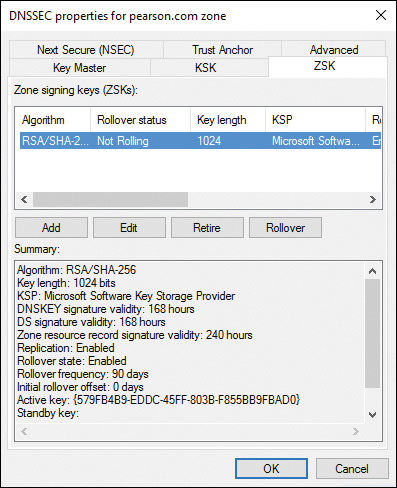
Figure 4-15 shows the Zone Signing Key (ZSK) Configuration page of the DNSSEC Zone Signing Wizard.

Figure 4-15 Zone Signing Key (ZSK) Configuration Page of the DNSSEC Zone Signing Wizard on a Windows Server 2016 DNS Server
Figure 4-16 shows the ZSK settings of the default ZSK key of the DNSSEC Zone Signing Wizard.

Figure 4-16 Edit Zone Signing Key (ZSK) Page of the DNSSEC Zone Signing Wizard on a Windows Server 2016 DNS Server
The following ZSK settings are available:
![]() Guid
Guid
![]() Key Properties
Key Properties
![]() Cryptographic Algorithm
Cryptographic Algorithm
![]() Key Length (Bits)
Key Length (Bits)
![]() Key Storage Provider
Key Storage Provider
![]() DNSKEY Signature Validity Period (Hours)
DNSKEY Signature Validity Period (Hours)
![]() DS Signature Validity Period (Hours)
DS Signature Validity Period (Hours)
![]() Zone Record Validity Period (Hours)
Zone Record Validity Period (Hours)
Understanding ZSK
Each zone in DNSSEC has a ZSK pair: The private portion of the key digitally signs each RRset in the zone, and the public portion verifies the signature.
To enable DNSSEC, a zone operator creates digital signatures for each RRset using the private ZSK and stores them in their name server as RRSIG records.
This is like saying, “These are my DNS records; they come from my server and they should look like this.”
However, these RRSIG records are useless unless DNS resolvers find a way to verify the signatures. The zone operator makes the public ZSK available by adding it to a DNSKEY record. When a DNSSEC resolver requests a particular record type, the DNS server also returns the corresponding RRSIG. The resolver then pulls the DNSKEY record containing the public ZSK from the DNS server.
Together, the RRset, RRSIG, and public ZSK can validate the response. If you trust the ZSK in the DNSKEY record, you can trust all records in that zone. You can view the properties of an RRSIG record named CL1 using the following PowerShell cmdlet:
Get-DnsServerResourceRecord -name CL1 -zonename pearson.com -RRType
RRSIG | FL *
RRSIG records have a TTL and a signature expiration date/time. Figure 4-17 shows example RRSIG settings.

Figure 4-18 shows the Next Secure (NSEC) page of the DNSSEC Zone Signing Wizard. Here you can choose between NSEC and NSEC3 resource records to provide authenticated denial of existence.

Figure 4-18 Next Secure (NSEC) Page of the DNSSEC Zone Signing Wizard on a Windows Server 2016 DNS Server
NSEC3 is a hashed version of NSEC records that prevents attacks by enumerating the zone. DNSSEC-aware servers can choose to send an NSEC3 record instead of an NSEC record when they cannot find a record. The NSEC3 record is signed, but instead of including the name directly, the NSEC3 record includes a cryptographically hashed value of the name. Therefore, NSEC3 is more secure, but it generates greater cryptographic overhead for recursive validators and has a slightly more complicated DNS configuration.
Figure 4-19 shows the Trust Anchors (TAs) page of the DNSSEC Zone Signing Wizard.
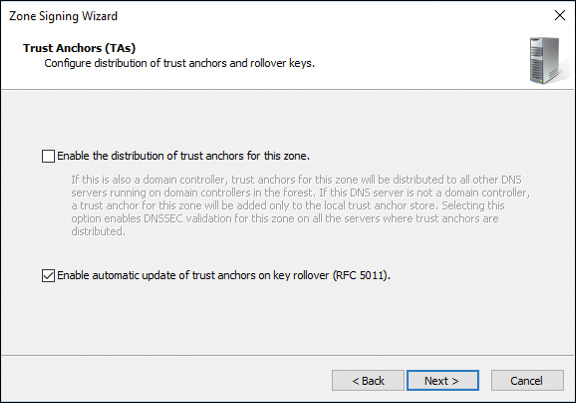
Figure 4-19 Trust Anchors Page of the DNSSEC Zone Signing Wizard on a Windows Server 2016 DNS Server
In the Zone Signing Wizard on the Trust Anchors page, you can configure the distribution of trust anchors and rollover keys. You can choose between the following two settings:
![]() Enable the Distribution of Trust Anchors for This Zone: With this setting, you enable trust anchor distribution in Active Directory. If this setting is enabled and the DNS server is also a domain controller, trust anchors are distributed to all DNS servers running on domain controllers in the Active Directory forest. If the DNS server is not a domain controller, a trust anchor for the zone is added only to the local trust anchor store, located by default in %windir%system32dnsTrustAnchors.dns.
Enable the Distribution of Trust Anchors for This Zone: With this setting, you enable trust anchor distribution in Active Directory. If this setting is enabled and the DNS server is also a domain controller, trust anchors are distributed to all DNS servers running on domain controllers in the Active Directory forest. If the DNS server is not a domain controller, a trust anchor for the zone is added only to the local trust anchor store, located by default in %windir%system32dnsTrustAnchors.dns.
![]() Enable Automatic Update of Trust Anchors on Key Rollover (RFC 5011): You must redistribute trust anchors each time a zone is re-signed unless re-signing occurs as part of an automatic key rollover and trust anchors are distributed automatically on key rollover (RFC 5011). Trust anchors can also be distributed automatically in Active Directory to all AD-integrated DNS servers within the replication scope for the zone. Support for RFC 5011 is enabled on the authoritative DNS server on a zone-by-zone basis. However, trust anchor updates are supported only for automated key rollover.
Enable Automatic Update of Trust Anchors on Key Rollover (RFC 5011): You must redistribute trust anchors each time a zone is re-signed unless re-signing occurs as part of an automatic key rollover and trust anchors are distributed automatically on key rollover (RFC 5011). Trust anchors can also be distributed automatically in Active Directory to all AD-integrated DNS servers within the replication scope for the zone. Support for RFC 5011 is enabled on the authoritative DNS server on a zone-by-zone basis. However, trust anchor updates are supported only for automated key rollover.
Tip
If you manually re-sign or unsign a zone, or if you manually roll over zone signing keys, trust anchors on validating DNS servers are not automatically updated.
Tip
Trust anchors that have been enabled for RFC 5011 automatic updates have information that is stored in the file %windir%system32dnsRFC5011.csv on the DNS server where the trust anchor is installed.
To enable automatic update of trust anchors on key rollover using Windows PowerShell, you can use the following command:
Get-DnsServerSigningKey -ZoneName secure.pearson.com |
Enable-DnsServerSigningKey Rollover -Force
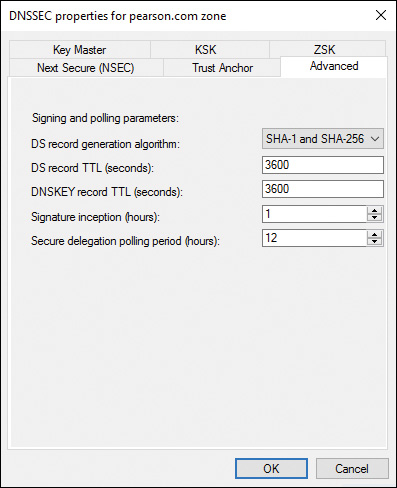
Figure 4-20 shows the Signing and Polling Parameters page of the DNSSEC Zone Signing Wizard. Here you can configure the following parameters:
![]() DS Record Generation Algorithm
DS Record Generation Algorithm
![]() DS Record TTL (Seconds)
DS Record TTL (Seconds)
![]() DNSKEY Record TTL (Seconds)
DNSKEY Record TTL (Seconds)
![]() Secure Delegation Polling Period (Hours)
Secure Delegation Polling Period (Hours)
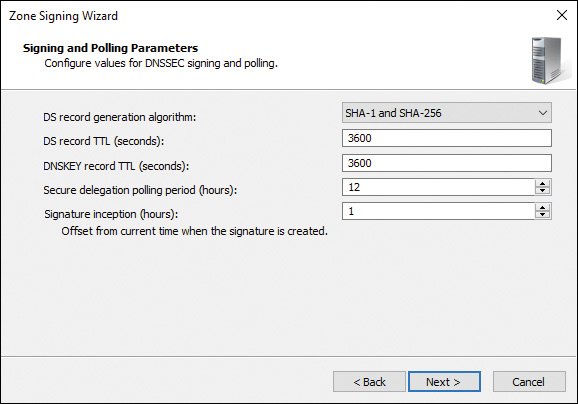
Figure 4-20 Signing and Polling Parameters Page of the DNSSEC Zone Signing Wizard on a Windows Server 2016 DNS Server
By default, the parent zone queries every 12 hours (SecureDelegationPolling-Period) for DNSKEY from the child zone. When it receives the DNSKEY RRset, the parent zone creates a DS of the new DNSKEY.
DNSSEC Monitoring
Windows Server 2016 DNS server audit events permit you to track changes on the DNS server. An audit event gets logged every time changes occur to server, zone, or resource record settings. This includes operational events such as DNSSEC zone signing and unsigning. You can also use the Event Viewer to view DNSSEC events. In addition, you can use some third-party tools to monitor DNSSEC issues such as DNSViz or the DNSSECAnalyzer.
Event Viewer
You can view DNSSEC events in the DNS Server log part of the Event Viewer. Figure 4-21 shows an example of a DNSSEC event.

In the exam, DNSSEC events can produce messages such as “The DNS server has successfully assumed Key Master responsibilities for zone pearson.com. The Key Master role was transferred to this server from…”. Another example is the warning event about the DNSSEC trust point shown in Figure 4-21. You must run DNSSEC testing as much as possible and view the relevant events in the DNS server log in the Event Viewer. This example should point out that you have no other way to test DNSSEC for yourself and to experiment with DNSSEC events.
DNSSEC Outages
If you need to get an overview of major DNSSEC outages and validation failures from the past, you can get a list of such DNSSEC failures through the following site:
https://ianix.com/pub/DNSSEC-outages.html
DNSSEC Status Verification
If you want to verify the DNSSEC status of a DNS zone, you can do that with the DNSViz tool: http://dnsviz.net/. For example, if you want to verify the authentication chain of trust for a given name, you can graphically display that through DNSViz (see Figure 4-22).

You also can use the VERISIGN DNSSEC Analyzer (http://DNSSEC-debugger.verisignlabs.com/) to verify DNSSEC configurations and locate DNSSEC problems. Figure 4-23 shows example output for pearson.com in the DNSSEC Analyzer.

Figure 4-23 VERISIGN DNSSEC Analyzer Example for pearson.com
Trust Anchors
A trust anchor is an authoritative entity that is represented by a public key. The TrustAnchors zone on a Windows Server 2016 DNS server stores preconfigured public keys that are associated with a specific zone. In DNS, the trust anchor is the DNSKEY or DS resource record.
Tip
A DS record is smaller in size than a DNSKEY record because it contains only a hash of the public key. To add a DS record, you must manually add or import it. DNSKEY records can be added automatically through the DNSSEC Zone Signing Wizard.
DS records must be added to each parent zone in a chain of authentication. For example, DS records for finance.corp.pearson.com must be added to corp.pearson.com to complete a chain of authentication from finance.corp.pearson.com to pearson.com.
Figure 4-24 shows where to add trust anchor records in the DNS Manager console.

When you select the Enable the Distribution of Trust Anchors for This Zone setting on the Trust Anchor page of the DNSSEC Zone Signing Wizard (refer to Figure 4-19), the following two DNSKEY records will be created under Trust Points if you enable DNSSEC for the zone pearson.com. These DNSKey records are the trust anchors. In Figures 4-26 and 4-27, on the properties of the records, you can see that the FQDN of each record is pearson.com.trustanchors; this shows that these records are the trust anchors (more on that in the upcoming sections).
Figure 4-25 shows the trust points configuration in the DNS Manager.
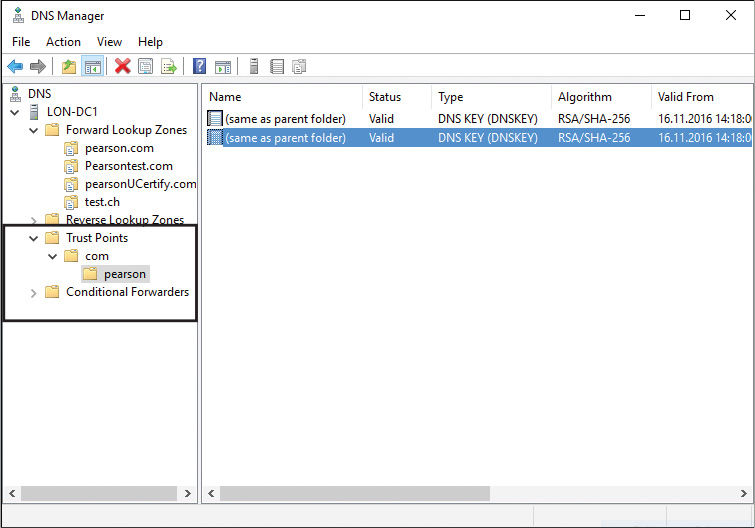
Figure 4-25 Trust Points Configuration for pearson.com
Figures 4-26 and 4-27 show the two trust anchor DNSKEY records for the pearson.com zone.

Figure 4-26 First Trust Anchor DNSKEY Record for pearson.com
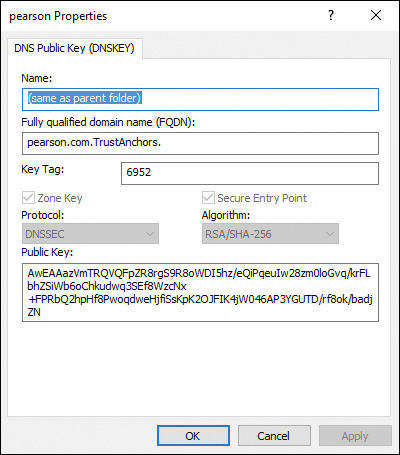
Figure 4-27 Second Trust Anchor DNSKEY Record for pearson.com
A DNS server running Windows Server 2016, Windows Server 2012, or Windows Server 2012 R2 displays configured trust anchors in the DNS Manager console tree in the Trust Points container. A trust anchor is a public cryptographic key for a signed zone. Trust anchors must be configured on every nonauthoritative DNS server that attempts to validate DNS data.
Client computers use trust anchor records such as DNSKEY or DS records to build trust chains.
You must configure a trust anchor from the zone on every domain Windows Server 2016 DNS server to validate responses from that signed zone.
If the DNS server is a DC, then AD-integrated zones can distribute the trust. A validating DNS server must be configured with one or more trust anchors to perform validation. TAs are stored in the forest directory partition in AD DS and can be replicated to all DCs in the forest.
On standalone Windows Server 2016 DNS servers, trust anchors are stored in the file TrustAnchors.dns.
You can use the PowerShell cmdlet Get-DnsServerTrustAnchor to display trust anchors on a Windows Server 2016 DNS server, or you can use Dnscmd.exe to view trust anchors. For example, you can list the trust anchors for pearson.com with the following PowerShell command:
Get-DnsServerTrustAnchor -Name "pearson.com"
With the following PowerShell command, you can obtain a DNSKEY resource record from the DNS server DNS1 for pearson.com and then add the trust anchor to the current DNS server for this zone:
Get-DnsServer ResourceRecord -ZoneName "sec.contoso.com" -RRType
"DNSKEY"
-ComputerName DNS1 | %{ $_.RecordData | Add-DnsServerTrustAnchor
-PassThru -Verbose
-Name "pearson.com"}
DS Resource Record Set
A DS record is a hash of a public key. DS records are smaller than DNSKEY records. To add a DS record, you manually add or import it. The DS resource record set (DSSET) is automatically added as a file to the key master when a zone is signed.
You can use this file with the Import-DnsServerResourceRecordDS PowerShell cmdlet to import DS records to the parent zone. With the following example, you can use the Import-DnsServer ResourceRecordDS cmdlet to import DS records to a parent zone:
Import-DnsServerResourceRecordDS -ZoneName pearson.com -DSSetFile "c:
windowssystem32dnsdsset-corp.pearson.com"
Get-DnsServerResourceRecord -ZoneName pearson.com -RRType DS
In the preceding example, the DS records for the child zone corp.pearson.com are imported into the parent zone, pearson.com, by using the DSSET file that is located in the C:windowssystem32dns folder. The DSSET file is located in this directory because the local DNS server is the key master for the child zone. If the key master DNS server for a child zone is not the same computer as the primary authoritative DNS server for the parent zone where you are adding the DS record, you must obtain the DSSET file for the child zone and make it available to the primary authoritative server for the parent zone. Alternatively, you can manually add DS records.
Updating and Removing Trust Anchors
Trust anchors must be updated if the public key for a zone changes, such as when a zone is re-signed.
If trust anchors are distributed after a zone is signed and the zone becomes unsigned later, trust anchors for the zone must be removed. If trust anchors are not removed when a zone is unsigned, DNS servers will continue to attempt validation of DNS responses for the zone; however, this validation will fail and, therefore, DNS resolution for the zone will also fail.
![]() DNSKEY (public key from a DNSKEY resource record)
DNSKEY (public key from a DNSKEY resource record)
![]() DS (hash of a public key)
DS (hash of a public key)
Windows Server 2008 R2 supported only DNSKEY trust anchors.
Windows Server 2012 and 2012 R2 and Windows Server 2016 support DNSKEY and DS trust anchors.
Trust Anchor Status
When a zone has been signed with DNSSEC, the success or failure of a DNS query also depends on the trust anchor status. Trust anchors are installed on DNS servers. A trust anchor has these status options:
![]() Available and valid
Available and valid
![]() Available and invalid
Available and invalid
![]() Missing
Missing
A security-aware DNS server automatically attempts to validate a DNS response if the server has a trust anchor installed for the specified zone. You cannot install a trust anchor on a DNS server that does not support DNSSEC.
You can verify the trust anchor status with the following PowerShell command for the zone pearson.com:
Get-DnsServerTrustAnchor -Name pearson.com
Trust Anchor Status Verification
To view the status of a trust anchor on a Windows Server 2016 DNS server, you can use the DNS Manager or PowerShell. Trust anchors are displayed in the DNS Manager console tree under Trust Points. The PowerShell cmdlets Get-DnsServerTrustAnchor and Get-DnsServerTrustPoint provide status information. The PowerShell cmdlets Get-DnsServerTrust Anchor and Get-DnsServerTrustPoint display all configured trust anchors on the DNS server if a name is not specified. Table 4-3 outlines the possible trust anchor states.

Root Zone Trust Anchor
The most obvious trust anchor to add is the one for the root zone. IANA publishes the root zone trust anchor online, along with signatures and certificates to determine its authenticity. If you are not sure whether your TLD (that your domain zone is a child zone of) is signed, you can find that information on this ICANN page on the TLD (generic top-level domain) DNSSEC Report:
http://stats.research.icann.org/dns/tld_report/
At https://data.iana.org/root-anchors/root-anchors.xml, you can retrieve the root trust anchor.
Your Windows Server 2016 DNS server must know this URL to deploy a root trust anchor from the IANA using that URL. It is specified in the RootTrustAnchors-URL property of the DNS server. You can view the RootTrust AnchorsURL by using Get-DnsServerSetting:
Get-DnsServerSetting -All | Select RootTrustAnchorsURL
RootTrustAnchorsURL
-------------------
https://data.iana.org/root-anchors/root-anchors.xml
With that information (see Figure 4-28), you can create the DS record on your Windows Server 2016 DNS server.

You can add the trust anchors for the DNS root zone with dnscmd.exe. It retrieves the DS records for the root zone, adds them, and enables DNSSEC validation all in one command:
Dnscmd.exe /RetrieveRootTrustAnchors
Are you sure you want to Retrieve and add root trust anchors
(activating DNSSEC validation)? (y/n) y
The root trust anchors were successfully retrieved and added as DS
trust anchors. They will become effective when the server is able
to convert them to DNSKEY trust anchors during an active refresh.
Command completed successfully.
You also can add the trust anchors for the DNS root zone with PowerShell using the following command:
Add-DnsServerTrustAnchor -Root
DNSSEC Priming
In DNSSEC priming, a validating DNS server that uses a DS trust anchor must query the authoritative DNS server to obtain the full DNSKEY resource record set. This forces the validating server to acquire up-to-date information.
Trust Anchor Distribution with Active Directory
You can distribute trust anchors through Active Directory. You can use the DNS Manager console or PowerShell for that. To enable automatic distribution of trust anchors through Active Directory for a zone that is already signed for DNSSEC, you perform the configuration steps outlined in the following sections.
Trust Anchor Distribution in Active Directory Using DNS Manager
By default, trust anchors are updated automatically upon key rollover. Normally, you want this to happen. If not, you need to manually update trust anchors upon key rollover. The option to enable the distribution of trust anchors for the zone is the best choice when the DNS server is running on a domain controller because the DNS server then replicates the trust anchors for the zone to all domain controllers running DNS servers in the AD forest. Following are the steps to configure this:
Step 1. Open the DNS Manager and right-click the zone where you want to enable trust anchor distribution. Point to DNSSEC and click Properties.
Step 2. Click the Trust Anchor tab.
Step 3. Select the Enable the Distribution of Trust Anchors for This Zone check box and the Enable Automatic Update of Trust Anchors on Key Rollover (RFC 5011) check box, and click OK.
Trust Anchor Distribution in Active Directory Using PowerShell
If the DNS server is not Active Directory–integrated, trust points are stored on the DNS server as a text file. By default, the list of trust points is stored in the file %windir%system32dnsTrustAnchors.dns. If the DNS server is also a domain controller, trust points are stored in Active Directory. You can distribute trust anchors in Active Directory by using PowerShell with the following commands. Membership in the Administrators group, or equivalent, is the minimum requirement for these steps.
Step 1. Open an elevated Windows PowerShell prompt on a primary, authoritative DNS server.
Step 2. Use the following PowerShell commands to enable distribution of trust anchors in Active Directory:
Set-DnsServerDNSSECZoneSetting zuerich.pearson.com
-DistributeTrustAnchor DnsKey
Get-DnsServerDNSSECZoneSetting zuerich.pearson.com | fl -Property
Zone, Name,DistributeTrustAnchor
ZSK/KSK Rollover Process
You have secured your zone with DNSSEC. The longer a key is used, the longer intruders have to break it. From time to time, key algorithms need updating, to lower the risk that someone will steal your private keys. All these problems have the same solution: Replace your keys with updated newer keys. This is called key rollover. You can roll over KSKs and ZSKs.
Changing a KSK or ZSK certainly risks breaking the chain of trust, so the goal of key rollover is to still have a valid chain of trust. If a DNS server can verify any one of those signatures through the chain of trust, the zone stays secure. Extra signatures do not harm DNS or DNSSEC, but your timing must be very good so that resolvers do not try to use a key that is not valid or one that has been removed or rolled from cache.
Two standard rollover methods are used: double signature and prepublishing. With the double signature method, you simultaneously sign the zone with both the old and new keys. Recursive clients get both signatures. Both signatures are held in the zone until all caches have had enough time to expire the old public key from the zone. When the time passes, the old key is removed. This is a risk-reducing method, but it doubles the size of your zone. With the prepublishing method, you make the new DNSKEY record available before signing. You then propagate the key to all client caches, remove the old signatures, and create new ones with the new key. This method does not double the size of your zone; it replaces signatures as they expire. However, it is more complicated. Best practice is to use prepublishing for ZSK rollovers and double signing for KSK.
Windows Server 2016 has some new PowerShell cmdlets to help you perform a ZSK/KSK rollover process. One is Step-DnsServerSigningKeyRollover, which you can use to roll over a KSK that is waiting for an update from a parent delegation signer (DS). If a server that hosts a securely delegated zone cannot check whether the DS record in a parent is updated, use this cmdlet to force a rollover. Important: You must manually update the DS record in the parent before you run this cmdlet.
The root’s KSK pair was first generated in the year 2010. The KSK rollover will take place in eight steps, a process that is expected to take about 2 years.
ISPs and network operators that have enabled DNSSEC validation must update their systems with the new public part of the KSK, known as the root’s trust anchor.
Developers of software that supports DNSSEC validation should ensure that their product supports RFC 5011. If so, the KSK will be updated automatically at the appropriate time.
For software that does not conform to RFC 5011, or for software that is not configured to use it, the new trust anchor file can be manually updated. This file is available at http://data.iana.org/root-anchors/.
DNSSEC Clients
A DNSSEC security-aware DNS client is a client that understands DNSSEC. A non-security-aware DNS client is a DNS client that does not understand DNSSEC. Table 4-4 summarizes DNS client security-aware status.

When a zone has been signed with DNSSEC, the success or failure of a DNS query depends on the following settings:
1. Name Resolution Policy
2. Trust anchor status
3. Security-aware status
Name Resolution Policy
The Name Resolution Policy Table (NRPT) contains rules that control the DNS client behavior for sending DNS queries and processing the responses from those queries.
Settings from the NRPT can be applied only to security-aware DNS clients. Non-security-aware clients ignore such settings. GPOs can be configured to either require DNSSEC validation or not require DNSSEC validation for a given namespace (see Figure 4-29).
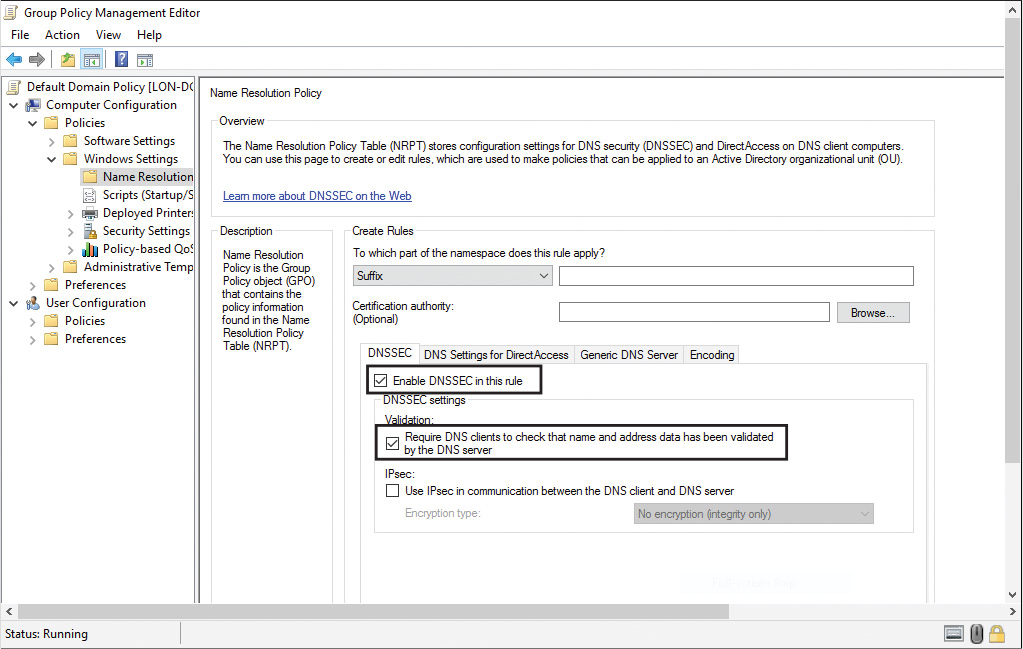
For example, a DNSSEC rule prompts the client computer to check for validation of the response for a particular DNS domain suffix. As a best practice, you should use GPOs as the preferred method for delivering NRPT settings. If no NRPT is present, the client computer accepts responses without validating them.
In Windows 8, Windows Server 2012, Windows 8.1, and Windows Server 2012 R2, the DNS client service continues to be nonvalidating and security-aware, the same as computers running Windows 7 and Windows Server 2008 R2. When the DNS client issues a query, it can indicate to the DNS server that it understands DNSSEC. However, the client is nonvalidating. When issuing queries, the DNS client relies on the local DNS server to indicate that validation was successful. If the server fails to perform validation or reports that validation was unsuccessful, the DNS client service can be configured to return no results.
With the following PowerShell command, you can retrieve the effective DNS client NRPT:
Get-DnsClientNrptPolicy -Effective
Security-aware Status
A security-aware (DNSSEC-enabled) client can still be protected by DNSSEC because a DNS server with an installed trust anchor automatically attempts to validate all responses in that namespace and discards invalid (spoofed) responses. A non-security-aware client ignores Name Resolution Policy requirements for DNSSEC validation. Therefore, if a trust anchor is not installed on a DNS server that is used by the client, and NRPT policy requires that validation be performed, only a security-aware DNS client will fail DNS resolution. The behavior of a non-security-aware client is the same as the behavior of a security-aware client that does not have any NRPT rules applied. Table 4-5 summarizes how DNSSEC validation works for security-aware and non-security-aware DNS clients under different conditions.

DNSSEC and Delegation
A delegation is a referral of authority from one DNS server to a different DNS server for a specific namespace. Delegations are commonly used to assign authority for child zones. For example, the Internet root DNS servers delegate DNS authority for .com to generic top-level domain (gTLD) servers. See the following example for nslookup.exe:
nslookup -q=NS microsoft.com. a.root-servers.net
com nameserver = m.gtld-servers.net
com nameserver = l.gtld-servers.net
com nameserver = k.gtld-servers.net
com nameserver = j.gtld-servers.net
com nameserver = i.gtld-servers.net
com nameserver = h.gtld-servers.net
com nameserver = g.gtld-servers.net
com nameserver = f.gtld-servers.net
com nameserver = e.gtld-servers.net
com nameserver = d.gtld-servers.net
com nameserver = c.gtld-servers.net
com nameserver = b.gtld-servers.net
com nameserver = a.gtld-servers.net
The gTLD servers delegate authority for microsoft.com to msft.net authoritative DNS servers. See the following example:
nslookup -q=NS microsoft.com. a.gtld-servers.net
microsoft.com nameserver = ns3.msft.net
microsoft.com nameserver = ns1.msft.net
microsoft.com nameserver = ns5.msft.net
microsoft.com nameserver = ns2.msft.net
microsoft.com nameserver = ns4.msft.net
Delegations are important because they establish a chain of authentication for child zones. If all zones in the chain are signed with DNSSEC, resolving DNS servers can have only a single delegation signer (DS) trust anchor installed, as long as the appropriate DS records are available in the parent zone.
With delegations, installing a trust anchor is not always necessary for every zone that a caching DNS server can validate. Under certain conditions, you can build a chain of authentication (a chain of trust) in which it is sufficient for the DNS server to have only a DS trust anchor installed for the parent zone.
Chain of Trust
During secure name resolution, a resolver builds a chain of trust: It starts from a trusted key and follows the path to the queried resource records while verifying signatures of resource records and secure links represented by DS-DNSKEY records.
Figure 4-30 shows the steps that a DNSSEC client (with only the root zone key as the secure entry point) follows to trust a resource record of the pearson.com zone.

At each step, you see the same scheme: A DS resource record allows trust for a KSK, a KSK allows trust for all the zone keys (the DNSKEY RRset), and ZSKs allow trust for other resource records of the zone.
Tip
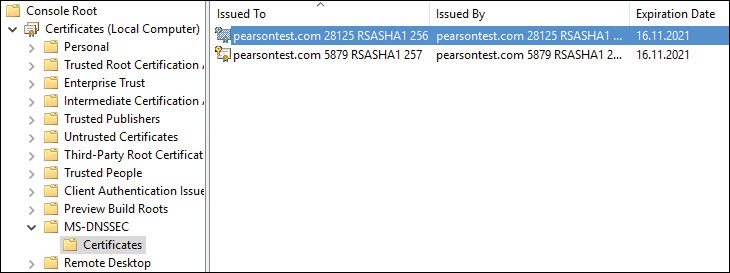
Storing a KSK or ZSK for a zone as a certificate is also possible. With the following command, you can create a ZSK or KSK certificate with the corresponding signing key in the certificate: dnscmd /OfflineSign /GenKey /Alg /Flags /Length /Zone /SSCert /FriendlyName. In the Microsoft Script Center, you can find the DNSSEC Zone Sign/Rollover Sample Script to aid in signing or rolling over a zone using DNSSEC. By default, the script uses the RSA/SHA-1 signing algorithm and 1024-bit key lengths. Supported rollover methods include prepublished ZSK, double signature ZSK, and double signature KSK. For example, with the Generate-Key function in this script, you can create a ZSK or KSK for the pearsontest.com zone using the following commands: Generate-Key zsk pearsontest.com or Generate-Key ksk pearsontest.com. Afterward, you have two new certificates in the local computer certificate store under MS-DNSSEC/Certificates (see Figure 4-31).
An attacker that owns a compromised key for a given zone can forge any resource record for this zone and generate signatures for these RRs. Then the attacker can send these RRs with their associated signatures to the target cache server or a resolver to provide false information. Moreover, with this key, the attacker can generate an entire false zone and its delegations. It can also create a false or forged child zone (and so on) because it owns a secure entry point in the DNS tree.
However, if the chain of trust is broken, a child zone must have its own trust anchor installed. For example, DNS responses for the signed zone A.B.C.com can be validated using a trust anchor for the signed zone C.com, as long as B.C.com is also signed. If B.C.com is not signed, then C.com becomes an island of trust and requires its own trust anchor.
After a zone is DNSSEC-signed, and if the parent of the zone is also DNSSEC-signed, the signed delegation records must be added to the parent zone and then the parent zone must be re-signed.
This process must be performed every time a new child zone is signed for the first time or when a child zone is re-signed with a new key signing key.
If you own a signed zone but do not own the children of the zone, and if the children zones are in the process of being DNSSEC-signed one at a time, you must re-sign your zone after adding the delegation records each time a new child zone is signed. However, you optimize the process of signing multiple zones if you own the parent as well as the children zones that are to be signed.
DNSSEC Record Types
With DNSSEC you get new resource record types that contain the encryption information and hashes used to perform DNSSEC validation. The six most important DNSSEC record types are TA, DNSKEY, DS, RRSIG, NSEC, and NSEC3.
Table 4-6 describes the base functionality of DNSSEC resource records.

RRset
A resource record set (RRset) is simply a collection of records of the same domain name, record class, and record type. Resolvers return entire RRsets when answering queries. If you make a DNS query for www.pearson.com, you get a single A record in answer. This is the most simple complete RRset. If you ask for the host www.google.ch, however, you get six records. Those six records are a single RRset. Suppose that you get an error message such as “Not enough valid signatures over SOA RRset found.” A possible cause of the problem is that either the SOA RRset didn’t come with RRSIG records or none of the RRSIG that did come with it were valid and cryptographically sound. An SOA RRset can be one SOA record or a group of SOA records. Why is it important to know about RRsets? DNSSEC does not sign single DNS records; instead, it signs complete RRsets.
DNSKEY Record
The DNSKEY records contain a zone’s public key. This is an example DNSKEY resource record, followed by some explanation of its components:
Resolve-DnsName -Name pearson.com -Type DNSKEY | FL *
QueryType : DNSKEY
Flags : 257
Protocol : DNSSEC
Algorithm : 8
Key : {3, 1, 0, 1...}
Name : pearson.com
Type : DNSKEY
CharacterSet : Unicode
Section : Answer
DataLength : 270
TTL : 3600
Flags: DNSKEY records use only two flags: 256 = record is a ZSK, 257
= record is a KSK.
Algorithm: 5 = RSASHA (old), 8 = RSASHA256 (recommended)
DS Record
The DS (Delegation Signer) record is based on a zone’s KSK and contains a hash of the zone’s active KSK, along with information about the algorithm used and the associated key tag. An example for a DS resource record follows, along with an explanation of its components:
Example DS resource record:
pearson.com 86400 IN DS 12086 5 2 GD216607…
pearson.com = domain
86400 = TTL (Time to Live value)
IN DS = this labels this as an Internet DS record
12086 = Key Tag (A tag is unique for any zone, but isn't unique
between zones)
5 = algorithm (5=RSASHA1, 8=RSA/SHA-256, 10=RSA/SHA-512)
2 = Digest type (algorithm used to compute this hash; 1=SHA1,
2=SHA256)
GD216607… = Hash of the Public Key
RRSIG Record
The RRSIG (Resource Record Signature) record gives the digital signature of an RRset. If a DNSSEC-secured zone has an RRset for www.pearson.com, that RRset includes an RRSIG record. An example for an RRSIG resource record follows, along with an explanation of its components:
Resolve-DnsName -Name pearson.com -Type RRSIG
QueryType : RRSIG
Key : 53115
TypeCovered : NS
Algorithm : 8
LabelCount : 2
OriginalTtl : 3600
Expiration : 26.11.2016 13:18:00
Signed : 16.11.2016 12:18:00
KeyTag : 53115
Signer : pearson.com
Signature : {123, 110, 37, 254...}
Name : pearson.com
Type : RRSIG
CharacterSet : Unicode
Section : Answer
DataLength : 168
TTL : 3600
TypeCovered: Type of DNS resource (in this case, an NS record) the signature applies to. It can be A, SOA, NS, MX, or any other sort of DNS record.
Algorithm: Type of algorithm (5=RSASHA1, 8=RSA/SHA-256).
LabelCount: Number of labels (for example, www.pearson.com has three labels and pearson.com has two labels).
OriginalTTL: Time to Live, in seconds. Validating a DNSSEC signature requires the original TTL.
Expiration: Date the signature expires.
Signed: Date the signature becomes valid.
Signature: Digital signature (the signature is generated by signing the zone data with the ZSK).
NSEC/NSEC3 Records
The “next secure” records offer proof that a record does not exist. You want to generate a statement if you try to find a record that does not appear in DNS. A disadvantage of NSEC records is that an attacker can use them to enumerate the entries in a zone. NSEC3 is better because NSEC3 records hash the names of existing hosts. Consider this example for an NSEC recourse record, followed by an explanation of its components:
usa.pearson.com. 900 IN NSEC www.pearson.com. A TXT AAAA RRSIG NSEC
DNSKEY
usa.pearson.com. = Name of valid host in the zone
900 = TTL for this record
IN NSEC = Identification as an Internet NSEC record
www.pearson.com. = Name of the next valid host in the zone
A TXT AAA RRSIG NSEC DNSKEY = The host with which usa.pearson.com has these records associated
An example for a NSEC3 recourse record follows, along with an explanation of its components:
ZUAQT15EZT56UT1ZUET.pearson.com. 3600 IN NSEC3 1 0 10 03F92714
bzewf26zgf2gd72gd A RRSIG
ZUAQT15EZT56UT1ZUET = Hash of a valid hostname
3600 = TTL for this record
IN NSEC3 = Identification of an Internet NSEC3 record
1 = Algorithm used to generate the hash
0 = NSEC3 flags
10 = Number of times the hostname is passed through the hashing algorithm
03F92714 = Hexadecimal salt used for that calculation
bzewf26zgf2gd72gd = Hashed hostname for the next host in the zone
A RRSIG = List of valid resource records associated with this host
A zone using NSEC3 also has a NSEC3PARAM record, which is necessary for the proper functioning of NSEC3. Figure 4-32 shows an example of the NSEC3PARAM resource record.

Exam Preparation Tasks
Review All the Key Topics
Review the most important topics in the chapter, noted with the Key Topics icon in the outer margin of the page. Table 4-7 lists these key topics and the page numbers where each is found.

Complete the Tables and Lists from Memory
Print a copy of Appendix B, “Memory Tables” (on the book’s website), or at least the section for this chapter, and complete the tables and lists from memory. Appendix C, “Memory Tables Answer Key,” also on the website, includes completed tables and lists to check your work.
Define Key Terms
Define the following key terms from this chapter and check your answers in the glossary.
root zone trust anchor
trust anchor state
DNSSEC priming
DS record
trust point
NRPT
End-of-Chapter Review Questions
1. Your Active Directory environment consists of one forest with two trees and six domains (see Figure 4-33). Every domain has two domain controllers named DC1 and DC2 with an installed DNS server role. You have created an AD-integrated zone named devtestenv.com on dc1.pearson.com. The zone is signed with DNSSEC. DNS data of this zone is stored in a custom DNS application directory partition. Only the DC1 domain controllers from all domains are enlisted in the scope of that partition. You must ensure that all domain controllers from all domains can get the DNS data replicated from devtestenv.com and that the zone is signed. What is your first step?

a. Change the replication scope of zone devtestenv.com.
b. Unsign the zone devtestenv.com. Change the replication scope to all domain controllers running DNS servers in this forest. Re-sign the zone.
c. Change zone devtestenv.com to Primary. Apply zone type AD integrated with forest replication scope.
d. Create a new zone named devtestenv2.com. In the DNSSEC Zone Signing Wizard, select Sign the Zone with Parameters of an Existing Zone.
2. You have a domain named pearson.com and two domain controllers with the DNS server role installed (DC1 and DC2). The zone pearson.com is a signed AD-integrated zone. You have installed a new Azure virtual machine DC3 as an additional domain controller. Your company site is connected through an Azure S2S tunnel to Azure. You successfully have tested AD replication for all domain controllers. You want to transfer the key master role from DC1 to DC3 and you want to get confirmation messages. Which tools or commands can you use?
a. On DC3, select Use the Following DNS Server as the Key Master on DC3 and then choose DC3 as the new key master.
b. On DC1, select Use the Following DNS Server as the Key Master on DC3 and then choose DC3 as the new key master.
c. On DC3, use Reset-DnsServerZoneKeyMasterRole -SeizeRole.
d. On DC3, use Reset-DnsServerZoneKeyMasterRole -Force.
3. You want to stage a Windows Server 2016 DNSSEC deployment with Windows 10 clients. You have only writeable domain controllers and Windows Servers. You know about the 10 DNSSEC deployment steps. Which of the following two deployment steps are wrong?
a. Choose a zone
b. Choose a key master
c. Choose methods and settings
d. Sign the zone
e. Verify zone signing
f. Add DLV records
g. Choose DNS clients
h. Deploy trust anchors
i. Configure BIND
j. Configure and deploy name resolution policy
k. Verify name resolution policy
l. Monitor and manage
4. Your environment consists of one domain named pearson.com and two sites named HQ and Branch (a physically unsecure location). A firewall secures the network traffic between both sites. The HQ site consists of two domain controllers, named DC1 and DC2, with the DNS server role installed. The zone pearson.com is a signed AD-integrated zone. You install a new Windows Server 2016 RODC at the Branch site. After you do so, you find that the DNS server on that RODC does not have the pearson.com zone. Which configuration should you perform so that the DNS server on the RODC can work as a DNS server for DNS clients at the Branch site?
a. Make sure your firewall isn’t blocking UDP DNS replies that are larger than 512 bytes.
b. Allow zone transfer with Set-DnsServerPrimaryZone.
c. Install an additional writeable domain controller at the Branch site.
d. Install an additional RODC at the Branch site.
5. You have the following DNS servers:
![]() DNS1: Windows Server 2008 R2; Signed Zone: pearson1.com
DNS1: Windows Server 2008 R2; Signed Zone: pearson1.com
![]() DNS2: Windows Server 2012; Signed Zone: pearson2.com
DNS2: Windows Server 2012; Signed Zone: pearson2.com
![]() DNS3: Windows Server 2012 R2; Signed Zone: pearson3.com
DNS3: Windows Server 2012 R2; Signed Zone: pearson3.com
![]() DNS4: Windows Server 2016; Signed Zone: pearson4.com
DNS4: Windows Server 2016; Signed Zone: pearson4.com
All zones were signed locally by a DNS server. You want to use the PowerShell cmdlet Invoke-DnsServerZoneUnsign to unsign all the zones. Which zone can you not unsign in this way?
a. pearson1.com
b. pearson2.com
c. pearson3.com
d. pearson4.com