12. Publishing
Lesson overview
In this lesson, you’ll learn how to do the following:
Understand runtime environments
Understand the output files for different Animate document types
Modify the publish settings
Convert one Animate document type to a different document type
Publish an Adobe AIR application for the desktop
Publish an HTML5 Canvas document
Publish a projector for Windows and macOS
Test mobile interactions in the AIR Debug Launcher
Understand publishing for iOS and Android
This lesson will take about one and a half hours to complete. Please log in to your account on peachpit.com to download the lesson files for this chapter, or go to the Getting Started section at the beginning of this book and follow the instructions under “Accessing the Lesson Files and Web Edition.”
Use the various document types in Adobe Animate CC to create content that targets a variety of platforms and uses, including HTML5 multimedia for the web browser, multimedia for Flash Player, desktop applications, high-definition video, or mobile device apps. Put your content everywhere while leveraging Animate’s powerful and familiar animation and drawing tools.
Understanding Publishing
Publishing is the process that creates the file or files that are required to play your final Adobe Animate CC project for your viewers. Keep in mind that Animate CC is the authoring application, which is a different environment from that on which your viewers experience your movie. In Animate CC, you author content, which means you’re creating art and animation and adding text, videos, sound, buttons, and code. In the target environment, such as a desktop browser or a mobile device, your viewers watch the content when it plays back, or runs. So developers make a distinction between “author-time” and “runtime” environments.
![]() Note
Note
If you have not already downloaded the project files for this lesson to your computer from your Account page, make sure to do so now. See “Getting Started” at the beginning of the book.
Animate can publish content to various runtime environments, and your desired runtime environment determines the Animate document that you choose when you begin a project.
Sometimes a single document type can publish content for multiple runtime environments. For example, an ActionScript 3.0 document can export a high-definition video or a web page for Flash Player.
Document types
You learned about the various Animate document types in Lesson 1, and you’ve worked with a few of them throughout the projects in this book. For example, you started an HTML5 Canvas document for Lesson 2, an ActionScript 3.0 document for Lesson 7, and an AIR for Desktop document for Lesson 11. Each project publishes a different set of files for their targeted runtime environment, but each project is saved as an FLA (Animate Document) or XFL (Uncompressed Animate Document) file that you edit in Animate CC.
In this lesson, you’ll explore various publishing options for the document types in greater detail.
Runtime environments
If an ActionScript 3.0 document is published to SWF and is played back with Flash Player in a desktop web browser, then Flash Player is the runtime environment for that ActionScript 3.0 document. Flash Player 26 is the latest version and supports all the new features in Animate CC. Flash Player is available as a free plug-in from the Adobe website for all the major browsers and platforms.
![]() Note
Note
The ActionScript 3.0 document also supports publishing content as a projector for either macOS or Windows. A projector plays as a stand-alone application on the desktop, without needing a browser.
By the end of 2020, however, Adobe will no longer support Flash Player for web browsers. Increasingly, major browsers automatically block Flash Player, and readers must enable the plug-in manually. For these reasons, it’s best to use ActionScript 3.0 documents to create animation assets for export (as HD video, sprite sheets, or PNG sequences) or for projectors (covered in this lesson).
If you want to target web browsers without requiring Flash Player, then begin your Animate project with an HTML5 Canvas or WebGL document. To integrate interactivity into an HTML5 Canvas or WebGL document, you use JavaScript rather than ActionScript. You can add JavaScript directly in the Actions panel or by using the Actions code wizard in the Actions panel.
Adobe AIR is another runtime environment. AIR (Adobe Integrated Runtime) runs content directly from your desktop, without the need for a browser. When you publish your content for AIR, you can make it available as an installer that creates a stand-alone application, or you can build the application with the runtime already installed, known as “captive runtime.”
You can also publish AIR applications as mobile apps that can be installed and run on Android devices and on iOS devices such as the Apple iPhone or iPad, whose browsers do not support Flash Player.
![]() Tip
Tip
When you change the settings in the Publish Settings dialog box, Animate saves them with the document.
![]() Note
Note
Not all features are supported across all document types. For example, WebGL documents don’t support text and HTML5 Canvas documents don’t support the 3D Rotation and Translation tools. Unsupported tools are grayed out.
Converting to HTML5 Canvas
You may have many older animations that you created as an ActionScript 3.0 document that a client wants to use as HTML5 animations. Don’t worry; you don’t have to redo all your work. Fortunately, Animate CC includes options for converting ActionScript 3.0 documents into HTML5 Canvas documents so your animations can reach the widest audience.
There are two approaches to creating an HTML5 Canvas document with Animate assets. First, you can simply create a new HTML5 Canvas document and copy and paste the layers from one file to your new file. Second, you can open your ActionScript 3.0 document and choose File > Convert To > HTML5 Canvas. Animate makes the conversion, and you can save your new file as an HTML5 Canvas document.
![]() Note
Note
Remember that an ActionScript 3.0 document doesn’t necessarily contain ActionScript 3.0. An ActionScript 3.0 document is simply an Animate document that publishes for Flash Player in a browser by default. An ActionScript 3.0 document can consist of animation only.
Converting an ActionScript 3.0 document to an HTML5 Canvas document
You’ll convert an animation that you built as an ActionScript 3.0 document in a previous lesson to an HTML5 Canvas document.
Open the 12Start_convert.fla file in the 12Start folder.
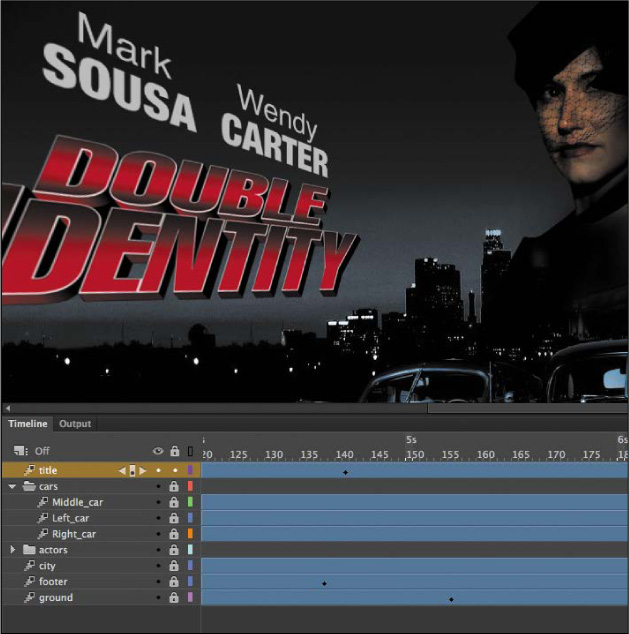
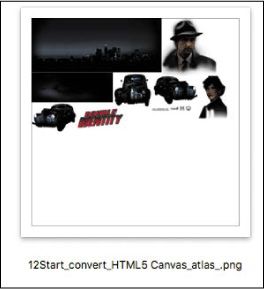
The project is the completed animated promotional piece for the fictional movie Double Identity from a previous lesson. The ActionScript 3.0 document contains bitmaps and motion tweens with changes in position, scale, color effects, 3D effects, and filters.
The file targets Flash Player. The frame rate is set at 30 frames per second, with a black Stage fixed at a generous 1280 pixels in width and 787 pixels in height.
Choose File > Convert To > HTML5 Canvas.
Animate asks you where to save the new converted file.
Click Save to save the file in the 12Start folder.
Animate duplicates your content into a new HTML5 Canvas document and saves a new file. The new HTML5 Canvas document contains your converted content.
View the warnings in the Output panel.
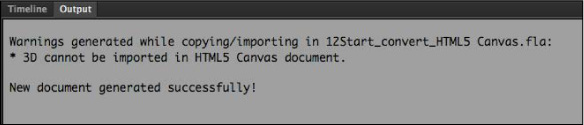
The Output panel displays the following warning:
* 3D cannot be imported in HTML5 Canvas document.
The HTML5 Canvas document does not support either the 3D Rotation tool or the 3D Translation tool, so the tween does not display. Keep an eye out for the messages in the Output panel to make sure you understand how Animate handles the transition of your content from Flash Player to HTML5, and so that you know what features cannot be ported over. Often, you’ll have to do additional edits to your animation after each conversion.
Choose Control > Test to test the converted content.

Animate exports HTML5 and JavaScript and displays the animation in a browser. The converted animation plays, showing all the motion tweens, including the nested animations of the idling cars. The 3D animation of the title, which is unsupported, appears at the end without any animated effects. In addition, the Blur filter does not animate, which is another limitation of the HTML5 Canvas document.
The Output panel displays additional warnings regarding features included in the animation.
Publishing for HTML5
HTML5 is the latest version of the HTML specification for marking up web pages for the browser. HTML5, along with CSS3 and JavaScript, is the modern standard for creating content for the web on the desktop, mobile phones, and tablets. Choosing the HTML5 Canvas document type in Animate targets HTML5 as the published runtime and outputs a collection of HTML5 and JavaScript files.
What is HTML5 Canvas?
Canvas refers to the canvas element, a tag in HTML5 that allows JavaScript to render and animate 2D graphics. Animate CC relies on the CreateJS JavaScript libraries to generate the graphics and animations inside the canvas element of the HTML5 project.
What is CreateJS?
CreateJS is a suite of JavaScript libraries that enable rich, interactive content with HTML5. CreateJS itself is a collection of several separate JavaScript libraries: EaselJS, TweenJS, SoundJS, and PreloadJS.
EaselJS is a library that provides a display list that allows you to work with objects on the canvas in the browser.
TweenJS is a library that provides the animation features.
SoundJS is a library that provides functionality for playing audio in the browser.
PreloadJS is a library that manages and coordinates the loading of content.
With CreateJS, Animate CC generates all the necessary JavaScript code to represent your images, graphics, symbols, animations, and sounds on the Stage. Animate also outputs dependent assets, such as images and sounds. You can easily configure how those image and sound assets are organized in the publish settings.
You can also include your own JavaScript commands directly in the Actions panel to control your animation. Those JavaScript commands get exported in the JavaScript files.
Learn more about the CreateJS JavaScript libraries at www.createJS.com.
Exporting to HTML5
The process to export your animation to HTML5 and JavaScript is straightforward.
Choose File > Publish.
Animate exports the animation as HTML and JavaScript files and saves them in the same folder as your FLA file (according to the default Publish Settings options).
Double-click the HTML file, named 12Start_convert_HTML5 Canvas.html.
Your default browser opens and plays the animation.
Understanding the exported files
This animated sequence uses bitmap images. Images imported into the Animate library must be exported so that they are accessible to the HTML and JavaScript documents.
Examine the folder on your desktop where you saved your Animate file, 12Start_convert_HTML5 Canvas.fla.
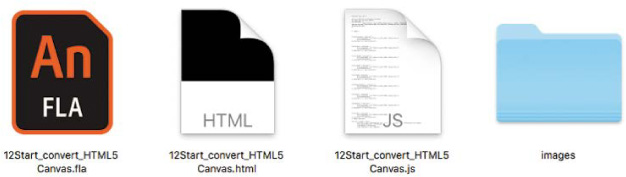
Animate creates an HTML file, as well as a JavaScript file that contains the code that animates all the image assets.
In addition, Animate has created a folder named images. Inside the images folder are all the bitmap assets for the animation saved as a single PNG image. The JavaScript code in your exported documents dynamically loads just the images that it needs to display from the single PNG image, called a sprite sheet.
To share your HTML5 animation over the web, you need to upload the HTML file, the JavaScript file, and the images folder to your server. Point your readers to the HTML5 document to have them see your animation. You can rename the HTML5 document, but do not rename the JavaScript file, the images folder, or the sprite sheet inside the folder. The HTML5 document references those files, and if you rename them, they can’t be found, and your animation won’t work.
Publish settings
The Publish Settings dialog box lets you change where your files are saved and how they are saved.
Click Publish Settings in the Properties panel, or choose File > Publish Settings to open the Publish Settings dialog box.
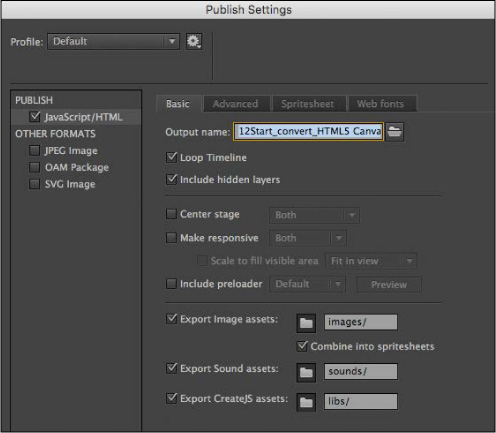
On the Basic tab, do one or more of the following:
Deselect Loop Timeline if you want the Timeline to play only once.
Click the folder icon next to the Output Name field to save your published files to a different folder or under a different filename.
Change the paths next to the Export Assets options if you want to save your assets to a different folder. The Export Image Assets checkbox must be selected if your file contains images, and Export Sound Assets must be selected if your file contains sounds.
Select Center Stage to center-align your Animate project in the browser window. You can use the menu next to the option to choose to center your movie Horizontally, Vertically, or Both.
Select Make Responsive to have your Animate project respond to changes in the browser window dimensions, and use the menu next to the option to choose whether the project responds to changes in window height, window width, or both. The Scale To Fill Visible Area option determines how your project fills the available space in the browser window.
Select Include Preloader. This option includes a standard small looping animation that plays to let users know that files are being downloaded before the animation can begin.
Select the Advanced tab.
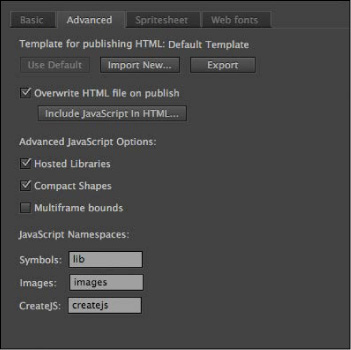
Click Include JavaScript In HTML if you want to publish a single file that includes all the necessary JavaScript and HTML code for your file. If you choose this option, Animate will overwrite the exported file each time you publish.
Deselect the Overwrite HTML File On Publish checkbox if you want to preserve the HTML file and simply change the JavaScript code that gets generated that drives your animations.
The Hosted Libraries option tells your published file where to find the CreateJS JavaScript libraries. When the option is selected, your published file points to a CDN (content distribution network) at http://code.createjs.com to download the libraries. You must have an Internet connection for your animation to work when this option is selected. When the Hosted Libraries option is deselected, Animate includes the CreateJS JavaScript libraries as separate documents that must accompany your project files.
Leave all the other Advanced JavaScript options at their default settings.
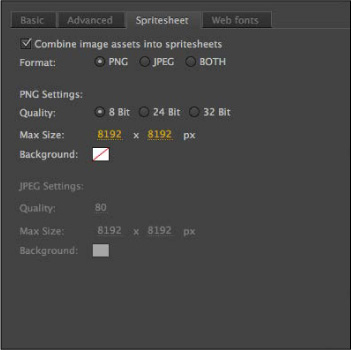
Select the Spritesheet tab.
 Note
NoteYou can publish a transparent Stage from an HTML5 Canvas document. In the Properties panel, in the Properties area, choose the selection with a diagonal red line, indicating “no color” for the Stage.
Select Combine Image Assets Into Spritesheets if you want to create a single image file for all the bitmaps that you’ve imported into your library. An HTML5 web page can load a single image file and retrieve specific portions of the image more quickly than it can load multiple smaller images.
Select a Format option for the exported image, and set the quality, size, and background color for the image. If you choose a size that’s too small to fit the images in your library, Animate will publish multiple sprite sheets as needed.
Click OK to save all your settings. Close the file; you won’t be needing it again for this lesson.
NoteIf you select the Combine Into Spritesheets option on the Basic tab (in the Export Image Assets section), the Combine Image Assets Into Spritesheets option will also be selected in the Spritesheet tab, and vice versa.
Publishing a Desktop Application
You may want to distribute your movie to run without a browser.
You can output your movie as an AIR file, which installs an application on the user’s desktop. Adobe AIR is a robust runtime environment that supports a broader range of technologies.
Viewers must download the free Adobe AIR runtime from the Adobe website at http://get.adobe.com/air/. Alternatively, you can output an AIR project with the Captive Runtime option, which includes the AIR runtime so that your audience doesn’t need to download anything additional.
Creating an AIR application
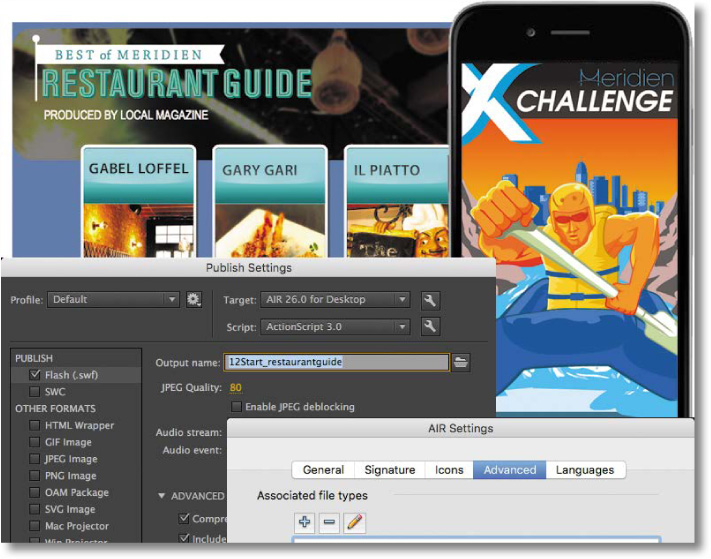
Adobe AIR allows your viewers to see your Animate content on their desktop as an application. You’ll recall that in Lesson 11, the final project was a desktop application of an interactive zoo kiosk. In this section, you’ll specify the necessary publish settings to create a desktop application of a restaurant guide.
Open 12Start_restaurantguide.fla.
This is the same interactive restaurant guide that you created in a previous lesson, with a few modifications to the background image.
In the Properties panel, in the Publish section, note that AIR 26.0 For Desktop is chosen from the Target menu.
Click the Edit Application Settings button (wrench icon) next to the Target menu.
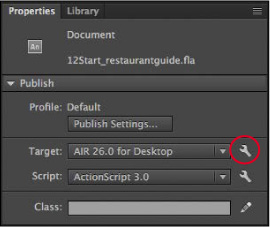
The AIR Settings dialog box appears.
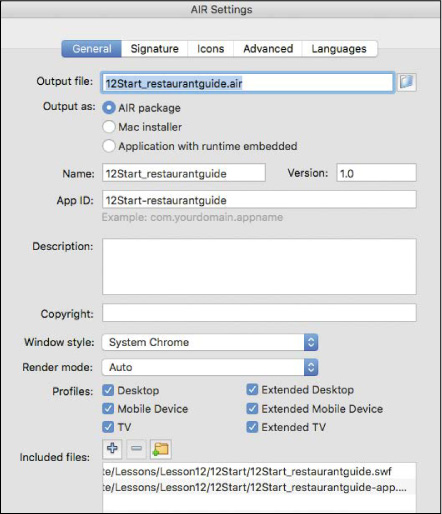
Examine the settings on the General tab.
The Output File field shows the filename of the published AIR installer as 12Start_restaurantguide.air. The Output As options provide three ways to create an AIR application. The first choice, AIR Package, should be selected; here is a description of what each option does:
AIR Package creates a platform-independent AIR installer.
Windows Installer (Windows)/Mac Installer (Mac) creates a platform-specific AIR installer.
Application With Runtime Embedded creates an application without an installer or the need for the AIR runtime to be installed on the end user’s desktop.
In the App Name (Windows) or Name (macOS) field, enter Meridien Restaurant Guide.
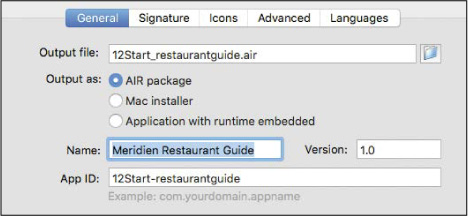
This will be the name of your published application.
From the Window Style menu, choose Custom Chrome (Transparent).
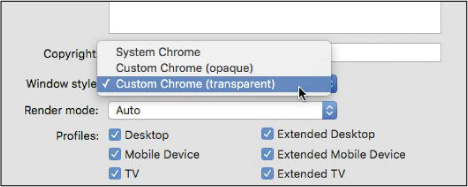
Custom Chrome (Transparent) creates an application that has no interface or frame elements (known as chrome) and that has a transparent background.
Click the Signature tab at the top of the AIR Settings dialog box.
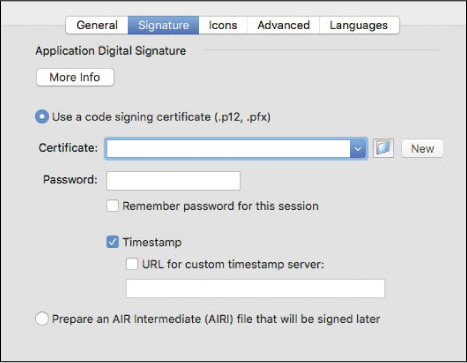
Creating an AIR application requires a certificate so that users can identify and trust the developer of the Animate content. For this lesson, you won’t need an official certificate, so you can create your own self-signed certificate.
Click the Create (Windows) or New (macOS) button next to Certificate.
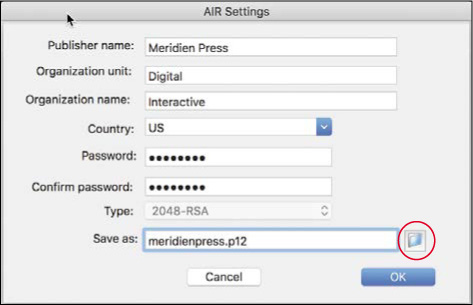
Enter your information in the empty fields. You can use Meridien Press for Publisher Name, Digital for Organization Unit, and Interactive for Organization Name. Enter your own password in both password fields, and then enter meridienpress.p12 in the Save As field. Click the Folder/Browse button to save it in the same folder in which your .FLA file is saved. Click Save and then OK.
Animate creates a self-signed certificate (.p12) file on your computer.
 Tip
TipYou can also open the AIR Settings dialog box from the Publish Settings dialog box. Click the Player Settings button (wrench icon) next to the Target menu.
Animate automatically fills out the path to your .p12 file in the Certificate field. Make sure that the Password field is filled (the password must match the one you used to create the certificate), and that the Remember Password For This Session and Timestamp options are selected.
Now click the Icons tab at the top of the AIR Settings dialog box.
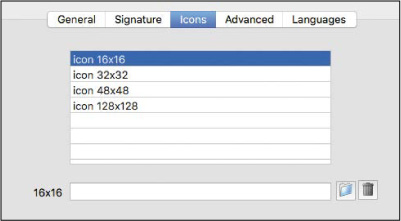
NoteIf you open an FLA file that was created on another computer, Animate may warn you that your computer doesn’t have the same fonts that were used to build the file. Click OK in the alert dialog box to accept the substitute fonts suggested by Animate.
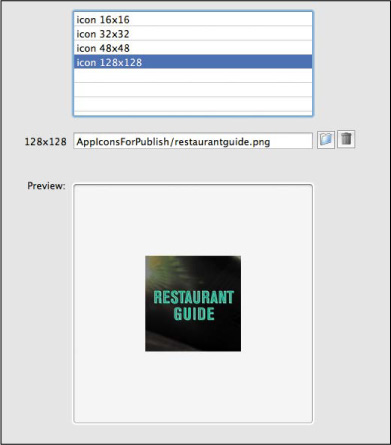
Select icon 128 × 128, and click the folder icon.
Navigate to the AppIconsForPublish folder inside the 12Start folder, select the restaurantguide.png file provided for you, and click Open.
The image in the restaurantguide.png file will be the application icon on the desktop.
Click the Advanced tab at the top of the AIR Settings dialog box.
Under Initial Window Settings, enter 0 for the X field and 50 for the Y field.

When the application launches, it will appear flush to the left side of the screen and 50 pixels from the top.
Click Publish and then click OK.
Animate creates an AIR installer (.air).
Installing an AIR application
The AIR installer is platform-independent, but it requires that the AIR runtime be installed on the user’s system.
Double-click the AIR installer that you just created, 12Start_restaurantguide.air.
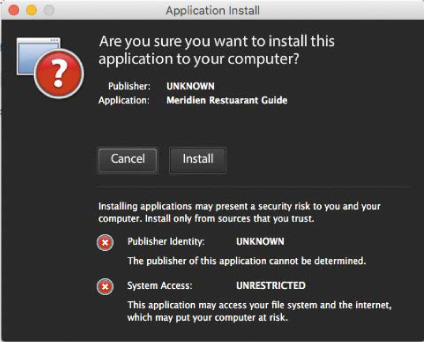
The Adobe AIR Application Installer opens and asks to install the application. Since you used a self-signed certificate to create the AIR installer, Adobe warns of a potential security risk due to an unknown and untrusted developer. (Since you can trust yourself, you’re safe to proceed!)
Click Install, and then click Continue to proceed with the installation at the default settings.
The application called Meridien Restaurant Guide is installed on your computer and automatically opens.
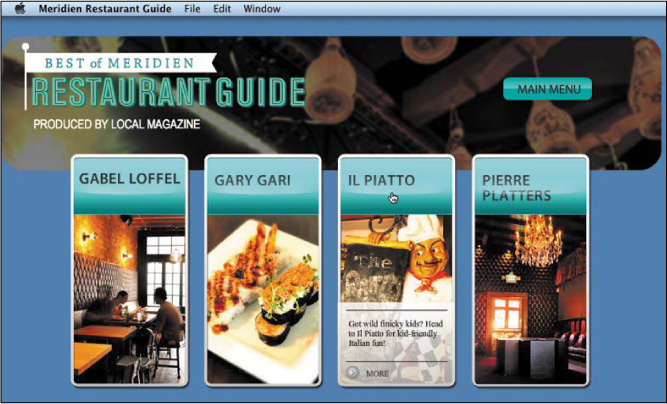
Notice that the application is positioned at the far left edge of your desktop, 50 pixels (between one-quarter and one-half inch, depending on the resolution of your display) down from the top edge, as you specified in the AIR Settings dialog box. Note, too, that the Stage is transparent, so your graphic elements float over the desktop, much like the appearance of other applications.
Quit the application by pressing Alt+F4 (Windows)/Command+Q (macOS).
Creating a projector
In some cases—for example, if you don’t want to deal with an app that requires installation and all the accompanying security issues—you may want to use a low-tech and simpler distribution method. A projector is a self-contained file that includes the Flash Player runtime so that your audience can simply double-click the projector icon to play and view your multimedia content.
You can publish either a macOS or Windows projector from an ActionScript 3.0 or AIR document. However, unlike when you’re creating an AIR application, with a projector you don’t have publishing options such as choosing thumbnails for the app icon, or specifying a transparent background or initial position when the app is launched.
Open 12Start_restaurantguide.fla.
Choose File > Publish Settings.
The Publish Settings dialog box opens.
Under Other Formats in the left column, select Mac Projector, Win Projector, or both. Windows projectors have the file extension .exe, and Mac projectors have the file extension .app.
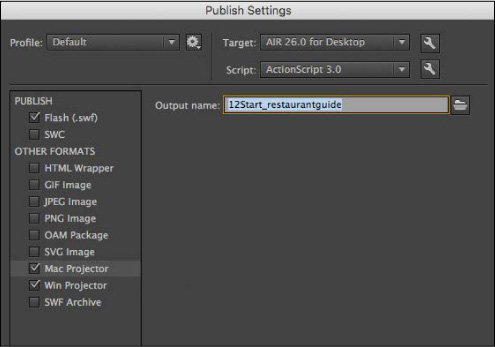
Specify the filename and location where you want Animate to save the projector. Each projector (Mac and Windows) needs a unique filename, so highlight each option to enter it.
Click Publish.
Animate creates the selected projector or projectors in the output location, with a filename that matches the Output Name field. Click OK.
Double-click the projector file.

The restaurant guide opens as a separate application on your desktop. Compare your projector application with your AIR application. Close the file, since you won’t need it again for this lesson.
NoteAny dependent assets, such as video files, must also be included with your projector so that it plays correctly. Animate does not embed those dependent files into the projector.
Publishing to Mobile Devices
You can also publish Animate content to mobile devices running on iOS (such as the iPhone or iPad) or on Android. To publish Animate content to a mobile device, you target AIR for iOS or AIR for Android to create an application that viewers download and install on their devices.
Testing a mobile app
Creating an app for mobile devices is more complicated than creating an application for the desktop because you have to obtain specific certificates for development and distribution. For example, if you want to upload apps to the iTunes Store, Apple requires that you pay a yearly subscription to be a certified developer. Developing for an Android device requires a one-time fee. Moreover, you have to factor in the additional time and effort required for testing and debugging on a separate device. However, Animate CC provides several ways to facilitate testing content for mobile devices:
![]() Note
Note
Testing an app on an iOS device requires that you be part of Apple’s iOS Developer program, where you create development, distribution, and provisioning certificates. The certificates allow you to install apps on iOS devices for testing and upload apps to the iTunes store.
You can use the mobile device simulator provided with Animate, the AIR Debug Launcher, to test mobile interactions. The SimController that accompanies the AIR Debug Launcher emulates interactions such as tilting the device (using the accelerometer), touch gestures such as swiping and pinching, and even geolocation functions.
For iOS devices, Animate can publish an AIR app to test in the native iOS Simulator, which emulates the mobile app experience on your macOS desktop.
Connect a mobile device to your computer with a USB cable and Animate can publish an AIR app directly to your mobile device.
![]() Note
Note
The iOS Simulator is part of Apple’s Xcode developer toolset, which is available as a free download from Apple.
Simulating a mobile app
You’ll use the Adobe SimController and AIR Debug Launcher to simulate mobile device interactions within Animate CC.
![]() Note
Note
On Windows, a security warning may appear when you use the AIR Debug Launcher. Click Allow Access to continue.
Open 12Start_mobileapp.fla.
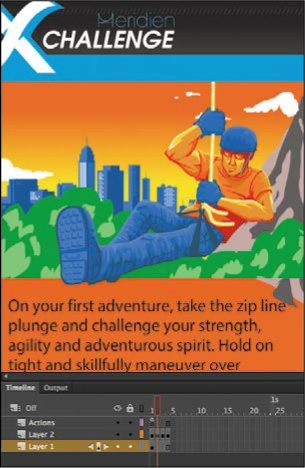
The project is a simple application with four keyframes that announces an imaginary sports challenge set in our familiar city of Meridien.
The project already contains ActionScript code that enables the viewer to swipe the Stage left or right to go to the next or previous frames, respectively.
Examine the code in the Actions panel. The code was added from the Code Snippets panel, which includes dozens of code snippets for interactivity on mobile devices.
In the Properties panel, notice that the target is set for AIR 26.0 for Android.
Choose Control > Test Movie > In AIR Debug Launcher (Mobile), which should already be selected.
The project publishes to a new window. In addition, the SimController application, which provides options for interacting with the Animate content, launches.
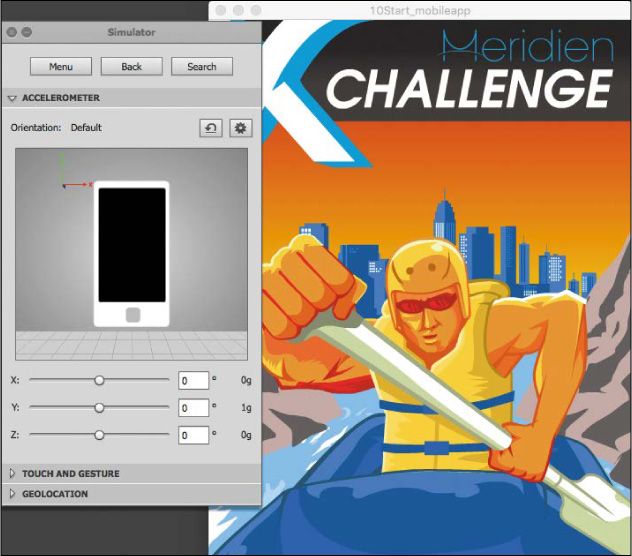
In the Simulator panel, click Touch And Gesture to expand that section.
Select Touch Layer.
The simulator overlays a transparent gray box on the Animate content to simulate the touch surface of the mobile device.
Select Gesture > Swipe.
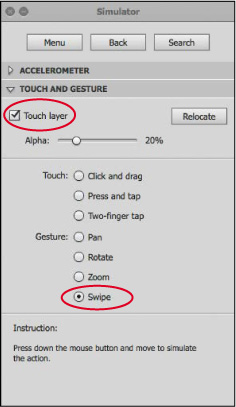
The simulator is now enabled to emulate a swipe interaction. The instructions at the bottom of the panel detail how you can create the interaction with just your mouse cursor.
On the touch layer over your Animate content, drag to the left, and then let go of your mouse button.
The yellow dot represents the contact point on the touch layer of the mobile device.
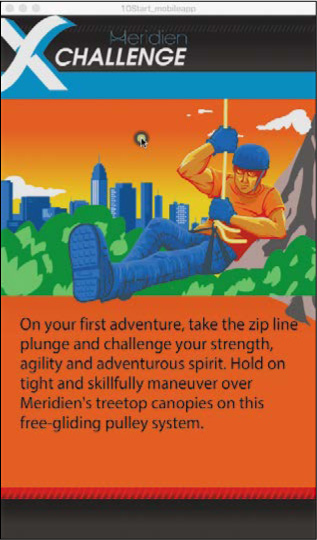
The project recognizes the swipe interaction, and the second keyframe appears.
Swipe left and right.
Animate advances ahead one frame or moves back one frame, respectively.
Close the window.
![]() Tip
Tip
You can change the opacity of the touch layer by changing the Alpha value.
![]() Note
Note
Don’t move the window that contains your Animate content (AIR Debug Launcher, or ADL) when you’ve enabled the touch layer. If you do, the touch layer won’t align with the ADL window, and you won’t be able to accurately test your mobile interactions.
Next Steps
Congratulations! You’ve made it through the last of 12 lessons. By now you’ve seen how Adobe Animate CC, in the right creative hands (yours!), has all the features you need to produce media-rich interactive projects and animations that publish to multiple platforms. You’ve completed these lessons—many of them from scratch—so you understand how the various tools, panels, and code work together for real-world applications.
But there’s always more to learn. Continue practicing your Animate skills by creating your own animation or interactive site. Get inspired by seeking out animation and multimedia projects on the web and exploring apps on mobile devices. Expand your Animate knowledge by exploring the Adobe Animate Help resources and other fine Adobe Press publications.
![]() Note
Note
For more information about publishing Animate content to AIR for iOS or Android, visit the Adobe AIR Developer Center at www.adobe.com/devnet/air.html. Tutorials, tricks and tips, and sample files are available for download.
Review Questions
1 What’s the difference between author-time and runtime?
2 What is CreateJS?
3 What kinds of files are generated when you publish an HTML5 Canvas document?
4 Where should you look for warnings about converting Animate files from one document type to another?
5 What are the various ways you can test an Animate file for a mobile device?
6 What is a code-signing certificate, and why do you need one for an AIR application?
Review Answers
1 Author-time refers to the environment in which you build your Animate content, such as Animate CC. Runtime refers to the environment in which your Animate content plays back for your audience. The runtime for your content can be Flash Player in a desktop browser or an AIR application on the desktop or on a mobile device.
2 CreateJS is a suite of open source JavaScript libraries: EaselJS, TweenJS, SoundJS, and PreloadJS. The JavaScript is required to drive the animation and interactivity for your HTML5 Canvas project.
3 When you publish or test an HTML5 Canvas document, Animate exports all the necessary JavaScript code to represent your images, graphics, symbols, animations, and sounds on the Stage. It also exports an HTML file and dependent assets, such as images and sounds.
4 When you convert one kind of Animate document into another, warnings will appear in the Output panel to inform you about interactive or animation features that may not have converted properly.
5 You can test your Animate project for a mobile device by testing it in the Air Debug Launcher (Control > Test Movie > In AIR Debug Launcher [Mobile]). The accompanying SimController allows you to simulate various mobile interactions, such as pinches and swipes. You can also test your Animate project by publishing it directly to a connected USB device (Android or iOS). Lastly, you can test an iOS app in the native iOS Simulator (Control > Test Movie > On iOS Simulator).
6 A code-signing certificate is a certified document that acts as your digital signature. You purchase one from a certification authority. It provides a way for your audience to authenticate your identity so they can confidently download and install desktop AIR applications, or AIR apps for Android or iOS.