
Chapter 20
Maximizing productivity on mobile devices
Windows 10 and your mobile phone
The modern portable PC is packed with feats of hardware engineering wizardry, miniaturizing powerful components to previously unheard-of sizes. On the software side, similar efforts have been successful in coaxing ever more battery life out of those designs. The upshot is you can now take a portable PC running Windows 10 on the road and do work that is nearly identical to what you can accomplish back at the office.
There are, however, some key differences that make up our discussion in this chapter. When you’re traveling, for example, your portable PC is unlikely to have the advantage of a fast, always-on broadband connection. Likewise, you’re limited to the amount of data storage inside that laptop, without easy access to USB- and network-attached storage devices.
Security is also an ongoing concern when you travel, especially when you find yourself connecting to public Wi-Fi networks with no guarantee that your packets and passwords aren’t being intercepted.
We cover all these topics in this chapter. We know there’s some inevitable overlap with similar discussions earlier in this book, but our focus here remains on the unique challenges of computing on the go. We begin with the biggest challenge of all: battery life.
Managing battery life
Sometimes you want the full power of your PC, especially if you’re trying to accomplish a resource-intensive task on a tight schedule and you know that you’ll be back within range of AC power well before your battery is in danger of running out of juice. Under other circumstances, when the workload is light and you know it will be many hours before you’ll be able to recharge your device, you want to make that battery last as long as possible.
Being able to accomplish either goal requires mastering one essential skill first: the ability to quickly assess how much power capacity remains in the current session.
For a quick estimate of remaining battery life, click the battery icon in the notification area. That opens a flyout menu that shows the remaining battery life, expressed as a percentage. (On a portable PC with more than one battery, such as the Surface Book line from Microsoft, each battery gets its own percentage, beneath an overall percentage that estimates the remaining battery life overall.) When the laptop is plugged into a charger, this menu also estimates the amount of time before the battery is fully charged, as shown in Figure 20-1.
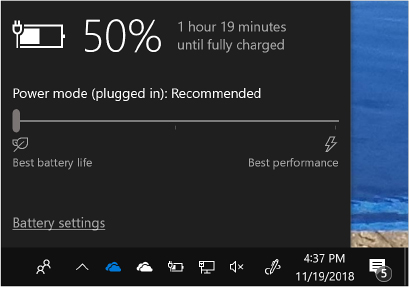
Figure 20-1 Click the battery icon in the taskbar to display this flyout menu, which shows remaining battery life and offers a slider to control how Windows uses the battery.
When the portable PC is plugged in, this flyout also displays an estimate of the time remaining before the device is fully charged. When running on battery power, Windows displays an estimate of the time remaining. (If you don’t see either detail, just wait; Windows needs a few minutes of charging or discharging time to make an estimate, and it sometimes takes a few extra minutes to make an accurate estimate.)
For a more complete display of information about the current battery status, click the Battery Settings link at the bottom of that flyout menu (or take the long way around by going to Settings > System > Battery). On that page, you’ll find a similar display of remaining battery life and, if available, estimated charging time. But that Settings page also includes some additional controls, as shown in Figure 20-2.
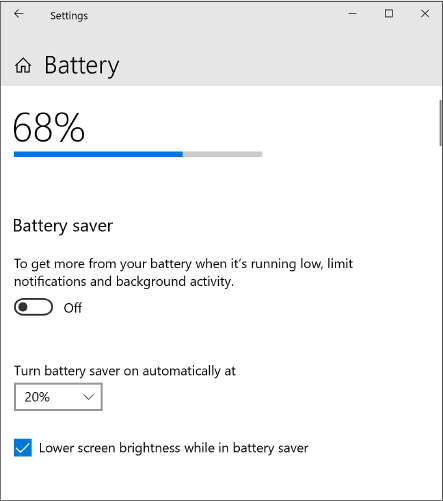
Figure 20-2 This Settings page shows the same information available on the Battery flyout menu, but it also includes a Battery Saver switch to help keep your PC running longer.
For the most important troubleshooting tool on the Battery page in Settings, scroll down to the section headed Battery Usage Per App. After running your portable PC on battery power for at least a few hours (and preferably at least a day), this section contains details similar to those shown in Figure 20-3.
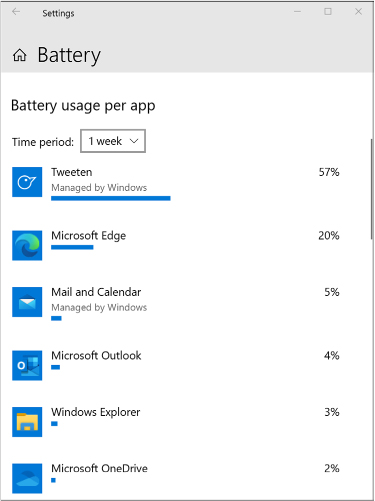
Figure 20-3 After running your Windows 10 laptop PC on battery power over the course of a full day or week, you can see which apps are most responsible for using the battery.
Use the options on the Time Period menu to change the scale of activity to 24 Hours or 1 Week; the values returned show activity on a per-app basis for all times during the selected period when your device was running on battery power. That’s pretty powerful diagnostic information. Used properly, it can help you diagnose which apps are most responsible for draining your PC’s battery. Armed with that information, you can either choose not to use those apps when power saving is high on the agenda, or you can look for configuration changes in the apps at the top of the list to help reduce their hunger for power.
Battery Saver and other power management options
To quickly change the way in which Windows uses the battery during the current session, open the Battery flyout menu and use the slider to choose one of the options ranging from Best Performance (on the right) to Best Battery Life (on the left). Moving the slider all the way to the left turns on the Battery Saver feature; you can also turn on Battery Saver using its Quick Actions button at the bottom of Action Center.
While Battery Saver is on, Windows automatically adjusts the following settings:
The Mail, People, and Calendar apps no longer sync automatically.
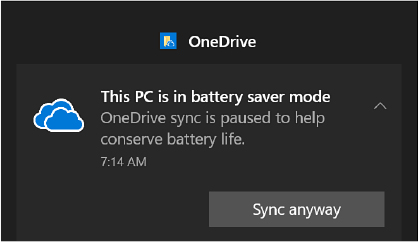
Most apps that normally run in the background are blocked from doing so. OneDrive, for example, sends a notification that it has temporarily stopped syncing local changes to the cloud. You can override this action by clicking the Sync Anyway button in Action Center, as shown in the graphic.
Display brightness (one of the biggest factors in battery usage) is reduced by 30 percent. Hardware manufacturers can change this default setting, and you can override it using the Lower Screen Brightness While In Battery Saver check box.
All noncritical telemetry uploads are blocked.
All noncritical downloads from Windows Update are blocked.
While Battery Saver is enabled, Windows displays an overlay of a leaf on the battery icon in the taskbar, in Settings, and in the Battery flyout menu.
By default, Windows 10 automatically turns on Battery Saver when remaining battery life falls below 20 percent. Use the drop-down menu on the Battery page in Settings to change that threshold to a round percentage between 10 and 50; choose Always to make Battery Saver mode the default, or choose Never to continue running at your chosen power mode until you reach the Low or Critical battery level. At those two settings, you can ask Windows to show a notification or perform an action. For example, you might ask to see a notification when remaining battery level drops to 10 percent and have Windows automatically hibernate when it reaches 5 percent.
You’ll find these settings for the current power plan in the old Control Panel, in the Power Options category, under the Advanced Settings tab for the current power plan. (For more detailed instructions on how to work with power plans, see “Power management on desktop systems,” in Chapter 12, “Performance and power management.”) Expand the Battery heading to expose options for setting Low and Critical levels and defining notifications and actions for each level.
Monitoring long-term battery life and capacity
Over time, if you’re paying attention, you develop an instinctive sense for how long your battery will last and when you should begin looking in earnest for a power outlet. Windows 10 allows you to generate a battery report that gives you a more precise measurement of your battery’s history. The report also allows you to observe the decline in battery capacity that inevitably occurs over time. To generate a battery report, open a Command Prompt or PowerShell window and run the command powercfg /batteryreport. That action generates a file in the current folder called Battery-report.html; double-click that file to view the report in a browser window.
Figure 20-4 shows the Battery Life Estimates section of one such report. The values under the Active heading show actual battery life for each session, with an average at the bottom of the list.
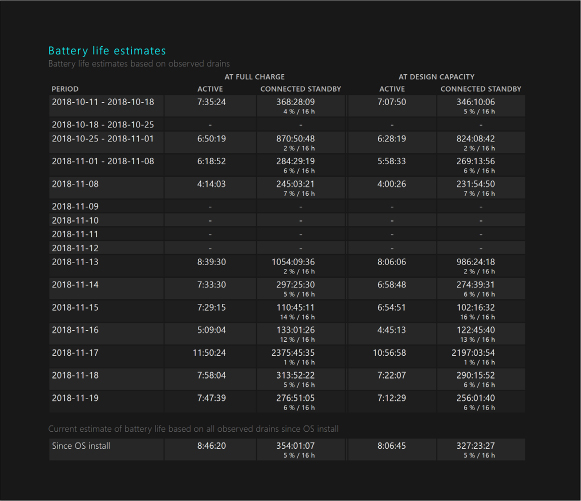
Figure 20-4 Run a battery report to generate an HTML-formatted report that shows, among other things, actual battery life for a portable PC.
Mobile connectivity
At home or in the office, with an always-on broadband connection, you probably don’t think of data as a scarce resource. But on the road, where you typically connect to the internet through mobile data services or Wi-Fi networks managed by other people, that’s an essential factor to keep in mind.
We cover the basic techniques for connecting to public and private Wi-Fi networks in Chapter 13, “Windows networking,” along with similar details for “tethering” a mobile phone as a Wi-Fi hotspot, and won’t repeat those instructions here. Instead, we focus on cellular connectivity options that allow connection over high-speed LTE mobile networks. These features are beginning to appear in some new Windows 10 devices, including the Surface Pro X and Surface Go lines from Microsoft.
On a device that’s equipped with an LTE modem, you’ll see a Cellular page under the Network & Internet category in Settings. You’ll need to insert a SIM card from your mobile provider or, on devices that have a built-in eSIM card, configure that connectivity according to the data provider’s instructions. Figure 20-5 shows a properly configured LTE modem on a Windows 10 PC.
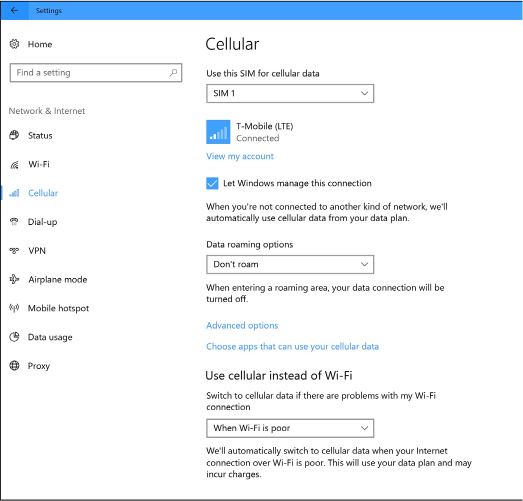
Figure 20-5 On a Windows 10 PC equipped with an LTE cellular modem, you have a wide selection of options for tightly controlling mobile data usage.
If continuous connectivity is more important than managing your mobile data budget, you can select Let Windows Manage This Connection and set the Use Cellular Data Instead Of Wi-Fi option to When Wi-Fi Is Poor. If, on the other hand, your mobile data comes at a steep price, you might choose to connect to the LTE connection manually. For data plans with severe limits, you might want to click Choose Apps That Can Use Your Cellular Data and disallow noncritical apps (like games and streaming music players) from eating into your allowance.
 As is the case when you set up your mobile phone as a hotspot and connect to it via Wi-Fi, you can monitor data usage on a per-connection basis. For details, see “Mobile hotspots and other metered connections,” in Chapter 13.
Storage
How do you make sure you have the data files you need when you hit the road? If you use OneDrive (or an equivalent cloud service), the challenge is one of organizing your work files into folders in the cloud and then letting OneDrive’s sync feature do the heavy lifting.
The other option is downright old-fashioned but still effective. If your portable PC has an expansion slot for an SD or MicroSD card, you can use that removable storage to physically transfer data between PCs. Because it’s a separate physical device from the primary storage, you can also use it for File History backups.
- For details on backing up and restoring files with File History, see “Using File History to protect files and folders,” in Chapter 15, “Troubleshooting, backup, and recovery.”
After adding a removable MicroSD card, you can view details about its usage by going to Settings > System > Storage; scroll down to the More Storage Settings heading, and click View Storage Usage On Other Drives.
Two facts are worth noting when using this type of removable storage. First, it’s typically far slower than the solid-state drives used on a modern laptop PC. For performance reasons, you should avoid using this type of removable storage for data files where the ability to read and write quickly is important, such as Hyper-V virtual machines. Second, bear in mind that it’s especially important to encrypt a removable storage device so that if it’s lost or stolen, your personal data is safe from prying eyes.
Windows 10 and your mobile phone
The Windows 10 Mobile platform is, alas, no more. We recognize that some of our readers still proudly use Windows 10 phones, and we salute their loyalty, but that doesn’t change the fact that Microsoft has stopped developing Windows 10 for phones and has no plans to start back up.
But that decision doesn’t mean Microsoft has exited the phone business completely. In September 2020, Microsoft began shipping the Surface Duo, a pocket-sized mobile device that folds open to reveal two displays arranged side by side. The Surface Duo runs the Android OS, and Microsoft has optimized its mobile Office apps to run effectively in this unusual configuration.
For those who have moved on to more conventional mobile phones running the Android OS on a single screen, there are some consolations. Microsoft has been actively engaged in developing apps for Android, including one that enables direct connections between an Android phone and a PC running Windows 10. (A similar app is available for use on iPhones, but security restrictions in Apple’s iOS make it far less useful than the Android alternative.)
The easiest way to get started is at Settings > Phone, where you’ll find a large Add A Phone button. (If you’ve already connected a phone to your PC, you’ll find options to add another phone or unlink the PC from that mobile device.) Making this connection requires installing matching apps on each device. On the PC side, you’ll need a Microsoft Store app called Your Phone, which is available at https://www.microsoft.com/store/productId/9NMPJ99VJBWV. (This app is installed automatically on Windows 10 version 1809 and later.) From the Google Play Store, download Microsoft’s Your Phone Companion app and install it on the Android device. (The app is available at https://play.google.com/store/apps/details?id=com.microsoft.appmanager.) Our brief discussion in this section covers the publicly released versions of both apps as of September 2020.
After following the instructions to connect the two devices using a Microsoft account, you can do four phone-related tasks from your PC using the Your Phone app. Figure 20-6 shows all four of these activities in a navigation pane along the left side of the Your Phone app, along with one of the many requests for permissions you’ll have to approve to allow your phone and PC to interact smoothly.
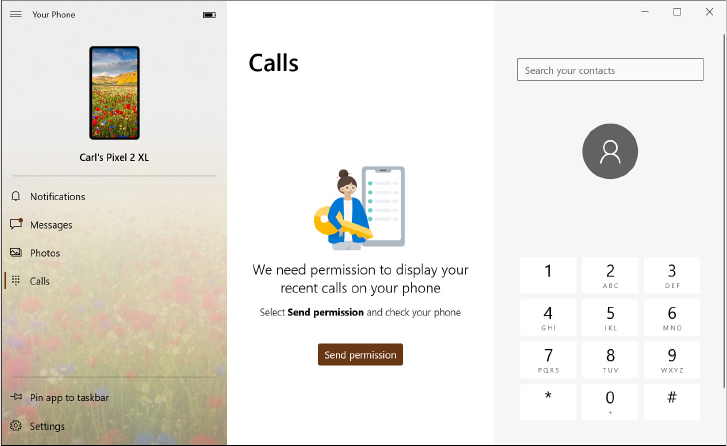
Figure 20-6 Use the Your Phone app to make and receive calls on your mobile device directly from a connected Windows 10 PC.
The navigation pane on the left shows the four available activities in this version of the app. You can view and manage phone notifications on your PC, send and receive SMS and MMS messages, view and copy images from your phone’s camera roll, and make and receive calls using your PC’s audio hardware.
The Photos feature is probably the most interesting one. Click Photos to view the 2000 most recent images (photos and screenshots) from your phone, as in the example in Figure 20-7. Snap a picture on the phone, and you no longer need to jump through hoops to get it onto your PC. Drag a photo from Your Phone into File Explorer or an app or share it. Or double-click to edit the picture in Microsoft Photos or the default photo editor.
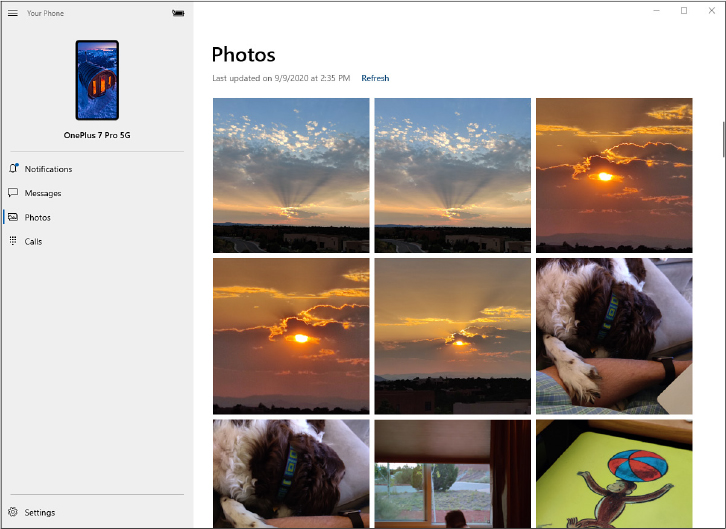
Figure 20-7 Use the Your Phone app to copy or share photos or screenshots from your Android phone directly from a PC running Windows 10.
The Your Phone app also syncs SMS messages from your phone, allowing you to carry on conversations from your desktop PC or laptop without having to take your phone out of your pocket or purse.
One cool trick that isn’t immediately obvious when using a connected Android device is the ability to share a web link from the mobile device to the PC. After opening the page on your mobile browser, choose the Share option and select Your Phone Companion as the share target. Choose the name of the connected PC where you want to continue reading, and wait for the browser to open on your PC.