layers and channels

Serap Osman
essential skills
- Learn the creative potential of layers, adjustment layers, channels and layer masks.
- Develop skills and experience in the control and construction of digital montages.
Introduction
The traditional photograph contains all the picture elements in a single plane. Digital images captured by a camera or sourced from a scanner are similar in that they are also flat files. And for a lot of new digital photographers this is how their files remain – flat. All editing and enhancing work is conducted on the original picture but advanced techniques require things to be a little different.
Digital pictures are not always flat
Photoshop contains the ability to use layers with your pictures. This feature releases your images from having to keep all their information in a flat file. Different image parts, added text and certain enhancement tasks can all be kept on separate layers. The layers are kept in a stack and the image you see on screen in the work area is a composite of all the layers. Sound confusing? Well try imagining, for example, that each of the image parts of a simple portrait photograph are stored on separate plastic sheets. These are your layers. The background sits at the bottom. The portrait is laid on top of the background and the text is placed on top. When viewed from above the solid part of each layer obscures the picture beneath. Whilst the picture parts are based on separate layers they can be moved, edited or enhanced independently of each other. If they are saved using a file format like Photoshop’s PSD file (which is layer friendly) all the layers will be preserved and present next time the file is opened.
Layers and channels confusion
Another picture file feature that new users often confuse with layers is channels. The difference is best described as follows:
- Layers separate the image into picture, text, shapes and enhancement parts.
- Channels, on the other hand, separate the image into its primary base colors.
The Layers palette will display the layer stack with each part assembled on top of each other, whereas the Channels palette will show the photograph broken into its red, green and blue components (if it is an RGB image – but more on this later).

Example image showing the layer components.

Example image showing the channels.
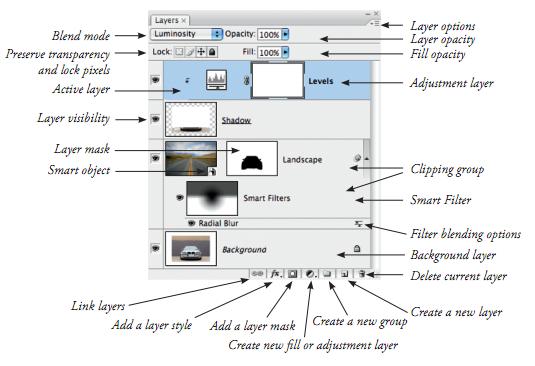
Layers overview
Being able to separate different components of a picture means that these pieces can be moved and edited independently. This is a big advantage compared to flat file editing, where the changes are permanently made part of the picture and can’t be edited at a later date. A special file type is needed if these edit features are to be maintained after a layered image is saved and reopened. In Photoshop, the PSD (Photoshop document), Photoshop PDF and PSB (Large Document Format) formats support all layer types and maintain their editability. It is important to note that other common file formats such as standard JPEG and TIFF do not generally support these features (although JPEG2000 and TIFF saved via recent versions of Photoshop can support all layer types). They flatten the image layers while saving the file, making it impossible to edit individual image parts later.

Authority – Duncan Walker (iStockphoto.com) The Layers palette is used to view the content of the different layers that make up a picture.
Adding layers
When a picture is first downloaded from your digital camera or imported into Photoshop or Bridge it usually contains a single layer. It is a ‘flat file’. By default the program classifies the picture as a background layer. You can add extra ‘empty’ layers to your picture by clicking the Create New Layer button at the bottom of the Layers dialog or choosing the Layer option from the New menu in the Layer heading (Layer > New > Layer). The new layer is positioned above the currently selected layer (highlighted in the Layers palette).
Some actions such as adding text with the Type Tool automatically or drawing a shape create a new layer for the content. This is also true when adding adjustment and fill layers to your image and when selecting, copying and pasting image parts.
Viewing layers
Photoshop’s Layers palette displays all your layers and their settings in the one dialog box. If the palette isn’t already on screen when opening the program, choose the option from the Window menu (Window > Layers). The individual layers are displayed, one on top of each other, in a ‘layer stack’. The image is viewed from the top down through the layers. When looking at the picture on screen we see a preview of how the image looks when all the layers are combined. Each layer is represented by a thumbnail on the left and a name on the right. The size of the thumbnail can be changed, as can the name of the layer. By default each new layer is named sequentially (layer 1, layer 2, layer 3). This is fine when your image contains a few different picture parts, but for more complex illustrations it is helpful to rename the layers with titles that help to remind you of their content (portrait, sky, tree). This is especially true when working with 3D layers as the layer name is incorporated in other characteristics of the 3D environment. Layers can be turned off by clicking the eye symbol on the far left of the layer so that it is no longer showing. This action removes the layer from view but not from the stack. You can turn the layer back on again by clicking the eye space.
Working with layers
To select the layer that you want to change you need to click on the layer. At this point the layer will change to a different color from the rest in the stack. This layer is now the ‘selected layer’ or ‘active layer’ and can be edited in isolation from the others that make up the picture. It is common for new users to experience the problem of trying to edit pixels on a layer that has not been selected. Always check the correct layer has been selected prior to editing a multi–layered image. Each layer in the same image must have the same resolution and image mode (a selection from one image that is imported into another image will take on the host image’s resolution and image mode). Increasing the size of any selection will lead to ‘interpolation’, which will degrade its quality unless the layer is converted into a ‘Smart Object’ first.
Manipulating layers
Layers can be moved up and down the layer stack by click–hold–dragging. Moving a layer upwards will mean that its picture content may obscure more of the details in the layers below. Moving downwards progressively positions the layer’s details further behind the picture parts of the layers above. In this way you can reposition the content of any layers (except background layers). Two or more layers can be linked together so that when the content of one layer is moved the other details follow precisely. Simply multi–select the layers to link (hold down the Shift key and click onto each layer) and click the Link Layers button (chain icon) at the bottom of the palette. A chain symbol will appear on the right of the thumbnail to indicate that these layers are now linked. To unlink selected layers click on the Link Layers button again. Unwanted layers can be deleted by dragging them to the trash icon at the bottom of the Layers palette or by selecting the layer and clicking the trash icon.
Layer styles
Layer styles or effects can be applied to the contents of any layer. Users can add effects by clicking on the ‘Add a Layer Style’ button at the bottom of the Layers palette (the ‘fx’ icon), by choosing Layer Style from the Layer menu, by clicking on the desired effect in the Styles palette or by dragging existing effects from one layer to another. The effects added are listed below the layer in the palette. You can turn effects on and off using the eye symbol and even edit effect settings by double–clicking on them in the palette.
Opacity
As well as layer styles, or effects, the opacity (how transparent a layer is) of each layer can be altered by dragging the opacity slider down from 100% to the desired level of translucency. The lower the number, the more detail from the layers below will show through. The opacity slider is located at the top of the Layers palette and changes the selected layer only. In Photoshop CS5 you can adjust the opacity of multi–selected layers in one step.
Blending modes
On the left of the opacity control is a drop–down menu containing a range of blending modes. The default selection is ‘normal’, which means that the detail in upper layers obscures the layers beneath. Switching to a different blending mode will alter the way in which the layers interact. Checking the ‘preserve transparency’ box confines any painting or editing to the areas containing pixels (transparent areas remain unaffected).
Layer shortcuts
- To display Layers palette – Choose Window> Layers.
- To access layers options – Click the settings icon in the upper right–hand corner of the Layers palette.
- To change the size of thumbnails – Choose Panel Options from the Layers palette menu and select a thumbnail size.
- To make a new layer – Choose Layer > New > Layer.
- To create a new adjustment layer – Choose Layer > New Adjustment Layer and then select the layer type or click on the option in the Adjustment List in the Adjustment panel.
- To create a new layer group – Choose Layer > New > Layer or Layer > New Group From Layers.
- To add a style to a layer – Select the layer and click on the Layer Styles button at the bottom of the palette.

Layer groups
Layer groups are a collection of layers organized into a single ‘folder’. Placing all the layers used to create a single picture part into a group makes these layers easier to manage and organize. Layers can be moved into the group by dragging them onto the group’s heading. Layers in groups can have their stacking order (within the group) adjusted without ungrouping. To create a layer group click on the New Group button at the bottom of the palette or choose Layer > New > Group or multi–select the layers to include in the group and press Ctrl/Cmd + G. In previous versions of Photoshop this feature was referred to as Layer Sets. In Photoshop CS5 you can group layers beyond the five level limit of previous versions.
Layer masks
A ‘layer mask’ is attached to a layer and controls which pixels are concealed or revealed on that layer. Masks provide a way of protecting areas of a picture from enhancement or editing changes. In this way masks are the opposite to selections, which restrict the changes to the area selected. Masks are standard grayscale images and because of this they can be painted, edited and erased just like other pictures. Masks are displayed as a separate thumbnail to the right of the main layer thumbnail in the Layers palette. The black portion of the mask thumbnail is the protected or transparent area and is opaque or shows the layer image without transparency. Grays, depending on the dark or lightness of the tone, will give varying amounts of transparency from partially transparent to almost opaque. Photoshop provides a variety of ways to create masks but one of the easiest is to use the special Quick Mask mode.
Layer types
Image layers: This is the most basic and common layer type containing any picture parts or image details. Background is a special type of image layer.
Text layers: Designed solely for text, these layers allow the user to edit and enhance the text after the layer has been made. It is possible to create ‘editable text’ in Photoshop. If the text needs to be modified (font, style, spelling, color, etc.) the user can simply double–click the type layer. To apply filters to the contents of a text layer, it must be rasterized (Layer > Rasterize > type or Layer > Rasterize > Layer) first. This converts the text layer to a standard image layer and in this process the ability to edit the text is lost.
Shape layers: Shape layers are designed to hold the shapes created with Photoshop’s drawing tools (Rectangle, Ellipse, Polygon, Line and Custom Shape). Like text layers the content of these layers is ‘vector’ based and therefore can be scaled upwards or downwards without loss of quality.
Smart Object layers: Smart Object layers are special layers that encapsulate another picture (either vector or pixel based). As the original picture content is always maintained any editing action such as transforms or filtering that is applied to a Smart Object layer is non–destructive. Pixel–based editing (painting, erasing, etc.) can’t be performed on Smart Objects without first converting them to a normal image layer (Layer > Smart Object> Rasterize). You create a Smart Object layer by either converting an existing image layer (Layer > Smart Objects > Convert to Smart Objects) or by opening the original file as a Smart Object (File > Open As Smart Object) when commencing initial editing. When a filter is applied to a Smart Object layer it is termed a Smart Filter and appears below the Smart Object layer. Because the effects of a Smart Filter can be altered or removed after application, this type of filtering is non–destructive.

Smart Object layers are used for some non–destructive editing techniques as they contain and protect the original picture.
3D Layers (Photoshop Extended only): The Extended edition of Photoshop also has the ability to open and work with three–dimensional architectural or design files. When Photoshop opens a 3D file it is placed on a separate layer where you can move, scale, change lighting and rendering of the 3D model. Apart from the extrusions possible with the new Repoussé feature creating complex 3D models is only possible in a 3D authoring program.

Selecting an Adjustment in the Adjustments pane automatically adds an adjustment layer to the layers stack.
Adjustment layers: These layers alter the layers that are arranged below them in the stack. Adjustment layers act as a glass filter through which the lower layers are viewed. They allow image adjustments to be made without permanently modifying the original pixels (if the adjustment layer is removed, or the visibility of the layer is turned off, the pixels revert to their original value). You can use adjustment layers to perform many of the enhancement tasks that you would normally apply directly to an image layer without changing the image itself. From CS4, adjustment layers are added automatically when clicking onto an Adjustment Type icon in the Adjustment panel. This is a big change in adjustment layer workflow from previous versions of Photoshop. Adjustment layers are always added to the stack with a linked layer mask.
Background layers: An image can only have one background layer. It is the bottom–most layer in the stack. No other layers can be moved beneath this layer. You cannot adjust this layer’s opacity or its blending mode. You can convert background layers to standard image layers by double–clicking the layer in the Layers palette, setting your desired layer options in the dialog provided and then clicking OK.
Saving an image with layers
The file formats that support layers are Photoshop’s native Photoshop document (PSD) format, Photoshop PDF, JPEG2000, PSB (Large Document Format) and Photoshop’s version of TIFF. The layers in a picture must always be flattened if the file is to be saved as a standard JPEG. It is recommend that a PSD with its layers is always kept as an archived master copy – best practice would keep in progress archives as well as the final image. It is possible to quickly flatten a multi–layered image and save it as a JPEG or TIFF file by choosing File > Save As and then selecting the required file format from the pull–down menu.
Quick Masks, selections and alpha channels
Selections isolate parts of a picture. When first starting to use Photoshop it is easy to think of selections, masks and channels as all being completely separate program features, but in the reality of day–to–day image enhancement each of these tools is inextricably linked. As your skills develop most image–makers will develop their own preferred ways of working. Some use a workflow that is selection based, others switch between masking and selections and a third group concentrates all their efforts on creating masks only. No one way of working is right or wrong. In fact, many of the techniques advocated by the members of each group often provide a different approach to solving the same problem.

The masks created with the Quick Mask feature are stored as alpha channels which can be viewed and edited via the Channels palette. Switching from the Quick Mask mode changes the mask to a selection.
Switching between Mask and Selection modes
You can switch between Mask and Selection (also called ‘Standard’) modes by clicking on the mode button positioned at the bottom of the toolbox. Any ‘marching ants’ indicating active selections will be converted to red shaded areas when selecting the Mask mode. Similarly active masks will be outlined with ‘marching ants’ when switching back to Selection mode.

Saving selections
Photoshop provides users with the option to save their carefully created selections using the Select > Save Selection option. In this way the selection can be reloaded at a later date in the same file via the Select > Load Selection feature, or even after the document has been closed and reopened. Though not immediately obvious to the new user, the selection is actually saved with the picture as a special alpha channel and this is where the primary link between selections and masks occurs. Masks too are stored as alpha channels in your picture documents. Alpha channels are essentially grayscale pictures where the black section of the image indicates the area where changes can be made, the white portion represents protected areas and gray values allow proportional levels of change. Alpha channels can be viewed, selected and edited via the Channels palette.
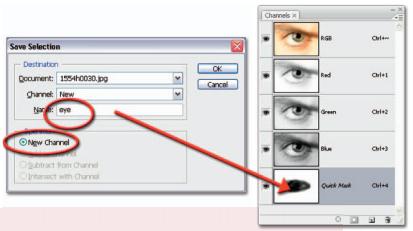
When you save a selection you create a grayscale alpha channel. You can name the selection inside the Save Selection dialog.
Quick definitions
Selections – A selection is an area of a picture that is isolated so that it can be edited or enhanced independently of the rest of the image. Selections are made with a range of Photoshop tools including the Marquee, Lasso and Magic Wand tools.
Masks – Masks also provide a means of restricting image changes to a section of the picture. Masks are created using standard painting tools whilst in the Quick Mask mode.
Alpha channels – Alpha channels are a special channel type that are separate to those used to define the base color of a picture such as Red, Green and Blue. Selections and masks are stored as alpha channels and can be viewed in the Channels palette. You can edit a selected alpha channel using painting and editing tools as well as filters.
Channels
As we have already seen, channels represent the way in which the base color in an image is represented. Most images that are created by digital cameras are made up of Red, Green and Blue (RGB) channels. In contrast, pictures that are destined for printing are created with Cyan, Magenta, Yellow and Black (CMYK) channels to match the printing inks. Sometimes the channels in an image are also referred to as the picture’s ‘color mode’.
Viewing channels
Many image–editing programs contain features designed for managing and viewing the color channels in your image. Photoshop uses a separate Channels palette (Window > Channels). Looking a little like the Layers palette, hence the source of much confusion, this palette breaks the full color picture into its various base color parts.
Changing color mode
Though most editing and enhancement work can be performed on the RGB file, sometimes the digital photographer may need to change the color mode of his or her file. There are a range of conversion options located under the Mode menu (Image > Mode) in Photoshop. When one of these options is selected your picture’s color will be translated into the new set of channels. Changing the number of channels in an image also impacts on the file size of the picture. Four–channel CMYK images are bigger than three–channel RGB pictures, which in turn are roughly three times larger than single–channel grayscale photographs.

The type and number of color channels used to create the color in your pictures can be changed via the Mode option in the Image menu.
When do I need to change channels
For most image–editing and enhancement tasks RGB color mode is all you will ever need. Some high–quality and printing–specific techniques do require changing modes, but this is generally the field of the ‘hardened’ professional. A question often asked is ‘Given that my inkjet printer uses CMYK inks, should I change my photograph to CMYK before printing?’ Logic says yes, but practically speaking this type of conversion is best handled by your printer’s driver software. Most modern desktop printers are optimized for RGB output even if their ink set is CMYK.
Channel types
RGB: This is the most common color mode. Consisting of Red, Green and Blue channels, most digital camera and scanner output is supplied in this mode.
CMYK: Designed to replicate the ink sets used to print magazines and newspapers, this mode is made from Cyan, Magenta, Yellow and Black (K) channels.
LAB: Consisting of Lightness, A color (green–red) and B color (blue–yellow) channels, this mode is used by professional photographers when they want to enhance the details of an image without altering the color. By selecting the L channel and then performing their changes only the image details are affected.
Grayscale: Consisting of a single black channel, this mode is used for monochrome pictures. Duo–, Tri– and Quad–tones are a special variation of grayscale images that include extra colors creating tinted monochromes.

The most used color modes (channel types) are RGB, CMYK, LAB and Grayscale. Unless you are working in the publishing industry, or you want to use advanced image–editing techniques, you should keep your picture in
RGB mode.
Adjustment and filter layers and editing quality
As introduced earlier, adjustment layers act as filters that modify the hue, saturation and brightness of the pixels on the layer or layers beneath. Using an adjustment layer instead of the ‘Adjustments’ from the ‘Image’ menu allows the user to make multiple and consecutive image adjustments without permanently modifying the original pixel values.
Non–destructive image editing
The manipulation of image quality using ‘adjustment layers’ and ‘layer masks’ is often termed ‘non–destructive’. Using adjustment layers to manipulate images is preferable to working directly and repeatedly on the pixels themselves. Using the ‘Adjustments’ from the ‘Image’ menu, or the manipulation tools from the toolbox (Dodge, Burn and Sponge Tools), directly on pixel layers can eventually lead to a degradation of image quality. If adjustment layers are used together with ‘layer masks’ to limit their effect, the pixel values are physically changed only once when the image is flattened or the layers are merged. Retaining the integrity of your original file is essential for high–quality output.
Note > For the last couple of versions of Photoshop it has been possible to scale or ‘transform’ a layer or group of layers non–destructively by turning the layer, or layers, into a ‘Smart Object’. In CS3 it became possible to apply filters (called Smart Filters) non–destructively to these Smart Objects and since CS4 we can also Skew, Distort and add Perspective effects interactively to a Smart Object.

Retaining quality
The evidence of a file that has been degraded can be observed by viewing its histogram. If the resulting histogram displays excessive spikes or missing levels there is a high risk that a smooth transition between tones and color will not be possible in the resulting print. A tell–tale sign of poor scanning and image editing is the effect of ‘banding’ that can be clearly observed in the final print. This is where the transition between colors or tones is no longer smooth, but can be observed as a series of steps, or bands, of tone and/or color. To avoid this it is essential that you start with a good scan (a broad histogram without gaps) and limit the number of changes to the original pixel values.
Layer masks and editing adjustments
The use of ‘layer masks’ is an essential skill for professional image retouching. Together with the Selection Tools and ‘adjustment layers’ they form the key to effective and sophisticated image editing. A ‘layer mask’ can control which pixels are concealed or revealed on any image layer except the background layer. If the layer mask that has been used to conceal pixels is then discarded or switched off (Shift–click the layer mask thumbnail) the original pixels reappear. This non–destructive approach to retouching and photographic montage allows the user to make frequent changes. To attach a layer mask to any layer (except the background layer) simply click on the layer and then click on the ‘Add layer mask’ icon at the base of the Layers palette.
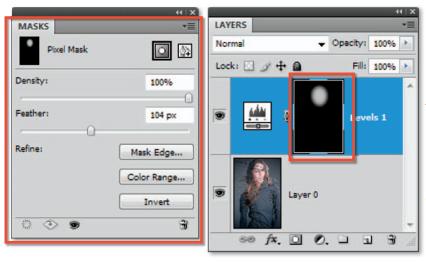
Photoshop contains a special Masks pane with controls for adjusting the density and feather of a layer mask. Also included are buttons for refining the mask using Mask Edge, Color Range and Invert features. Remember that painting or adding gradients to a mask will reveal or conceal the adjustment when used with Adjustment layers.
A layer mask is automatically attached to every adjustment layer. The effects of an adjustment layer can be limited to a localized area of the image by simply clicking on the adjustment layer’s associated mask thumbnail in the Layers palette and then painting out the adjustment selectively using any of the painting tools whilst working in the main image window. The opacity and tone of the foreground color in the toolbox will control whether the adjustment is reduced or eliminated in the localized area of the painting action. Painting with a darker tone will conceal more than when painting with a lighter tone or a dark tone with a reduced opacity.
A layer mask can be filled with black to conceal the effects of the adjustment layer. Painting with white in the layer mask will then reveal the adjustment in the localized area of the painting action. Alternatively the user can select the Gradient Tool and draw a gradient in the layer mask to selectively conceal a portion of the adjustment. To add additional gradients the user must select either the Multiply or Screen blend modes for the gradient in the Options bar.
| Layer mask shortcuts | |
| Disable/enable layer mask | Shift + click layer mask thumbnail |
| Preview contents of layer mask | Opt/Alt + click layer mask thumbnail |
| Preview layer mask and image | Opt/Alt + Shift + click layer mask thumbnail |