selections

essential skills
- Develop skills in creating and modifying selections to isolate and mask image content.
- Develop skills using the following tools and features:
– Selection Tools
– Quick Mask, alpha channels and layer masks
– Color Range and Extract filter
– Pen Tool.
Introduction
One of the most skilled areas of digital retouching and manipulation is the ability to make accurate selections of pixels for repositioning, modifying or exporting to another image. This skill allows localized retouching and image enhancement. Photoshop provides several different tools that allow the user to select the area to be changed. Called the ‘Selection’ Tools, using these features will fast become a regular part of your editing and retouching process. Photoshop marks the boundaries of a selected area using a flashing dotted line sometimes called ‘marching ants’. Obvious distortions of photographic originals are common in the media but so are images where the retouching and manipulations are subtle and not detectable. Nearly every image in the printed media is retouched to some extent. Selections are made for a number of reasons:
- Making an adjustment or modification to a localized area, e.g. color, contrast, etc.
- Defining a subject within the overall image to mask, move or replicate.
- Defining an area where an image or group of pixels will be inserted (‘paste into’).
Selection Tools overview
Photoshop groups the Selection Tools based on how they isolate picture parts. These categories are:
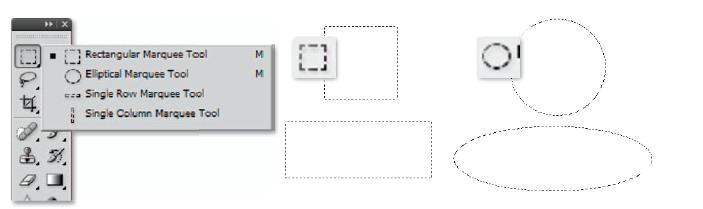
- The ‘Marquee Tools’ are used to draw regular-shaped selections such as rectangles or ellipses around an area within the image.
- The ‘Lasso Tools’ use a more freehand drawing approach and are used to draw a selection by defining the edge between a subject and its background.
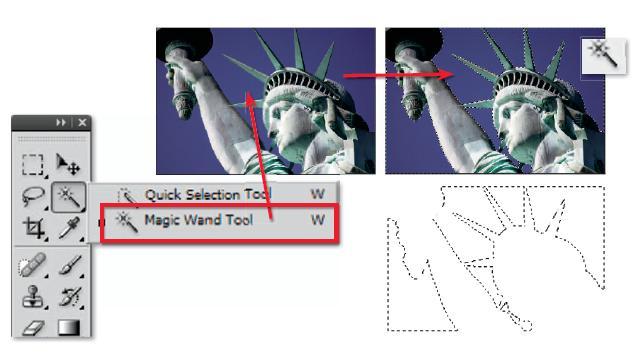
- The ‘Magic Wand’ and the ‘Quick Selection’ Tools both create selections based on color and tone and are used to isolate groups of pixels by evaluating the similarity of the neighboring pixel values (hue, saturation and brightness) to the pixel that is selected.
Shape-based selections with the Marquee Tools
The Marquee Tools select by dragging with the mouse over the area required. Holding down the Shift key as you drag the selection will ‘constrain’ the selection to a square or circle rather than a rectangle or oval. Using the Alt (Windows) or Option (Mac) key will draw the selections from their centers. The Marquee Tools are great for isolating objects in your images that are regular in shape, but for less conventional shapes, you will need to use one of the Lasso Tools.
Selections based on shapes
Selections based on drawing
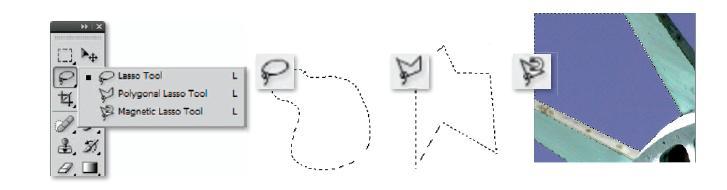
Drawn selections using the Lasso Tools
Select by encircling or drawing around the area you wish to select. The standard Lasso Tool works like a pencil, allowing the user to draw freehand shapes for selections. A large screen and a mouse in good condition (or a graphics tablet) are required to use the Freehand Lasso Tool effectively. In contrast, the Polygonal Lasso Tool draws straight-edged lines between mouse-click points. Either of these features can be used to outline and select irregular-shaped image parts. A third tool, the Magnetic Lasso, helps with the drawing process by aligning the outline with the edge of objects automatically. It uses contrast in color and tone as a basis for determining the edge of an object. The accuracy of the ‘magnetic’ features of this tool is determined by three settings in the tool’s Options bar. Contrast is the value that a pixel has to differ from its neighbor to be considered an edge, Width is the number of pixels either side of the pointer that are sampled in the edge determination process and Frequency is the distance between fastening points in the outline.
Double-clicking the Polygonal Lasso Tool or Magnetic Lasso Tool automatically completes the selection using a straight line between the last selected point and the first.
Note > Remember the Magnetic Lasso Tool requires a tonal or color difference between the object and its background in order to work effectively.
Selections b based on color and tone
The Magic Wand
Unlike the Lasso and Marquee Tools the Magic Wand makes selections based on color and tone. It selects by relative pixel values. When the user clicks on an image with the Magic Wand Tool Photoshop searches the picture for pixels that have a similar color and tone. With large images this process can take a little time but the end result is a selection of all similar pixels across the whole picture.
Tolerance
How identical a pixel has to be to the original is determined by the Tolerance value in the Options bar. The higher the value, the less alike the two pixels need to be, whereas a lower setting will require a more exact match before a pixel is added to the selection. Turning on the Contiguous option will only include the pixels that are similar and adjacent to the original pixels in the selection.
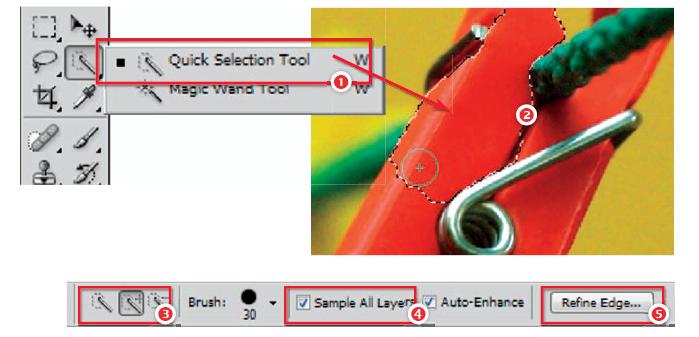
The new Quick Selection Tool is grouped with the Magic Wand in the toolbar (1). The feature creates intelligent selections as you paint over the picture surface (2). The tool’s options bar contains settings for adding to and subtracting from existing selections (3), using the tool over multiple layers (4) as well as a button to display the new Refine Edge feature (5).
Quicker selections
Right from the very early days of Photoshop most users quickly recognized that being able to apply changes to just a portion of their images via selections was a very powerful way to work. It followed that the quality of their selective editing and enhancement activities was directly related to the quality of the selections they created. This was the start of our love/hate relationship with selection creation.
Over the years Adobe has provided us with a range of tools designed to help in this quest. Some, like the Magic Wand, are based on selecting pixels that are similar in tone and color; others, such as the Lasso and Marquee Tools, require you to draw around the subject to create the selection.
The Quick Selection Tool was first introduced in Photoshop CS3. It is grouped with the Magic Wand in the toolbar. The tool is used by painting over the parts of the picture that you want to select. The selection outline will grow as you continue to paint. When you release the mouse button the tool will automatically refine the selection further.
Moving a selection
If the selection is not accurate it is possible to move the selection without moving any pixels. With the Selection Tool still active place the cursor inside your selection and drag the selection to reposition it. To move the pixels and the selection, use the Move Tool from the Tools palette. New for Photoshop CS5 is the ability to move selections even if the active layer is currently hidden.
To remove a selection
Go to Select > Deselect or use the shortcut ‘Command/Ctrl + D’ to deselect a selection.
Customizing your selections
Basic selections of standard, or regular-shaped, picture parts can be easily made with one simple step – just click and drag. But you will quickly realize that most selection scenarios are often a little more complex. For this reason the thoughtful people at Adobe have provided several ways of allowing you to modify your selections. The two most used methods provide the means to ‘add to’ or ‘subtract from’ existing selections. This, in conjunction with the range of Selection Tools offered by the program, gives the user the power to select even the most complex picture parts, often using more than one tool for the task. Skillful selecting takes practice and patience as well as the ability to choose which Selection Tool (or Tools) will work best for a given task. Photoshop provides two different methods to customize an existing selection.
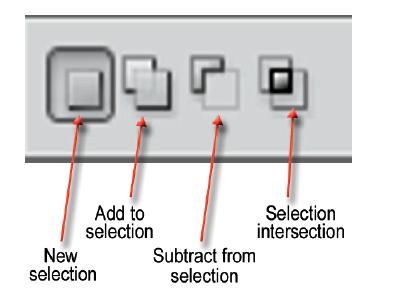
Use the mode buttons located in a special portion of the tool’s Options bar to start changing your selections. The default mode is ‘New Selection’, which means that each selection you make replaces the last. Once another option is selected the mode remains active for the duration of the selection session. This is true even when you switch Selection Tools.
The user can make a selection before creating the adjustment layer and then when the adjustment layer is created the selection is used to automatically create a mask.
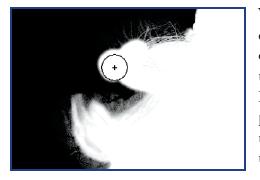
Add to a selection
To add to an existing selection hold down the Shift key while selecting a new area. Notice that when the Shift key is held down the Selection Tool’s cursor changes to include a ‘+’ to indicate that you are in the ‘add’ mode. This addition mode works for all tools and you can change Selection Tools as needed to make further refinements.
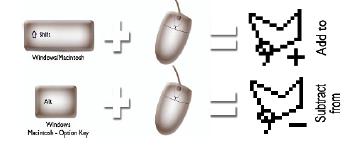
Keyboard shortcuts provide the fastest way to customize your selections.
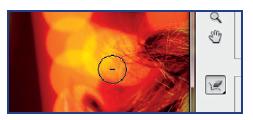
Subtract from a selection
To remove sections from an existing selection hold down the Alt key (Option for Macintosh) while selecting the part of the picture you do not wish to include in the selection. When in the subtract mode the cursor will change to include a ‘−’.
Selection intersection
In Photoshop often the quickest route to selection perfection is not the most direct route. When you are trying to isolate picture parts with complex edges it is sometimes quicker and easier to make two separate selections and then form the final selection based on their intersection. The fourth mode available as a button on the Selection Tool’s Options bar is the Intersect mode (Opt/Alt Shift). Though not used often, this mode provides you with the ability to define a selection based on the area in common between two different selections.
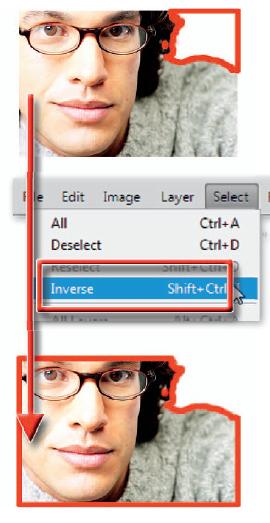
Sometimes it is quicker to select the area that you don’t want and then inverse the selection to produce the required results.
Inversing a selection
In a related technique, some users find it helpful to select what they don’t want in a picture and then instruct Photoshop to select everything but this area. The Select > Inverse command (Ctrl/Cmd Shift I ) inverts or reverses the current selection and is perfect for this approach. In this way foreground objects can be quickly selected in pictures with a smoothly graduated background of all one color (sky, snow or a wall space) by using the Magic Wand to select the background. Then the act of inversing the selection will isolate the foreground detail.
Professionals who know that the foreground will be extracted from the picture’s surrounds often shoot their subjects against an evenly lit background of a consistent color to facilitate the application of this technique.
Refining selections
As well as ‘adding to’ and ‘subtracting from’ existing selections, Photoshop contains several other options for refining the selections you make. Grouped under the Select menu, these features generally concentrate on adjusting the edge of the current selection. The options include:
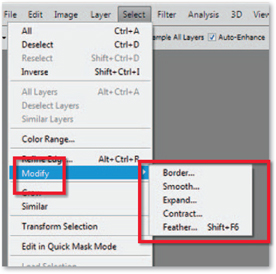
Other options for modifying your selections can be found under the Select menu.
Border – Choosing the Border option from the Modify menu displays a dialog where you can enter the width of the border in pixels (between 1 and 200). Clicking OK creates a border selection that frames the original selection.
Smooth – This option cleans up stray pixels that are left unselected after using the Magic Wand Tool. After choosing Modify enter a radius value to use for searching for stray pixels and then click OK.
Expand – After selecting Expand, enter the number of pixels that you want to increase the selection by and click OK. The original selection is increased in size. You can enter a pixel value between 1 and 100.
Contract – Selecting this option will reduce the size of the selection by the number of pixels entered into the dialog. You can enter a pixel value between 1 and 100.
Feather – The Feather command softens the transition between selected and non-selected areas.
Grow – The Grow feature increases the size of an existing selection by incorporating pixels of similar color and tone to those already in the selection. For a pixel to be included in the ‘grown’ selection it must be adjacent to the existing selection and fall within the current tolerance settings located in the options bar.
Similar – For a pixel to be included in the ‘similar’ selection it does not have to be adjacent to the existing selection but must fall within the current tolerance settings located in the options bar.
Refine Edge – Adobe included a new Refine Edge feature in CS3 to coincide with the release of the Quick Selection Tool. In Photoshop CS5 the feature has been revamped and now provides a mechanism for intelligently adapting the qualities of the selection edge to the changing characteristics of the subject. Refine Edge is accessed either via the button now present in all the Options Bar of all Selection Tools, or via Select > Refine Edge. The dialog brings together a range of different controls for adjusting the edges of the selection with seven selection edge preview modes and the new Edge Detection ability (Smart Radius) and Output options. Smart Radius plus the Output and Preview modes edge refinement which used to be a pretty hit and miss affair, a lot easier to manage, with the ultimate result of the production of better selection edges for all.
Two other options are available only in Refine Edge:
Radius – Use this slider to increase the quality of the edge in areas of soft transition with background pixels or where the subject’s edge is finely detailed.
Contrast – Increase the contrast settings to sharpen soft selection edges.
Shift Edge – Moves the selection edge effectively expanding or contracting the selection.
Smart Radius – Applies the edge detection technology to the selection. The Radius slider changes the width of the area around the selection edge being used in the detection.
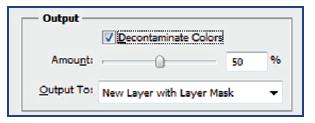
Decontaminate – Removes the remnants of background color from the selection edge in order to produce a better blend when placing the subject on a new background. The Amount slider controls the strength of the effect.
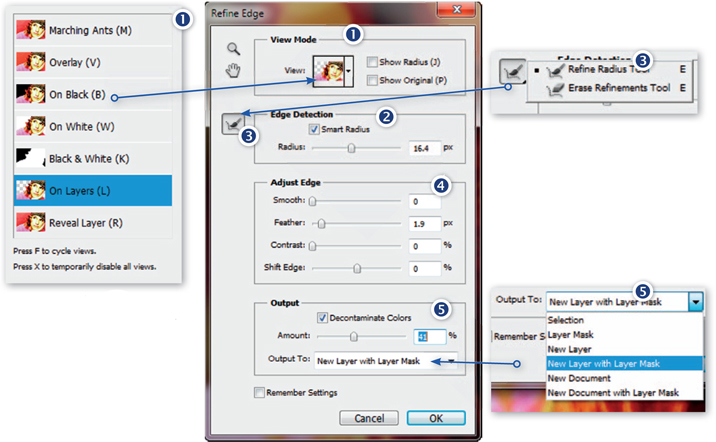
The revamped Refine Edge dialog now includes new View options (1), powerful Edge Detection features (2), selection refinement tools (3), Edge adjustment controls (4), and new Output settings (5).
Previewing edge refinements – The View mode menu at the top of the Refine Edge dialog provides a range of different ways to view the selection on your picture. Press the F key to cycle through the view modes and the X key to temporarily display the full image view.
Output To – Also new for CS5 is the drop-down list of output options at the bottom of the Refine Edge dialog. There are options here to create layers, masks and even new documents from the refined selection.
Refine Edge in action
The power of the new edge detection and refinement features are best put to use when creating a seamless montage of a subject against a new background. Just as in the last release, using Refine Edge is a three step process. First you need to make a rough selection of the subject, next you use the feature’s controls to adjust the selection edge before finally extracting the subject from its existing background and layering above the new background.
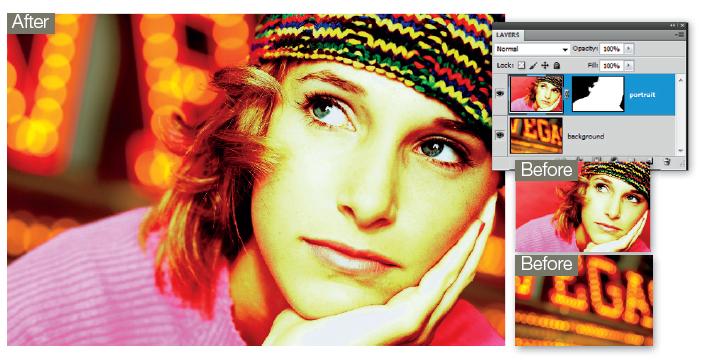
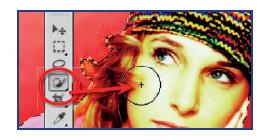
The first step is to create a selection around the subject. In the example above, the girl on the upper layer. I chose the Quick Selection Tool from the toolbar and painted a selection over the subject. The tool automatically selects the jumper, face, hat and hair as I drag the tool over the canvas.
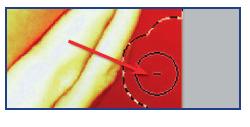
If some of the background is included in your selection, remember you can adjust the selection further by holding down the Alt/Opt key to switch the tool to the Subtract From Select mode, and then painting over these parts to remove them.
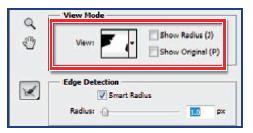
With the newly created selection displayed, I chose Select > Refine Edge. This displays the Refine Edge dialog box. Next, I adjusted the settings so that the View was Black and White, Smart Radius was checked, Radius was 1 pixel, Decontaminate Colors was unchecked and all other settings were zero.
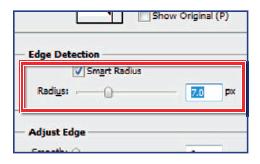
The Smart Radius feature automatically adapts the selection approach to the differences in edge between the subject’s jumper, hat and hair. I moved the Radius slider to increase the width of the area either side of the selection’s edge used by the Smart Radius. Pressing the J key displays the radius and adjusting the Shift Edge slider moves the position of the edge.
With some subjects a single Radius setting will not encompass all edge details. In these cases, you can customize the width and positioning of the edge with the Refine Radius and Erase Refinements tools. Here, I fine-tuned the mask around the subject’s hair by painting with the Refine Radius Tool. I then pressed the F key to cycle through the preview modes to check the quality of the edge.
Next, I switched to the Erase Refinements Tool to remove any unwanted areas that had crept into the mask’s edge. Here, I viewed the changes in the On Layer view so that it was possible to see the subject against the layer beneath.
If you intend to place the selected subject on a new background you can use the use the Decontaminate Colors setting and its associated Amount slider to remove any color remaining in the edge from the old background. These settings introduce a degree of transparency to the mask edge so that the subject is merged more seamlessly with the new background. The Output To menu contains a range of options that determine how the selected part of photo will be processed when exiting the Refine Edge dialog box. For this example I selected the New Layer With Layer Mask option.
Saving and loading selections
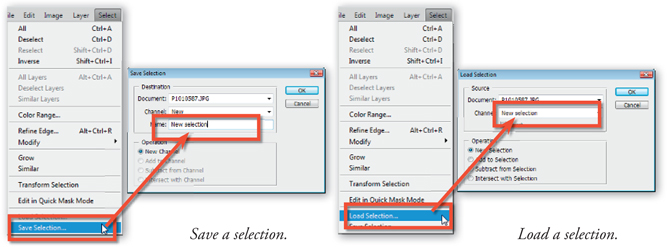
The selections you make remain active while the image is open and until a new selection is made, but what if you want to store all your hard work to use on another occasion? As we have already seen in the previous chapter Photoshop provides the option to save your selections/masks as part of the picture file. Simply choose Select > Save Selection and the existing selection will be stored with the picture.
To display a selection saved with a picture, open the file and choose Load Selection from the Select menu. In the Load Selection dialog click on the Channel drop-down menu and choose the selection you wish to reinstate. Choose the mode with which the selection will be added to your picture from the Operation section of the dialog. Click OK to finish.
Feather and anti-alias
The ability to create a composite image or ‘photomontage’ that looks subtle, realistic and believable rests with whether or not the viewer is able to detect where one image starts and the other finishes. The edges of each selection can be modified so that it appears as if it belongs, or is related, to the surrounding pixels.
Options are available in Photoshop to alter the appearance of the edges of a selection. Edges can appear sharp or soft (a gradual transition between the selection and the background). The options to effect these changes are:
- Feather
- Anti-aliasing.
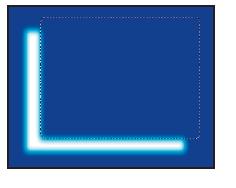
Feather
When this option is chosen the pixels at the edges of the selection are blurred. The edges are softer and less harsh. This blurring may either create a more realistic montage or cause loss of detail at the edge of the selection.
You can choose feathering for the Marquee or Lasso Tools as you use them by entering a value in the tool options box, or you can add feathering to an existing selection (Select > Feather). The feathering effect only becomes apparent when you move or paste the selection to a new area.
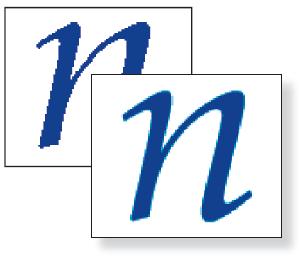
Anti-aliasing
When this option is chosen the jagged edges of a selection are softened. A more gradual transition between the edge pixels and the background pixels is created. Only the edge pixels are changed so no detail is lost. Anti-aliasing must be chosen before the selection is made (it cannot be added afterwards). It is usual to have the anti-alias option selected for most selections. The anti-alias option also needs to be considered when using type in image-editing software. The anti-alias option may be deselected to improve the appearance of small type to avoid the appearance of blurred text.
 Better with a tablet
Many professionals prefer to work with a stylus and tablet when creating complex selections. All models change a tool’s characteristics using pressure sensitivity with some including options such as intuitive motion as well.
Defringe and Matting
When a selection has been made using the anti-alias option some of the pixels surrounding the selection are included. If these surrounding pixels are darker, lighter or a different color to the selection a fringe or halo may be seen.
Your first point of call for fixing this problem should be the new Decontaminate Colors option in the Refine Edge dialog. For the best blending be sure to preview the subject against the new background as you adjust the Amount slider.
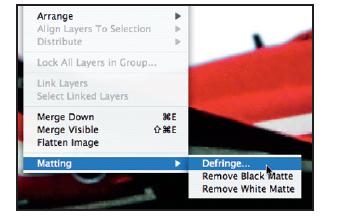
Alternatively, you can choose Matting > Defringe from the layers menu to replace the different fringe pixels with pixels of a similar hue, saturation or brightness found within the selection area.
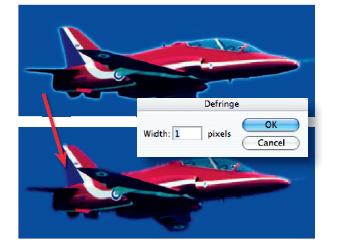
The user may have to experiment with the most appropriate method of removing a fringe. The alternative options of Remove White Matte and Remove Black Matte may provide the user with a better result. If a noticeable fringe still persists it is possible to contract the selection prior to moving it using the Modify > Contract option from the Select menu.
Saving a selection as an alpha channel
Selections can be permanently stored as ‘alpha channels’. The saved selections can be reloaded and/or modified even after the image has been closed and reopened. To save a selection as an alpha channel simply click the ‘Save selection as channel’ icon at the base of the Channels palette. To load a selection either drag the alpha channel to the ‘Load channel as selection’ icon in the Channels palette or Command/Ctrl-click the alpha channel.
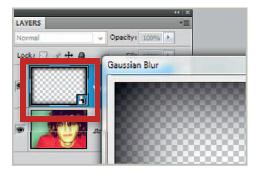
It is possible to edit an alpha channel (and the resulting selection) by using the painting and editing tools. Painting with black will add to the alpha channel whilst painting with white will remove information. Painting with shades of gray will lower or increase the opacity of the alpha channel. The user can selectively soften a channel and resulting selection by applying a Gaussian Blur filter. Choose Blur > Gaussian Blur from the Filters menu.
Note > An image with saved selections (alpha channels) cannot be saved in the standard JPEG format. Use the PSD, PDF or TIFF formats or JPEG2000 (optional plug-in) if storage space is tight.
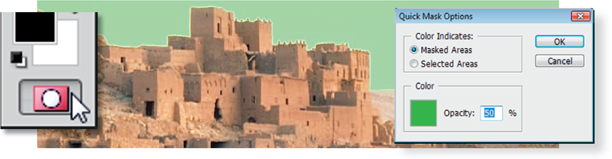
Quick Mask or Refine Edge
The problem with feathering and modifying selections using the Modify commands in the ‘Select’ menu is that the ants give very poor feedback about what is actually going on at the edge. Viewing the selection against a Matte color in the Refine Edge dialog box or as a ‘Mask’ in ‘Quick Mask mode’ allows you to view the quality and accuracy of your selection. Quick Mask allows the user to modify localized areas of the edge whilst Refine Edge works on the entire edge. Zoom in on an edge to take a closer look. Double-click the Quick Mask icon to change the mask color, opacity and to switch between ‘Masked Areas’ and ‘Selected Areas’. if the mask is still falling short of the edge you can expand the selection by going to Filter > Other > Maximum. Choose a 1-pixel radius, select OK and the mask will shrink (expanding the selection). A ‘Levels’ adjustment in Quick Mask mode provides a ‘one-stop shop’ for editing the mask, giving you the luxury of a preview as with Refine Edge, but also gives you the advantage of localized editing.
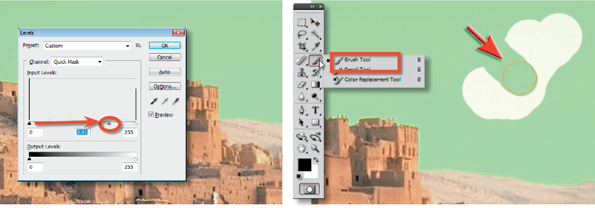
Using a ‘Levels’ adjustment (Image > Adjustments > Levels) in Quick Mask mode allows you to modify the edge quality if it is too soft and also reposition the edge so that it aligns closely with your subject. Make a selection of the edge using the Lasso Tool if you need to modify just a small portion of the Quick Mask. Dragging the shadow and highlight sliders in towards the center will reduce the softness of the mask whilst moving the midtone or ‘Gamma’ slider will move the edge itself. Unlike the Refine Edge dialog box you can paint in Quick Mask to refine localized areas of the selection.
Note > The selection must have been feathered prior to the application of the Levels adjustment for this to be effective.
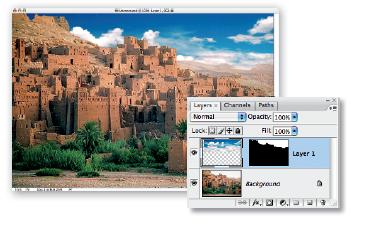
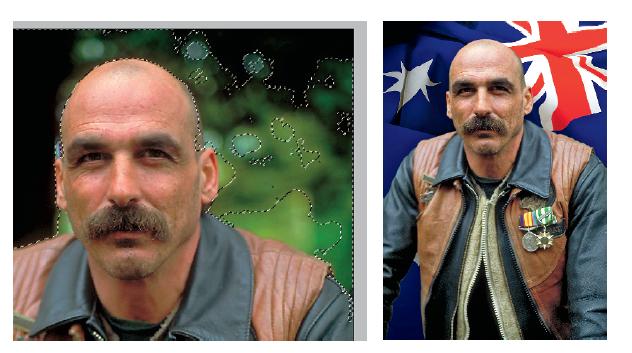
Save the selection as an alpha channel. This will ensure that your work is stored permanently in the file. If the file is closed and reopened the selection can be reloaded. Finish off the job in hand by modifying or replacing the selected pixels. If the Quick Selection Tool or Magic Wand Tool is not working for you, try exploring the following alternatives.
‘Color Range’
The Quick Selection Tool may be the obvious tool for making a selection of a subject with a good color or tonal contrast, but Color Range can be utilized for making selections of similar color that are not contiguous. ‘Color Range’, from the Select menu, is useful for selecting subjects that are defined by a limited color range (sufficiently different from those of the background colors). The feature contains Localized Color Clusters and Range options for better control over where the feature is put to work. Color Range is especially useful when the selection is to be used for a hue adjustment. Use a Marquee Tool (from the Tools palette) to limit the selection area before you start using the Color Range option.
Note > The Color Range option can misbehave sometimes. If the selection does not seem to be restricted to your sampled color press the Alt/Option key and click on the reset option or close the dialog box and re-enter.
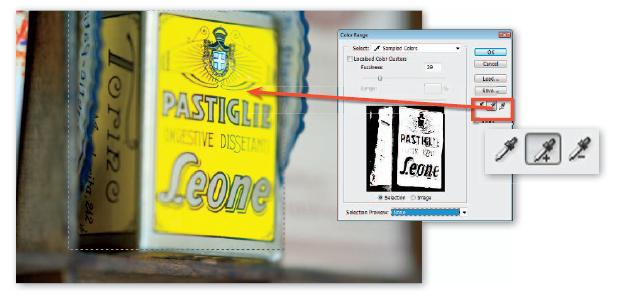
Use the ‘Add to sample’ eyedropper and drag the eyedropper over the subject area you wish to select. In the later stages you can choose a matte color to help the task of selection. Adjust the Fuzziness slider to perfect the selection. Very dark or light pixels can be left out of the selection if it is to be used for a hue adjustment only. The dialog contains four options in the Selection Preview menu that will allow you to view the quality of the selection on the image to gain an idea of the selection’s suitability for the job in hand.
The mask can be ‘cleaned’ using the Dust & Scratches filter and softened using a Gaussian Blur filter. A selection prepared by the ‘Color Range’ command is ideal for making a hue adjustment. It is also recommended to view the individual channels to see if the subject you are trying to isolate is separated from the surrounding information. If this is the case a duplicate channel can act as a starting point for a selection.
Channel masking
An extremely quick and effective method for selecting a subject with reasonable color contrast to the surrounding pixels is to use the information from one of the channels to create a mask and then to load this mask as a selection.
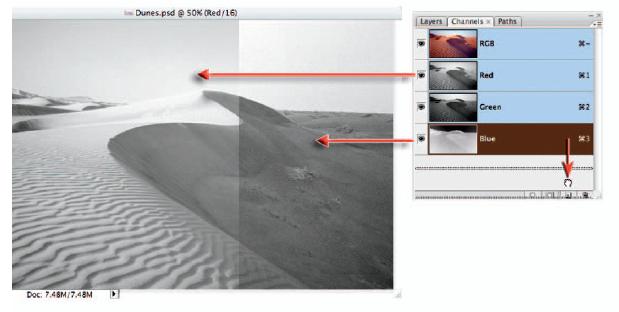
Click on each individual channel to see which channel offers the best contrast and then duplicate this channel by dragging it to the ‘New Channel’ icon.
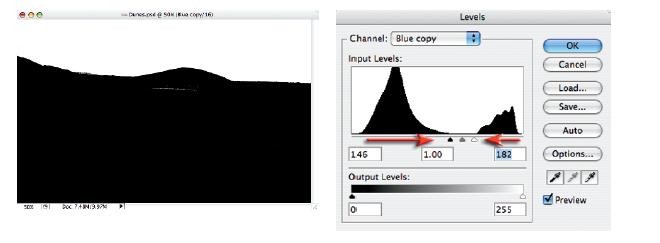
Apply a Levels adjustment to the duplicate channel to increase the contrast of the mask. Slide the shadow, midtone and highlight sliders until the required mask is achieved. The mask may still not be perfect but this can be modified using the painting tools.
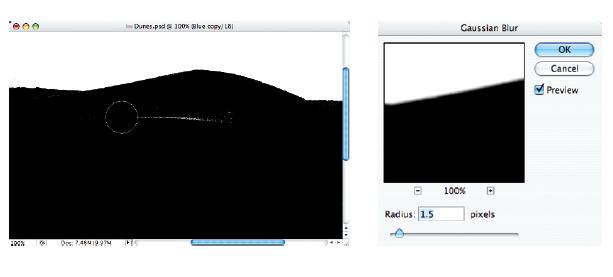
Select the default settings for the foreground and background colors in the Tools palette, choose a paintbrush, set the opacity to 100% in the Options bar and then paint to perfect the mask. Zoom in to make sure there are no holes in the mask before moving on. To soften the edge of the mask, apply a small amount of Gaussian Blur.
Note > Switch on the master channel visibility or Shift-click the RGB master to view the channel copy as a mask together with the RGB image. This will give you a preview so that you can see how much blur to apply and if further modifications are required.
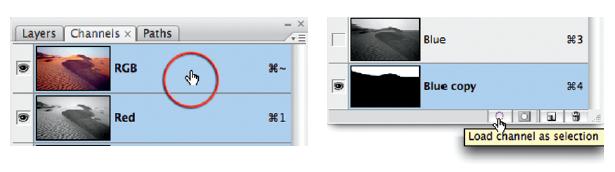
Click on the active duplicate channel or drag it to the ‘Load channel as selection’ icon. Click on the RGB master before returning to the Layers palette.
Channel masking may at first seem a little complex but it is surprisingly quick when the technique has been used a few times. This technique is very useful for photographers shooting products for catalogs and websites. A small amount of color contrast between the subject and background is all that is required to make a quick and effective mask.
Tone-based selections and masks
So as we can see masks and, their alter ego, selections, are very useful for controlling how layers are blended together and also how effects are applied to images, but they can also help us alter specific tones in a photo. Once created, a mask can be used in conjunction with a Curves or Levels Adjustment layer to restrict the changes made with these features to a specific tonal range.
Using the abilities of a luminosity mask it is possible to control adjustments so that they are applied proportionately to highlights, then midtones and shadows.
Luminosity masking
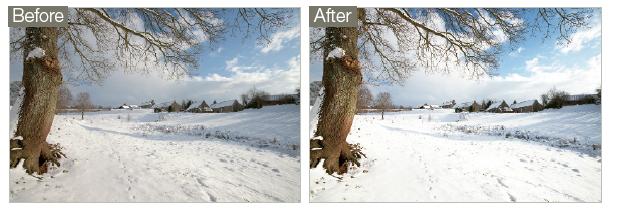
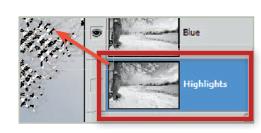
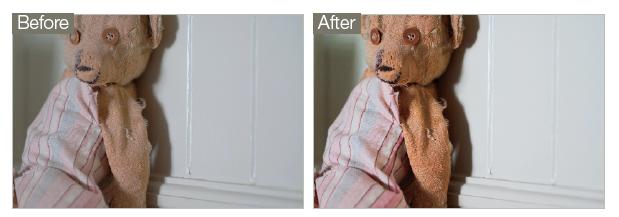
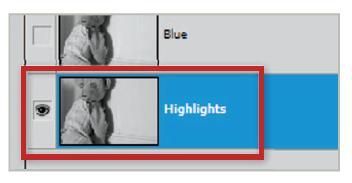
In this example, a Luminosity mask is used to alter the highlight details of the photo to provide more apparent detail. Because the mask was created with tones of the original image the adjustment is applied proportionately to the highlights most, then midtones, and finally, to the shadow areas. This is because of the basic nature of masks where white areas ‘reveal’ the effect and black areas ‘conceal’ the effect.
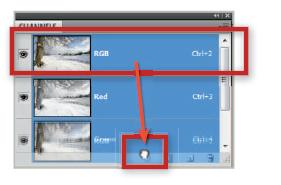
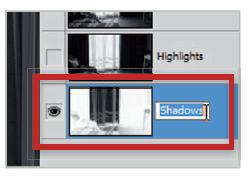
Start by displaying the Channels palette and then make a selection from the image. Drag the RGB channel to the Load Selection button at the bottom of the palette. Click the Save Selection button to create a new entry called Alpha 1. Rename the entry to Highlights.
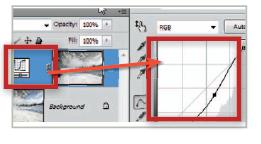
The resulting luminosity mask is used in conjunction with the Adjustment layer to tweak the highlight tones in the image.
Click the RGB Channel entry at the top of the palette to make it active. This restores the color preview. Now, choose Select > Deselect to remove the marching ants from the preview.
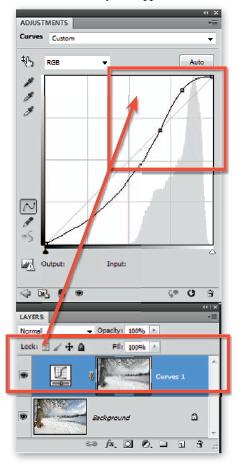
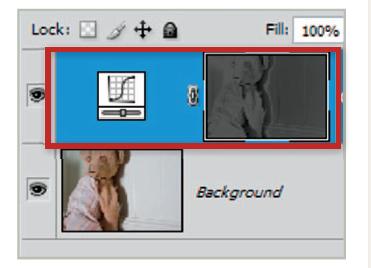
Drag the channel to the Load Selection button at the bottom of the Channels palette. With the selection active you can now add a new Curves Adjustment layer. Make changes to the shape of the highlight end of the curve and click the OK button to apply the adjustments via the associated Highlights mask.
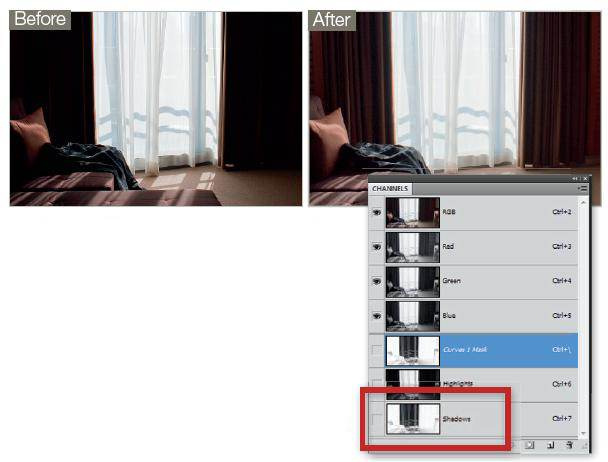
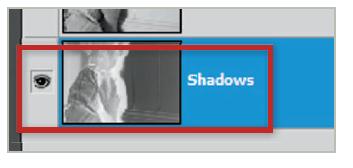
Using a shadow mask, it is possible to alter the tones of the dark portions of the image while leaving much of the midtones and all of the highlights untouched. Here more detail was added to the dark curtains by boosting the brightness and contrast of these tones.
Shadow masking
Shadow luminosity masking, like the highlight masking we looked at in the previous technique, is a process by which the darker tones in an image are isolated with a mask. Once this has occurred, then it is possible to adjust just those values in the photo using an Adjustment layer. In this example the shadow areas have been changed using a Curves Adjustment Layer and in the process, the highlights in the image have been left unchanged.
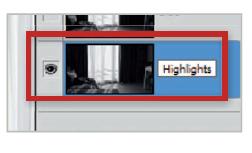
The first step is to create a highlight mask. Do this by displaying the Channels palette and then dragging the RGB entry to the Load Channel as Selection button at the bottom of the palette. With the selection still active, click on the next button along to create a mask from the selection. Rename the new mask Highlights.
We will now use the Highlight mask to create the shadow mask. Start by deselecting any selections still active. Next, drag the Highlight mask entry to the Create New Channel button at the bottom of the palette. This will create a copy of the Highlight mask entry. Select the copied entry and click Ctrl/Cmd I to inverse the image. Rename the channel Shadows.
Inverting the Highlight mask effectively creates a mask that concentrates on the opposite end of the spectrum - the shadows. Now with the Shadow Channel selected click onto the Load Channel as Selection button at the bottom of the palette. Next deselect the Shadow channel and click onto the RGB channel entry. then select Layer > New Adjustment Layer > Curves. Make your shadow adjustment via the Curves feature.
Middle values of a photo can also be altered via a midtone luminosity mask. This will largely restrict the changes from shadows and highlight areas.
Mid-tone contrast boost
We have already looked at the how to adjust middle tones using controls such as Curves and Shadows/Highlights, but what if we want to use a masking approach for the task? In other words, apply the Curves control through a midtone mask which, by definition, restricts the changes from being applied to shadows or highlights. This technique is based on creating highlight and shadow masks first and then using these to generate a third mask that just isolates the middle values of the image.
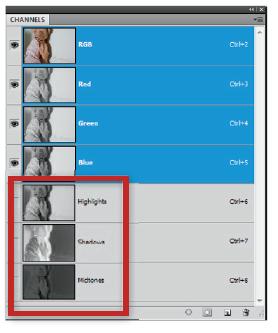
Start by creating a luminosity Highlight mask. Do this by dragging the RGB entry in the Channels to the Load Channel as Selection button. Then click onto the Save Selection as Channel button. Rename the entry Highlights. Hit Ctrl/Cmd D to deselect the active selection.
Now to create the shadow luminosity mask. Start by dragging the Highlights mask to the Create New Channel button at the bottom of the Channels palette. Rename this entry Shadows. Select the new Shadows mask and inverse the tones of the mask by hitting the Ctrl/Cmd I keys.
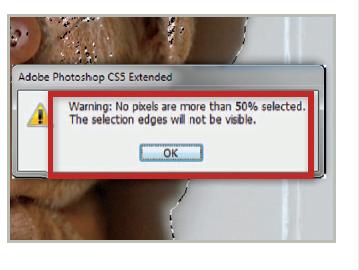
To create the midtone mask, firstly click onto the RGB channel entry. Choose Select > All to create a selection of all the image. Now hold down the Ctrl/ Cmd Alt/Opt keys while clicking both highlight and shadow mask channel thumbnails. This subtracts highlight and shadows from the whole image selection. During this process you may see a warning like the one above. Click OK to continue. Rename the new mask Midtones.
Now select the Midtones entry in the Channel palette. Click onto the Load Channel as Selection button at the bottom of the palette then select the RGB channel entry to reset the preview back to full color. You may not see the marching ants of the selection but it will be active. Now create a new Curves Adjustment layer. Automatically the midtone mask will be used in conjunction with the Curves feature. Now you can alter the curve’s shape to adjust the middle values.
Selections from paths
The Pen Tool is often used in the creation of sophisticated smooth-edged selections, but strictly speaking it is not one of the selection tools. The Pen Tool creates vector paths instead of selections; these, however, can be converted into selections that in turn can be used to extract or mask groups of pixels. The Pen Tool has an unfortunate reputation – neglected by most, considered an awkward tool by those who have made just a passing acquaintance, and revered by just a select few who have taken a little time to get to know ‘the one who sits next to Mr. Blobby’ (custom shape icon) in the Tools palette. Who exactly is this little fellow with the ‘ye olde’ ink nib icon and the awkward working persona? The Pen Tool was drafted into Photoshop from Adobe Illustrator. Although graphic designers are quite adept at using this tool, many photographers the world over have been furiously waving magic wands and magnetic lassos at the megapixel army and putting graphics tablets on their shopping lists each year in an attempt to avoid recognizing the contribution that this unique tool has to offer.
Not everything you can see with your eye can be selected easily with a selection technique based on color or tonal values. The resulting ragged selections can be fixed in Quick Mask mode, but sometimes not without a great deal of effort. The question then comes down to ‘how much effort am I prepared to apply, and for how long?’ Its about this time that many image editors decide to better acquaint themselves with the Pen Tool. Mastering the Pen Tool in order to harness a selection prowess known to few mortals is not something you can do in a hurry – it falls into a certain skill acquisition category, along with such things as teaching a puppy not to pee in the house, called time-based reward, i.e. investing your time over a short period of time will pay you dividends over a longer period of time. The creation of silky smooth curvaceous lines (called paths) that can then be converted into staggeringly smooth curvaceous selections makes the effort of learning the Pen Tool all worthwhile.
Basic drawing skills
Vector lines and shapes are constructed from geographical markers (anchor points) connected by lines or curves. Many photographers have looked with curiosity at the vector tools in Photoshop’s Tools palette for years but have dismissed them as ‘not for me’. The reason for this is that drawing vector lines with the Pen Tool for the inexperienced image editor is like reversing with a trailer for the inexperienced driver. It takes practice, and the practice can be initially frustrating.

The pen can multi-task (just like most women and very few men that I know). The pen can draw a vector shape whilst filling it with a color and applying a layer style – all at the same time. Although tempting, this has nothing to do with selecting a bald man’s head, so we must be sure to disarm this charming little function. We can also use the training wheels, otherwise known as the ‘Rubber Band’ option, by clicking on the menu options next to ‘Mr Blobby’.
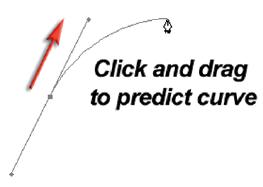
Basics Step 1 – Go to ‘File > New’ and create a new blank document. Choose ‘White’ as the ‘Background Contents’. Size is not really important (no really – in this instance anything that can be zoomed to fill the screen will serve your purpose). Click on the Pen Tool (double-check the ‘Paths’ option, rather than the ‘Shape layers’ option, is selected in the Options bar) and then click and drag (hold down the mouse clicker as you drag your mouse) in the direction illustrated above. The little black square in the center of the radiating lines is called an anchor point. The lines extending either side of this anchor point are called direction lines, with a direction point on either end, and that thing waving around (courtesy of the Rubber Band option) is about to become the path with your very next click of the mouse.
Basics Step 2 – Make a second click and drag in the same direction. Notice how the dragging action modifies the shape of the previous curved line. Go to the ‘Edit’ menu and select ‘Undo’. Try clicking a second time and dragging in a different direction. Undo a third time and this time drag the direction point a different distance from the anchor point. The thing you must take with you from this second step is that a curve (sometimes referred to as a Bézier curve) is both a product of the relative position of the two anchor points either side of the curve, and the direction and length of the two direction lines (the distance and direction of the dragging action).
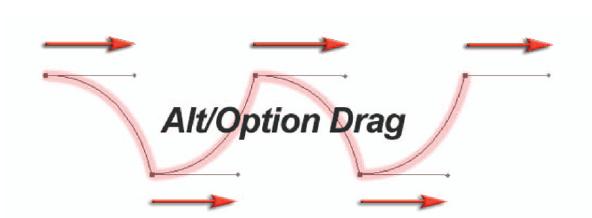
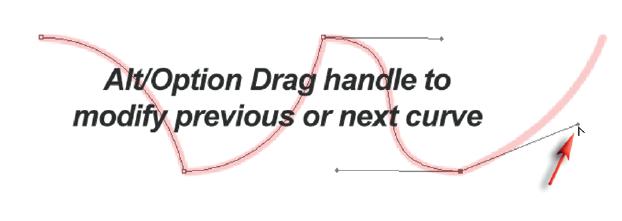
Basics Step 3 – Scenario 1: Let us imagine that the first click and drag action has resulted in a perfect curve; the second dragging action is not required to perfect the curve but instead upsets the shape of this perfect curve – so how do we stop this from happening? Answer: Hold down the Alt key (PC) or Option key (Mac) and then drag away from the second anchor point to predict the shape of the next curve. This use of the Alt/Option key cancels the first direction line that would otherwise influence the previous curve.
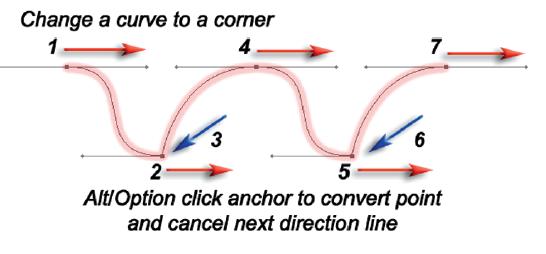
Scenario 2: Let us imagine that we have created the first perfect curve using two normal click and drag actions (no use of a modifier key). The direction lines that are perfecting the first curve are, however, unsuitable for the next curve – so how do we draw the next curve whilst preserving the appearance of the first curve? Answer: The last anchor point can be clicked whilst holding down the Alt/Option key. This action converts the smooth anchor point to a corner anchor point, deleting the second direction line. The next curved shape can then be created without the interference of an inappropriate direction line.
Note > The information that you need to take from this third step is that sometimes direction lines can upset adjacent curves. The technique of cancelling one of the direction lines using a modifier key makes a series of perfect curves possible. These two techniques are especially useful for converting smooth points into corner points on a path.
Basics Step 4 – Just a few more steps and we can go out to play. It is possible to change direction quickly on a path without cancelling a direction line. It is possible to alter the position of a direction line by moving the direction point (at the end of the line) independently of the direction line on the other side of the anchor point. To achieve this simply position the mouse cursor over the direction point and, again using the Alt/Option key, click and drag the direction point to a new position.
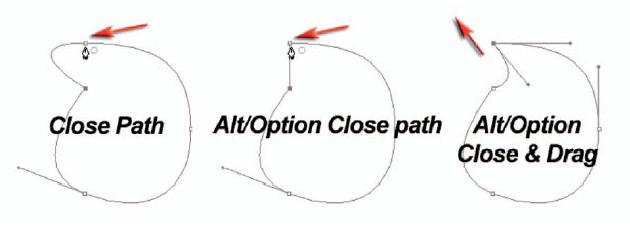
Basics Step 5 – If this path is going to be useful as a selection, it is important to return to the start point. Clicking on the start point will close the path. As you move the cursor over the start point the Pen Tool will be accompanied by a small circle to indicate that closure is about to occur. You will also notice that the final curve is influenced by the first direction line of the starting anchor point. Hold down the Alt/Option key when closing the path to cancel this first direction line. Alternatively, hold down the Alt/Option key and drag a new direction line to perfect the final curve.
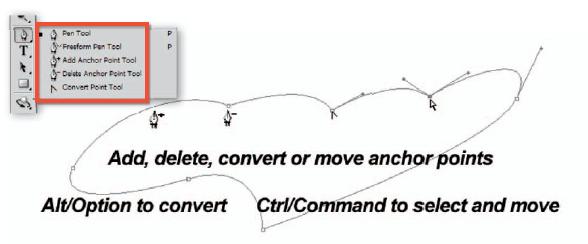
Basics Step 6 – When a path has been closed it is possible to add, delete, convert or move any point. Although these additional tools are available in the Tools palette they can all be accessed without moving your mouse away from the path in progress. If the Auto Add/Delete box has been checked in the Options bar you simply have to move the Pen Tool to a section of the path and click to add an additional point (the pen cursor sprouts a plus symbol). If the Pen Tool is moved over an existing anchor point you can simply click to delete it. Holding down the Ctrl key (PC) or Command key (Mac) will enable you to access the Direct Selection Tool (this normally lives behind the Path Selection Tool). The Direct Selection Tool has a white arrow icon and can select and move a single anchor point (click and drag) or multiple points (by holding down the Shift key and clicking on subsequent points). The Path Selection Tool has to be selected from the Tools palette and is able to select the entire path.
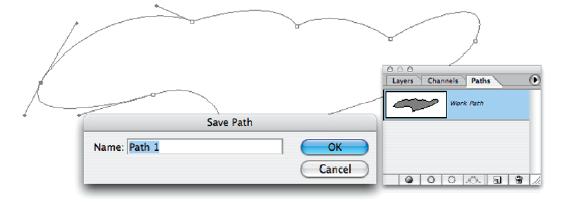
Basics Step 7 – The final step in the creation of a Path is to save it. All Paths, even Work Paths, are saved with the image file (PSD, PDF, PSB, JPEG or TIFF). If, however, a Work Path is not active (such as when the file is closed and reopened) and then the Pen Tool is inadvertently used to draw a new Path, any previous Work Path that was not saved is deleted.
Click on the Paths palette tab and then double-click the Work Path. This will bring up the option to save and name the Work Path and ensure that it cannot be deleted accidentally. To start editing an existing Path click on the Path in the Paths palette and then choose either the Direct Selection Tool or the Pen Tool in the Tools palette. Click near the Path with the Direct Selection Tool to view the handles and the Path.