CHAPTER 11
Film
With today's digital effects pipeline it is entirely possible for the modern digital compositor to spend his or her entire life without getting an opportunity to interact with physical film. The first time the shot probably will be encountered is on a monitor. The last time will probably be when it is projected in the screening room. Unless you shoot some wedges, you may never actually touch a real frame of film. This can create vocabulary problems when talking to clients. The client, on the other hand, works with film all day long. The client may not know what a pixel is, but he expects you to know his terms and vocabulary.
This chapter is about film as seen by the digital compositor, not an editor or cinematographer. It therefore leaves many things mercifully unsaid—things that, although perhaps technically true, are of no value or importance to you, the digital compositor. One of the most critical topics is the different film formats. It is essential for the compositor to know, for example, where the academy center is in a full aperture frame. You must routinely incorporate odd-sized elements from one format (or no format) into some other format. And you must know what parts of the frame you must care about and what areas you can ignore. There is even a short description of how film scanners and film recorders work, just in case you are interested.
11.1 Terms and Definitions
Before diving into the academy aperture, there are some film terms and definitions that are used throughout the following discussion. Clarifying all of this terminology will contribute to your film vocabulary and assist you in speaking with clients, as well as assist you in reading the following sections.
11.1.1 Conversions
You, the dauntless digital artist, no doubt relate to film in terms of frames and pixels. The client, however, comes from a different world, an analog world, with a different way of looking at things and different units of measure. For example, the client may refer to how long a shot is in terms of feet and frames. Following, then, are a few key conversion numbers you will find it helpful to commit to memory.
11.1.2 Apertures
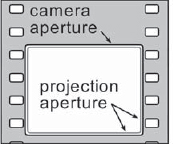
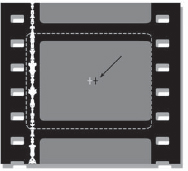
In film cameras there is a metal plate called a “gate” with a rectangular opening that sits just in front of the film that blocks some of the incoming light to define the area of the negative that is to be exposed. The rectangular opening in the gate and the exposed region of the film are both referred to as the camera aperture. The film projector has a similar gate with another rectangular opening called the projection aperture. The projection aperture is slightly smaller than the camera aperture in order to provide a narrow safety margin around the edge of the exposed frame in case the projection aperture is not perfectly aligned. Figure 11-1 illustrates both a camera aperture and a “generic” projection aperture to illustrate the basic idea.
The projection aperture, then, is a window within the camera aperture where the action is to stay confined. Some projection apertures are a great deal smaller than the camera aperture, so it can be ambiguous as to what area of the film you really care about and how to position elements within it. Not surprisingly, it is the camera aperture that is digitized by film scanners and sent to a film recorder to film out, while the work may only need to be done in the projection aperture. There are a great many projection apertures, so the ones you are likely to encounter are detailed in Section 11.2, “Film Formats.”
11.1.3 Composition
Before a movie is filmed a decision is made as to what format the cinematography will be using. All shots are then composed for that format, meaning that the action and items of interest will stay framed within the prescribed aperture, or “window,” of that format. If a shot is composed for academy 1.85, for example, the action will be framed within that aperture. It is important to know what you are composing to because it affects both creative and work decisions you have to make. You may be given a full aperture plate to work with, but there is no way to tell if the shot was composed for academy 1.85 by just looking at it. Be sure to find out what the film projection format is at the very outset of a project.
To illustrate the impact of composition on a shot, Figure 11-2 shows an example of a 1.33 aspect ratio picture composed for 1.33. The subject is well framed and nowhere clipped within the 1.33 aspect ratio aperture. However, Figure 11-3 shows what happens when it is projected with a 1.85 aspect ratio projection gate. The top and bottom of the subject have been cropped. Beyond just esthetic impact, critical parts of the picture that affect the storytelling could be cropped out.
Figure 11-4 shows the same subject in another 1.33 aspect ratio picture, but this one is composed for 1.85. Notice that the subject is framed somewhat wider than in Figure 11-2. When projected with a 1.85 projection gate in Figure 11-5, the subject is well framed and no longer cropped. Even though the subject was filmed in a 1.33 format in both examples, the composition would be different, depending on the intended projection format of the film.
A related issue is the safe to aperture. The client may say the shot is composed for 1.85, but he wants it to be “safe to 1.66.” This means that even though the action is composed for 1.85, you need to make sure the finished shot looks good out to the 1.66 aperture. Outside of that it doesn't matter if it is less than a perfect picture. This can occasionally save you a great deal of unnecessary work if there is frame-by-frame work like rotoscoping or painting, or just bad matte edges outside of the safe area that you can safely ignore.

Figure 11-2: Composed for 1.33
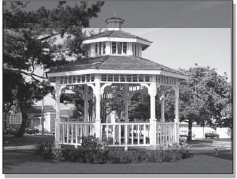
Figure 11-3: Projected at 1.85
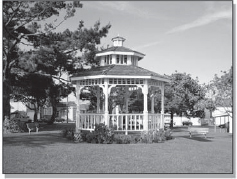
Figure 11-4: Composed for 1.85
Figure 11-5: Projected at 1.85
11.1.4 Aspect Ratio
The aspect ratio of a frame is a number that describes the frame's shape—whether it is nearly square or more rectangular. The aspect ratio is calculated by dividing the width by the height as in Equation 11-1:
Aspect ratio = frame width ÷ frame height(Eq. 11-1)
It does not matter what units of measure are used in the calculation. For example, the aspect ratio of an academy aperture in Cineon pixels is 1828 ÷ 1332 = 1.37. If you measured the film itself in inches, it would be 0.864 ÷ 0.630 = 1.37. An aspect ratio can also be expressed as an actual ratio, such as 4:3. This means that the item of interest is 4 “units” wide by 3 “units” tall. A 4:3 aspect ratio can also be expressed as a floating point number by performing the arithmetic of dividing the 4 by the 3 (4 ÷ 3 = 1.33). I prefer the floating point representation for two reasons. First, for many real-world aspect ratios the ratio representation is hard to visualize. Would you rather see an aspect ratio expressed as 61:33 or 1.85? Second, you frequently need to use the aspect ratio in calculations of image width or height and would have to convert the ratio form into a floating point number anyway.
Figure 11-6 shows a series of aspect ratios to illustrate a pattern. An aspect ratio of 1.0 is a perfect square, and as the aspect ratio gets larger and larger the shape gets progressively more “wide screen.” For aspect ratios greater than 1.0, trimming the perimeter of an image by a uniform amount, say, 100 pixels all around, will increase the aspect ratio.
The aspect ratio is also essential in calculating image window heights and widths—for example, cropping a 1.85 window out of an academy aperture frame. We will assume the academy aperture is 1828 pixels wide and we need to calculate the height of a 1.85 window using Equation 11-1. Slinging a little algebra, we can solve Equation 11-1 for height and width like so:
Height = width ÷ aspect ratio(Eq. 11-2)
Width = height × aspect ratio(Eq. 11-3)
We want to figure the height, so using Equation 11-2, we would calculate:
Height = 1828 ÷ 1.85 = 988 pixels high
So, a 1.85 aspect ratio window within an academy aperture frame is 1828 × 988.
11.1.5 Image Resolutions
The image resolution is given below for each type of film format in terms of Cineon scans because their standards are followed by most other film scanners and recorders. Both the Cineon scanners and film recorders allocate 4k (4096) pixels of resolution to the full width of 35mm film (the full aperture). The vertical height varies depending on the format. Folks working with the 70mm formats will want 4k scans, but for the vast majority of 35mm work the 2k (2048) scans are excellent and dramatically reduce the required database size and render times compared with 4k scans. Cineon refers to the 4k scans as “full resolution,” and the 2k scans as “half resolution.” Table 11-1 summarizes the image resolutions and aspect ratios that are detailed in the following text. The image resolutions you are not likely to be working with are included for completeness, but ghosted out.
In the following detail sections describing each film format, all 35mm frame resolutions are given in terms of 2k scans because that is most likely what you would be working with. Refer to Table 11-1 if you need to look up the 4k numbers. For 70mm formats, the numbers are in terms of 4k scans because that is most likely what you would be working with. Refer to Table 11-1 if you need to look up the 2k numbers.
11.2 Film Formats
There are a number of film formats for 35mm film, and it can get a bit confusing at times. In this section we will examine the full aperture with its variations, the academy aperture and its variations, plus Cinemascope and VistaVision. The standard 65mm format and its Imax variant are also discussed. Again, all image sizes are given in terms of Cineon pixel dimensions in the resolution you are most likely to be working in for that format. Tips and techniques are offered for reformatting, such as taking a Vista frame to academy, and special attention is paid to the difficulties of working with Cinemascope.
11.2.1 Full Aperture
Full aperture is a 1.33 aspect ratio image that covers the film perf-to-perf left and right, and vertically is so tall that it leaves only a thin frame line between frames (see Figure 11-7). Because the entire negative area is exposed there is no room for a sound track, so this format cannot be projected in theaters. Cineon full ap scans are 2048 × 1556.
If the full ap frame cannot be projected in a theater, what is it doing on your monitor getting an effects shot? There are two possibilities. One is that the shot was composed for full ap, and will be optically printed down later to another format for theatrical release. The second possibility is that even though the full aperture was scanned, the shot was composed for academy aperture, which is described in the next section. The academy aperture uses only a portion of the full aperture, so you can seriously mess up a shot if you are not aware of this little detail.
11.2.1.1 Super 35
Full ap is often referred to as “Super 35” and it is a very popular format because of the flexibility of being able to go in almost any direction from there. Again, it is very important to find out from the client what the composition and safe apertures are. You might hear it referred to as “full ap 185” or “super 185.” This means that the plate was shot full ap, was composed for a 1.85 aperture within the full ap frame, and the plan is to “print down” to an academy 1.85 format later. The only real impact this has on the compositor is that you must make sure to keep the action 1.85 safe in the full ap frame unless, of course, you are given the job of resizing the full ap frame down to academy digitally. The thing to keep in mind is that the full ap plate is a 1.33 aspect ratio and the academy plate is 1.37. To avoid stretching the nice client's picture slightly in X, you would crop a 1.37 window out of the full ap plate, then resize it down to the academy size.
Figure 11-7: Full Aperture Frame
The Super 35 2.35 format is a very important one. The full aperture is still exposed, but the action is composed for a 2.35 window within the full ap. The 2.35 window is the full width of the full aperture (2048) and a height of (2048 ÷ 2.35 =) 871. This is not Cinemascope. Cinemascope is 2.35 and anamorphic (squeezed in X), as described in Section 11.2.3. The artistic intent is to eventually finish in Cscope (Cinemascope) for theatrical release. Later, the Super 35 will be reformatted into Cscope either optically or digitally. Perhaps it will be your job to do the digital refit for the effects shots.
11.2.1.2 Common Top and Common Center
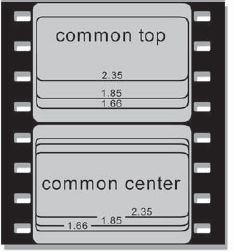
The fact that there are several theatrical projection formats as well as (soon) multiple TV formats makes it difficult for the cinematographer to select a single format to shoot in. One attempt to find “one format that fits all” is to shoot Super 35 “common top” or “common center,” as shown in Figure 11-8. The full ap frame is shown with 1.66, 1.85, and 2.35 projection guides inside.
The idea of common top is that the topline of the frame is common to all formats, as if they all “hang” from the tops of their frames. This top line is common to the top line of academy 1.66. Later, when the film is released in different formats, only the “footroom” changes from format to format.
The common center format keeps the action vertically centered in the full ap frame and is more popular than common top. Later, the release formats are taken from the center of the aperture, increasing top and bottom equally with the taller formats. So, in addition to asking the client what format you are working toward, with Super 35 you must also check whether it is common top or common center.
11.2.2 Academy Aperture
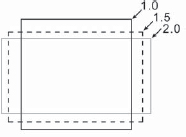
The academy aperture is a 1.37 aspect ratio image (often referred to as 1.33) that is smaller and shifted to the right relative to the full aperture to make room for a sound track. Of course, none of your film scans will have a sound track because it goes on the print for theatrical projection, not the original camera negative. Figure 11-9 has a dotted outline of the full aperture to illustrate how the academy aperture fits within it. It also shows how the academy center (black cross) is shifted to the right of the full ap center (light gray cross). Any reference to the academy center, then, refers to this “off-center” center. The Cineon scan of the academy aperture is 1828 × 1332.
To reformat some other film format to academy you would crop a 1.37 aspect ratio piece out of the source film and resize it to 1828 × 1332. If you have an academy shot but the film recorder can only shoot full aperture, then the academy frames must be pasted within a black full ap plate. The academy frame would be centered vertically and shifted to the right until the right edges line up.
An academy aperture scan of 1828 × 1332 represents the camera aperture, not the projection aperture. This is the image size that you would both get from the Cineon scanner and send out to a Cineon film recorder. Just inside of the camera aperture is the projection aperture, shown in the academy camera guide in Figure 11-10. The projection aperture is the portion of the film frame seen when the academy aperture is projected. It leaves a little safety margin all around the frame for the theater projector. The 1.85 aperture is not a 1.85 window into the 1828 × 1332 image, since that is the camera aperture. It is instead a 1.85 window in the academy projection aperture, which is slightly smaller.
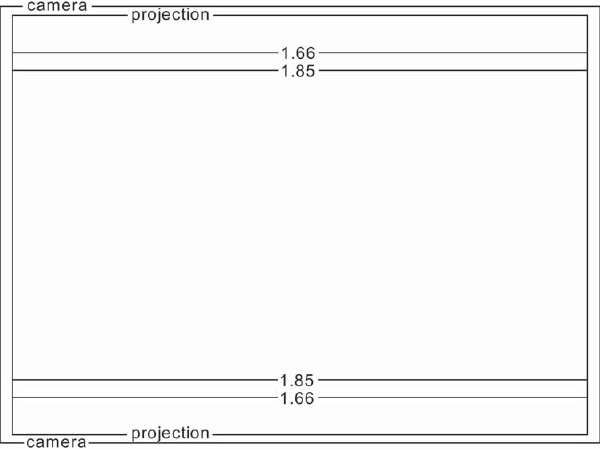
Figure 11-10: Academy Aperture Camera Guide
Keep in mind that even though a shot was (say) an academy 1.85 shot, you could be given either an academy scan or a full ap scan to work with. The thing to watch out for with full ap plates is when the shot is actually composed for academy. Sometimes the shots are exposed, scanned, composited, and recorded out as full ap, but they are composed for academy. The center of action will be at the academy center, which is to the right of the full ap center as shown in Figure 11-9. The lens will be centered there, too, along with its distortions. If you were, for example, to rotate the plate around the center of the full ap plate, the center of rotation would be quite noticeably wrong for the academy portion of the frame when projected. Most embarrassing.
11.2.3 Cinemascope
Cinemascope is a 2.35 aspect ratio “wide screen” format with the image on the film squeezed in X by a factor of 2. At projection time a special anamorphic lens stretches the image horizontally by a factor of 2 to restore the proper perspective to the picture. When an anamorphic image is unsqueezed it is referred to as flat. This 2:1 relationship between the squeezed film frame and the flat projection frame is illustrated in Figure 11-11.
To get the squeezed image on the film in the first place, it was initially photographed with an anamorphic lens that squeezed the scene by 2 in X. These lenses are less popular to work with than normal “spherical” lenses, which is one reason many movies are filmed in the Super 35 formats with regular spherical lenses for later reformatting to Cscope.
The real advantage of Cscope is that much more film area is used for the picture. This can be seen in the Cinemascope film aperture illustration in Figure 11-12. The Cscope frame has an academy width but a full aperture height (1828 × 1556). This gives an aspect ratio of (1828 ÷ 1556 =) 1.175, which, when scaled by 2 in X at projection time results in a (1.175 × 2 =) 2.35 aspect ratio image on the screen. Also, because Cscope has an academy width, it also has an academy center.
Although the Super 35 2.35 format film area is a bit wider because it is full ap, it is not nearly as tall. As a result, there is much less film area compared to a Cscope frame. A Cscope frame has over 60 percent more projected film area than Super 35 2.35.
You may encounter a Cscope job filmed at full aperture with picture covering the sound track area. The active picture area will still be just the academy width, and the action will be composed for it. More important, the lens will still have an academy center. In other words, don't let the fact that there is exposed film in the sound track area mislead you. Keep the action centered within the academy width, as well as the center of rotation or scale.

Figure 11-11: Anamorphic Projection of Squeezed Film Frame
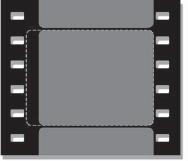
Figure 11-12: Cinemascope Frame with Full Aperture Reference Outline
11.2.3.1 Working with Cscope
Speaking of rotation and scale, Cscope is a prickly format to work with. If your compositing software does not have an anamorphic image viewer you have to either stare at squeezed images all day or add a resize node to double the width every time you want to look at a frame. Worse, an anamorphically squeezed image cannot be rotated or scaled without introducing serious distortions. If you scale an anamorphic image by 10 percent, when it is later flattened during projection it will appear scaled 10 percent in Y and 20 percent in X.
If you attempt to rotate an anamorphic image it will end up both skewed and rotated. The rotational distortions are harder to visualize, so Figure 11-13 is offered as a case in point. The original image was squeezed 50 percent in X like Cscope, rotated 10 degrees, then flattened back to original size. As you can see, the target took a serious hit during the anamorphic rotation.
Tragically, the production workaround is to flatten the Cscope images by scaling them by 2 in X. If there are only one or two “anamorphically illegal” operations, the image could be flattened just before the operation and then resqueezed afterwards. If there are several, it may have to be flattened at the first operation and left that way until after the last operation. The problem is that this obviously doubles the number of pixels in the image, which will seriously impact the rendering time. It also causes the image to be filtered (re-sampled) several times, which softens the picture. Perhaps someday someone will make an anamorphic rotate. If your scaling operation can scale differently in X than in Y, then you can make your own anamorphic scale simply by scaling twice as much in Y as in X and avoid the whole flattening thing.
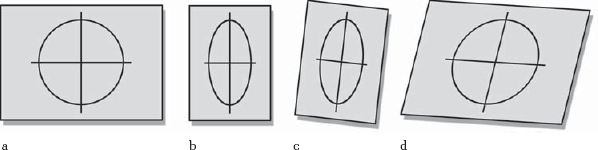
Figure 11-13: (a) Original Image; (b) Squeezed; (c) Rotated; (d) Flattened.
Motion tracking can safely be done on a squeezed anamorphic image if the tracking is for panning only (translate X and Y). If you are trying to track rotation or scale (zoom), then the data collected by the motion tracker from the squeezed frame will be distorted and unuseable, so it will have to be flattened first. Perhaps someday someone will make an anamorphic motion tracker.
11.2.3.2 Reformatting Other Formats to Cscope
You will occasionally have other film formats to incorporate into a Cscope job, so you will have to reformat them. The key issue is to keep the number of filtering operations to a minimum—in this case, just one. Whether you are starting with a big bad Vista plate or an academy frame, the procedure is the same:
Step 1: Crop a 2.35 window out of the source plate.
Step 2: Resize the cropped window to 1828 × 1556 in one resize operation.
Virtually all resize operations have an option to resize differently in X than Y, so the resize can be done in one step. This keeps the filtering down to one time only. If the Cscope layer is going to be flat (3656 × 1556) when it is joined to the imported element, then the imported element could be cropped to 2.35, left flat when it is resized to match at 3656 × 1556, and composited with the Cscope. Then the joined layers can be squeezed later in the composite. This would save squeezing the imported layer, flattening it later for composite, then squeezing the results again. Again, try to keep the number of filtering operations to a minimum.
11.2.4 VistaVision
Vista is a super-high-resolution 35mm format with a 1.5 aspect ratio which is frequently used for photographing background plates for effects shots. By starting with an ultra-high-resolution element there is far less visible degradation by the end of the effects process, and the grain is very small in what will likely be a held frame. Vista, sometimes referred to as “8 perf,” uses far more negative area than any other 35mm format by turning the film sideways so that the image spans 8 perfs rather than the usual 4 (see Figure 11-14). This means that the Vista negative area is twice as big as the usual 4 perf full aperture. Transporting the film sideways obviously requires special cameras and projectors, but it uses the same film stock and lab processing as the rest of the 35mm world.
Vista scans are a whopping 3096 × 2048, with a file size to match. You are unlikely to ever actually do an effects shot in Vista, but you are likely to be given a Vista element to include in a more normally formatted shot. One common application is to load up a regular 35mm photographer's camera with movie film stock and shoot stills to be used as background plates. Regular 35mm stills are also an 8 perf 1.5 aspect ratio format, which fits nicely on your neighborhood Cineon film scanner. You wind up with beautiful Vista plates without a film crew or anything more than a photographer and a still camera. The extra size of the Vista plate also comes in handy when you need an oversized background plate in order to give it an overriding move or to push in (scale up).

Figure 11-14: VistaVision Frame
11.2.5 65mm/70mm
65mm camera negative is a 5 perf format with an aspect ratio of 2.2, and is often referred to by the term “5 perf 70.” It is actually the release prints that are 70mm, with the extra 5mm on the outside of the sprocket holes for some additional sound track channels, as illustrated by the dotted lines in Figure 11-15. Cineon full-res scans of 5 perf 65mm are 4096 × 1840, and it is unlikely that you would use halfres scans for 65mm work since it would kind of thwart the whole purpose of the large 65mm format.
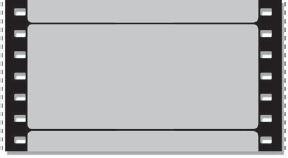
Figure 11-15: 65mm Film with 5 Perfs and 2.2 Aspect Ratio
11.2.6 Imax
Imax, the mother of all formats, is a 15 perf 70mm format with a 1.37 aspect ratio, often referred to as “15/70.” The negative, of course, is standard 65mm film. The film is laid on its side, as in the Vista format. This is a special venue format for Imax theaters. A full-res Cineon scan of an Imax frame is 5616 × 4096, and again, it is very unlikely that you would work with a half-res scan. Cineon can scan a 65mm negative, but there is currently no Cineon 65mm film recorder. When sending Imax frames out to a regular film recorder, then, they will probably need to be sized down to something like 4096 × 3002.
Imax has a truly huge frame with over ten times the negative area of a regular 35mm academy frame. In addition to its enormous projected size, the Imax theaters are designed with the audience seats much closer to the screen, relative to its size, than in regular theaters. It's like having the entire audience sit in the first five rows of a regular theater. The screen covers so much of the field of view that the action must be specially composed, as shown in Figure 11-16.
The concept behind the Imax format is visual “immersion.” Therefore, much of the screen is intended to be literally peripheral. The action and any titles should stay in the action “sweet spot,” below the center of the frame. Composing an Imax film like an ordinary 35mm film with the action in the center will cause the entire audience to crane their necks upwards for 40 minutes. Keeping the action low and using the rest of the huge screen to fill the peripheral vision of the viewer results in the immersion experience.
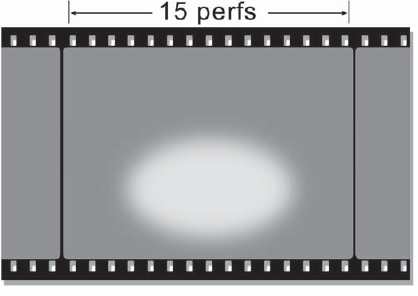
Figure 11-16: Imax Frame with Below Center Action “Sweet Spot”
It is particularly difficult to work with the Imax format, not just because of the huge frame sizes, but also because of the very different audience-to-screen relationship. Imax frames on video or your monitor look odd with the action and titles all huddled down into the little sweet spot area. The instinct is to raise things up and make them bigger—until you screen the shot in an Imax theater. Then suddenly everything is way too big and overhead. To get some idea of what the image on your monitor will look like when projected, move your nose down low and to within about 3 inches of your monitor. Seriously.
11.3 Film Scanners
The film scanner digitizes the film negative (or interpositive) and outputs data files for digital manipulation. The film frames you are working with at your workstation came off of a film scanner, so it might be helpful to know a bit about them. The information about hardware resolution and aperture correction can be helpful in selecting a scanning service bureau with which to work.
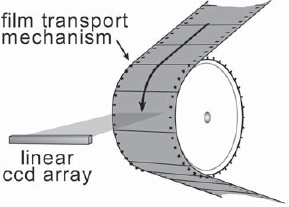
Figure 11-17 illustrates the typical film scanner configuration. It has a linear CCD array that digitizes one entire scan line of film at a time, plus a precision transport mechanism that single-steps the film past the CCD array one scan line at a time. Because it is very difficult to build film transport and lens systems that are high precision and repeatable as well as adjustable, most film scanners are hardwired to scan the full aperture horizontally at a fixed resolution, but can vary the vertical height of the scan simply by altering how many scan lines are stepped through per frame. For an academy aperture scan, for example, the full aperture would be scanned horizontally and the resulting scan cropped to academy size. Cscope needs an academy crop horizontally with a full aperature transport vertically. For a Vista scan (the sideways format) the film transport just keeps moving for 8 perfs instead of the usual 4.
One extremely important characteristic of a film scanner is its hardware scanning resolution. For horizontal resolution the hardware scanning resolution depends on how many elements (pixels) are in the linear CCD array. For vertical resolution it is the finesse of the film transport mechanism—that is to say, how small a “step” the transport mechanism can make when moving the film vertically.
All film scanners have square pixels. Most scanners are either 2k (2048) or 4k (4096) scanners, meaning the resolution of their CCD arrays. The process of digitizing an image softens it for reasons clearly explained in the arcane science of signal theory (which we will mercifully skip). To compensate, some scanners apply aperture correction, which is scanner-speak for an image sharpening algorithm. There is a very important point here. Although most of the world actually uses only 2k scans, a 4k scan filtered down to 2k is a much better scan than a 2k scan. Always ask what the hardware scanning resolution is, regardless of the resolution of the delivered images.
In the early days of film scanner design it was determined that a lossless scan of film would require a 4k resolution. Practical experience has shown, however, that a good 2k scan looks good enough for almost all applications, and requires 1/4 the disk space, data transfer time, and rendering time of a 4k scan. Most scanners digitize the film at 12 to 14 bits of color resolution, then filter it down to 8 or 10 bits. The 8 bits are for a linear version of the scan, and 10 bits for a log version. The differences between linear and log film images are covered in detail in Chapter 12, “Log versus Linear.” Most scanners can digitize either a negative or an interpositive. The interpositive has the same density range as the negative, so the scanner optics do not have to be altered. The interpositive scan data just has to be inverted to convert it to negative scan data.
11.4 Film Recorders
Film recorders take the digital image data and expose it back to film. There are two basic kinds of film scanners: CRT based and laser based. All film scanners try to add as little grain as possible since they are designed to “rephotograph” previously digitized film that already has considerable grain content. The way to do this is to use a very fine-grained film. A very fine- grained film is also a very “slow” film, meaning that it takes a lot of light to expose it, or, if you don't have a lot of light, a much longer exposure time. Since a CRT cannot produce the intensity of light that a laser can, it will be no surprise to find out that the laser film recorders can be as much as ten times faster than CRT recorders.
11.4.1 How Film Recorders Work
The CRT film recorder uses a film camera to shoot a picture off of a CRT, as illustrated in Figure 11-18. The CRT is a special, high-resolution black and white model. Color is achieved by filming each frame through the color wheel one channel at a time, which means three passes are required for each frame. For example, the red filter is first rotated in front of the camera lens. Then, the red channel is displayed on the CRT to expose the red record, but the film is not advanced. Next, the green filter is rotated into place and the green channel data is displayed on the CRT, again without advancing the film. Finally, the blue channel is exposed, then the film is advanced to the next frame.
Figure 11-18: CRT Film Recorder
The laser film recorder literally “paints” each frame one scan line at a time directly onto the film negative as it is slowly moved vertically. The laser first passes through a beam modulator that alters its brightness for each pixel as it scans a line, then through a deflector that sweeps the beam horizontally to scan across the film. Figure 11-19 shows just one laser for clarity, but there are actually three lasers, one for each color channel. Each beam has its own modulator and deflector so that all three beams can operate simultaneously to record the frame in one pass.
11.4.2 Comparison of Laser versus CRT Film Recorders
Although the CRT film recorder does a good job in most cases and is much less expensive than laser film recorders, the laser wins all of the performance contests, hands down. The laser film recorder is:
- Faster: The light source of the laser recorder is much brighter than a CRT so it requires much shorter exposure times for each frame. The CRT recorder also needs to make three passes per frame, whereas the laser recorder records all three channels simultaneously in one pass.
- Finer grained: A second advantage of the intense light produced by the laser is that an even slower, finer-grained film stock can be used.
- Sharper: The spot size on a CRT is small, but cannot be kept constant because it tends to balloon with brightness. The laser can be focused to the same incredibly small spot regardless of intensity.
- More saturated: The laser beams are extremely narrow in their color frequencies, so the red laser, for example, exposes only the film's red layer with very little contamination of the other two layers. This gives the laser recorder excellent color separation, which results in superb color saturation. The color wheels on CRTs are not nearly as selective, so the red color filter will let a little green and blue pass through, reducing color separation and therefore saturation.
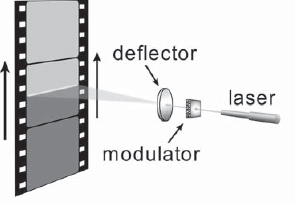
Figure 11-19: Laser Film Recorder
11.4.3 Calibrating the Workstation to the Film Recorder
The single biggest question on the digital compositor's mind relative to film recorders is “why doesn't the film look like the picture on my monitor?” What it takes to actually make them look the same is, literally, a whole other book. What we can do here is try to appreciate some of the reasons it is very difficult to do what seems so obvious—make the film look like the monitor. It is not the digital compositor's job to achieve this. There are film recorder lookup tables as well as workstation monitor calibrations that need to be done, and these are the responsibility of the engineering department. Unfortunately, even when properly done, the monitor can only come close.
11.4.3.1 Dark Surround
The human perception system adapts to the viewing environment. In a movie theater (or screening room) the viewing environment is a dark surround—the room is totally dark except for the movie screen. The viewing environment in a typical compositing studio, however, is a dim surround—the room is dimly lit, and sometimes brightly lit. This issue is covered in greater detail in Chapter 9, “Gamma.” The bottom line is, even if you could somehow bring the movie screen into your compositing studio, it would suddenly appear very different because of the dim surround. The only way to replicate the dark surround in the compositing studio, of course, is to cover the windows and turn off all the lights, which is just not going to happen.
11.4.3.2 Contrast Ratio
The contrast ratio of an image display system is simply the ratio of the brightest image you can display compared to the darkest image you can display. The darkest your monitor gets is the color of the screen with the power turned off and the lights down low. The darkest film gets is the maximum density of the print with a projector bulb attempting to shine through it. The brightest your monitor gets is displaying pixel value 255 with the monitor contrast and brightness properly adjusted. The brightest film gets is the minimum density (virtually clear) with the projector bulb shining directly on the screen. To quantify this issue, the contrast ratio of projected film is in excess of 150:1, while a good-quality studio monitor is more like 50:1, even under ideal conditions. The modern monitor just does not have the “reach” to match the contrast ratio of film.
11.4.3.3 Primary Colors
The dyes in film act like color filters that pass the primary colors—red, green, and blue—which blend together in the human perceptual system to make the sensation of color. These dyes pass primary colors with a particular range of frequencies. The phosphors in your monitor's CRT also create red, green, and blue primary colors, but they have somewhat different ranges of frequencies from the film dyes. As a result, your monitor's red is not an exact match to the film's red, and so on. To some degree, this discrepancy can be reduced, but not eliminated, by careful calibration of both the monitor and the film recorder.
11.4.3.4 Film Layer Effects
Modern motion picture film is a complex layering of light-sensitive chemicals, and a mind-boggling array of couplers, inhibitors, enhancers, blockers, and so forth. When red light hits the film, it does not simply result in neatly exposing just the red layer. Some of it exposes the blue layer, a bit of it is absorbed by this inhibitor, some is reflected by that interaction, then this other molecule over here shifts the light's frequency and reradiates it as ultraviolet, and on and on. The bottom line is that the optical chemistry of the physical film medium is very complex and there are interactions between the many layers of film. In contrast, when you add 10 percent to the red channel of the picture on your monitor the red increases by 10 percent. Period. There is no model of the physical film's behavior in the display of film images, so the display is inherently incomplete and incorrect. This issue is only partially correctable with film recorder calibration.
11.4.3.5 Monitor Calibration
As we have seen, the differences between film and monitors are far too great to be fixed with a little lookup table. However, proper monitor calibration combined with proper film recorder calibration can achieve a fairly close match. All film recorders come with calibration and lookup table preparation tools, so this end of the pipeline is well cared for. Not so the monitors. To properly calibrate the workstation monitor, an expensive piece of calibration equipment with a light-sensing device must be attached to the screen to read the actual color of light coming off the screen for a given RGB value in the frame buffer. It then builds a color lookup table that alters the color of the light from the screen to match a particular specification. This takes equipment, trained staff, data tables, technical procedures, and film recorder calibration data. Plus, these monitor calibrations must be performed every few weeks because of the inherent instability of CRT monitors. The resulting lookup tables will have three slightly different “S”-shaped film response curves for each color channel, and will be unique for each workstation. It's no surprise, then, that simply adjusting the gamma won't make your monitor suddenly match the film.