Traditional and Non-Traditional Tools for Digital Methods
I love it when a plan comes together!
One of the most interesting promotional items created for my book “The Photographer’s Digital Studio” was a cartoon drawn by the brilliant artist John Grimes which showed trays of developer, stop, fix, and wash, with floppy disks being dipped in and out of each one. The caption was “A common mistake in digital photography.”
Years ago I labored many hours in a wet darkroom to produce a composite image showing what an historic statue would look like when moved to a different location. Digital imaging software would have let me do a better job in less than an hour and I wouldn’t have to spend time working in the dark with smelly chemicals.
Part of the reason that some people even ask the question “why digital?” is that many believe digital imaging is somehow different from traditional photography. That’s not really true. I think that there are no more differences between the two methodologies than you would find than when comparing photographers working with large format view cameras to someone grabbing snapshots with a point-and-shoot camera. Nowhere is this more evident than in the names and operations of some of the tools found in most digital imaging programs.
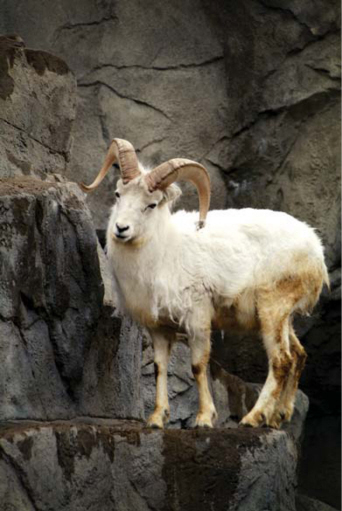
This photograph of a big horn sheep made at the Denver Zoo looks unmanipulated, but has been enhanced in Adobe Photoshop using the same kind of burning and dodging techniques I would have used in the traditional wet darkroom years ago. If you are not familiar with burning and dodging I’ll show you how to apply these tools manually in this chapter and how to use power tools in the following chapter. This image was captured with Fuji’s S3pro and an 80–200-mm Nikon lens. Exposure was 1/250 second at f/4.0 at an ISO of 400. © 2005 Joe Farace.
Retouching Tools and How to Use them
Since photography began, portrait photographers have used various photograph techniques, from retouching negatives with pencils and dyes to applying artwork, and even airbrushing prints to improve on nature’s little imperfections. Years ago, I did a portrait session that used a golf course as a background; the best image of the couple is one that had a foursome strolling by in the background. I paid an artist to airbrush the golfers out, but today I would have been able to use Photoshop’s Clone Stamp a.k.a. Clone Paintbrush tool in Ulead’s PhotoImpact to replace the foursome with some golf course grass using just a few digital brushstrokes.
The Clone/Rubber Stamp tool allows you to take a sample of part of an image, and then apply it over another image or part of the same image. When you use the Clone Stamp tool, you set a sampling point on the area you want to apply over another area. The Clone Stamp tool is useful for duplicating an object or removing a defect in an image. In Photoshop this is done by Option-Click (Mac OS) to define a source. On the Windows platform that keystroke combination is Alt-Click. Because you can use any brush with the Clone Stamp tool, you have a lot of control over the size of the area that can serve as a source. More importantly you can adjust (usually lower) the opacity and flow settings to apply the cloning with a softer touch that is especially important with photo retouching. Let me show you what I mean.
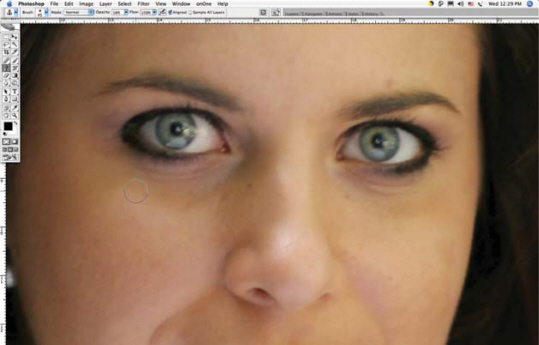
Kellie makes a beautiful bride but shooting in some lighting conditions will produce unattractive shadows under a subject’s eyes, and there are a few tiny wrinkles that can be removed to produce an idealized bridal portrait. Here the Clone Stamp is set to sample an area at the top of her cheekbone. © 2004 Joe Farace.
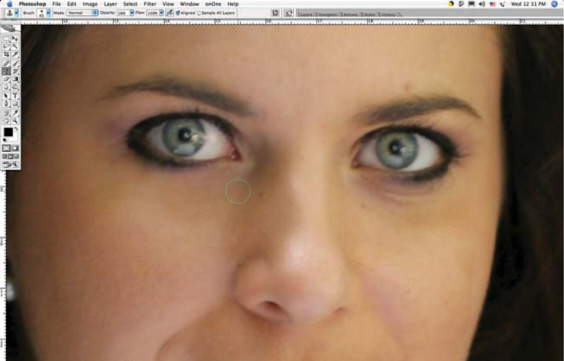
You can think of it as digital makeup. I used the Clone Stamp with an Opacity setting (see the settings in the Options bar) of 16%, so what I stamp lightly covers the dark areas under her eyes and the tiny wrinkles but does not completely replace the skin tones that are already there. Now I move to the other eye. © 2004 Joe Farace.
Repairing old faded and damaged photographs used to be the province of the specialist artist. Now anyone with a little patience to learn a few new digital tools and tricks can use image-editing programs to fix old scratched photographs and make them look like new again. Best of all, the original print is left untouched by the process.
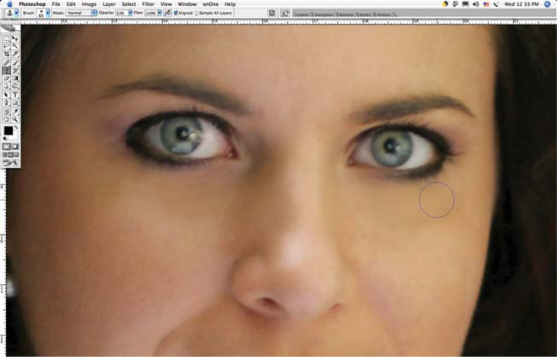
Since the other eye was slightly darker, I increased the Clone Stamp with an Opacity setting of 23% and used the same lightly dabbing brush strokes. If one click doesn’t do it, try another but if you’re-clicking the mouse too much it might be time to raise the opacity or switch to the Healing Brush (more on that later). © 2004 Joe Farace.
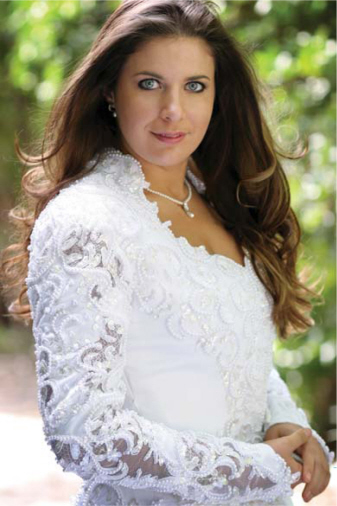
Here’s the final image. I used a smaller diameter brush to cover a few small imperfections along with some burning and dodging of the background to complete the final photograph of a young bride in the courtyard of a historic church in Brighton, Colorado. Image was captured with a Canon EOS 20D with an 85 mm f/1.8 lens at ISO 200. Exposure was 1/200 second at f/2.5. © 2004 Joe Farace.
Lots of image-editing programs have a Clone or Rubber Stamp tool and most of them work the way I just showed you in the above example. Adobe Photoshop adds a tool called the Healing Brush, a.k.a. Band-Aid. Like the Clone/Rubber Stamp, the Healing Brush paints with sampled pixels from an image or pattern but also matches the texture, lighting, transparency, and shading of the sampled pixels to the pixels being “healed” so that the repaired pixels blend seamlessly into the rest of the image.
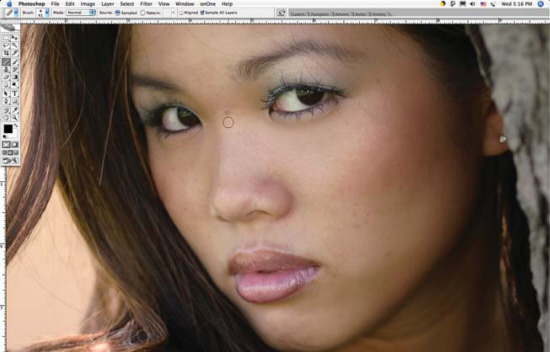
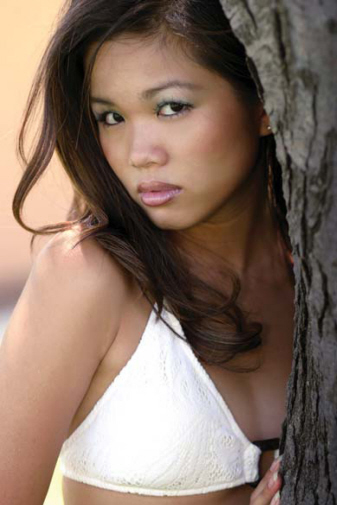
Helen has a natural beauty but like all of us she’s not perfect. (Cindy Crawford once said, “Even I don’t look like Cindy Crawford when I get up in the morning.) To retouch the few freckles on Helen’s face the Healing Brush is the prefect tool.” © 2004 Joe Farace.

The Healing Brush could be considered an “intelligent” Clone tool because it matches what is under the brush stroke rather than just plopping the same pixels over top of it. But is it not perfect, and I find it works bets for dust spotting. Yes, dust can get into digital interchangeable lens SLRs, and the Healing Brush will cure it fast. If you apply the brush to a light area that’s close to a dark edge you might not get results that you like; in that case, the Clone tool will be your best friend. © 2004 Joe Farace.
Here is the finished result of Helen with just some Clone and Healing Brush retouching. Oh, and a little burning of the tree trunk on the left. For those of you unfamiliar with this traditional darkroom technique, let me show you how it works next. © 2004 Joe Farace.
Traditional Tools for Digital Methods
Back during the Cretaceous era while studying photography at the Maryland Institute of Art, I was privileged to have Jack Wilgus as an instructor. One of my fondest memories of Jack was his facetious comment about how some of the best photographs were made by students in the break room. Not real photographs, mind you, but all of those comments from my erstwhile colleagues about the great photographs they were going to make—someday. While some of those images may have actually gotten made, I’ll bet few of them actually produced the photographs that they talked about so excitedly with their friends, and Jack’s comments resonate with me today.
Photographers, both amateur and professional, often get so wrapped up in what they have successfully been doing for so long that they forget to explore new directions of the kind that attracted them to the art form in the first place. We digital imagers, for example, can spend so much time being mesmerized by the pixels on our computer monitors that we often forget to make time to create some new photographs, something that’s different from the last batch of images that we captured. I think it’s a good idea to not only take time to smell the roses, but photograph them as well.
Burn and Dodge
You can use image-enhancement tools to produce traditional photographic techniques like “burning” and “dodging” to improve a photograph’s appearance. For new photographers, or those not familiar with darkroom work, burning is a term for selectively darkening part of an image to hide a distracting element or bringing out something hidden by highlights. Dodging is the reverse process and selectively lightens part of an image. Photographers hold back light to lighten an area on the print (dodging) or increase the exposure to darken areas on a print (burning).
Burning and dodging are done using the Burn Tool that looks like a hand with a little opening in it. In the traditional, wet darkroom photographer often used their hands to make opening that would selectively add exposure to part of a print while it was being exposed under the enlarger while blocking the rest of it. The Dodge Tool looks like a little black lollipop on the Tool Bar. These were usually fashioned with a stick and a piece of black paper cut to a desired shape.
Whichever you choose, you begin by selecting the tool. Then you place your brush over the area of an image you want to darken/lighten, and click. As you move the tool around, the effect is applied to your image.
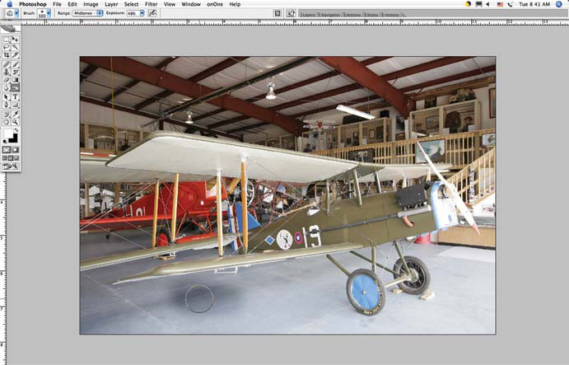
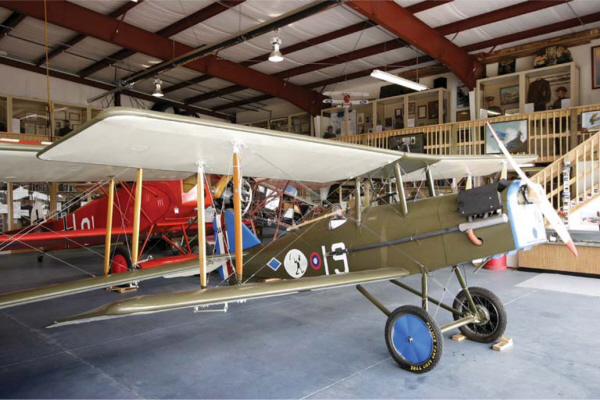
Here is the original photograph of an historic WWI airplane made in a museum. While the upper half of the image has the proper exposure, the bottom half is a bit washed out. The Burn tool was selected and was applied to the ground under the pane to darken the ground. © 2005 Joe Farace.
For the finished image, a much larger brush was used and applied gradually in soft strokes horizontally across the image frame with gradually repeated strokes of the Burn tool from light to heavy toward the bottom of the frame. As a finishing touch, contrast was increased to punch up the colors and density too. © 2005 Joe Farace.
|
Burn and Dodge Power Tools |
|
|
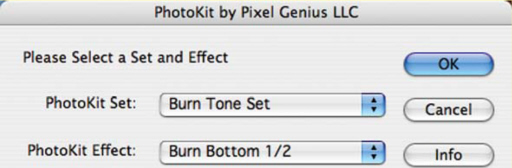
There are a number of power tools (see Chapter 9 for more details) that extend Photoshop’s capabilities and one of the most useful is called PhotoKit. Pixel Genius’ (www.pixelgenius.com) PhotoKit is a photographer’s toolkit that includes 141 effects offering digital versions of traditional analog photographic effects that range from automatic burning and dodging, to toning, to adding black edges |
to your images. A simple dialog calls up the PhotoKit tool sets, but there is no real plug-in interface, no sliders, and no preview window. PhotoKit is optimized for images between 8–18 MB and is useful on larger sizes, but some of the effects don’t translate to small Web-sized files. You can download a fully operational Mac OS or Windows version and try it for 7 days. |
One of the advantages of using Pixel Genius’ PhotoKit is that burning and dodging are applied as a separate layer so that you can change the Layer’s Opacity (see the previous chapter for information on using Layers).
Photographers have been “cropping” images since the beginning of the media, so it’s not surprising that there is a digital equivalent. In traditional photography, cropping is the act of changing the shape of the image by removing a part of the image on any or all edges of the photographic frame to focus attention on the real subject of your photograph and eliminate distractions. You can also use cropping tools to change the shape of the image from portrait (vertical) to landscape (horizontal) orientation.
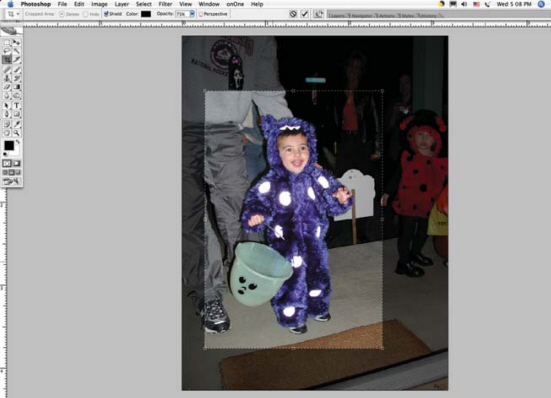
While Crop tools vary in how they appear when applied, Adobe Photoshop’s version of this useful tool creates a gray subdued area around the cropped area allowing you to have a preview of what will be left in the photograph, while still letting you see what’s being left behind. © 2003 Mary Farace.
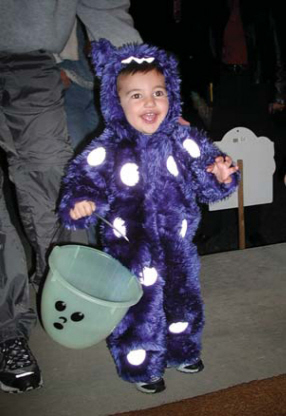
Not all photographs are perfect, but the Crop tool is the perfect tool to eliminate all of the extra information in this snapshot and focus on the most important subject—the cute child in his Halloween costume. © 2003 Mary Farace.
|
Cropping Tip |
|
|
You can always crop an image after you make it to produce the exact image you had in your mind, but when you do there is a price to be paid. You are tossing away pixels. This is what’s wrong with the so-called “digital zoom” functions of many digital point-and-shoot cameras. Yeah, you get the image you want, but the resolution is much less. So take a tip from me: Crop in camera when you can. If you have a Zoom lens, use it to crop the image exactly the way you want before tripping the shutter. If you don’t |
have a zoom lens, use your feet to move around to get the subject framed the way you want. Often taking a single step closer to your subject will improve the composition more than you might otherwise think. (Don’t believe me? Try it!) If neither of these alternatives works with a given photographic situation use the Crop tool sparingly, but remember there is no free digital lunch. Every pixel you crop out is one that is lost forever. |
Lighten/Darken
One of the most useful tools for determining correct exposure is built into your camera, especially digital SLRs somewhere in its “INFO” mode. It’s called the histogram. (This will vary with each camera and some may not even have one; most digital SLRs do. Read your camera’s manual to find where the histogram is located.) Don’t let that geeky word scare you. A histogram is a graphic representation of tabulated frequencies. Okay, that sounds geekier. In digital photography, a histogram is a display of the tones in the image file from the darkest shadow to the brightest highlight. Traditional darkroom practitioners might think of it as a digital Zone System with Zone Zero at the leftmost part of the histogram and Zone X at the extreme right. There are two ways to use histograms: One while shooting, by looking at the histogram you can see on the camera’s LCD screen, and the second is later when viewing the image in an editing program (of course, by then, it’s usually too late to re-shoot).
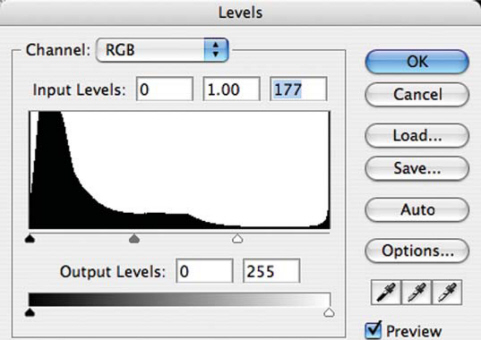
The histogram in the center of the Levels dialog box shows how pixels are distributed in an image by graphing the number of pixels at each intensity level. It displays the relative number of pixels in the shadows (left), midtones (middle), and highlights (right). On this histogram you can see there is a lot of space on the right hand side indicating a lack of light. You can adjust Levels by moving the white triangle on the right toward the left, as I have done here.
Levels and Curves
The Levels and Curves command found in many digital imaging programs on some levels could be called more intermediate, than basic tools. They are also less “traditional” than some of the others in this chapter, but since they relate to changing an image’s brightness or darkness, I want to introduce them now. Unlike burning and dodging, which darken or lighten selective areas of an image, the Levels and Curves commands light or darken the entire image.
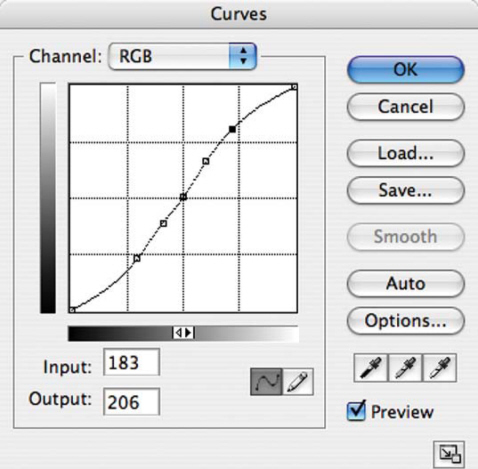
Changing the shape of the curve in the Curves dialog box alters an image’s tonality. Clicking of the curve and pulling it upward lightens the photograph and pulling it downward darkens the image. The steeper sections of the curve represent portions of an image with more contrast. Conversely, flatter sections of the curve represent areas of lower contrast. In this example, I clicked in the middle of the curve and added five additional adjustment points.
The first thing I do with any digital image is using Photoshop’s Levels command to set highlight and shadow points. The Image > Adjust > Levels menu presents you with a histogram that shows the image’s range of darkness and brightness. At the opposite ends are black and white triangles and in the middle is a gray one. They can be moved back and forth under the histogram’s peaks and valleys to interactively enhance the image. The Levels dialog box includes Eyedropper tools that let you click on equivalent color tones in the image to adjust white, gray, and black points. Often all you need to do is click on a point that should be white (or black or middle gray) to bring the image into balance.
Like Levels, Curves lets you adjust the entire tonal range of an image. Unlike Levels, which has only three adjustments, Curves lets you adjust up to 14 different points throughout an image’s tonal range from shadows to highlights. You can also save settings made in the Curves dialog box for use in another image.
Changing the shape of the curve in the Curves dialog box alters the tonality and color of an image. Bowing the curve upward or downward lightens or darkens the image, depending on whether the dialog box is set to display levels or percentages. The steeper sections of the curve represent portions of an image with more contrast. Conversely, flatter sections of the curve represent areas of lower contrast. Most importantly, both Levels and Curves can be applied as an Adjustment Layer in Photoshop.
Brightness and CONTRAST Control
The Brightness/Contrast command lets you make simple adjustments to the tonal range of an image. Unlike Curves and Levels, which apply proportionate (non-linear) adjustments to the pixels in an image, Brightness/Contrast makes the same amount of adjustment to every pixel (a linear adjustment). That’s why photo artistes usually don’t recommend using the Brightness/Contrast command for high-quality output because some image detail can be lost. Sometimes I can’t just resist, and make minor tweaks to brightness and contrast.
The Shadow/Highlight command is useful for correcting photographs with strong backlighting or correcting subjects that have been slightly washed out because they were either too close to the camera flash or slightly overexposed. This adjustment can also be useful for lightening shadow areas in an otherwise well-exposed image file. In Adobe Photoshop, the Shadow/ Highlight command does not lighten or darken an image; it lightens or darkens based on the surrounding pixels in shadows or highlights. That’s why there are separate controls for the shadows and the highlights. There’s a Midtone Contrast slider, Black Clip option, and White Clip option for adjusting the overall contrast of the image. So as you can see, this control panel is also a more useful tool for increasing an image’s contrast than using Brightness/Contrast slider controls.
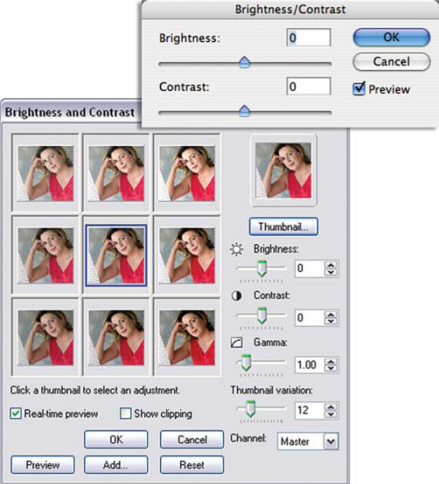
The yin and yang of Brightness and Contrast controls can be seen in this small control panel used by Adobe Photoshop CS2 and the larger, simpler interface used in Ulead’s PhotoImpact. Which one is best for you? The one that helps you work fast and makes you most comfortable is the best choice. This is not a one control panel fits all situations. © 2004 Joe Farace.
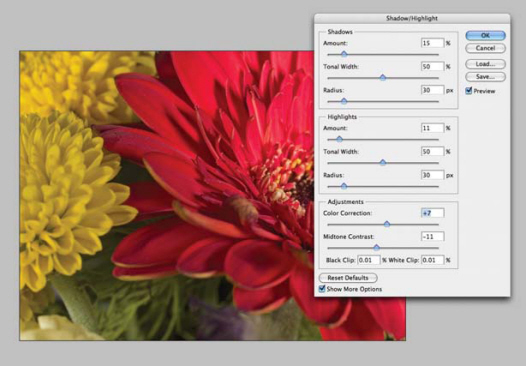
You can reuse Shadow/Highlight settings for other, similar images by clicking the Save button to save the current settings to a file and later using the Load button to reload them. © 2005 Joe Farace.
The first thing your eyes see when looking at an image is sharpness, then brightness, and finally warmth, but there are degrees of sharpness. Some photographs may be “acceptably” sharp, while other, more carefully focused images made with a camera on a tripod and at small apertures, might be termed “critically” sharp. OK, I can hear some of you now: “All of my images are sharp!” But it’s been my experience that, depending on how they are captured, some digital files are sharper than others.
Unsharp Masking
One of the biggest advantages digital imaging has over traditional photographic techniques is the ability to sharpen images. Many image-editing programs, such as Adobe Photoshop CS2, contain a Sharpen command that works by raising the contrast of adjacent pixels, but sometimes this increases apparent sharpness at the expense of overall contrast. Some photographs can handle additional contrast before loosing highlight detail, while others can’t. A better bet is to use the unlikely named and wonderfully practical Unsharp Mask (Filter > Sharpen > Unsharp Mask) command that’s found in Photoshop and many other image-enhancement applications to sharpen a photograph.
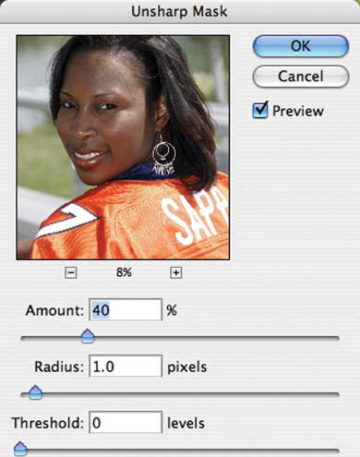
Adobe Photoshop’s Unsharp Mask’s preview window allows you to see the sharpness of the finished image before it’s sharpened. The dialog box’s movable “hand” drag the image to choose a particular portion of an image to see the effect of your sharpening efforts. Click and hold to see the original, then release to show what the current settings will do to the image. Clicking on the Plus box zooms into the image and clicking on the Minus box zooms the preview window out. © 2005 Joe Farace.
In Adobe Photoshop, Unsharp Mask’s dialog box provides three sliders that let you control sharpness and unsharpness. The Amount slider displays the actual percentage of sharpening that will be applied to your photograph. Don’t be afraid to apply more than 100% to high-resolution files, but lower-resolution images can fall apart fast if large amounts are used. The Radius slider determines the number of pixels surrounding the edge pixels for sharpening. Lower values only sharpen the edge pixels, while higher values sharpen a wider range. The Threshold slider determines how different sharpened pixels must be from their surrounding area in order to be considered edge pixels. The default value of zero sharpens all pixels in the image.
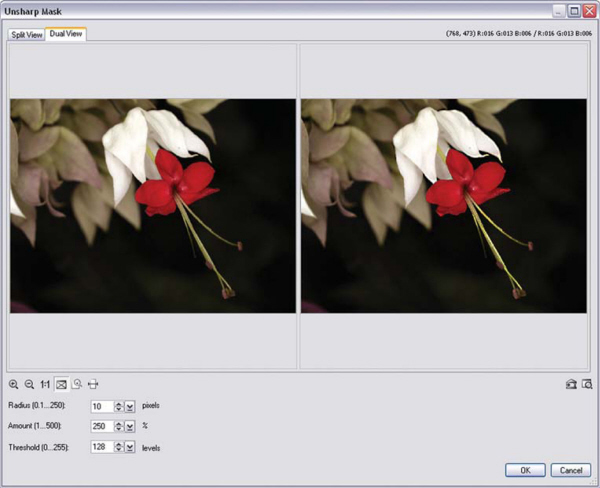
Not all Unsharp Mask commands work the same way. In Ulead’s PhotoImpact, the Unsharp Command uses “before and after” Windows and offers a split window to make a different kind of comparison between sharpened and unsharpened versions of your photograph. © 2005 Joe Farace.
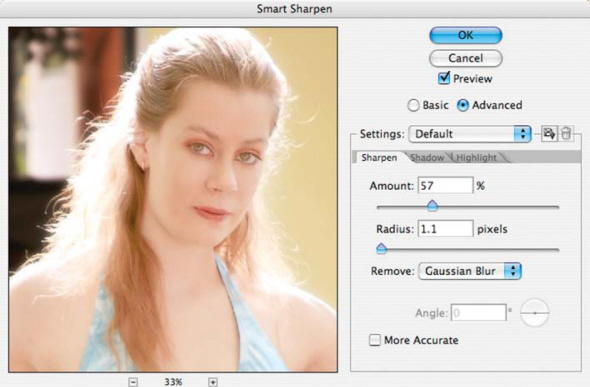
Photoshop CS2 adds a new command to the Sharpen menu called Smart Sharpen (Filter > Sharpen > Smart Sharpen). Its dialog box is similar to Unsharp Mask but includes an advanced Mode featuring three tabs, including Shadow and Highlight. The first two sliders under the Sharpen tab are Amount and Radius, which act as they both did in Unsharp Mask; but in place of Threshold, there’s a pop-up menu that lets you control sharpness for a specific kind of lack-of-sharpness problem including Gaussian, Motion, and Lens Blur.
|
Sharpening tip |
|
|
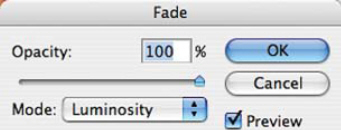
Here’s a useful tip for dealing with color fringing that might occur when applying Unsharp Mask. After sharpening the image file, go to the Fade command (Edit > Fade Unsharp Mask) that appears only after a filter is applied in |
Adobe Photoshop. Don’t change the Opacity setting leave it at 100%—but select Luminosity from the pop up menu. Any color artifacts should then be gone! |
External Solutions to an Internal Problem
nik Sharpener Pro 2.0 ()www.nikmultimedia.com) is a Photoshop-compatible plug-in that lets you apply sharpening to parts of an image with selective brush strokes; or else you can apply sharpening to the whole image and selectively brush it out. The Advanced menu contains five sliders that can be associated with different colors. You pick the color and each slider lets you increase or decrease the sharpening applied to image areas with that color! Sharpener Pro 2.0 is compatible with the image rendering characteristics of different printing processes such as traditional halftone, dye sublimation, ink-jet, digital photographic, and even between ink-jet printer manufacturers.
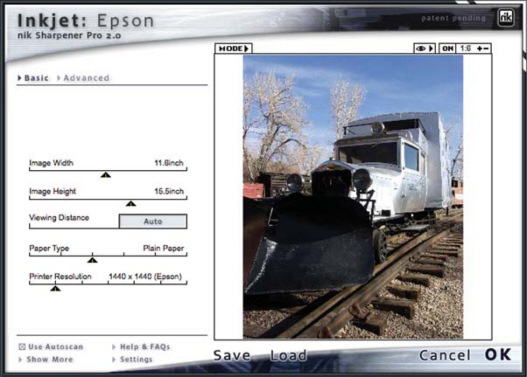
nik Sharpener Pro 2.0 is a Photoshop-compatible plug-in that lets you apply sharpening to any part of an image with selective brush strokes, which is a good reason to have a graphics tablet handy. © 2005 Joe Farace.
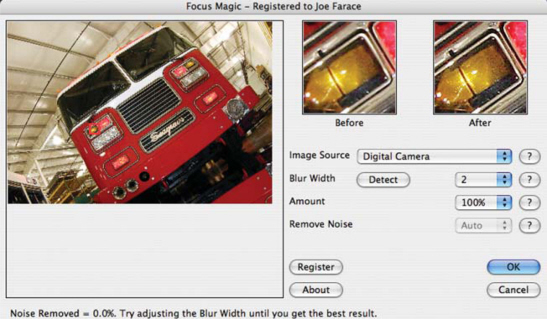
Holding a camera at slow shutter speeds is easier for some photographers than others, that’s why a sturdy tripod is a useful accessory when image sharpness is critical. Acclaim Software’s Focus Magic is a Photoshop-compatible plug-in that can reinstate as much of the original “in focus” image as possible, allowing it to recover detail from photographs blurred by movement. © 2005 Joe Farace.
Acclaim Software’s (www.focusmagic.com) Eric Schwerzel believes 60% of blurred photographs are caused by motion and developed a Photoshop-compatible plug-in called Focus Magic to recover detail from photographs blurred by movement. Focus Magic is not a miracle worker, but it improves images for which there is otherwise no hope, which earned it a place in my personal list must have plug-ins. A free version that allows up to 10 images to be sharpened can be downloaded from Acclaim’s website.
Sharpness vs. Blur
Blur is different from soft focus and can be created by an object moving while the camera’s shutter is open, by moving the camera, or maybe both at the same time. Streaking light images use an age-old technique produced by making photographs of headlights and city lights while riding in a car at night and using slow shutter speed settings on your camera. Digital blurring of an image is typically accomplished through software averaging of pixel values to soften edge detail.
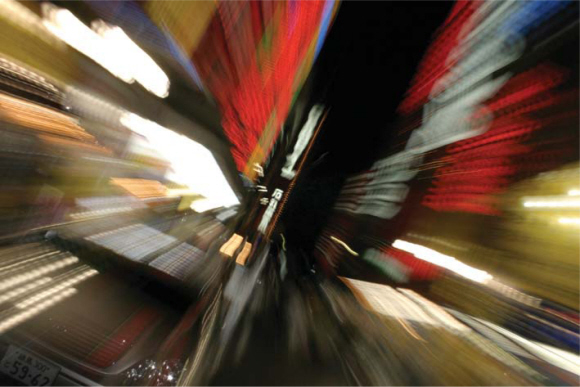
One classic technique is to zoom the lens slowly during an exposure time of about one second and you can surround your subject with streaks. You can turn a blah photo one exploding with color. This trick works anywhere, but this particular example was shot through the streets of Akihabara in Tokyo. This technique can be hit and miss with film, but it’s a snap with a digital SLR and you can instantly adjust your aperture or shutter speed to achieve precisely the effect you want. The camera used was a Canon EOS Digital Rebel and 18–55-mm lens. Exposure was 1 second at f/8.0 at ISO 100. © 2003 Joe Farace.
Soft focus is created with a lens that is not corrected for spherical aberration. It produces a diffused look that’s achieved by bending some of the light away from the subject so it’s defocused while the rest of the photograph remains in focus. Highlights are dispersed onto adjacent areas but the image looks focused, while some of its components are just enough out-of-focus to appear softened. Lines are slightly fuzzy and small details seem to disappear. Capturing soft focus effects is also possible by using camera (analog) or digital filters.
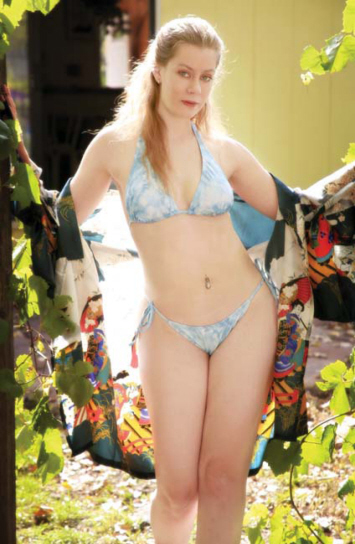
One of the easiest ways to achieve a soft focus look is by using special optics such as Canon’s EF 135 f/2.8 SF lens. This photograph of Dottie was made with a Canon EOS 5D and Canon’s soft focus lens. Exposure in Program mode was 1/200 second at f/7.1 at ISO 200. An exposure compensation of plus two-thirds stop was added to lighten the model’s skin and enhance the soft focus effect. © 2005 Joe Farace.
Digital Blur and Soft Focus
Most image-enhancement programs have a least one blur command built in. One of the newest and most fun filters found in Photoshop CS is Lens Blur (Filter > Blur > Lens Blur). This filter can blur an image to give the effect of a narrower depth-of-field so that some objects in the image stay in focus while others are blurry. The way this digital blur appears depends on the iris shape you choose. You can change blades of a virtual iris by curving them (making them more circular) or rotating them. You can check the effect on screen by clicking the plus button in the control panel to magnify the preview.
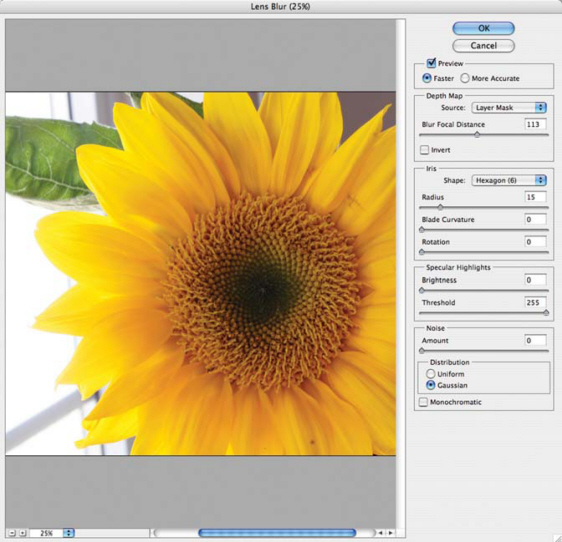
Photoshop CS’s Lens Blur filter produces the effect of a narrower depth-of-field so that some objects in the image stay in focus and other areas are blurred. Just select any part of the photograph to determine which areas are blurred and which are not. © 2005 Joe Farace.
Nik Multimedia’s ColorEfex Pro 2 suite of Photoshop-compatible plug-ins contains a Classical Soft Focus filter that mimics soft focus camera filters used in conventional photography—think Zeiss Softar here—and adds diffusion to an image while preserving detail. The control panel’s Soft Focus Method pop-up menu lets you select the type of blur, that can range from a subtle soft focus effect to more pronounced diffusion. The Diffused Detail slider controls the amount of random detail to maintain the appearance of some sharpness and prevent banding. While many photographers traditionally use soft focus techniques for portraiture, I like to use it for images of vintage automobiles to add to that “old car” look. So use it how you like: don’t be bound by any “rules.”
While many photographers use soft focus techniques for portraiture, I also use if with vintage automobiles to add to an “old car” look. James Bond fans know that his real vehicle of choice was a 1930 4.5 liter Bentley convertible coupe, not an Aston Martin. Fleming introduces the car in the 1953 novel “Casino Royale,” but the Bentley made its first movie appearance in “From Russia with Love” in black, not the gray Fleming described or the green model depicted here. © 2005 Joe Farace.
The ScatterLight Lenses 1.2 Photoshop-compatible plug-in produces a broad scope of realistic patterned and diffusion lens effects that range from subtle soft focus effects to more dramatic effects that scatter and focus light over the brightest areas of an image. ScatterLight Lenses has four different categories. Dream Optics pulls and scatters light from highlighted areas to create dreamy highlights throughout the image. SoftFocus uses various optical lens patterns for softening portraits. SoftDiffuser adds diffusion or fog. StarLight focuses light over the brightest areas of your image to create a starlight effect.
My current favorite soft focus/blur power tool is the Craig’s Action (www.craigsactions.com) Shadowsoft and Grainy Photoshop Action set. (Get more scoop on one-click Actions in Chapter 9.) This is a collection of monochrome—black and white, blue, sepia, and green—Photoshop Actions that lets you create and control toned softness effects, with options for some delightfully grainy enhancements. While originally designed for Wedding and Portrait photographers, these Actions are fun to use with commercial or artistic images. Shadowsoft and Grainy Actions can be run as a one-click operation and are customizable to fit your personal style.
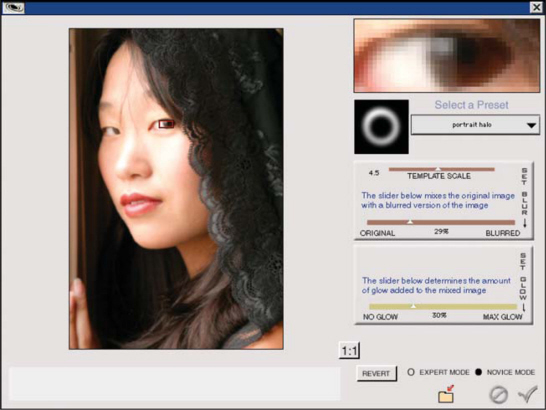
I love this picture of Brenda, but felt it need just a touch of soft focus to give it that Hollywood look of the 1950s Technicolor epics. To accomplish that goal, I applied Andromeda Software’s ScatterLight Lenses plug-in, specifically the Dream Optics filter that pulls and scatters light from highlighted areas to create dreamy highlights. © 2005 Joe Farace.
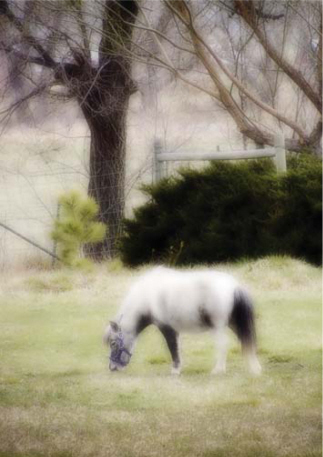
One of the easiest and maybe best ways to create soft focus/blur effects is the Shadowsoft and Grainy Photoshop Action set (www.craigsactions.com). This is a collection of Photoshop Actions that let you create and control toned softness effects in color or monochrome. The basic Shadowsoft Action was applied to this pastoral image made of a miniature horse (yup, this little guy is about the size of a big dog) with an Olympus E100RS. The image you see is a one-click effect. © 2005 Joe Farace.
There are no rules of thumb about how much blur or soft focus to apply to any image. My best advice, as Emeril says, is to “season to taste,” but that doesn’t mean you can’t have a few Photoshop tricks up your sleeve.
First of all, don’t be afraid to yank those control panel sliders to the extreme ends to see what effect this produces. Even after you apply a filter, there’s always the UNDO command waiting in the wings, and I promise that no pixels will be harmed while performing this maneuver.
Second, don’t forget the FADE option. After applying any filter, you can reduce its effect by applying the Fade command (Edit > Fade . . .) that becomes available only at that time. Use the slider to apply the Filter at anywhere from 1% to 99% to create the desired soft focus or blurry effect.