
CHAPTER 5
Technical Issues: Killing the Gremlins before They Kill Your Pictures
Good subjects and careful composition will be entirely wasted if your pictures are rejected due to technical faults. In this chapter, I'm going to help you identify the faults in your pictures that are most likely to lead to rejections and share some of my own tips and tricks to kill those technical gremlins with the minimum of fuss.
Rejections for technical faults and imperfections can be very frustrating. There are long threads on the forums of the microstocks and on independent forums that are started by disbelieving photographers who simply don't see why their images have been rejected for technical problems, and after so much hard work! Some complain that their rejected image recently won a competition or that they have had images like it accepted at a traditional library without complaint. But having run a small stock library myself, I know just how easy it is for photographers to turn a blind eye to sometimes obvious technical faults.
Mistakes can of course be made, particularly when tens of thousands of candidate images are being assessed weekly by the microstock libraries. Generally, however, the libraries tend to get it right most of the time. If your image is rejected for technical reasons, you will just have to learn from the experience, painful as that may be.
The bad news is that to be a successful contributor to the microstocks your images need to be technically perfect. The good news is that it is often reasonably easy to achieve near-technical perfection. Follow this and other advice in this book, and you should see your acceptance levels skyrocket and your income dramatically increase.
THE MICROSTOCK INSPECTION PROCESS
The microstocks have to review and assess many thousands of images every week (e.g., Shutterstock was adding around 30,000 new images each week in November 2007). They do this by employing image inspectors, who are often other contributing photographers paid to undertake reviews. The libraries therefore have to set some pretty basic and easy-to-follow guidelines for these inspectors to use. Being human, the inspectors can make mistakes and are sometimes overzealous in rejecting images for vanishingly small and irrelevant defects; plus, being microstock photographers themselves, the inspectors are unlikely to pass images less perfect than their own.
Once I started taking high-quality pictures, it occurred to me that they could be useful to others—I had always needed imagery in the past for my previous businesses—and then saw that there was no real forum to market images like my own.
Jon Oringer, CEO, Shutterstock
So, they are not out to get you; it just feels that way at the outset. But, help is at hand.
READ THE RULES!
Each library has useful guidance on its technical criteria. For example, iStockphoto has the Photographers Training Manual that outlines its own quality standards. Although this book covers technical requirements, you should check each site for more site-specific requirements.
When images are rejected, you will usually be told why, at least in general terms, in the rejection notice. So, your first step is to read what you have been told and understand the reasons for rejection. Then go back and check to see if you can detect the faults in your image. Remember to review your image at 100% magnification on your monitor!
KIT
You cannot correct image defects unless you can see them, so get yourself a decent computer monitor and, preferably, calibrate it so that it shows accurate colors. Monitor calibration is easy. There are plenty of inexpensive calibration products on the market, and if you are planning on selling images, you really should invest in basic calibration tools. Examples include Pantone's Huey and Huey Pro and Colorvision's Spider 2; there are many others, all within a $100–$250 price range. They are simple to use. You'll be amazed the difference a properly calibrated and profiled monitor will make.
However, if you cannot stretch your budget to buy proper profiling equipment, you can use Adobe Photoshop and Elements, which both include a basic profile-by-eye tool called Adobe Gamma. This is not as good as using proper profiling equipment, but it is better than nothing. If you are really short of cash, there is a free-ware program called Quick Gamma available from http://www.quickgamma.de/indexen.html to set monitor gamma and a free profiling tool, QuickMonitorProfile, at http://quickgamma.de/QuickMonitorProfile/infoen.html. This produces a workable profile based on data stored by modern monitors instead of using external measuring tools.
For corrective work and, indeed, for all my photo manipulation, I use Photoshop CS3, and the screen shots and tips in this book are based on that program. It may seem expensive, but most of the relevant functions are also available in the much-less-expensive consumer-level program, Photoshop Elements, which I recommend if Photoshop CS3 is too costly for your tastes. A further alternative is Corel Paint Shop Pro. As you will likely be spending quite some time editing your images for microstock submission, it makes sense to buy the best software tools you can afford.
There are trial versions of Photoshop and Elements available for download from Adobe at http://www.adobe.com/downloads and for Corel Paint Shop Pro from www.corel.com.
THE RAW DEAL
Data captured by digital cameras have to be stored in a file format readable on your computer. There are many different file formats, but the most common in photography are raw, JPEG, and TIFF. Not all cameras output in raw file format. Compact cameras generally do not. However, all digital cameras I am aware of output JPEG. So, why on earth would you use raw file format if all cameras support JPEG?
The reason to use raw is quality. If your camera allows you to do so, I urge you to shoot in raw mode. It is called “raw” for a reason. Raw mode retains virtually all the data seen by the sensor when the shot is taken, and it has many advantages over shooting in the more common JPEG format.
The biggest advantage is that raw files save the full 12-bit (or with some professional cameras, 14- or 16-bit) data from the sensor, compared with just 8 bits for a JPEG file. The 12-bit data from the raw file can be mapped to 16 bits when converted to TIFF format by software used for raw conversion. This higher bit depth allows for greater image manipulation later in your image-editing software, without causing banding or other image-degradation problems. The higher bit depth in raw files also means the full dynamic range of the sensor is preserved, so it is possible to “recover” burned-out highlights in a raw shot, whereas it would not be possible to do so in an identical JPEG shot.
“Blah,” I hear some of you say, “JPEG is good enough.” Well, that s often true. But in many situations, you are much better off with the raw file; so why settle for second best if you have the choice?
Here is some proof. Take a look Figures 5.1 and 5.2, two shots of a farm building and sky taken by the same camera in sequence using the same exposure that left the sky about 2.5 stops overexposed. Figure 5.1 was shot in JPEG and Figure 5.2 in raw. The JPEG image sky is completely “blown out,” pure white (RGB 255,255,255). There is nothing I could do to recover any detail in the sky, because there are no data to manipulate. It is gone forever! The image on the right looked very similar when opened in my raw conversion software, but
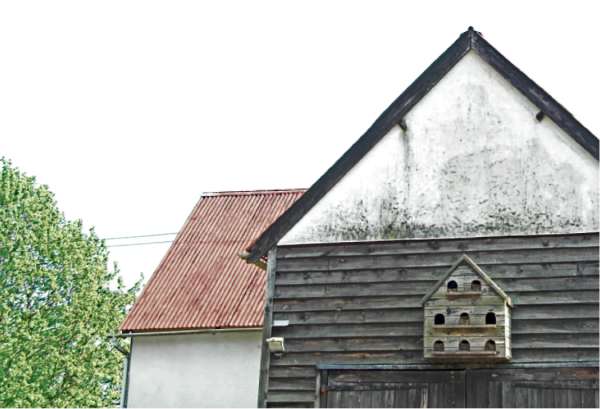
Figure 5.1 An overexposed JPEG file.
using Adobe Camera Raw, it was possible to almost completely recover the sky, even with such extreme overexposure.
Usually you won't have two or more stops of overexposure to contend with, but you will immediately appreciate from these samples how valuable shooting in raw format can be in tricky lighting conditions, particularly high-contrast conditions. Don't expect miracles, though.
Another problem is that JPEG is a “lossy” format. This means that each time you save a JPEG file, some data are discarded (lost), even at the highest-quality settings (“best” or “12”).
WHITE BALANCE
Finally, and importantly, with raw you are not stuck with the color balance guessed at by the camera when the shot was taken. As entire image data are saved in the raw file, you can change the white balance later on. With a JPEG format, the image white balance was chosen
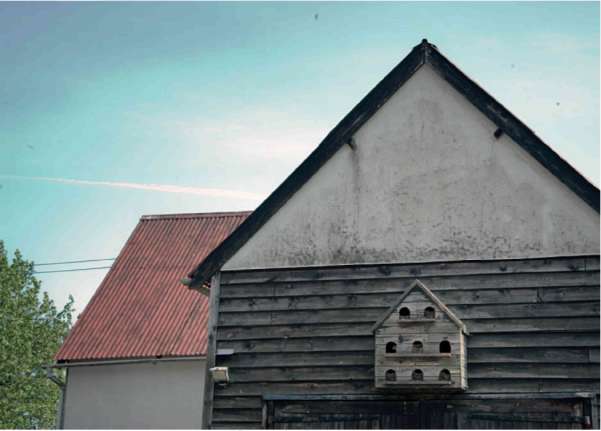
Figure 5.2 An overexposed raw file converted to JPEG.
when the shot was taken, and all other data were discarded—so major white balance changes are impossible to make without serious image degradation.
White balance is vitally important if your shot is to look like the original scene. You can choose a white balance setting in your camera (sunny, cloudy, flash, tungsten light, etc.), or you can leave it on “auto” and let the camera guess the right balance. Most of the time, the camera guesses pretty well. However, if it gets it wrong, with raw it's not a problem; adjust it later. As all the data are in the file, all you are seeing is a preview. With a JPEG file, your adjustment options are limited as so much of the original data have been thrown away.
“But I don't have raw!” some will say. All is not lost. Make sure your camera is set to save in the highest JPEG format. This will be called “super fine,” “super high quality,” or a similar name. Check your handbook for the right title.
If your camera does not support raw format, and most compacts do not, don't panic. JPEGs have some advantages. The files are smaller, and JPEGs are a universally recognized format that can be opened in any image editor or viewed using, say, a Web browser. They are ubiquitous in the extreme. You just have to be that much more careful to get the exposure and white balance right in camera.
16-BIT MANIPULATION
Wherever possible, keep your photos in 16 bits until you have finished editing it. More data equal better results. That means outputting 16-bit TIFFs from your raw file converter.
If you have a great image saved as a JPEG and you do want to manipulate it to get the best from it—say, by changing the levels, curves, or color balance—another trick is to convert your JPEG file to a 16-bit TIFF format file, if your image-editing software allows it. Then you can make the changes you want while in 16 bit. It is not as good as starting out with a 16-bit TIFF from a converted raw file, but it is better than making changes to the original 8-bit file. When you are finished editing, convert it back to 8 bit.
Processing raw files is easy. Photoshop Elements and Photoshop both come with built-in raw converters. Camera manufacturers supply their own raw file decoders, and there are many third-party raw decoders available that are not very expensive. My personal favorite is Silk-ypix (www.silkypix.com), which is popular, I am told, with Japanese pros.
Figure 5.3 shows a dramatic example of the benefits of manipulating images in 16 bit. On the left is the 16-bit image after several changes
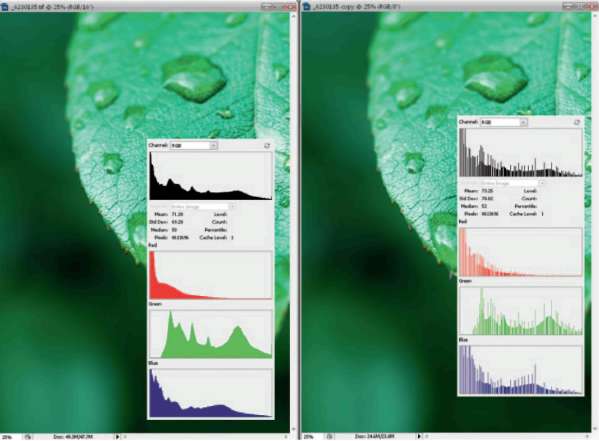
Figure 5.3 Need proof that 16 bits are better? Here it is.
to contrast and levels. The histograms are still even with no “combing.” The image on the right is a copy of the first image but converted to 8 bits before the exact same changes to contrast and levels were applied. Notice the severe “combing” of the histograms, evidencing lost data that will affect image quality, causing posterization and other “nasties.” I rest my case.
If your image editor does not support 16-bit TIFF files, my advice is to get a better image editor that does.
SHOOT AT LOW ISO
Noise. If there is one subject you need to understand as a microstock photographer, it's noise. To minimize noise, shoot at low ISO.
Your camera's ISO setting represents the sensitivity of the sensor to light. The lower the ISO setting, the lower the sensitivity and,
generally, the higher the quality of the image. Most cameras have a base ISO of between 50 and 200. As you increase the ISO, more ampli-fication is used to compensate for the reduced amount of light, leading to noise. This can be useful. The shutter speed for correct exposure for a given lens aperture will increase, meaning you can shoot handheld without visible camera shake or use smaller lens apertures for a greater depth of field. The trade-off is more noise—how much more will depend upon the characteristics of the image sensor and (when shooting JPEGs) the efficiency of the camera maker's noise-reduction algorithms.
Your camera should have an ISO setting on a dial (Figure 5.4) or a menu from which you can select the ISO. Some cameras will select the ISO automatically, increasing it to prevent camera shake. Do not be tempted to leave the choice of ISO to the camera if you are shooting for stock. Set the ISO manually, as low as possible for the light level you are shooting in.
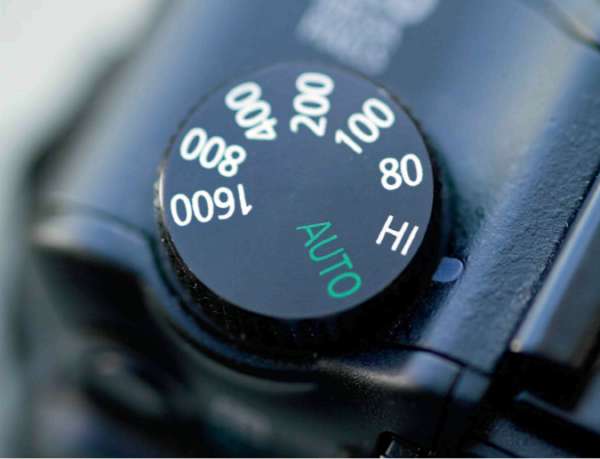
Figure 5.4 An ISO dial on a quality compact camera. Avoid Auto and Hi (high)! Stick to settings below 200 ISO. Not all cameras have a separate dial for ISO settings; some have ISO settings buried in a submenu. © Douglas Freer
THE 100% RULE
Finally, before we get started on some practical examples of problem images and solutions, let's agree on a simple rule you need to follow from now on: the 100% rule. Always check your images at 100% magnification on screen in your chosen image editor. That way, you are looking at the actual pixels and you will see defects much more clearly than at a lower magnification.
NOISE
Time now to turn to some specifics of problems with images that lead to rejections. We will start with public enemy number one—noise. To be a big noise in microstock, avoid noise!
Digital noise is the number one reason why images are rejected by our photo screeners.
Jon Oringer, CEO, Shutterstock
Noise takes different forms and is usually most clearly visible in areas of even color, such as a clear blue sky. Luminance noise looks like film “grain” (Figure 5.5). Variations in the sensitivity of individual photosites (the bits of the chip that record light) in digital cameras can cause the appearance of grain in an image. When this is even and very fine, it may not detract from an image at all; in fact, there are a few circumstances when adding a little grain can be beneficial (as we will see later). Generally, however, this grain-like noise is bad, and too much will lead to your images being rejected. Compact digital cameras use smaller sensors with poorer light-gathering properties, and this can lead to more noise (Figure 5.6).
Another tip is to expose to the right. This as an advanced digital camera shooting technique that you can try if your camera has a histogram display that you can use to check the exposure of your photographs (most do). Before explaining how to do this, it is worth discussing the theory.
There is a noise floor in all imaging devices. Think of this as being like background noise affecting your stereo system. The more you turn up the music volume on your stereo, the more difficult it will be to hear any background noise from the electronics. Similarly, with a digital camera, the more light you let in, the more any noise will be suppressed. But the risk is that if you take this too far, you will overexpose highlight parts of your images, leading to those horrible white blank areas. So, it is a balancing act to “max out” the exposure without burning out image highlights.
Figure 5.7 illustrates histograms of digitally captured images. The histogram on the left has a gap to the right, which means the
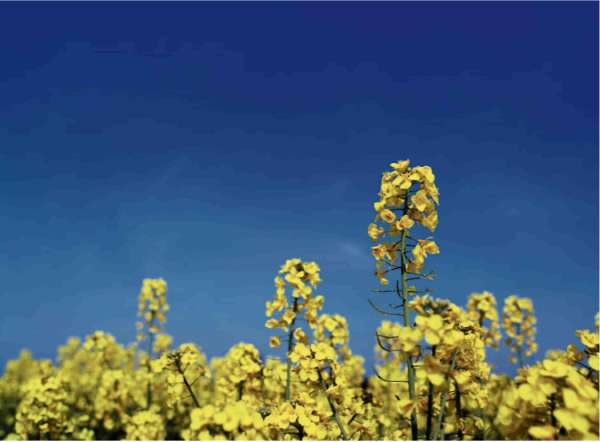
Figure 5.5 “Spring Field Background.” Pictures like this, with large areas of a single color, are more likely to show noise. © Douglas Freer/ Shutterstock
image has been underexposed. While this can be corrected later, in the process of making adjustments to brighten the image using curves or levels in Photoshop, you will increase visible noise in the image, particularly in the darker shadow areas of the image, especially if you are working in 8 bits. The histogram on the right, Figure 5.7B, is much better, with lots of data from the shadows to the highlights, but the highlights are not “burned out.” The only difference between the two images used for these examples was the exposure setting.
Of course, you might find that your shot is overexposed, in which case you'll need to reduce the exposure, not increase it. Try if you can to expose so that there are data all the way to the right but not beyond it. Not all cameras allow you manually to set the exposure, and generally it is not necessary to do so. However, it is normally possible to
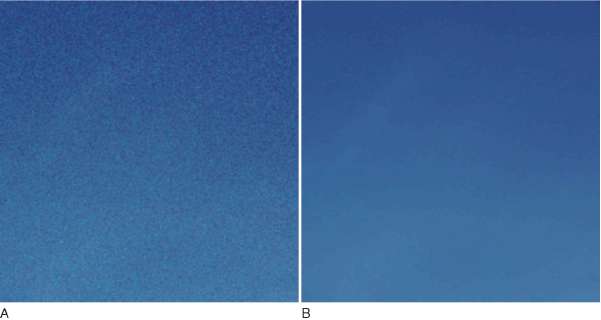
Figure 5.6A and B Two sky sections: A showing noise (quite fine, not too bad), and B with the noise removed using noise-reduction software. B is more likely to be accepted.
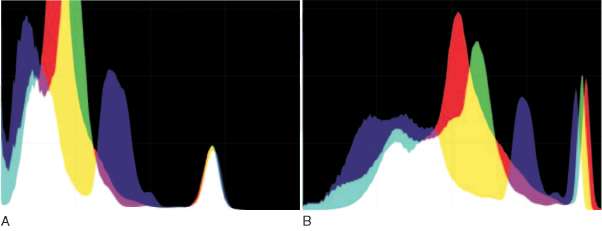
Figure 5.7A and B A illustrates a “bad” histogram from an underexposed shot. B is a lot better, with no large gaps at either end. Generally aim for a histogram where there are data right up to but not touching the right side.
use exposure compensation to increase exposure, so a good workflow might be as follows:
- Select a low ISO setting, where possible. Make sure, though, that you have a high enough shutter speed to avoid camera shake. (You could try a wider aperture to achieve this.)
- Compose and take your shot; check the histogram.
- If the histogram shows problems, adjust the exposure to get the best histogram and then reshoot.
- If you are in any doubt, bracket your exposures; that is, take several versions of the same image at different exposures and choose the best later.
COLOR BLOTCHES
Another sort of noise is color noise that can look like uneven blotches, as seen in the next image where an attempt has been made to extract shadow detail from a church interior shot (Figure 5.8). Provided noise in luminance or color forms is not too extreme, you can zap it in a number of ways.
NOISE-REDUCTION SOFTWARE
The simplest solution for noise is to use a good specialized noise-reduction software package like Neat Image (www.neatimage.com) or Noise Ninja (www.picturecode.com). These products work by measuring image noise through samples taken from within the image and
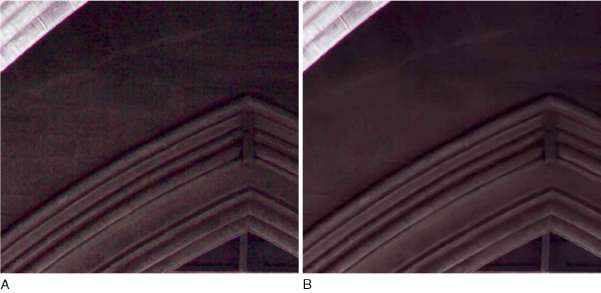
Figure 5.8A and B Before (A) and after (B ) filtration of an image with blotchy color noise.
then applying complex algorithms to remove the noise without destroying too much image detail (Figures 5.9 and 5.10).
Photoshop CS3 has its own built-in noise reduction program, accessible from the Filter menu (Filter > Noise > Reduce Noise). It is not as complete or, in my view, as effective as specialized noise-reduction programs, but it is better than nothing. Try experimenting with the settings.
One of the problems with all noise-reduction software is that even when you exercise great care, it can still remove some useful image detail when it removes noise, leaving the image looking too smooth and “plastic.” To avoid this, experiment by using different amounts of noise reduction. Use the “fade” command in Photoshop to reduce the amount of filtration after the event if necessary. Use only the minimum amount of noise reduction necessary to remove the worst of the noise.
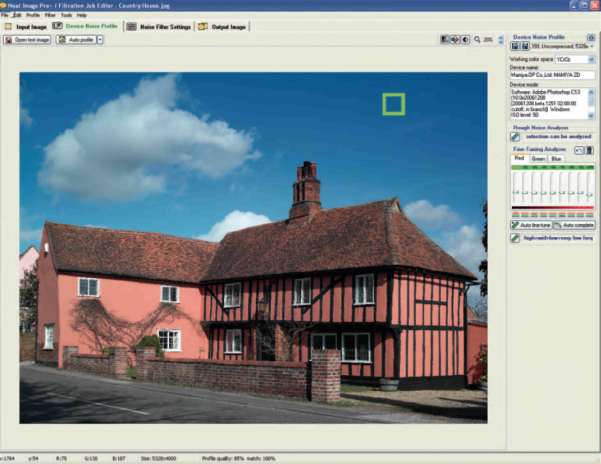
Figure 5.9 Neat Image working on a high-resolution JPEG. The green box is the sample area used to build the initial profile. This can then be fine-tuned.
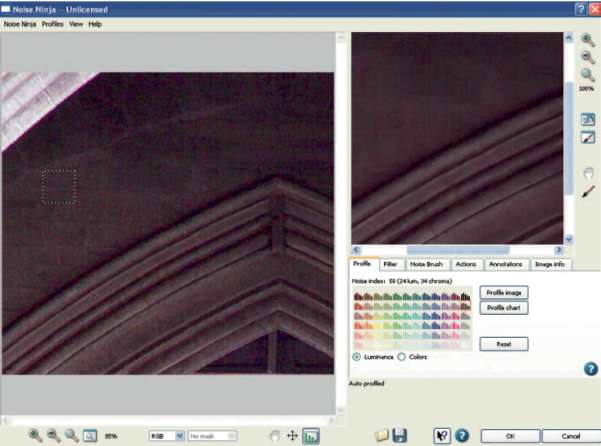
Figure 5.10 The Noise Ninja Photoshop plug-in profile window.
Another tricky issue can be that noise is often only visible in part of the image, say, in the shadows or the sky. In Photoshop, there are a number of ways to make sure that noise reduction is applied only to those parts of the image that really need it
- Quick mask. In Photoshop, use the quick mask tool and paint over areas you don't want noise reduction to impact before running the noise-reduction software. This is fast and effective, but you have to judge in advance which areas to exclude from noise reduction.
- Selection. Use the lasso tool to do the same job as Quick mask; then feather the selection before running noise reduction
- History brush. After you have run your noise-reduction software, select a history state from the time immediately before you ran the software, and use the history brush on any areas where too much detail has been lost. You can build up the effect by selecting less than 100% opacity for the history brush and then painting over the area where you want to reduce the effect of the noise reduction software. I suggest a low value, say 20%, for the history brush
- Layers. My personal favorite. Duplicate the layer and then run the noise-reduction software on the bottom layer. Use the eraser tool (select an opacity of about 20%) with a soft edge to gently rub out those parts of the top layer where noise is intrusive; or you can even vary the opacity of the entire layer until you are satisfied that you have the balance between noise and detail correct.
Sometimes getting the balance right between noise removal and detail retention is difficult. If you overfilter an image, the microstocks will reject it. If you have too much noise in your image, the micro-stocks will reject it. Talk about being caught between a rock and a hard place! Using the above tips will help you minimize the risk of rejection; but, if all else fails, you have to get devious and add noise to the filtered image.
“Whoal” I hear you murmur. “Add noise? But you just mentioned that noise is bad!” Strangely, adding some noise can add realism back to the filtered image, if done with care. It is not cheating. All that matters is that the image looks good to reviewer and buyer alike.
My suggestion is to use a free Photoshop plug-in from Richard Rosenman called the Grain Generator, available from www.richardro-senman.com. Choose either minimum or standard, setting between 2% and 7%, and see how the finished article looks at 100% on the screen. It only works on 8-bit images, but you'll be saving your files as 8-bit JPEGs before submitting them, so that's no problem. I think you'll find that adding a little noise can sometimes have real benefits. I have used this trick quite a few times to good effect, and the images look better for it, even when printed! Of course, it is better to prevent noise in the first place, but shooting conditions may not always allow for that.
An alternative to the Rosenman filter is to use the noise filter in Adobe Photoshop (Filter > Noise > Add Noise). Select Uniform and around 5%. I find this is easier to use than the grain filter in Photoshop (Filter > Artistic > Film Grain).
ARTIFACTS
I hate artifacts. They are more trouble than the sort of noise mentioned in the preceding section. Most often they are the result of compression applied when saving images in JPEG format.
Figure 5.11 is an example of part of an image with heavy JPEG artifacts visible. The most common cause of visible JPEG artifacts is saving a JPEG file at a quality setting that is too low. The JPEG file format uses lossy compression. File size is reduced by throwing away some image data. At the highest-quality settings, the data lost are often
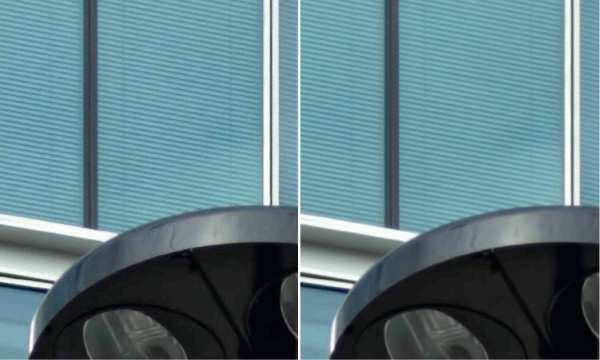
Figure 5.11A and B Two small sections from a larger image. A clearly shows JPEG artifacts on sharp edges. Avoid this at all costs!
almost invisible; but as the quality settings are reduced, more data are discarded in the quest for a smaller file size.
Unfortunately, the effects quickly become apparent to image inspectors and, worse still, the compression artifacts increase each time a JPEG file is saved. This is one critical reason why it is worth converting a JPEG format file from your digital camera to a TIFF format, preferably a 16-bit TIFF format, while you are editing the image data. Only convert back to JPEG when you have finished editing your file and are ready to submit it to your microstock library.
Some noise-reduction programs can be set to reduce JPEG artifacts, including the built-in noise-reduction filter in Photoshop (mentioned earlier). However, I have found they rarely work well. Avoidance is better than any cure.
In summary, my advice to avoid or minimize artifacts is the following:
- Use raw format whenever available.
- Use the highest in-camera JPEG settings.
- Convert JPEGs to TIFFs (16 bit preferred) and only resave as JPEGs once you are done editing your image and ready to send to the microstock library.
- Don't repeat save JPEGs as this causes cumulative image degradation.
CHROMATIC ABERRATIONS
Called CA for short, chromatic aberrations are color fringing on edges in images caused by lenses not focusing different wavelengths accurately on the sensor. The microstocks are sharp on too much CA, so check your pictures, particularly the edges of the frames, for this problem.
Take a look at Figure 5.12A and the cropped section indicated in red. Figure 5.12B illustrates a cropped section showing fairly bad edge-of-frame CA; notice the color fringing at the areas of high contrast. Figure 5.12C shows the corrected version.
If you shoot raw, then your raw file converter may include the facility to remove or reduce CA before decoding the file. The built-in raw converter with Photoshop CS3 has just such a facility. If not, or if you shot the photo in JPEG, then you can still remove CA by judicious application of Photoshop's Lens Correction filter (Filter > Distort > Lens Correction). I used the built-in CA-removal tool with my standard raw converter, Silkypix, on Figure 5.12B.
MOIRÉ AND COLOR NOISE
Moiré is similar to the color aliasing normally visible on fine detail as the limits of the sensor's resolution are reached. It manifests itself as
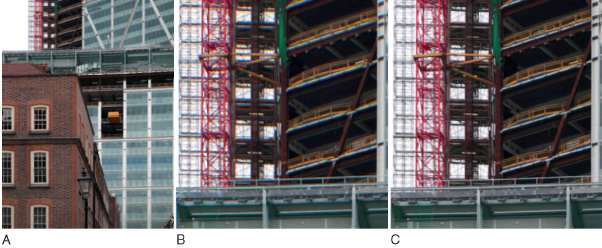
Figure 5.12A-C A illustrates buildings and cutouts. B and C show before and after shots of chromatic aberration.
a rainbow pattern effect and can be quite difficult to deal with. But deal with it you must before submission.
Most digital cameras are fitted with an antialiasing (AA) filter to reduce moiré effects. This works by slightly softening the image. The downside is a slight loss of resolution. A few cameras take a chance on moiré and do not use an AA filter. This results in a sharper image, but it leaves you spending more time in postprocessing removing not just moiré but other forms of color noise.
Figure 5.13 illustrates a small part of an image opened up in Photoshop with pretty bad moiré. Figure 5.14 shows the image being worked on to remove the moiré, using a simple solution that is usually good for the job. Here is what you can do:
- In Photoshop, select the Paint Brush and then from the Mode menu, choose Color.
- Choose the eyedropper tool, and select a part of the image that is closest to the average color. In this case, it's a bronzy pink shade.
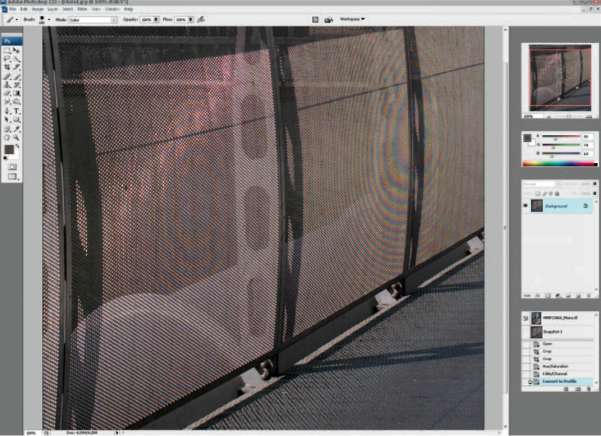
Figure 5.13 Moiré sample.
- Then, using a soft brush (see the white circle in Figure 5.14) of reasonable size, gently paint over the affected area. If the color looks wrong, go back and fine-tune it until it looks right. With a bit of patience and practice, you will get the hang of it.
What you are doing is coloring the image with the average local color using the paint brush. In the process, you are removing (coloring) the moiré color pattern. Unfortunately, the actual pattern itself remains, but it is usually not noticeable if the color is removed. The effect is nondestructive for other parts of the image. If you work on a layer, you can always erase through any areas where you have overdone it. This method can also be used to deal with a variety of other color anomalies.
Of course, there are software tools that can help. Adobe Camera Raw includes a color noise slider that reduces color artifacts, including moiré, but it affects the entire image. Other raw converters have similar tools, and these are fine for minor cases, but when the chips are down, I prefer my method.
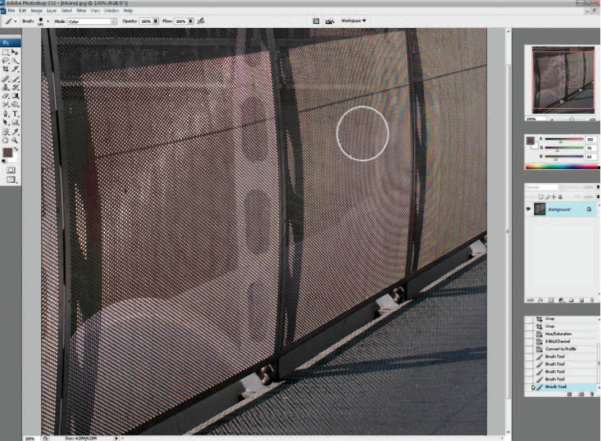
Figure 5.14 The Photoshop Paint Brush in color mode removing moiré.
DUST BLOBS
You have spent a lot of money on your digital camera, so it can come as a nasty surprise to see how easily dust blobs make an unwanted appearance in your images. Being electrically charged devices, camera sensors tend to attract small particles of dust that stick to the surface of the glass filter in front of the sensor. The problem is much more acute with interchangeable lens digital single-lens reflex (SLR) cameras because dust enters the camera body each time you change lenses. But any digital camera can potentially be affected, as can scans of film.
As with other image defects, dust blobs, hairs, or other unwanted horrors need to be removed; otherwise, your images will be rejected. There are two great Photoshop tools that can help you achieve image perfection: the Spot Healing Brush tool and the clone stamp.
SPOT HEALING BRUSH
The Spot Healing Brush works by sampling the area surrounding the brush and then replacing the area selected with the sampled data. It is very effective for blobs and marks in areas of even color, such as a blue sky, but less effective in areas where there are more complex patterns. Figure 5.15 shows what dust blobs might look like against a blue sky.
Choose the Spot Healing Brush from the Tool menu, and using a brush size just a little larger than the defect you want to remove, brush over the dirt. For large areas, try using the Patch tool from the same menu.
CLONE STAMP
The Spot Healing Brush is a relatively new addition to the Photoshop armory. The clone stamp has been around longer, but is almost as useful. The difference is that you select the area from which the sample is taken, then paint over—or clone in—the selected data to remove the visible dirt blob. A disadvantage of the clone stamp is that it does not try to match the color of the area being replaced as the Spot Healing Brush does, so with sky, for example, you need to make sure you select an area very close to the dirt mark being removed or you will see a difference in the color. An advantage is that it copes better, with practice, in areas of more complex detail, where you have more control over what data you use as your clone sample.
There are some cameras now being sold that have built-in dust-reduction systems. They use high-frequency vibrations to shake dust off the camera sensor, and they work quite well. If you do have dirtor
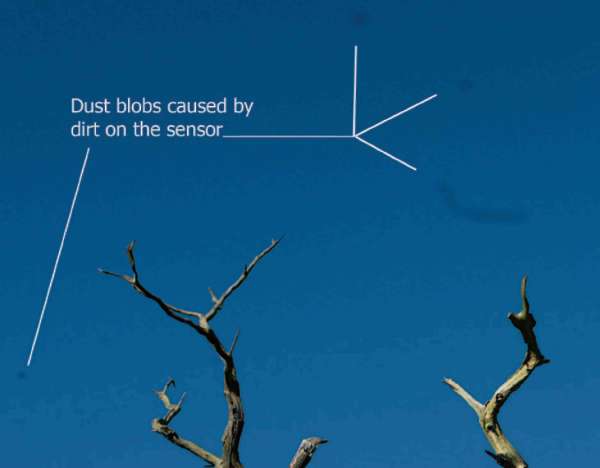
FIGURE 5.15 Dust blobs against a blue sky.
blobs on your sensor, you can return the camera for service and cleaning or try one of the do-it-yourself solutions now available on the market. Some products use chemical solutions to “wash” the sensor clean; others used static charged brushes to gently lift off dust particles. Whatever solution you use (I use a static charged brush), take great care to follow the manufacturer's instructions as it is easy to permanently damage your camera or its sensor.
REMOVING COPYRIGHT SYMBOLS AND LOGOS
Copyright symbols and brand names that you might hardly notice walking down the street suddenly seem to be everywhere when you are out shooting for stock, and the last place you need them is in your image. The clone stamp tool can be used to remove unwanted parts of your image, such as roof-mounted aerials and copyright logos or names that, if left in place, could lead to your image being rejected by the microstocks. With some libraries, even street signs can get you in trouble. Remember this formula: logo = microstock rejection.
You need to check your photos for copyright information, brands, names, and the like. Look carefully. They lurk in many a dark corner! If you find any, ruthlessly expunge them using whatever tool you are most comfortable with; my preference is the clone stamp tool. While you are at it, zap any visible faces for which you don't have a model release.
You will take care not to include copyright material or faces in your microstock shots, but don't be too concerned as it is really quite a simple process to remove the offending material in postprocessing. Check out Figure 5.16. The main part of this composite example shot is bounded in red and is the final image after the road sign was cloned out using Photoshop's clone stamp tool. The area on the right within the blue line shows how the road sign was originally visible, and the
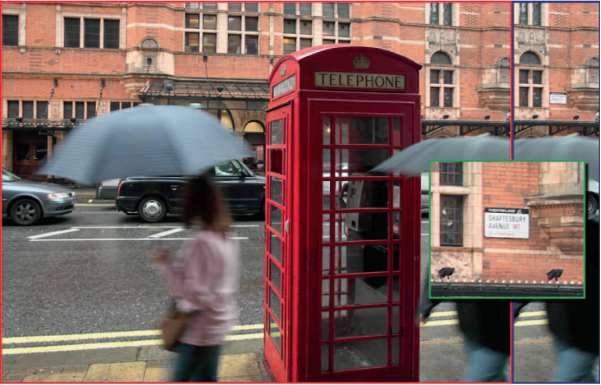
FIGURE 5.16 A road sign in this image was cloned out using Photoshop's clone stamp tool. © Douglas Freer
area bounded in a green line is an enlargement of the offending area.
SHARPENING YOUR IMAGES
Your microstock images need be sharp. Are yours? If not, they are sure to be rejected.
Sharpening your images is not a get-out-of-jail for poor focus. There is little point in trying to salvage a poorly focused image by using a lot of sharpening. It won't work. You must start with an image that is properly focused, at the point where it should be focused. With a portrait shot, you will normally focus on the eyes (not the end of the nose, as can happen!)—so with portraits, start by checking the eyes are sharp by examining them at 100% magnification on your computer monitor. Also, check for any camera shake, which can be caused by using a shutter speed that is too slow for the available light and the focal length of the lens.
But even properly focused shake-free images may not look quite sharp enough to microstock image inspectors.
A number of factors affect image sharpness such as the following:
- Lens quality. Not all camera lenses are equally sharp. Lenses that cover a wide range of focal lengths, such as some consumer-grade superzooms sold in kits with digital SLRs and some powerful compact camera lenses are “softer” than their less ambitious (and usually more expensive) counterparts—particularly when used near their maximum aperture.
- Default in-camera sharpening. If you shoot in JPEG format, the camera wil apply some level of sharpening. This can normally be adjusted by the user.
- Dirty or greasy marks on the lens. Get cleaning!
- Poor focus or camera shake. No real solution, so please avoid at all costs.
Assuming you are working with an image without a terminal problem such as camera shake (unless used intentionally as a special effect) or poor focus, then you should apply some sharpening to the JPEG file as a last step in your post-production process and before submission of the image to the microstocks.
My workflow involves turning sharpening down low in-camera and (when shooting RAW file format) in my raw decoding software. Sharpening too early in the process can emphasize noise or artifacts that I generally want to deal with first before I apply any significant amount of sharpening.
Knowing how much sharpening to apply is tricky. If your file looks sharp on-screen at 100% magnification, then you will only
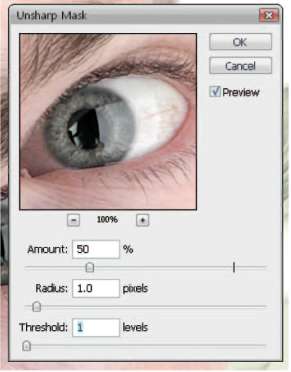
FIGURE 5.17 Dialogue box from Photoshop CS3 Unsharp Mask. The original image, from the cover of this book, is already pretty sharp, so not much extra sharpening is required. © Douglas Freer
need a little sharpening tweak. In Photoshop, use Unsharp Mask (Filter > Sharpen > Unsharp Mask) at a setting around radius 0.6 to 1.2, amount 50–175%, and a threshold of 1. Figure 5.17 shows the Unsharp Mask filter in action on the cover photo. Play around with the settings to achieve the best result.
If you have to apply more sharpening than the maximum suggested, then the image might simply be too unsharp to salvage.
If you only want to sharpen a selected part of your image, not the whole of it (to avoid emphasizing noise in shadow areas, for example) then you can use the same techniques I suggested above when using noise-reduction software so that you only apply sharpening where it is needed. Do be careful not to overdo sharpening. Too much can be as bad as none at all.
There are a number of specialized sharpening programs available to purchase, some of which operate as plug-ins or actions within Photoshop or other image editors. Links to examples are included in the appendices.
Note that some traditional non-microstock libraries, like Alamy, warn against applying any sharpening at all. Each library has its own quirks. My experience with the microstocks has shown that careful sharpening, but not too much, is desirable.
With your well-composed images now free of noise, dust blobs, and copyright logos and properly sharpened, you are ready to start down the path toward microstock nirvana. But hold on a moment, that path is taking you past a camera store, and wouldn't a nice new piece of kit help you take better photographs? Read on; Chapter 6 has it covered.