
CHAPTER 6
Equipment
Hopefully, having read this far, you are now thinking about joining the microstock revolution and you want to get stuck in. But before you jump, you need to make sure you have the right kit. The right kit does not necessarily mean the most expensive pro kit. Good microstock-ready images can be taken on quite modest equipment.
I don't want to get into a brand or even megapixel war here, so I am not planning on rating specifi c camera models in this chapter; camera models change far too often to make that a worthwhile exercise. There are some great online resources that review cameras, and I list a few in Appendix 3. This chapter is not about Canon versus Nikon or any other brand preference but about camera types.
For old-timers (well, let's face it, I must be one), we will start with the first choice you will have to make.
FILM OR DIGITAL?
Given the choice, starting from scratch, the answer must be digital. That is not to say that film is no good—far from it. I still shoot film but not usually for microstock. Film is great for my personal projects and, in particular, for large-format images as I own a drum scanner and can extract the best from film by using it.
Digital SLR images are always preferable.
Jon Oringer, CEO, Shutterstock
Consider the advantages of digital:
- The freedom to experiment. Film costs money, whereas, after the initial outlay, digital cameras are low maintenance. That means you can experiment and try out new ideas, which is important for your learning curve and bank balance.
- Instant feedback. You absolutely will appreciate being able to see where you are going wrong (or right) (Figure 6.1). Digital compact cameras use a live rear liquid
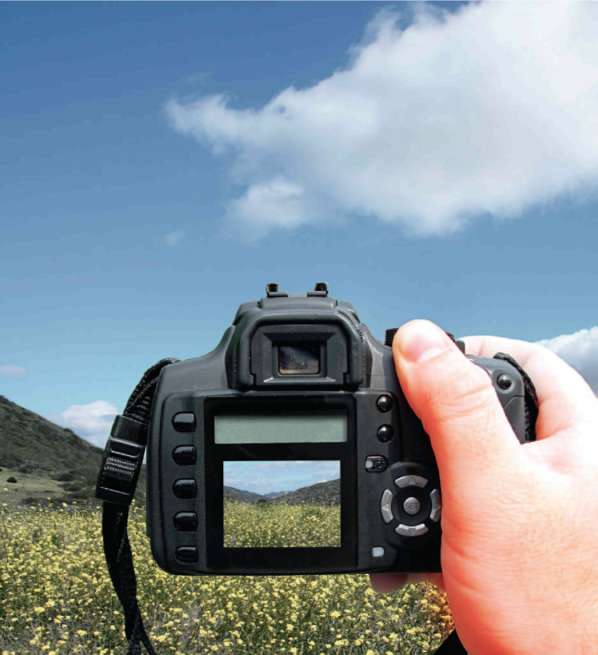
FIGURE 6.1 Instant feedback from digital cameras gives them a decisive advantage for microstock use. This is illustrated here by the use of the camera's rear screen—in itself, an excellent concept shot for stock. © LPETTET/iStockphoto
crystal display screen to give you instant feedback even as you take the shot. At the time of this writing, most digital single-lens-refl ex cameras (dSLRs) don't have a live view, but new releases from some major manufacturers do have this feature. Check to see of your preferred model has it. With film cameras, you have to wait for the film to be developed.
- • Adjustable ISO. Now this is really useful and unique to digital cameras (except for medium-format cameras with removable film backs). We discussed in Chapter 5 why you should use low ISO whenever possible, but many modern cameras have excellent high ISO performance that is useful to combat camera shake in low light. With film, you are stuck with the speed rating of the film you have loaded, unless you “push process” the entire film
- The ability to delete unwanted images. With digital, there's no need to pay for the development of bad images along with the good
- High capacity. Rolls of 35-mm film usually hold a maximum of 36 images. With a decent-sized memory card, you can shoot and store hundreds of images for later review. This can introduce storage problems, but they are easily solved with cheap mass storage devices and hard backup on digital versatile discs (DVDs)
- No film grain. All film has grain, and at 100% magnification you'll see it. This was never a problem before the mass acceptance of digital cameras, but it can be a problem now, particularly as many image reviewers on microstock sites have never used a film camera and may see normal film grain as “noise,” leading to the rejection of your images. My experience with this is a bit hit and miss regarding whether film grain is seen as a problem or not by a particular library or reviewer. Some libraries like iStockphoto allow the photographer to tick a box to advise the reviewer whether the shot being uploaded was taken with a digital or film camera. Others like Dreams-time, Fotolia, and Shutterstock have a place where you can include comments for the reviewer.
- No need for a scanner. Once you have your film developed, you still have to scan it, or pay to have it scanned, to digitize the images. Film is useless for microstock purposes (and for most other stock libraries) unless it is scanned. The quality of affordable scanners is not bad, but a dedicated film scanner for 35-mm film will still cost a few hundred dollars; then you have to factor in the learning curve to get decent results. You could use the money to buy Photoshop or a new lens instead. If you shoot formats larger than 35 mm, then scanner choices become more limited
- Great gadgets! We all like gadgets. Enough said.
So, is film no good? Well, although I consider film a second-best choice for microstock photography, many still like it. It is possible to pick up some great used film camera bargains to get started. Film also has a certain look that many like, and film still offers incredible resolution in larger formats like 4 × 5 and 8 × 10 as yet unmatched by affordable digital equipment. I still shoot some 8 × 10 film, but not for microstocks. For microstock use, it is game over—my advice is to use a digital camera and don't look back!
THE BEST DIGITAL CAMERA FOR YOU
So, assuming you are set on a digital camera, what type is best for you? I mean “type” and not “make” because new models of digital cameras are being released every few months. By the time you read this chapter, the current latest and greatest kit will probably have been replaced by something later and greater.
COMPACT DIGITAL CAMERAS
Compact, or “point-and-shoot,” cameras are great carry-anywhere microstock tools (Figure 6.2). All the major brands market models with similar characteristics, and for a couple of hundred dollars or less, you can be the proud owner of a relatively sophisticated and versatile photographic tool. I carry a compact nearly everywhere. My runaway most popular microstock image, which has made me hundreds of dollars in commission, was taken on a 6-mp compact (see Chapter 2, Figure 2.2).
Size and convenience are the pluses of compacts—but they do have issues, so beware. Their sensor size is much smaller than that in a dSLR and is therefore more prone to noise. This means that compact cameras are normally not much use above around 200 ISO; some even have visible noise and artifacts at their base ISO, normally 100 ISO.
The diagram in Figure 6.3 compares the sizes of different types of digital camera sensors. The largest size shown is for a 35-mm film
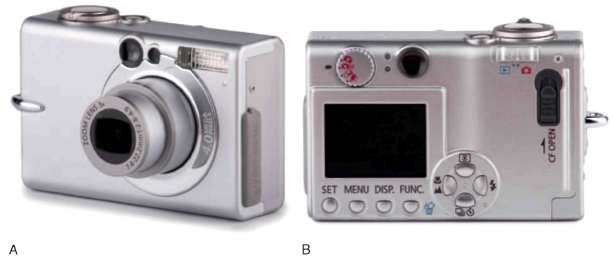
FIGURE 6.2A and B A typical point-and-shoot compact camera. Fun for all the family, and also useful for microstock photography. © Mark_Aplet/iStockphoto
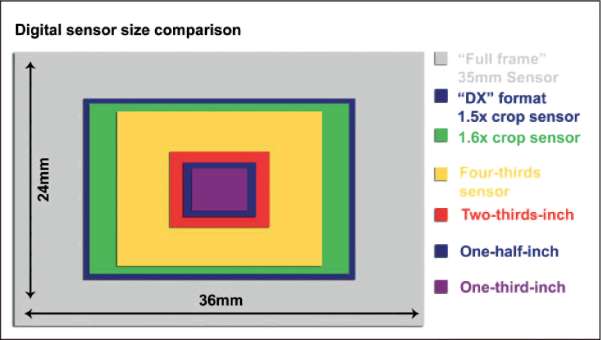
FIGURE 6.3 A typical point-and-shoot compact camera. Fun for all the family, and also useful for microstock photography. © Mark_Aplet/iStockphoto
camera or full-frame digital camera in the 35-mm format. A typical compact camera sensor will be no larger than the two-thirds-inch selection shown in the diagram, and camera phones will be around the one-third-inch size. It is easier to get low noise with bigger sensors for a given pixel count because of their better light-gathering characteristics. Note the sensor size for the new Four Thirds standard and also its shape, which is slightly squarer than either the 35mm full frame or crop factor sensors. The measurements themselves are a bit confusing, being based on old Imperial measures that hark back to television camera tube sizes from the mid-20th century.
Because compact cameras are more prone to noise, higher pixel counts do not always translate to better image quality when crammed into the smaller available area. This is a weakness for microstock use—remember that those dreaded image inspectors will check your uploaded shots at 100% on screen and will reject any with excessive noise. Currently, Fuji compact cameras in the “F” series that began with the F10 model and has progressed through several model iterations are generally regarded as having the best performance at high ISO, using their own unique sensor design (Figure 6.4). But do check the online review sites for the latest product reviews. Manufacturers deal with small sensor noise by applying more aggressive noise reduction and that can impact adversely on image quality.
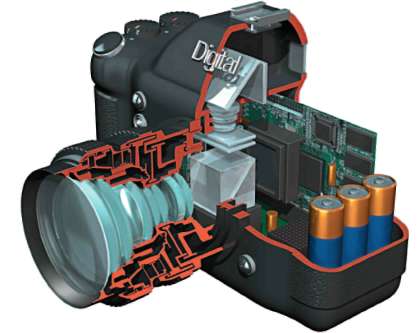
FIGURE 6.4 Digital camera cutaway. This is also a stock shot from Fotolia. © Stephen_Sweet/Fotolia
Fixed lenses on compact cameras
You are stuck with the lens your compact camera comes with. These can be pretty versatile, but not as versatile as a dSLR (see next section), where you can change the lenses for a much wider range of shooting possibilities. Look for a decent zoom range, around 8–40 mm, or roughly 35–300 mm in 35-mm camera lens terms. Personally I like lenses that give a wider view than this, but not many compacts have them fitted, although Canon, for example, does sell a wide angle adapter for its G-series compact cameras.
Another issue with compacts is that they rarely have a raw file mode. The absence of a raw mode limits the usefulness of compacts for serious photography. (See Chapter 5 for details on why raw mode is so useful.)
An advantage that compact cameras undeniably have is that they are pocketable. Their small size means it is easier to carry your camera with you just about anywhere. Better to have a camera with some limitations than no camera at all when that once-in-a-lifetime shot presents itself to you.
“BRIDGE” OR “PROSUMER” CAMERAS
“Bridge” cameras (Figure 6.5) fall between pocket compacts and full-scale dSLRs. They do no not have a mirror or reflex box like a full-blown
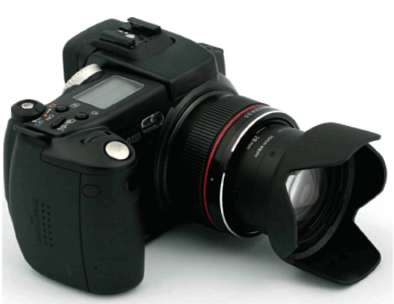
FIGURE 6.5 A chunky little bridge camera. This is also (like every other photo in this book) a microstock shot. Note how all brand identification has been carefully removed, an essential prerequisite for any microstock shot. © Mark Hayes/iStockphoto
blown dSLR; they do have electronic viewfinders and live view capabilities using their rear screen, which may swivel, a bit like a video camera. Bridge cameras are bigger and heavier than compacts and often look a lot like a small dSLR. A lot of people like bridge cameras, but I am not a fan. They are too bulky to substitute for compact cameras as carry-anywhere tools; electronic viewfinders are a poor substitute for the optical viewfinders found on dSLRs, and they still use very small sensors and non-interchangeable zoom lenses. Their only saving graces, in my view, are their relatively low cost and dust sealing.
With true dSLRs falling in price, the serious photographer would be well advised to give bridge cameras a miss and instead buy an entry-level dSLR for microstock use. In the long run, it will probably make life a lot easier.
DIGITAL SLRs
Now we're talking—the big daddy of the digital world is the dSLR (Figure 6.6). The first commercially available dSLR was the 1.3-MP Kodak DCS-100 launched at Photokina in 1991. Kodak remained a leader in the production of professional dSLRs until the early 21st century, and although its last dSLRs (the Kodak SLR/n Nikon mount and SLR/c Canon mount 13.5-MP models) ceased production in 2005 in the face of heavy competition from Nikon, Canon, Olympus, and other traditional camera makers, it still designs and fabricates sensors
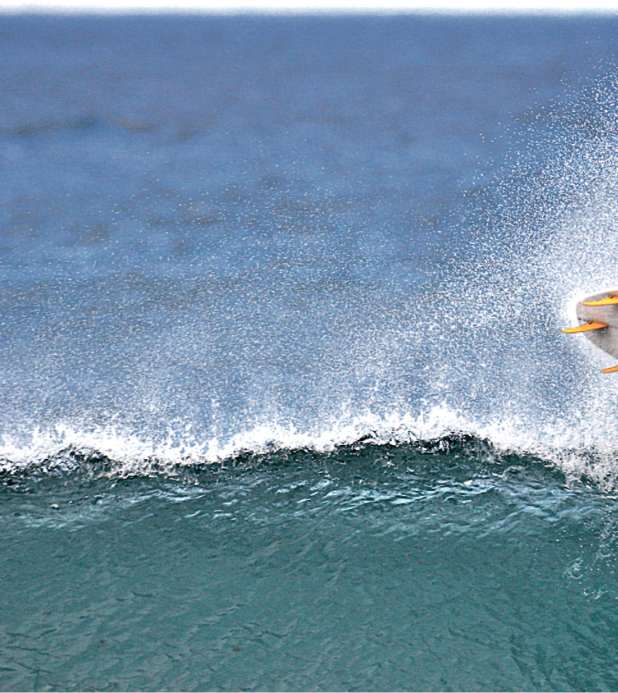
FIGURE 6.6 Images like this great surfing shot taken from Fotolia are ideal material for dSLRs. This shot was taken with a Canon EOS 20D. It would be difficult, but not necessarily impossible, to take as good a shot with a bridge camera. © Geoff Tydeman/Fotolia

Many current dSLR sensors are smaller than a frame of 35-mm film. Compare the blue and green boxes in Figure6.3 with the full 35-mm frame to see the difference. Cameras with 1.6 or 1.5 crop factor sensors can use normal lenses designed for full-frame cameras, but they can also use lenses specially designed for the smaller sensor sizes.
used in some other manufacturers' cameras. dSLRs are true system cameras, with a range of accessories useful to the microstock shooter (Figure 6.7).
Crop factor
Canon, Nikon, and Sigma all make lenses for their crop factor dSLRs. They have a smaller image circle designed to cover the smaller sensors. Independent lens maker Sigma also makes lenses to fit Nikon and Canon dSLRs. The advantages of specially designed lenses are that they are smaller and lighter than their full-frame counterparts.
Smaller sensors cost less to produce. Entry-level dSLRs now cost just a few hundred dollars yet offer a degree of versatility that makes them a much better choice for you, the prospective microstock photographer, than the bridge cameras mentioned earlier.
FIGURE 6.7 A dSLR system. © Tom Perkins/Fotolia
The Four Thirds system
If you take another look at the Figure 6.3, you'll see a yellow box marked Four Thirds sensor. This refers to a brand new Four Thirds format built from the ground up for digital imaging. Four Thirds has its own Web site at http://www.four-thirds.org/en/index.html; there you can read a lot more. In brief, Four Thirds is a standard established by Olympus and Eastman Kodak Company for next-generation ]dSLR cameras. This standard has now been accepted by major companies, including Fuji Photo Film, Sanyo Electric, Sigma, Matsushita Electric, and Leica Camera AG. That does not mean that they all make Four Thirds products—at the time of this writing, only Olympus, Panasonic, and Leica do so—but they all subscribe to the standard.
A lot of the original research was done by Katsuhiro Takada of Olympus, looking to produce a camera that was lighter than a traditional 35-mm camera, optimized for digital, and based on open standards. Open standards means that lenses from one Four Thirds manufacturer will fit another manufacturer's camera body. It's about time!
For the microstock photographer, there are some real benefits to the Four Thirds system, one not being immediately obvious—format. You'll see that Four Thirds is a little squarer than its competitors. In fact, the proportions are (yes, you guessed it!) 4 : 3. If you shoot macro (e.g., product shots, food, flowers), then the squarer format can mean less cropping and therefore less wasted image data at the edges of the frame. Trust me; it makes a positive difference in many shooting situations.
Reduced weight, open standards, improved format shape—it all sounds very good. But there is a downside. That smaller sensor can result in a little more noise (as with compact cameras). However, the good news is that the latest Four Thirds models from Olympus seem to have conquered that problem.
Despite the potential technical advantages of the Four Thirds format, traditional format dSLRs based on the shape and, with the full frame, size of 35-mm film cameras still have a lot of life in them, particularly as that format has the backing of the largest dSLR manufacturers, Nikon and Canon.
THE BIG GUNS: MEDIUM-FORMAT DIGITAL
As long as your lottery ticket has come through, it is safe to read on—once we get up to medium-format digital capture, we are considering serious financial outlay, from $10,000 to $40,000. That is serious cash in anyone's language. If you are a professional, then such an outlay is not unreasonable given the savings in film and development costs and the superb quality of which these devices are capable. But is such an expense justified for microstock photography?
Current medium-format digital is based on charge-coupled device (CCD) and complementary metal-oxide semiconductor (CMOS) imaging chips that are very close to 645 film in size. A separate digital back replaces the film holder. More recently, we have seen a closer integration between the digital back and camera body, and a completely integrated 22-MP digital camera from Mamiya, the ZD.
The major manufacturers are Hasselblad with its “H” series cameras (Figure 6.8), Phase One with “P” series digital camera backs, Mamiya with the ZD camera and ZD digital back, and Sinar, Leaf, and Rollei with the Hy6 series. Resolutions presently range from 16 MP to 39 MP, with more to come.
Here is my take on medium-format digital and microstock: it can be justified, but only for the most dedicated and serious photographers, or rich hobbyists. The quality of today's 22-MP or greater backs is good enough for just about any conceivable purpose, and the large file sizes they produce provide ample room for cropping. They are at their best in a studio environment, tethered to a computer, but they also work well in the field if you don't mind lugging around the not inconsiderable weight. Some used bargains are beginning to emerge, but medium-format digital is always going to be an option chosen by a minority of microstock photographers. I'm currently using a Mamiya ZD medium-format digital camera and this was used for the main cover shot.
SCANNING BACKS
Finally, I should mention scanning backs. These devices have been popular in studios since the mid-1990s when Dicomed was a leader. Now Betterlight (www.betterlight.com) is the leading manufacturer of these highly specialized devices that are used in conjunction with large-format cameras and “hot” (continuous) lights. The back itself is an insert that replaces the film holder in the large-format camera and acts like a miniature version of a desktop CCD scanner, with a CCD array scanning the scene. These backs offer superb quality but are not much use outside the studio because any movement causes serious color fringing, or worse—just the same as moving an item being scanned with a desktop scanner ruins the scan.
SCANNING FILM
As I mentioned earlier, film still has life left in it. You might have a back catalogue of film with a number of images suitable for micro-stock.
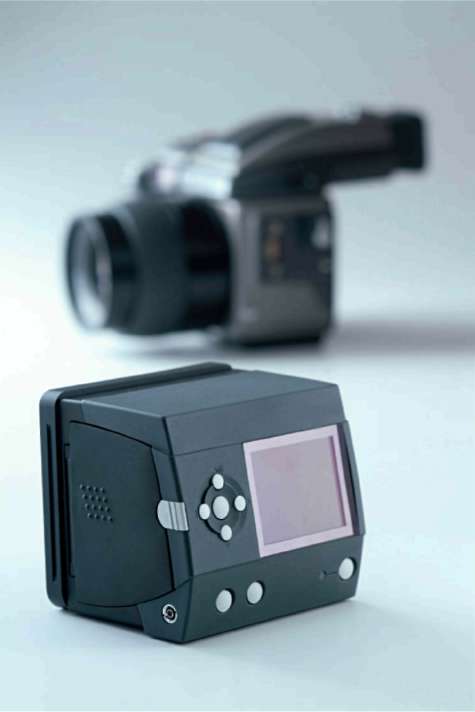
FIGURE 6.8 A medium-format back is a separate image-capturing device that replaces the film holder on a medium-format camera. This back is from a Hasselblad H1. © nikada33/iStockphoto
Or you might just prefer the look and feel of film images. Either way, you have to convert analogue film images into bits of data, and that means scanning them
My advice is don't waste old images—making dollars from cents means maximizing returns from each suitable image in your collection! If you are a complete fanatic about quality, the best scans come from drum scanners. Drum scanners are the 500-lb. gorillas of the scanning world, and once you would have had to spend $40,000 or more to buy one. They capture image information with photomultiplier tubes (PMT) rather than with the CCD arrays found in flatbed scanners. They require a little practice to use. Negatives or transparencies have to be stuck to the outer surface of a transparent drum, which is rotated at high speed so the image can be “read” in strips as the drum moves along its carriage. Transparent overlays are used to sandwich the image between the drum and overlay, and liquids can be used in the sandwich to improve scan quality.
You can now find decent used drum scanners on eBay for around a few hundred dollars; the demand from repro houses and graphic design agencies is just not there anymore as digital capture replaces film and the quality of desktop CCD scanners improves. With a bit of effort and help from support groups like the Scan-Hi End group on Yahoo! (set up by your author), a used drum scanner can be great high-quality alternative to their more ubiquitous CCD-based cousins. I use one myself, an old Howtek Scanmaster 4500, a popular “desktop” drum scanner. Many drum scanners you see for sale use outdated and unsupported software that may require older Macintosh computers to run on, but there are software packages from Lasersoft that will drive some of these old beasts on more modern computers.
Perhaps a less exotic alternative is a dedicated film scanner, such as the Nikon Coolscan range, that takes strips of 35-mm film or individual mounted transparencies. Microtek and Canon, among others, also make dedicated film scanners. There are medium-format options too from Nikon and Microtek, and at the top of the CCD pile, Hassel-blad sells some very pricey virtual drum scanners under the Flextight brand name that are almost as expensive as true drum scanners. The CCD desktop scanners are not cheap, but they arguably offer the best quality-cost compromise.
A further alternative that makes particular sense for anyone with medium- or large-format film to scan is the affordable range of flatbed scanners (Figure 6.9) with film scanning kits available from Epson and Canon. Results from these scanners are not quite as good as from dedicated film scanners, but they come close based on tests I have conducted.
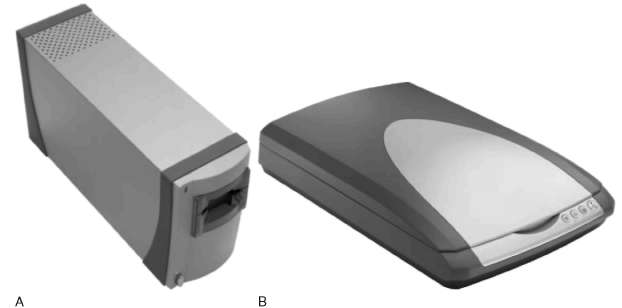
FIGURE 6.9A and B A shows a dedicated 35-mm film scanner and B a flatbed scanner. Both use CCD arrays to “read” film and convert it to bits that can then be manipulated in a computer. © Ole Røsset/iStockphoto (A) and © Jeffrey Schmieg/iStockphoto (B)
Whatever scanner you choose, you should bear the following in mind as rough guidance (I generalize here; there are always exceptions):
- PMT-based drum scanners are better than CCD film scanners, and dedicated film scanners are better than flatbeds with film scanning attachments.
- Drum scanners aside, all film scanners and flatbeds are CCD devices.
- Check the bit depth for CCD scanners. This refers to the number of bits used to represent the color of a single pixel in an image. Higher is better (as it is with cameras), and most scanners are now 12-16 bits. Don't buy a CCD scanner with a bit depth lower than 12 bits.
- Check the optical resolution. Anything around 4000 PPI from a film scanner will recover most all useful data on the film. Some flatbeds are quoted with huge pixel-per-inch figures, but these can be misleading, with real detail resolve being compromised by lens quality, focus accuracy (particularly for fixed-lens flatbeds), and light bleed between adjacent pixels. I'd pitch my 4000-PPI drum scanner against any CCD-based film or flatbed regardless of the latter's quoted resolution.
- The latest generation of flatbeds designed for film, like the best of the Epson Perfection range, is probably good enough for most uses if used with care. After purchase, join one of the great online scanning support groups for assistance and further tips.
SUMMARY
There is no doubt that Jon Oringer is right to say that dSLRs are the preferred tool for microstock. However, compact digital cameras and “prosumer” or bridge cameras can do a good job, even if they are less versatile than their dSLR brethren.
Film also still has its place, and if you have been shooting images suitable for stock for years, it's plain silly not to digitize and use some of those images. It would not make sense though to start out a career in microstock by buying a film camera. Digital cameras are now too good and inexpensive to make film a sensible choice for microstock use.
If you are serious about microstock photography, I strongly advise the purchase of a decent dSLR. By all means, buy a good compact as well if you can afford to do so, but make your main camera a tool that can extract the most from your talent. dSLRs are not only more versatile, used as a platform for interchangeable lens systems, they also offer higher quality, with less work required in postprocessing to remove noise, chromatic aberrations, and other defects necessary for acceptance on the microstocks. As the competition among photographers heats up, the dSLR user has a distinct quality advantage over users of cheaper prosumer and compact cameras, and having read this far, I just know you want to be part of the haves, not the have-nots!