
The well-written application accesses its resources programmatically instead of hard coding them into the source code. This is done for a variety of reasons. Storing application resources in a resource table is a more organized approach to development and makes the code more readable and maintainable. Externalizing resources such as strings make it easier to localize applications for different languages and geographic regions.
In this chapter, you learn how Android applications store and access important resources such as strings, graphics, and other data. You also learn how to organize Android resources within the project files for localization and different device configurations.
All applications are composed of two parts: functionality and resources. The functionality is the code that determines how your application behaves. This includes any algorithms that make the application run. Resources include text strings, images and icons, audio files, videos, and other assets used by the application.
Android resource files are stored separately from the java class files in the Android project. Most common resource types are stored in XML. You can also store raw data files and graphics as resources.
Resources are organized in a strict directory hierarchy within the Android project. All resources must be stored under the /res project directory in specially named subdirectories that must be lowercase.
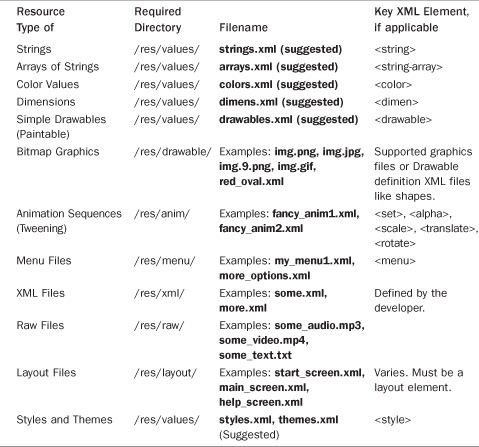
Different resource types are stored in different directories. The most common resource subdirectories generated by default when you create an Android project using the Eclipse plug-in are shown in Table 5.1.

If you use the Eclipse with the Android Development Tools Plug-In (ADT), you find that adding resources to your project is simple. The plug-in detects new resources when you add them to your project resource directory /res and automatically uses an underlying Android Software Development Kit (SDK) tool called the Android Asset Packaging Tool (aapt) to compile your resources so that you can access them programmatically.
The aapt packages your application for installation on the emulator or the hardware, but it also compiles the appropriate application resources into an automatically generated source file called R.java, which you find in the /src directory of your project. Your application relies on the R.java file, as it exposes the resource table for your application.
If you use a different development environment, you need to use the aapt tool command-line interface to compile your resources and package your application binaries to deploy to the phone or emulator. You can find the aapt in the /tools directory of the Android SDK.
Tip
Build scripts can use the aapt for automation purposes and to create archives of assets and compile them efficiently for your application. The tool can be configured using command–line arguments to package only including assets for a specific device configuration or target language, for example. All resources for all targets are included by default.
Android applications rely on many different types of resources, such as text labels, image graphics, and color schemes, for user interface design.
These resources are stored in the /res directory of your Android project in a strict (but reasonably flexible) set of directories and files. All resources filenames must be lowercase and simple (letters, numbers, and underscores only).
The resource types supported by the Android SDK and how they are stored within the project are shown in Table 5.2.
The aapt traverses all properly formatted files in the /res directory hierarchy and generates the class file R.java in your source code directory /src to access all variables.
Later in this chapter, we cover how to store and use each different resource type in detail, but for now, you need to understand that different types of resources are stored in different ways.
Simple resource value types like strings, colors, dimensions, and other primitives are stored under the /res/values project directory in XML files. Each resource file under the /res/values directory must begin with the following XML header:
<?xml version="1.0" encoding="utf-8"?>
Next comes the root node <resources> followed by the specific resource element types like <string> or <color>. Each resource is defined using a different element name.
Although the XML file names are arbitrary, the best practice is to store your resources in separate files to reflect their types, such as strings.xml, colors.xml, and so on. However, there’s nothing stopping the developers from creating multiple resource files for a given type, such as two separate xml files called bright_colors.xml and muted_colors.xml, if they so choose.
In addition to simple resource types stored in the /res/values directory, you can also store animations, graphics, arbitrary XML files, and raw files as resources. These types of resources are not stored in the /res/values directory, but instead stored in specially named directories according to their type. For example, you can include graphics in the /res/drawable directory. Again, make sure you name these files appropriately because the resource name will be derived from the filename. For example, a file called flag.png in the /res/drawable directory will be given the name R.drawable.flag.
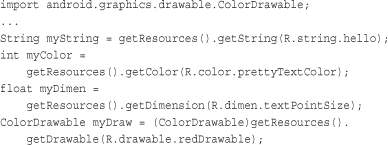
Developers access specific application resources using the R.java class file and its subclasses, which are automatically generated when you add resources to your project (if you use Eclipse). You can refer to any resource identifier in your project by name. For example, the following string resource named hello is accessed in the code as:
R.string.hello
This variable is not the actual data associated with the string named hello. Instead, you use this resource identifier to retrieve the resource of that type (which happens to be string).
For example, a simple way to retrieve the string text is to call:
String myString = getResources().getString(R.string.hello);
First, you retrieve the Resources instance for your application Context (android.content.Context) which is, in this case, this because the Activity class extends Context. Then you use the Resources instance to get the appropriate kind of resource you want. You find that the Resources class (android.content.res.Resources) has methods for every kind of resource.
Before we go any further, we find it can be helpful to dig in and create some resources, so let’s create a simple example. Don’t worry if you don’t understand every aspect of the exercise. You can find out more about each different resource type later in this chapter.
Developers can define the simpler resource types by editing resource XML files manually and using the aapt to compile them and generate the R.java file or by using the handy ADT Plug-Ins built in the resource editor.
To illustrate how to set resources using the Eclipse plug-in, let’s create a new Android project called ResourceRoundup.
Tip
You can find the ResourceRoundup project on the CD provided at the end of this book or online at the book Web site.
After you create the new project, navigate to the /res/values/strings.xml file in Eclipse and double click on the file to edit it. Your strings.xml resource file opens in the right pane and should look something like Figure 5.1.
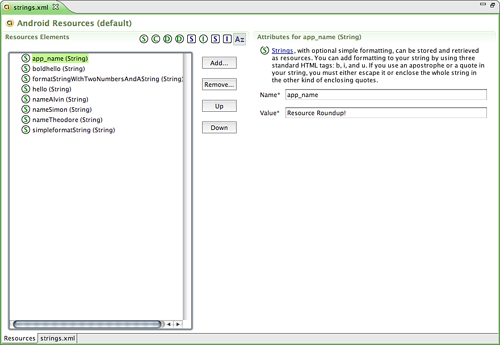
There are two tabs at the bottom of this pane. The Resources tab provides a friendly method to insert primitive resource types such as strings, colors, and dimension resources easily. The strings.xml tab shows the raw XML resource file you are creating. Sometimes, editing the XML file manually is much faster, especially if you add a number of new resources.
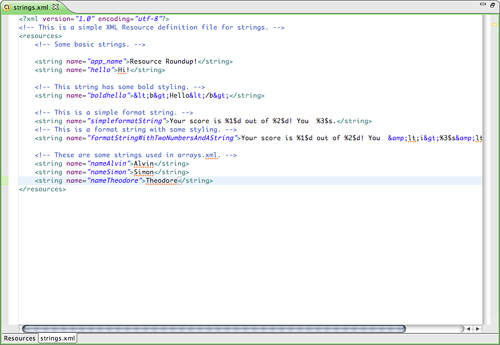
Click the strings.xml tab, and your pane should look something like Figure 5.2.
Now add some resources using the Add button on the Resources tab. Specifically, create the following resources:
• A color resource named prettyTextColor with a value of #ff0000
• A dimension resource named textPointSize with a value of 14pt
• A drawable resource named redDrawable with a value of #F00
Now you have several resources of various types in your strings.xml resource file. If you switch back to the XML view, you see that the Eclipse resource editor has added the appropriate XML elements to your file, which now should look something like this:

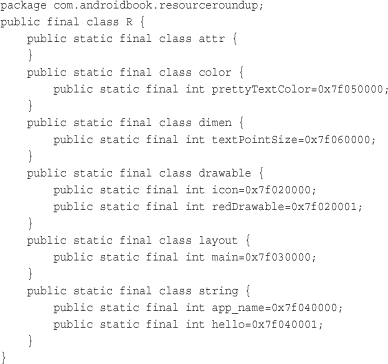
Save the strings.xml resource file. The Eclipse plug-in automatically generates the R.java file in your project, with the appropriate resource IDs, which allow you to programmatically access your resources after they are compiled into the project. If you navigate to your R.java file, which is located under the /src directory in your package, it looks something like this:
Now you are free to use these resources in your code. If you navigate to your resourceroundup.java source file, you can add some lines to retrieve your resources and work with them, like this:
Some resource types, such as string arrays, are more easily added to resource files by editing the XML by hand. For example, if we go back to the strings.xml file and choose the strings.xml tab, we can add a string array to our resource listing by adding the following XML element:
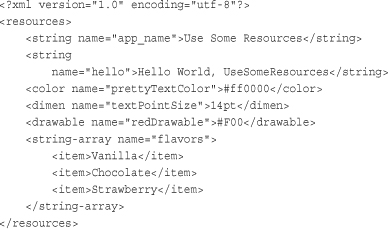
Save the strings.xml file, and now this string array named “flavors” is available in your source file R.java, so you can use it programmatically in resourcesroundup.java like this:
String[] aFlavors =
getResources().getStringArray(R.array.flavors);
Now you have a general idea how to add simple resources using the Eclipse plug-in, but there are quite a few different types of data available to add as resources. Now let’s have a look at how to add each different type of resource to your project.
In this section, we look at the specific types of resources available for Android applications, how they are defined in the project files, and how you can access this resource data programmatically.
For each type of resource type, you learn what types of values can be stored and in what format. Some resource types (like Strings and Colors) are well supported with the Android Plug-in Resource Editor, whereas others (like Animation sequences) are more easily managed by editing the XML files directly.
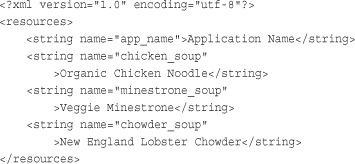
String resources are among the simplest resource types available to the developer. String resources might show text labels on form views and for help text. The application name is also stored as a string resource, by default.
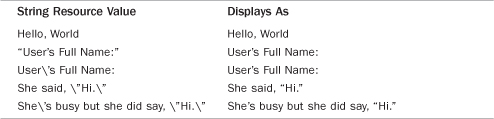
String resources are defined in XML under the /res/values project directory and compiled into the application package at build time. All strings with apostrophes or single straight quotes need to be escaped or wrapped in double straight quotes. Some examples of well-formatted string values are shown in Table 5.3.
You can edit the strings.xml file directly by clicking on the file and choosing the strings.xml tab (as opposed to the Resources tab). You can edit the file directly, adding string resources. These resources will automatically be added to your R.java class file when you save.
String values are appropriately tagged with the <string> tag and represent a name-value pair. The name attribute is how you refer to the specific string programmatically, so name these resources wisely.
Here’s an example of a simple string resource file /res/values/strings.xml:
You can create format strings, but you need to escape all bold, italic, and underlining tags if you do so. For example, this text shows a score and the “win” or “lose” string:
<string
name="winLose">Score: %1$d of %2$d! You %3$s.</string>
If you wanted to include bold, italic, or underlining in this format string, you need to escape the format tags. For example, if want to italicize the “win” or “lose” string at the end, your resource would look like this:
![]()
As shown earlier in this chapter, accessing string resources in code is straightforward. There are two primary ways in which you can access this string resource.
The following code accesses your application’s string resource named hello, returning only the string. All HTML-style attributes (bold, italic, and underlining) are stripped from the string.
String myStrHello =
getResources().getString(R.string.hello);
You can also access the string and preserve the formatting by using this other method:
CharSequence myBoldStr =
getResources().getText(R.string.boldhello);
To load a format string, you need to make sure any format variables are properly escaped. One way to do this is to use the TextUtils.htmlEncode() method:
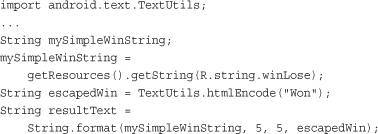
The resulting text in the resultText variable is
Score: 5 of 5! You Won.
Now if you have styling in this format string like the preceding winLoseStyled string resource, you need to take a few more steps to handle the escaped italic tags.
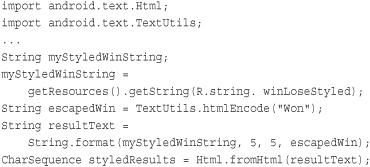
The resulting text in the styledResults variable is
Score: 5 of 5! You <i>won</i>.
This variable, styledResults, can then be used in user interface widgets like TextView objects, where styled text is displayed correctly.
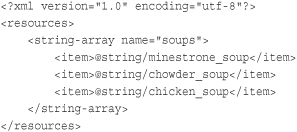
You can specify lists of strings in resource files. This can be a good way to store menu options and drop-down list values. String arrays are defined in XML under the /res/values project directory and compiled into the application package at build time.
String arrays are appropriately tagged with the <string-array> tag and a number of <item> child tags, one for each string in the array. Here’s an example of a simple array resource file /res/values/arrays.xml:
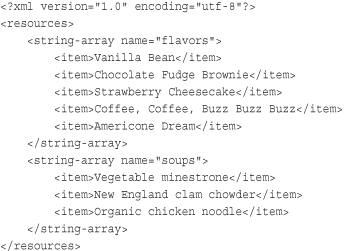
As shown earlier in this chapter, accessing string arrays resources is easy. The following code retrieves a string array named flavors:
String[] aFlavors =
getResources().getStringArray(R.array.flavors);
Android applications can store RGB color values, which can then be applied to other screen elements. You can use these values to set the color of text or other elements, like the screen background. Color resources are defined in XML under the /res/values project directory and compiled into the application package at build time.
RGB color values always start with the hash symbol (#). The alpha value can be given for transparency control. The following color formats are supported:
• #RGB (Example: #F00 is 12-bit color, red)
• #ARGB (Example: #8F00 is 12-bit color, red with alpha 50 percent)
• #RRGGBB (Example: #FF00FF is 24-bit color, magenta)
• #AARRGGBB (Example: #80FF00FF is 24-bit color, magenta with alpha 50 percent)
Color values are appropriately tagged with the <color> tag and represent a name-value pair. Here’s an example of a simple color resource file: /res/values/colors.xml:
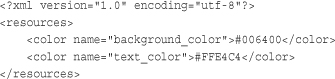
The example at the beginning of the chapter accessed a color resource. Color resources are simply integers. The following code retrieves a color resource called prettyTextColor:
int myResourceColor =
getResources().getColor(R.color.prettyTextColor);
Many user interface layout widgets such as text controls and buttons are drawn to specific dimensions. These dimensions can be stored as resources. Dimension values always end with a unit of measurement tag.
Dimension values are appropriately tagged with the <dimen> tag and represent a name-value pair. Dimension resources are defined in XML under the /res/values project directory and compiled into the application package at build time.
The dimension units supported are shown in Table 5.4.
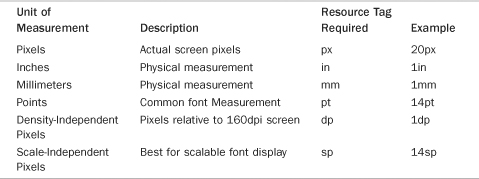
Here’s an example of a simple dimension resource file /res/values/dimens.xml:
Dimension resources are simply floating point values. The following code retrieves a dimension resource called textPointSize:
float myDimension =
getResources().getDimension(R.dimen.textPointSize);
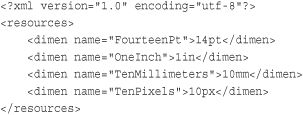
You can specify simple colored rectangles by using the drawable resource type, which can then be applied to other screen elements. These drawable types are defined in specific paint colors, much like the Color resources are defined.
Simple paintable drawable resources are defined in XML under the /res/values project directory and compiled into the application package at build time. Paintable drawable resources use the <drawable> tag and represent a name-value pair. Here’s an example of a simple drawable resource file /res/values/drawables.xml:
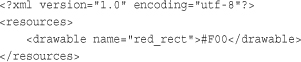
Although it might seem a tad confusing, you can also create XML files that describe other Drawable subclasses, such as ShapeDrawable. Drawable XML definition files are stored in the /res/drawable directory within your project along with image files.
Caution
This is not the same as storing <drawable> resources, which are paintable drawables. PaintableDrawable resources are stored in the /res/values directory, as explained in the previous section.
Here’s a simple ShapeDrawable described in the file /res/drawable/red_oval.xml:
We talk more about graphics and drawing shapes in Chapter 8, “Drawing and Working with Animation in Android.”
Drawable resources defined with <drawable> are simply rectangles of a given color, which is represented by the Drawable subclass ColorDrawable. The following code retrieves a ColorDrawable resource called redDrawable:

Applications often include visual elements such as icons and graphics. Android supports several image formats that can be directly included as resources for your application. These image formats are shown in Table 5.5.
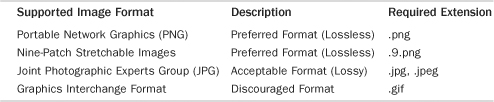
These image formats are all well supported by popular graphics editors such as Adobe Photoshop, GIMP, and Microsoft Paint. The Nine-Patch Stretchable Graphics can be created from PNG files using the draw9patch tool included with the Android SDK under the /tools directory.
Tip
All resources filenames must be lowercase and simple (letters, numbers, and underscores only). This rule applies to all files, including graphics.
Adding image resources to your project is easy. Simply drag the image asset into the /res/drawable directory, and it will automatically be included into the application package at build time.
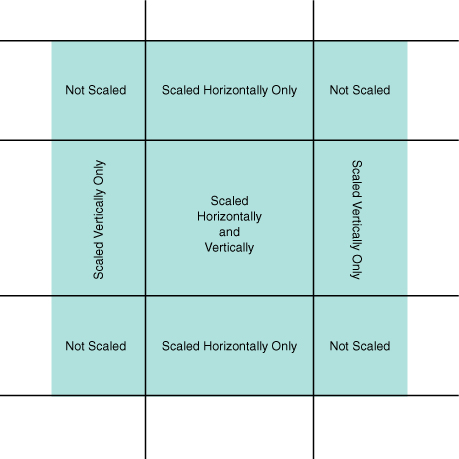
Phone screens come in various dimensions. It can be handy to use stretchable graphics to allow a single graphic that can scale appropriately for different screen sizes and orientations or different lengths of text. This can save you or your designer a lot of time in creating graphics for many different screen sizes.
Android supports Nine-Patch Stretchable Graphics for this purpose. Nine-Patch graphics are simply PNG graphics that have patches, or areas of the image, defined to scale appropriately, instead of scaling the entire image as one unit. Often the center segment is transparent.
In Figure 5.3, you can see how the image (shown as the square) is divided into nine patches.
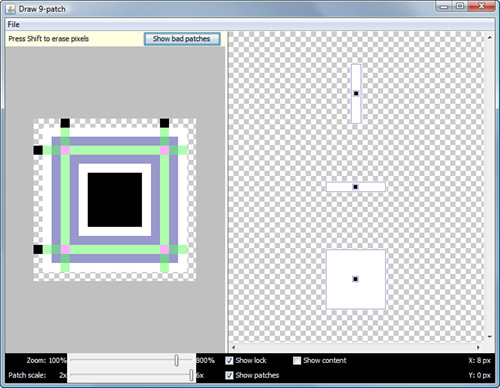
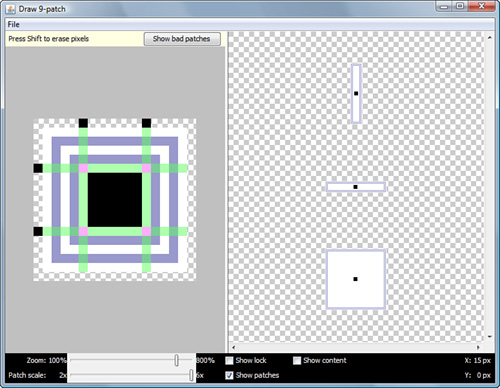
Nine-Patch Stretchable Graphics can be created from PNG files using the draw9patch tool included with the Tools directory of the Android SDK. The interface for the draw9patch tool (see Figure 5.4) is straightforward. In the left pane, you can define the Nine-Patch guides to your graphic to define how it will scale when stretched. In the right pane, you can preview how your graphic will behave when scaled with the patches you defined.

To create a Nine-Patch graphic from a PNG file using the draw9patch tool, perform the following steps:
- Launch
draw9patch.batin your Android SDKtoolsdirectory. - Drag a PNG file into the left pane (or use File, Open Nine-Patch)
- Click the Show Patches check box at the bottom of the left pane.
- Set your Patch Scale appropriately (higher to see more marked results).
- Click along the right edge of your graphic to set a horizontal patch guide.
- Click along the top edge of your graphic to set a vertical patch guide.
- View the results in the right pane; move patch guides until the graphic stretches as desired, as shown in Figure 5.5 and Figure 5.6).
- To delete a patch guide, press shift and click on the guide pixel (black).
- Save your graphic with the extension
.9.png(for example,little_black_box.9.png).
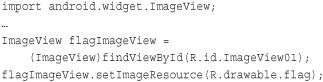
Images resources are simply another kind of Drawable called a BitmapDrawable. Most of the time, you need only the resource ID of the image to set as an attribute on a user interface widget.
For example, if I dropped the graphics file flag.png into the /res/drawable directory and added an ImageView widget to my main layout, we could set the image to be displayed programmatically in the layout this way:
If you want to access the BitmapDrawable object directly, you simply request that resource directly as follows:
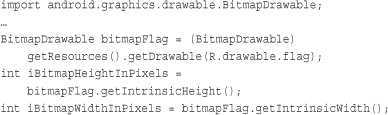
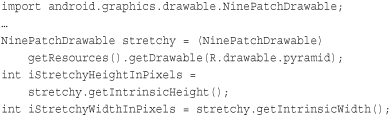
And finally, if you work with Nine-Patch graphics, the call to getDrawable() returns a NinePatchDrawable instead of a BitmapDrawable object.
Android supports animation and tweening. Some animation features include scaling, fading, and rotation. These actions can be applied simultaneously or sequentially and might use different interpolators.
Animation sequences are not tied to a specific graphic file, so you can write one sequence and then use it for a variety of different graphics. For example, you can make moon, star, and diamond graphics all pulse using a single scaling sequence or spin using a rotate sequence.
Graphic animation sequences can be stored as specially formatted XML files in the /res/anim directory and are compiled into the application binary at build time.
Here’s an example of a simple animation resource file /res/anim/spin.xml that defines a simple rotate operation, rotating the target graphic counterclockwise four times in place, taking 10 seconds to complete:
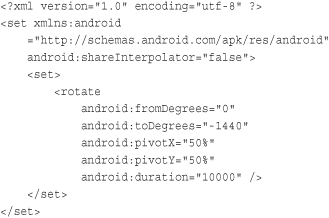
The Android SDK provides some helper utilities for loading and using animation resources. These utilities are found in the android.view.animation.AnimationUtils class.
If we go back to the example of a BitmapDrawable earlier, we can now add some animation simply by adding the following code to load the animation resource file spin.xml and set the animation in motion.
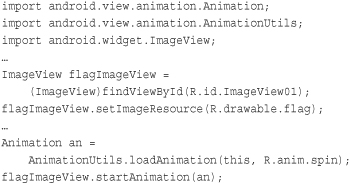
Now you have your graphic spinning. Notice that we loaded the animation using the base class object Animation. You can also extract specific animation types using the subclasses that match: RotateAnimation, ScaleAnimation, TranslateAnimation, and AlphaAnimation.
You learn more about graphics and animation in Chapter 8.
You can also include menu resources in your project files. Like animation resources, menu resources are not tied to a specific widget or control but can be reused in any menu control.
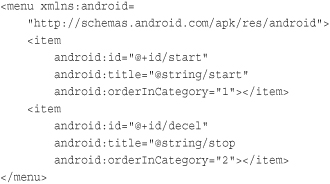
Each menu resource (which is a set of individual menu items) is stored as a specially formatted XML files in the /res/menu directory and are compiled into the application package at build time.
Here’s an example of a simple menu resource file /res/menu/speed.xml that defines a short menu with four items in a specific order:

You can create menus using the Eclipse plug-in, which can access the various configuration attributes for each menu item. In the previous case, we set the title (label) of each menu item and the order in which the items display. Now, you can use string resources for those titles, instead of typing the strings in. For example:
To access the preceding menu resource called /res/menu/speed.xml, simply override the method onCreateOptionsMenu() in your application:

That’s it. Now if you run your application and press the menu button, you see the menu. You learn a lot more about menus and menu event handling in Chapter 6, “Exploring User Interface Screen Elements.”
You can include arbitrary XML resource files to your project. These XML files should be stored in the /res/xml directory and are compiled into the application package at build time.
The Android SDK has a variety of packages and classes available for XML manipulation. You learn more about XML handling in Chapter 9, “Using Android Data and Storage APIs,” and Chapter 10, “Using Android Networking APIs.” For now, we create an XML resource file and access it through code.
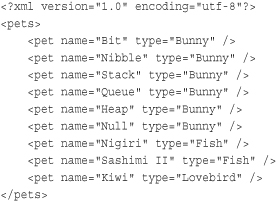
First, put a simple XML file in /res/xml directory. In this case, the file my_pets.xml with the following contents can be created:
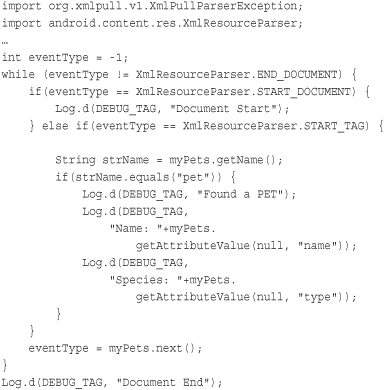
Now you can access this XML file as a resource programmatically in the following manner:
XmlResourceParser myPets =
getResources().getXml(R.xml.my_pets);
Finally, to prove this is XML, here’s one way you might churn through the XML and extract the information:
Your application can also include raw files as part of its resources. Raw files your application might use include audio files, video files, and other file formats not supported by the Android Resource packaging tool appt.
All raw resource files are included in the /res/raw directory and are added to your package without further processing.
Caution
All resources filenames must be lowercase and simple (letters, numbers, and underscores only). This also applies to raw file filenames even though the tools don’t process these files, other than to put them in your application package.
The resource filename must be unique to the directory and should be descriptive because the filename (without the extension) becomes the name by which the resource is accessed.
You can access raw file resources and any resource from the /res/drawable directory (bitmap graphics files, anything not using the <resource> XML definition method). Here’s one way to open a file called the_help.txt:

You can reference resources instead of duplicating them. For example, your application might want to reference a single string resource in multiple string arrays.
The most common use of resource references is in layout XML files, where layouts can reference any number of resources to specify attributes for layout colors, dimensions, strings, and graphics. Another common use is within style and theme resources.
Resources are referenced using the following format:
@[optional_package_name:]resource_type/variable_name
Recall previously when we had a string-array of soup names. If we wanted to localize the soup listing, a better way to create the array would be to create individual string resources for each soup name and then store the references to those string resources in the string-array (instead of the text).
To do this, we would define the string resources in the /res/strings.xml file like this:
And then we could define a localizable string-array that references the above string resources by name in the /res/arrays.xml file like this:
Tip
Save the strings.xml file first so that the string resources (which are picked up by the appt and included in the R.java class) are defined prior to trying to save the arrays.xml file, which references those particular string resources. Otherwise, you might get the following error:
Error: No resource found that matches the given name.
You can also use references to make aliases to other resources. For example, you can alias the system resource for the OK string to an application resource name by including the following in your strings.xml resource file:

You learn more about all the different system resources available later in this chapter.
Much as web designers use HTML, user interface designers can use XML to define Android application screen elements and layout.
Layout resource files are included in the /res/layout/ directory and are compiled into the application package at build time. Layout files might include many user interface controls and define the layout for an entire screen or describe custom controls used in other layouts.
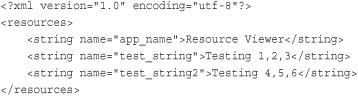
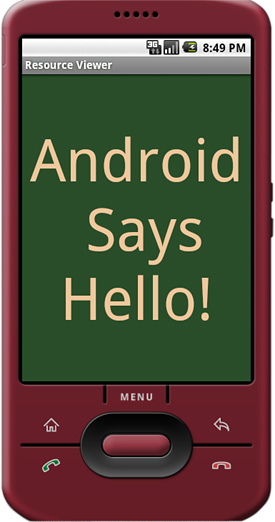
Here’s a simple example of a layout file (/res/layout/main.xml) that sets the screen’s background color and displays some text in the middle of the screen (see Figure 5.7). You can find this layout file in the Resource Viewer Android project provided on the CD and on the book Web site.
The main.xml layout file references a number of other resources, including colors, strings, and dimension values, all of which were defined in the strings.xml, colors.xml, and dimens.xml resource files. The color resource for the screen background color and resources for a TextView control’s color, string, and text size follows:

The preceding layout describes all the visual elements on a screen. In this example, a LinearLayout control is used as a container for other user interface widgets—here, a single TextView that displays a line of text.
You can also encapsulate specific layout features in their own layout files and then include those common widgets in other layout files using the <include> tag. For example, you can use the following <include> tag that would include another layout file called /res/layout/mygreenrect.xml in main.xml:
<include layout="@layout/mygreenrect"/>
Layouts can be designed and previewed in Eclipse. If you click on the project file /res/layout/main.xml, which is provided with any new Android project, you see a Layout tab, which shows you the preview of the layout, and a main.xml tab, which shows you the raw XML of the layout file.
As with most user interface designers, the Android plug-in works well for your basic layout needs, allows you to create user interface controls such as TextView and Button widgets easily, and allows setting their properties in the Properties pane.
Tip
Moving the Properties pane to the far right of the workspace in the Eclipse Java perspective makes it easier to browse and set properties when designing layouts.
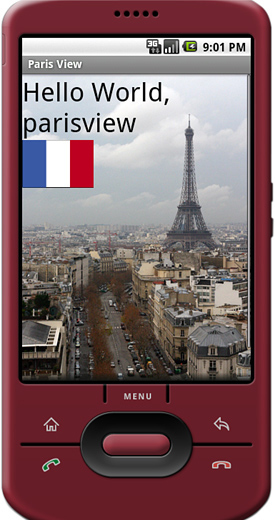
Now is a great time to get to know the layout resource designer. Create a new Android project called ParisView. The ParisView project is also available on the CD and book Web site. Navigate to the /res/layout/main.xml layout file and double-click it to open it in the resource editor. It’s quite simple by default, only a black (empty) rectangle and string of text.
Below in the Resource pane of the Eclipse perspective, you notice an Outline tab. This outline is the XML hierarchy of this layout file. By default, you see a LinearLayout. If you expand it, you see it contains one TextView widget.
Click on the TextView widget. You’ll see that the Properties pane of the Eclipse perspective now has all the properties available for that object. If you scroll down to the property called Text, you’ll see that it’s set to a string resource variable @string/hello.
Tip
You can also select specific layout widgets by clicking on them in the layout designer. The currently selected widget will be highlighted in red. We prefer to use the Outline view, so we can be sure we are clicking on what we expect.
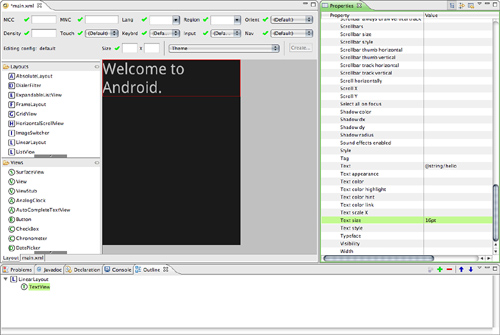
You can use the layout designer to set and preview layout widget properties. For example, you can modify the TextView property called Text Size by typing 18pt (a dimension, you recognize). You see the results of your change to the property immediately in the preview area, as shown in Figure 5.8.
Take a moment to switch to the main.xml tab. You notice that the properties you set are now in the XML. If you save and run your project in the emulator now, you see similar results to what you see in the designer preview.
Now go back to the Outline pane. You see a green plus and a red minus button. You can use these buttons to add and remove widgets to your layout file. For example, select the LinearLayout from the Outline view, and click the green button to add a control within that container object.
Choose the ImageView object. Now you have a new widget in your layout. You can’t actually see it yet because it is not yet fully defined.
Drag two PNG graphics files (or JPG) into your /res/drawable project directory, naming them flag.png and background.png. Now, browse the properties of your ImageView widget, and set the Src property by clicking on the resource browser button labeled [...]. You can browse all the Drawable resources in your project and select the flag resource you just added. You can also set this property manually by typing @drawable/flag.
Now, you see that the graphic shows up in your preview. While we’re at it, select the LinearLayout object and set its Background property to the background Drawable you added.
If you save the layout file and run the application in the emulator (see Figure 5.9) or on the phone, you see results much like you did in the resource designer preview pane.
Layouts, whether they are Button or ImageView widgets, are all derived from the View class. Here’s how you would retrieve a TextView object named TextView01:
TextView txt = (TextView)findViewById(R.id.TextView01);
You can also access the underlying XML of a layout resource much as you would any XML file. The following code retrieves the main.xml layout file for XML parsing:
XmlResourceParser myMainXml =
getResources().getLayout(R.layout.main);
Developers can also define custom layouts with unique attributes. We talk much more about layout files and designing Android user interfaces in Chapter 7, “Designing Android User Interfaces with Layouts.”
Android user interface designers can group layout element attributes together in styles. Layout widgets are all derived from the View base class, which has many useful attributes. Individual widgets, such as Checkbox, Button, and TextView, have specialized attributes associated with their behavior.
Styles are tagged with the <style> tag and should be stored in the /res/values/ directory. Style resources are defined in XML and compiled into the application binary at build time.
Tip
Styles cannot be previewed using the Android Eclipse Plug-In but are shown in the Emulator correctly.
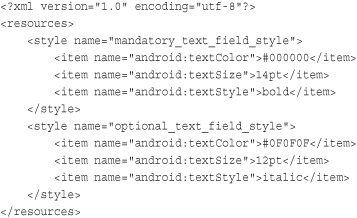
Here’s an example of a simple style resource file /res/values/styles.xml containing two styles, one for mandatory form fields and one for optional form fields on TextView and EditText objects:
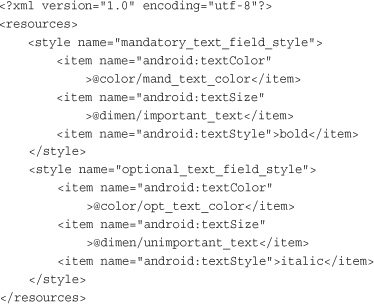
Many useful style attributes are colors and dimensions. It would be more appropriate to use references to resources. Here’s the styles.xml file again; this time the color and text size fields are available in the other resource files colors.xml and dimens.xml:
Now, if you can create a new layout with a couple of TextView and EditText text widgets, you can set each widget’s style attribute by referencing it as such:
style="@style/name_of_style"
Here we have a form layout called /res/layout/form.xml that does that:
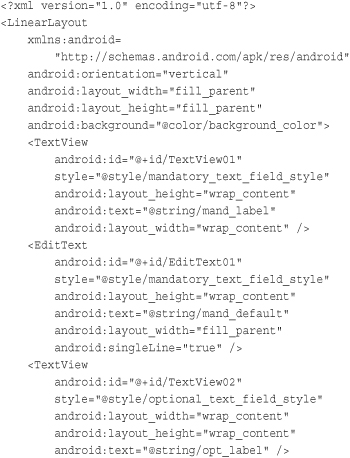
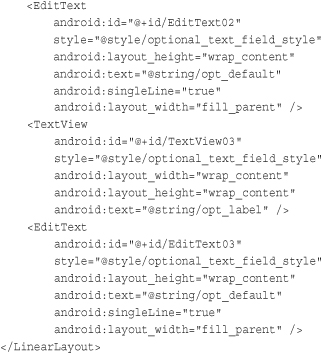
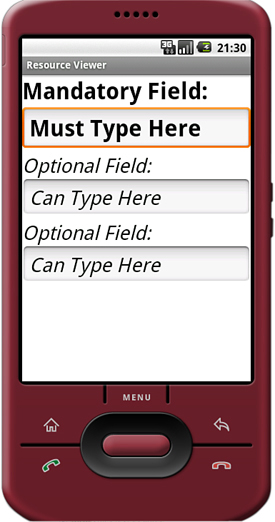
The resulting layout has three fields, each made up of one TextView for the label and one EditText where the user can input text. The mandatory style is applied to the mandatory label and text entry. The other two fields use the optional style. The resulting layout would look something like Figure 5.10.
We talk much more about styles in Chapter 7.
Styles are applied to specific layout widgets like TextView and Button objects. Usually, you want to supply the style resource id when you call the widget’s constructor. For example, the style named myAppIsStyling would be referred to as R.style.myAppIsStyling.
Themes are much like styles, but instead of being applied to one layout element at a time, they are applied to all elements of a given activity (which, generally speaking, means one screen).
Themes are defined in exactly the same way as styles. Themes use the <style> tag and should be stored in the /res/values directory. The only difference is that instead of applying that named style to a layout element, you define it as the Theme attribute of an activity in the AndroidManifest.xml file.
We talk much more about themes in Chapter 7.
You can access system resources in addition to your own resources. The android package contains all kinds of resources, which you can browse by looking in the android.R subclasses. Here you find system resources for
• Animation sequences for fading in and out
• Arrays of email/phone types (home, work, and such)
• Standard system colors
• Dimensions for application thumbnails and icons
• Many commonly used drawable and layout types
• Error strings and standard button text
• System styles and themes
You can reference system resources the same way you use your own; set the package name to android. For example, to set the background to the system color for darker gray, you set the appropriate background color attribute to @android:color/darker_gray You can access system resources much like you access your application’s resources. Instead of using your application resources, use the Android package’s resources under the android.R class.
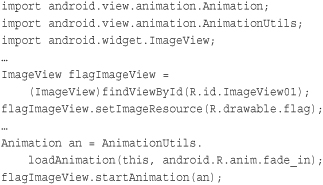
If we go back to our animation example, we could have used a system animation instead of defining our own. Here is the same animation example again, except it uses a system animation to fade in:
Resources can be further organized to be tailored to the specific language and regional settings of the device and screen state and input methods. Perhaps two of the most common cases developers need to be aware of are for internationalization and localization purposes and to design a single application that can run smoothly on different phone screens and screen orientations.
Warning
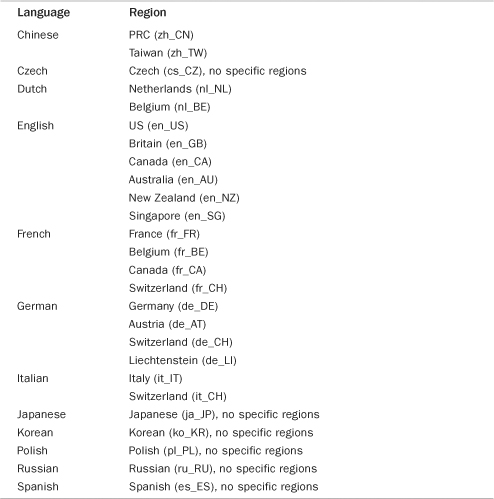
In Android 1.1, only English (with no specific regions) was supported, but many more languages and locales were added as part of the Android 1.5 system image. Some languages, such as English, French, and German are supported with regional differences (American versus British English) whereas others, such as Spanish, do not have regional support at the time of this writing but will hopefully be added soon.
The locale support provided in Android 1.5, broken down into languages and specific regions (where applicable), is shown in Table 5.6.
To change the locale setting on the emulator or the device (requires at least Android 1.5), you need to perform the following steps:
- Navigate to the Home screen.
- Press the Menu button.
- Choose the Settings option.
- Scroll down and choose the Locale & Text settings.
- Choose the Set Locale option.
- Select the locale you want to change the system to, for example, French (France).
Tip
You might want to memorize changing this setting because you need to navigate back to this screen in the foreign language to change it back.
After you change the locale setting on the Android system, all applications will use the most specific resources available for that locale. For example, if your application provides French language strings, the Android application framework will use those strings automatically as part of the application. If no specific localization resources are available, the default are used.
Tip
We included a simple example project called “MultiNational” on the CD to illustrate how you can organize application resources to provide functionality based upon device configurations. This project includes some support for English and French, including specific regional support for Great Britain. It also includes a fallback for any language or region not explicitly supported.
To organize application resources by these criteria, developers must create specific directory names so that the Android system can choose the most appropriate resources at runtime.
You can apply these directory name qualifiers to the resource subdirectories such as /res/values/ and /res/drawable/. Qualifiers are tacked on to the existing subdirectory name in a strict order, shown in descending order in Table 5.7. You must use a dash when combining multiple qualifiers. Qualifiers are always lowercase, and directories can only contain one qualifier of each type.
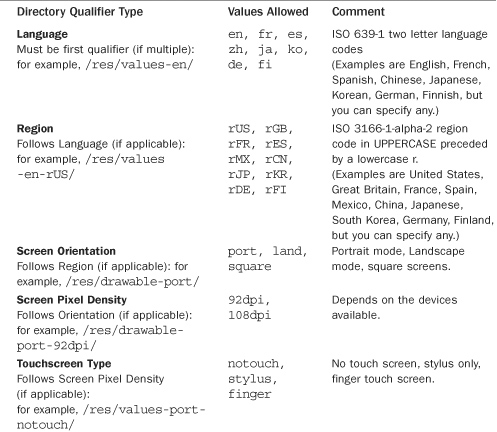

Tip
No custom qualifiers are allowed. You, for example, are not allowed to name a directory /res/values-en-rUS-port-finger-320x240-custom.
Good examples of directories:
/res/values-en-rUS-port-finger
/res/drawables-en-rUS-land-640x480
/res/values-en-qwerty
/res/values-en-rUS-rGB
/res/values-en-rUS-port-FINGER-320x240
/res/values-en-rUS-port-finger-320x240-custom
/res/drawables-rUS-en
The first bad example will not work because you can have only one qualifier of a given type, and this one violates that rule by including both rUS and rGB. The second bad example violates the rule that qualifiers (with the exception of the Region) are always lowercase. The third bad example includes a custom attribute defined by the developer, but these are not currently supported. The last bad example violates the order in which the qualifiers must be placed: Language first, then Region, and so on.
There is currently no way to request resources of a specific configuration programmatically. For example, the developer cannot programmatically request the French or English version of the string resource. Instead, the Android system determines the resource at runtime, and developers refer only to the general resource variable name.
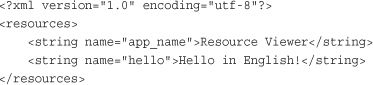
To make all this work, the developer must name individual resources by the same unique names in these directories. For example, in a “Hello, World” example, you might have two files called /res/values-en/strings.xml and /res/values-fr/strings.xml. In each file, you would define the same string with the same id.
The /res/values-en/strings.xml file would look like this:
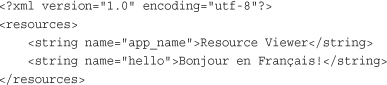
The /res/values-fr/strings.xml file would look like this:
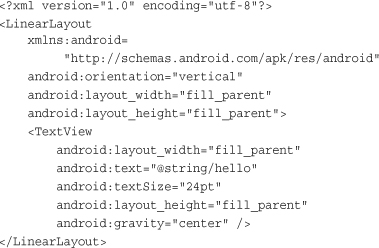
A shared layout file in the /res/layout/ directory that displays the string refers to the string by the variable name @string/hello, without regard to which language or directory the string resource is in. The Android device knows how to choose the appropriate version based on the operating system language setting. A layout showing the text string would look like this:
The string would be accessed programmatically like this:
String str = getString(R.string.hello);
Again, I’ve included a simple example project called “MultiNational” on the CD to illustrate how you can organize application resources to provide functionality based upon device configurations. This project doesn’t have a line of code. Instead, all its functionality is handled by the careful organization of String, Drawable, and Layout resources.
The “MultiNational” application does two things: It displays a background image and a string. The text displayed changes based on the device language (three settings: English, French, or Anything Else). The background image displayed changes based on the language and the screen orientation (Portrait or Landscape). Also, to illustrate that the Android system will take the most specific resources available for a given locale, we included British English strings to illustrate how the graphics would match at the /res/drawables-en/ whereas the strings are pulled from /res/values-en-rGB.
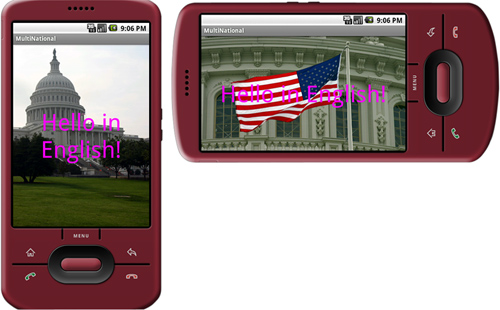
As of Android 1.5, the internationalization support in Android is almost fully functional. You can test your application in the emulator and on the device. The Portrait and Landscape screen orientation support works in the Eclipse Layout Resource Designer on the emulator (you can change between Portrait and Landscape mode on-the-fly in the emulator by pressing the 7 key on the numeric keypad) and on the T-Mobile G1. Figure 5.11 shows the “MultiNational” application running in the emulator in the default English language.
Figure 5.11. The MultiNational Application in Landscape and Portrait modes in the emulator (English).
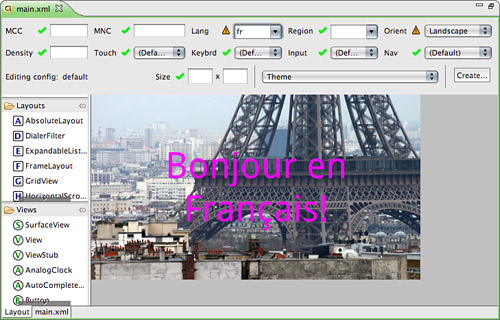
You can then navigate to the Locale settings and change to French, English (United Kingdom), and any other locale setting to see how different resources are loaded. You can also get some idea of whether your resources are set up properly within the Eclipse Layout Resource Designer (see Figure 5.12). Here, you can change the settings to see what your layout would look like using different device configurations. This allows developers to get a head start on internationalization at the layout design stage, even before the application is ready for testing.
Choose your directory naming scheme carefully. Consider having a default configuration, which you don’t set specifically, to provide a catch-all for assets, so they are always defined, regardless of the hardware configuration. Then add specific tailored resources, which overlay your defaults.
For example, if your T-Mobile G1 application generally requires the keyboard, you might design your application user interface in Landscape mode and store those assets in the default directories (for example, /res/drawable/). However, you might include some nondefault portrait mode resources for your application in more specific subset directory (/res/drawable-port).
Another method might be to keep your default language (for example, English) in the /res/values/strings.xml file, but as you add languages, create the appropriate string files for those languages. This means that your application will run on any nonspecified platform in English but also in target platforms you have specifically made string resources for in the local language, such as French or Korean.
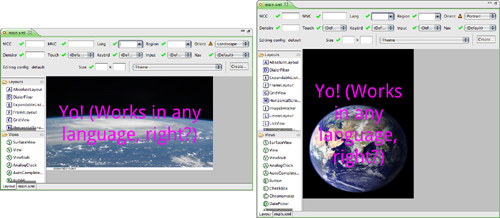
Notice in the “MultiNational” project that we included a set of resources without language settings (the Earth backgrounds and the “Yo!” string, as shown in Figure 5.13). These are generic. These resources are used if the language setting is not set to English (en) or French (fr). Ideally, your application would also support square screen orientations but because we don’t have a phone yet that has this screen type, we left it out of the example.
Android applications rely on various types of resources, including strings, string arrays, colors, dimensions, drawable objects, graphics, animation sequences, layouts, styles, and themes. Resources can also be raw files. Many of these resources are defined with XML and organized into specially named project directories.
Resources are compiled and accessed using the R.java class file, which is automatically generated when the application resources are compiled. Developers access application and system resources programmatically using this special class.
In the next few chapters, you learn more about user interface design, creating layouts programmatically and using XML layout files, and more about all the user interface widgets available as part of the Android SDK. In Chapter 6, we dive further into the user interface components available in the Android SDK, specifically the various interactive widgets that can be used within these layouts—controls such as Button, Spinner, and DatePicker objects. Chapter 7 covers how to lay widgets out on the screen in various ways to organize user interface displays.
ISO 639-1 Languages: www.loc.gov/standards/iso639-2/php/code_list.php
ISO 3166-1-alpha-2 Regions: www.iso.org/iso/country_codes/iso_3166_code_lists/