
9. Tips and Troubleshooting
The iPod touch is a dream of intuitive design and ease of use. Yet nothing in this world (save you, dear reader, and me) is completely foolproof or infallible, which is why this chapter is necessary.
Within these pages, I offer ways to get things done more expeditiously, provide hints for operating the iPod touch in ways that may not seem obvious, and (of course) tell you what to do when your iPod does the Bad Thing and stops behaving as it should.
Getting Tipsy
I’ve sprinkled tips and hints throughout the book, but I saved a few good ones for this chapter. In the following sections, I show you how to control text, manage the battery, and sync your iPod efficiently.
The word on text
If one iPod touch feature frustrates the greatest number of people from the get-go, it’s text entry. These tips will help make you a better iPod typist.
Keep going
Typing on the iPod’s keyboard isn’t like typing on your computer keyboard, a process in which you type, make a mistake, backspace to correct the mistake, and continue typing. Use that technique on the iPod, and you’ll go nuts making the constant corrections.
Typing the first letter correctly is important, as mistyping that first letter is likely to send the iPod’s predictive powers in the wrong direction. But after that, get as close as you can to the correct letters and continue typing even if you make a mistake. More often than not, the iPod’s predictive typing will correct the mistake for you (Figure 9.1). To take the suggestion, tap the spacebar; the iPod will fill in the (ideally) correct word.
Figure 9.1 More often than not, the iPod knows what you meant to type.
![]()
Sure, you may need to go back and correct a word or two in a couple of sentences by pressing and holding the display to bring up the magnifying-glass icon, but doing this for two mistakes is far more efficient than retyping half a dozen words.
Move to the correct letter
You need to type as carefully as possible in one specific instance: when you’re entering a password. As I mention elsewhere, for security reasons the iPod very briefly displays the last letter you typed in a password field before turning that letter into a black dot. This brevity makes it nigh-on impossible to correct your work, because you can’t see where you’ve made a mistake.
For this reason, when you’re entering passwords (or just typing carefully), tap a character and wait for the letter to pop up on the display. If you’ve hit the wrong character, keep your finger on the display and move it to the correct character. Only when you release your finger will the iPod accept the character.
Adjust the dictionary
Irked because the iPod invariably suggests candle when you intended to type dandle (Figure 9.2)? You have the power to modify the iPod’s built-in dictionary. If you type d-a-n-d-l-e, but the iPod displays candle, simply tap the candle suggestion, and it disappears. Then finish typing.
Figure 9.2 Correct the dictionary by tapping incorrect suggestions.

When you next get a good way into typing dandle, the iPod will propose it as the word to use. When it does, just tap the spacebar to autocomplete the word. The iPod’s not stupid, so it won’t suggest dandle when you next type candle, but it may not autocomplete candle that first time. In subsequent entries, however, it probably will.
Avoid unnecessary capitalizations and contractions
The iPod tries to make as much sense as possible from your typing. When it’s willing to, let it carry the load. You probably won’t type the letter i all by itself unless you mean I, for example. The iPod knows this and will make a lone i a capital I. Similarly, type ill, and even if you’re trying to say that you’re not feeling well, the iPod will suggest I’ll. Conversely, if you’re feeling fine, the iPod allows you to type well without suggesting we’ll. Knowing that both its and it’s are common, the iPod will never suggest the contraction.
Rule of thumb: When a word that can also be spelled as a contraction is tossed at the iPod, it will suggest the more commonly used word (Figure 9.3).
Figure 9.3 You can often skip the apostrophes when typing on the iPod.

Space out your periods
No, I don’t mean place spaces between them. I mean when you reach the end of a sentence, don’t bother going to the .?123 keyboard to enter a period. Just tap the Space key twice in succession. The iPod will end the last word you typed with a period, insert a space, and configure the Shift key so that the next letter you type will be capitalized. Now you’re ready to type the next sentence.
![]() You can turn off this double-tap Space-key behavior by switching the setting off in the Keyboard portion of the General setting.
You can turn off this double-tap Space-key behavior by switching the setting off in the Keyboard portion of the General setting.
Use Pogue’s punctuation tip
The New York Times’ technology columnist, David Pogue, revealed this tip scant days after the first version of the iPhone was released (it works on the iPod touch too), and in doing so, he proclaimed that other technology writers would use it in a heartbeat because it’s so good.
Darn tootin’, say I. It goes like this:
You may find it distracting to have to tap in and tap out of the iPod’s number/punctuation screen whenever you want to add a stray comma or type 9 rather than nine. This dance isn’t necessary. Just tap and hold the .?123 key in the bottom-left corner of the keyboard. While holding down your finger, drag to the punctuation symbol or number you want to type. When that item is selected, let go. The keyboard will return to the alphabetical keyboard.
Power management
Wonderful as it is to have an iPod that can play full-length movies, you do not want to board a cross-country flight, enjoy the latest Harry Potter flick on your iPod, jump off the plane with the expectation of sending an “I arrived safely” email message to hearth and home, and be greeted with a dead battery. Power can be paramount in such situations. To help ensure that your battery will still have something to offer, try these tips.
Treat it right
Your iPod’s battery performs its best in these conditions:
• It’s warm. Lithium-ion batteries perform best when they’re run at around room temperature. If they get cold—below 24°F—they don’t hold a charge as long.
• But not too warm. Running a cool iPod won’t damage the battery, but storing it somewhere that’s really hot—say, your car’s glove compartment when it’s 95°F outside—can. Also, the iPod gets warm when you charge it and extra-warm when you charge it in a case. Therefore, don’t leave your iPod in a hot place, and remove it from a case before charging.
Lock it
The iPod isn’t supposed to do anything unless you touch its display or press its Home button, but you might accidentally do one thing or the other if the iPod is rattling around loose in your pocket or pocketbook. Rather than project all 216 minutes of Lawrence of Arabia to the inside of your pants pocket, quickly press the Sleep/Wake button to lock your iPod.
Turn off Sound Check and EQ
The iPod features Sound Check and EQ (equalizer) require more processing power from your iPod, in turn pulling more power from your battery. If you’ve applied EQ settings in iTunes to the tracks that will play on your iPod, you must set the iPod’s EQ setting to Flat, which essentially tells the iPod to ignore any EQ settings imposed by iTunes. To make EQ Flat, choose Settings > iPod > EQ, and tap Flat in the EQ screen.
Turn off Wi-Fi
Turning off Wi-Fi can help you get more life from your iPod charge. To turn off Wi-Fi, go to the Settings screen, tap Wi-Fi, and flip the toggle switch to Off.
Turn off Bluetooth
Yes, Bluetooth can stress a battery too. Turn it off by going to the General setting, tapping Bluetooth, and flicking the switch in the resulting Bluetooth screen to Off.
Turn off Location Services
This option is another one that can drain a battery as the iPod looks around every so often to see where it is. You can turn Location Services off in the General setting.
Fetch mail less often
Push mail and accounts configured to fetch messages automatically every 15 minutes will tax your battery’s charge. If you don’t need your mail Right Now, turn push mail off and configure mail fetching so that it’s done manually (when you launch the Mail application). You do this in the Fetch New Data screen within the Mail, Contacts, Calendars setting.
Plug it in
If you’re accustomed to the way that click-wheel iPods work, you may be under the impression that when you jack your iPod touch into your computer’s USB port, you can’t use it. Wrong. When it’s plugged into its power supply, your computer, or an accessory device that supplies power, the iPod is completely usable. There’s no need to unmount it to watch movies, surf the Net, or get email; everything works.
Sync different
Ask Apple about syncing your iPod touch, and the answer you get is simple: one iPod touch, one computer. But that answer’s not entirely correct. To avoid that sinking feeling, keep these syncing tips in mind.
Sync to multiple computers
When you plug your iPod touch into your computer, select it in iTunes’ Source list, and click the Summary tab, you’ll see (under Options) that you can Manually Manage Music and Videos. On click-wheel iPods and the iPod shuffle, enabling this option means that on any computer to which the iPod is connected, you can add music to the iPod by dragging it from the iTunes Library to the iPod’s icon in the Source list.
This isn’t the case with the iPod touch. You can use this technique on only one computer: the computer that the iPod is synced with. Try it on a different computer, and you’ll be told that the iPod can be synced with only one iTunes Library. To add music from the currently connected computer, you must erase all the media from the iPod.
Although the iPod touch lacks a click-wheel iPod’s manual-syncing option, you can sync your iPod touch with different computers—to a point. The trick is that in nearly all cases, each computer will sync a different kind of media. You can sync music and videos from Computer A, photos from Computer B, podcasts from Computer C, and contacts and calendars from all three.
For this technique to work, you must enable the sync option in iTunes for just the media you intend to sync from a particular computer. So on Computer A, enable just the Sync Music, Sync TV Shows, and Sync Movies options. On Computer B, uncheck these options but check Sync Photos. Disable all these sync options on Computer C but enable the sync option for podcasts.
Sync from multiple computers to one iPod
You can add contact, calendar, mail-account, and bookmark data from all these computers to a single iPod. To do so, follow these steps:
1. Click the Info tab in iTunes’ iPod Preferences window, and enable the sync options you want (Sync Address Book Contacts and Sync iCal Calendars, for example).
2. In the Advanced area at the bottom of this window, where you see Replace Information on This iPod, do not enable the options for contacts and calendars.
3. Click Apply.
A dialog box will appear, asking whether you’d like to replace the information on your iPod with the information on the currently connected computer or to merge the data on this computer with the data that’s currently on the iPod.
4. Click Merge.
The chosen information on the computer will be merged with the existing information on the iPod.
iPod gone missing
The iPod is small enough and out of your pocket enough that it’s easy to misplace. Whether it slipped behind a couch cushion or you left it in the back of a cab, you’d like to know where it is. The Find My iPod feature lets you do just that.
To use Find My iPod, you must have a MobileMe account, which costs $100 a year. Also, before you can use this feature, you must switch it on (meaning that you have to do this before you lose your iPod). Just follow these steps:
1. Choose Settings > Mail, Contacts, Calendars, and tap your MobileMe account.
I tell you how to set up a MobileMe account in Chapter 2, in case you haven’t done this yet.
2. Enable Find My iPod by flicking the On/Off switch to On.
3. Open your computer’s Web browser, and travel to http://me.com, which is MobileMe’s log-in page.
4. Log into MobileMe by entering your user name and password.
5. Click the Find My iPhone button (the second button from the right, bearing a radar icon), and verify your password.
![]() Yes, even though you’re tracking your iPod touch, this feature first appeared on the iPhone, so it bears the name Find My iPhone.
Yes, even though you’re tracking your iPod touch, this feature first appeared on the iPhone, so it bears the name Find My iPhone.
6. On the next page, enter your MobileMe password again.
7. Locate your iPod.
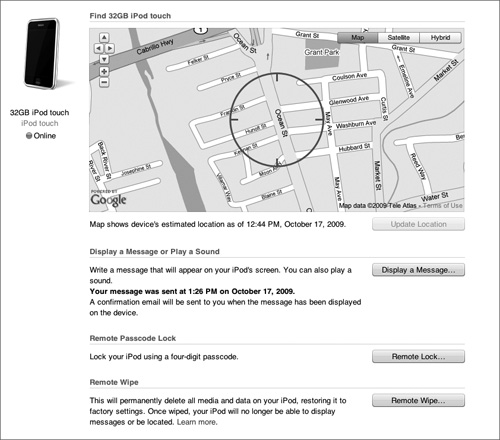
In the page that appears, you’ll see a world map with the words Trying to Locate . . . on top of it. If your iPod is switched on and near a Wi-Fi network that broadcasts location information, and if the Find My iPod option is enabled on the iPod, you should soon see a map with a blue circle imposed on it. This circle indicates the iPod’s location (Figure 9.4).
Figure 9.4 Find My iPod has found my iPod.
![]() Again, if the iPod’s not switched on and within range of a Wi-Fi network that provides location information, Find My iPod won’t work; your iPod won’t be located.
Again, if the iPod’s not switched on and within range of a Wi-Fi network that provides location information, Find My iPod won’t work; your iPod won’t be located.
8. Communicate with the iPod.
Click the Display a Message button, and a window appears where you can type as many as 160 characters. If you know that you’ve left your iPod in a place where someone may find it—a restaurant or a doctor’s office, for example—type something polite in this field, such as Please return my iPod by calling 555-555-1212. Thank you.
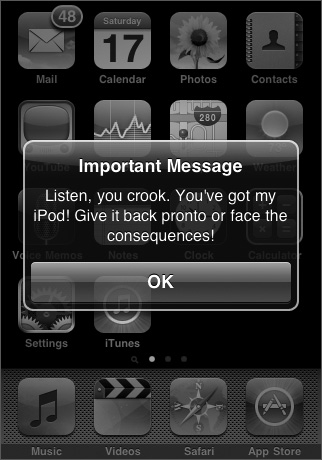
To help get the finder’s attention when communicating with a 2G iPod touch (this feature isn’t available on a 1G iPod touch), enable the Play a Sound for 2 Minutes with This Message option in this window. The message appears on the iPod’s display with an OK button below that dismisses the window (Figure 9.5).
Figure 9.5 Let the iPod’s finder know that you’re on his trail.
![]() The Play a Sound for 2 Minutes with This Message option is perfect for those times when you know that your 2G iPod touch is in your house somewhere, but you can’t find it.
The Play a Sound for 2 Minutes with This Message option is perfect for those times when you know that your 2G iPod touch is in your house somewhere, but you can’t find it.
9. Lock your iPod.
If you think there’s some possibility that you’ll get your iPod touch back, click the Remote Lock button and enter a four-digit passcode. This prevents the person who has the iPod from accessing its data. Later, when it’s back in your possession, you can unlock it with this passcode.
10. If all else fails, wipe the iPod.
If you’re certain that the iPod is lost or in the wrong hands, you should wipe its data. To do that, click the Remote Wipe button in the Find My iPhone screen (refer to Figure 9.4). This feature permanently deletes all the media and data on the iPod.
![]() If you wipe the iPod remotely and later recover it, you can always restore its data and media by plugging it into your computer. Remember, iTunes keeps a backup when you sync.
If you wipe the iPod remotely and later recover it, you can always restore its data and media by plugging it into your computer. Remember, iTunes keeps a backup when you sync.
Troubleshooting
The iPod touch may be an engineering marvel, but even engineering marvels get moody from time to time, and when your iPod misbehaves, you’re bound to be in a hurry to put things right. Allow me to lend a hand by suggesting the following troubleshooting techniques.
The basics
If your iPod acts up in a general way—won’t turn on, won’t appear in iTunes, or quits and locks up—try these techniques.
No iPod startup
Is your iPod just sitting there, with its cold black screen mocking you? Try charging it with an optional charger (perhaps you have one for an older iPod) rather than a USB 2.0 port. If you get no response after about 10 minutes, try another electrical outlet. Still nothing? Try a different iPod cable.
Still no go, even though you’ve had that iPod for a long time and use it constantly? The battery may be dead (but this shouldn’t happen in your first year of ownership, regardless of how much you use the iPod).
No iPod in iTunes
If your iPod doesn’t appear in iTunes when you connect it to your computer, try these steps:
1. Make sure that your iPod is charged.
If the battery is completely dead, it may need about 10 minutes of charging before it can be roused enough to make an iTunes appearance.
2. Be sure that the iPod is plugged into a USB 2.0 port.
Your computer won’t recognize the iPod when it’s attached to a USB 1.0 port or a FireWire port.
3. Plug your iPod into a different USB 2.0 port.
4. Unplug the iPod, turn it off and then on, and plug it back in.
5. Throw the iPod into DFU mode (described in the sidebar “The Four Rs”).
6. Use a different iPod cable, if you have one.
7. Restart your computer, and try again.
8. Reinstall iTunes.
Unresponsive (and uncooperative) applications
Just like the programs running on your computer, your iPod’s applications—both those from Apple and third-party applications that you obtain from the App Store—can act up, freezing or quitting unexpectedly. You can try a few things to nudge your iPod into action. If the first step doesn’t work, march to the next.
1. Resign from the application.
If an application refuses to do anything, it’s likely frozen. The only way to thaw it is to force it to quit. Press and hold the Home button until you return to the Home screen.
2. Restart your iPod.
Some applications misbehave until you shut down the iPod and then restart it.
3. Clear Safari’s cache.
If you find that Safari quits suddenly, something in its cache may be corrupted, and clearing the cache may solve the problem. To do so, tap Settings in the Home screen; then tap Safari; and in the Safari Settings screen, tap Clear Cache.
4. Reset the iPod by holding down the Home and Sleep/Wake buttons until you see the Apple logo.
5. Delete and reinstall troublesome third-party applications.
If a third-party application quits time and again, tap and hold it until it and the other icons start wiggling. Tap the X in the application icon’s top-left corner to remove it from the iPod. Go to the App Store, locate the application, and download it again. Apple keeps a record of your application purchases, so don’t worry; you won’t have to pay for it again.
6. On the iPod, go to the General setting; tap Reset; and then tap Reset All Settings.
This step resets the iPod’s preferences but doesn’t delete any of your data or media.
7. In that same Reset screen, tap Erase All Content and Settings (Figure 9.6).
Figure 9.6 Erasing all the content and settings from your iPod is the next-to-last resort.
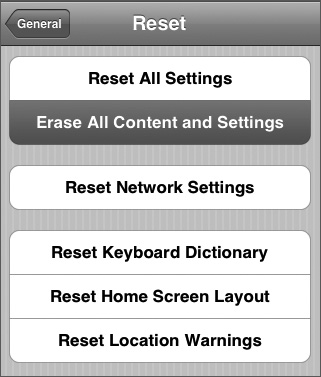
![]() This step vaporizes not only the iPod’s preferences, but its media content as well. Before doing this, try to sync your iPod so that you can save any events, contacts, bookmarks, and photos you’ve created, as well as the third-party applications.
This step vaporizes not only the iPod’s preferences, but its media content as well. Before doing this, try to sync your iPod so that you can save any events, contacts, bookmarks, and photos you’ve created, as well as the third-party applications.
![]() You want to try to back up third-party applications in particular because all the data for those applications is stored within the applications themselves. If you’re unable to back up these applications and then lose them because you erased them, any data files you created with them are lost as well.
You want to try to back up third-party applications in particular because all the data for those applications is stored within the applications themselves. If you’re unable to back up these applications and then lose them because you erased them, any data files you created with them are lost as well.
As I suggest in the sidebar “The Four Rs,” try restoring from your most recent backup first. If the problem persists, something in the backup may be corrupted.
9. Restore yet again, but choose not to restore from a backup; instead, start as though you’re configuring a new iPod.
iTunes will install everything afresh, which means that you’ll have to resync your data.
Mail issues
Are your attachments not opening? Is the iPod refusing to send your mail? Are you getting far too many offers for questionable nostrums and shady real estate deals? Read on for solutions.
Can’t read attachments
You can read certain kinds of documents that arrive as attachments in email messages—specifically, Microsoft Word, Microsoft Excel, PDF, JPEG, and text files. But Word, Excel, PowerPoint, iWork, and PDF files won’t open unless they carry the proper extensions: .doc or .docx; .xls or .xlxs; .ppt or .pptx; .key, .numbers, and .pages; and .pdf, respectively. Also, if the message body is formatted in rich text format (RTF) and includes an attachment, you won’t be able to read the attachment. Try forwarding the message to yourself. This method should convert the rich text to plain text and allow you to view the attachment.
Can’t send mail
If you can’t send mail because your ISP prohibits you from relaying (sending mail through another ISP), as it may when you’re connected to a Wi-Fi network other than your own, add a free Gmail (http://mail.google.com), Yahoo (http://mail.yahoo.com), or AOL (http://mail.aol.com) account, and send mail via its server. These services are rarely blocked.
Can’t cope with spam overload
The iPod’s Mail program offers no spam filtering. If your computer’s email client removes the bulk of the spam you receive, you’ll be shocked when you download your first batch of mail on the iPod, because it’s likely to be choked with spam.
If your ISP can’t impose some kind of filtering on your email so that the spam doesn’t reach you in the first place, sign up for a free Gmail account, and switch to it for email that you intend to receive on your iPod. Gmail has great spam filtering, so you’ll get just the mail you want without the excess junk. (You can also configure Gmail to forward mail from other accounts through your Gmail account and remove the spam in the process.)