
2. Setup, Settings, and Sync
As much fun as it is to fondle your new iPod touch (and smudge its shiny silver back in the process), it’s time to stop admiring the sheer awesomeness of its design and start doing practical things with it. In this chapter, you do just that.
Setting up the iPod touch
You begin by establishing a relationship between the iPod and iTunes to make the iPod comfortable with your media, email accounts, and personal information.
Get iTunes
iTunes is, in nearly all instances, the conduit for passing information between your computer and the iPod touch. Without it, your iPod will be a pretty limited hunk of technology. Therefore, if you don’t have a copy of iTunes 9 or later, now’s the time to make a beeline for www.apple.com/itunes/download. (iTunes 9 is the most current version as I write these words, and Apple doesn’t include a copy of iTunes in the box.)
iTunes is available in both Macintosh and Windows versions. For the iPod to work with your Mac, you must be running Mac OS X 10.4.11 or later, and your Mac should have a 500 MHz G3 processor or better. PC users must be running Windows XP (with Service Pack 2), Vista, or Windows 7 on a 500 MHz Pentium processor or better.
Plug in the iPod
Plug the included USB cable into a free USB 2.0 port on your Mac or PC. Then plug the data-connector end of the cable into the bottom of the iPod. When you do, iTunes should launch automatically and display the Set Up Your iPod screen. (You may also see a friendly offer to search your iTunes Library for songs that can be turned into ringtones. Feel free to ignore it for now.)
What initially appears on the setup screen with regard to the iPod depends on whether you’ve previously jacked an iPod touch or iPhone into your computer. If not, you see a Name field containing something like Joe Blow’s iPod touch and, below that, options titled Automatically Sync Songs and Videos to My iPod (enabled by default), Automatically Add Photos to This iPod, and Automatically Sync Applications.
If you’ve plugged an iPod touch or iPhone into this computer before—if this iPod is an additional iPod touch or you also own an iPhone—you’ll be offered the opportunity to set up your iPod as a new device or restore it from a backup of your previous iPod (Figure 2.1).
Figure 2.1 Setting up the iPod touch.
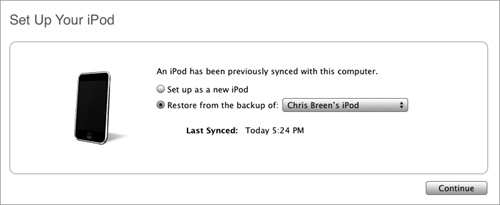
To restore your iPod with this old information, simply select the Restore from the Backup of … radio button, click the pop-up menu to the right, choose the backup you’d like to restore from (the Last Synced entry below the menu tells you the age of this backup), and then click Continue. The iPod displays Restore in Progress while iTunes restores it with the data from the backup you selected.
If you’d rather tell iTunes exactly which music and videos to sync, you can do this later and in a more specific fashion. Simply clear the Automatically Sync Songs and Videos to My iPod check box in this window and then click Done.
Your iPod touch and iTunes have engaged in the equivalent of a warm handshake. I delve into the more intimate details of their relationship later in this chapter. But first, it’s important that you become familiar with the iPod touch’s settings so that you can use them to your advantage when you deal with iTunes.
Configuring the Settings
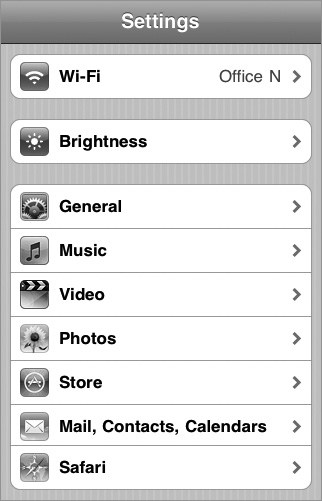
As its name implies, the Settings screen is where you control much of the iPod touch’s behavior (Figure 2.2). Here’s what you’ll see within each setting.
Figure 2.2 Setting up the iPod touch.
Wi-Fi
The iPod touch supports 802.11 wireless networking. In the Wi-Fi Networks screen that appears when you tap Wi-Fi in the Settings screen, you can turn Wi-Fi on or off. Turning it off saves some battery power.
Below this is the Choose a Network area. Any visible Wi-Fi networks within range appear in a list below; those that have a lock icon next to them are password-protected. To access a password-protected network, simply tap its name, enter the password with the keyboard that appears, and tap Join.
To see detailed network information, tap the blue symbol to the right of the network’s name. A new screen appears, listing such information as IP Address, Subnet Mask, Router, DNS, Search Domains, and Client ID. At the bottom of one of these screens, you see an HTTP Proxy area with the choices Off, Manual, and Auto. An IT or ISP representative will tell you whether you need to muck with these settings.
Finally, the bottom of the Wi-Fi Networks screen includes the Ask to Join Networks option. Leave this option set on (as it is by default), and your iPod will join known networks automatically and ask to join a network if no known network is available. If you switch the option off, you’ll have to join networks manually without being asked. To do so, tap Other; then, using the keyboard that appears, enter the name of the network and password (if required).
Brightness
By default, the iPod’s display brightness is adjusted automatically, based on the light it senses around it. When you’re outdoors on a sunny day, for example, the screen brightens; when you’re inside a dark room, the display dims. If you’d like to override the automatic brightness settings—when you want to save battery power by making the display dimmer than the iPod thinks necessary, for example—you do so in this screen. Turn autobrightness off and drag the slider to adjust brightness up or down.
General
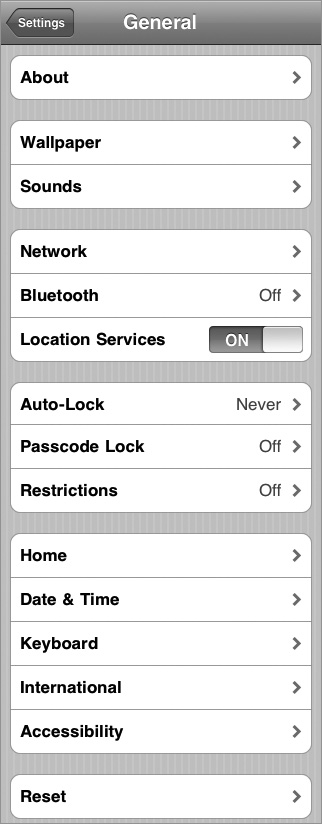
The General settings are … well, pretty general. The grouping consists of a hodgepodge of miscellaneous controls (Figure 2.3 on the following page).
About
This screen provides your iPod’s vital statistics: the number of audio tracks, videos, photos, and applications on the iPod; total capacity; how much storage space remains; software version; serial and model numbers; Wi-Fi and Bluetooth addresses; and a Legal command that, when tapped, leads to a seemingly endless screen of legal mumbo jumbo.
Figure 2.3 An elongated view of the General screen.
Wallpaper
On the iPod, wallpaper refers to an image you choose, which appears when you unlock the device. To set and adjust your wallpaper picture, tap the Wallpaper control and then navigate to an image file in the collection provided by Apple, an image you’ve taken using the iPod’s screen-shot shortcut (click and hold the Home button, and briefly press the Sleep/Wake button), or an image you’ve synced to your iPod via iTunes’ Photos tab. Just tap the image, and the iPod touch shows you a preview of it as wallpaper (Figure 2.4).
Figure 2.4 Creating a wallpaper image.

Sounds
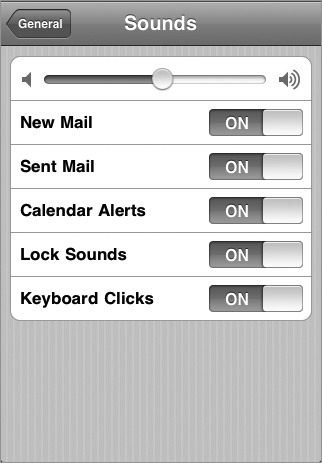
In the Sounds screen (Figure 2.5), you can turn alerts on for these events: New Mail, Sent Mail, Calendar Alerts, Lock Sounds, and Keyboard Clicks. Each event has a On/Off toggle switch next to it; you use this switch to make your audio choice. By default, all sounds are switched on. You can use the volume slider at the top of this screen to adjust the volume of the alert sounds. (You can also use the iPod’s Volume toggle switch to adjust this slider up or down.)
Figure 2.5 The iPod touch’s Sounds setting screen.
Network
The Network setting includes options for configuring VPN (virtual private networks) and Wi-Fi.
A VPN is an encrypted network protocol, used by many companies, that allows authorized outsiders to join the company network regardless of their locations. When you choose VPN, you’re shown the VPN window, which includes a switch for turning VPN on or off; the Choose a Configuration area, which includes any VPN networks you’ve created; and an Add VPN Configuration button that you tap to view an Add Configuration screen with a list of fields to fill in, including Server, Account, and Password. You can also choose among L2TP, PPTP, and IPSec networks.
![]() Configuring a VPN is beyond the mission of this small book. The IT department at your company will be able to tell you how to configure VPN on your iPod touch.
Configuring a VPN is beyond the mission of this small book. The IT department at your company will be able to tell you how to configure VPN on your iPod touch.
When you tap the Wi-Fi entry in the Network screen, you’re taken to the Wi-Fi Networks screen, which I’ve already discussed.
Bluetooth
This setting is a simple on/off option. When you turn it on, the iPod becomes discoverable and searches for other Bluetooth devices. Turning Bluetooth off can save power. Any Bluetooth devices you’ve paired your iPod with are listed in the Devices area.
![]() The iPod touch 3.0 software provided improved Bluetooth support. Now you can use Bluetooth stereo headphones with the iPod touch, for example. You still can’t do several other desirable things, however, such as use a Bluetooth keyboard with your iPod, copy files between the iPod and your computer over a Bluetooth connection, or wirelessly sync your iPod over Bluetooth.
The iPod touch 3.0 software provided improved Bluetooth support. Now you can use Bluetooth stereo headphones with the iPod touch, for example. You still can’t do several other desirable things, however, such as use a Bluetooth keyboard with your iPod, copy files between the iPod and your computer over a Bluetooth connection, or wirelessly sync your iPod over Bluetooth.
Location Services
The iPod is one smart media player. Unlike other such devices, it often knows its location when it’s within range of a Wi-Fi network—even if it’s not connected to that network. It performs this trick via Wi-Fi location. It works this way:
Some Wi-Fi routers know their geographic coordinates. Those that do will broadcast this information to your iPod touch. Using this information, the iPod can often make a pretty good guess about where it is in relation to those routers based on the strength of their signals. This feature is slick, but it can eat up the iPod touch’s battery charge. When you want to conserve power, switch this option off.
Auto-Lock
The iPod equivalent of a keypad lock, Auto-Lock tells the touchscreen to ignore taps after a customizable period of inactivity. Use these controls to specify that interval: 1, 2, 3, 4, or 5 Minutes, or Never. To make the iPod pay attention again after it autolocks, click the Home button.
When the iPod is locked, you can still use the iPod’s Volume switch to change the volume while listening to music or placing calls. The button on the headset’s mic works when the iPod is locked, too.
Passcode Lock
You’d hate to lose your iPod. Worse, you’d hate to lose your iPod and have some ne’er-do-well dig through it for your email, contacts, and schedule. If you fear that your iPod could fall into the wrong hands (and yes, that may just mean your surly teenage daughter), create a passcode. To do so, tap Passcode Lock; then enter and re-enter a four-digit password with the numeric keypad (Figure 2.6).
Figure 2.6 Entering a passcode.
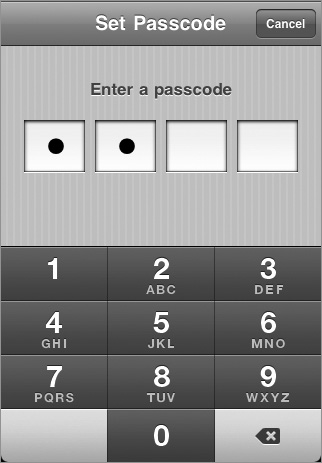
The next screen offers the option to turn the passcode off (useful if you decide that you no longer require a passcode), change it (for … well, you know), and a Require Passcode area that offers the options Immediately; After 1, 5, or 15 Minutes; and After 1 or 4 Hours. At the very bottom of the screen is an Erase Data On/Off option. If someone fails to enter the correct passcode after 10 attempts, the iPod’s data will be erased.
Restrictions
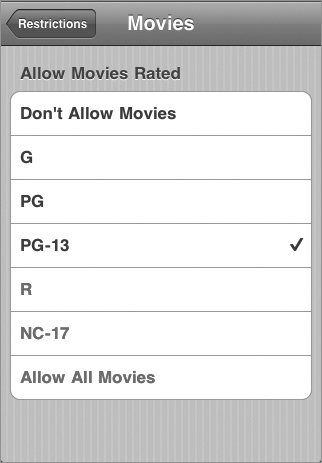
With the iPod touch 2.0 software came a form of parental controls called restrictions. The 3.0 software gave you finer control of the kind of content you get from the iTunes and App stores. Tap Restrictions, and in the top part of the screen labeled Allow, you see options for shutting off Safari, YouTube, iTunes, Installing Apps, and Location. In the Allowed Content area, you can switch off in-application purchases (add-on levels for games, for example), choose ratings for specific countries (Australia, Canada, France, Germany, Ireland, Japan, New Zealand, the United Kingdom, and the United States), disallow playing explicit music and podcasts, select allowed movies by rating (G, PG, PG-13, R, and NC-17), select allowed TV shows (TV-Y, TV-Y7, TV-G, TV-PG, TV-14, and TV-MA), and allow apps by age ratings (4+, 9+, 12+, and 17+). By default, restrictions are turned off, meaning that everything is allowed.
To impose restrictions, first tap Enable Restrictions at the top of the screen. You’ll be asked to enter and confirm a four-digit password. When you do, you’re allowed to use On/Off switches for functions in the Allow section and for the In-App Purchases option. In the Allowed Content area, you tap one of the entries and then tap the ratings restriction you want to impose (Figure 2.7). When you’re ready to free all the iPod’s functions, tap Disable Restrictions. You’ll be asked to enter the restrictions password. When you do, all functionality is restored.
Figure 2.7 Imposing movie restrictions.
Home
The Home button on the iPod’s face can do more than just transport you to the Home screen. In this setting, you determine what happens when you give the Home button two rapid clicks. Options are Home, Search, and iPod.
Below is an iPod Controls switch. When this switch is on, and you’re playing music, double-clicking the Home button shows the iPod play-controls overlay, regardless of how you’ve set the double-click function.
When you’re looking at the very first Home page and click the Home button, you move one screen to the left to the Spotlight search screen. See the nearby “Search” sidebar for more information on this feature.
With the iPod touch 3.0 software came ways to search your iPod. The obvious way to search is to visit the first page of the Home screen and swipe your finger to the right to produce the Search screen. (You can also click the Home button once while you’re on the first page of the Home screen to produce the Search screen.)
The power of search goes beyond this screen, however; it’s spread throughout the iPod touch applications. When you launch the Contacts application, for example, you’ll find a Search field at the top of the screen. This same kind of Search field appears in other applications, including Mail, Notes, and Music. In these applications, however, the Search field doesn’t appear by default. To produce it, just flick your finger down the screen. The Search field bounces down into view.
You can configure the kind of results you get from the main Search screen by tapping the Search Results entry at the bottom of the Home setting screen (in the General setting). Here, you see a list of items you can search for on your iPod touch (Figure 2.8). Search results appear in this order, but you can change that order by dragging items up or down in the list by using the drag handles on the right side of the screen.
Figure 2.8 Configuring the iPod touch’s Search filters.
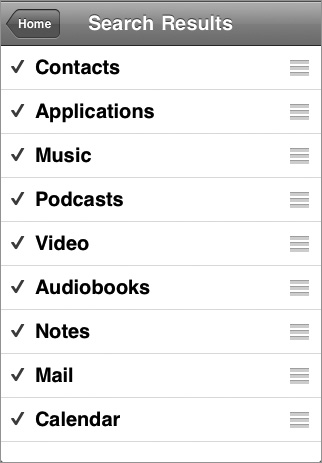
By default, all these options are enabled. If you don’t want certain kinds of items to appear when you search—podcasts and calendar items, for example—just tap them to uncheck them.
Date & Time
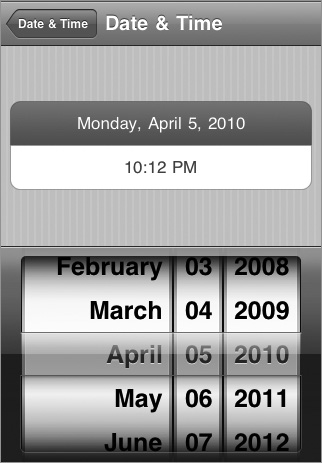
The Date & Time settings include a switch for enabling 24-hour time; a Time Zone entry that, when tapped, produces a Time Zone screen, where you can enter a medium-to-large city to establish a time zone; and a Set Date & Time command that, when tapped, takes you to a screen where you can enter the date and time by using a wheel controller (Figure 2.9).
Figure 2.9 Setting the iPod’s date and time manually.
Keyboard
Are you sensitive enough about your iPod autocorrecting your typing errors that you want to disable that feature? Care to turn autocapitalization on or off (on means that the iPod automatically capitalizes words after a period, question mark, or exclamation point)? Or to enable or disable Caps Lock (a feature that types in ALL CAPITALS when you double-tap the keyboard’s spacebar)? Or to configure the iPod so that when you tap the spacebar at the end of a sentence, the iPod types a period and adds a space? Here’s where you do these things.
Below these four On/Off options, you see International Keyboards. Tap it, and you’re taken to a Keyboards screen, where you can switch on additional keyboards. Do so, and when you’re using an application that requires the iPod’s keyboard, a small globe icon appears to the left of the spacebar. Tap it, and you can switch keyboards. The name of the selected keyboard appears briefly on the spacebar. The number of activated keyboards is reflected next to the International Keyboard entry in the Keyboard screen—International Keyboards 5, for example.
International
The International setting is where you choose the language for your iPod, which supports 30 languages, including English, French, Japanese, Chinese, Korean, German, Italian, Portuguese, Romanian, Behasa Indonesian, and Polish.
On the 32 GB and 64 GB iPod touch, you’ll see a Voice Control command below the Language entry. (The 8 GB iPod touch doesn’t support Voice Control.) Tap this command, and you discover that you can speak to your iPod in one of 21 languages. The iPod not only listens for commands in the language you select, but also tells you what it’s doing in a robotic form of that language. VoiceOver, the iPod’s screen reader, speaks in the language that you’ve chosen here.
![]() U.S. iPod touch owners who want a tonier-sounding iPod—yet one that still understands their commands—should choose English (United Kingdom) from this list to hear responses delivered in a feminine British accent.
U.S. iPod touch owners who want a tonier-sounding iPod—yet one that still understands their commands—should choose English (United Kingdom) from this list to hear responses delivered in a feminine British accent.
The Keyboards command appears in the International screen as well. Tap it, and you’re taken to your old friend the Keyboards screen, where you can enable additional keyboards.
At the bottom of the International screen, you discover the Region Format command. Tap it, and you can choose among a seemingly endless list of countries supported by the iPod touch. Choose a country, and the format for date, time, and telephone number changes.
Accessibility (32 GB and 64 GB iPod touches only)
Apple has taken its world-class VoiceOver technology feature from Mac OS X and adapted it for the 32 GB and 64 GB iPod touches (as well as the iPhone). Now the blind and visually impaired can navigate an iPod touch’s touchscreen—something that many people thought would be impossible—thanks to the voice cues and modified commands offered on the iPod.
The accessibility feature offers not only the VoiceOver screen reader—which speaks the name of onscreen elements as well as items under your finger—but also a Zoom feature for enlarging the screen; a White on Black toggle that inverts the iPod’s screen colors, making it easier for some visually impaired users to read; Mono Audio, which mixes the left and right channels of a stereo track into both the left and right earbuds; and Speak Auto-Text, which alerts the user to autocorrections and capitalizations with VoiceOver’s voice (Figure 2.10). Finally, the Accessibility setting offers a Home button triple-click feature. The response to a triple click can be Off, Toggle VoiceOver, Toggle White on Black, or Ask.
Figure 2.10 The Accessibility screen with VoiceOver on.
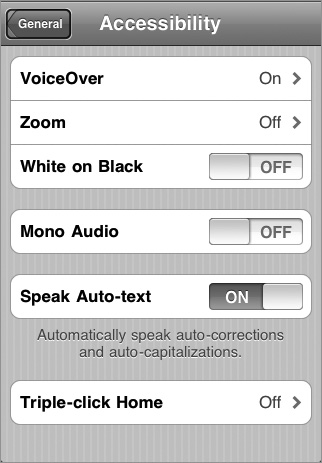
![]() You can enable either VoiceOver (the screen reader) or Zoom (which does exactly as its name implies), but not both.
You can enable either VoiceOver (the screen reader) or Zoom (which does exactly as its name implies), but not both.
When you tap VoiceOver, you have a few options:
• You can activate or deactivate the Speak Hints option, which reads items on a screen to you.
• You can adjust the speaking rate with a slider. (I find the voice too fast in the default setting.)
• You can determine what kind of typing feedback VoiceOver gives you: characters, words, characters and words, or nothing.
VoiceOver isn’t difficult to learn, but it takes practice. If you’re a Mac user who’s familiar with VoiceOver on the Mac, the workings of this feature will be familiar. Selecting letters and typing on a virtual keyboard take some getting used to, however.
All the applications that ship with the iPod are compatible with VoiceOver, and because VoiceOver is built into the operating system, third-party applications take advantage of it as well. The one iPod touch 3.0 software feature that isn’t supported by VoiceOver is cut, copy, and paste.
Reset
To remove information from your iPod without syncing it with your computer, you use this screen, which includes a variety of options:
• Reset All Settings. This option resets your iPod’s preferences (your Network and Keyboard settings, for example) but doesn’t delete media or data (your mail settings, bookmarks, or contacts, for example).
• Erase All Content and Settings. If your iPod is packed with pirated music, and the Recording Industry Association of America is banging on the door, this option is the one to choose. It erases your preferences and also removes data and media. After you’ve performed this action, you’ll need to sync your iPod with iTunes to put this material back on the device.
• Reset Network Settings. Choose this option, and any networks you’ve used and your VPN settings are erased. Additionally, the iPod switches Wi-Fi on and off, thus disconnecting you from the network you’re connected to.
• Reset Keyboard Dictionary. As you type on your iPod’s keyboard, word suggestions occasionally crop up. This feature is really handy when the iPod guesses the word you’re trying to type. If the word is correct, just tap the spacebar, and the word appears complete onscreen. But if the iPod always guesses particular words incorrectly—your last name, for example—you can correct it by tapping the suggestion and continuing to type. The dictionary will learn that word.
When you tap Reset Keyboard Dictionary, the dictionary returns to its original state, and your additions are erased.
• Reset Home Screen Layout. You can move icons on the Home screen around by tapping and holding them until they wiggle, at which point you can move them to another position on that screen or move them to a new screen by dragging them to the right or left edge of the iPod’s display. When you invoke this command, the icons on the Home screen return to their default locations, and third-party applications are arranged in alphabetical order.
• Reset Location Warnings. The iPod will warn you when an application wants to use the iPod’s location services. After you OK the warning a second time for a particular application, the iPod no longer issues the warning for that application. To reset the iPod so that it starts asking again, invoke this reset.
![]() Fear not that a slip of the finger is going to delete your valuable data. The iPod always pops up a panel that asks you to confirm any Reset choice.
Fear not that a slip of the finger is going to delete your valuable data. The iPod always pops up a panel that asks you to confirm any Reset choice.
And more
The iPod touch includes six more Settings screens by default: Music; Video; Photos; Store; Mail, Contacts, Calendars; and Safari. (In truth, you may see several more, because some third-party applications that you download from the App Store place their settings commands in the Settings screen too.) Because these settings are tied to iPod touch functions, I discuss them in the chapters devoted to those subjects.
Syncing the iPod touch
Although you could pack your iPod touch with nothing but content that you download directly from the iTunes and App Stores, there’s a good chance that you’d like some of the music and video files that currently reside in your iTunes Library to find places on your iPod. To make that possible, you must sync your iPod to iTunes.
You do that via the several tabs that appear when you select your iPod touch in iTunes’ Source list. Those tabs shake out as follows.
Summary
As its name suggests, the Summary tab provides an overview of your iPod. Here, you find the iPod’s name (which you can change by clicking it in iTunes’ Source list and entering a new name), its capacity, the software version it’s running, and its serial number (Figure 2.11).
In the Version portion of the tab, you learn whether your iPod’s software is up to date. (You can make sure that you have the latest version by clicking the Check for Update button.) Here, you also find a Restore button for placing a new version of the iPhone software on the device. I revisit this button in Chapter 9.
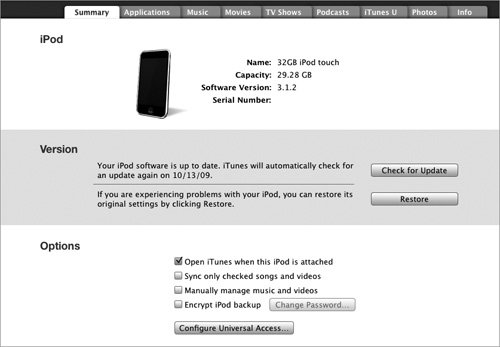
The Summary tab provides four or five options, depending on which iPod touch you have. The first, Open iTunes When This iPod Is Attached, does exactly that: It tells iTunes to launch when you plug in your iPod into your computer’s powered USB 2.0 port. Unless the Manually Manage Music and Videos option is selected (I’ll get to that option very shortly), the iPod will sync automatically when iTunes launches. This setting is carried with the iPod, which means that regardless of which computer you jack the iPod into, it does what this setting instructs.
![]() The Devices panel of the iTunes Preferences window contains an option similar to this one: the Prevent iPods and iPhones from Syncing Automatically check box. The option in the Summary tab applies only to an individual iPod touch or iPhone; the iTunes setting applies to all iPod touches and iPhones. When you check Prevent iPods and iPhones from Syncing Automatically, no iPod touch or iPhone connected to the computer will sync until you tell it to.
The Devices panel of the iTunes Preferences window contains an option similar to this one: the Prevent iPods and iPhones from Syncing Automatically check box. The option in the Summary tab applies only to an individual iPod touch or iPhone; the iTunes setting applies to all iPod touches and iPhones. When you check Prevent iPods and iPhones from Syncing Automatically, no iPod touch or iPhone connected to the computer will sync until you tell it to.
The second option—Sync Only Checked Songs and Videos—tells the iPod to sync only those checked items in your iTunes Library. If you want greater control of what is planted on your iPod, you can check some songs or videos on a playlist in your iTunes Library but not others. The check boxes appear next to the names of the items—“Love Me Do” and Casablanca, for example. When this option is turned on, when you sync the iPod, it syncs only the items you’ve checked.
The third option—Manually Manage Music and Videos—makes it possible to drag content from your iTunes Library to the iPod in iTunes’ Source list. You can’t do this to add music from another computer’s library; the iPod can be synced with the music from only one iTunes Library.
![]() This option is a good one to use when you want to add something to the iPod quickly, without going through the whole syncing rigmarole.
This option is a good one to use when you want to add something to the iPod quickly, without going through the whole syncing rigmarole.
When you check Encrypt iPod Backup, which is the fourth and last option if you have anything but a 32 GB or 64 GB iPod touch released in late 2009, you ask iTunes to back up your iPod and password-protect your data. You might do this with a iPod containing sensitive personal or business information that you back up to your computer.
When you select this option, you’ll be prompted to enter and verify a password. Thereafter, your iPod will be backed up completely (even if you just backed it up recently), and the backup will be protected. Should you want to change the password—say, because foreign agents weaseled it out of you by putting ants in your pants—click the Change Password button, enter your old password, and then enter and verify a new password.
![]() Encrypting a backup can take iTunes a very long time. You might consider starting this process just before you go to bed. It should be complete when you awaken in the morning.
Encrypting a backup can take iTunes a very long time. You might consider starting this process just before you go to bed. It should be complete when you awaken in the morning.
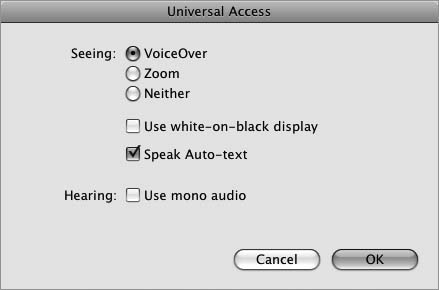
If you have that late-2009 32 GB or 64 GB iPod touch, you’ll also see a Configure Universal Access button at the bottom of the options list. Click it to open a Universal Access window, where you can choose which (if any) of the iPod’s accessibility features to switch on (Figure 2.12).
Figure 2.12 Configuring Universal Access.
I would be remiss if I left the iPod touch Preferences window without mentioning the Capacity bar at the bottom (Figure 2.13). This bar details how your iPod’s storage space is being used. Here, you view the total capacity of your iPod, along with statistics for Audio, Video, Photos, Apps, Other (a category that includes contacts, calendars, and applications, for example), and Free (as in free space).

By default, the amount of storage consumed by a particular item appears below its heading (Video 1.25 GB, for example). But if you click the Capacity bar, the statistics labels change—first to the number of items in each category and then, with another click, to the amount of time it would take to play all the videos and audio stored on the iPod (2.5 days, for example).
To the right of the Capacity bar is the Sync button. Click this button to sync the iPod right now rather than wait for the next time you dock the thing.
If you make a change in your sync settings—change photo albums, for example, or choose a new movie or podcast to sync—the Sync button disappears, and Cancel and Apply buttons take its place. To sync the iPod immediately with the new settings, click Apply. If you think better of your choices, click Cancel to undo your changes.
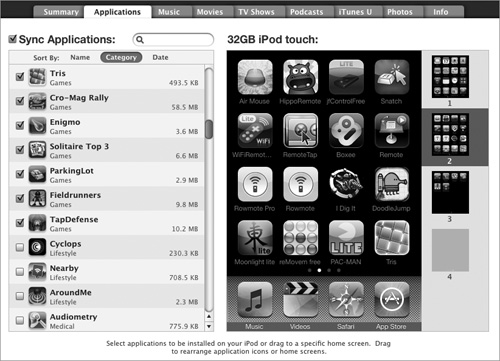
Applications
Your iPod touch can use applications sold at Apple’s App Store. This tab is where you manage which apps are synced to your iPod. I look at the App Store in greater detail in Chapter 4, but if you’d like to take a look now, here’s what you’re looking at: All applications that you download from the App Store (either from within iTunes or from an iPod touch or iPhone) are listed in this tab. Those applications that you downloaded from the iPod touch or an iPhone are moved to iTunes only when you sync.
Within this tab, you can choose to sync all applications or just those that you’ve checked in the list box (Figure 2.14). Within this list box, you can sort apps by Name, Category (Books, Games, and Music, for example), or Date. To designate an application for syncing, make sure that the check box next to it is enabled. To search for a particular app, enter its name in the Search field at the top of this tab.
Figure 2.14 The Applications tab.
![]() You can quickly enable or disable all your applications by holding down the Command key (Mac) or Ctrl key (Windows PC) and clicking a check box.
You can quickly enable or disable all your applications by holding down the Command key (Mac) or Ctrl key (Windows PC) and clicking a check box.
As you enable applications, you’ll see that they appear on the virtual Home screen next to the application list. This Home screen is one of iTunes 9’s finest achievements if you have a lot of applications in your iTunes Library. With it, you can easily drag applications to exactly the positions and pages where you’d like them to be. I cover moving apps a little later in the chapter, but for now, know that repositioning them within iTunes is easier than doing it on the iPod.
To move an application, click and drag it to a new position. All applications after it will move up one position. To remove an application, hover your cursor over it until an X appears in its top-left corner; then click the X to remove the application from the iPod touch (but not from your iTunes Library). Although you can change the position of Apple’s applications in the Home screen and on the Dock, you can’t remove them.
![]() The virtual Home screen will always show a blank page (up to 11 pages total). This blank page is helpful because it lets you create new pages for particular kinds of applications. You might use page 2 for social-networking applications such as Twitter and Facebook, pages 3 and 4 for games, and page 5 for productivity applications.
The virtual Home screen will always show a blank page (up to 11 pages total). This blank page is helpful because it lets you create new pages for particular kinds of applications. You might use page 2 for social-networking applications such as Twitter and Facebook, pages 3 and 4 for games, and page 5 for productivity applications.
Music
The Music tab (Figure 2.15 on the following page) contains options for syncing music and music videos to your iPod. With iTunes 9, Apple has completely redone the interface in this and other media windows, making it easier to get exactly the media you want onto your iPod.
Enabling the Sync Music option tells iTunes that you’d like it to sync its music collection to the iPod automatically. If you’ve enabled the Manually Manage Music and Videos option in the Summary tab, enabling the Sync Music option overrides the Manual option (iTunes will ask you whether you’re sure you want to do this). When you’ve chosen Sync Music, you then have the choice to sync your entire music library or just selected playlists, artists, and genres.

Any songs currently on the iPod that aren’t in the iTunes Library or in the selected playlists are erased from the iPod.
Why choose selected playlists, artists, and genres rather than your entire music library? Your iPod may not have the capacity to hold your entire music collection. This option is also a good one to use when several members of your family share an iPod, because it allows you to chunk a music collection into multiple playlists and then rotate those playlists in and out of the iPod.
When you enable the Selected Playlists, Artists, and Genres option, you get three scrolling lists: Playlists, Artists, and Genres.
• Playlists
This list includes all the playlists on your iPod, including Genius Mixes. (I discuss Genius Mixes at greater length in Chapter 3.) For purposes of this discussion, you should understand that if you have a largish music library, a Genius Mix can include as many as 250 tracks. For this reason, you should think carefully about selecting Genius Mixes, as more than a couple could eat up a lot of space on a low-capacity iPod touch.
![]() At the top of this list, you’ll see Audiobooks with no entries below it, which may lead you to believe that you either have to sync all of your audiobooks or none of them. Enable this option, and you will indeed sync every audiobook that appears in this special playlist. You can sync individual audiobooks, however, by placing them in a separate playlist and then syncing that playlist or by choosing an audiobook’s author from the Artists list to the right of the Playlists list.
At the top of this list, you’ll see Audiobooks with no entries below it, which may lead you to believe that you either have to sync all of your audiobooks or none of them. Enable this option, and you will indeed sync every audiobook that appears in this special playlist. You can sync individual audiobooks, however, by placing them in a separate playlist and then syncing that playlist or by choosing an audiobook’s author from the Artists list to the right of the Playlists list.
To sync playlists to your iPod, just enable them in this Playlists list. If you created a folder full of playlists by choosing File > New Playlist Folder and then enabled that folder, all the playlists within the folder will be synced to your iPod.
• Artists
An improvement that comes with iTunes 9 is the ability to sync individual artists’ work to your iPod easily. You do this via the Artists list. Just enable the artists whose music you want to copy to your iPod, and so it shall be when you sync the iPod.
![]() Notice the Search field above the Artists list. If you have a large iTunes Library, you’ll find that this Search feature is a godsend.
Notice the Search field above the Artists list. If you have a large iTunes Library, you’ll find that this Search feature is a godsend.
• Genres
Another hat-tip to iTunes 9 for the Genres list. If the holidays are beckoning, and you’d like to add a little musical cheer to the mix, enable the Holiday option in the Genres list, and your iPod will be as full of holiday music as it and your iTunes Library allow. Better yet, when the seemingly endless cheer ends, you can get that stuff off your iPod quickly by unchecking that genre and choosing a less festive genre.
![]() If you’ve removed songs from the iTunes Library and want them to remain on your iPod after the update, you’ll want to avoid the Selected Playlists, Artists, and Genres option and manage your music manually.
If you’ve removed songs from the iTunes Library and want them to remain on your iPod after the update, you’ll want to avoid the Selected Playlists, Artists, and Genres option and manage your music manually.
You’ll see three additional options in this pane: Include Music Videos, Include Voice Memos, and Automatically Fill Free Space with Songs. Enable the first option, and any music videos in selected playlists will also be synced to your iPod. Turn the option off, and music videos will steer clear, even if they’re part of a playlist. Enable the second option, and voice memos that have been copied from your iPod to iTunes can be copied back to your iPod (if you so choose). Switch the option off, and iTunes won’t sync voice memos. As for the last option, if you haven’t chosen enough music, videos, podcasts, photos, contacts, calendars, and apps to fill your iPod, enabling this option instructs iTunes to top off your iPod with music of its choosing.
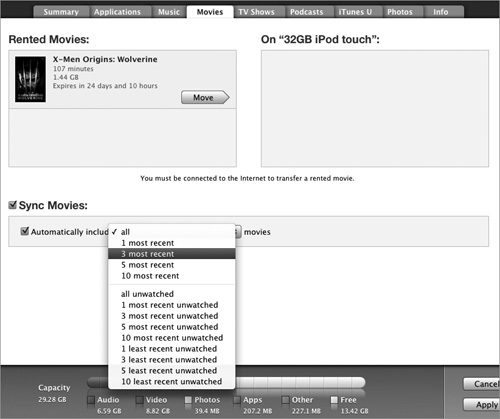
Movies
The Movies tab has been rejiggered in iTunes 9 as well. As with the Music tab, you can sync all your movies simply by checking the Sync Movies box and leaving the option below it set to automatically include all movies.
You can add a layer of choice by choosing one of the options from the Automatically Include pop-up menu. These options include syncing the 1, 3, 5, or 10 movies most recently added to iTunes; the 1, 3, 5, or 10 most recent unwatched movies (stuff that you haven’t seen and added not all that long ago); or the 1, 3, 5, or 10 least recently unwatched movies (unwatched movies that are starting to gather dust in your iTunes Library).
When you choose one of these options, you’re not committed to syncing only those movies. Below, you’ll see all the movies in iTunes’ Movies playlist with check boxes next to their titles. To sync any of these movies as well, just check their boxes (Figure 2.16).
To be far more particular about the movies that are placed on your iPod, clear the Automatically Include check box. When you do, you see a list of all the movies in iTunes’ Movies playlist, plus a list of all the playlists that include movies. Now you can pick just those movies you want, as well as pull movies from playlists you’ve created that may have a mix of movies and music (such as the Purchased playlist, which contains movies, TV shows, and music that you’ve bought from the iTunes Store).
Again, if you enable the Sync Movies option, you undo the Manually Manage Movies and Videos setting if you’ve switched it on.
TV Shows
The TV Shows tab (Figure 2.17 on the following page) works similarly to the Movies tab. When Sync TV Shows is enabled along with Automatically Include All Episodes of All Shows, all your TV shows will be copied to your iPod when you sync it. But here again, you have the option to sync the 1, 3, 5, or 10 most recent, most recent unwatched, and least recent unwatched episodes of all the shows in your iTunes Library or selected shows.
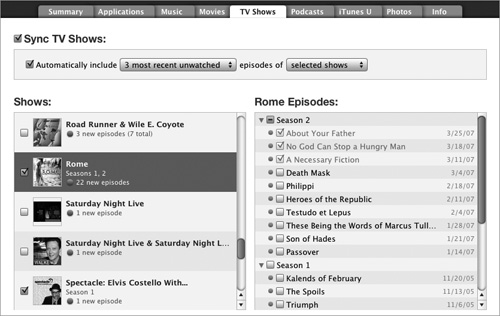
![]() What’s with this “least recent unwatched episodes” stuff? If you’ve downloaded a season of a TV series, you’d choose this option so that the shows sync in order from the beginning of the season to the end. If, instead, you chose the most recent unwatched episodes, playback would start with the last show and then work its way backward. (If that wouldn’t spoil the suspense, I don’t know what would!)
What’s with this “least recent unwatched episodes” stuff? If you’ve downloaded a season of a TV series, you’d choose this option so that the shows sync in order from the beginning of the season to the end. If, instead, you chose the most recent unwatched episodes, playback would start with the last show and then work its way backward. (If that wouldn’t spoil the suspense, I don’t know what would!)
As with the Movies tab, you can clear the Automatically Include check box, select individual shows and episodes within those shows, and sync just those shows and episodes to your iPod. Here, too, you’ll find a list that lets you sync shows that are stored within specific playlists.
Podcasts
What puts the pod in podcast is the iPod. Because people tend to listen to lots of podcasts, some of which can be long (their files therefore taking up significant amounts of room), iTunes’ Podcasts tab (Figure 2.18) lets you manage which ones are synced to your iPod.
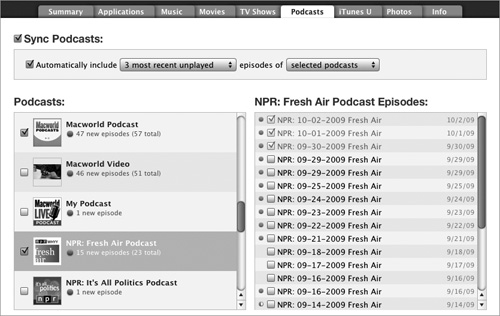
As in each one of these tabs, you have the option to not sync this content, but if you choose to, you have plenty of options. To get it all, just enable Sync Podcasts, and the option below it reads (by default) Automatically Include All Episodes of All Podcasts. If you have a lot of podcast episodes—as many of us do—be choosy by choosing the proper options. Click the All pop-up menu, and you’ll see familiar options—1, 3, 5, or 10 most recent; most recent unplayed; and least recent unplayed. Additionally, you’ll find options for playing all unplayed; all new; the 1, 3, 5, or 10 most recent new; and the 1, 3, 5, or 10 least recent new. You can do this for all podcasts or just selected podcasts.
Or—and I know you’ve heard this before—clear the Automatically Include check box, and choose the podcasts and episodes you want to sync. And yes, you can include episodes from podcasts contained within playlists.
Note that video as well as audio podcasts are included here. Because video can consume a lot of storage space, be careful how you choose your video podcasts.
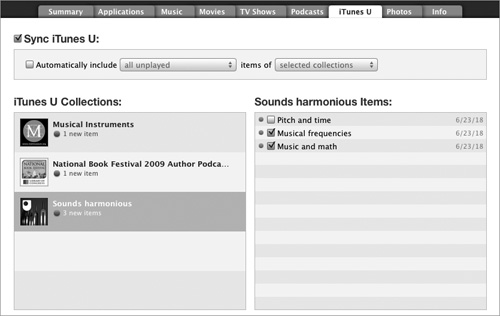
iTunes U
Not terribly long ago, Apple introduced iTunes U, which provides audio and video content from such providers as universities, American Public Media, the Library of Congress, and The Metropolitan Museum of Art. And it’s all free! Download some of this content, and you’ll see that it can be synced very much like podcasts (Figure 2.19).
Photos
The Mac and Windows versions of the Photos pane differ slightly. Like so.
Macintosh
If you use a Mac, an iPod with a color display can sync photos with Apple’s iPhoto and Aperture, as well as with your Photos folder or a different folder of your choosing. On that Mac, you also have the option to sync all iPhoto albums, events, and faces. Or you can enable the Selected Albums, Events, and Faces, and Automatically Include option (Figure 2.20). Do this, and Albums, Events, and Faces lists appear. You can select specific items from these lists, such as all Faces photos that contain a picture of your boyfriend.
Figure 2.20 The Photos tab in the Mac version of iTunes.
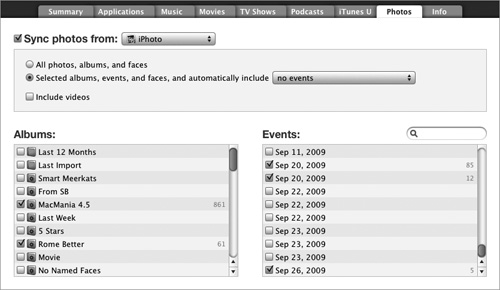
With regard to events, iTunes offers the option to automatically include no events; all events; the most recent, 3, 5, 10, or 20 events; events from the past month; or events from the past 2, 3, 6, or 12 months. If you choose No Events, you can choose the specific events you want on your iPod from the Events list below. iTunes provides a Search field for making these events easier to find.
You also have the option to include videos that have been copied to your iPhoto library—videos you’ve shot with a pocket camcorder, iPhone, or 5G iPod nano, for example.
Aperture, a tool more often used by pros and advanced photo hobbyists, doesn’t enjoy this level of support. Choose Aperture on a Mac version of iTunes, and you see but three options: All Photos and Albums, Selected Albums, and Include Full-Resolution Photos. Choose Selected Albums, and all your Aperture albums appear in a list below. As with iPhoto, you don’t have the option to choose individual pictures from albums.
You can also select Choose Folder from the Sync Photos From pop-up menu. When you do, up pops a Change Photos Folder Location navigation window. Just traipse to the folder you want to pull pictures from, and click Open. When you do this, the folder you’ve chosen appears in the pop-up menu.
If you choose Pictures from this pop-up menu, the options below it change to All Photos and Albums and Selected Folders. The principles of iPhoto/Aperture import apply here as well. If you choose All Photos, iTunes rummages around in this folder and looks for compatible graphics files. If you choose Selected Folders, you can direct iTunes to look in only those folders that you select.
![]() This method is a good way to copy every picture from your hard drive to your iPod. As far as iTunes is concerned, your hard drive is just another folder. Select it as the source folder with the All Photos option selected, and iTunes grabs all the compatible graphics files it can find, converts them, and plunks them onto your iPod.
This method is a good way to copy every picture from your hard drive to your iPod. As far as iTunes is concerned, your hard drive is just another folder. Select it as the source folder with the All Photos option selected, and iTunes grabs all the compatible graphics files it can find, converts them, and plunks them onto your iPod.
Windows
On a Windows PC, you can sync with your My Pictures folder, a different folder of your choosing, or photo albums created with Adobe Photoshop Elements 3 or later or Adobe Photoshop Album 2 or later. To do this, enable the Sync Photos From option, and from the pop-up menu that follows it, choose the source for your photos.
If you’ve installed Photoshop Elements (version 3 or later) or Photoshop Album on your PC, the Sync Photos From pop-up menu also contains entries for these programs, allowing you to import pictures from the albums that these programs create.
![]() The tip I propose for copying all the pictures from your Mac to your iPod works in Windows as well. In this case, choose your C drive as the source. When you do, every compatible graphics file will be converted and copied.
The tip I propose for copying all the pictures from your Mac to your iPod works in Windows as well. In this case, choose your C drive as the source. When you do, every compatible graphics file will be converted and copied.
Info
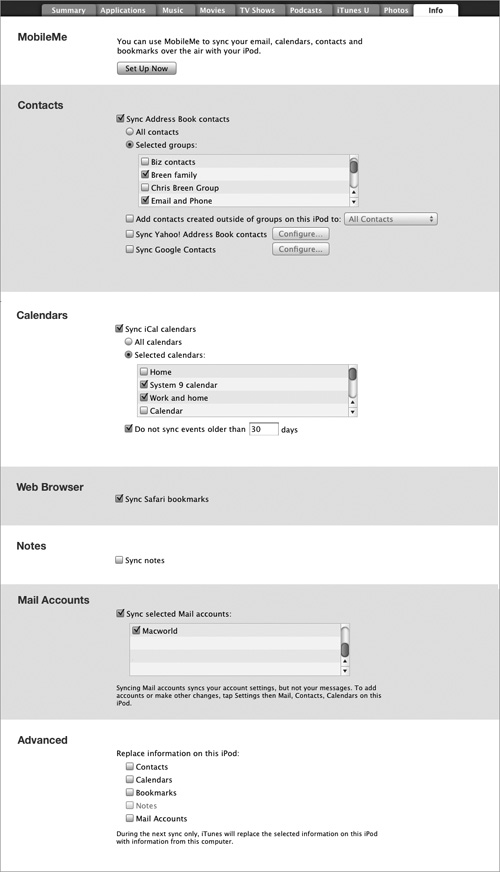
The Info tab is where you choose which data—contacts, calendars, notes, mail accounts, and browser bookmarks—you’d like to sync to your iPod (Figure 2.21). This tab is also where you configure iTunes to push email, calendars, contacts, and bookmarks from Apple’s MobileMe service to the iPod touch.
MobileMe
To set up MobileMe, you first have to have a MobileMe account, which costs $100 annually. You can sign up for just such an account at www.apple.com/mobileme. (Apple offers a 60-day free trial if you’d like to test the service before committing.)
Having signed up, click the Set Up Now button in the MobileMe area of the iPod’s Info tab. A MobileMe Setup page appears in your default browser. Here, you find links for setting up Macs as well as Windows PCs. Essentially, the steps break down this way:
1. After downloading iTunes 9 or later, sync your contacts, calendars, and bookmarks with your iPod touch.
You enable these options in the Info tab.
2. Sync your data with MobileMe.
You do this on a Mac from within the MobileMe system preference. Just choose MobileMe in System Preferences; click the Sync tab; enable the Synchronize with MobileMe option; check the Bookmarks, Calendars, and Contacts boxes in the list box; and click Sync Now. A MobileMe Sync Alert dialog box appears; via a pop-up menu, it lets you Merge All Data, Replace Data on Computer, or Replace All Data on Mobile Me. Choose the setting you want, and click Sync. Your data will be synced.
On a Windows PC, choose the MobileMe Preferences item in Windows’ Control Panels area. (This control panel is installed when you install iTunes 9 or later.) Click the Sync tab, and as you would on a Mac, enable Contacts, Calendars, and Bookmarks. For contacts, you have the option to sync Google, Outlook, Yahoo Address Book, and Windows contacts. Only Outlook calendars are supported. Also, you can sync either Internet Explorer or Safari bookmarks. Just like on the Mac, when you click Sync Now, you see an alert box that offers you the option to merge or replace data.
3. Configure MobileMe on the iPod touch.
Tap the Settings button on the Home screen; tap the Mail, Contacts, Calendars entry; and ensure that Push is set as the Fetch New Data option. If it isn’t, tap Fetch New Data, and switch the Push option on in the resulting Fetch New Data screen.
If you haven’t yet added your MobileMe account to the iPod, now’s the time. Tap Mail, Contacts, Calendars, and in the screen that appears, tap Add Account. In the resulting Add Account screen, tap MobileMe. In the sheet that appears, add your name, MobileMe address (such as [email protected]), MobileMe password, and a description of the account (such as Chris’ MobileMe). Tap Save to add the account.
A MobileMe screen will appear. Here, you can choose those kinds of data—Mail, Contacts, Calendars, and Bookmarks—that you’d like to sync with your iPod touch. Just flick the On/Off slider to On for those bits of information. When everything is set up the way you want it, tap the Mail arrow in the top-left corner of the screen, and your settings will be saved.
And … say what? Oh, yes—the Find My iPod touch entry at the bottom of your MobileMe screen. I address that entry fully in Chapter 9, but to help you hold out until then, I’ll explain that if you have a MobileMe account, you have the ability to trace your iPod’s whereabouts, whether it’s hiding under the fridge, resting in the back yard where your dog buried it, or chugging away in the back of a sardine trawler. When you switch on the Find My iPod touch option, this wonder becomes possible. When the option is off, nuh-uh.
Contacts
Here, you find settings for syncing all your contacts or just selected groups that you’ve created in Address Book (if you use a Mac) or in Windows Address Book, Outlook, Yahoo Address Book, and Google Contacts. (On a Mac, the Yahoo and Google options are listed at the bottom of the Contacts area. Click the Configure button next to either one, agree to the license agreement, and enter your Yahoo or Google user name and password. When this option is enabled, your Yahoo Address Book and Google contacts will make their way to the iPod touch too.)
Below this area, you see the option to put new contacts that you create on the iPod touch in a specific group within Address Book or Outlook. You also see an option for syncing your online Yahoo Address Book and Google contacts.
Calendars
This area works similarly. You can choose to sync all your calendars or, if you’re using a Mac, just selected calendars you’ve created in Apple’s iCal (your work calendar, for example, but not your personal calendar). With the iPod touch 2.0 software and later, the iPod displays multiple calendars in its Calendar application. I discuss calendars in greater depth in Chapter 5.
Web Browser
In this area of the Info window in the Macintosh version of iTunes, you’ll find a Sync Safari Bookmarks check box. On a Windows PC, a pop-up menu provides the option to sync Safari or Internet Explorer bookmarks.
Notes
Notes is an on/off option. Enable Sync Notes in the Mac version of iTunes, and any notes created on the iPod touch will be synced to the Notes area of Mail—Apple’s email client. Likewise, if you create a note in Mail and have this option enabled, that note will be synced to your iPod.) On a Windows PC, notes are be synced to Outlook (and vice versa here, too). I take a closer look at Notes in Chapter 8.
Mail Accounts
iTunes looks for email account settings in Mail on a Mac and in Outlook, Microsoft Mail, and Outlook Express on a Windows PC. (It looks for the settings only; syncing mail accounts doesn’t sync messages.) The settings that it finds appear in a list in the Mail Accounts area of the Info tab. You have the option to select the email account(s) you’d like to access with the iPod touch.
![]() If, after allowing iTunes to add email accounts to the Info tab automatically, you add a different account (maybe you’ve changed Internet service providers or taken on a MobileMe account, for example), iTunes will add the account to the Mail Accounts area automatically when you next sync your iPod.
If, after allowing iTunes to add email accounts to the Info tab automatically, you add a different account (maybe you’ve changed Internet service providers or taken on a MobileMe account, for example), iTunes will add the account to the Mail Accounts area automatically when you next sync your iPod.
Advanced
Finally, the Advanced area offers a nifty little workaround when you plug your iPod touch into another computer. For this feature to work, you must first choose at least one option above—say, Sync Address Book Contacts—and then choose the options you want in that area (choose to sync a specific group of contacts, for example). Now enable the related option in the Advanced area (you’d choose Contacts if you enabled Sync Address Book Contacts). When you click the Apply button in the bottom-right corner of the window, iTunes overwrites the selected information that’s currently on the iPod with the information stored on the computer to which the iPod is connected.
Note the word overwrite. If you do this, the information you had on the iPod is deleted.