Crop movies
Convert output movie dimensions
Convert output movie aspect ratio
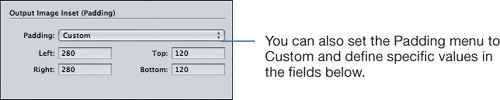
Pad output movies
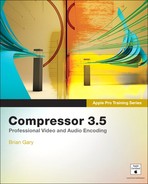
While you’ll use the Inspector’s Encoder and Frame Controls pane for the “heavy lifting” in Compressor, in the other panes you’ll fine-tune and finesse encoding jobs. In the Geometry pane, you’ll change the output frame size, adjust the aspect ratio of the output movie, and pad the source movie inside the output frame size.
Although aesthetic or logistical considerations are key when choosing frame dimensions, scaling down to a smaller output frame size is a common strategy for reducing overall file size. For example, an HD movie with a 1280 × 720 pixel frame size can be reduced to a 640 × 360 frame, creating a smaller file that is acceptable for computer playback. This size reduction has a direct correlation to a decrease in output file size; smaller frame sizes require less data.
In some instances, Compressor will dictate the output frame size and dim the options in the Geometry pane. The SD DVD specification, for example, requires a fixed frame size of 720 × 480 pixels. Therefore, the Geometry options are dimmed and unavailable for all DVD settings, including HD to SD downcoverts.
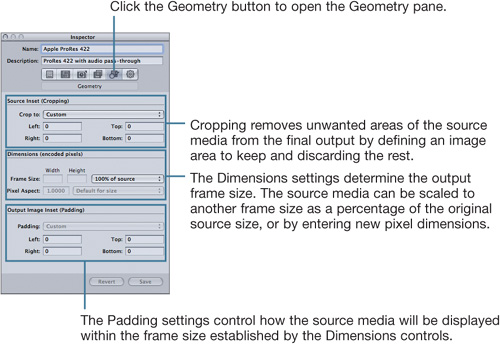
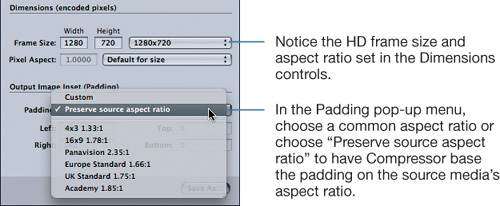
Use the Dimensions (encoded pixels) controls to transform the source media’s frame width, height, and aspect ratio to different values.
By default, Compressor uses the entire source media frame during the encoding process. You can redefine which part of the image will be encoded by creating a source inset.
Compressor offers two ways to crop media: a visual method using the Preview window, and a numerical method using the Geometry pane.
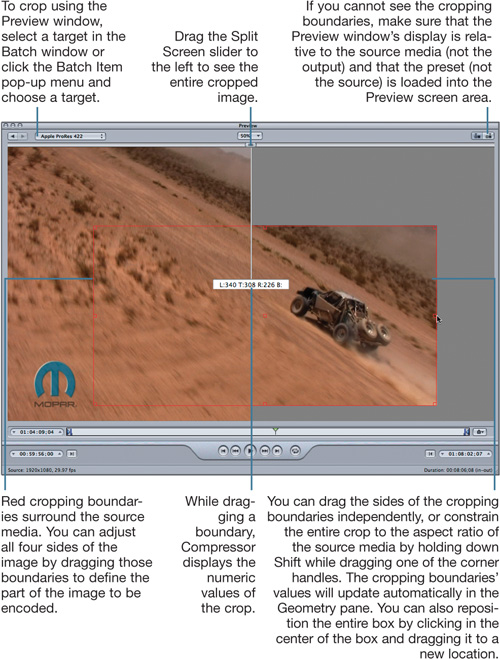


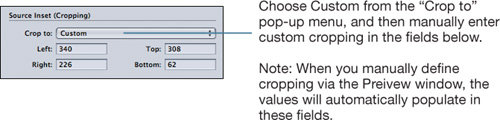
The Source Inset (Cropping) controls work in tandem with the Dimensions (encoded pixels) controls. For example, if you crop a movie and have a fixed output dimension, the cropped source media will be scaled to fit inside the fixed-frame dimensions.
To apply a crop and not scale the output media, in the Frame Size pop-up menu, choose 100% of Source, or manually enter the frame-size values based on the resulting reduction of the crop. For example, if a 720 × 480 frame was cropped 40 lines from the top and 40 lines from the bottom, enter a custom frame size of 720 × 400.
If cropping limits which part of the visual image Compressor will encode, then padding dictates which part of the output frame the source media will occupy. For instance, if you have a DV NTSC clip that’s 720 × 480 and you apply an HD frame size (1280 × 720) target, by default, the DV source clip will be scaled up to fill the entire frame size. Using padding, you can maintain the DV’s actual 4:3 aspect ratio and play it within the output HD (16:9) frame size of 1280 × 720.
The following example uses the Padding controls to retain a SD, 4:3 aspect ratio within the HD output dimensions.
Tip
Select the source media’s job in the Batch window to view its dimensions and aspect ratio in the Inspector window
Padding, in essence, creates a matte around the source media inside the output frame size, much as you would frame a painting or photograph post. This can be used in several practical and creative situations. For example, a network might want you to deliver a full HD-framed movie of standard definition source media. You could use padding to have your SD content play back in its original frame size and aspect ratio within a 16:9 HD frame. The black, empty areas of the border could later be filled with commercial content from the network or additional content of your own (think of Bloomberg Television).
Another example would occur in a post-production workflow where you are building elements for HD delivery and are responsible for only one element in the frame. You could inset your content into the frame and leave the rest of the frame available for others.
All the functions in the Geometry pane can significantly alter the presentation of your output video, so it is essential to understand why certain values produce certain results. For example, if you start with HD source media at 1920 × 1080 and choose the MPEG-4, 300Kbps Apple setting, the default output frame size will be 320 × 240. Houston, we have a problem! Compressor will do exactly what you tell it to do: It will squeeze the 16:9 footage into a 4:3 box and your movie will look like the opening sequence of Kung-Fu Theatre—the image is pushed in at the sides making everything look tall and thin.
Video frame sizes ranging from web delivery to SD to HD are all governed by width and height proportions called aspect ratios. For example, DV NTSC has a frame size of 720 pixels wide by 480 pixels high (720 × 480). The aspect ratio for that frame size is 3:2, meaning that for every 3 pixels in width, the image is 2 pixels tall. That’s why, when you look at a DV NTSC image, it’s not a square, it’s a rectangle.
The following table lists basic calculations for the most common frame sizes. You can use this information in the Geometry pane to correct display problems in your output movies and also to creatively produce unconventional frame sizes.
Using the table, you can quickly deduce the proper frame size if you have just one of the output dimensions. For example, a common task is creating web-ready versions of 16:9 movies. The common 320 × 240 web output frame size represents a 4:3 aspect ratio. It will not accurately display 16:9 content because the source is scaled to fit (which changes the aspect ratio). But, using the 16:9 calculation in the table, you can derive the proper widescreen height for a 320-pixel width by multiplying 320 by .5625, which equals 180 pixels. Granted, Compressor addresses this common output issue in the Dimensions settings where you can easily set the widescreen aspect using the pop-up menus, but the calculations listed in the following table can address any custom situation you may encounter.
Note
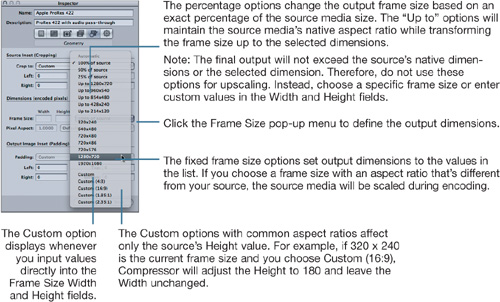
When setting custom frame dimensions, it’s best to set the Pixel Aspect to Square to avoid any unwanted distortion of the output movies during playback.
Frame Size | Aspect Ratio | Width Calculation | Height Calculation |
|---|---|---|---|
DV NTSC 720 × 480 | 3:2 | Multiply the height by 1.5 | Multiply the width by .667 |
Widescreen DV 720 × 480 (squeezed) | 16:9 | Multiply the height by 1.778 | Multiply the width by .5625 |
HD 1280 × 720 | 16:9 | Multiply the height by 1.778 | Multiply the width by .5625 |
HD 1920 × 1080 | 16:9 | Multiply the height by 1.778 | Multiply the width by .5625 |
HDV 1440 × 1080 | 16:9 | Multiply the height by 1.333 | Multiply the width by .75 |
Web 320 × 240 | 4:3 | Multiply the height by 1.333 | Multiply the width by .75 |
N/A | Academy 1:85:1 | Multiply the height by 1.851 | Multiply the width by .5403 |
N/A | Panavision 2:35:1 | Multiply the height by 2.351 | Multiply the width by .425 |
Note
Some equations may not produce whole numbers. Screen dimensions cannot include fractions, so you must round off fractional values. For example, if the height equals 319.23, round up the height value to 320 pixels.
To evaluate your understanding of the concepts covered in this lesson and to prepare for the Apple Pro Certification Exam, download the online quiz at www.peachpit.com/apts.compressor.