
Chapter 1. Implementing and Consuming Your First Service
In the grand tradition of programming books beginning with a “hello, world” example, this book starts off with a simple service. This chapter walks through the creation of a service to store user metadata and manage authentication. This includes building the web service to handle HTTP requests and the client library for interacting with the service.
What’s a Service?
In this book, service generally refers to a system that responds to HTTP requests. Such HTTP requests are usually to write, retrieve, or modify data. Examples of public-facing HTTP services include Twitter’s API (http://apiwiki.twitter.com), the Amazon S3 service (http://aws.amazon.com/s3/), the Delicious API (http://delicious.com/help/api), the Digg API (http://apidoc.digg.com), and the New York Times APIs (http://developer.nytimes.com/docs). Internally, services could exist to contain pieces of data and business logic that are used by one or more applications.
Using a broader scope of definition, service can refer to a system that provides functionality through a standard interface. Working at this level of abstraction are services such as relational databases (for example, MySQL), Memcached servers, message queues (for example, RabbitMQ), and other types of data stores, such as Cassandra (http://incubator.apache.org/cassandra/).
While this book touches on the broader definition of service in a few places, the majority of the material focuses on HTTP-based services. More specifically, this book focuses on services that are designed to roughly follow a RESTful paradigm, as described in the appendix, “RESTful Primer.” Further, this book focuses on using services within an organization and infrastructure to build out applications. These services may or may not be public facing, like the previous examples.
The details of why, when, and how to use services are covered throughout the course of the book. For now the goal is to implement a simple service.
Service Requirements
A simple user management system is an example of something that can be pulled out as a service. After implementation, this service could be used across multiple applications within an organization as a single sign-on point. The goals and requirements of the service are fairly simple:
• Store user metadata, including name, email address, password, and bio.
• Support the full range of CRUD (create, update, delete) operations for user objects.
• Verify a user login by name and password.
In later versions of the user service, features could map which users work with each other, which user each user reports to, and which groups a user is a member of. For now, the basic feature set provides enough to work on.
The Ruby Tool Set
Ruby provides many tools to build both the service and client sides of services. However, this book heavily favors some specific tools due to their aesthetics or performance characteristics. The following libraries appear often throughout this book.
Sinatra
Sinatra is a lightweight framework for creating web applications. It can be described as a domain-specific language for web applications and web services. Built on top of Rack, Sinatra is perfectly suited for creating small web services like the example in this chapter. In addition to encouraging an elegant code style, Sinatra has fewer than 2,000 lines of code. With this small and readable code base, it’s easy to dig through the internals to get a more specific idea of what’s going on under the hood.
Sinatra was originally written by Blake Mizerany, and continued development is supported by Heroku. The official web site is http://www.sinatrarb.com, and the code repository is on GitHub, at http://github.com/sinatra/sinatra. Chapter 4, “Service and API Design,” provides more in-depth coverage of Sinatra. For now, Sinatra can be installed to work through the example in this chapter using the gem command on the command line, like this:
gem install sinatra
ActiveRecord
ActiveRecord is the well-known object/relational mapper (ORM) that is an integral part of Ruby on Rails. It provides a simple interface for mapping Ruby objects to the MySQL, PostgreSQL, or SQLite relational databases. Since most readers are probably familiar with ActiveRecord, the choice to use it as the data library was easy. However, the focus of this book is on creating service interfaces, creating clients, and organizing service interactions. Which data store or library to use is beyond the scope of this book. Readers experienced with alternative data stores are welcome to use them in place of ActiveRecord.
ActiveRecord was originally developed by David Heinemeier Hansson as a part of Ruby on Rails. It is an implementation of the ActiveRecord design pattern by Martin Fowler (http://www.martinfowler.com/eaaCatalog/activeRecord.html). The documentation can be found at http://ar.rubyonrails.org, and the source code is part of the Rails repository on GitHub, at http://github.com/rails/rails/tree/master/activerecord/. ActiveRecord can be installed using the gem command on the command line, like this:
gem install activerecord
JSON
The representation of resources from HTTP services can be in any of a number of formats. HTML, XML, and JSON are the most common. JSON is quickly becoming a favorite choice because of its speed and simplicity as well as the availability of quality parsers in most languages. JSON includes built-in types such as strings, integers, floats, objects (such as Ruby hashes), and arrays. Most complex data types can be represented fairly easily and succinctly by using these basic data structures.
There is no shortage of available JSON parsers for Ruby. The most popular option is the JSON Ruby implementation found at http://flori.github.com/json/. However, Brian Marino’s Ruby bindings to YAJL (yet another JSON library) look like a very solid option that can provide some performance increases. Marino’s code can be found at http://github.com/brianmario/yajl-ruby, and the YAJL code can be found at http://lloyd.github.com/yajl/. For simplicity, the service example in this chapter uses the JSON Ruby implementation, which can be installed using the gem command on the command line, like this:
gem install json
Typhoeus
The client libraries for services must use an HTTP library to connect to the server. Typhoeus is an HTTP library specifically designed for high-speed parallel access to services. Being able to run requests in parallel becomes very important when connecting to multiple services. Typhoeus includes classes to wrap requests and response logic as well as a connection manager to run requests in parallel. It also includes raw bindings to the libcurl and libcurl-multi libraries that make up its core functionality.
Typhoeus was originally written by me, and ongoing support is provided at http://KnowMore.com. The code and documentation can be found at http://github.com/pauldix/typhoeus/, and the support mailing list is at http://groups.google.com/group/typhoeus. Typhoeus is covered in greater detail in Chapter 6. “Connecting to Services.” For now, it can be install using the gem command line, like this:
gem install typhoeus
Rspec
Testing should be an integral part of any programming effort. This book uses Rspec as its preferred testing library. It provides a clean, readable domain-specific language for writing tests.
Rspec is written and maintained by the core team of Dave Astels, Steven Baker, David Chemlimsky, Aslak Hellesøy, Pat Maddox, Dan North, and Brian Takita. Coverage of Rspec is beyond the scope of this book. However, detailed documentation and examples can be found on the Rspec site, at http://rspec.info. Rspec can be installed using the gem command on the command line, like this:
gem install rspec
The User Service Implementation
With the list of tools to build the service and client libraries chosen, you’re ready to implement the service. The server side of the system is the first part to build. Remember that this is a Sinatra application. Unlike Rails, Sinatra doesn’t come with generators to start new projects, so you have to lay out the application yourself. The basic directory structure and necessary files should look something like the following:
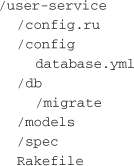
The user-service directory is the top level of the service. The config directory contains database.yml, which ActiveRecord uses to make a database connection. config.ru is a configuration file that Rack uses to start the service. The db directory contains the migrate scripts for models. The models directory contains any ActiveRecord models. Rakefile contains a few tasks for migrating the database.
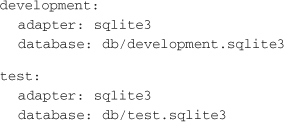
The database.yml file looks like a standard Rails database configuration file:
Rakefile contains the task to migrate the database after you’ve created the user migration:
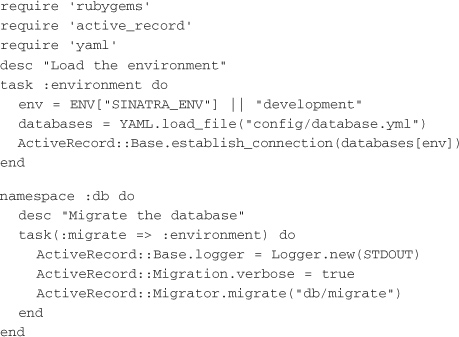
First, the dependencies are loaded. Then the :environment task is created. This makes a connection to the database based on what environment is being requested. Finally, the :db namespace is defined with the :migrate task. The migrate task calls the migrate method on Migrator, pointing it to the directory the database migrations are in.
With all the basic file and directory scaffolding out of the way, you can now spec and create the service. The specs for the service define the behavior for expected interactions and a few of the possible error conditions. The specs described here are by no means complete, but they cover the primary cases.
Using GET
The most basic use case for the server is to return the data about a single user. The following sections outline the behavior with specs before starting the implementation.
Spec’ing GET User
To get the specs started, you create a file in the /spec directory called service_spec.rb. The beginning of the file and the user GET specs look like this:
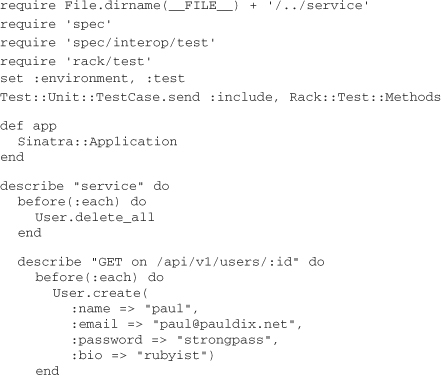
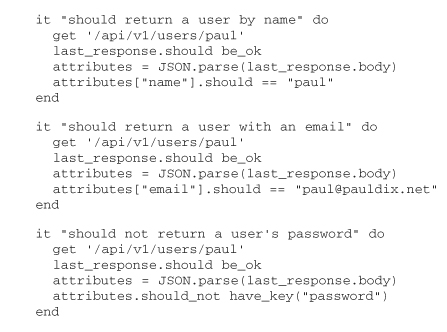
The first 11 lines of the file set up the basic framework for running specs against a Sinatra service. The details of each are unimportant as you continue with the user specs.
There are a few things to note about the tests in this file. First, only the public interface of the service is being tested. Sinatra provides a convenient way to write tests against HTTP service entry points. These are the most important tests for the service because they represent what consumers see. Tests can be written for the models and code behind the service, but the consumers of the service really only care about its HTTP interface. Testing only at this level also makes the tests less brittle because they aren’t tied to the underlying implementation.
That being said, the test still requires a user account to test against. This introduces an implementation dependency in the tests. If the service were later moved from DataMapper to some other data library, it would break the test setup. There are two possible options for dealing with setting up the test data.
First, the service could automatically load a set of fixtures when started in a test environment. Then when the tests are run, it would assume that the necessary fixture data is loaded. However, this would make things a little less readable because the setup of preconditions would be outside the test definitions.
The second option is to use the interface of the service to set up any preconditions. This means that the user create functionality would have to work before any of the other tests could be run. This option is a good choice when writing a service where the test data can be set up completely using only the API. Indeed, later tests will use the service interface to verify the results, but for now it’s easier to work with the user model directly to create test data.
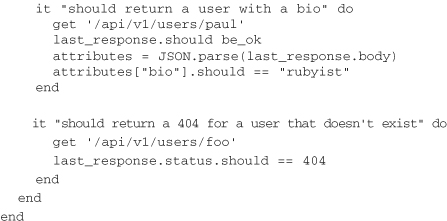
Each of the successful test cases expects the response to contain a JSON hash with the attributes of the user. With the exception of the “user not found” test, the tests verify that the individual attributes of the user are returned. Notice that each attribute is verified in its own test. This style is common in test code despite its verbosity. When a failure occurs, the test shows exactly which attribute is missing.
The spec can be run from the command line. While in the user-service directory, you run the following command:
spec spec/service_spec.rb
As expected, the spec fails to run correctly before it even gets to the specs section. To get that far, the user model file and the basic service have to be created.
Creating a User Model
To create the user model, a migration file and a model file need to be created. You create a file named 001_create_users.rb in the /db/migrate directory:
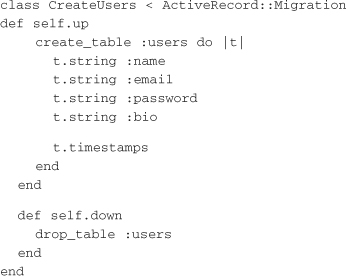
The file contains the ActiveRecord migration logic to set up the users table. The fields for the name, email address, password, and bio fields are all there as string types.
When the migration is done, you can add the user model. You create a file called user.rb in the /models directory:

The model contains only a few lines. There is a validation to ensure that the name and email address of the user are unique. The to_json method, which will be used in the implementation, has been overridden to exclude the password attribute. This user model stores the password as a regular string to keep the example simple. Ordinarily, a better solution would be to use Ben Johnson’s Authlogic (http://github.com/binarylogic/authlogic). The primary benefit of Authlogic in this case is its built-in ability to store a salted hash of the user password. It is a big security risk to directly store user passwords, and using a popular tested library reduces the number of potential security holes in an application.
Implementing GET User
With the model created, the next step is to create the service and start wiring up the public API. The interface of a service is created through its HTTP entry points. These represent the implementation of the testable public interface.
In the main user-service directory, you create a file named service.rb that will contain the entire service:
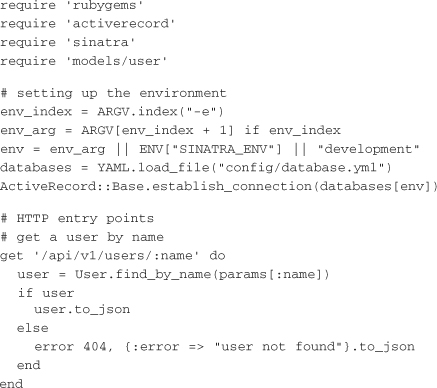
The beginning lines in service.rb load requirements and set up the environment. The environment loading pulls an optional environment argument from the command line.
The implementation for the GET user is simple. It opens up with a call to the Sinatra domain-specific language with the line get ' /api/v1/users/:name ' do, which is a call on the method get that passes in a string and a block. The string specifies the path or URL pattern to match against. This specifies that it should use this block for paths matching /api/v1/users/, followed by some string of characters. This will be checked against only if the incoming request is a GET.
Inside the block lies the implementation of the get method. Sinatra also provides post, put, and delete methods, which you’ll use in a bit. Note here that params is a hash that is automatically populated. It stores the request body, if provided, and maps the symbol arguments in the URL match string. In this specific case, the mapping would be {:name => "paul" } if the request URL were /api/v1/users/paul.
The body of the method uses the params hash to attempt to find the user. If the user is found, it is returned as serialized JSON. The to_json call is the last statement executed in the block, so it is the return value. Sinatra puts this value in the response body with a status code of 200.
Finally, the error condition of not matching the user must be gracefully handled. Sinatra provides another method, called error, that is used for returning error conditions. If the user isn’t found, the service returns a 404 error with a JSON error message.
At this point, the service spec can be rerun, and everything should pass. To run the service locally for additional testing, you can run the service regularly as a script, like this:
ruby service.rb –p 3000
The service will be started on the localhost at port 3000.
POSTing a User
Now that the basic case of finding a user has been covered, the service should be able to create a user. The service will follow the standard Rails conventions and make the call to create a user a POST.
Spec’ing POST User
Within the describe block for the service in spec/service_spec.rb, you add another describe block:
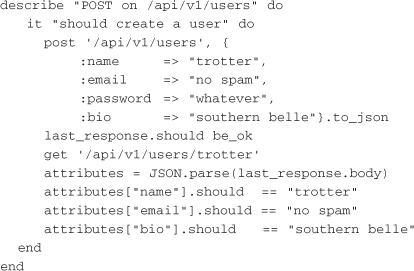
The spec sends a POST to the /api/v1/users entry point. The second argument to post is a string that is sent as the request body. To make things a little easier and more readable, this code uses a hash and converts it to JSON. The service should be able to read this JSON hash and create a user. The expected response is a 200 error message with the newly created user as the body.
This spec now shows using the service interface to confirm the success of the user create. Another GET is issued for the user that was just created. It is checked to make sure that all of the POSTed data is the same.
Implementing POST User
With the specs written, the POST user implementation can be put into the service. You add the following code to service.rb after the GET interface:
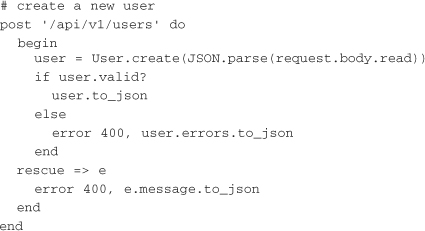
The Sinatra domain-specific language offers a method for defining HTTP POST endpoints to the service. The string matches against a specific URL. The service expects a JSON attributes hash to be in the body of the request. Sinatra exposes a request object with an assessor to the body. It is a StringIO object that has to be read in.
Once the body is read, it can be parsed by JSON and handed to the user create method to create a new user in the database. If the create fails, the errors object is serialized as JSON and returned in the body of a 400 response.
PUTing a User
The service uses HTTP PUT to perform updates to existing users.
Spec’ing PUT User
Within the describe block for the service in service_spec.rb, you add an additional describe block to specify the behavior of user updates:
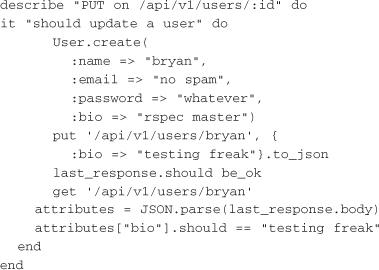
First, a user is created that can be updated through the service interface. The spec then sends a PUT request to /api/v1/users/bryan, with a body that contains an attributes hash converted to JSON. Once again, the service interface is used to test whether the user has been updated. The check verifies that the passed-in attribute has been updated.
Implementing PUT User
With the specs written, the PUT user implementation can be put into the service. You add the following code to service.rb after the POST interface:
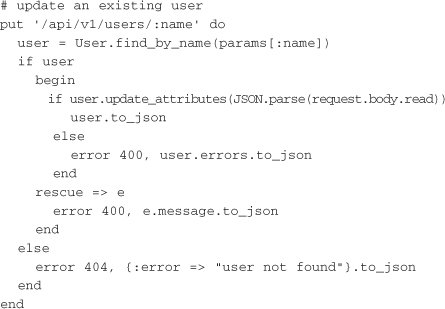
Sinatra provides a put method to match up with the HTTP method of the same name. The matcher looks for the /api/v1/users/ followed by a string of characters that are parsed as the name. First, the user is found from the database. Then the attributes are parsed from the request body and the user is updated.
Much of the code in the PUT method is for handling errors. The code accounts for three possible error conditions: attempts to update a user that doesn’t exist, data validation errors when update attributes are called, and JSON parse errors with the body.
Deleting a User
To support full user CRUD, the service must be able to delete users. The HTTP DELETE method is the perfect choice.
Spec’ing DELETE User
Within the describe block for the service in service_spec.rb, you add another describe block to specify the behavior of user deletions:
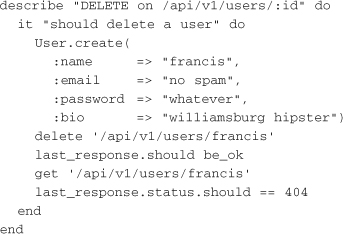
The delete action only cares that the service response is a 200 error. The service is used to test the deletion by trying to perform a GET on that user. The expected result is a 404 (“not found”) error for the recently deleted user. Having well-defined behavior for the GET error condition makes it easy to verify that DELETE actually worked.
Implementing DELETE User
With the specs written, the DELETE user implementation can be put into the service. You add the following code to service.rb after the PUT interface:
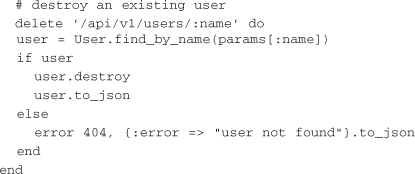
Sinatra also provides a delete method to match the HTTP method of the same name. The matcher for delete looks exactly like the PUT matcher. The user is found and deleted from the database. If the user isn’t found, a 404 error is returned.
Verifying a User
The final requirement for the service is the ability to verify a user’s credentials based on the user’s name and password.
Spec’ing User Verification
Within the describe block for the service in service_spec.rb, you add another describe block to specify the behavior of user verification:
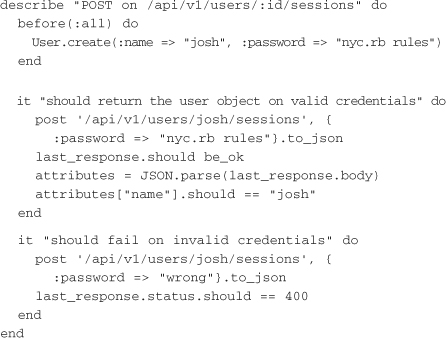
The service follows the pattern of creating a session. This makes the choice of which URI to use fairly simple. The URI could easily be /api/v1/users/:id/login. However, if you want to do finer-grained session management later, it helps to think of the session as a completely separate resource. Having the session as a resource also falls more closely in line with the general RESTful style.
You need to test for two basic cases: valid credentials and invalid credentials. The body of the request is a JSON hash that has only the password. The name of the user is pulled directly from the URI.
For invalid user name and password combinations, the service should return a 400 HTTP status code, which means that the server received a “bad request.” The service could also use the 401 (“unauthorized”) response code, but that code specifies that authentication credentials need to be in the request header, which is not quite what is required.
Implementing User Verification
The final piece of the service is ready to be implemented. You now add the following code to the end of service.rb:
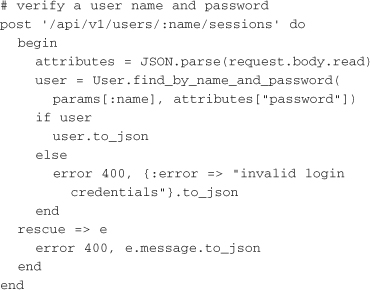
The request to create a session is an HTTP POST. The user name is pulled from the matcher, and the password is in the request body. These are both passed to the finder. If a user matching the two is found, the user object is returned. In a more complete implementation, a session object would probably be created and returned. Finally, the error condition of an invalid login is handled, with a 400 return code.
Implementing the Client Library
A client library must be written to access the service functions from the outside. The goal of the client is to provide a lightweight wrapper to the service that will handle making requests and dealing with error conditions. Chapter 7, “Developing Service Client Libraries,” goes into greater depth on cleanly separating request and parsing logic, but for now we’ll keep things simple and make this client library very lightweight.
Finding a User
First, the client library should be able to call to the service to look up a user. The file for the library can sit in the same directory as the service, and the spec for the client library can go in the spec directory.
Spec’ing User.find
The specs for the client will test end-to-end interaction with the service. This means that the service will have to be running locally in order to run the client-side specs. Many programmers would prefer to mock in their client library specs, but doing so could result in the service and client passing all specs with hidden failures. These tests will serve to make sure that the actual service responses reflect what the client expects.
It’s useful to note that when using the client library in other applications, the remote calls should be mocked out. At this point, the library has been fully tested and there’s no need to run all the way to the service itself.
As with the service-side tests, there is the problem of how to handle fixture data. The problem is especially tricky when writing the client tests because they shouldn’t have direct access to the service database. The first option is to enable the service to start up in a test environment. If it is running in that environment, it should load fixture data. The second option is to use the service API to create fixture data. This chapter uses the first approach. You add the following lines just after line 10 in service.rb:
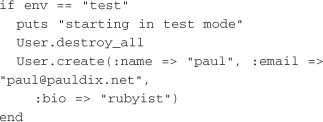
With these additional lines, you can start the service in test mode before running the client specs by first running the database migrations and then running the service from the command line, like this:
![]()
Now that the service is running in test mode, the client and specs can be created. In the spec directory, you create a file named client_spec.rb and copy in the following lines of code:
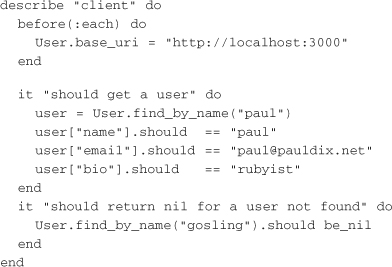
The setup of the test sets a base_uri on the User class. This tells the service client where the service lives. The two it blocks test the basic find functionality. First, the service should find a user that exists (remember that this user was created when the service was started). Second, it should return nil for a user that doesn’t exist. Notice that both tests work with raw JSON responses from the service.
Implementing User.find
Find user is the first method that the client library should implement. In the main service directory, you create a file called client.rb and copy in the following code:
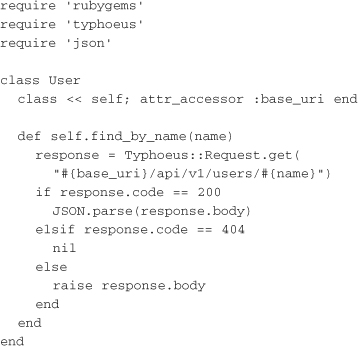
First, all the library dependencies are loaded and the class is declared. Then the base_uri accessor is created on the class. Finally, the find_by_name class method is declared. The implementation uses a shortcut method provided by the Typhoeus Request class. An HTTP GET is made to the service at the proper endpoint, /api/v1/users/:name. This simple example uses only the basic Typhoeus functionality.
To handle both of the test cases, the response code must be checked. If it is 200, you parse the response body and return it. If the response code is 404, the library should return a nil. Finally, if some other response is encountered, you raise an exception.
Creating a User
The next step in wiring up the service functionality is to enable the client library to create a user.
Spec’ing User.create
In the client_spec.rb file, you add the following it block right after the “user not found” test:
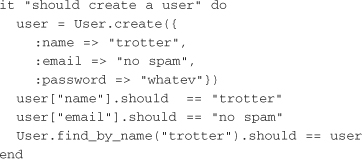
This user creation test actually checks for two things. First, it confirms that when a call is made to User.create, the test returns the user hash. Then the final line confirms that the user was actually created in the service. Notice that the previously implemented find_by_name functionality is in use. The call verifies that the server understands the create call the client sent, and it ensures that there is end-to-end coverage with the client and service.
Implementing User.create
Now you can wire up user creation. After the find_by_name method, you add the following code:
The implementation is very simple. The attributes are passed in as a hash. A POST is made to the service, with the attribute’s hash serialized as JSON in the body. This is slightly different from a regular POST request because it doesn’t use form variables. The service expects a JSON hash in the body.
Notice that no validation occurs in the client library. The server is able to perform that validation and return errors. This example handles only successful responses gracefully. In a more fully featured client library, the errors should also be handled.
Because create user is running against a locally running service, the first time the spec is run, the user is created. Remember that the service startup clears out the test database. This means that between each full run of the client specs, the local test service needs to be restarted. Chapter 7, “Developing Service Client Libraries,” explores other methods for client library testing.
Updating a User
The next step in writing the client is to wire up the functionality to update a user.
Spec’ing User.update
The user update test looks very similar to the user creation test. You add the following code after the create user test:
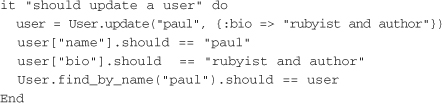
The test verifies that the user model has a class method called update. It takes the user name as the first argument and the attribute’s hash as the second. Further, this method should return the full user attribute’s hash. Finally, the test verifies that the user has actually been updated.
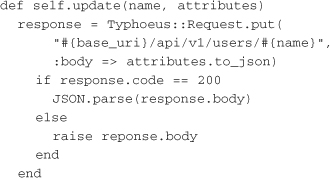
Implementing User.update
With the spec written, the update user method can be added to client.rb. After the create method, you add the following code:
Here, an HTTP PUT request is made to the service to update the specific resource of the user with the passed-in name. Just as with user creation, the JSON serialized attribute’s hash is passed in the request body. It should be noted that a PUT with this service works as it does in Rails. That is, the attributes that are in the hash are updated, while the omitted attributes remain the same. The service should be restarted between each run of the client specs.
Destroying a User
The final step in wiring up full CRUD functionality is enabling deletion of a user.
Spec’ing User.destroy
The destroy user spec is fairly simple. However, for the spec to run, a little bit of setup needs to occur in the service.rb file. In the test environment setup block, you add the following line to create a user that can be deleted:
User.create(:name => "bryan", :email => "no spam")
Now that the test data is in the service, the spec can be written. You add the following it block after the update spec:

The User.destroy spec verifies that the return value for the destroy call is true. Finally, it uses the find functionality to verify that the user was deleted on the service side. Once again, this ensures end-to-end coverage of the client and service.
Implementing User.destroy
After the update method in client.rb, you add the following method:

This simple method makes an HTTP DELETE call to the service to delete the specific user resource. The method simply checks that the response code is 200 (“success”).
Verifying a User
The final part of the service functionality that needs to be written is the verification of user credentials.
Spec’ing User.login
At a minimum, there should be two tests to check that our user verification works as expected. The first test verifies valid credentials, and the second verifies disapproval of invalid credentials:
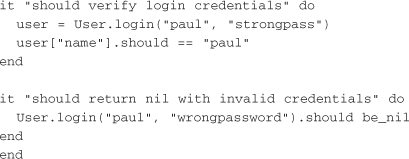
The tests are fairly simple. Both run against the user paul that is already set up. The first test makes sure that the login method returns the user hash when successful. The second test shows that if login is unsuccessful, the test returns nil.
Implementing User.login
After the delete method in client.rb, you add the following for the login functionality:
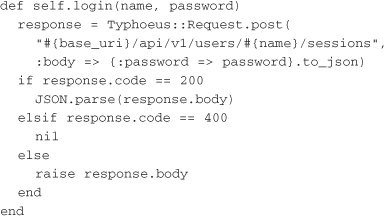
The client makes a simple HTTP POST to the service, with the password in a JSON object in the body. If the request is successful, the response body is parsed. If a 400 code is returned, this means the credentials were invalid and a nil should be returned. Finally, if some other error occurs, an exception is raised.
Putting It All Together
Now that the service and client have been fully written, they’re ready for a full test. You start up the service in test mode and run the client-side specs. Because the client specs hit the running service, doing this actually tests both the service side and the client side. When these specs pass, you can be sure that the service works end-to-end.
Having the client specs hit the running service may seem like overkill. In fact, there is a bit of coverage overlap between the server-side specs and the client-side specs. Indeed, the client specs alone are enough to test the service in this case. While this may seem like an appealing shortcut, it’s worth having the client and service separate. As more logic is added to both the client and service, it will become important to run tests against underlying methods that aren’t part of the public interface. So despite the service’s current simplicity, later you’ll appreciate having both client- and service-side specs.
Conclusion
This chapter provides a quick introduction to creating a simple service. It may seem like a lot of work, but as you will see throughout this book, the effort can pay off in the long run. For now, this implementation represents the basic functionality of a user service that can be used by many applications.
While most of the effort involved here has to do with creating a simple HTTP-based data store for user accounts, services can be used to contain business logic behind their interfaces. The upcoming chapters look at design considerations, complexity, and configurations for writing services and client libraries. Much of this is done with an eye toward integrating these services into a fully featured Rails application.