
Chapter 12. Web Hooks and External Services
Applications that send and receive requests from external services have been such a key factor in the boom of web applications, APIs, and innovation over the past few years that a term has even been coined for this network: the Programmable Web. Applications that rely on resources that are outside a project’s or an organization’s control bring a level of dynamism with unique challenges for development teams. Some of these traits can change various aspects of how an application should be designed or the level of attention that needs to be paid to how the application performs and behaves if these services are unavailable or otherwise limited.
This chapter provides a broad overview of some of the most important ways to think about solving the challenges associated with external web services. This chapter provides a definition and overview of web hooks, along with examples for implementing both web hook providers and consumers. The chapter also discusses strategies for dealing with external services, queuing systems, and OAuth-delegated authentication. This includes how to manage the effects that the availability or performance (or lack thereof) of an external service may have on the way an application behaves. Where possible, representative projects, libraries, and resources are referenced so that readers can dig deeper into the concepts that may specifically affect their applications and projects.
Web Hooks
Web hooks are essentially callbacks for services. When speaking of callbacks, developers are typically talking about methods or messages that are automatically “fired” on completion of some other process or event. Most web developers are familiar with the typical case of using JavaScript in the browser to handle click, mouse, and other user-initiated events, such as onClick and onMouseOver.
In the Ruby world, a similar concept is built into ActiveRecord objects. A series of callbacks are fired during the lifecycle events of ActiveRecord objects, including before_save, before_validation, and after_validation, after_save.
Suppose there is a resource in an application called Car, and the application requires some work to be done after every Car is created. These tasks could be initiated using the following code:
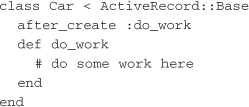
The after_create line tells the Car class to call the do_work method after the create occurs. Web hooks take this concept of callbacks, or event-based programming, and move it into the sphere of web services.
Let’s look at an example that highlights the motivation for the use of web hooks. Say that an organization requires that an event be created in its calendar system every time a new milestone is added to a separate project management system. The typical way to accomplish this is to build a client plugin for the calendar system that polls the project management system for new milestones. This process could run nightly, hourly, or every five minutes. It could pull new milestones into the calendar as they are found. When it comes time to scale this model to thousands of calendars or hundreds of project management systems, the polling method quickly becomes unmanageable. Massive amounts of wasted resources will be used when the calendar system polls the project management system and finds no updates. Further, the updated data will always lag a little bit behind, based on the polling interval.
Web hooks represent a different way of thinking about the problem of exposing data to clients. By focusing on the events that would trigger a client’s interest, web hooks turn the model on its head. In the web hooks model, the project management system implements a web hook callback that posts data to a predetermined URI whenever new milestones are entered. The calendar system implements a service endpoint specified by a URI that receives these callbacks and takes the appropriate action (in this case, entering a new event in the calendar). When no action is taking place, both systems are idle, and no resources are wasted on unnecessary polling.
PubSubHubbub
PubSubHubbub (http://code.google.com/p/pubsubhubbub/) is a decentralized protocol that extends the Atom and RSS protocols to include support for web hooks. The general idea behind PubSubHubbub is that Atom/RSS feed servers can direct potential subscribers to “hubs.” Instead of continually polling the feed, clients can subscribe to the hub and be notified via web callback when updates are published. The following sequence shows how PubSubHubbub operates:
1. A client makes a request to the Atom feed at http://pauldix.net/atom.xml.
2. The client parses Atom XML and finds the URI for the hub.
3. The client makes a request to the hub (at http://pauldix.net/hub) to be subscribed to the Atom feed (http://pauldix.net/atom.xml), with notifications sent to http://trottercashion.com/notify.
4. When the Atom feed is updated, the server (or publisher) sends a notification to the hub.
5. The hub gets the Atom feed and sends the update to all the the subscribed clients.
6. The subscriber (http://trottercashion.com/notify) gets the notification from the hub.
This example shows one client subscribing to an Atom feed to be notified of updates. PubsubHubbub uses the word topic to refer to the Atom feed URL. What occurs in step 4 is referred to as a ping sent to the hub by the server. Note that anyone can host a hub. There is no requirement that the hub for http://pauldix.net/atom.xml be hosted at the same domain. There is a competing standard in RSS called rssCloud (http://rsscloud.org) that does nearly the same thing.
Receiving Web Hooks
A continuous integration server is a good example of where web hooks can be used. A continuous integration server runs an application’s test or build suite whenever changes are made to the code base. Thus, a web hook can be used to notify the integration server of an update to the code.
Following is an example of how this works with the post-receive hooks web callbacks provided by Github (http://help.github.com/post-receive-hooks/) and the continuous integration server Integrity (http://integrityapp.com). Post-receive hooks can be enabled in Github by going to the project home page as a logged-in user, clicking Admin, and then setting the URL. In Integrity, the post-receive hooks callback URL should be set to http://yourserver/github/token, where yourserver is the public host name of the server Integrity is running on, and token is a string that has been set in Integrity’s configuration options.
Once this URL is set in the repository’s options, Github POSTs a web hook in the form of a JSON payload to the Integrity server after every changeset is pushed. As of this writing, the payload contains details about the repository and a list of the commits in the changeset that is being pushed. The following is an example of a payload provided in Github’s documentation:
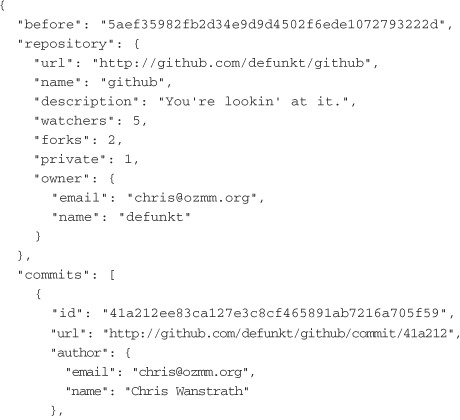
The body of the callback is essentially a JSON-formatted payload of what was once a Ruby object. This data can be marshaled back into a Ruby object or parsed into a hash by any application that needs to act on it.
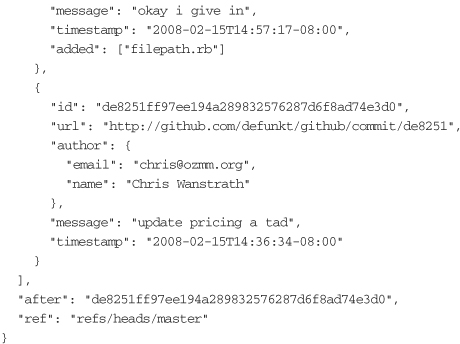
Integrity is a lightweight Sinatra application. The following code matches incoming post-receive hooks callback requests:
When Integrity receives the POST request from Github, it does a quick check to make sure the endpoint (Github) is enabled and that the token matches the configuration. Then it passes the payload information to the class responsible for running the build.
Using web hooks to notify an integration server shows how simple and powerful web hooks are. Having just one push done in a day triggers only a single call instead of the hundreds that a poll-based method would use. For event-driven interactions, using web hooks is much more efficient than constantly polling another server to look for changes. The number of web hook implementations out in the wild is still relatively small, but services that are providing them as part of their applications are providing their customers with another powerful tool to implement innovative applications.
Providing Web Hooks
To show an example of providing web hooks in an application, let’s jump back to the hypothetical example of a project management tool that needs to send milestone dates to a calendar. Because ActiveRecord already has built-in callbacks around the object lifecycle, this provides a simple place to hook in and provide the behavior the application needs:
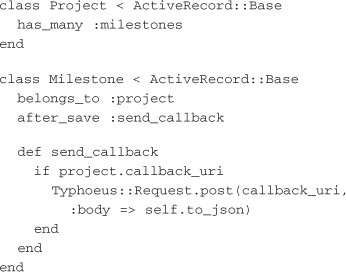
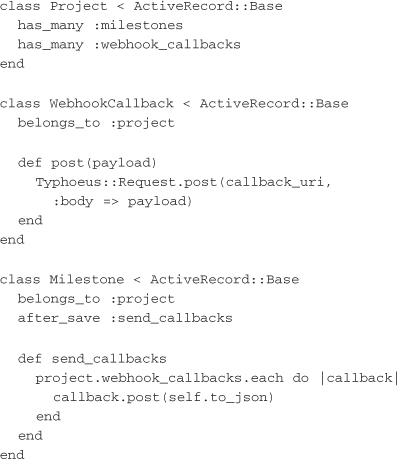
This implementation has a few issues that need to be dealt with at some point in the near future. First, the project has only one potential callback URI. Second, the web hook POST happens within the request lifecycle when a milestone is created. Adding multiple callback URIs is a simple modification that can be accomplished with the addition of a WebhookCallback model and some slight changes to the existing models:
Posting callbacks within the normal request lifecycle (that is, while the user is waiting for the application to respond) is not desirable in most production applications. The method for moving work outside the request lifecycle is to use a queue or messaging system to communicate with a background worker.
Next we’ll build on the introduction in Chapter 11, “Messaging.” A few simple modifications to the WebhookCallback class allow the application to write data to a queue on a RabbitMQ server, using the Bunny library discussed in Chapter 11.
Anything that is written into the queue is picked up by workers. Workers can be run on any machine that has access to the queue, and multiple workers can be run and can consume messages out of the queue:
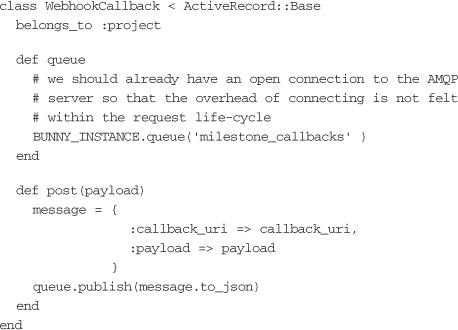
Enough information is pushed into the queue (in this case, the destination URI for the callback and the payload that should be sent) that a generic worker can pick the message off the queue and accomplish the task. Applications can marshal or serialize Ruby objects directly into the queue as YAML or JSON, but the more generic the message is, the better.
Strategies for Dealing with Failure
A couple of basics need to be dealt with when implementing a delayed work and queuing strategy in an application. It is sometimes prudent to track the number of attempts for any job, when a job is run, when a job has failed, when a job is locked (being executed), or which worker is running a job.
Retry logic is vital when working with external services. If the third-party service that data is being posted to is unreliable, or if the network in between the two applications is unreliable, a retry mechanism can ensure that a single failure does not prevent the web hook callback from being issued. When designing retry logic, it’s best to have an exponential back off on the time. For instance, when a failure occurs, the worker should retry two seconds later, then four, then eight, and so on until some threshold has been reached. If the remote server has still not responded after a reasonable number of retries, an error should be logged or the job should be placed into an error state so that it can be addressed again later.
Web hook callback receivers should be idempotent. That is, if a callback is called once and done again, the second call does not have a different effect. This is common in the RESTful design paradigm and an important aspect of web API design. Remember that the HTTP verbs GET, PUT, DELETE, and HEAD are all idempotent actions. Designing callback receivers to be idempotent ensures that if a worker attempts to run a callback and fails partway through, another worker can run the callback again without adverse consequences.
Job deletion should be the last action a worker takes on an item. This assumes that the jobs are idempotent, but a worker should be able to fail until the last possible moment without hindering the ability of another worker to retry the job. Tangentially, recording failures (perhaps in an independent queue, database table, or log file) can provide a level of forensic insight into why jobs are failing and may allow some of those failures to be worked around. AMQP-based queues have the concept of acknowledgment built in. Messages are deleted from the queue when they are read but are reinserted directly back into the queue if acknowledgment is on and the client does not acknowledge receipt of the message.
OAuth
While web hooks provide a method for services to communicate with each other quickly about updates in their data, OAuth provides a method for users to give services access to their data. OAuth is an open protocol that allows API authorization for desktop and web applications. More specifically, OAuth enables users of one service to allow other applications to access their data without the need to reveal or store their account credentials. OAuth accomplishes this by sending the user to the service to authenticate while the service creates an authorization token for each consumer application. The user or data provider can then revoke the token at any future point.
Implementing an OAuth Consumer
Following is a brief tutorial that steps through the OAuth flow, with some sample code for using the OAuth gem to connect to the Twitter OAuth service. It shows how to connect to an OAuth-protected API from your web application on behalf of a user.
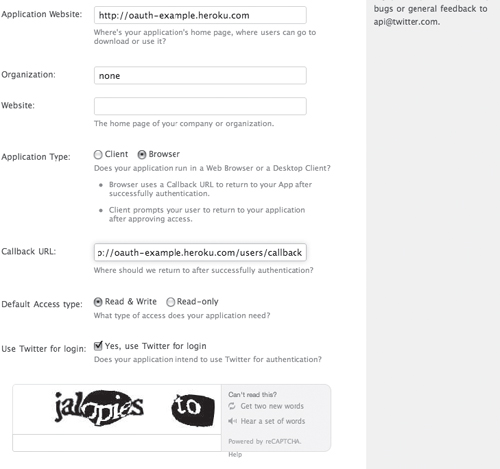
First, the new consumer application needs to be registered with the service that is going to be connected to, in this case Twitter, and a consumer key must be obtained. Go to http://twitter.com/oauth_clients to start this process. Figure 12.1 shows the application registration page.
The important things here are setting the application type to Browser to ensure that users are redirected back to the application after authorization at Twitter, and the callback URL, which is where users will be sent.
Figure 12.1 The Twitter OAuth consumer application registration.
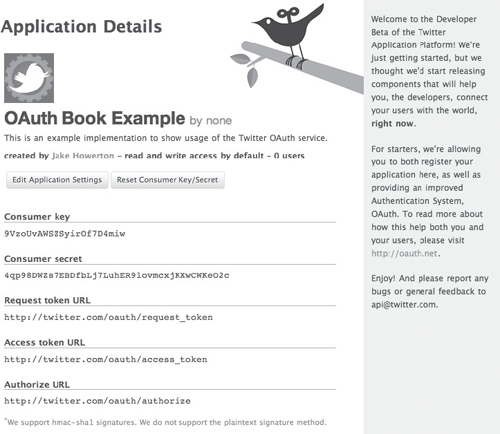
After you create the application, a confirmation page appears, as in Figure 12.2. The confirmation page shows the consumer token and secret that will be used later.
Now you set up the OAuth gem and client. The official fork can be found at http://github.com/mojodna/oauth:
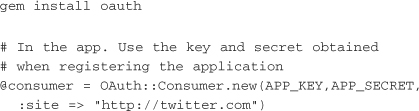
Figure 12.2 Twitter OAuth consumer application registration confirmation and credentials.
The first step in the process is retrieving what OAuth calls the request token from the provider (Twitter). This token is sent along with the user as the user authenticates so that the provider can identify the application that is being authorized:

This request token will be exchanged later for an authorization token. Be sure to set the callback URL in place of APP_CALLBACK_URL. The request token needs to be stored somewhere while the user leaves the site to authorize. In this example, it is being stored in the user’s session.
Next, you redirect the user to http://twitter.com to authorize the connection:
redirect_to @request_token.authorize_url
The authorize URL that the user is redirected to looks something like http://twitter.com/oauth/authorize?oauth_token=fkmutXA.
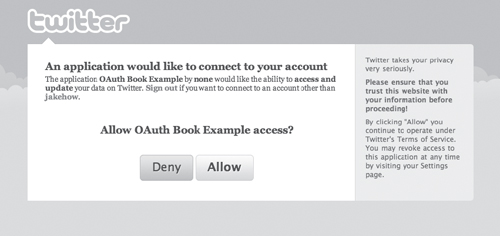
The user needs to authenticate with Twitter and agree to authorize the app, as shown in Figure 12.3.
Figure 12.3 The Twitter OAuth access authorization screen.
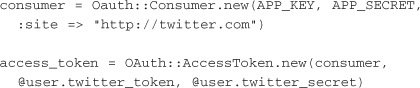
After authorization, the user is redirected back to the application through the callback URL that was set. The application should then trade the request token for an access token and store it for future use:
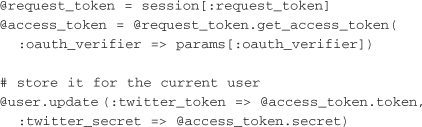
In the future, the access token will need to be reconstructed to perform other actions:
Using the access token, the application can now retrieve data or write data to the user’s Twitter account as long as the token and account are valid.
Implementing an OAuth Provider
An application needs to implement a few features in order to provide access to its resources via OAuth:
• Developers need to be able to register new applications to receive consumer key/secret pairs.
• Users need to be able to approve, manage, and revoke tokens that have been issued against their account.
• The application needs to be able to authorize access to resources when presented with a token.
Luckily, there is a full implementation that provides these basic features out of the box for Rails applications. The plugin is compatible only with Rails 2.x as of this writing, but it should be adaptable to newer versions relatively easily. The code is available at http://github.com/pelle/oauth-plugin:
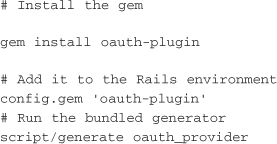
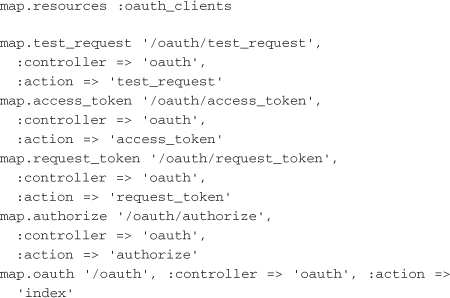
The generator spits out several models, most importantly ConsumerToken, ClientApplication, OAuthToken, and OAuthNonce, along with a migration for these new tables, some default views, and the following routes:
You need to add the following two lines to the user model in the application:

And then you need to run the database migration:
![]()
At this point, the plugin is completely set up. The current implementation assumes that the application uses a RESTful authentication—style authentication plugin and provides filters for allowing OAuth authorization to restricted resources:
![]()
These methods authorize and populate current_user and other expected conventions from restful_authentication, making integration relatively seamless. The views need to be customized to look like they belong in your application, but otherwise, the application is now ready to provide access to consumers as described in the previous section.
Integrating with External Services
Integrating with external services involves consuming data from or sending data to another service. Twitter is one of the best examples of a platform that provides relatively open access as a service to individual developers, other services, and users. Allowing access in this fashion has let these third parties iterate and innovate on Twitter’s core platform by providing additional services, features, and applications that are built around and into the various core features that Twitter itself provides. Thus, the Twitter services provide for the examples in the following sections.
Consuming Data
With the background understanding built around using OAuth to authenticate with Twitter, the next logical thing that an application needs to do is grab some data from this service. Consuming data from external services can present unique challenges, but let’s take a look at a basic case in which the application needs to fetch the friend’s timeline of the authenticated user:
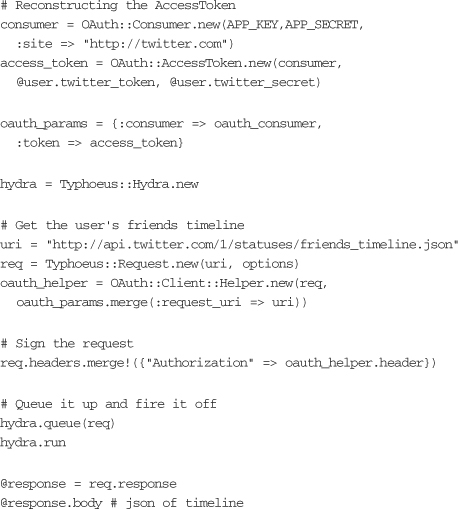
This example creates the access token from the user’s token and secret. A request points to the friends timeline of the user. The OAuth parameters are merged into the request, and it is sent to Twitter. The response is a Typhoeus response object. The body contains the user’s friends timeline in JSON format.
Pushing Data
The quintessential example of pushing data into Twitter is the status update, or tweet. Much of the tool chain necessary to accomplish this action has been dealt with at this point. The only difference is that this request is going to be a POST, with the status message sent along in the params hash:
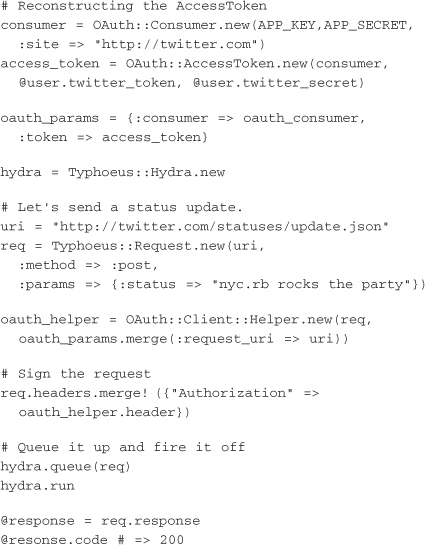
This example sets up the access token, builds a request, and sends it through hydra. The response should indicate a 200 code.
The Request Lifecycle
As with web hooks, the examples of consuming and publishing data to external services must take into consideration the issues of failover and performance. Requests to these services should almost never happen within the request lifecycle of a user. However, data from third-party services may not have an immediate time sensitivity like the normal data in an application. Perhaps the application can rely on a cron job that runs once an hour and caches data in the application’s own database. This would allow all work to be done outside the request, and it would allow results to be pulled directly from the cache instead of being fetched across a public network on every request.
If real-time results are necessary for an application, one strategy is to load the main page content first and have an AJAX widget that checks whether the data is ready. In the background, the application sends a job to a queue that assembles the results. When the data is ready, it can be loaded onto the page through the embedded AJAX widget. If there is a failure, a message can be displayed to the user, or the job can be retried in the background. These strategies are used heavily in complex web applications such as Google’s Gmail.
Worker Processes
In order to push interactions with external services outside the request lifecycle, a new piece of infrastructure comes in to play: the worker process. Ideally, worker processes are always-on daemons that monitor the queue and process jobs as required by the application. The following example of building a simple worker daemon uses the Servolux library from Tim Pease. Code for this library is available at http://github.com/TwP/servolux, and it is also available as a gem. This library provides generic wrappers to do many of the common tasks necessary for managing long-running jobs. In the case of building a worker process, Servolux helps manage a pool of child processors that actually do the work.
The worker that you are building here takes the example from the earlier section on pushing data and accomplishes the same task within a worker. This assumes that the application is now pushing JSON with the authorization header and body of the tweet into a RabbitMQ queue called tweet_callbacks:
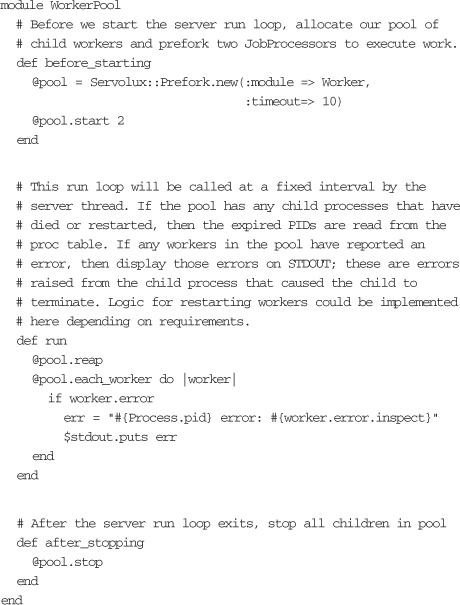
The WorkerPool module manages a simple pool of workers. In this case, you have set the pool size to two workers in the body of the built-in setup method before_starting. Servolux executes the run method at a specified interval in order to manage the workers and report on any errors that may have occurred in the pool. The specific worker implementation is encapsulated in a module called TweetSender, and the details are shown here:
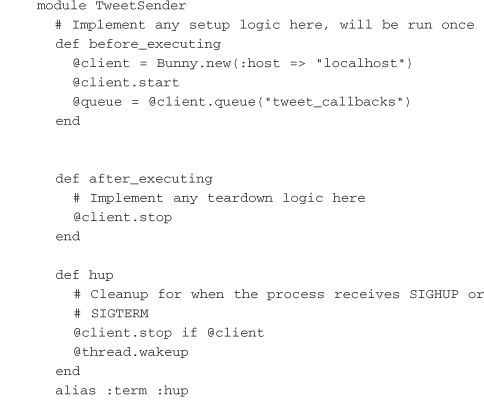
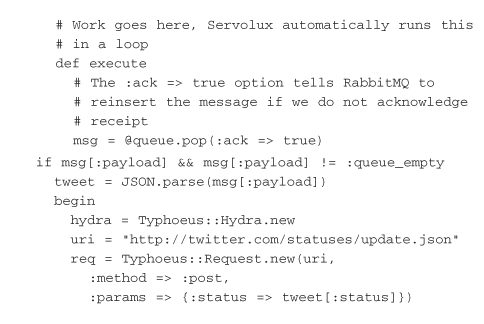
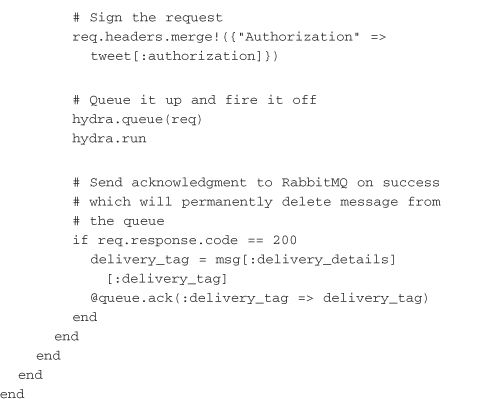
The worker has built-in hooks for setup and teardown as well, with the addition of methods that can respond to signals sent to the process. For our purposes, SIGHUP and SIGTERM should be dealt with in the same fashion, but individual implementations can be made for each. The real crux of what happens here occurs in the body of the execute method. Servolux runs this code in a loop until an exception is thrown. The code pulls one message at a time off the queue and ships it over to the Twitter API, using the method described in the previous section. If it is successful, the queue is sent an acknowledgment, which permanently removes the message from the queue:
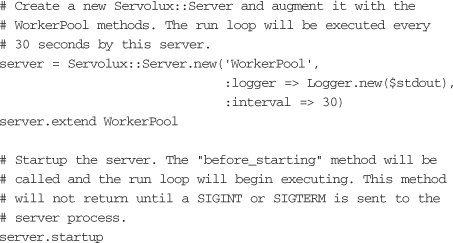
Here you are simply loading your custom WorkerPool module, setting the interval at which the run method will be executed, and starting up the server.
As you might imagine, implementing queues and worker pools to support scaling an application and taking slow writes out of the user’s request lifecycle is a significant change and addition to the infrastructure that a team is supporting. These worker pools should be managed and instrumented in much the same way as the actual application servers in order to ensure that they are running and healthy at all times. The example here is relatively generic and would require that additional considerations be dealt with in a live application. This is left for you as an exercise because the actual requirements are unique to the project at hand.
Ensuring Performance and Reliability
Using messaging and work queues to bring external services into in an application is a necessary step in increasing performance and bringing a service-oriented design to fruition. You need to give some thought to how the connections to external services are managed. They should be isolated to ensure that the performance of one service does not have a negative impact on others. For your own APIs that are exposed to the public, you should be careful to ensure their reliable operation. The following sections cover some of the factors you need to take into account when working with and exposing services to the public.
Segregating Queues
Imagine that there is a shipping company that has one warehouse. All trucks deliver packages to this warehouse and pick them up there for delivery elsewhere in a hub-and-spoke system. One day a hurricane destroys the warehouse. All shipping is halted. Queuing systems operate in much the same way as this warehouse and shipping system. Therefore, queues should be segregated to prevent failure. Some common ways that queues can be separated are by feature, by current state of the work, by region, and by customer. When integrating with multiple external services, queues should always be segregated by service. Segregating queues by service allows work to continue even if one service is down. For example, if an application pushes status updates to both Facebook and Twitter, and the work for these tasks both go through the same queue and worker pool, an outage at Twitter will affect the application’s ability to send messages to Facebook. Maintaining separate queues for each service ensures that a single failure does not cascade to the rest.
Metrics
Metrics are a window into the operational health of a system. Basic metrics that are important in queuing systems include the size of each queue, the length of time any item spends in the queue before being picked up by a worker, and the rates of ingress and egress. Because queues can sometimes abstract away pain points that customers would normally feel immediately, knowing these simple metrics can put an operations team ahead of issues that may be happening in the system but that customers have not yet noticed. For instance, if the queue of status updates going to Twitter is growing, it may be because the marketing plan is finally working, and users are joining en masse. But a quick comparison with the total time that messages are staying in the queue can help a team instantly distinguish between this situation and something being broken.
Having metrics for services that are exposed within an application is just as important. However, the determination of what to measure is likely to be quite unique. Some API metrics that may matter in an application are usage by geography, usage by customer, usage by time of day, usage by application feature, and internal usage versus external usage. Performance in any of these cases is also important, as is general usage. Keeping track of these metrics can help determine when one part of an application is degrading performance of another unrelated feature or whether a new customer is bringing more load onto the system than capacity can currently support.
Throttling and Quotas
Throttling and quotas refers to the limiting of API access by the number of times the API can be hit by an external consumer. This could come in the form of requests per second/hour/day or number of connections per IP address. Throttling and quotas can be used for preventing abuse (whether intentional or from inept client implementers) that may degrade more legitimate use of services. Or they can be used for providing different classes of service to users and customers.
There are a few Rack middleware–based implementations of throttling, but these examples are from Rack::Throttle (http://github.com/datagraph/rack-throttle). Rack::Throttle has three strategies built in for throttling client requests.
• Rack::Throttle::Interval—Sets a specific minimum interval between requests
• Rack::Throttle::Hourly—Sets a maximum hourly rate
• Rack::Throttle::Daily—Sets a maximum daily rate
The interval strategy is one of the most useful methods for regular applications. Hours and days are large intervals that may not be able to prevent potential abuse. For instance, an out-of-control client may be able to affect availability of resources in a shorter time period (a couple minutes) without ever hitting the hourly quota.
Because Rack::Throttle is a Rack middleware–based implementation, implementing it in a Rack-based application such as Rails or Sinatra is simple:

This single directive in your application’s config.ru file forces every request to go through the throttler to verify that the client can make the request. In a small Sinatra service that serves only a web service API, this is ideal. But this isn’t something that you would do for an entire Rails application.
Rack::Throttle allows customized choices for counter storage and response codes. Counter storage refers to where the counters for a client are kept. For instance, if you set a limit of one request every two seconds, the throttler needs to store the counts of when the client making the request last made a request. Counter storage is usually done in Memcached or some other fast in-memory data store. A customized response code can be given after a user has hit his or her request limit. Rack::Throttle can be further customized by subclassing the various throttlers provided.
Conclusion
This chapter provides a whirlwind tour through some of the most important concepts and pitfalls involved in implementing and integrating with external services in real applications. Developers working with and exposing external services have unique needs based on an application’s traffic and the complexity of the API. Providing web hooks to other developers enables developers to create highly responsive and performant applications that integrate with others. Authenticating with other external services via OAuth enables an application to request data on behalf of the user while maintaining the user’s trust. Finally, when exposing your own APIs, it is important to take into consideration the performance, metrics, and possible throttling that should be done to ensure reliable operation.
Overall, this book discusses a number of tools and techniques for building Ruby and Rails applications that are built from multiple services. Splitting a large application into services can lead to improved performance, scalability, and reliability. It also provides the ability to manage complexity and creates a more robust infrastructure. As an application matures, there are many advantages to pulling functionality out of the main Rails code base and into discrete services. You can use messaging systems and web services, and you can package your own code into libraries to make a large project more manageable.