10. Painting and Drawing
A lifetime ago (in computer years, anyway) a little company just south of San Francisco introduced a small beige box with a tiny 9-inch keyhole of a monitor and a mouse resembling a bar of soap. It could display and print only in black and white, was incapable of reproducing even remotely convincing photographic images, and was strictly limited to a resolution of 72 pixels per inch. And yet, graphic artists smiled a collective smile, because bundled in its modest software suite, alongside its stunted little word processor, Apple’s Macintosh gave the world MacPaint.
Painting and drawing programs have jumped by leaps and bounds since taking those first, early baby steps, but one feature remains the same: They’re still so much fun to use!
In this chapter, you’ll learn how to use Photoshop Elements’ built-in drawing and painting tools to create original artwork or to enhance your digital photos—whether you’re filling parts of your image with color, adding a decorative stroked border to a logo or design element, or “painting” a photo with Impressionist-style brushstrokes.
About Bitmap Images and Vector Graphics
Photoshop Elements’ painting and drawing tools render artwork in two fundamentally different ways.
The painting tools, including all the varied fills, gradients, brushes, and erasers, work by making changes to pixels—adding them, removing them, or changing their colors. A bitmap image is composed entirely of tiny pixels; and digital photos, the mainstay of Photoshop Elements, are bitmap images. Although you can apply paintbrushes, color fills, special effects, and filters to bitmaps, they simply don’t resize well. If you try to enlarge a digital photo, for example, you’ll see that its image quality suffers as the pixels get bigger, resulting in a blurry mess.
The drawing tools (shape creation tools, really) form images not by manipulating pixels but by constructing geometric paths based on precise mathematical coordinates, or vectors. Images created with these drawing tools, known as vector graphics, hold one decided advantage over their bitmap cousins: They can be scaled up or down, virtually infinitely, with no loss of detail or resolution (Figure 10.1). Elements’ scalable fonts, for example, are based on vector shapes, so they can be stretched, warped, and resized to your heart’s content. Vector graphics files also tend to be smaller than comparable bitmap image files, since a path shape requires less information for your computer to process and render than a similar shape constructed of pixels.
Although they’re designed to work with different kinds of graphics, the painting and drawing tools are equally easy to use, and work well together if you want to combine vector and bitmap graphics—such as adding type or custom shapes to a favorite photo.
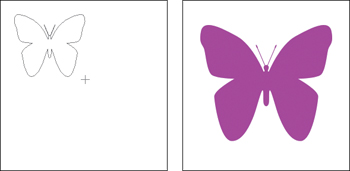
Figure 10.1 A photographic bitmap image (top) is constructed of pixels. Any attempt to zoom in on or enlarge a portion of the image can make the pixels more pronounced and the image more pixelated. A vector image (bottom) is drawn with a series of geometric paths rather than pixels. Vector graphics can be enlarged or reduced with no loss of detail or resolution.

Figure 10.2 Clicking the foreground or background color swatch in the toolbox opens the Color Picker.
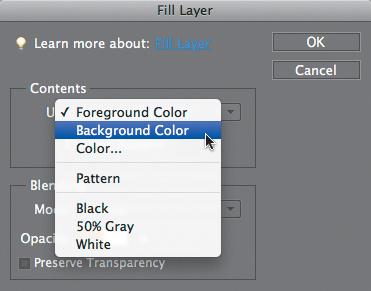
Figure 10.3 The Fill Layer dialog offers several options for filling a layer or selection with color.
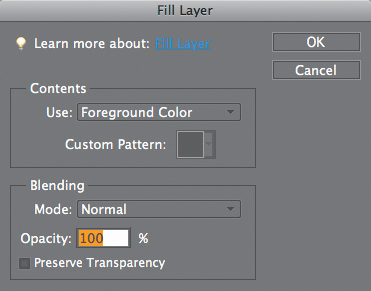
Figure 10.4 The Use drop-down menu contains various sources from which to choose a fill color. Choose the Foreground Color option to apply a specific color chosen from the Color Picker or Swatches panel.
Filling Areas with Color
You have two primary ways of filling areas with a solid color. With the Fill dialog, you can quickly blanket an entire layer or a selected area of a layer with color. The Paint Bucket tool operates in a more controlled manner, filling only portions of areas based on properties that you set on the options bar. Either method works especially well for those times when you want to cover large, expansive areas with a single color.
To fill a selection or layer with color:
1. Using any of the selection or marquee tools, select the area of your image you want to fill with color.
If you want to fill an entire layer, it’s not necessary to make a selection.
2. To select a fill color, do one of the following:
![]() Click either the current foreground or background color swatch at the bottom of the toolbox (Figure 10.2) to open the Color Picker; then select a color.
Click either the current foreground or background color swatch at the bottom of the toolbox (Figure 10.2) to open the Color Picker; then select a color.
![]() From the Swatches panel, click any color to select it.
From the Swatches panel, click any color to select it.
3. From the Edit menu, choose either Fill Selection or Fill Layer to open the Fill Layer dialog (Figure 10.3).
4. From the Use drop-down menu, choose a source for your fill color (Figure 10.4). In addition to the foreground and background colors, you can use the Fill command to fill a selection or area with a pattern or with black, white, or 50-percent gray. Or you can choose Color to open the Color Picker and select a different color altogether.
5. From the Blending area of the dialog, select a blending mode and opacity for your fill. (For more information on blending modes, see “About Opacity and Blending Modes” in Chapter 8.)
6. Click the Preserve Transparency check box if you want to preserve a layer’s transparency when you apply the fill.
7. Click OK to close the dialog.
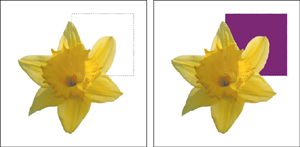
The selection or layer is filled with the color and properties you specified (Figure 10.5).
![]() Tips
Tips
![]() To save time, use simple keyboard shortcuts to fill a selection or layer with either the current foreground or background color. Option-Delete will fill a selection or layer with the current foreground color, and Command-Delete applies the current background color.
To save time, use simple keyboard shortcuts to fill a selection or layer with either the current foreground or background color. Option-Delete will fill a selection or layer with the current foreground color, and Command-Delete applies the current background color.
![]() To swap the foreground and background color swatches in the toolbox, press X.
To swap the foreground and background color swatches in the toolbox, press X.
![]() To convert the foreground and background color to black and white (the defaults), press D.
To convert the foreground and background color to black and white (the defaults), press D.
Figure 10.5 In this example, an area of the Background layer is selected (left), then filled with a color using the Fill dialog (right).
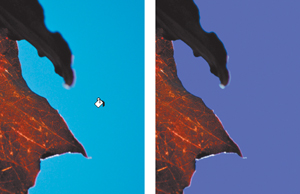
The Preserve Transparency check box works just like the Lock Transparent Pixels button on the Layers panel. If the check box is highlighted and you fill a layer that has both opaque and transparent pixels, the transparent areas will be locked (or protected), and only the opaque areas of the layer will be filled (Figure 10.6). If you check Preserve Transparency and then try to fill an empty layer (one containing only transparent pixels), the layer remains unfilled. That’s because the whole layer, being transparent, is locked. If you fill a flattened layer, like Photoshop Elements’ default background layer, the check box is dimmed and the option isn’t available because a background layer contains no transparency.
Figure 10.6 When a layer (left) is filled using the Preserve Transparency option, the transparent areas of the layer remain protected and untouched, and only the layer object accepts the fill color (right).

Figure 10.7 The Paint Bucket tool.
Figure 10.8 The Paint Bucket tool takes advantage of all of Photoshop Elements’ blending modes and opacity options.

Figure 10.9 The options bar contains several settings that fine-tune the Paint Bucket’s fill properties.

Figure 10.10 The Paint Bucket tool fills areas based on their tonal values. Here it automatically selects and fills just the light-colored background area.
To apply fill color with the Paint Bucket tool:
1. Select the Paint Bucket tool from the toolbox (or press K) (Figure 10.7).
2. Select a foreground color from either the Color Picker or the Swatches panel.
3. On the options bar, select a blending mode and opacity setting, if desired (Figure 10.8).
4. Still on the options bar, set a Tolerance value; then specify whether you want the colored fill to be anti-aliased, to fill only contiguous pixels, or to affect all layers (Figure 10.9).
For more information on these options, see the sidebar “How Does that Paint Bucket Tool Work, Anyway?” on the next page.
5. Click the area of your image where you want to apply the colored fill.
The selected color is painted into your image (Figure 10.10).
If you’re familiar with other painting and drawing programs, Photoshop Elements’ Paint Bucket tool may leave you scratching your head. In many paint programs, the Paint Bucket tool does little more than indiscriminately dump color across large areas of an image. But Elements’ Paint Bucket tool is much more intelligent and selective about where it applies color. Depending on the parameters you set in the options bar, it fills areas based on the tonal values of their pixels.
The Tolerance slider determines the range of pixels the Paint Bucket fills. The greater the value, the larger the range of pixels filled.
Click Anti-alias to add a smooth, soft transition to the edges of your color fill.
Click Contiguous to limit the fill to pixels similar in color or tonal value that touch, or are contiguous with, one another. If you’re using the Paint Bucket tool to switch your car’s color from green to blue, this ensures that only the car’s green pixels are turned blue—not all the green pixels within the entire image.
If you select the Use All Layers check box, Photoshop Elements recognizes and considers pixel colors and values across all layers, but the fill is applied only to the active layer. This means if you click the Paint Bucket tool in an area of any inactive layer, the fill will be applied to the current active layer (Figure 10.11).
Figure 10.11 If the All Layers check box is selected and you click the Paint Bucket tool in an inactive layer (top), the fill for that specific area is applied to the active layer (bottom).
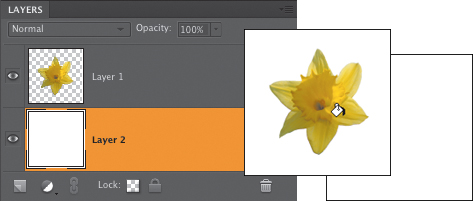
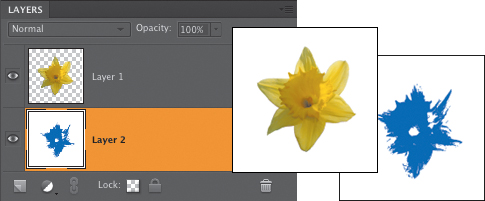
Figure 10.12 The Gradient tool.
Figure 10.13 Open the gradient picker to select from sets of gradient thumbnails.
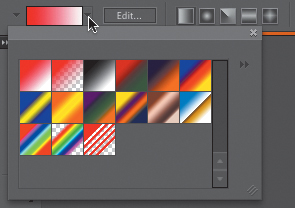
Figure 10.14 The gradient picker’s menu offers several picker display options plus access to a variety of gradient sets.
Filling Areas with a Gradient
The Gradient tool fills any selection or layer with smooth transitions of color, one blending gradually into the next. They can be rendered as opaque fills or seamlessly incorporated into a layered project using any of Elements’ blending modes and opacity settings. Use a gradient to create an effective background image for a photo; to screen back a portion of an image; to create an area on which to place type; or apply it to any shape or object to simulate the surface texture of metal or glass.
To apply a gradient fill:
1. Using any of the selection or marquee tools, select the area of your image where you want to apply the gradient.
If you want to fill an entire layer, you don’t need to make a selection.
2. Select the Gradient tool from the toolbox (or press G) (Figure 10.12).
3. On the options bar, click to open the gradient picker (Figure 10.13).
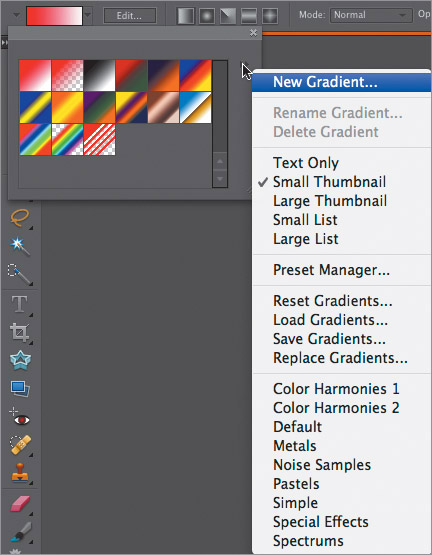
4. Click to choose from the list of default gradients, or if you want to view additional gradient sets, click the More button (the triangles to the right of the thumbnail images) to open the gradient picker menu (Figure 10.14).
Gradient sets are located in the bottommost section of the menu. When you select a new gradient set, it replaces the set displayed in the gradient picker.
5. On the options bar, click to choose a gradient style (Figure 10.15).
Choose from five gradient styles: Linear, Radial, Angle, Reflected, and Diamond.
6. In the image window, click and drag in the area where you want to apply the gradient (Figure 10.16).
The selection or layer is filled with the gradient.
![]() Tip
Tip
![]() Hold down the Shift key to constrain a gradient horizontally, vertically, or at a 45-degree angle.
Hold down the Shift key to constrain a gradient horizontally, vertically, or at a 45-degree angle.
Figure 10.15 Click a gradient style button on the options bar to draw one of five gradient styles.
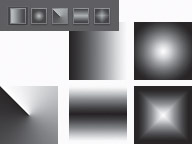
Figure 10.16 Drag from the center to the edge to create a halo effect with the Radial gradient.
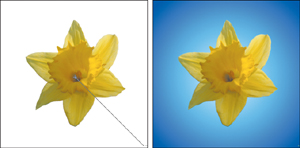
Figure 10.17 Draw lines around selections using the Stroke dialog.
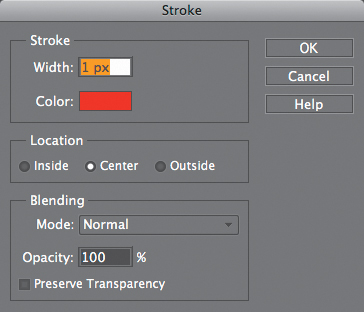
Figure 10.18 Once an object is selected, you can stroke it either inside, centered on, or outside of the selection.

Adding a Stroke to a Selection or Layer
Photoshop Elements’ Stroke command adds a colored rule or border around any selected object or layer. With the Stroke command, you can easily trace around almost anything, from simple rectangle or ellipse selections to complex typographic characters. Because you can control both the stroke’s thickness and where the stroke is drawn in relation to a selection (inside, outside, or centered), you can create everything from delicate, single-ruled outlines to decorative, multiple-stroked borders and frames.
To apply a stroke:
1. Using any of the selection or marquee tools, select the area of your image to which you want to add a stroke.
If you’re adding a stroke to an object on its own transparent layer, there’s no need to make a selection. Instead, just check that the layer is active on the Layers panel.
2. From the Edit menu, choose Stroke (Outline) Selection to open the Stroke dialog (Figure 10.17).
3. In the Width text box, enter the stroke width, in pixels.
There’s no need to enter the pixel abbreviation (px) following the number value.
4. Change the stroke color by clicking the Color box and opening the Color Picker.
5. Select the location of the stroke. The location determines where the stroke is drawn: inside, outside, or centered directly on the selection (Figure 10.18).
6. Ignore the Blending portion of the dialog for now.
7. Click OK to apply the stroke to your selection or layer (Figure 10.19).
![]() Tip
Tip
![]() Photoshop Elements uses the foreground color for the stroke color unless you change the color in the Stroke dialog. So if you want to pick a stroke color from the Swatches panel, click the Swatches panel to assign the foreground color before anything else; then choose Stroke from the Edit menu. The color you choose from the Swatches panel will appear as the stroke color in the dialog.
Photoshop Elements uses the foreground color for the stroke color unless you change the color in the Stroke dialog. So if you want to pick a stroke color from the Swatches panel, click the Swatches panel to assign the foreground color before anything else; then choose Stroke from the Edit menu. The color you choose from the Swatches panel will appear as the stroke color in the dialog.
Figure 10.19 Select an object (left), and then choose the Stroke command to apply a stroke (right).

It’s a good habit to create a new layer before applying strokes to your image. That way, you can control attributes such as opacity and blending modes right on the Layers panel. You can even turn strokes off and on by clicking the stroke layer’s visibility icon. If you’re adding a stroke to a selection, simply create a new layer and then follow the steps in the task “To apply a stroke.” If you’re stroking an object on a transparent layer and want its stroke on a separate layer, you need to perform a couple additional steps:
1. Identify the object to which you want to add a stroke; then press Command and click once on the layer on the Layers panel. The object is automatically selected in the image window (Figure 10.20).
2. Create a new layer by clicking the New Layer button at the top of the Layers panel.
3. With the new layer selected on the Layers panel, choose Stroke (Outline) Selection from the Edit menu; then follow steps 3 through 7 of “To apply a stroke.”
A stroke is created for the object, but placed on its own layer.
Figure 10.20 Command-click the Layers panel to create a selection around a layer object.
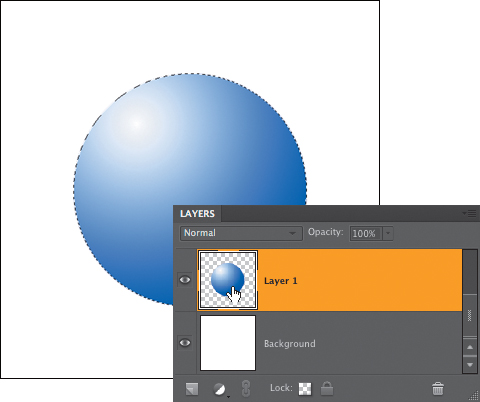
Figure 10.21 The first step in creating a multiruled border is to create a thick stroke. Here, I used a stroke of 15 pixels.
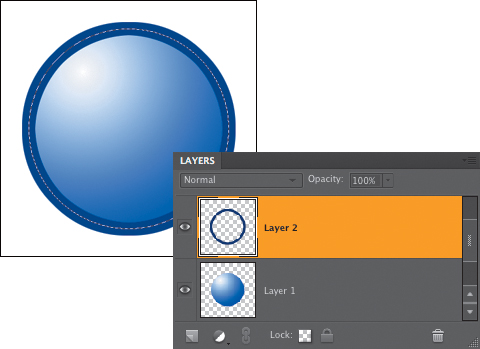
Figure 10.22 Placing a narrow stroke of a different color over the broad first stroke creates an attractive three-ruled border.

To create a decorative border:
1. Make a selection, either by using one of the selection or marquee tools, or by selecting an object on a transparent layer as described in the “Creating a Stroke Layer” sidebar.
2. Create a new layer; then apply a wide stroke to the selection (Figure 10.21). In this example, I used a stroke of 15 pixels.
3. With the selection still active, create a new layer above the first.
4. Apply a stroke narrower than the first and in a contrasting color or value (Figure 10.22).
5. Continue to add stroke layers until you achieve the desired result.
![]() Tip
Tip
![]() You can create different effects by adding inside and outside strokes.
You can create different effects by adding inside and outside strokes.
Using the Brush Tool
The Brush tool is a near limitless reservoir of hundreds of different and unique brushes. You can apply painted brushstrokes directly to the surface of any photograph, or open a new file to serve as a blank canvas upon which you can create an original work of fine art. The dozen preset brush libraries offer selections as varied as Calligraphic, Wet Media, and Special effect, and any brush can be resized from 1 pixel to a staggering 2500 pixels in diameter. You can paint using any of Photoshop Elements’ blending modes and opacity settings, and you can turn any brush into an airbrush with a single click of a button. So whether you’re a budding Van Gogh, would like to add a color-tint effect to an antique black-and-white photograph, or just enjoy doodling while talking on the phone, Photoshop Elements’ brushes can help to bring out your inner artist.
To paint with the Brush tool:
1. To select a paint color, do one of the following:
![]() Click the current foreground color swatch at the bottom of the toolbox to open the Color Picker.
Click the current foreground color swatch at the bottom of the toolbox to open the Color Picker.
![]() Choose a color from the Swatches panel.
Choose a color from the Swatches panel.
2. Select the Brush tool in the toolbox (or press B) (Figure 10.23).
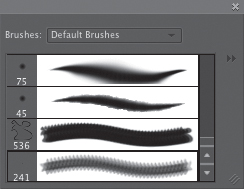
3. On the options bar, click to open the Brush Presets panel (Figure 10.24).
4. Click to choose from the list of default brushes, or select a different brush set from the Brushes drop-down menu (Figure 10.25).
![]()
Figure 10.24 Open the Brush Presets panel to select from sets of different brushes.
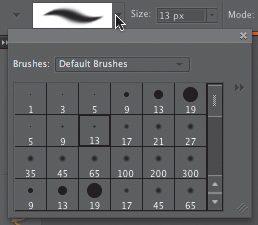
Figure 10.25 The Brushes drop-down menu gives you access to a variety of brush sets.
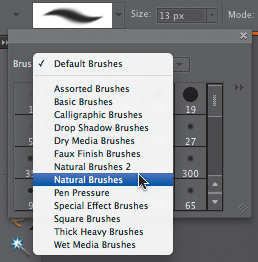
Figure 10.26 Use the brush Size slider to resize your brush.

Figure 10.27 Create realistic brush effects simply by dragging through the image window.
Figure 10.28 Click the Airbrush button on the options bar to give a brush the characteristics of an airbrush.
![]()
Once you’ve selected a brush, you can use it at its predefined size, or you can resize it using the brush Size slider on the options bar (Figure 10.26).
5. Again on the options bar, select a blend mode and opacity setting.
6. In the image window, drag to paint a brushstroke (Figure 10.27).
![]() Tips
Tips
![]() You can easily resize brushes on the fly using simple keyboard shortcuts. Once a brush of any size is selected, press the ] or [ key to increase or decrease the current brush size to the nearest unit of 10 pixels. Thus, if you’re painting with a brush size of 23 pixels and press the ] key, the brush size increases to 30 pixels and then grows in increments of 10 each subsequent time you press ]. Conversely, a brush size of 56 pixels is reduced to 50 pixels when you press the [ key, and the brush continues to shrink by 10 pixels each time thereafter that you press [.
You can easily resize brushes on the fly using simple keyboard shortcuts. Once a brush of any size is selected, press the ] or [ key to increase or decrease the current brush size to the nearest unit of 10 pixels. Thus, if you’re painting with a brush size of 23 pixels and press the ] key, the brush size increases to 30 pixels and then grows in increments of 10 each subsequent time you press ]. Conversely, a brush size of 56 pixels is reduced to 50 pixels when you press the [ key, and the brush continues to shrink by 10 pixels each time thereafter that you press [.
![]() When any tool that uses a brush-type pointer is selected (the Eraser, Blur, Sharpen, and Clone tools, for instance), use the same keyboard shortcuts above.
When any tool that uses a brush-type pointer is selected (the Eraser, Blur, Sharpen, and Clone tools, for instance), use the same keyboard shortcuts above.
![]() Almost any brush can be made to behave like an airbrush by clicking the Airbrush button on the options bar (Figure 10.28). With the Airbrush activated, paint flows more slowly from the brush and gradually builds denser tones of color. The Airbrush option is most effective when applied to soft, round brushes or to brushes with scatter and spacing properties. (For more information on scatter and spacing properties, see the sidebar “Understanding the Brush Dynamics Panel” later in this chapter.)
Almost any brush can be made to behave like an airbrush by clicking the Airbrush button on the options bar (Figure 10.28). With the Airbrush activated, paint flows more slowly from the brush and gradually builds denser tones of color. The Airbrush option is most effective when applied to soft, round brushes or to brushes with scatter and spacing properties. (For more information on scatter and spacing properties, see the sidebar “Understanding the Brush Dynamics Panel” later in this chapter.)
Creating and Saving Custom Brushes
With so many different brushes and brush sets at your disposal, you may be surprised to discover you can change not only the size of brushes, but other characteristics such as flow, shape, and color. Photoshop Elements provides you with all the tools you need to modify existing brushes and create your own from photographs or scanned objects, such as leaves or flower petals. Once you’ve created a new brush, you can store it temporarily in an existing brush set or save and organize it into a new brush set of your own. Any new brush sets you create are then accessed and loaded from the Brushes dropdown menu on the Brush Presets panel.
To create a custom brush:
1. Select the Brush tool from the toolbox (or press B).
2. From the list of preset brushes on the options bar, click to select a brush you want to customize (Figure 10.29).
3. On the options bar, click the More Options button to open the Brush Dynamics panel (Figure 10.30).
4. Use the sliders on the panel to modify the Fade, Hue Jitter, Scatter, Spacing, and Hardness properties of the brush.
For more information on these slider controls, see the “Understanding the Brush Dynamics Panel” sidebar later in this chapter.
5. You can also adjust the angle and roundness of the brush (Figure 10.31).
Figure 10.29 To create a new brush, select an existing brush and customize its properties.
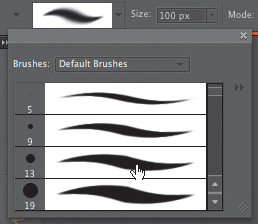
Figure 10.30 The Brush Dynamics panel contains sliders to modify a brush shape.
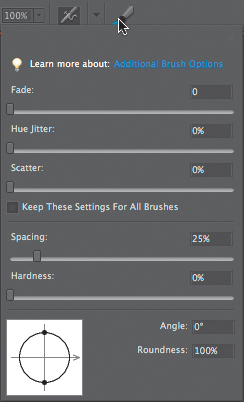
Figure 10.31 The lower portion of the Brush Dynamics panel offers controls for angle and roundness.
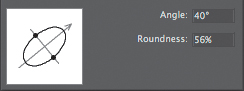
Figure 10.32 The Brush Presets preview area here shows an original brush (top) and the same brush customized on the Brush Dynamics panel (bottom).
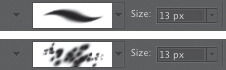
Figure 10.33 Tablet options give you control over how pen pressure affects certain brush settings.
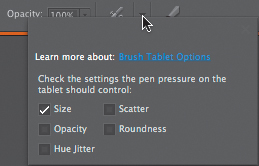
Figure 10.34 Save your customized brushes on the Brush Presets panel menu.
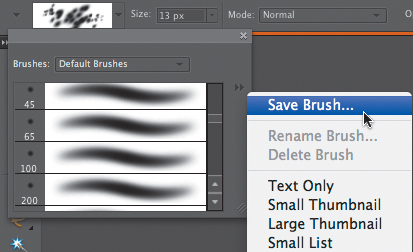
Figure 10.35 The new brush appears at the bottom of the panel list.
As you move the sliders, or enter angle and roundness values, refer to the brush presets preview on the options bar to see the effects of your changes. All but the Hue Jitter property will be reflected in the preview on the options bar (Figure 10.32).
6. If you have a pressure-sensitive digital tablet connected to your computer, you can control how the pen’s pressure will affect your brush settings.
On the options bar, click the Tablet Options button, then check the boxes for the brush settings you want the pen pressure to control (Figure 10.33).
7. When you’re satisfied with your changes, click anywhere on the options bar to close the panel.
8. On the options bar, use the brush Size slider to size your brush.
9. Still on the options bar, open the Brush Presets panel; then select Save Brush from the panel options menu (Figure 10.34).
The Brush Name dialog opens.
10. Type a name for your new brush and click OK.
Your new brush appears at the bottom of the current brush presets list on the Brush Presets panel (Figure 10.35).
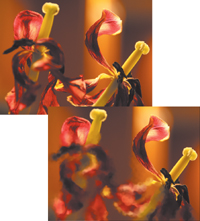
To create a brush from a photographic object:
1. Open an image that contains an object or area from which you want to create a new brush.
2. To select an object from the image, do one of the following:
![]() Using one of the selection tools, select the object or portion of a photograph you want to make into a brush. The Selection Brush and Magnetic Lasso tools both work well for this kind of selection (Figure 10.36).
Using one of the selection tools, select the object or portion of a photograph you want to make into a brush. The Selection Brush and Magnetic Lasso tools both work well for this kind of selection (Figure 10.36).
![]() If you already have an object on its own transparent layer, hold down Command and click on the layer thumbnail in the Layers panel.
If you already have an object on its own transparent layer, hold down Command and click on the layer thumbnail in the Layers panel.
3. From the Edit menu, choose Define Brush from Selection. The Brush Name dialog opens with a representation of your new brush in its preview box (Figure 10.37).
4. Enter a name for the brush and click OK to close the dialog.
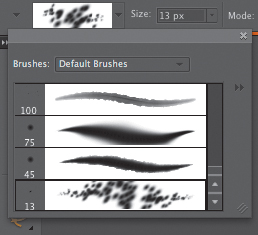
5. Select the Brush tool from the toolbox; then from the options bar, open the Brush Presets panel. Your new brush appears at the bottom of the current brush presets list (Figure 10.38).
6. Click to select the new brush; then on the options bar, click the More Options button to open the Brush Dynamics panel.
7. Use the sliders on the panel to modify the brush attributes; then click anywhere on the options bar to close the panel.
Figure 10.36 A custom brush can be made out of virtually any selected object. In this example, I’ve selected a large flower.
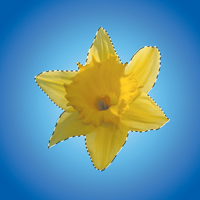
Figure 10.37 The selection appears in the brush preview of the Brush Name dialog.
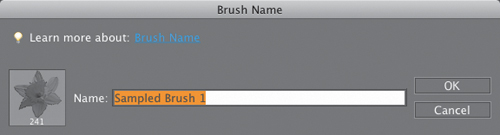
Figure 10.38 Once saved, your new brush appears in the brush presets list.
![]() You can use these kinds of brushes to great effect as background textures, type borders, or homemade “rubber stamps” for greeting cards and invitations.
You can use these kinds of brushes to great effect as background textures, type borders, or homemade “rubber stamps” for greeting cards and invitations.
![]() Images with high contrast generally work best as brush shapes. Remember that you’re not saving any color information—just the object’s shape and its tonal values—so you’ll want to use shapes with as much defined detail as possible.
Images with high contrast generally work best as brush shapes. Remember that you’re not saving any color information—just the object’s shape and its tonal values—so you’ll want to use shapes with as much defined detail as possible.
![]() Don’t be discouraged if you can’t seem to duplicate the color and scatter effects of preset brushes such as Maple Leaves. A good number of the built-in brushes weren’t created in Photoshop Elements at all, but in Adobe Photoshop. Photoshop offers a host of additional controls, including jitter properties for scatter, angle, hue, and size. For now, while you’re working in Photoshop Elements, any blowing leaves or dune grass you create will all have to face the same direction.
Don’t be discouraged if you can’t seem to duplicate the color and scatter effects of preset brushes such as Maple Leaves. A good number of the built-in brushes weren’t created in Photoshop Elements at all, but in Adobe Photoshop. Photoshop offers a host of additional controls, including jitter properties for scatter, angle, hue, and size. For now, while you’re working in Photoshop Elements, any blowing leaves or dune grass you create will all have to face the same direction.
With a bit of exploration, you’ll find the Brush Dynamics panel to be a useful tool for creating new brushes and modifying existing ones.
The Spacing slider controls the spacing of the brush shape and is based on a percentage of the brush’s current size (Figure 10.39). The default for most round brushes is 25 percent; 5 percent seems to be the optimum for most of the fine-art brushes such as Chalks, Pastels, and Loaded Watercolor.
The Fade slider sets the number of steps a brush takes to fade to transparent and can simulate the effect of a brush running out of paint as it draws across a surface. One step is equal to a brush width, so the fade effect is dependent on Spacing (Figure 10.40).
The Hue Jitter slider determines how randomly the brush renders color, based on the foreground and background colors. The lower the jitter percentage, the more the foreground color is favored. If the percentage is set to the maximum of 100 percent, the foreground and background colors (and mixtures of the two colors combined) are represented in equal measure throughout the brushstroke.
The Hardness slider controls the hardness or softness of a brushstroke’s edges. A Hardness value of 100 percent creates a solid brushstroke with no soft edges (Figure 10.41).
The Scatter slider determines how much a brush shape is spread around with each stroke. The higher the percentage, the more brush shapes are scattered and spread. Lower percentages create almost no scatter at all (Figure 10.42).
The Angle value allows you to rotate a brush shape to any angle, and the Roundness value can be used to flatten or squish a brush shape.
Figure 10.39 A brush spacing value of 25 percent (left) and 75 percent (right).
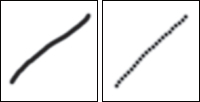
Figure 10.40 A brush fade value of 0 (left) and 15 (right).
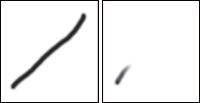
Figure 10.41 A brush hardness value of 0 percent (left) and 100 percent (right).
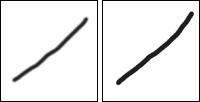
Figure 10.42 A brush scatter value of 0 percent (left) and 30 percent (right).
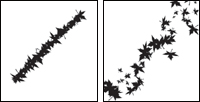
Figure 10.43 The Brushes Preset Manager.
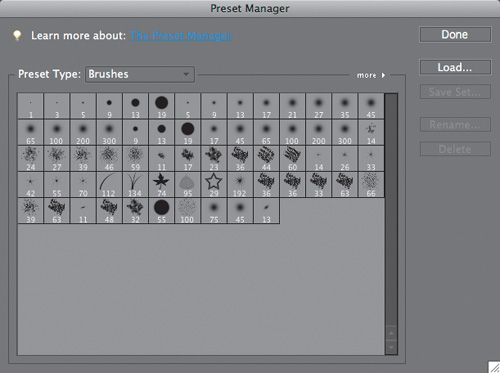
Figure 10.44 Select brushes you want included in your new brush set.
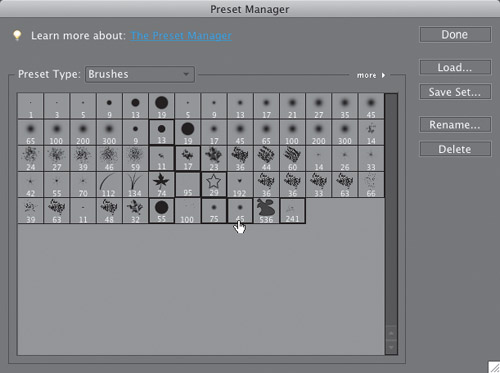
Figure 10.45 Name your new brush set in the Save dialog.
Managing brush sets
Managing brushes is no different than managing other presets (such as gradients and patterns). When you create a new brush, it’s saved in the presets file. But once you reset the brushes on the Brush Presets panel or select a different brush set, any new brushes you’ve created will be lost. Use the Preset Manager to create and save new brush sets.
To create a new brush set:
1. Create as many new brushes as you like, as described in the previous procedures.
2. From the Brush Presets panel menu, choose Preset Manager.
The Preset Manager dialog opens to the current brush set displayed on the Brush Presets panel (Figure 10.43).
3. Scroll through the thumbnail views until you find the brushes you want to include in your new set.
4. In the thumbnail area, Command-click to select all of the brushes you want to include (Figure 10.44).
If you select a brush by mistake, you can deselect it by holding down Command and clicking the thumbnail a second time.
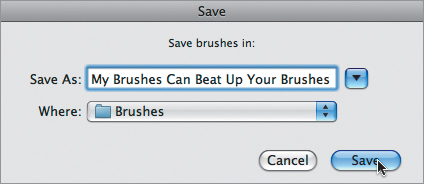
5. Click the Save Set button to open the Save dialog.
6. In the File name text box, enter a new name to describe your brush set and click Save (Figure 10.45).
Your brush set is saved with the brushes you selected in step 4.
Your new brush set is saved with the others, but it won’t appear on either the More menu in the Preset Manager or the Brushes drop-down menu on the Brush Presets panel until after you quit and then restart Photoshop Elements.
Creating Special Painting Effects
The Impressionist Brush tool adds a painterly look to any photographic image. Although similar in effect to some of the Artistic and Brush Stroke filters, the Impressionist Brush tool allows you to be much more selective about which areas of an image it’s applied to. That’s because it uses the same scaleable, editable brushes as the Brush tool. You can use the Impressionist Brush tool to create compelling works of art from even the most mundane of photographs.
To paint with the Impressionist Brush tool:
1. Open the image to which you want to apply the Impressionist Brush effect.
2. Select the Impressionist Brush tool from beneath the Brush tool in the toolbox (Figure 10.46).
Alternatively, you can press B to select the Brush tool and then press B again to toggle to the Impressionist Brush tool.
3. On the options bar, select a brush from the Brush Presets panel.
You can, of course, use any brush with the Impressionist Brush tool, but the round, soft-sided brush that Photoshop Elements picks as the default works especially well.
4. Again on the options bar, select a size with the brush Size slider (Figure 10.47).
You can also select a mode and an opacity option, although in most cases the defaults of Normal and 100 percent are fine.
5. Still on the options bar, click the More Options button to open the Impressionist Brush Options panel (Figure 10.48).
Figure 10.46 The Impressionist Brush tool.
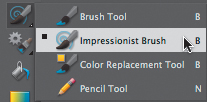
Figure 10.47 The brush size can have quite an impact on the way the Impressionist Brush tool affects your photograph. In the top photo, I painted with a brushstroke of 10 pixels. In the bottom photo, I changed the brushstroke to 20 pixels.
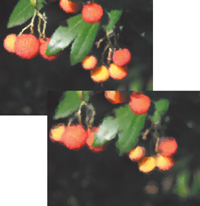
Figure 10.48 The Impressionist Brush Options panel has controls for different brush styles and the amount of image area they affect with each brushstroke.
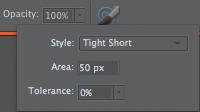
Figure 10.49 Brush styles vary from subtle (Dab) to extravagant (Loose Curl Long).
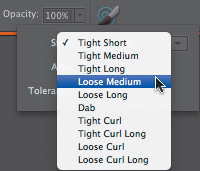
Figure 10.50 Simply drag the brush through your photo to create a work of art.
6. From the Style drop-down menu, select a brush style (Figure 10.49).
I tend not to stray much beyond the top three Styles (Tight Short, Medium, and Long), although the Dab style also creates some pretty effects.
7. In the Area text box, enter a value, in pixels, for the amount of area you want to affect with each stroke of the brush. For example, let’s say you start with a brush that makes a single brush mark 10 pixels wide, and then select an Area value of 80 pixels. As you move the brush through the image—and depending on the brush style you chose—it will swoosh around an area of 80 × 80 pixels, distributing the paint in 10-pixel dollops.
8. If desired, select a Tolerance setting to determine the range of pixels affected. You may want to keep the Tolerance slider set at 0 percent and leave it alone. In use with the Impressionist brush, this setting seems wildly erratic and not worth the trouble.
9. In the image window, drag the brush through your image. The image takes on a painterly look wherever the brush is drawn through it (Figure 10.50).
![]() Tips
Tips
![]() Images with resolutions of 150 pixels per inch and higher make the best candidates for the Impressionist Brush tool, because the higher resolution helps to preserve detail when the effect is applied.
Images with resolutions of 150 pixels per inch and higher make the best candidates for the Impressionist Brush tool, because the higher resolution helps to preserve detail when the effect is applied.
![]() Stick to using smaller brush sizes, particularly on low-resolution images. Although any rules of thumb vary from image to image, a good starting place is a brush size between 6 and 10 pixels and an Area setting between 30 and 50.
Stick to using smaller brush sizes, particularly on low-resolution images. Although any rules of thumb vary from image to image, a good starting place is a brush size between 6 and 10 pixels and an Area setting between 30 and 50.
Erasing with Customizable Brush Shapes
The images or brushstrokes you choose to remove from a photograph are often as important as those you decide to add or leave behind. The basic Eraser feature is a powerful tool for cleaning up and fine-tuning your images, taking full advantage of every brush style and size that Photoshop Elements has to offer. Not only can you perform routine erasing tasks such as rubbing away stray pixels, you can also customize an eraser’s brush and opacity settings to create unique texture, color, and pattern effects. Three modes allow you to customize your erasers even further, so that you can erase with soft-edged brush shapes, hard-edged pencil shapes, or a simple hard-edged square block.
To use the Eraser tool:
1. Select the Eraser tool from the toolbox (or press E) (Figure 10.51).
2. On the options bar, select a brush from the Brush Presets panel (Figure 10.52).
3. Again on the options bar, select a size using the brush Size slider.
4. From the Mode drop-down menu, select one of the three eraser modes (Brush, Pencil, or Block).
If you select a soft, anti-aliased brush and then choose Pencil from the mode menu, the eraser will become coarse and aliased (Figure 10.53).
5. Still on the options bar, select an opacity using the Opacity slider.
6. In the image window, drag the eraser through your image.
The image is erased according to the attributes you’ve applied to the eraser.
![]()
Figure 10.52 The same brush presets are available for the Eraser tool as for the Brush tool.
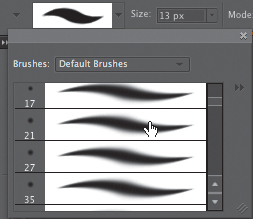
Figure 10.53 An eraser in Brush mode (left) and in Pencil mode (right).

Figure 10.54 On a flattened image layer, the Eraser tool paints with the current background color wherever the eraser is dragged.
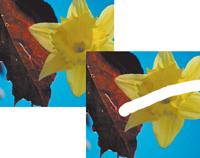
Figure 10.55 When erasing on a layer with transparency, the Eraser tool actually removes image pixels (here, the center of the flower layer) and exposes the image on the layer below (the leaf).
The Eraser tool functions in a fundamentally different way, depending on whether it’s erasing on a flattened image, such as Photoshop Elements’ default background, or on a layer of a multilayered file. When erasing on a flattened image, the Eraser tool doesn’t really erase at all. Instead, it replaces the image with the current background color displayed in the toolbox. In other words, it simply paints over the image with the background color (Figure 10.54).
On the other hand, when erasing a portion of an image from a layer, the Eraser tool actually removes the pixels from the layer, creating a transparent hole and exposing the image on the layer directly below it (Figure 10.55).
![]() Tip
Tip
![]() You’re not limited to round or square brush shapes for your erasers. Any brush, even pictorial ones (for instance, Maple Leaves and Dune Grass) or photographic ones (like Scattered Leaves) can be used as erasers. Try experimenting with different brush shapes and opacity settings to create unusual textures and patterns in your photographs.
You’re not limited to round or square brush shapes for your erasers. Any brush, even pictorial ones (for instance, Maple Leaves and Dune Grass) or photographic ones (like Scattered Leaves) can be used as erasers. Try experimenting with different brush shapes and opacity settings to create unusual textures and patterns in your photographs.
Understanding Shapes
In Photoshop Elements, you create shapes not by rendering them with pixels, but by constructing them from vector paths, which are actually vector masks. I’ll use some simple circle and square shapes to illustrate what that means.
Each time you draw a shape with one of the shape tools, Photoshop Elements is performing a little behind-the-scenes sleight of hand. Although it may appear that you’re drawing a solid, filled circle, for instance, what you’re really creating is a new layer containing both a colored fill and a mask with a circle-shaped cutout (Figure 10.56). When you move, reshape, or resize a shape, you’re actually just moving or reshaping the cutout and revealing a different area of the colored fill below it (Figure 10.57). When you add to or subtract from a shape by drawing additional shapes, you’re simply revealing or hiding more of the same colored layer (Figure 10.58).
Every time you create a new shape, a new shape layer is added to the Layers panel. A shape layer is represented in the panel thumbnails by a gray background (the mask) and a white shape (the mask cutout, or path). Since a shape’s outline isn’t always visible in the image window—if you deselect it, for instance—the Layers panel provides a handy, visual reference for every shape in your project (Figure 10.59). And as with any other layered image, you can use the Layers panel to hide a shape’s visibility and even change its opacity and its blending mode.
Figure 10.56 When you draw a shape, you’re actually drawing a shape mask.
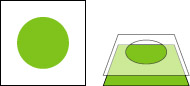
Figure 10.57 Moving a shape really means moving the cutout portion of the mask.
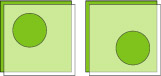
Figure 10.58 Adding a shape to a layer masks off another portion of the colored fill below it, in this case giving the illusion that the circle has a square hole in its center.
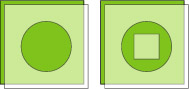
Figure 10.59 Shapes appear on their own layers.

Figure 10.60 The Ellipse shape tool.
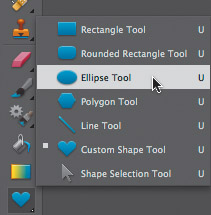
Figure 10.61 Some shape tools, such as the Polygon tool, have properties you can set on the options bar.
![]()
Drawing Basic Shapes
In Photoshop Elements, you can draw five basic geometric shapes (a shape selection tool and a tool for creating custom shapes are discussed in detail later in this chapter). Shapes can be drawn freely by clicking and dragging, or they can be constrained according to your specification of size, proportion, and special characteristics. You can use the shape tools to create logos or geometric designs; or, because a new layer is created with every shape you draw, you can draw shapes directly over any photograph or scanned image without fear of damaging the image.
To draw a shape:
1. Select a shape tool from the toolbox (or press U) (Figure 10.60).
To cycle through the shape tools, press U again until you arrive at the shape you want.
2. To select a shape color, do one of the following:
![]() Click the current foreground color swatch at the bottom of the toolbox, or click the color box on the options bar to open the Color Picker.
Click the current foreground color swatch at the bottom of the toolbox, or click the color box on the options bar to open the Color Picker.
![]() Choose a color from the Swatches panel.
Choose a color from the Swatches panel.
3. If they’re available for the tool you’ve selected, you can set special properties for your shape before you draw. On the options bar, enter values specific to the shape you’ve chosen (Figure 10.61).
For the Rounded Rectangle tool, you can enter a corner radius. For the Polygon tool, you can enter the number of sides. For the Line tool, you can enter a pixel weight.
4. On the options bar, click the arrow next to the shape buttons to open the Geometry Options panel (Figure 10.62).
In the Geometry Options panel, select from the available options for that particular shape or leave the options set to the default of Unconstrained.
5. In the image window, click and drag to draw the shape (Figure 10.63).
If you like, you can add a style to your shape from the Shape tool’s built-in style picker.
6. On the options bar, click the icon or arrow to open the style picker (Figure 10.64).
7. Choose from the list of available styles or click the arrows to the right of the thumbnail images to open the Style panel menu. The style picker displays the new style set.
Figure 10.62 Every shape tool has its own particular set of geometry options.
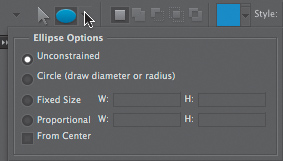
Figure 10.63 Drawing a shape is as simple as clicking and dragging.
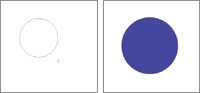
Figure 10.64 Whenever any of the shape tools are selected, the shape tool style picker appears on the options bar.
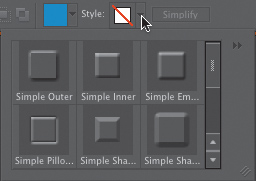
Figure 10.65 A simple circle drawn with the ellipse shape tool (left) is transformed into a glossy button (right) using just one of the many styles from the style picker.

8. Click a style in the style picker to apply it to your shape (Figure 10.65).
9. To deselect the shape and hide the path outline, press Enter.
![]() Tip
Tip
![]() If you decide to remove a style from a shape, you have two options. With the shape layer selected in the Layers panel, either open the Style panel menu in the style picker and then choose Remove Style; or, right-click the Layer Style icon on the desired layer in the Layers panel and choose Clear Layer Style.
If you decide to remove a style from a shape, you have two options. With the shape layer selected in the Layers panel, either open the Style panel menu in the style picker and then choose Remove Style; or, right-click the Layer Style icon on the desired layer in the Layers panel and choose Clear Layer Style.
Figure 10.66 The Polygon tool’s geometry options and the Line tool’s arrowhead options.
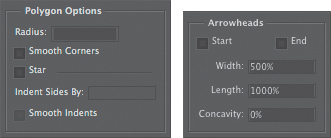
Figure 10.67 Using the Polygon tool’s Star option, a six-sided polygon (left) can be changed into a six-point star (right).

Each shape tool (with the exception of the Shape Selection tool) has its own unique Geometry Options panel. The two rectangle tools and the Ellipse and Custom Shape tools all offer similar options for defining size, proportions, and constraint properties; and the Polygon and Line tools each have their own unique sets of options (Figure 10.66). The Polygon tool’s most distinctive option is the Star check box. When Star is selected, you’re presented with a couple of indent properties that fold the polygon in on itself, so that the points of its angles become the tips of a star shape (Figure 10.67). When the Line tool is selected, you can choose from a small set of Arrowheads options based on the pixel weight of the line.
![]() Tip
Tip
![]() To constrain the proportions of any shape (to make a rectangle a perfect square or an ellipse a perfect circle, for example) without the aid of the Geometry Options panel, hold down the Shift key as you drag.
To constrain the proportions of any shape (to make a rectangle a perfect square or an ellipse a perfect circle, for example) without the aid of the Geometry Options panel, hold down the Shift key as you drag.
Transforming Shapes
You’re not limited to just creating shapes in Photoshop Elements. You can also scale (resize), rotate, and distort them to your liking. Shapes can be altered either numerically, by entering specific values on the options bar, or manually, by dragging their control handles in the image window. Constrain options, such as proportional scaling, are available for most transformations, and a set of keyboard shortcuts helps to simplify the process of adding distortion and perspective.
To scale a shape:
1. Select the Shape Selection tool by doing any of the following:
![]() Choose the Shape Selection tool from beneath the current shape tool in the toolbox (Figure 10.68).
Choose the Shape Selection tool from beneath the current shape tool in the toolbox (Figure 10.68).
![]() Press U to select any shape tool and then press U again until you toggle to the Shape Selection tool.
Press U to select any shape tool and then press U again until you toggle to the Shape Selection tool.
![]() Select any shape tool in the toolbox, and then choose the Shape Selection tool from the options bar (it looks like an arrow).
Select any shape tool in the toolbox, and then choose the Shape Selection tool from the options bar (it looks like an arrow).
2. In the image window, select the shape with the Shape Selection tool.
3. From the Image menu, choose Transform Shape > Free Transform Shape, or press Command-T.
The options bar changes to show the scale and rotation text boxes, and the reference point locator (Figure 10.69).
Figure 10.68 The Shape Selection tool.
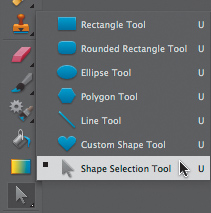
Figure 10.69 Precise scale and rotation values can be entered for any shape.
![]()
Figure 10.70 These squares are both being reduced in size by about half. The one on the left is scaled toward its upper-left corner, and the one on the right is scaled toward its center.
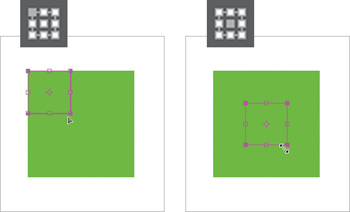
Figure 10.71 The Commit Transform button scales the shape to the size you define.
![]()
4. On the options bar, click to set a reference point location.
The reference point determines what point your shape will be scaled to: toward the center, toward a corner, and so on (Figure 10.70).
5. If you want to scale your shape proportionately, click the Constrain Proportions check box.
6. Enter a value in either the height or width text box.
The shape is scaled accordingly.
7. Click the Commit Transform button (Figure 10.71), or press Enter.
![]() Tips
Tips
![]() You can scale a shape manually by selecting it with the Shape Selection tool and then dragging any one of the eight handles on the selection border. Constrain the scaling by holding down the Shift key while dragging one of the four corner handles.
You can scale a shape manually by selecting it with the Shape Selection tool and then dragging any one of the eight handles on the selection border. Constrain the scaling by holding down the Shift key while dragging one of the four corner handles.
![]() If you want to simply reposition a shape in the image window, click anywhere inside the shape with the Shape Selection tool and then drag the shape to its new position.
If you want to simply reposition a shape in the image window, click anywhere inside the shape with the Shape Selection tool and then drag the shape to its new position.
1. Select the Shape Selection tool from the toolbox or options bar.
2. In the image window, select the shape with the Shape Selection tool.
3. From the Image menu, choose Rotate > Free Rotate Layer (Figure 10.72).
The options bar changes to show the scale and rotation text boxes, and the reference point locator.
4. On the options bar, click to set a reference point location.
The reference point determines the point around which your shape will be rotated (Figure 10.73).
5. Enter a value in the rotate text box. The shape will rotate accordingly.
6. Click the Commit Transform button, or press Enter.
![]() Tips
Tips
![]() To rotate your shape in 90- or 180-degree increments or to flip it horizontally or vertically, choose Image > Rotate; then choose from the list of five menu commands below the Free Rotate Layer command.
To rotate your shape in 90- or 180-degree increments or to flip it horizontally or vertically, choose Image > Rotate; then choose from the list of five menu commands below the Free Rotate Layer command.
![]() You can rotate a shape manually by selecting it with the Shape Selection tool and then moving the pointer outside of the selection border until it becomes a rotation cursor (Figure 10.74). Drag around the outside of the selection border to rotate the shape. In addition, you can constrain the rotation to 15-degree increments by holding down the Shift key while dragging the rotation cursor.
You can rotate a shape manually by selecting it with the Shape Selection tool and then moving the pointer outside of the selection border until it becomes a rotation cursor (Figure 10.74). Drag around the outside of the selection border to rotate the shape. In addition, you can constrain the rotation to 15-degree increments by holding down the Shift key while dragging the rotation cursor.
Figure 10.72 You can apply any of the layer rotation menu commands to your shapes.
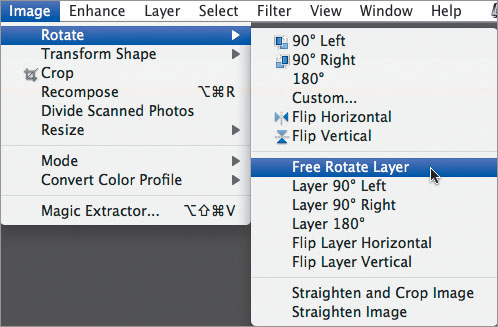
Figure 10.73 These squares are both being rotated about 20 degrees. The one on the left is rotated around its upper-left corner, and the one on the right is rotated around its center.
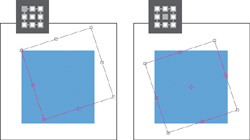
Figure 10.74 Rotate any shape manually by dragging it around its reference point with the rotation pointer.

Figure 10.75 Choose one of the three specific transformation commands.
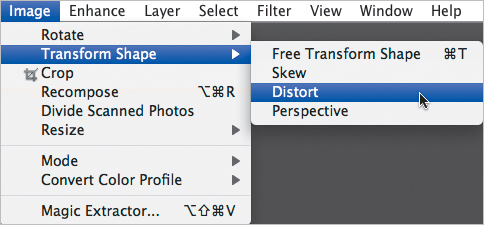
Figure 10.76 The same square shape transformed using Skew (left), Distort (center), and Perspective (right).
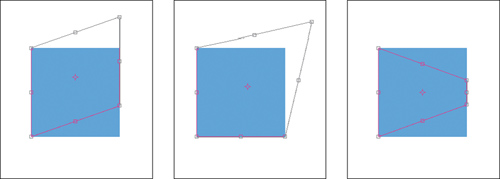
To distort a shape:
1. Select the Shape Selection tool from the toolbox.
2. In the image window, select the shape with the Shape Selection tool.
3. From the Image menu, choose Transform Shape; then choose Skew, Distort, or Perspective (Figure 10.75).
4. On the options bar, check that the reference point location is set to the center.
The reference point can, of course, be set to any location, but the center seems to work best when applying any of the three distortions.
5. Drag any of the shape’s control handles to distort the shape.
Dragging the control handles will yield different results depending on the distort option you choose (Figure 10.76).
6. Click the Commit Transform button, or press Enter.
Creating Custom Shapes
Once you’ve gained a basic understanding of working with Elements’ geometric shapes, you can begin adding those shapes together to create even more interesting and intricate shapes. Shape option buttons allow you to perform a little vector path magic by creating brand-new shapes out of the intersections and overlapping portions of the rectangle, ellipse, and polygon shapes.
The Custom Shape tool is in a world unto itself, working from a library of nearly 400 complex vector graphics grouped into categories as diverse as ornaments, music, fruit, symbols, and nature—far beyond the relatively simple icons and graphics you can build with the basic geometric shape tools.
To add a shape to an existing shape:
1. Follow steps 1 through 5 in the task “To draw a shape” earlier in this chapter. Make sure that this first shape’s path remains selected (Figure 10.77). This technique will only work when both shapes are being drawn to the same layer.
2. From the toolbox, select the shape tool for the next shape you want to add.
You can use the same shape more than once, if you wish.
3. On the options bar, set color, value, and geometry options as desired.
4. Still on the options bar, click to select one of the shape area options (Figure 10.78).
5. In the image window, click and drag to draw the new shape (Figure 10.79).
6. To deselect the shapes and hide their path outlines, press Enter.
Figure 10.77 When a shape is selected, its path outline is visible (left). The path disappears when the shape is deselected (right).
Figure 10.78 The shape area options define how one shape reacts with another.
![]()
Figure 10.79 As the new shape is drawn, only its outline is visible (left). When the new shape is completed, it’s filled according to the preset shape area option (right). In this case, the option was set to Intersect Shape.
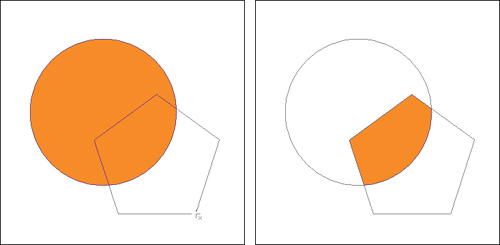
Figure 10.80 Shift-click to select the shapes you want to combine.
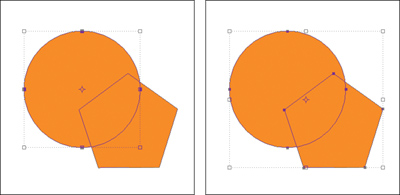
Figure 10.81 The Combine button groups multiple shapes together.
![]()
To combine multiple shapes:
1. Select the Shape Selection tool from the toolbox.
2. In the image window, click to select the first shape; then Shift-click to select the additional shapes you want to group (Figure 10.80).
3. On the options bar, click the Combine button (Figure 10.81). The shapes are combined into one complex shape.
![]() Tip
Tip
![]() The Layers panel can be a useful tool when working with the shape tools. Its layer thumbnails provide good visual feedback, particularly when you’re building complex shapes and want to verify that the new shapes you create are being placed on the correct layers.
The Layers panel can be a useful tool when working with the shape tools. Its layer thumbnails provide good visual feedback, particularly when you’re building complex shapes and want to verify that the new shapes you create are being placed on the correct layers.
![]() You can only combine shapes that appear on the same layer on the Layers panel; like those I created in the previous procedure. However, if you’ve created shapes on separate layers and then decide you want to combine them, all is not lost. With the Shape Selection tool, select one of the shapes. Then from the Edit menu, choose Cut (Command-X). In the Layers panel, click to select the shape layer you want to combine the “cut” shape with, and then from the Edit menu, choose Paste (Command-V). The shape will be pasted into the selected layer along with the other shape. From there, just follow the steps to combine multiple shapes.
You can only combine shapes that appear on the same layer on the Layers panel; like those I created in the previous procedure. However, if you’ve created shapes on separate layers and then decide you want to combine them, all is not lost. With the Shape Selection tool, select one of the shapes. Then from the Edit menu, choose Cut (Command-X). In the Layers panel, click to select the shape layer you want to combine the “cut” shape with, and then from the Edit menu, choose Paste (Command-V). The shape will be pasted into the selected layer along with the other shape. From there, just follow the steps to combine multiple shapes.
![]() When selecting multiple shapes, work from the inside out. In other words, if you have a large shape with a smaller cutout or intersecting shape inside it, select the smaller, inside shape first. Photoshop Elements doesn’t assign any stacking order per se to multiple shapes on a layer, but if a larger, outside shape is selected first, the selection sort of covers up any smaller shapes inside, making them next to impossible to select.
When selecting multiple shapes, work from the inside out. In other words, if you have a large shape with a smaller cutout or intersecting shape inside it, select the smaller, inside shape first. Photoshop Elements doesn’t assign any stacking order per se to multiple shapes on a layer, but if a larger, outside shape is selected first, the selection sort of covers up any smaller shapes inside, making them next to impossible to select.
![]() Up until the moment multiple shapes are grouped together with the Combine button, they can be selected individually and then scaled, rotated, distorted, and even duplicated with the Copy and Paste commands.
Up until the moment multiple shapes are grouped together with the Combine button, they can be selected individually and then scaled, rotated, distorted, and even duplicated with the Copy and Paste commands.
Photoshop Elements gives you five options to choose from when creating a new shape or modifying an existing one (Figure 10.82).
Figure 10.82 On the options bar, click to select one of five shape area options.
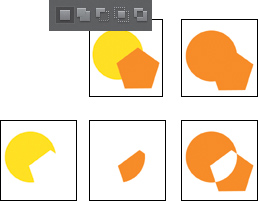
Create New Shape Layer does just that; it draws a new shape on its own, separate layer.
Add to Shape Area draws a new shape on the same layer as the existing shape.
Subtract from Shape Area adds a shape to the same layer as the existing shape, creating a cutout or hole.
Intersect Shape Areas adds a shape to the same layer as the existing shape and causes only those areas where the two shapes overlap to be visible.
Exclude Overlapping Shape Areas does just the opposite of Intersect Shape Areas, creating a cutout or hole where the two shapes overlap.
Figure 10.83 The Custom Shape tool offers geometry options similar to those for the Ellipse and Rectangle tools.
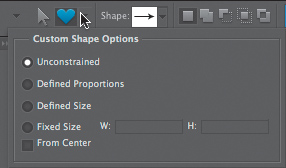
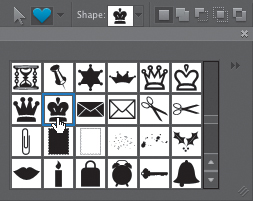
Figure 10.84 Open the custom shape picker to select from sets of complex shape thumbnails.
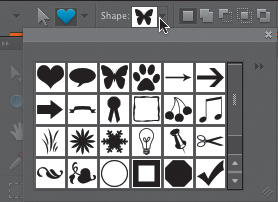
Figure 10.85 You draw a custom shape just as you would any other shape: simply by clicking and dragging. Here, I clicked to apply the butterfly shape (left) and then dragged with the mouse to enlarge it (right).
To draw a custom shape:
1. Select the Custom Shape tool by doing one of the following:
![]() Select the Custom Shape tool from beneath the current shape tool in the toolbox.
Select the Custom Shape tool from beneath the current shape tool in the toolbox.
![]() Press U to select any shape tool; then press U again to toggle to the Custom Shape tool.
Press U to select any shape tool; then press U again to toggle to the Custom Shape tool.
2. To select a shape color, do one of the following:
![]() Click the current foreground color swatch at the bottom of the toolbox, or click the color box on the options bar to open the Color Picker.
Click the current foreground color swatch at the bottom of the toolbox, or click the color box on the options bar to open the Color Picker.
![]() Choose a color from the Swatches panel.
Choose a color from the Swatches panel.
3. On the options bar, click the arrow next to the Custom Shape button to open the Custom Shape Options panel (Figure 10.83). Select from the available options or leave the options set to Unconstrained.
4. Still on the options bar, click to open the custom shape picker (Figure 10.84).
5. Click to choose from the list of default shapes, or select a different shape set from the Custom Shapes drop-down menu.
6. In the image window, click and drag to draw the selected shape (Figure 10.85).
7. Press Enter to deselect the shape.
![]() Tip
Tip
![]() Custom shapes can be used in combination with other shapes and with the shape area options just like any of the basic geometric shapes.
Custom shapes can be used in combination with other shapes and with the shape area options just like any of the basic geometric shapes.
If you ever want to paint on a shape or apply any filter effects to it, you’ll first need to convert the shape from a vector path to a bitmap.
To convert a vector shape to a bitmap:
1. To open the Layers panel, do one of the following:
![]() From the Window menu, choose Layers.
From the Window menu, choose Layers.
![]() Click the arrow on the Layers panel tab in the panel bin.
Click the arrow on the Layers panel tab in the panel bin.
2. On the Layers panel, click to select the layer containing the shape (or shapes) you want to convert to bitmaps (Figure 10.86).
3. From the More menu on the Layers panel, select Simplify Layer (Figure 10.87).
The vector shape is converted to a bitmap, and instead of showing the shape’s path, the layer thumbnail displays the shape’s image on a transparent background (Figure 10.88).
Figure 10.86 Use the Layers panel to select a custom shape’s layer.
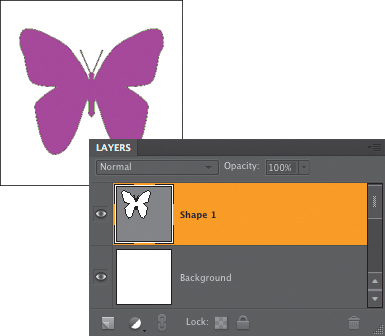
Figure 10.87 The Simplify Layer command converts a custom shape’s vector path to a bitmap graphic.

Figure 10.88 The vector path layer thumbnail (left) and the converted bitmap thumbnail (right).

Figure 10.89 The Cookie Cutter tool.
Figure 10.90 The Cookie Cutter tool uses the same shape libraries as the Custom Shape tool.
Using the Cookie Cutter Tool
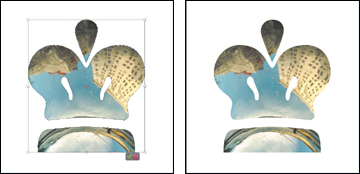
The Cookie Cutter tool isn’t exactly a painting or drawing tool, although right up to the moment you press the Commit Transform button, it behaves in exactly the same way as the Custom Shape tool. The Cookie Cutter tool uses the Custom Shape tool’s libraries of shapes to create distinctive masked versions of image layers. The difference between the two (and it’s a biggie) is that whereas the Custom Shape tool creates vector shapes, the Cookie Cutter tool creates a raster image. So, although you can initially scale, rotate, and otherwise distort a Cookie Cutter shape just like a vector graphic, once you commit the shape to your image, the final result is still a raster (or bitmap) image layer. Once you understand the Cookie Cutter’s limitations, it can still be a fun and useful tool.
To mask an image with the Cookie Cutter tool:
1. From the toolbox, click to select the Cookie Cutter tool, or press Q (Figure 10.89).
2. On the options bar, click the Shape Options button to open the Cookie Cutter Options panel.
Select from the available options or leave the options set to Unconstrained.
3. Still on the options bar, click to open the Cookie Cutter shape picker (Figure 10.90).
4. Click to choose from the list of default shapes, or select a different shape set from the Custom Shapes drop-down menu.
5. In the image window, click and drag over an image layer to draw the selected shape. The image now appears only within the Cookie Cutter shape, leaving the rest of the layer transparent (Figure 10.91).
If you apply the Cookie Cutter tool to a flattened, background layer, it automatically converts the layer to a working layer with transparency.
6. To reposition the shape in the image window, place the cursor anywhere inside the shape bounding box, and then click and drag.
Notice that as you drag the shape, different areas of the original image are revealed, as if you were moving a window around on a solid wall (Figure 10.92).
7. To scale, rotate, or otherwise transform the shape, refer to the section “Transforming Shapes,” earlier in this chapter.
8. When you’re satisfied with the size and position of your masked shape, click the Commit Transform button, or press Enter (Figure 10.93).
Once you commit the shape to the image layer, you can apply blending modes, opacity changes, and filters just as you would on any other raster image layer.
![]() Tip
Tip
![]() For a similar effect that affords you more flexibility (namely, the ability to transform your layer mask indefinitely), create a shape with the Custom Shape tool, and then follow the steps in the section “Creating Clipping Masks,” in Chapter 8.
For a similar effect that affords you more flexibility (namely, the ability to transform your layer mask indefinitely), create a shape with the Custom Shape tool, and then follow the steps in the section “Creating Clipping Masks,” in Chapter 8.
Figure 10.91 When you draw a shape with the Cookie Cutter tool, any underlying images are visible only within the shape.
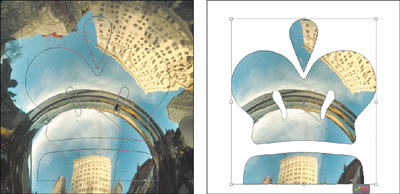
Figure 10.92 You can position, scale, rotate, and otherwise transform a Cookie Cutter shape right up to the moment you commit the shape to the image layer.
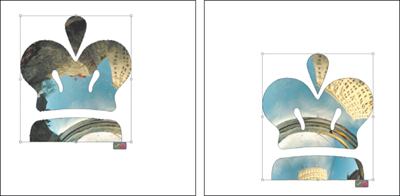
Figure 10.93 Once you commit the shape, its bounding box disappears.