The AutoLISP examples that I gave you in Chapter 8, "AutoLISP by Example: Getting Started," were simplified, but that doesn't mean they weren't useful. In fact, with only those examples, you can now create hundreds of new and useful AutoCAD commands. But before long, you'll probably want to generate functions that require something more complex than the skeletal AutoLISP structure laid out in the previous chapter. This chapter adds some meat to that skeleton, not only by introducing you to more complex functions, but also by describing two of the most important concepts for your future programming efforts: error handling and annotating.
First, though, let's try to preempt the frustration inherent in creating your own programs. When your program fails to work, how do you figure out what's wrong?
Debugging Techniques
Error Handling
Annotation
Selection Sets
IF Function
WHILE Function
COND, INITGET, and GETKWORD Functions
Text and String Manipulation
Getting to DOS
In Chapter 8, the programs you tried were simple enough that you probably had little problem getting them to run. As you start developing more complex programs, however, you'll have to enter the realm of problem-solving known in programming as debugging. Before we begin looking at more complex program examples, let's go over some techniques you can use while you're creating new programs. Those techniques include the following:
Testing sections of code in the Visual LISP Console or at the AutoCAD command prompt
Finding matching parentheses as you type or after you've typed your code
Modifying the format of your code so it's easier to read
Checking your code for structural flaws
Running code fragments from the Visual LISP editor
Finding the current value of a variable
Note
AutoLISP programs deal with two kinds of variables: system variables defined by AutoCAD, such as OSMODE; and program variables defined by you and named by you. Program variables can be either local, having a value in only one program, or global, holding a value after the program in which it's defined has terminated.
Stopping the program as it runs so you can see if a problem has developed
Slowing the program so you can watch it as it runs to see how it's working
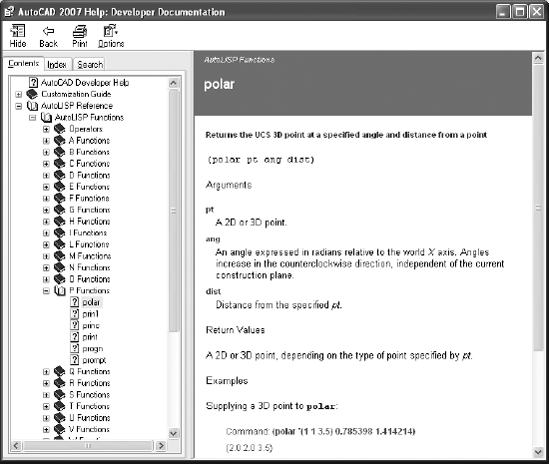
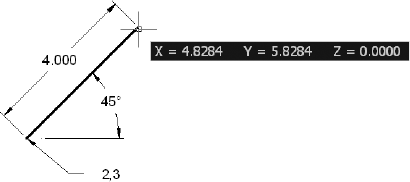
You can test your understanding of the syntax of a function by trying it at the AutoCAD command prompt or in the Visual LISP Console. Suppose, for example, you can't remember the structure of the POLAR function (we looked at that in Chapter 8). POLAR allows you to find a point at a specific distance and angle from an existing point. You know that POLAR requires a starting point, a distance, and an angle. You understand arguments well enough now to know that they must be placed after the function name, but in what order?
If you look up the POLAR function in the Help system (hey, what a great idea!), it gives you the following information:
OK, that seems clear enough. You close Help and try the POLAR function by typing it in the Visual LISP Console or at the AutoCAD command prompt exactly as it appears in the Help dialog, and you get the message "error: bad argument type: 2D/3D point: nil."
Of course! The three required arguments must be a point, an angle in radians, and a distance in units. In the Help system, they're represented by pt, ang, and dist. They could be variable names in a program, but until they have a value assigned, they're all nil; therefore, the POLAR function returns an error.

Note
AutoLISP programs often return nil, which represents either an empty list or a false condition. Think of it as meaning no value, and don't make the mistake of thinking nil is the same as zero. It's not, since 0 is a value.
You try again, replacing pt with (2 3 0), ang with 45, and dist with 4. Now that you've provided proper arguments, entering the code should return a point that is 4 units away from coordinate 2,3 at an angle of 45°. But it doesn't. Instead, you get a different error message.
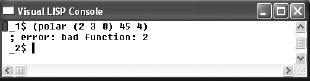
This error message contains a clue, "error: bad function: 2." When you get the bad function error, start looking at open parentheses. The number 2 appears immediately after an opening parenthesis. Remember, there must be a function in that location. Unless you tell AutoLISP not to evaluate the 2 as a function, it tries to do so, only to discover that the function 2 is undefined (or bad). How do you tell AutoLISP not to evaluate the first item in a list? You quote the list by adding an apostrophe before the opening parenthesis. The Help system example shows a single quote, but it's hard to notice everything. Now you add an apostrophe and try again, getting the following results.
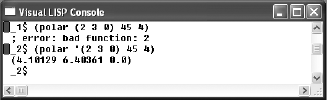
This looks pretty good. At least you got a point, which is to say at least you got a list of three values. But is that point correct? You can't tell for sure, although it looks feasible. How can you check?
Use AutoCAD to find out what the new point should be by drawing a line from the coordinate 2,3 that's 4 units long at an angle of 45°. The coordinates of the new end point are 4.8284,5.8284,0, which aren't the coordinates returned when you entered the function at the Visual LISP Console. You have to try something else.
The result is obviously wrong, yet so close to what you expected. Maybe you mixed up the angle and the distance. They're both numbers, so the program would still run. The Help system could be wrong about what comes first, couldn't it? Possible, but unlikely. Look to your code for problems before blaming the Help system.
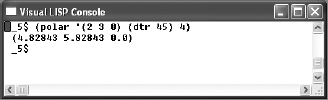
Let's say you've already checked your code, so you decide to experiment. Maybe the Help system is wrong. You try reversing the values, and type (polar '(2 3 0) 4 45), but that result's not even close. It returns (−27.414 −31.0561 0.0).
In this case, the problem is staring you right in the face. You want an angle of 45°, but the POLAR function thinks you mean 45 radians. It says so in the Help system, but somehow you missed it. Now you try (polar '(2 3 0) (dtr 45) 4), which assumes that DTR (the function you wrote in Chapter 8) is loaded. The results you get from this line of code match the results you get using the ID command—4.8284, 5.8284, 0.
When you're trying to apply a function for the first time, this kind of stumbling around is realistic, even after you've been writing programs for a while. Think of it as a game: Try to have a little fun, even when you're faced with the frustration of getting hung up on the littlest things.
Note
If you didn't define the function DTR before trying the last code example, do the conversion mathematically. It looks like this: (polar '(2 3 0) (* pi (/ 45 180.0)) 4).
When I first started writing AutoLISP programs, I used a program named PQCHECK. It checked AutoLISP code for problems with parentheses and quotation marks, reported the problems, and then identified possible error locations by line number. I had to open the AutoLISP file, go to the identified lines, and then start poking around for trouble.
The Visual LISP editor has improved that process considerably. One of its most appealing features is its ability to keep track of parentheses and double quotes as you type. It also has tools for finding matching parentheses after you type the code.
Let's get double quotation marks out of the way first, because that's easy. With color-coding, the Visual LISP editor displays in magenta any string enclosed in double quotes. This color-coding is applied as you type, so the first quotation mark turns the rest of the file magenta all the way to the next double quote. It stays that way until you place the corresponding closing quotation. If you miss a quotation mark, just go back to where the magenta color begins, and you'll find a double quote. It should be clear where you should place the closing double quote.
Parentheses still cause their share of problems, but the Visual LISP editor contains other tools for solving them.
As you create the code for a new program, whenever you type a closing parenthesis, your cursor jumps to the corresponding opening parenthesis. If the cursor doesn't jump, this means you have too many closing parentheses: There is no opening parenthesis to jump to. If the program is short, keeping track of the jump is easy. In longer programs, keeping track becomes more difficult, because the cursor goes to a location that's outside the current window.
The Visual LISP editor solves the problem of tracking cursor jumps with a highlighting feature. Place your cursor directly in front of any opening parenthesis or directly after a closing one, and double-click. The entire contents enclosed by those parentheses will be highlighted. Now you can see where they match up. If you want, you can take advantage of this selected, highlight text and load it to see if it works. I do this all the time while writing or debugging a program. Place your cursor in the location shown, and double-click.
You can also use the Ctrl key in combination with the open and close bracket keys to move through a document. Place the cursor directly after a closing parenthesis, and press Ctrl+[ to go to the matching opening parenthesis. Place your cursor directly before an opening parenthesis, and Ctrl-+] goes to the matching closing parenthesis.
If your new program doesn't run, don't get discouraged—get interested. Start your sleuthing by determining how far your program got before it stopped working. Because most programs, even the simple ones we're using here, use a lot of variables, it's possible to find out where the program stops working by checking to see whether variables have been properly assigned values along the way.
There are three ways to check variables.
To use the first two methods, it's critical that you avoid making the variables local until you've finished developing the program. Otherwise, the variable values are discarded (returned to nil) when the program ends. Variables become local when they're listed as arguments to the DEFUN function, so you may want to wait until you know the program works before you list them on the DEFUN line.
Adding variables to a Watch window works for both global and local program variables, as long as you set break points in the program. Check the Watch window when the program stops at a break point to see the current values for the listed variables.
To add variables to a Watch window, do the following:
Start the Visual LISP editor.
Open your AutoLISP program.
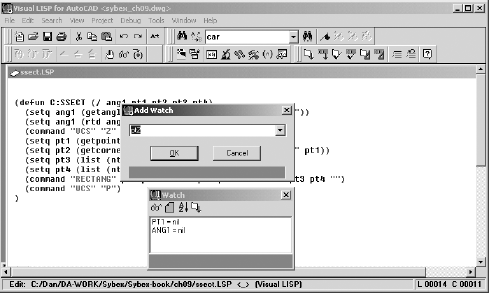
Place the cursor at a variable name, and right-click.
Select Add Watch from the cursor menu.
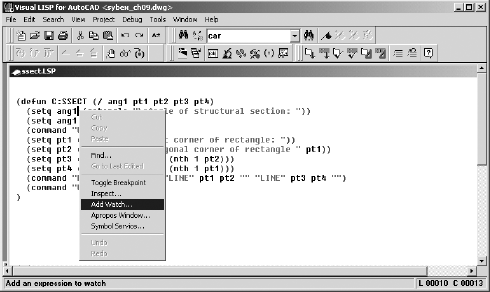
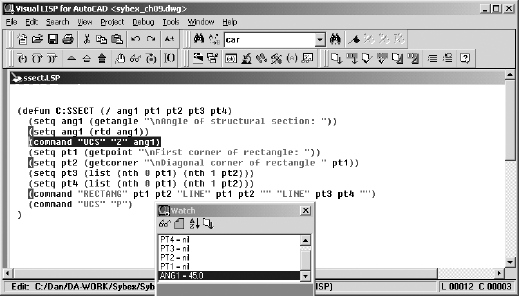
Confirm the variable name in the Add Watch dialog box, and click OK. The Watch dialog box opens as shown. The next graphic shows the code for the program that you'll be debugging here. If you want, you can duplicate it in the Visual LISP editor and follow along. Just type it exactly as shown, because it's purposely broken.
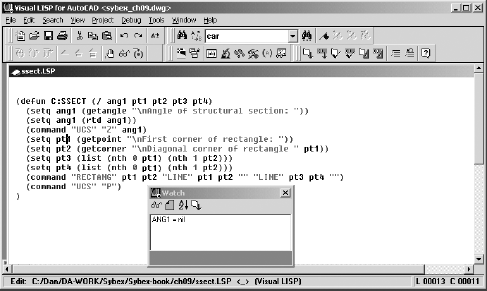
You can add more variables to the Watch window by clicking the Add Watch button (looks like a pair of glasses) on the Debug toolbar. As far as I know, you must add each variable one at a time. All variables in this window are currently nil.
To get values assigned to the variables, you have to run the program; but if you run the program, things happen so fast you can't see the variable values before they're returned to nil. You have to stop the program from running at a few key points. To do that, add some break points.
Remember, there's an error in the SSECT program code that appears in the Visual LISP editor shown in the next graphic. You'll see where it's broken as we go through the debugging procedure.
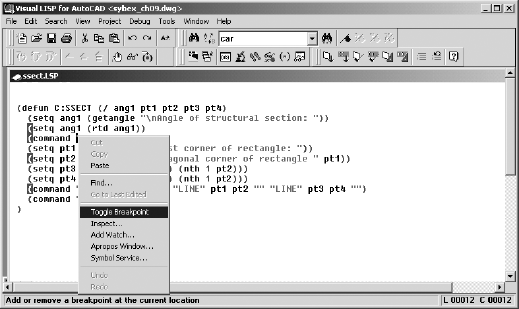
To place a break point, move your cursor to a location where a break makes sense, right-click, and then select Toggle Breakpoint from the cursor menu. There are four break points in the code. The first break point stops the program after a value is first assigned to ang1 so you can check to see whether it's correct. The second break point stops the program again after the value stored in ang1 is converted from radians to degrees to see if the new value is correct. The third break point stops the program so you can check the list of coordinate values stored in pt1. The last break point, which is placed just before the command function, stops the program so you can inspect the values of pt2, pt3, and pt4.
Now that the breaks are in place, load the program using the Load Active Edit Window button, and then click the Activate AutoCAD button and type the new command at the command line. VLIDE switches back to the editor when the break point is reached, so you can check the variable. After starting the program, type 45 in response to the prompt Angle of structural section:. The program stops when it gets to the first break point.
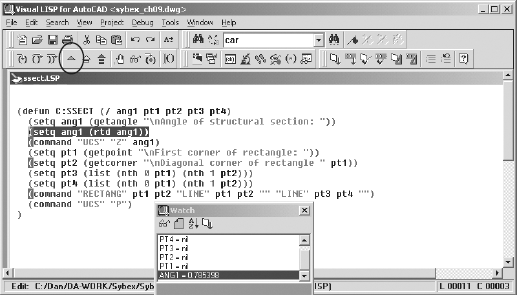
Notice that the variable ang1 now shows a value of 0.785398 in the Watch window—that looks like an angle in radians, and it is. The highlighted line is the expression that will be evaluated next. To continue to the next break point, click the Continue button, which is the one whose button icon is a green triangle.
The program now evaluates the next line. The value of ang1 changes in the Watch window because it's been redefined using the RTD function (if the function is loaded). Once the value of ang1 is converted from radians, a new value of 45.0 is assigned to ang1. Because this matches your intent, you can move on by clicking the Continue button again.
Note
The SETQ function is used in this line to change the value currently assigned to a variable. This is common practice in AutoLISP programs.
Now the next two lines are evaluated, because the next break point is two lines away. VLIDE switches back to AutoCAD so you can select or enter a point. Type or select 0,0, and the Visual LISP editor opens again, highlighting the next line to be evaluated.
Note
When you're debugging a program, use points, distances, and angles that allow you to easily predict the results. Once you've gotten the program to work for values like 0,0,0 and 45°, you can test it with more complicated input.
Variable pt1 shows the value (0.0 0.0 0.0), which is correct. So far, the Watch window confirms that the program is working fine. The error must occur somewhere after the break point. Add the other point variables to the Watch window, and continue with the debugging.
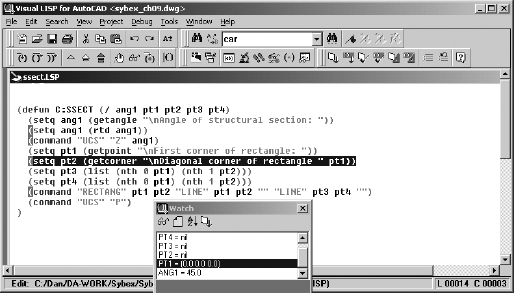
Click the Continue button, and enter 5.5,1.5 at the AutoCAD command line. VLIDE switches back to the editor, and the Watch window now shows the values of pt2, pt3, and pt4. Aha: There's the problem. The variable pt2 shows the correct values of 5.5 and 1.5, but the other two variables have the same values assigned to them. No wonder the program won't work. Two corners of the rectangle have been assigned the same point.

Now that you've found the error, you may be a little perplexed. How could you have made such a mistake? Well, look at the two preceding lines. Because the lines of code are so similar, you undoubtedly copied the first and pasted it to get the second, and then you got distracted and forgot to edit the line. I've done this myself more times than I'd like to admit. Let's fix the problem.
To clear all the break points when you're finished with them, press Shift+Ctrl+F9. If you want to disable the breakpoints while leaving them in place for future debugging, right-click each one, click Breakpoint Service, and click the Disable button in the Breakpoint Service dialog box. There are a number of ways to move through breakpoints:
When I first found this debugging function, I thought it was fun. Now I don't use it because it takes so long. Try it at least once to see how it works; you may like it.
To turn on animation, use Debug → Animate. Now, load your program, and switch to AutoCAD to try the command. As you follow the prompts for your program, VLIDE switches between the Visual LISP editor and the AutoCAD editor to display the program and highlight the section being evaluated as it moves along. Because this happens so slowly, you can follow along and see where the program hangs up. You may also have time to make coffee and answer your e-mail.
When your program appears to work flawlessly, it's time to try to break it:
If you haven't already done so, add all local program variables to the list of arguments for the DEFUN function.
Save the AutoLISP program.
Exit the Visual LISP editor, and exit the drawing to clear all stored variables from memory. This step is critical. If you've been debugging one or more programs, it's very likely that some of the variables still have values stored in them.
Start AutoCAD, and set up as many variations as possible of how your new function may be applied. To do this for a program like the earlier SSECT command, create a series of lines at different angles—some regular angles like 45 degrees, and others at random angles going in all directions.
Use the new command function to create end-section symbols. When prompted for an angle, pick two points on each line. Type some angles. Then, type in some random letters, hit the Esc key, and press the Spacebar to see what happens. In other words, do things that an AutoCAD user could do, even if they don't seem logical. This program still has some flaws. See if you can find them.
Compare the prompts in your new command to those in AutoCAD to make sure they're similar in form.
Performing these steps with the SSECT program brings up six concerns:
When the program is running, all the AutoCAD commands and their related prompts are displayed in the command line. You can fix that by turning off the setvar CMDECHO at the beginning of the program and then turning it back on at the end of the program.
It would be nice if the operator could select a default angle of 0 by pressing Enter. You can fix that with the IF function.
If you press the Esc key after the UCS is rotated but before the program ends, the UCS never returns to its previous state. You can fix that by adding error handling.
If you change your mind after creating the new symbol, you have to undo each step used by your program to create the symbol. You can fix that by setting start and end points for UNDO in the program.
If you pick two points that have the same X or Y coordinates, the rectangle and both lines look like a single line because they're stacked on top of each other. You can fix that, too, but maybe a whole new approach is in order. See the "COND, INITGET, GETKWORD" section below for a different approach to this program.
When the program is done,
nilis printed to the command line. You can prevent that by adding the line(PRINC)to the end of the program.
Running the program as designed prints the following lines to the AutoCAD text screen:
Command: SSECT
Angle of structural section <0>:
ucs
Current ucs name:  *WORLD*
Enter an option [New/Move/orthoGraphic/Prev/Restore/Save/Del/Apply/?/World]
<World>: z
Specify rotation angle about Z axis <90>: 0.000000000000000
Command:
First corner of rectangle:
Diagonal corner of rectangle RECTANG
Specify first corner point or [Chamfer/Elevation/Fillet/Thickness/Width]:
Specify other corner point or [Area/Dimensions/Rotation]:
Command: LINE Specify first point:
Specify next point or [Undo]:
Specify next point or [Undo]:
Command: LINE Specify first point:
Specify next point or [Undo]:
Specify next point or [Undo]:
Command: UCS
Current ucs name:  *WORLD*
Enter an option [New/Move/orthoGraphic/Prev/Restore/Save/Del/Apply/?/World]
<World>: P
Command: nil
By turning off the setvar CMDECHO at the beginning of the program and then turning it back on at the end of the program, you can reduce the screen text to the following lines:
Command: ssect
Angle of structural section <0>:
First corner of rectangle:
Diagonal corner of rectangle
Obviously, this is much cleaner. You should wait until you finish testing the program before turning off CMDECHO, because all those lines that are accessible in the Text Window of AutoCAD can be helpful in debugging.
The following code listing shows what the program looks like when it's rewritten to address most of the concerns identified earlier. The core of the program should look familiar, but there are probably a number of things that aren't so familiar. I'll discuss them in later sections of this chapter; you don't have to understand everything right now.
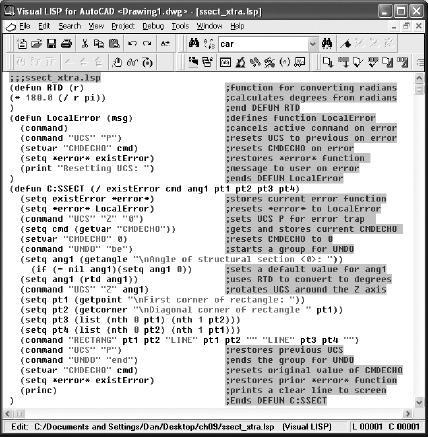
The new version of ssect.lsp is named ssect_xtra.lsp and uses inline annotation—the notes that appear after the semicolon in each line (see Listing 9.1). In the Visual LISP editor shown in Figure 9.1, these comments would be displayed as maroon text on a gray background.
Example 9.1. Listing 9.1
ssect_xtra.lsp

        ;;;ssect_xtra.lsp
        (defun RTD (r)                      ;function for converting radians
        (* 180.0 (/ r pi))                  ;calculates degrees from radians
        )                                   ;end DEFUN RTD
        (defun LocalError (msg)             ;defines function LocalError
          (command)                         ;cancels active command on error
          (command "UCS" "P")               ;resets UCS to previous on error
          (setvar "CMDECHO" cmd)            ;resets CMDECHO on error
          (setq *error* existError)         ;restores *error* function
          (print "Resetting UCS: ")         ;message to user on error
          (princ)                           ;print a clear line
        )                                   ;ends DEFUN LocalError
        (defun C:SSECT (/ existError cmd ang1 pt1 pt2 pt3 pt4)
          (setq existError *error*)         ;stores current error function
          (setq *error* LocalError)         ;resets *error* to LocalError
          (command "UCS" "Z" "0")           ;creates a previous UCS
          (setq cmd (getvar "CMDECHO"))     ;gets and stores current CMDECHO
          (setvar "CMDECHO" 0)              ;resets CMDECHO to 0
          (command "UNDO" "be")             ;starts a group for UNDO
          (setq ang1 (getangle "
Angle of structural section <0>: "))
            (if (= ang1 nil)(setq ang1 0))  ;sets a default value for ang1
          (setq ang1 (rtd ang1))            ;uses RTD to convert to degrees
          (command "UCS" "Z" ang1)          ;rotates UCS around the Z axis
          (setq pt1 (getpoint "
First corner of rectangle: "))
(setq pt2 (getcorner "
Diagonal corner of rectangle " pt1))
(setq pt3 (list (nth 0 pt1) (nth 1 pt2)))
(setq pt4 (list (nth 0 pt2) (nth 1 pt1)))
(command "RECTANG" pt1 pt2 "LINE" pt1 pt2 "" "LINE" pt3 pt4 "")
(command "UCS" "P") ;restores previous UCS
(command "UNDO" "end") ;ends the group for UNDO
(setvar "CMDECHO" cmd) ;resets value of CMDECHO
(setq *error* existError) ;restores prior *error* function
(princ) ;prints a clear line
) ;Ends DEFUN C:SSECTI used error handling in the last program example, because if you cancel the program before it ends you're left with an unexpected UCS. Now let's see how error handling works.
The purpose of error handling is to return the system to its original state if a user presses the Esc key in an attempt to stop a program prematurely. You can see why that would be a problem with programs designed to make changes in order to run—a change in the current coordinate system, for example, or in the value assigned to OSMODE to control running osnaps. You don't want AutoCAD users to be unpleasantly surprised as a result of using your AutoLISP function.
Error-trapping functions are defined the same way as any other AutoLISP function—using DEFUN without the C: in front of the function name. Once you define the error-trapping function, you can use it in any of your other programs by using SETQ to assign it to the AutoLISP variable *error*. The name of that variable does indeed include two asterisks. It's a special variable in AutoLISP, but it has no value until one is assigned using the SETQ function.
There are two kinds of error-trapping strategies: specific and general. The general strategy uses the UNDO command in AutoCAD to set a mark. The error handler rolls AutoCAD back to that mark in response to a program error. This strategy contains potential problems that could have dire consequences, so I won't cover it here. Instead, I recommend that you create a specific error-handling function for any program that changes anything while it's running—system variables, or open files, for example.
I recommend these steps for error handling.
Using the BEgin option of UNDO, start an UNDO group at the beginning of any program that creates entities. Doing so allows the user to clear newly created objects with a single UNDO if they don't like the results of using your program.
Save the settings of all system variables or environmental variables that are changed in the program by using SETQ to assign them to a program variable.
Write an error-trapping function that resets those variables to their original settings in response to an error that occurs while the program is running.
Place the error-trapping function immediately before the command function it applies to.
Let's add an error handling function to the mid.lsp program from Chapter 8. The original program made two changes to system variables: OSMODE was changed to 512, and APERTURE was changed to 3. If you recall, the program was polite enough to change the system variables back at the end. That works great as long as nothing goes wrong, but if you cancel the command before it finishes running, you end up with Nearest as the only running osnap. Here's what an error-handling function looks like for a program that changes OSMODE and APERTURE.
(defun ErrorMid (message)     ;define function named "ErrorMid"
   (command)                  ;cancel any active command
   (setvar "osmode" os)       ;set "osmode" to saved variable
   (setvar "aperture" ap)     ;set "aperture" to saved variable
   (setq *error* temperr)     ;restore existing *error* function
   (prompt "
Resetting System Variables ")     ;inform user
   (princ)                                      ;print a clear line
)
This function won't do anything until it's called by another program. Once the error-handling function is written, it must be referenced at the beginning of the C:MID function definition—that means before any variables get changed. To use the error-handling function ErrorMid, edit the definition for the C:MID program by adding the following lines:
(defun C:MID (/ p1 p2 os ap m) (setq temperr *error*);store any current value for*error* (setq *error* ErrorMid);re-assign*error*to your function
Earlier in this chapter, I showed you how a semicolon can be used to add notes to an AutoLISP program. The more notes you add, the easier it will be for you and others to understand your programs later. But too much annotation can make your code harder to read. Find a nice balance.
Annotation should include header material identifying the name of the program, when it was written, who wrote it, what it does, and any limitations you want to put on its use. You (or your employer) own the copyright on any program you write, and so do other people who write code. That's why you shouldn't use programs without permission. I advise you to take a leaf from Autodesk's book. At the beginning of the file, add a line giving people permission to use your program as-is. If you don't want anyone to use your programs, indicate that in the file, and don't pass them around. If you want to protect the code itself from being used by others to write their own program, compile it so it can't be edited. Check the Visual LISP editor Help system to see how.
When you write a program as a subcontractor, make sure all parties agree about who owns the final produce. I retain ownership of my programs, but I give permission for them to be used without express or implied warranty. Why no warranty? Once you hand over a program, you can't anticipate every possible use, or misuse, particularly if you don't compile the programs.
Listing 9.2 is the complete MID.lsp program with annotation and error handling added. To differentiate types of annotation, I varied the number of semicolons used for each section as follows:
;;;;General header material;;;Specific description of the code;;Header for individual sections of the program;Annotation of individual lines in the code
Example 9.2. Listing 9.2
MID.lsp

        ;;;; mid.lsp
        ;;;; Copyright 2006 by Daniel Abbott. Permission to use,
        ;;;; copy, modify, and distribute this code for any
        ;;;; purpose is hereby granted. I provide this program
        ;;;; "as is" with all faults. I specifically disclaim any
        ;;;; implied warranty of fitness for any particular use.
        ;;;; I do not warrant that the program will be error free.

        ;;;Purpose

        ;;; This program will place a point between two objects
        ;;; selected by the user. If parallel lines are selected
        ;;; point will be centered between them. It is designed as
        ;;; an aid in adding dimensions between lines that represent
        ;;; interior walls on floor plans. The points can be used
        ;;; as dimension origins to locate walls. If points are added
        ;;; to other dimension origins -- corners, window openings
        ;;; door openings -- QDIM can be used to quickly add
        ;;; continuous dimensions by selecting the points using the
        ;;; FILTER or QSELECT commands.
;; ----------- PROGRAM CODE STARTS BELOW THIS LINE ---------
;; Error handling function
(defun ErrorMid (msg) ;define function ErrorTrpMid
(command) ;cancels active command
(setvar "osmode" os) ;set "osmode" to os
(setvar "aperture" ap) ;set "aperture" to ap
(setq *error* ExistError) ;restore existing *error*
(prompt "
Resetting: ") ;inform user
(princ) ;print a clear line
);end defun
;; Program Code
(defun C:MID (/ existError p1 p2 os ap m)
(setq existError *error*) ;store an existing *error*
(setq *error* ErrorMid) ;re-assign *error* to ErrorMid
(setq os (getvar "osmode")) ;saves current osnap settings
(setq ap (getvar "aperture"));saves current aperture setting
(setvar "osmode" 512) ;resets "osmode" to nearest
(setvar "aperture" 3) ;resets "aperture" to 3 pixels
(initget 1) ;prevents Enter as a response
(setq p1 (getpoint "
First point: "))
(setq p2 (getpoint "
Second point: " p1));second point
(setq m ;sets program variable m
(polar p1 ;polar starts from p1
(angle p1 p2) ;angle from p1 to p2
(/ (distance p1 p2) 2.0);distance p1 to p2 divided by 2
);end polar
);end setq
(command "point" "non" m) ;point placed at m with NO osnap
(setvar "osmode" os) ;return osmode setting to original
(setvar "aperture" ap) ;return aperture setting to original
(setq *error* existError) ;return existing error handler
(princ)
);end defunNote
To save space and simplify the code, some of the remaining program examples in this chapter don't include error handling or annotation. Actual programs should have both.
In Chapter 8, you saw a list of GET functions—functions designed to get data or objects. Most of them are simple and allow you to prompt users so they know what kind of data you're trying to get. Now let's look at some functions that are more powerful and complex. First I'll show you how your AutoLISP program can get information about entities in your drawing. Once you understand how to get information from an entity, I'll show you how to use that information.
The ASSOC, ENTGET, and ENTSEL functions show up all the time in AutoLISP programs. They can work together to get a ton of information from an entity in the drawing. You can find out what the entity is, what layer it's on, what linetype it uses, and so on. Enter the following line of code at the AutoCAD command line with an Enter, and then select a circle when prompted. This line will prove extremely useful in future programs:
(cdr (assoc 5 (entget (car (entsel)))))
The value returned will vary, but it's always a hexadecimal number that represents the entity's handle. AutoCAD assigns a handle to each entity as it's created. The handle is permanently associated with that entity.
Note
Hexadecimal numbers are base 16 numbers, rather than base 10: hex (6) + decimal (10) are combined to form the word hexadecimal (16). Hexadecimals are used in computing because they can represent binary values with fewer characters than are needed for decimal values. To create a base 16 number system, several letters have to be used as though they're digits. To count in hexadecimal, use 0, 1, 2, 3, 4, 5, 6, 7, 8, 9, a, b, c, d, e, f, 10, 11, 12, 13, 14, 15, 16, 17, 18, 19, 1a, 1b, and so on. Entity names and entity handles in AutoLISP are hexadecimal.
You can use the same line with a number other than a 5 to get other information from the entity. Enter the line of code again with a 0, and select the same object; now you'll find out what kind of entity it is:
(cdr (assoc 0 (entget (car (entsel)))))
For this function, "CIRCLE" was returned when I picked a circle. Not too surprising (other entities may not be so obvious). Draw some polylines, dimensions, text, ellipses, and so on, load this line again, and then pick each one. You'll find out what kinds of entity they are.
Now that you know that you can use a 5 or a 0, you've probably guessed that other integers give you different information. These integers are called DXF group codes; and I've listed some of them in Table 9.1, but more on that later. We're not finished with this line of code yet. Let's look at each element of (cdr (assoc 0 (entget (car (entsel))))) from the inside out, starting with (entsel). You'll execute each function and then select the same circle, and discuss the results.
The ENTSEL function prompts the user to select a single object. When you use the ENTSEL function, it returns two pieces of information: the entity's name and the coordinates of the point picked to select it. When I selected a circle, (<Entity name: 7ef61ea8> (46.904 22.3015 0.0)) was returned. 7ef61ea8 is the entity name, and (46.904 22.3015 0.0) is the selection point.
Let's say you want only the entity's name. To eliminate the selection point from the list, use the CAR function, which returns only the first item in a list. (car (entsel)) returns only <Entity name: 7ef61ea8>. As I mentioned earlier in this chapter, I prefer the NTH function for this purpose; but you'll see this process used with CAR at some point, so you should be familiar with it. Use this line of code on your own circle and compare the results.
Now that you have the entity's name, use it with the ENTGET function to get more information. Think of ENTGET as "GET the ENTtity's data." Here's what that function returns from a specific circle. If you enter this line of code in the Visual LISP console it returns all this information on a single, long line similar to the broken lines that follow:
((−1 . <Entity name: 7ef61ea8>) (0 . "CIRCLE") (330 . <Entity name:
7ef61cf8>) (5 . "8D") (100 . "AcDbEntity") (67 . 0) (410 . "Model") (8 .
"0") (48 . 2.2222) (100 . "AcDbCircle") (10 51.9761 28.3512 0.0) (40 .
7.95186) (210 0.0 0.0 1.0))
Note
If you have a sharp eye, you may notice that the group code 100 shows up twice on this list. Group code 100 is a subclass marker that has no use here. If you want more information, see the article on subclass markers in the Visual LISP editor Help system. And if you want a glimpse of what real programmers deal with, type ARX
What you see in this confusing mess is a group of lists—13 of them. They're known as association lists because each piece of information is associated with a group code—the integer within each set of parentheses. The period you see with a space on either side is known as a dot. If the set of parentheses contains a dot, it's known as a dotted pair.
Don't forget about the spaces on both sides of the dot. As you start writing more advanced programs, you'll have to construct your own dotted pairs; leaving out a space will create a problem. The parentheses that have no dot are associations between an integer and another list. The most common list is a list of coordinate points. The list associated with the integer 10, for example, is the center point of the circle—a list of its X, Y, and Z coordinates.
When you select the same circle after running this part of the function, AutoLISP returns: (0 . "CIRCLE").
The function ASSOC is how you get each association list. You identify the integer as the first argument, followed by an association list. In this case, using 0 with ASSOC returns the dotted pair in which 0 is associated with "CIRCLE". 0 is always associated with the kind of entity you have selected. But in order to use this information, you don't need the 0 or the dot; you just need the string "CIRCLE". To get everything except the first item in the list, use the function CDR.
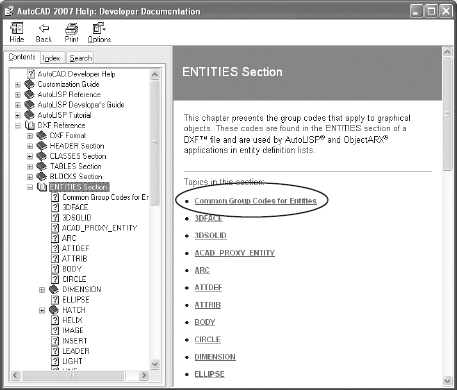
Now we're back where we started. This function returns "CIRCLE", the single thing you want—the type of entity. What else can you get? You can get the entity name by supplying an argument of −1 in place of the 0. You can get the entity handle by supplying an argument of 5 instead of the 0. Table 9.1 lists some of the integer values that can be associated with an entity in AutoCAD. If you substitute any of them for the 0 and select some entities, you get the data specified. They're known as DXF group codes. If you want the entire list of entities and the group codes most commonly associated with them, use the Visual LISP editor Help system as shown in Figure 9.2. To get the entire list of group codes, search Help for the article "Group Codes in Numerical Order."
Table 9.1. Partial List of DXF Group Codes
PURPOSE | |
|---|---|
−1 | Entity name: This is a unique hexadecimal value assigned to each entity in the drawing, but it differs from an entity's handle—the name changes every time you open the drawing. It's used in some situations to get information about an entity. |
−4 | Conditional operator: This is used to add conditions to the criteria by which a selection set is constructed. See the discussion of conditional operators later in this chapter. |
0 | Entity type: This is the group code for the object type—a string that tells you what kind of object you have selected. In our case, it was a "CIRCLE". |
2 | Name: This is different from the entity name. This group code represents a user-defined name for things like block definitions. Only entities that you can name have a group code of 2. |
5 | Entity handle: It's similar to the name in that it's a unique hexadecimal name, but it differs from the name in one important way—it's permanent. No matter how many times you open or close the drawing, this object always has this handle. It changes only if you insert the drawing or bind an XRef of the drawing into another drawing. |
6 | Linetype name: Only entities that can have linetypes have this code. |
7 | Text style name: This is only used for text or mtext objects. |
8 | Layer name: This is a property of all entities. |
10 | Primary point: This is a point value, and it means something different for different kinds of entities. For a circle, it's a center. For a line, it's the starting endpoint, and so on. |
38 | Entity elevation: This code is assigned only to entities with an elevation other than 0. If an entity's elevation is 0, searching for this code returns |
39 | Entity thickness: Like elevation, this code is assigned only if the entity's thickness isn't 0. |
48 | Entity linetype scale: This code is assigned only if the entity's linetype scale isn't the default value. If it's the default, searching for this code returns |
62 | Entity color: The index color codes are used, with 0 representing color BYBLOCK, and 256 representing color BYLAYER. |
Now that you know some important group codes and how to use them to get information from an entity, let's see how easy it is to apply this approach in another context.
Let's say you want a new command that will allow you to select an entity and apply its linetype scale to other entities. You could do this with MATCHPROP, but that would match all the properties, and you want to match only linetype scale. You can use (cdr (assoc 48 (entget (car (entsel))))) to get the linetype scale of a selected entity, which can then be assigned to a variable. That variable can be used to change the linetype scale of other entities. Once you include error handling, it may look like Listing 9.3.
Example 9.3. Listing 9.3
chlts.lsp

        (defun EtrapCHLTS (message)
          (command)
          (setvar "cmdecho" ce)
          (setq *error* existError)
          (prompt "Reset")
          (princ)
          )

        (defun C:CHLTS (/ existError ce source updateEnts lScale)
          (setq existError *error* )
          (setq *error* EtrapCHLTS)
          (setq ce (getvar "cmdecho"))
          (setvar "cmdecho" 0)
          (setq source (entsel "
Select source object: "))
          (prompt "
Select the objects to update: ")
          (setq updateEnts (ssget))
          (setq ltScale (cdr (assoc 48 (entget (car source)))))
          (if (= ltScale nil) (setq ltScale 1))
          (command "CHPROP" updateEnts "" "S" ltScale "")
          (setvar "cmdecho" ce)
          (setq *error* existError)
          (princ)
        )
This program is described in Table 9.2.
Table 9.2. chlts.lsp Description
LINE OF CODE | PURPOSE |
|---|---|
| Defines the error-handling function to be used with C:CHLTS. |
| Cancels any existing command. |
| Resets the system variable to its original setting if something interrupts C:CHLTS. |
| Resets the *ERROR* function to the value assigned to variable |
| Prints the message to the screen. |
| Prints a clear line to the command prompt. |
| Ends the DEFUN function. |
| Defines the new command, and identifies local program variables. |
| Assigns an active error-handling function to the program variable |
| Sets *ERROR* to the error-handling function defined previously. |
| Assigns the current setting for CMDECHO to the variable ce. |
| Sets the AutoCAD system variable CMDECHO to 0 (turns it off). |
| Sets the variable source equal to a single entity selected by the user. This variable is used later in the program to get information from the selected entity. |
| Tells the user what to do in the next line. The standard |
| Sets the variable |
| Uses the functions discussed in the previous section to determine the object's linetype scale. 48 is the DXF group code associated with linetype scale. Once the value is obtained, it's assigned to the variable |
| Necessary because of a quirk in AutoLISP. Some dotted pairs aren't shown for characteristics that have a default setting. If an entity has a default linetype scale, which is |
| Uses the CHPROP command to update the selection set obtained with SSGET. |
| Resets the system variable CMDECHO to its original setting. |
| Prints a blank line at the command line. |
| Ends the DEFUN function. |
Using this code as a sample, you can easily modify it to create other new commands that can be used to match any property of an entity to another group of entities. This technique is widely used for managing layers. Just use a different DXF group code to get at the data you want to extract or change.
You've seen the SSGET function several times now. It's often used by itself in the form (SSGET) when you want the user to create a selection set. The SSGET function has some other options that are worth noting. If you want a program to create a selection set directly from the entities in the drawing, you can modify SSGET as described in Table 9.3.
Table 9.3. Examples of SSGET Options
PURPOSE | |
|---|---|
| Selects all objects in the drawing. If you save the result to a program variable, you can modify all the entities in the drawing. |
| Selects all circles in the drawing. Notice the single quote preceding the dotted pair. You need that here so the function interprets what follows literally: no function directly follows the open parenthesis. The zero is the group code for entity type. If you want to select objects other than circles, name them instead. If you want more than one type of entity included, use commas to separate them with this format: |
| Creates (CONStructs) a dotted pair. This line also selects all circles in a drawing. This is an alternative means of selecting objects. Again, to select other objects, substitute their entity type for "CIRCLE". |
| Uses the group code |
| Selects all objects at an elevation of 10 units. 38 is the DXF group code for ELEVATION. |
| Defines a selection set with a window by identifying its corners—in this case, |
| Selects all entities that pass through the coordinates assigned to |
What if you want to combine properties for a more complex selection set the way you can when using the FILTER or the QSELECT command? Use SSGET with relational operators. These operators are identified in a dotted pair with the group code −4. They're always placed within double quotes. Table 9.4 shows the conditional operators and their meanings.
Let's see an example. To select all text whose height is equal to or greater than .125 but less than .25, use the following syntax (don't forget to leave a space in front of and after each dot in the dotted pairs):
(ssget "X" '((0 . "TEXT")(−4 . "<=")(40 . 0.125)(−4 . ">")(40 . 0.25)))
Let's take this one from left to right in Table 9.5.
Table 9.5. Application of Conditional Operators
FUNCTION | PURPOSE |
|---|---|
| The selection set will include all entities that meet the conditions that follow. |
| This quotes the following dotted pair so the 0 is interpreted not as a function but as a filter list. |
| Using the DXF group code for entity type limits the selection set to TEXT entities. |
| The DXF conditional operator code sets the condition greater than or equal to the value that follows. |
| DXF group code 40 is the text height. Only text greater than or equal to 0.125 will be selected. |
| This is the conditional operator code for less than the value that follows. |
| DXF group code 40 is the text height. Only text less than 0.25 will be selected. |
Combining selection sets complicates matters somewhat. If you want more control, you can add logical grouping to combine the conditions. The codes for logical grouping are shown in Table 9.6.
Table 9.6. Logical Grouping Operators
OPERATOR | PURPOSE |
|---|---|
| Begin the and group |
| End the and group |
| Begin the or group |
| End the or group |
| Begin the either/or group |
| End the either/or group |
| Begin the not group |
| End the not group |
Let's put it all together to create a selection set of all text in the drawing with a height greater than or equal to 3 but less than 6, or text of any height that is not on the text layer.
(setq ss1
   (ssget "X"
      '((0 . "TEXT")
        (−4 . ">=")
        (40 . 2)
        (−4 . "<")
        (40 . 6)
        (−4 . "<OR")
        (−4 . "<NOT")
        (8 . "TEXT")
        (−4 . "NOT>")
        (−4 . "OR>")
       )
   )
)
How can you use this code? Let's say you have trouble getting people to use the office standard for text. They always use the right text height of 6 for titles, so you don't want to select any text with that height. Your drawings contain some text labels with a height of 2.5, so you don't want to change those either. But the height used for everything else varies, and the text is often on the wrong layer.
See if the program in Listing 9.4 makes sense. It uses the previous code to select all the text (but not mtext) whose height is between 2 and 6, no matter what layer it's on, and puts it on a text layer at the proper text height of 3 mm without changing its location. If text of any height is on a layer other than the text layer, it's put on the text layer.
Example 9.4. Listing 9.4
fixtxt.lsp

        (defun C:FIXTXT (/ ss1)
          (command "LAYER" "N" "Text" "C" "BLUE" "Text" "")
          (setq ss1
               (ssget "X"
                    '((0 . "TEXT")
                      (−4 . ">=")
                      (40 . 2)
                      (−4 . "<")
                      (40 . 6)
                      (−4 . "<OR")
                      (−4 . "<NOT")
                      (8 . "TEXT")
(−4 . "NOT>")
(−4 . "OR>")
)
)
)
(if (/= ss1 nil)
(progn
(command "CHPROP" ss1 "" "LA" "Text" "")
(command "SCALETEXT" ss1 "" "E" 3)
)
(alert "No text found in that range: ")
)
(princ)
)The IF function is often described by programmers as an IF - Then - Else function. It's used all the time to check a condition and have the program respond differently depending on whether the condition is true or false. An IF function has either one or two arguments. If it has one argument, and a condition is true, the function that follows is executed, and the program continues. If the condition is false, the program ignores the next function and continues on.
When an IF statement has two arguments, the first is executed when the IF function returns true, and the second argument is ignored. When the IF condition isn't true, the first function is ignored, and the second function is executed; then the program continues. The best way to understand it is to write a short program to create a toggle.
The IF function can be used to toggle a variable—turn it on or off depending on its current state—like a three-way light switch. Let's create a command that turns the UCS icon on if it's off and off if it's on. The visibility of the UCS icon is controlled by the variable UCSICON. Although UCSICON has four settings, you'll use only two of them: 0 to turn it off, and 3 to turn it on and place it at 0,0. See Listing 9.5.
This code described in Table 9.7.
Example 9.5. Listing 9.5
ui.lsp

        ui.lsp
        (defun C:UI ()
         (setq uc (getvar "ucsicon"))
          (if (= uc 0)
            (setvar "ucsicon" 3)
            (setvar "ucsicon" 0)
          )
        )
Table 9.7. UCS Toggle Using the IF Function
Your newly created AutoCAD commands should behave like every other AutoCAD command. That's why each of the prompts you've used so far starts on a new line and ends with a colon followed by a space. That kind of familiarity makes it easier for AutoCAD operators to use the commands.
Most AutoCAD commands have something else in common: Their prompts list the most likely response as a default that can be selected with an Enter. In AutoLISP programs, you can use the IF function to create defaults. The program in Listing 9.6 shows you how. It creates a circular polyline so you can make circles that have a line width. AutoCAD has a secret circular polyline command: DONUT. But using it requires some calculations. If you want a circle with a diameter of 22 and a width of 0.3, you have to calculate the inside diameter and outside diameter in order to draw it.
Listing 9.6 lets you draw a circle by giving a diameter and a width. While we're at it, let's add a default value. Now you can accept a default width of 0 and worry about editing it later. Of course, if you want all your polycircles to be the same width, you can build that into the program.
The following program uses the DONUT command to create a circular polyline. The width given by the operator is used to calculate the inside and outside diameters of the donut by subtracting it from the diameter to determine the inside diameter and adding it to determine the outside diameter.
Example 9.6. Listing 9.6
polycircle.lsp

        (defun C:CC (/  wid pt1 dia id od)
          (setq wid (getdist "
Width of PolyCircle <0>: "))
          (if (= wid nil)
              (setq wid 0)
          )
          (setq pt1 (getpoint "
Center of PolyCircle: "))
          (setq dia (getdist "
Diameter of PolyCircle: " pt1))
          (setq id (- dia wid)
                od (+ dia wid)
          )
          (if (> id 0)
            (command "DONUT" id od pt1 "")
            (alert "Diameter must be positive and larger than width: ")
          )
          (princ)
        )
The code for polycircle.lsp is described in Table 9.8.
Well, it's nice to have a default value, but in this program it's always 0. Doesn't AutoCAD normally update the default settings to match the operator input from the last time the command was run? Yes, it does. If you want to do that, define a global program variable for the default width as discussed in the next section.
Table 9.8. Creating Local Default Values
LINE OF CODE | PURPOSE |
|---|---|
| You know what this line does by now. Note that I use CC as a command name because it's easier to type with the left hand than CP or PC. Of course, you can assign the command to a toolbar button. |
| Assigns a value provided by the operator to the variable |
This doesn't create a default. It just tells the operator that there is one. An ENTER assigns the value | |
| Creates the default. If the user responded to the last prompt with an Enter, then the list |
If the operator entered a value for width in the previous line, | |
| Ends the IF function. |
| Assigns a point provided by the operator to the variable |
| Assigns a distance provided by operator to the variable |
| Sets the variable |
| Sets the variable |
| Ends SETQ. |
| Checks to see if |
| Creates a donut using the values stored in the variables |
| Gives the user a warning if |
| Prints a clear line. |
| Ends DEFUN. |
Earlier in this chapter, I described local program variables. They hold their value only while the program is running and then return to a value of nil. (In other words, they're no longer variables.) Using local program variables is good practice if you want to prevent them from being used in another program. But what if you do want to use the same variable values again?
In the last program, you saw how the IF function can be used to create a default value. That default value doesn't update, though. No matter what the operator used the last time for a polycircle width, the value 0 shows up each time. If you want the default to be the last value used by the operator, you need a global program variable—one that won't return to nil when the program ends.
Note
This type of global default persists only during the current editing session. If the operator starts a new drawing or exits AutoCAD, the values bound to all program variables in AutoLISP are returned to nil.
To make a variable global, leave it off the list that follows your DEFUN statement. Be aware that you run the risk of inadvertently using the same symbol as a variable in a different program. To reduce this likelihood, use a variable name that is so specific to the program that it's unlikely to be used in any other. For this program, I use the name *<>PolyCircWid*. I can't imagine using this variable in another program, and other programmers almost never use the characters *, <, or >. Besides, how many commands could possibly use PolyCircWid as a logical part of a variable name? If you need even more reassurance, make the name even longer, and throw in some random characters.
The program in Listing 9.7 remembers the previous width used for a poly circle and makes it the default setting for future uses of the command. This one asks for a radius rather than a diameter, which makes it behave more like the CIRCLE command.
Example 9.7. Listing 9.7
polycircle_defaults.lsp
(defun C:CCC (/ str1 wid pt1 rad id od)
(if (= * <>PolyCircWid* nil)(setq *<>PolyCircWid* 0)
)
(setq str1 (rtos *<>PolyCircWid*))
(setq wid
(getdist (strcat "
PolyCircle Width <" str1 ">: ")
)
)
(if (= wid nil)(setq wid *<>PolyCircWid*)
)
(setq *<>PolyCircWid* wid)
(setq pt1 (getpoint "
Center of PolyCircle: ")rad (getdist "
Radius of PolyCircle: " pt1)
id (- (* rad 2) wid)
od (+ (* rad 2) wid)
)
(if (> id 0)
(command "DONUT" id od pt1 "")
(alert "Diameter must be positive and larger than width: ")
)
(princ)
)Because most of this program was described earlier, let's look only at the lines that create and use the global default in Table 9.9.
Table 9.9. Polycircle Command with Global Default
LINE OF CODE | PURPOSE |
|---|---|
| Notice that |
|
|
| The default setting displayed in the prompt the operator sees when running this program should match the value stored in the variable |
| This line creates the GETDIST prompt by joining three strings together using the STRCAT function. The variable |
| This IF statement is similar in function to the one in the last version of the program. If the variable |
| This line assigns the current value of the variable |
| The only other change to this program is the use of a radius instead of a diameter. This matches the behavior of the AutoCAD CIRCLE command. |
While programming, you often need to loop through a group of functions—either for a specific number of times, or indefinitely—until some condition changes. When you don't know how many times to repeat, use the WHILE function, which is discussed in the next section; when you do know how many times an evaluation must repeat, use the REPEAT function.
I created this next routine when I was asked to testify in a case in which one company accused another company of using direct copies of several of its drawings to produce an identical product. I wrote a program to determine whether a particular drawing was an original, independent creation or an electronic copy.
The program in Listing 9.8 uses entity handles, which are fixed, to compare the entities in one drawing with the entities in another. Rather than select each entity and use the LIST command to see the handles, I used this program to create a list of the handles for every object in each of the drawings and then write those lists to a text file. When I had finished comparing the files, I felt confident in judging how many entities had been copied from one to the other, and I had documentation to use in the deposition.
This program searches the database of the drawing to determine how many objects it contains and stores that number. Then, it goes through each object in the database and extracts its handle and object type. The handle and object types are then appended to a text file. If multiple sequential entities of the same type have the same hexadecimal name as those in another drawing, they're certainly copies, because handles are assigned to entities in chronological order.
Example 9.8. Listing 9.8
handle_file.lsp

        (defun c:handle_file (/ txtFile userProf fileName selSet1
                                ssLen indexCount entItem entHandle
                                entType entData entFile)
           (setq txtFile (getstring "
Name of file: "))
           (setq userProf (getenv "userprofile")
                 fileName
                 (strcat userProf "\My Documents\" txtFile ".txt")
           )
           (setq selSet1 (ssget "x"))
           (setq ssLen (sslength selSet1))
           (setq indexCount (1- ssLen)
                 entFile (open fileName "a")
           )
           (repeat ssLen
              (setq entItem (ssname selSet1 indexCount)
entHandle (cdr (assoc 5 (entget entItem)))
entType (cdr (assoc 0 (entget entItem)))
entData (strcat entHandle " " entType)
)
(write-line entData entFile)
(setq indexCount (1- indexCount))
);end repeat
(close entFile)
(prompt (strcat "
Data added to " fileName))
(startapp "notepad" fileName)
(princ)
);end defunTable 9.10 describes some of the code that appears in handle_file.lsp. At this point, you're so familiar with some of these functions that I'll describe just the code that is new.
Table 9.10. handle_file.lsp
LINE OF CODE | PURPOSE |
|---|---|
| Assigns a string to the variable |
| Assigns the profile path for the current user to the variable |
| Uses the SETQ function from the previous line to assign a string to the variable |
| Assigns all objects in the drawing's database to the variable |
| Counts the number of items using the SSLENGTH function and assigns the value to the variable |
| Sets up a means of counting down the number of items stored in |
| Opens the file named by the user and stored in |
| Begins the REPEAT function. Because there are |
| Begins setting a series of variables. The variable |
The last item is selected because the value stored in the variable | |
Before the REPEAT function loops back, the variable | |
| Uses the open SETQ function from the previous line to assign the handle of |
| Uses the open SETQ function to assign the entity type of |
| Uses the open SETQ function to assign the variable |
| Writes the string |
| Sets the variable |
| Closes the file represented by the variable |
| Informs the user that data was added to the file name stored in the program variable |
| Starts Notepad, and opens the file that was just created by this program. |
Here are several lines from a file named Drawing_ent.txt that was created with this program:
17A CIRCLE17B LWPOLYLINE17C LINE17D DIMENSION18B LWPOLYLINE18C POINT18E MTEXT18F ELLIPSE190 SPLINE191 CIRCLE
To use the REPEAT function, you have to know how many times you want the group of functions to be repeated. In contrast, the WHILE function repeats a series of functions until a specified condition is met. Let's use the WHILE function in the next example, which adds numbers in sequence to a drawing, beginning with whatever value is indicated by the operator. As long as the operator keeps picking points, the program keeps placing numbers. When the operator terminates the program with an Enter, the Spacebar, or a right-click with the mouse, the program exits the WHILE function. See Listing 9.9.
Example 9.9. Listing 9.9
Number.lsp

        (defun C:Number (/  txtStyle numSeq txtInsert str1 str2)
          (setq txtStyle (getvar "textstyle"))
          (command "STYLE" "romans0" "romans" 0 1 0 "N" "N" "N")
          (setq numSeq (getint "
First number in sequence <1>: "))
          (if (= numSeq nil)(setq numSeq 1))
          (setq txtInsert (getpoint "Insertion point:  "))
          (while txtInsert
            (setq str1 (itoa numSeq))
            (setq str2 (strcat "#" str1))
            (command "TEXT" txtInsert "3" "0" str2)
            (setq txtInsert (getpoint "Select insertion point:  "))
            (setq numSeq (+ numSeq 1))
          )
          (setvar "textstyle" txtStyle)
          (princ)
        )
Table 9.11 describes each of the new functions presented in Number.lsp.
Table 9.11. Number.lsp
LINE OF CODE | PURPOSE |
|---|---|
| Defines a new command function |
| Assigns the current value of the system variable TEXTSTYLE to the program variable |
| Creates a new text style with the name "romans0" and a text height of 0. |
| Assigns an integer typed by the operator to the variable |
| Determines whether |
Sets the variable | |
| Begins the WHILE function, which repeats the next five lines until the variable |
| Sets the variable |
| Sets the variable |
| Uses the TEXT command to place the string stored in |
| Resets the variable |
| Resets the variable |
| Closes the WHILE statement. |
| Restores the previous text style. |
| Prints a clear line. |
| Ends DEFUN. |
This is a nice little program that you can adapt to any listing situation. In this case, it uses a fixed metric text height suitable for plotting at a 1:1 scale. Do you see any shortcomings? What if you want to use this program for text at different plot scales? Wouldn't it be nice if the text height could scale automatically when placed in a floating viewport?
Listing 9.10 demonstrates a means of placing text and having it automatically scale to a floating viewport. It uses inline annotation. See if you can borrow from it to add automatic scaling capability to number.lsp. This example may contain some new concepts, but at this point you should be able to combine elements of these two programs even if you don't completely understand them. Just use copy and paste.
Example 9.10. Listing 9.10
Scaletxt.lsp

        ;;;;ScaleTxt.lsp
        ;;;;Dan Abbott
        ;;;;March 12, 2005
        ;;;Places text from a layout into Model Space scaled to the
        ;;;floating viewport into which it is placed. Text will plot
        ;;;at the size specified by DIMTXT. Provided "AS IS," with all
        ;;;faults. You are free to use this code at your own risk in
        ;;;any way you want.
;; Error Handling
(defun ScaleTxtError (msg)
(command)
(setvar "cmdecho" cm)
(setvar "dtexted" dtxtEd)
(alert "Program cancelled.")
(setq *error* ExistError)
)
;; ScaleTXT command
(defun c:SCALETXT (/ existError cm dtxtEd tm txtInsPt txtHgt
txtAngle currentVP viewHgtMS SSVprts
selSet viewHgtPS viewScale)
(setq existError *error*)
(setq *error* ScaleTxtError)
(setq cm (getvar "cmdecho"))
(setvar "cmdecho" 0)
(setq dtxtEd (getvar "dtexted"))
(setvar "dtexted" 1)
(command "style" "romans" "romans" "" "" "" "" "" "")
(setq tm (getvar "tilemode"))
(if (= tm 1)
(progn
(setq txtInsPt (getpoint "
Left Corner of Scaled Text: ")
txtHgt (getvar "dimtxt"))
(setq txtAngle (getangle "Angle of Scaled Text<0>: "
txtInsPt))
(if (= txtAngle nil)(setq txtAngle 0))
(setq txtAngle (* 180 (/ txtAngle pi)))
);end progn
(progn
(setq txtHgt(getvar "dimtxt")
currentVP (getvar "cvport")
viewHgtMS (getvar "viewsize")
SSVprts (ssget "X" (list '(0 . "Viewport")
(cons 69 currentVP)))
selSet (entget (ssname SSVprts 0))
viewHgtPS (cdr (assoc 41 selSet))
viewScale (/ viewHgtMS viewHgtPS)
txtHgt (* viewScale txtHgt)
TxtInsPt (getpoint "
Left Corner of Scaled Text: ")
);end setq(setq txtAngle (getangle "Angle of Scaled Text<0>: "
txtInsPt))
(if (= txtAngle nil)
(setq txtAngle 0)
);end if
(setq txtAngle (* 180 (/ txtAngle pi)))
);end progn
);end if
(command "DTEXT" TxtInsPt txtHgt txtAngle)
(setvar "DTEXTED" dtxtEd)
(setvar "cmdecho" cm)
(setq *error* existError)
(princ)
);end defunThe COND function behaves like multiple IF functions, but it's much more efficient. It allows you to create a list of multiple conditions and have your program go through them one at a time until it finds one condition that is true. When it finds a true condition, it executes the function that follows but ignores the other conditions in the list.
To illustrate how COND works, let's completely rethink the program for placing an end-section symbol on a piece of structural lumber. The program you wrote earlier is serviceable, but it has some flaws. You can eliminate those flaws by changing your approach. This time, let's force the user to apply the section symbol only in situations that make sense. Because structural lumber in the U.S. comes in the nominal sizes 2 × 2, 2 × 3, 2 × 4, 2 × 6, 2 × 8, 2 × 10, and 2 × 12, let's require the operator to use this symbol for only those sizes.
Instead of having the program draw out the symbol each time, let's insert a unit-sized block. Actual sizes of lumber are smaller than nominal sizes. Because the actual thickness of all structural lumber is 1.5 inches, you'll create a block that is 1.5 × 1 units in size. When it's inserted, you'll have the program adjust the X scale factor to match the actual size for the lumber selected by the operator.
To restrict user input, this program applies two GET functions you haven't used yet: INITGET and GETKWORD. INITGET can be used with any of the GET functions to restrict the range of acceptable responses from the user. There are several modes, most of which you won't apply here. Table 9.12 describes them for your information.
Table 9.12. INITGET codes
PURPOSE | |
|---|---|
| An Enter isn't an acceptable response. |
| A zero isn't an acceptable response. |
| Negative values aren't allowed. |
| Limit checking won't be used for picking points. |
| Use dashed lines for rubber band lines and rectangles. |
| The response must be one of the keywords in quotes. |
You probably recognize these numbers as bit-codes, except for the keywords defined in the last example. As is true with the setting for the OSMODE system variable, bit codes can be added together to get unique sums:
(Initget 3)means that neither an Enter nor zero input is allowed (bit code 1 + bit code 2).(Initget 40)means that limit checking isn't used and that dashed lines are used for rubberbands (bit code 8 + bit code 32).(Initget 1 "4 6 8")means that an Enter can't be used as a response, and that only the keywords"4", "6", and"8"can be used. Those numbers are in quotes to indicate that they're used as keywords.
Listing 9.11 shows the new version of the program, complete with keywords. Notice that the program lets you define a default response because it doesn't prevent the use of an Enter. The drawing must contain a block definition named SECTION for this program to work. Define the block from a 1.5 × 1 unit rectangle with diagonal lines, using the lower-left corner as the base point.
Example 9.11. Listing 9.11
EndSection.lsp

        ;; Radians to Degrees
        (defun RTD (r)
          (* 180.0 (/ r pi))
        )
        ;==========================
        ;;Error handling function
        (defun sectEtrap (msg)
          (command)
          (setvar "cmdecho" cm)
(setq *error* existError)
(Prompt "Quiting EndSection: ")
(princ)
)
;===========================
;;Pogram
(defun C:ENDSECT (/ existEtrap cm blkName size
pt1 ro1 xsize)
(setq existEtrap *error*)
(setq *error* sectEtrap)
(setq cm (getvar "cmdecho"))
(setvar "cmdecho" 0)
(setq blkName (tblsearch "block" "SECTION"))
(if (= blkname nil)
(alert "
Block SECTION not found.
Cancel and define block: ")
);end if
(initget "2 3 4 6 8 10 12")
(setq size (getkword "
Width [2/3/4/6/8/<10>/12]: "))
(if (= size nil)(setq size "10"))
(setq pt1 (getpoint "
Insertion Point: "))
(setq ro1 (getangle "
Rotation Angle <0>: "))
(if (= ro1 nil)(setq ro1 0))(setq ro1 (rtd ro1))
(cond
((= size "2") (setq xsize 1.5))
((= size "3") (setq xsize 2.5))
((= size "4") (setq xsize 3.5))
((= size "6") (setq xsize 5.5))
((= size "8") (setq xsize 7.25))
((= size "10") (setq xsize 9.25))
((= size "12") (setq xsize 11.25))
);end cond
(command "INSERT" "SECTION" pt1 xsize 1 ro1)
(setvar "cmdecho" cm)
(setq *error* existEtrap)
);end defunTable 9.13 describes the lines that use functions that we haven't looked at yet.
Table 9.13. endsect. lsp
PURPOSE | |
|---|---|
| Searches the names of symbols in a specified list—in this case, the list of block names. If the block name "SECTION" isn't found in the list, the function TBLSEARCH returns |
| Finds out whether the variable |
| If the variable |
| Establishes that the only acceptable responses to the next GET function are the keywords 2, 3, 4, 6, 8, 10, and 12. |
| Assigns the user response to the GETKWORD function to the variable |
| Begins the COND function, which is always followed by a list of conditions. Each of the conditions is searched until one of them returns |
| The first of the seven conditional statements. If the variable |
| Inserts the block named "SECTION" at the point given by the user, with an X scale factor equal to the value set in the COND function, a Y scale factor of 1, and the rotation angle entered by the user. |
Sometimes an AutoLISP program needs to open an existing file, because you want to either read data from it or add data to it. To demonstrate this kind of file management and to show you a little more about handling strings, let's look at a program that solves a small problem with AutoCAD: determining what release format a specific drawing was last saved in.
Every AutoCAD DWG file has a six-character string at the beginning of the file that indicates the format in which the drawing was saved. You can see the code for any AutoCAD drawing by opening the DWG file in a text editor. The rest of the file is unreadable, of course, but you can see those six characters. Except for the first release of AutoCAD (1.1), the first two characters are always AC, so the characters that denote the release are the third, fourth, fifth, and sixth.
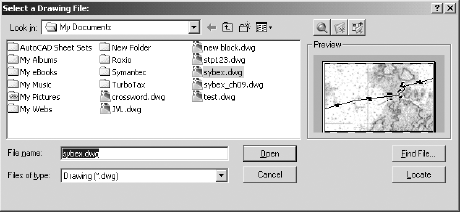
The AutoLISP program in Listing 9.12 uses the GETFILED function to prompt the user to select a DWG file using the dialog box shown in Figure 9.3, and then opens the specified file, reads the key characters, closes the file, sends a message to the screen via the ALERT function, opens a text file, adds the same information to the text file, and finally closes that file. This version refers only to releases R14 through AutoCAD 2007. If you want to go back further than that, see the last program in this chapter. I'm making the assumption here that the current format will be used for at least one more release.
Note
Error handling isn't included in Listing 9.12, but it should be included in the actual program.
Example 9.12. Listing 9.12
Release.lsp

        (defun c:RELEASE (/ path path2 dn fn fl rel str1)
          (setq path (getvar "dwgprefix"))
          (setq dn 1)
          (while (/= dn nil)
            (setq dn (getfiled "Select a Drawing File: " path "dwg" 0))
            (if (/= dn nil)
              (progn
                 (setq fn (open dn "r"))
                 (setq fl (read-line fn))
                 (setq rel (substr fl 3 4))
                 (close fn)
                 (setq str1 "a format other than 14, 2000, 2004 or 2007.")
                 (cond
                    ((= rel "1014") (setq str1 "R14/14.01 format."))
                    ((= rel "1015") (setq str1 "R2000/2000i/2002 format."))
                    ((= rel "1018") (setq str1 "R2004/2005/2006 format."))
                    ((= rel "1021") (setq str1 "R2007/2008 format."))
);close COND
(setq str2 (strcat dn " was saved in " str1))
(setq user (getenv "userprofile")
path2 (strcat user "\My Documents\")
relfile (strcat path2 "ReleaseNotes.txt")
fileName (open relfile "a")
);end setq
(write-line str2 fileName)
(close fileName)
(alert(strcat str2
"
Release format added to file:
"
relfile))
(setq path dn)
);close progn
);close if
);close while
(princ)
);close defunI've described the key functions used in this program in Table 9.14. Now that you're pretty savvy with AutoLISP, I don't want to bore you with descriptions of SETQ and DEFUN.
Table 9.14. Release. lsp
LINE OF CODE | PURPOSE |
|---|---|
| Introduces a new GET function: GETFILED. It displays a File dialog box based on the arguments provided. The prompt |
| Begins a new IF statement that provides a clean exit from the dialog box. As long as the variable |
| Normally, an IF function executes a single element that follows if it returns |
| Opens the drawing file represented by the variable |
Reads the first line of the opened DWG file and assigns it to the variable | |
| Looks at the line stored in variable |
| Any file opened by AutoLISP must be closed. In this case, now that you have the information you need, we can close the file. |
| Later in the program, you'll report the format to the operator, and you'll use a variable named |
| Saves the user's login profile to the variable |
| Assigns the variable |
| Once you have the user's login name, creates a full path for the file by combining |
| Creates or opens the file stored in the variable |
| Writes the string stored in the variable |
| Closes the open file assigned to the variable |
Now it's time to pull together a number of different tools. The program in Listing 9.13 was written for a company that deals with various contractors who use a range of AutoCAD releases. The company wanted to generate a list of its drawing files to determine whether any particular file had to be converted to an earlier release before sending it to a contractor. I didn't have to go back to the beginning of AutoCAD to write this program, but I thought it would be interesting, so I included all the commercial versions.
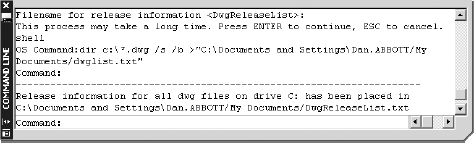
To solve this one, I modified the program from the previous section to search the entire drive and create two text files: one that lists all DWG files, and one that lists all drawings plus the release format in which it was saved. This brings us full circle: To get to DOS, use the external command SHELL from the ACAD.pgp file. For that to work, the bit-flag setting for the SHELL command has to be changed to 0 so the DOS dir command waits to finish making a list of files before returning to AutoCAD. The DOS dir command with the bare switch and the redirection function provides the means to generate the list of all drawing files necessary to complete the program.
I leave it to you to decipher this code based on what you know so far. Note the use of the ;| combination at the beginning and |; at the end of the opening commented section—no need to add all those semicolons. This program may take a long time to run, so be patient. The DOS window stays open until the first file is created.
Example 9.13. Listing 9.13
Relshell.lsp

         ;|
         relshell.lsp
         Dan Abbott
         ################################################################
         The bit flag for the SHELL command in the ACAD.pgp file
         must be set to 0 for this program to work. The default setting is
         1, so the program adds a line to the end of the file changing it
         to 0. This causes no harm, it just forces AutoCAD to wait until the
         program finishes its shell function. Use the program when you have
         the time to stop using AutoCAD for a while. Depending on the
         number of files you have, you may be waiting for some time.
         If you use the SHELL command in AutoCAD and want to return the
         bit flag setting to 1 when the program terminates, open the
         acad.pgp file by typing (startapp "notepad" (findfile "acad.pgp"))
         #################################################################

             Copyright 2006 by Daniel Abbott.

             You may use, copy, modify, and distribute this software
             for any purpose and without fee. Use it at your own risk.

          Relshell.lsp will search the entire C: drive, create a list
          of all DWG files in all non-hidden directories and then use
          that list to create a file that identifies the release format of
          AutoCAD in which each of those drawings was last saved.

          Two user-named text files are created by this program in
          the My Documents folder of the current user.
          |;
;;; Error handling function
(defun relShellError (msg)
(command)
(if (/= fileOpen nil) (close fileOpen))
(if (/= fileName nil) (close fileName))
(if (/= pgp nil)(close pgp))
(setvar "cmdecho" cm)
(alert "Program cancelled.")
(setq *error* old_error)
);end defun
;;;Command definition
(defun c:RelShell(/ fileList relFile path1 path2 fileOpen
relFile2 fileList1 fileList2 fileName fileLine
dwgFile rel dwgFileNextLine str1 str2 pgp)
(alert "The bit flag setting for SHELL will be
set to 0 in the last line of ACAD.pgp.
Press "Esc" now to cancel.")
(setq cm (getvar "cmdecho"))
(setvar "cmdecho" 0)
(setq old_error *error*)
(setq *error* relShellError)
(setq fileList (getstring
"
Drawing names file <Dwglist>: "))
(if (= fileList "") (setq fileList "dwglist"))
(setq relFile (getstring
"
Release Info File <DwgReleaseList>: "))
(if (= relFile "") (setq relFile "DwgReleaseList"))
(getstring "
This process may take a long time.
Press ENTER to continue, ESC to cancel.")
(setq path1 (strcat (getenv "userprofile") "/My Documents/")
path2 (strcat (getenv "userprofile") "/My Documents/")
relFile2 (strcat path2 relFile ".txt")
fileList1 (strcat """ path1 fileList ".txt" """)
fileList2 (strcat path2 fileList ".txt");without quotes
);end setq
(setq pgp (open (findfile "acad.pgp") "a"))
(write-line "
SHELL,,0,*OS Command:," pgp)
(close pgp)
(setvar "re-init" 16)
(command "shell"(strcat "dir c:\*.dwg /s /b >" fileList1))
(setq fileOpen (open relFile2 "a"))
(setq fileName (open fileList2 "r"))
(while (setq fileLine (read-line fileName))
(setq dwgFile (open fileLine "r"))
(setq dwgFileNextLine (read-line dwgFile))
(close dwgFile)
(setq rel (substr dwgFileNextLine 3 4))
(setq str1 (DrawingRelease rel))
(setq str2 (strcat fileLine " was saved in " str1))
(write-line str2 fileOpen)
);end while
(close fileOpen)
(close fileName)
(prompt "
-------------------------------------------------")
(prompt (strcat
"
Release information for all DWG files on
C: has been placed in
" relFile2)
);end prompt
(setvar "cmdecho" cm)
(setq *error* old_error)
(princ)
);end defun
;;;;Cond function
(defun DrawingRelease(rel)
(cond
((= rel "0.0 ") (setq rel "R1.1 format."))
((= rel "1.2 ") (setq rel "R1.2 format."))
((= rel "1.4 ") (setq rel "R1.4 format."))
((= rel "1.50") (setq rel "R2.05 format."))
((= rel "2.10") (setq rel "R2.10 format."))
((= rel "2.20") (setq rel "R2.20 format."))
((= rel "2.21") (setq rel "R2.21 format."))
((= rel "2.22") (setq rel "R2.22 format."))
((= rel "1001") (setq rel "R2.5 pre-release format."))
((= rel "1002") (setq rel "R2.6 format."))
((= rel "1004") (setq rel "R9 format."))
((= rel "1005") (setq rel "R10 pre-release format."))
((= rel "1006") (setq rel "R10 format."))
((= rel "1007") (setq rel "R11 pre-release format."))
((= rel "1008") (setq rel "R11 pre-release format."))
((= rel "1009") (setq rel "R11/12 format."))((= rel "1010") (setq rel "R13 internal format."))
((= rel "1011") (setq rel "R13 internal format."))
((= rel "1012") (setq rel "R13 format."))
((= rel "1013") (setq rel "R14 pre-release format."))
((= rel "1014") (setq rel "R14/14.01 format."))
((= rel "1500") (setq rel "R2000 pre-release format."))
((= rel "1015") (setq rel "R2000/2000i/2002 format."))
((= rel "1018") (setq rel "R2004/2005/2006 format."))
((= rel "1021") (setq rel "R2007/2008/2009 format."))
(T (setq rel "an unknown or internal release."))
);end cond
);end defun
;;;;;;;;;;;;;;;;;;;;;;;;;;;;;;;;;;;;;;;;;;;;;;;;;;;;;;;;;;;;;;;;;Figure 9.4 shows what the user sees at the command line when this program finishes.
In this chapter and the previous one, we've covered a lot of ground, but there's still a lot left to learn about programming if you desire. You may as well plunge right in: Look around the Web, get some books, and start solving problems. Nothing in the AutoCAD realm is quite so satisfying as writing a program, debugging it, having it work, and then watching other people use it effectively.