How do you use Flash's drawing tools?
How do you reuse elements within Flash?
How do you manipulate text within Flash.
How do you create animations with Flash?
How do you allow the user to interact with Flash?
How can you incorporate Sound within Flash?
How do you create learning interactions and test items within Flash?
In this chapter, you will be presented with a series of Flash guides. These guides have been designed to be independent of each other, so you should be able to go directly to whichever guide addresses the issues you are working with. However, all of the skills in each of the guides are necessary to build a minimal level of competence. You should work through each guide at least once, and thereafter use the guides as a reference. Each guide is demonstrated on the website for this text: http://oak.cats.ohiou.edu/~moored3.
Note: Any keyboard shortcuts will be placed in parenthesis. Additionally, any ActionScript code will be described using the Courier font.
For example,
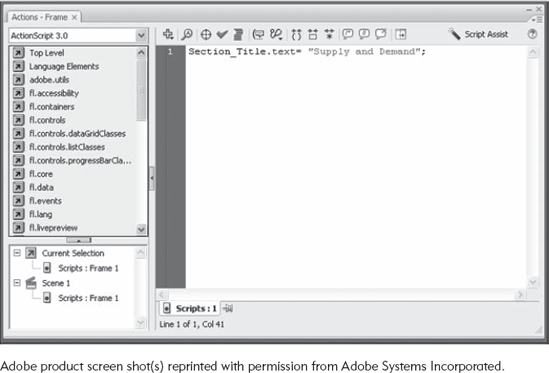
From the Menu Bar select Window and then Actions (F9)
Type
Section_Title.text= "Supply and Demand";
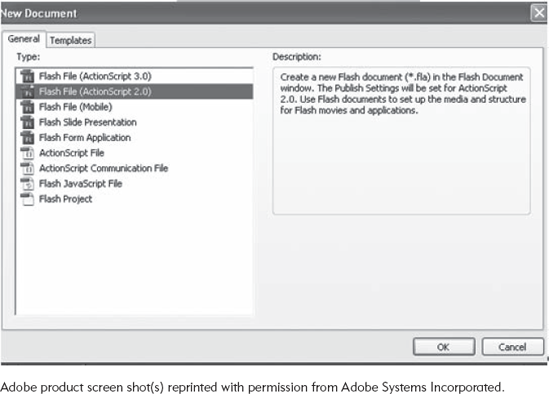
From the Menu Bar, select File, then select New (Ctrl+N)
On the New Document screen, select Flash File (ActionScript 2.0), then select OK
Note: To ensure compatibility with Flash 8, be sure to select ActionScript 2.0, all examples in this text use ActionScript 2.0.
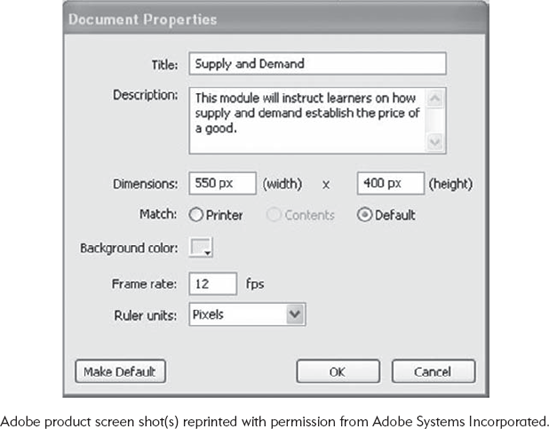
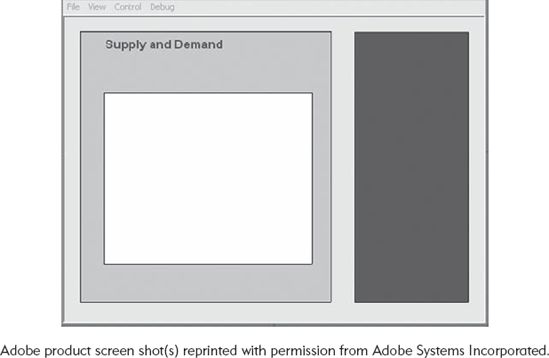
Note: On the Document Properties Screen, you can also give your application a Title (Supply and Demand in this example) and provide a Description. Additionally, you can select a Background Color (the default is white), a Frame rate, and units for the rulers.
Note: Dimensions refer to the size of display on the computer screen. There are roughly 72 pixels (px) to each inch. In this case, the dimensions come out to be about 7.5 inches to 5.5 inches. Flash is capable of creating applications of any reasonable dimensions, even small ones for PDA and cell phones. You want to choose a dimension that will adequately allow you to present your content, while being small enough to be able to be viewed on the largest number of screens.
Note: Frame rate refers to how many frames are displayed per second when the application runs. This rate is particularly important when animation is being rendered on the screen. A frame rate of 12 is the default settings and is adequate for most Flash applications. The higher the frame rate, the higher the resolution; however, at some point extra frames per second offer diminishing returns. For example, movies at the theater run at 24 frames per second and television runs at 30 frames a second.
Note: These spaces graphically separate the screen so that the learners will consistently receive certain types of information in the same place. Interface consistency helps the learners learn by making it easy for them to orient themselves to the application; once they have learned where information is located, they can focus their cognitive resources on the content and not on navigation.
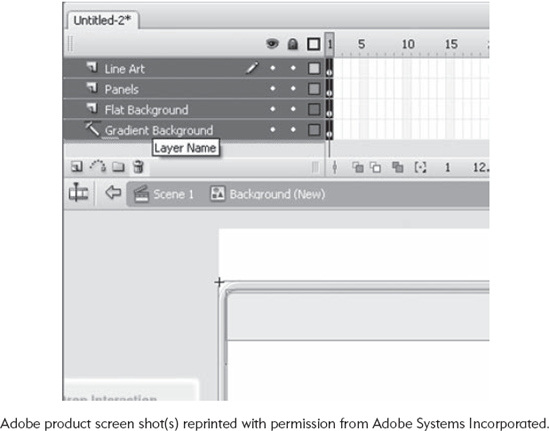
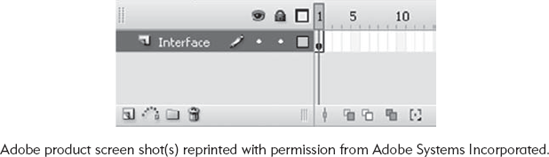
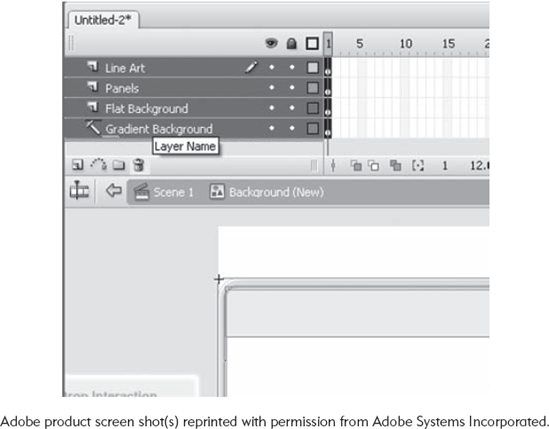
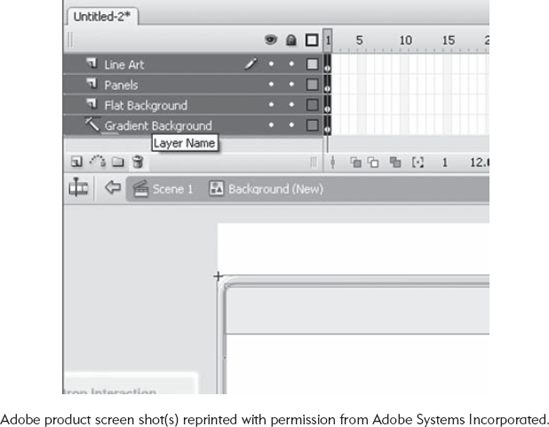
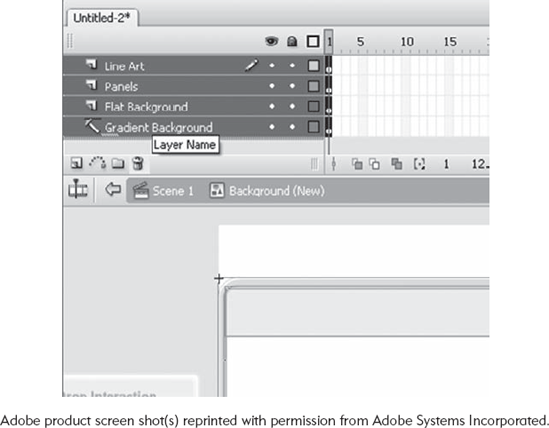
Double click on the Name Layer 1
Note: Layers separate elements in Flash so that they can be quickly found and manipulated independently. They also establish a hierarchy among elements. Elements on layers near the top of the timeline will appear in front of elements on layers below.
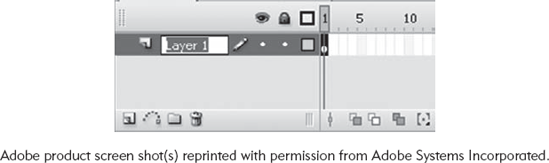
Type "Interface"
From the Menu Bar, select View, then Rulers
Note: Rulers are only present while you are in development mode (the end-user will never see these). Rulers are important because they assist you in lining up the elements on the screen for a clean, professional appearance.
From the Toolbar, select the Rectangle Tool

Note: Your cursor will become a cross when it is on the Stage.
Note: Each tool has its own version of the Property Inspector.
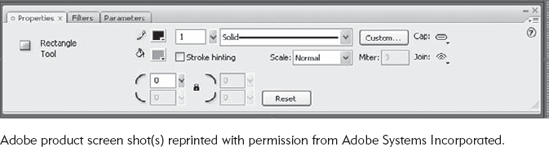
Note: You will be drawing several boxes with different properties. In the Rectangle Tool's Property Inspector, you can modify the color of the stroke (the stroke is the outside edge of the Rectangle) and the interior, the width and type of stroke, and the curve of the edges.
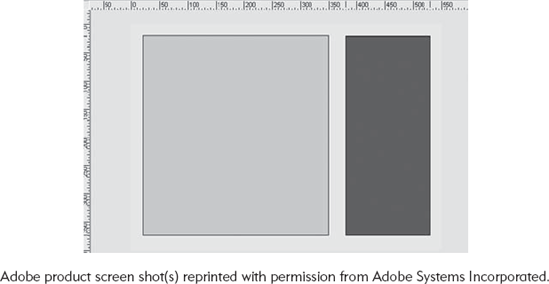
In the pop-up color panel, select the paint swatch and set the color to #CCCCCC.

Note: #CCCCCC is a hex triplet. A hex triplet is a six-digit, three-byte hexadecimal number. Each byte describes a color in the hexadecimal system. The important principle is that if you want to match, exactly, the colors from one part of the application to another, you should pay attention and copy the hex-triplet number. In this case the hex-triplet for gray is #CCCCCC.
Note: Colors can be chosen from the Color Palette or the "Hex" code can be used. It is recommended that you use the Hex code because there are millions of colors available that often look the same on some monitors, if you use the numeric designation of a color, you will be assured that the colors you choose will always be the same.
Position your cursor on the stage and at 20 pixels on the X axis, and 20 pixels on the Y axis. Click and drag the Rectangle to 350 pixels on the X axis and 375 on the Y axis.
Note: The X coordinates are on the horizontal axis and have positive numbers from left to right. The Y coordinates are on the vertical axis and have positive numbers from top to bottom (this is different than most graphs you may be familiar with, which have positive numbers from bottom to top).
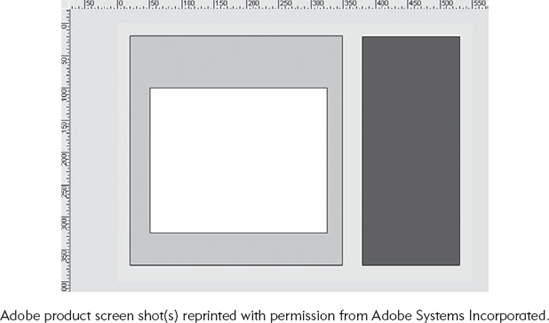
The start-up procedures apply to any Flash application. This guide demonstrated the development of an interface. An interface provides learners with a consistent framework for finding information. You should take great care to place the same types of information consistently on the screen; doing so reduces the cognitive load on the learners.
Flash is a visual medium. Any time that you are presenting information to the learners, you are likely to be using the drawing tools. All buttons and movie clips begin as simple graphics created with drawing tools. To improve the clarity and professionalism of your applications it is important to become familiar with these tools. Of particular importance is to become proficient at copying and pasting graphical element, modifying and editing them, and using the rulers, grid, and alignment functions to position elements on the screen appropriately. Graphics enhance an instructional presentation because they can demonstrate relationships in space and in time.
Note: It is a good idea to place each element that you work with on its own layer. This makes it easy to find and edit these elements. Be sure to name a layer with a label that makes it easy to identify.
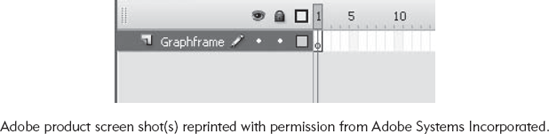
Select the Keyframe on the "GraphFrame" layer
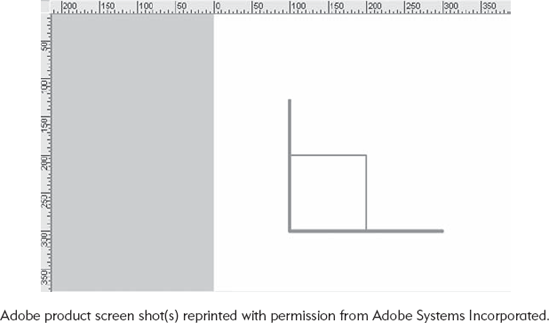
Select the Line tool from the tool sidebar?

In the line Property Inspector, set the color to #80A244, set the stroke width to 4
Note: The stroke is width of a line.
Turn on Rulers
From the Menu bar select the View and then Rulers
Note: The rulers will assist you in implementing specific coordinates.
Note: the x coordinates are represented on the top of the stage from left to right; the y coordinates are represented on the side of the stage from top to bottom.
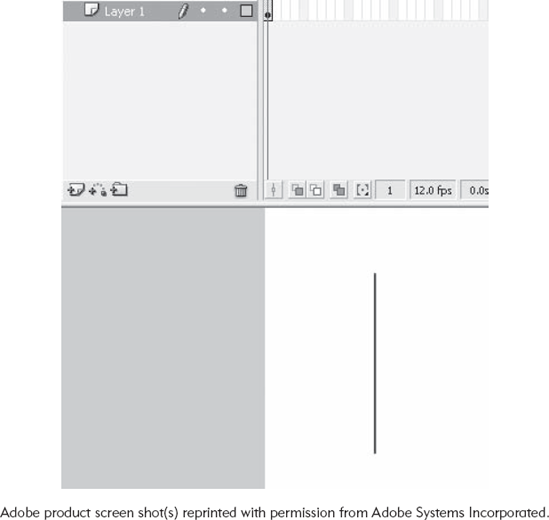
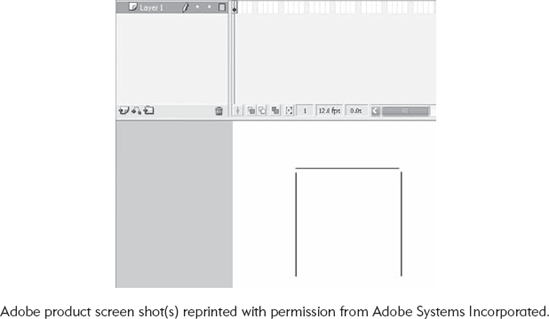
Draw a line from (100X, 125Y) to (100X, 300Y) and draw another from (100X, 300Y) to (300X, 300Y)
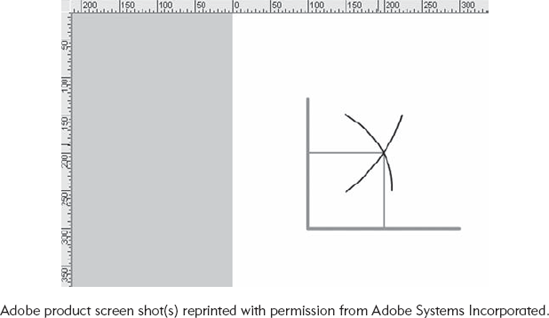
Change the stroke width to 2
Note: Changing a line's stroke width changes its emphasis.
Create a new layer and rename it "Demand"
Change the color of the Line tool in its Property Inspector to #000000
Note: Colors can be chosen from the palette or described through hexadecimal notation; in this case #000000 represents black.
Draw a line from (150X, 250Y) to (225X, 150Y)
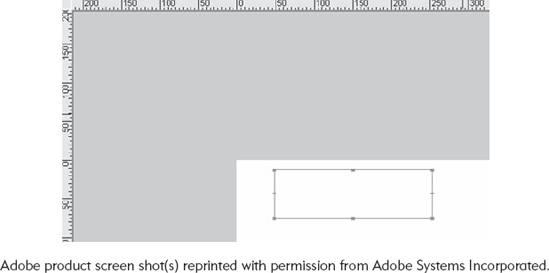
Select the Transform tool

Note: The Transformation tool can be applied to any object on the screen and allows you to stretch, rotate, and skew any object. If you want to increase or decrease the size of an object uniformly, then hold down the shift key as you pull one of its corner handles.
Place your cursor on the bottom right side of the line you have just drawn; adjust the position of the cursor until it turns into a "curved" cursor.
Note: It may take some practice to position your cursor just right so it changes shape (and therefore its function).

Dynamic text allows you to assign text to a variable and then it will appear in the Flash application any time the variable is used. Dynamic text is useful because it allows you to centralize the text. Titles, headings, and objectives should all change based on the context. If the text were placed on the screen statically, each screen would have to be reproduced individually any time you wanted to reuse an interface.
Select the Text tool and draw a Text box on the stage (50X, 25Y) to (250X, 75Y)

Note: The text box can be made any size. It will appear to be transparent on the learner's screen except for the text itself.
In the Property Inspector set the text type to Dynamic Text, set the font to Arial, set the font size to 16, and the color to #0000FF, Label the Instance "Section_Title"
Note: The parameters in the Property Inspector describe what the text will look like on the screen.

Note: By choosing Dynamic Text, you are telling Flash to put whatever text you assign to the variable "Section_Title" into this box. Since this interface may be reused, we want to be able simply rename the variable to change the text on the screen. This is much more efficient than deleting and re-creating text on the screen.
Note: There are three types of text in Flash. Static Text allows you to place text directly on the stage; Dynamic Text allows you to assign the text that will show up on the screen through a variable; and Input Text allows the learner to type in text and have it assigned to a variable for later use. In this case, use Dynamic Text because you want to separate the content from the interaction (you want to be able to go to one place to change all of the text). You will see that this is advantageous when you begin to revise your applications.
Note: To assign text to a variable, you must do some simple coding as follows.
Create new layer
From the Menu Bar select Insert then Timeline, finally Layer.
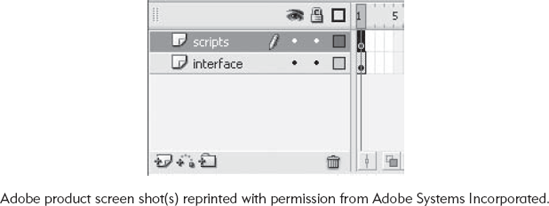
Rename the Layer "Scripts"
Note: By creating a new Layer, you separate the elements so that they can be manipulated without affecting the other elements. It is good practice to separate elements whenever possible.
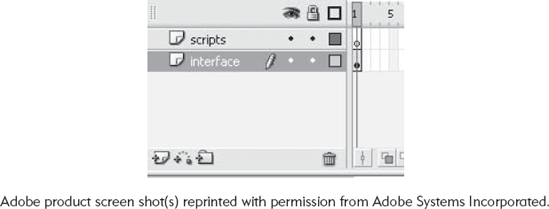
Note: Notice that the first frame of the "Interface" has a circle filled with black in it. A circle on a frame means that it is a keyframe. A black circle means that there is content on that frame. A keyframe is necessary any time there is a new object placed on the stage. The "Scripts" keyframe has a circle that is not filled. This indicates that no content has yet to be added to that frame.
Select the Keyframe on the "Scripts" layer
From the Menu Bar select Window and then Actions (F9)
Type "Section_Title" "
Supply and Demand";
Note: The Courier New font is used to indicate ActionScript code.
Note: This code means that the variable Section_Title is assigned the text box "Supply and Demand."
Note: Be sure to type the code exactly as written; syntax is very important for Flash to operate properly.
Note: Notice now on the "Script" Layer of the Timeline that there is now an alpha symbol. This means that there is now ActionScript associated with the frame.

Note: Flash version CS3 requires you to place your code in a layer. In previous versions of Flash, ActionScript can be placed in other places as well; however, it is good programming practice to place it on a dedicated layer inside of a keyframe. This way you can find your code quickly.
Note: Once you have inserted the code, you can hide the Action panel by double clicking on its Title Bar.
Note: All the panels in Flash version CS3 have this ability to be quickly hidden to free up screen space.
Since dynamic text is assigned to a variable, it can be presented to the learners conditionally. For example, suppose text is presented to the learners based on how many questions they have correctly answered. With dynamic text, you could easily suggest that they review part of the application or encourage them to move forward, depending on the need.
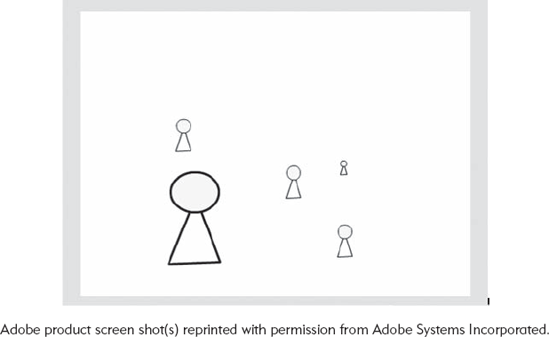
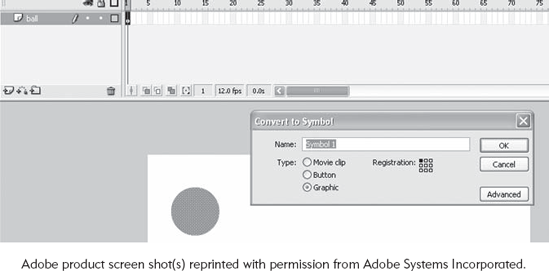
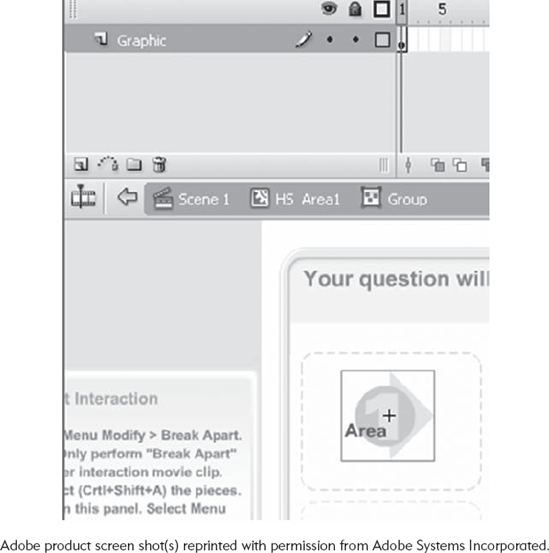
A symbol is an object that can be reused within Flash. Each instance of the symbol retains the basic characteristics of that symbol. There are three types of symbols: button, movie clip, and graphic. All symbols are placed in Flash's "library," a repository for reusable objects. A graphic symbol is similar to the grouping feature in that it allows for any set of graphical elements to be joined together to as a single entity and reused.
Create or select a graphic or a set of graphics on the stage
From the Menu Bar, select Modify and Convert to Symbol (F8)
Label the Symbol and Select Graphic Symbol
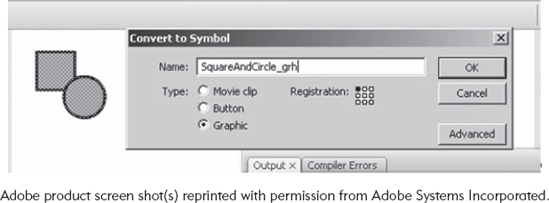
Note: The graphic symbol now appears in the Library.

Note: The graphic symbol can be placed on the stage as many times as it is needed by dragging and dropping it onto the stage.
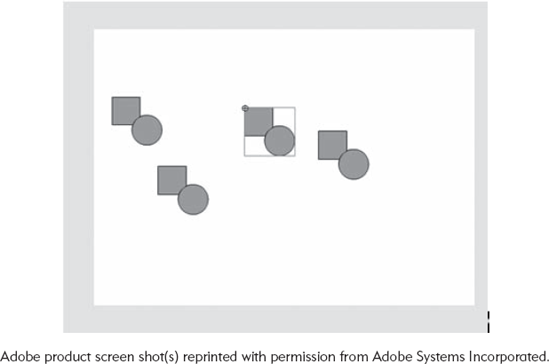
Note: Each time you drag the symbol to the stage, it creates a new instance.
Note: A button symbol allows the user to interact with Flash. When a user "presses" a button, it triggers an event. Buttons can change how they look depending on what the user is doing.
Create or select a graphic or set of graphics on the stage
From the Menu Bar, select Modify and Convert to Symbol (F8)
Label the Symbol and select Button Symbol (it is convention to use a label such as "symbolname_btn")
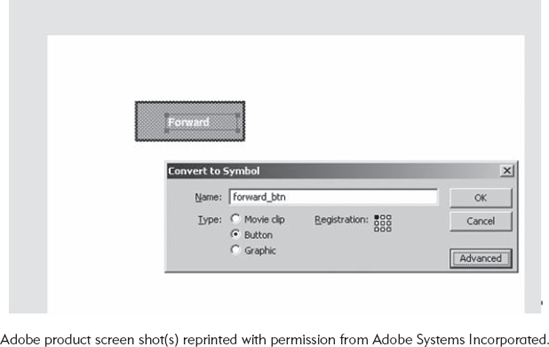
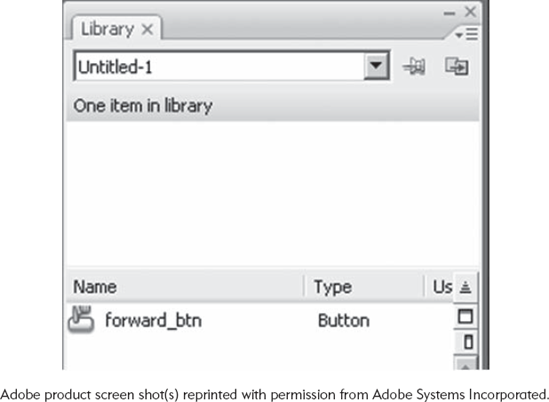
Note: The button symbol now appears in the Library.
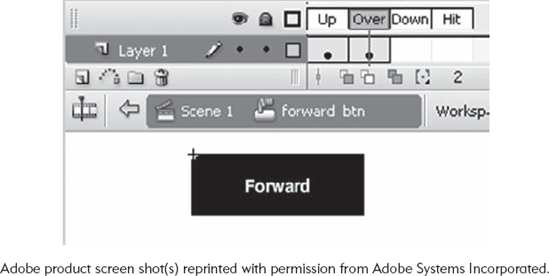
Note: A button has four states. Each state has a frame that can contain graphics, as demonstrated below:
Up—What the button looks like as it appears on the screen
Over—What the button looks like when the cursor is on top of it
Down—What the button looks like when the user "clicks" the button
Hit—An invisible area that defines what is clickable on the button. This is only required if the other frames are empty.
Note: To view these states, double click on the button.

Select the gray graphic and double click it to change its color to black ()
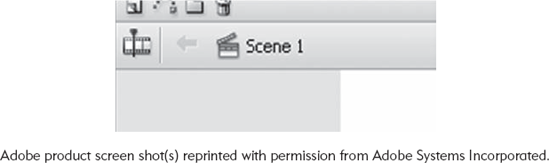
Return to the timeline
Select the icon "Scene 1"
Note: To make a button react to the user, you must program in some ActionScript code.
Create a new layer
From the Menu Bar, select Insert, then Timeline, then Layer
Label the new layer "Actions"
Note: All code should be placed in the layer Actions. Placing code in the Action layer makes it easy to find.
View the Actions panel (F9)
From the Menu Bar, select Windows, then Actions
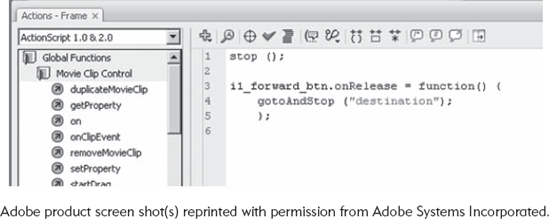
Type code in the Actions Panel
i1_forward_btn.onRelease = function() {
   gotoAndStop ("destination");
   };
Note: This code is written for ActionScript 2.0, so be sure to start with a file with ActionScript 2.0 selected. If you have begun with ActionScript 3.0 selected, be sure to save your document as Flash 8 and it will default to ActionScript 2.0.
Note: The code stop(); is simply there to stop the application from moving down the timeline.
Note: Although this text does not focus on ActionScript, the code can be interpreted as:
i1_forward_btn.onRelease
Note: Determine whether the i1_forward_btn button instance is receiving and activity from the user.
gotoAndStop ("destination");Note: If the activity on i1_forward_btn is a release of the mouse over the button, then goto the Frame labeled "destination" and stop.
Note: The timeline now has an alpha symbol on the frame where code was added.

Note: Movie clips are self-contained Flash animations. They can operate independently. For example, suppose you wanted to have a police car that you were going to animate moving across the screen and you wanted to lights to flash. The flashing of the lights must occur independently of the motion across the screen. The way this can be accomplished is through a movie clip.
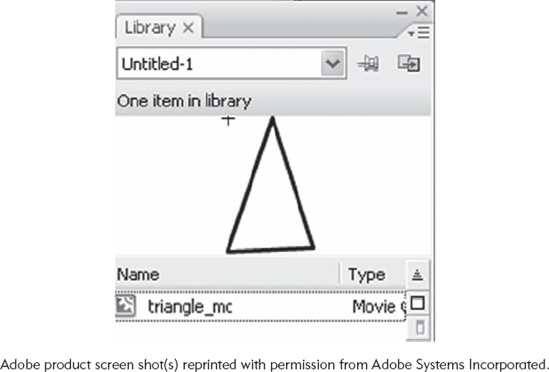
Create or select a graphic or a set of graphics on the stage
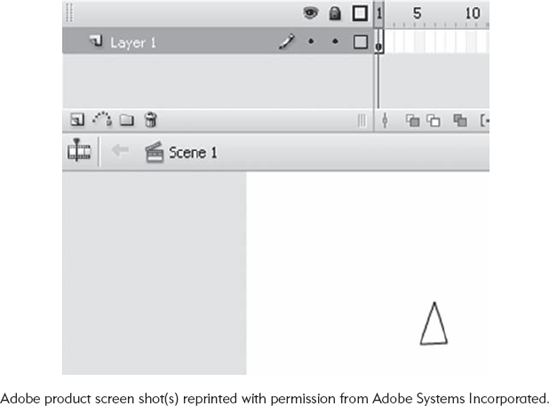
From the Menu Bar, select Modify and Convert to Symbol (F8)
Label the Symbol and Select Movie Clip Symbol
Note: The button symbol now appears in the Library.
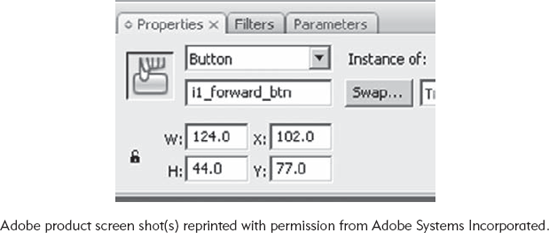
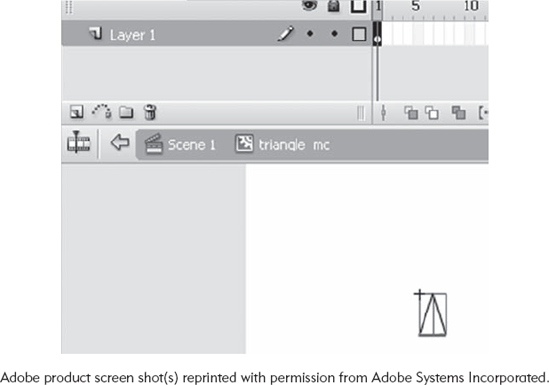
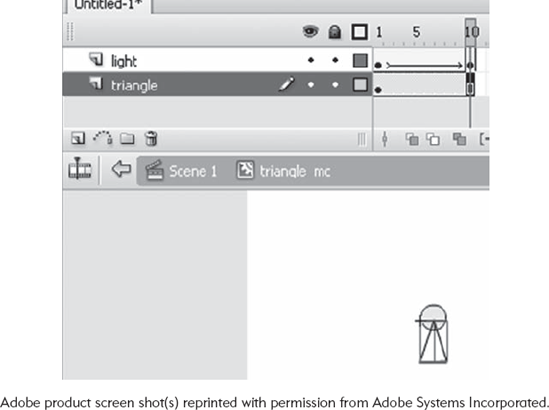
Select the movie clip instance on the stage and name it "i1_triangle_mc"
Double click on the instance i1_triangle_mc
Note: Each movie clip has its own timeline.
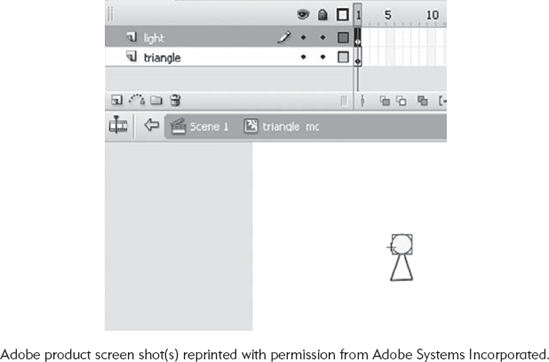
Insert a keyframe on frame 10 of the light layer
Select the yellow circle and change its alpha value in the Property Inspector

Symbols are one of the core technical ideas behind Flash. Symbols allow you to create content that is infinitely reusable. They also allow a level of independence; they allow segments of information and action to be modularized. This is a powerful ability, particularly when applied to instruction. Many of the instructional interventions will be reused. For example, the layout of the screen might be used from application to application. A layout might include graphics as well as dynamic text boxes. By turning those into symbols, they can easily be reused.
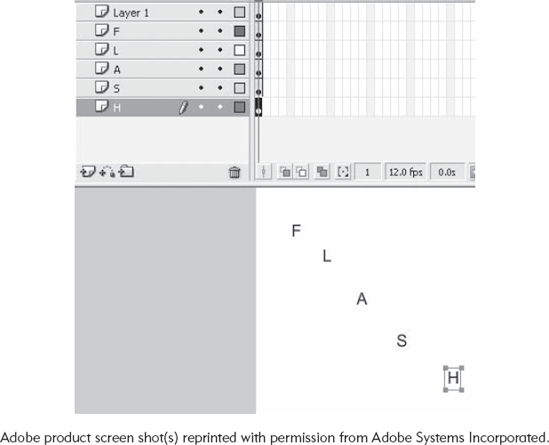
This technique allows you to easily break text into its individual letters.
Open a new Flash document
Label the layer "Text Separate"
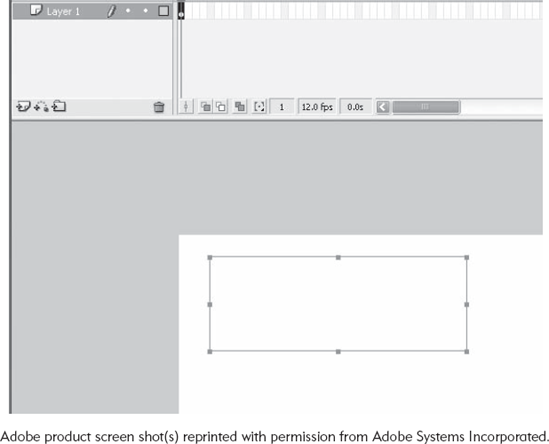
Draw in a Text box using the Text tool
Set the text type to Static
Note: Static text will show directly on the screen, while dynamic text needs to be assigned through ActionScript (see Dynamic Text)

Note: Now each letter is on its own layer and can be manipulated independently.
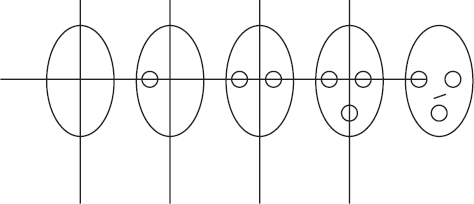
Animation has traditionally been made by drawing an object on a translucent cell and then copying the object onto another cell while modifying it slightly. The accumulation of modifications would create the illusion of animation when cells are looked at in sequence. It was common practice for the best artists to focus their time drawing the main events in an animation, perhaps drawing only one out of ten cells. More inexperienced artists would then draw the in-between cells. Figure 7.1 demonstrates this method.
Flash allows you to create animations through the same method. By placing images on successive frames of the time line, you can create the illusion of animation.
Note: many of the actions in this guide have been introduced in previous guides and will only be briefly described below:
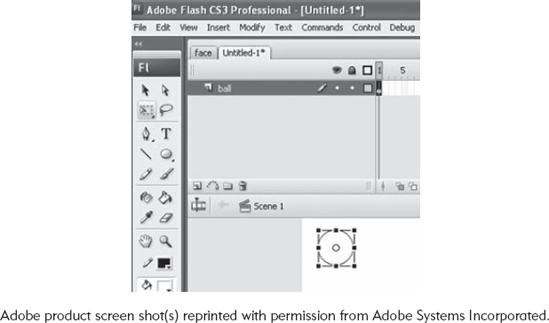
Create a new Flash file
Rename Layer 1 as "Ball"
Select Frame 1 of the Ball layer
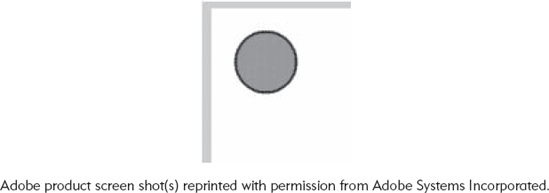
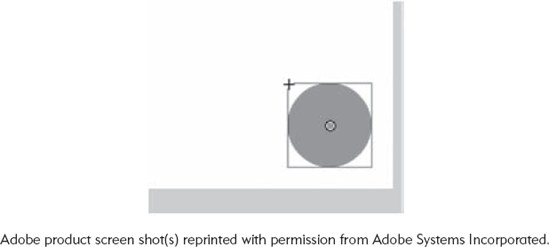
Draw a circle
Select the Oval tool from the Tools panel?

Note: The Oval tool shares the palette with the Rectangle tool; if you do not see it, click on the Rectangle tool to switch tools.
Position your cursor in the top left-hand side of the stage
Hold down the shift key
Note: The shift key constrains the Oval so that it will make circles
Drag the cursor to draw a small circle
Select the Transformation tool and reselect the circle
Note: You should select both the inside of the circle and its edge (they are separate entities).
Note: You can resize an object on the screen by clicking and dragging one of the handles that appear on the object when you select it with the transformation tool.
Resize the circle so that its Height is 44 pixels and its Width is 44 pixels
Note: You can tell how big the circle will be by viewing the Property Inspector Panel.
Note: Pixels are the individual points or dots that make up a computer screen; the more pixels per inch, the greater the resolution,
Move the circle to the upper left-hand side of the stage
Note: You can move the object around the screen by selecting it from the inside and not on the handles.
Note: You can also rotate the object clockwise and counterclockwise by positioning your cursor just outside of the handles (the cursor will turn into a small circular arrow).

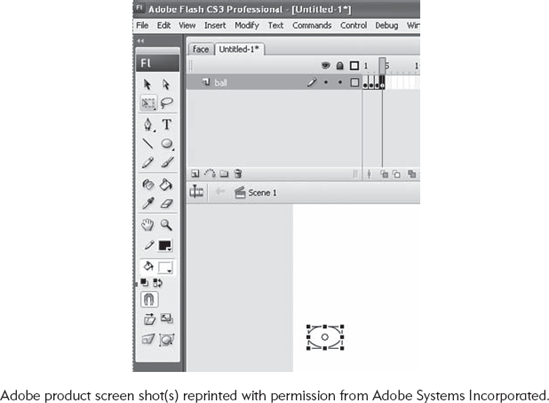
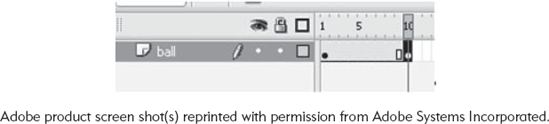
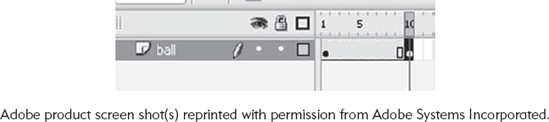
Insert a new Keyframe
Position your cursor on Frame 2 of the layer Ball
From the MenuBar, select Insert, then Timeline, and finally Keyframe
Note: When you insert a Keyframe, the contents of the previous Keyframe are copied to the new Keyframe.
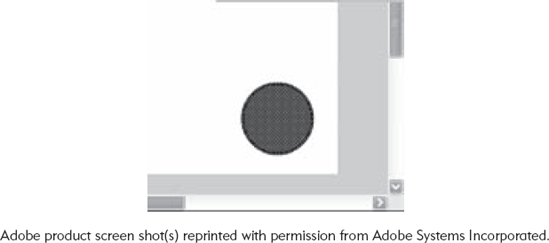
Select the circle on the stage with the Selection tool

Drag the circle downward on the stage about 40 pixels
Note: it may be easier to use the arrow keys to move the circle.
Repeat the previous steps for two more Keyframes so you have four frames, each with a circle slightly lower than the previous one
Create a "squish" effect
Frame-by-frame animation can be used any time that detailed animation needs to be used. The other animation techniques, Motion Tweening and Shape Tweening, allow the computer to decide how to interpolate between frames. These techniques are enormously powerful; however, they can be clumsy at times. You may find that to achieve the motion effect that you intended you will have to supplement a Tween with a frame-by-frame animation. Any instructional objective that require detailed visual changes should be done with the frame-by-frame animation technique.
The traditional method of manually creating each cell of an animation was digitized in through Flash's ability to create frame-by-frame animations. However, Flash has other, more powerful, methods of creating animation. Flash allows you to create graphics for individual Keyframes, and then it will interpolate or "fill in" any frames you leave in between, which creates a morphing effect. You can have one shape change into another over time that not only changes its location, but its color and size as well. This type of animation is called shape tweening and can be an enormous time-saver.
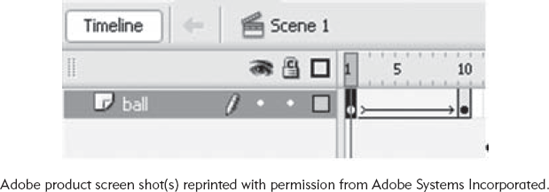
Rename Layer 1 as "Ball"

Select Frame 1 of the Ball layer
Select the Oval Tool from the Tool Palette, and hold down the shift key as you draw a circle at the top left-hand side of the stage
Set the color of the circle to red (#FF0000)
Insert a Keyframe on Frame 10
From the Menu Bar, select Insert, then Timeline, and finally Keyframe
Note: By inserting a Keyframe, you are duplicating the previous Keyframe onto Frame 10 and all of the frames in between.
Using the Selection tool, drag the red circle to the lower right-hand side of the stage.
Note: Be sure to select both the stroke and fill of the circle (remember they are separate).
In the Property Inspector Panel, set the color of the circle to blue (#0000FF)
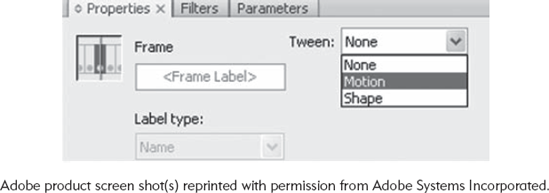
Reselect Frame 1 and select the Shape option from the Tween list in the Property Inspector
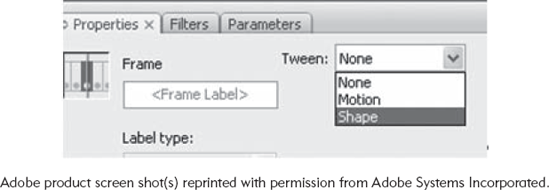
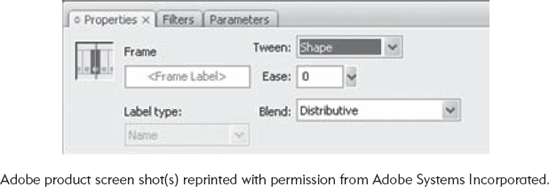
Note: The "Ease" is the degree of motion over time. A negative ease will begin slowly and end quickly, while a positive ease will begin quickly and end slowly.
Note: The "Blend" describes how a shape is blended. The angular option attempts to maintain sharp angles and line in the blending process, while the distributive option tends to smooth out sharp angle during a transition.
Test the movie (Ctrl-Enter)
Note: You should see the circle move from its starting point in the upper left-hand corner to the end point in the bottom right-hand corner and the circle's color gradually change from red to blue.
Note: The Shape Tween only works with vector-based shapes and images that have not been turned into symbols
Shape tweens allow you to create a blending effect; one element on the screen turns into another. This technique can be used to show the relationship between two elements. Shape tweening can be used to demonstrate the relationships between Concepts and to demonstrate the results of the application of a Principle.
There are times when you want to animate something other than vector graphics. For example, you may want to animate a bitmap or a symbol. For example, if you had a movie clip symbol that was animating the flapping of a bird's wings, it would appear stationary unless you moved that symbol across that stage with a motion animation.
Create a new Flash file
Rename Layer 1 as "Ball" [see Layers]
Select Frame 1 of the Ball layer
Draw a circle at the top left-hand side of the stage [see Drawing tools]
Set the color of the circle to red (#FF0000) [see Color]
Select both the fill and the stroke of the circle [see Drawing tools]
Convert the circle to a Graphic Symbol, name it RedCircle [see Symbols]
Insert a Keyframe on Frame 10 [see Frame guide]
Move the circle symbol to the lower right-hand side of the stage
Note: The graphic on frame 10 is a copy of the one on frame 1. Moving the graphic on frame 10 does not affect the graphics on frames 1 through 9.
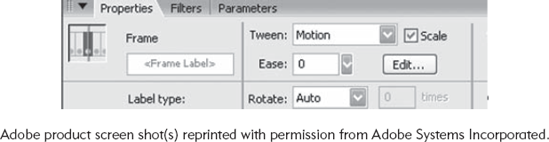
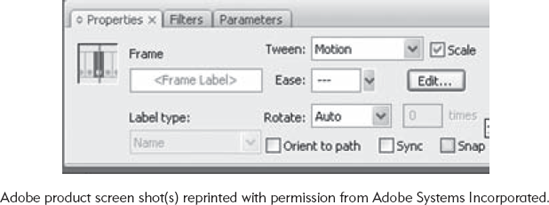
Reselect Frame 1 and select the Motion option from the Tween list in the Property Inspector
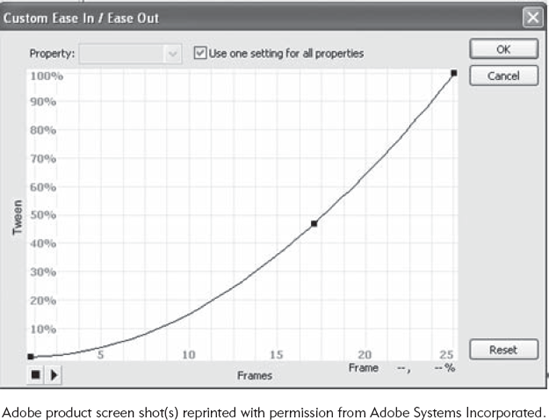
Note: The "Ease" is the degree of motion over time. A negative ease will begin slowly and end quickly, while a positive ease will begin quickly and end slowly. With a Motion Tween you can customize the ease by selecting and dragging any point on the Custom Ease graph.
Note: The Rotate option allows you to control the Tween's direction (clockwise or counterclockwise).
Test the movie (Ctrl-Enter)
Note: You should see the symbol move from its starting point in the upper left-hand corner to the end point in the bottom right-hand corner.
Note: The Motion Tween only works with symbols and raster-based images.
The motion tween allows you to move symbols on the stage. Movement is an important instructional tool, particularly for demonstrations. Instead of describing how something works, you can actually show it to the learners. The motion tween is particularly useful when using movie clips. For example, a movie clip could have an image of person's legs moving. By creating a motion tween with that movie clip, the illusion of a person walking across the stage would be created.
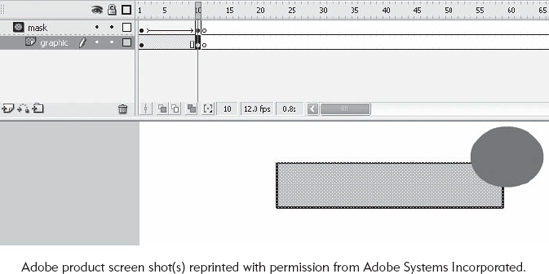
Masks allow you to cover or hide parts of the screen. The effect makes it easy for you to guide the learners' attention because it only reveals a portion of the images underneath it at any one time. The mask effect can be used in conjunction with tweening animation to move, expand, and contract the covered area.
Insert graphic
Label the layer "graphic"
Select the Rectangle tool and draw an object on stage
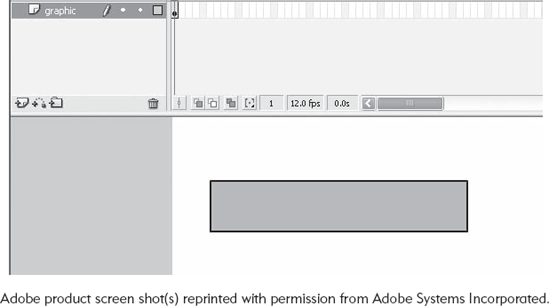

Note: The graphic layer should be indented under the Mask layer.
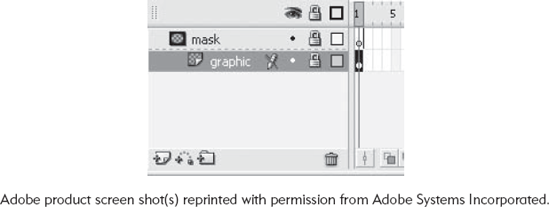
Note: You are drawing in the "mask." The mask will be the reverse of the object on the screen.
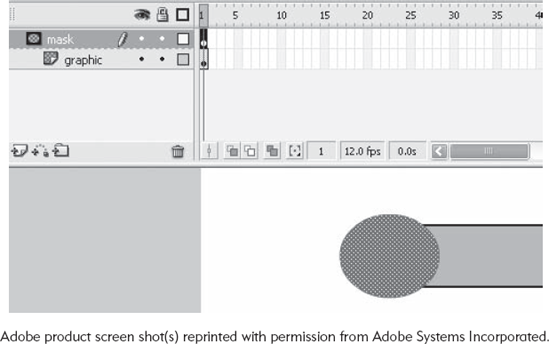
Create a shape tween on the Mask layer through Frame 10 (See Shape Tween)
Add a frame on the graphic layer at Frame 10
Note: Adding a frame on the graphic layer places the rectangle on each frame between 1 and 10. A Keyframe is not required because no new content is being added to this layer.
Note: By animating the mask, you are controlling, over time, what the learners will be able to see on the screen. From a technical point of view, this makes it easy use a single graphic to represent your content (instead of breaking up that graphic for use on multiple screens).
The mask effect is a tool for controlling the learners' attention on a screen. You can use a number of mask effects on the same screen to improve the process further. In particular, masks are useful for relating parts to a whole. For example, in an anatomy lesson you could begin by showing a wide image of the entire body and then use a mask to focus the learners' attention, sequentially, on particular organs.
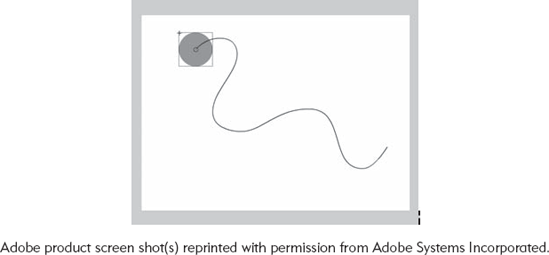
Both Shape Tweens and Motion Tweens will animate along a straight line between two Keyframes. There are often situations in which it would be useful to have the animation follow a particular path. To create a path, you will have to use a motion guide. The following instructions should be followed after creating a Shape or Motion Tween.
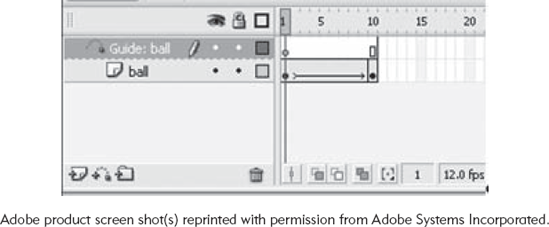
Note: Notice layer with the Tween is now indented beneath the Motion Guide
Select the first frame of the Motion Guide layer
Select the pencil tool and draw a path on the stage [see Drawing tools]
Use the selection tool to click and drag the symbol on Frame 1 until it "connects" with the path
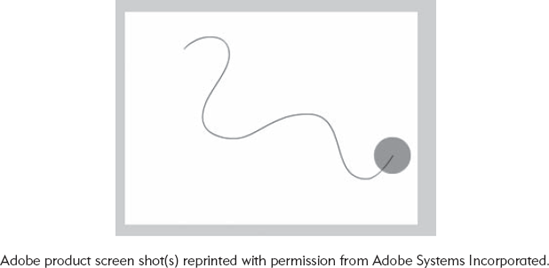
Select Frame 10 of your Tween and click and drag the symbol until it "connects" with the path
Note: The Guided Path option to "Orient to path" allows you to point your symbol in the direction of the path. The "Sync" allows you to synchronize with the main timeline if you are working within a movieclip. The "Snap" option attaches the object by its registration point.
Note: At this point, you can test the application to determine whether it is functioning as expected.
From the Menu Bar select Control and then choose Test Movie
Note: When you Test Movie, a .swf file is created and you can view what your learners will see.
Note: You should see the symbol move along the path.
This technique uses the timeline and shape tweens to create an effect of a drawing emerging from the screen
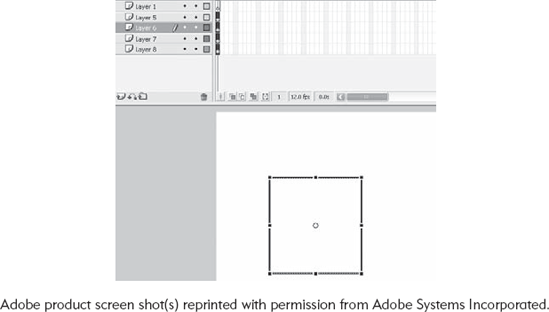
Note: The pasted lines will be stacked on top of each other.
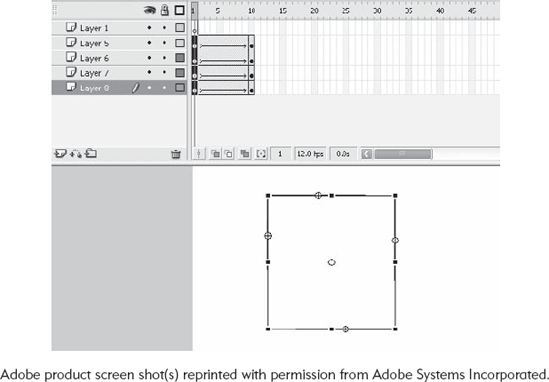
Drag the line to create a box shape, being careful not to allow the lines to intersect. Use the Transformation tool to rotate the vertical sides to the horizontal.
Select all of the lines on the stage
From the Menu Bar, select Modify, then Timeline, and finally Distribute to Layers
Select Frame 10 for all of the layers and insert a keyframe (from the Menu Bar, Select, Insert, then Timeline, and finally Keyframe)

Modify each line on Frame 1 of each layer
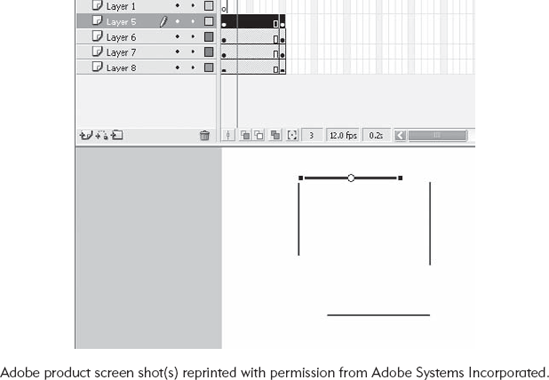
Create a shape tween on all layers between the Keyframes on Frame 1 and Frame 10
Select the Frames on each layer and drag them across the Timeline in a stagger pattern
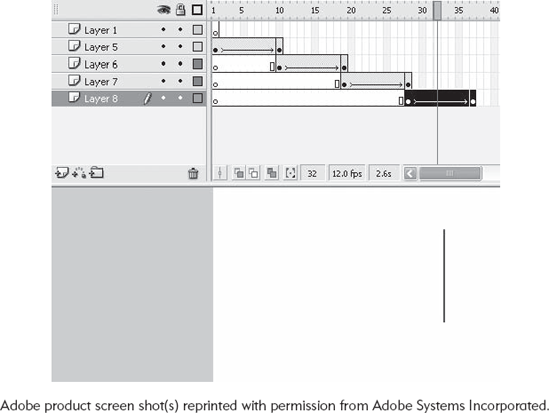
Fill in Frames by Selecting Frames that parallel the last layer as follows
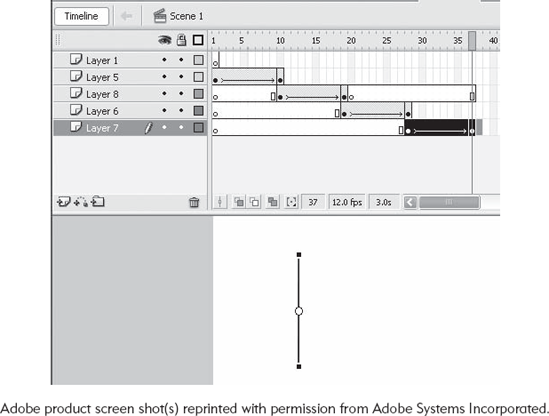
From the Menu Bar, select Insert, then Timeline, and finally Frames
Note: When the scene is tested, a simulated drawing effect will be observed.
This drawing technique is particularly helpful when teaching procedures because it allows you to demonstrate how a process emerges over time. This demonstration illustrated a simple procedure for drawing a box; however, the technique can easily be applied to complicated phenomena. An additional modification to the technique would be to insert a control button to allow the learners to step through the demonstration at their own pace.
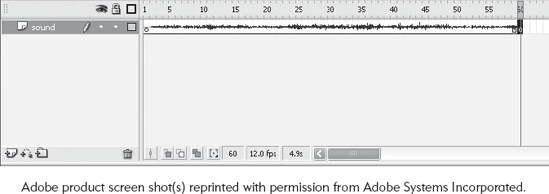
Sound opens up another dimension to your Flash application. Studies have found that sound can reinforce the content presented on the screen.
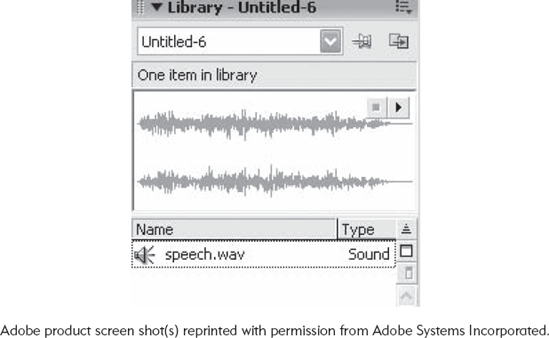
Note: This clip lasts close to five seconds when played. Extra frames will have to be inserted into the timeline for it to be heard in its entirety.

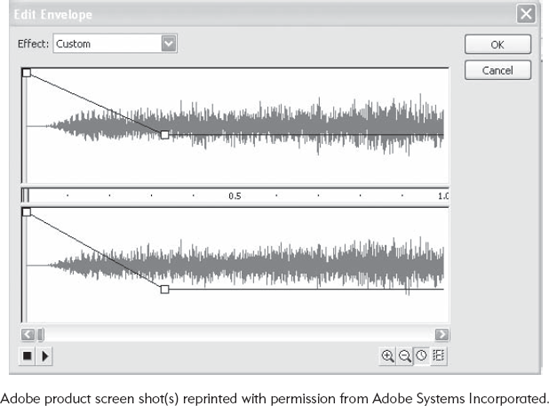
Sound can be used to provide feedback to the learners on their actions. For example, when a learner clicks on a button, by hearing a sound, a learner can confirm that he or she clicked on the appropriate place. Additionally, any time you are demonstrating process on the screen, narration can be used to allow the learners to focus on the screen instead of splitting their attention between the demonstration and text.
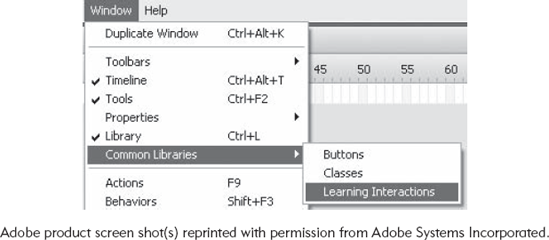
Flash has a set of learning components that are ideal for creating practice sequences and for assessing the learners. These components are pre-packaged tools that can be placed within any Flash application. With learning components, you no longer have to create interactions from scratch. The Drag and Drop component allows you to easily create interactions with the learners that allows them to perform by selecting an object on the screen and positioning it appropriately.
Create a new Flash file
Rename Layer 1 "Learning Interaction"
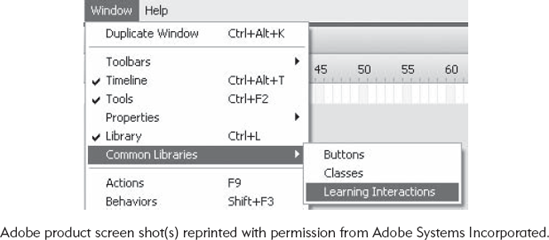
Open the Learning Interactions library
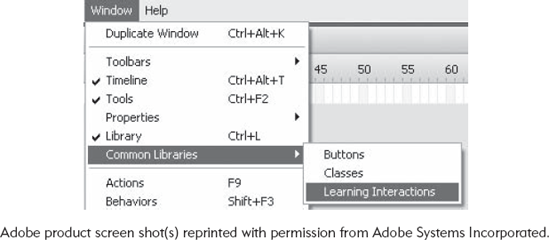
From the Menu Bar, select Window, then Common Libraries, then Learning Interaction
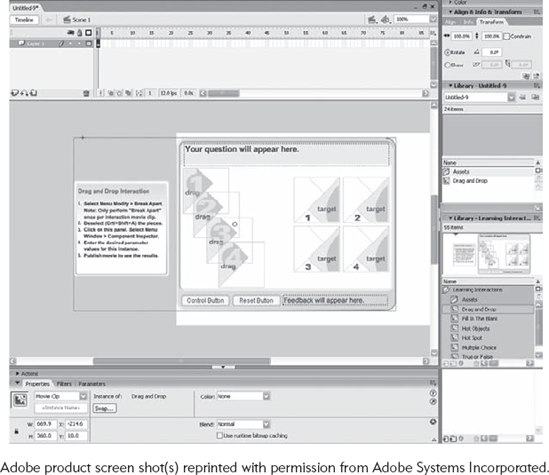
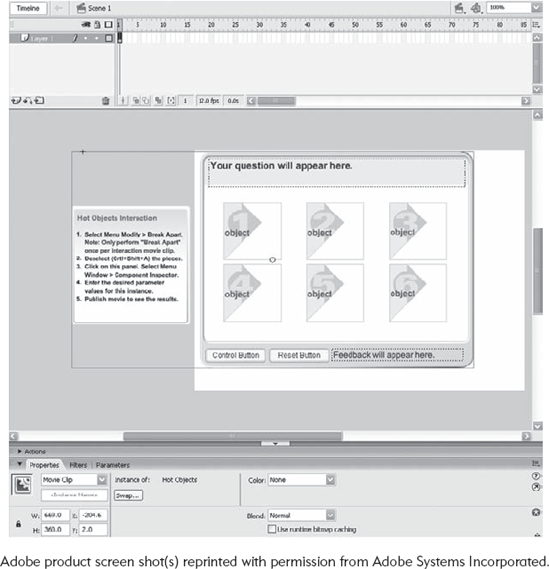
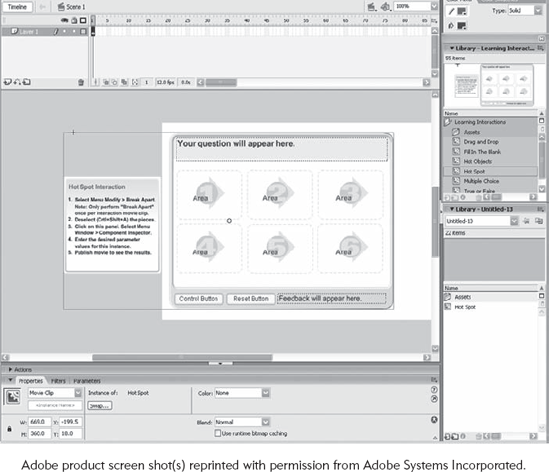
Drag the Drag and Drop Learning Interaction onto the Stage
Position the Learning Interaction so that the Instruction box on the left hangs outside of the stage area
Note: Never delete the Instruction box; it has important information for the learning interaction to operate properly. The instruction box will not be visible when the application is run.
Note: The learning component is a set of tools that have been compiled together; by breaking it apart you can tailor its parts to your particular application.
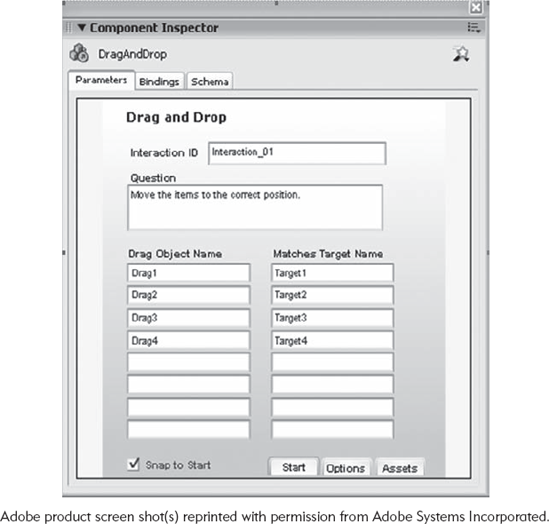
Note: The Interaction ID is a code for used when integrating Flash content into a learning management system such as Blackboard, WebCT, or Moodle. Learning management systems are beyond the scope of this text.
Note: Question form: This is where you ask the learners to perform a task. The default is "Move the items to the correct position."
Note: The Drag Object Name forms describe the objects that are dragged. It is a good idea to name these objects something descriptive, while retaining the task and number. For example, Drag1, Drag2, Drag3, and Drag4 might be changed to RobinDrag1, ParrotDrag2, SeagullDrag3, and FinchDrag4. Likewise, the Matches Target Name forms could be changed to RobinTarget1, ParrotTarget2, SeagullTarget3, and FinchTarget4.
Note: To add another draggable object, simply type it into the forms. For example, SparrowDrag5 and SparrowTarget5.
Note: If you want to give the learners feedback, check the Feedback checkbox.
Note: The Initial Feedback form reports instructions to the user. The default is "Press on an object to drag it."
Note: The Evaluate Feedback form reports instructions on how to check their responses. The default is "Click on the Check Answer button."
Note: The Correct Feedback form is the report the learner receives if his or her response was correct. The default is, "Yes that is correct."
Note: The Incorrect Feedback form is the report the learner receives if his or her response was incorrect. The default is, "No that is incorrect."
Note: The Tries Feedback form is the report the learner receives if his or her response is incorrect and he or she is allowed to try again (you can set the number of tries in the tries form). The default is, "No that is incorrect."
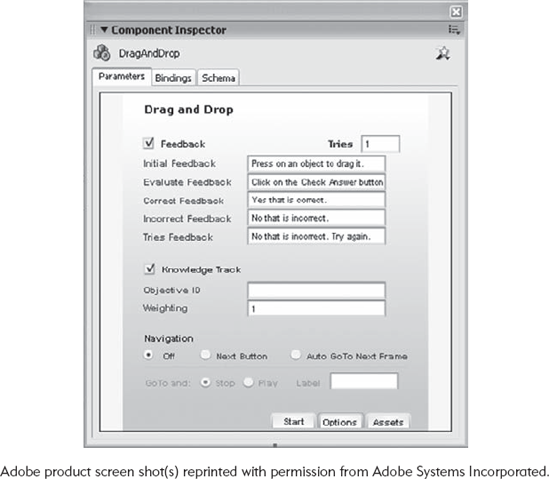
Note: Knowledge Track is a set of settings if this component is used in a learning management system.
Set Navigation to off
Note: Navigation can either be turned off or you can create Next Button that allows you to goto a specific frame on the Flash timeline (that frame must be labeled). You can also choose Auto GoTo Next Frame, which automatically moves the learner to the next frame.
Note: Assets, Bindings, and Scheme are features that can be used with a learning management system.
Hide the Component Inspector by clicking on its bar
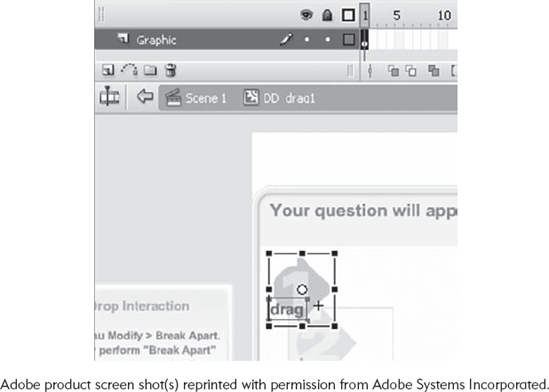
Select and double click on the Drag1 symbol on the stage

Note: Notice beneath the Timeline that there is the DD Drag1 symbol icon; this tells you that you are working with the symbol Timeline and not the Scene 1 Timeline.
Select all of the placeholder graphics by selecting the Keyframe on frame 1 of the graphics layer, then hitting the delete key
You can now import a graphic to act as the object
From the Menu Bar, select File, then Import, then Import to Stage; select an image, then select Open
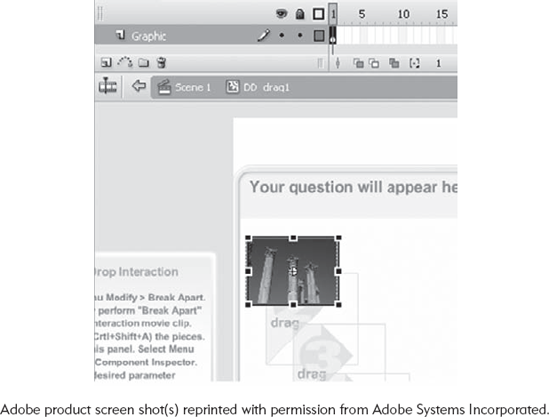
Click on Scene 1 to go back to the main time line

Repeat replacing the placeholder graphics for all of the drag objects
Replace the Target with a word
Select and double click on the Target1 symbol on the stage
Select all of the placeholder graphics by selecting the Keyframe on frame 1 of the graphics layer, then hitting the delete key
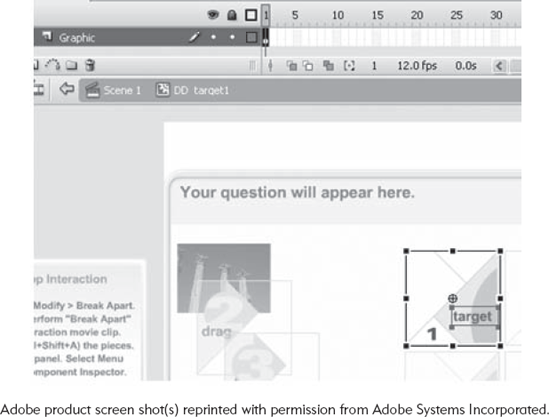
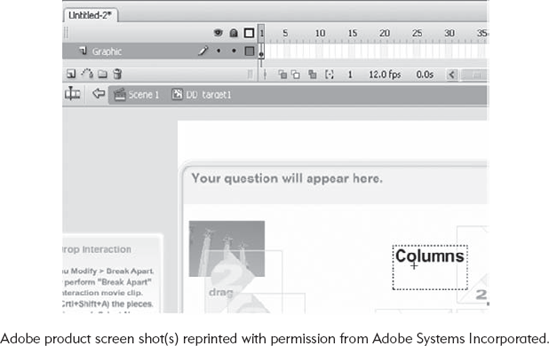
Select the Text tool and position it above the position cross
Draw in a text box
Type in the word "Columns"
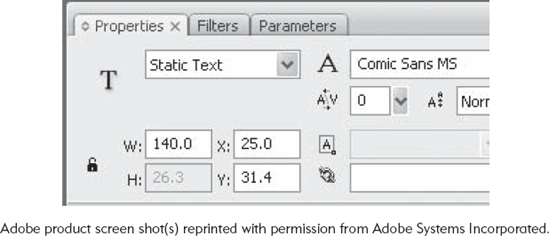
Change the Text type to Static Text
Click on Scene 1 to go back to the main time line

Repeat replacing the placeholder graphics with words for all of the target objects
Note: The background graphic can be deleted or modified to make the learning component visually compatible with the rest of the application while retaining its functionality.
On the Scene 1 Timeline, double click on the Background graphic with the Selection tool
Unlock the locked layers
Drag each layer to the trash can to remove the graphics
The Drag and Drop learning interaction is ideal for activities that require repositioning. For example, a module on anatomy might benefit from the learners being able to select a particular bone and place it in the correct position relative to other bones, to indicate an understanding of structure. The Drag and Drop learning interaction template consist of a series of rectangles; however, you should be aware that the graphics that you will use to replace the rectangles can be of any shape or size. This allows you to use the learning component in a number of widely divergent situations. The Drag and Drop learning interaction is useful for both practice and assessment.
Flash has a set of pre-built learning components that allow you to construct interactions that allow you to test the learners. These components are essential online learning tools. You will be familiar with many of these interaction types. The Fill in the Blank tool allows the learners to type in a response to a question. If a learner has made an acceptable response, he or she can receive supportive feedback.
Rename Layer 1 "Learning Interaction"
Open the Learning Interactions library
From the Menu Bar, select Window, then Common Libraries, then Learning Interaction
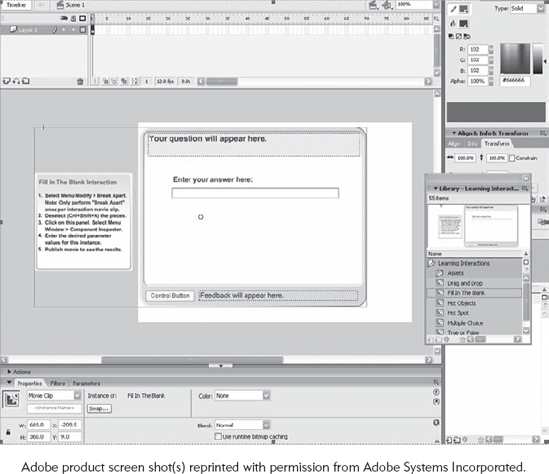
Drag the Fill in the Blank Learning Interaction onto the Stage
Position the Learning Interaction so that the Instruction box on the left hangs outside of the stage area
Note: Never delete the Instruction box, as it has important information for the learning interaction to operate properly. The Instruction box will not be visible when the application is run.
From the Menu Bar, select Modify, then Break Apart (Ctrl+B)
Deselect all of the components
From the Menu Bar, select Edit, then Deselect All (Ctrl+Shift+A)
Select the Instruction box
From the Menu Bar, select Window, then Component Inspector (Shift+F7)
Drag the lower-right pull corner of the Component Inspector to enlarge
Enter parameter values into Component Inspector
Note: The Interaction ID is a code for use when integrating Flash content into a learning management system such as Blackboard, WebCT, or Moodle. Learning management systems are beyond the scope of this text.
Note: Question form: This is where you ask the learners to perform a task. The default is "What animal has black and white stripes?" Replace that with your own question.
Note: The Response forms list the terms or phrases that are acceptable. Be sure to check the box to indicate the correct response. If you specifically want to exclude a term, type it in the response form without checking the correct box. The Fill in the Blank learning interaction can be evaluated for its case by checking the case sensitive box. You should check the Exact Match box if you require a response exactly as presented in a response form (the default is to accept the learner's response if it has any term in the response forms).
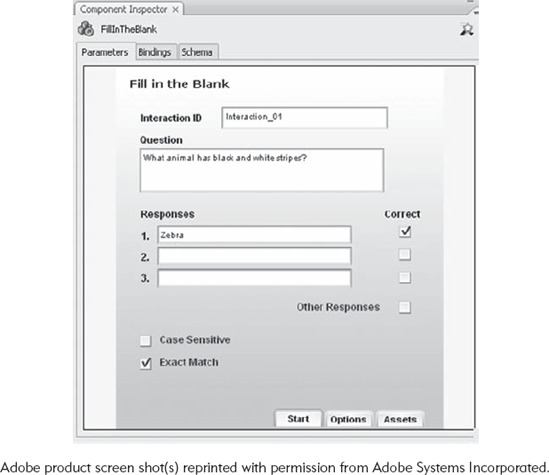
Note: If you want to give the learners feedback, check the Feedback checkbox.
Note: The Initial Feedback form reports instructions to the users. The default is "Fill in the blank Text Field."
Note: The Evaluate Feedback form reports instructions on how to check their responses. The default is "Click on the Check Answer button."
Note: The Correct Feedback form is the report the learner receives if his or her response was correct. The default is, "Yes that is correct."
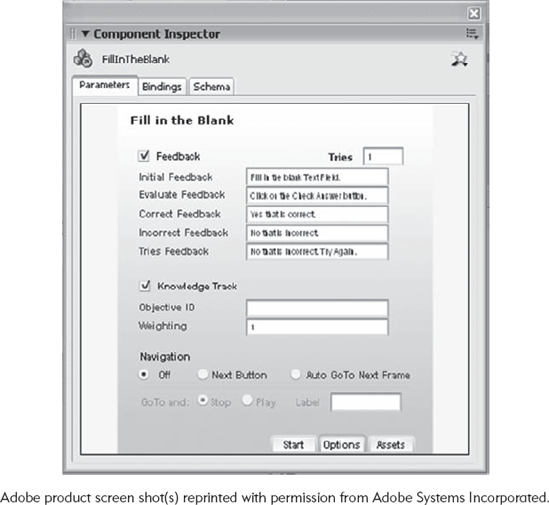
Note: The Incorrect Feedback form is the report the learner receives if his or her response was incorrect. The default is, "No that is incorrect."
Note: The Tries Feedback form is the report the learner receives if his or her response is incorrect and he or she is allowed to try again (you can set the number of tries in the Tries form). The default is, "No that is incorrect. Try again."
Note: Navigation can either be turned off or you can create a Next Button that allows you to goto a specific frame on the Flash timeline (that frame must be labeled). You can also choose Auto GoTo Next Frame, which automatically moves the learner to the next frame.
Note: Assets, Bindings, and Scheme are features that can be used with a learning management system.
Hide the Component Inspector by clicking on its bar
Note: The background graphic can be deleted or modified to make the learning component visually compatible with the rest of the application, while retaining its functionality.
On the Scene 1 Timeline double click on the Background graphic
Drag each layer to the trash can to remove the graphics
The Fill in the Blank learning interaction allows you to receive text input from the learners and evaluate it. This technique is particularly useful for practice situations that require one- or two-word responses. Unfortunately, this type of learning interaction becomes unwieldy with longer responses because of the limitations of Flash's response evaluation system; the learners must provide answers in a particular format and phrased in particular ways. For example, you might ask, "In which year is Columbus said to have 'discovered' America?" You may have set up the interaction to accept the response "1492"; unfortunately, the user may provide the response, "fourteen ninety-two." Both are equivalent with regard to meaning, but would not be evaluated as correct by Flash.
Flash has a set of pre-built learning components that allow you to construct interactions that allow you to test the learners. These components are essential online learning tools. You will be familiar with many of these interaction types. The Hot Object learning interaction works similar to a multiple-choice type question in that the users select their answers. However, the Hot Object tool makes it possible to make any graphic on the screen clickable as a response to a question. If the learner has made an acceptable response, he or she can receive supportive feedback.
Rename Layer 1 "Learning Interaction"
Open the Learning Interactions library
From the Menu Bar, select Window, then Common Libraries, then Learning Interaction
Drag the Hot Object Learning Interaction on to the Stage
Position the Learning Interaction so that the Instruction box on the left hangs outside of the stage area
Note: Never delete the Instruction box, as it has important information for the learning interaction to operate properly. The Instruction box will not be visible when the application is run.
From the Menu Bar, select Modify, then Break Apart (Ctrl+B)
Deselect all of the components
From the Menu Bar, select Edit, then Deselect All (Ctrl+Shift+A)
Select the Instruction box
From the Menu Bar, select Window, then Component Inspector (Shift+F7)
Drag the lower-right pull corner of the Component Inspector to enlarge
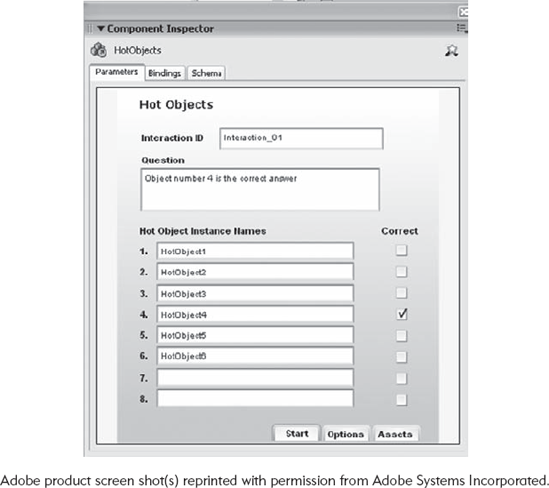
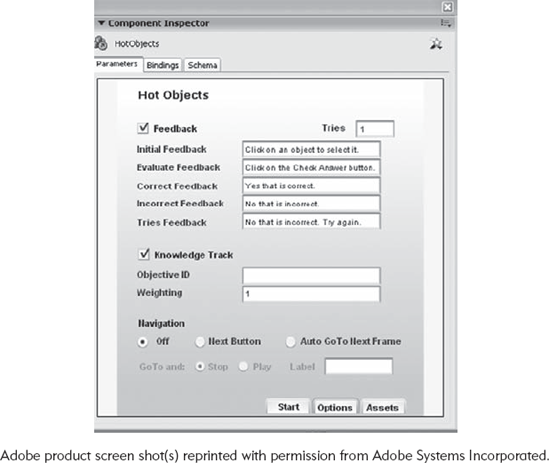
Enter parameter values into the Component Inspector
Note: The Interaction ID is a code for use when integrating Flash content into a learning management system such as Blackboard, WebCT, or Moodle. Learning management systems are beyond the scope of this text.
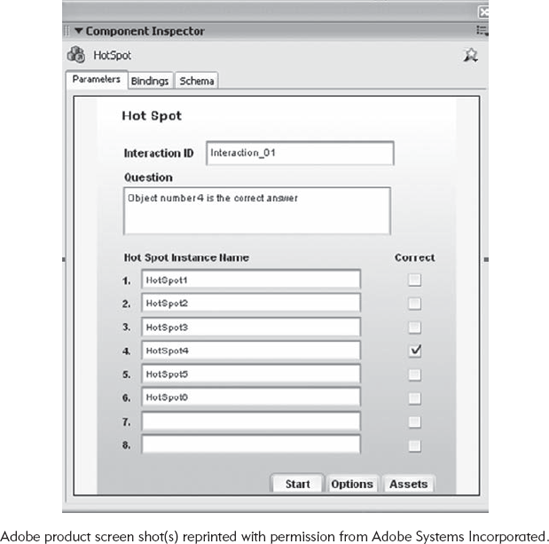
Note: Question form: This is where you ask the learners to perform a task. The default is "Object number 4 is the correct answer." Replace that with your own question.
Note: The Hot Object Instance Names forms list the names of the available objects. Be sure to check the box to indicate correct response. It is a good idea to name the objects with an identifier. For example, RobinHotObject1, ParrotHotObject2, PenguinHotObject3, SparrowHotObject4.
Note: If you do not require all of the Hot Objects, you can remove them by removing their names in the Component Inspector.
Select the Options tab in the lower right-hand side of the Component Inspector
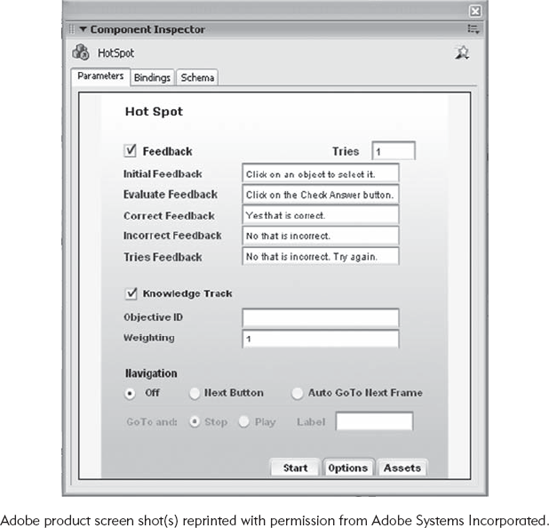
Note: If you want to give the learners feedback, check the Feedback checkbox.
Note: The Initial Feedback form reports instructions to the user. The default is "Click on an object to select it."
Note: The Evaluate Feedback form reports instructions on how to check their responses. The default is "Click on the Check Answer button."
Note: The Correct Feedback form is the report the learner receives if his or her response was correct. The default is, "Yes that is correct."
Note: The Incorrect Feedback form is the report the learner receives if his or her response was incorrect. The default is, "No that is incorrect."
Note: The Tries Feedback form is the report the learner receives if his or her response is incorrect and he or she is allowed to try again (you can set the number of tries in the tries form). The default is, "No, that is incorrect. Try again."
Note: Knowledge Track is a set of settings if this component is used in a learning management system.
Set Navigation to off
Note: Navigation can either be turned off or you can create Next Button that allows you to goto a specific frame on the Flash timeline (that frame must be labeled). You can also choose Auto GoTo Next Frame which automatically moves the learner to the next frame.
Note: Assets, Bindings, and Scheme are features that can be used with a learning management system.
Hide the Component Inspector by clicking on its bar
Select each Hot Object and name it in its Property Inspector (RobinHotObject1, SparrowHotObject2, etc.)
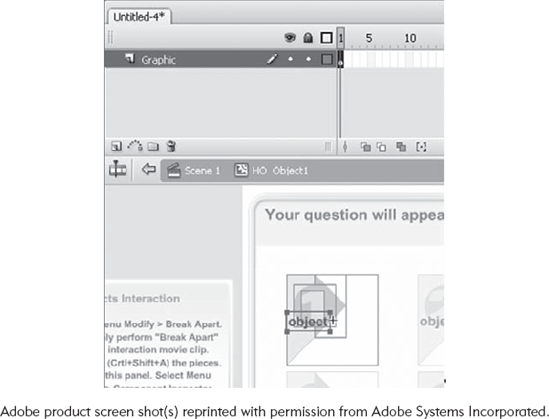
Select and Double Click on the Object1 symbol on the stage
Note: Notice beneath the Timeline that there is an HO Object1 symbol icon. This tells you that you are working with the symbol Timeline and not the Scene 1 Timeline.
Select all of the placeholder graphics by selecting the Keyframe on frame 1 of the graphics layer, the hitting the delete key
You can now import a graphic to use as act as the object
From the Menu Bar, select File, then Import, then Import to Stage, select an image, then select Open
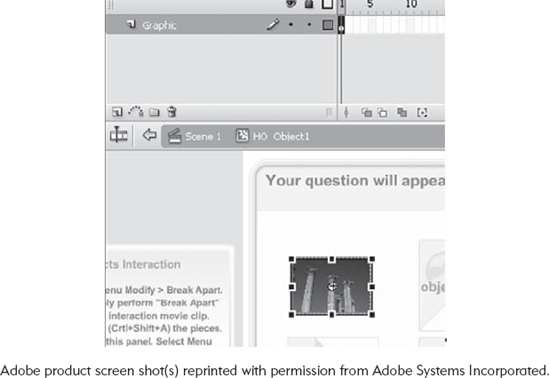
Repeat replacing the placeholder graphics for all of the Hot Objects

The Hot Object learning interaction allows you to create practice sequences that select particular graphics on the screen. With the Hot Object learning interaction, you can be very precise because anything that is not part of the target graphic will not be active. This is particularly helpful if you have a large number of graphics that you have produced outside of Flash. By using the Hot Object learning interaction, you can use these graphics with minimal positioning. Any time you need to have the users make a selection, the Hot Object learning interaction can be helpful.
Flash has a set of pre-built learning components that allow you to construct interactions that allow you to test the learner. These components are essential online learning tools. You will be familiar with many of these inter-action types. The Hot Spot learning interaction works similar to a Hot Object type question in that the users select their answers by selecting a point on the stage. However, the Hot Spot tool makes a region of the stage clickable instead of the pixels of a specific graphic. If the learner has made an acceptable response, he or she can receive supportive feedback.
Create a new Flash file
Rename Layer 1 "Learning Interaction"
Open the Learning Interactions library

Drag the Fill in the Blank Learning Interaction onto the Stage
Position the Learning Interaction so that the Instruction box on the left hangs outside of the stage area
Note: Never delete the Instruction box, as it has important information for the learning interaction to operate properly. The instruction box will not be visible when the application is run.
Deselect all of the components
From the Menu Bar, select Edit, then Deselect All (Ctrl+Shift+A)
Select the Instruction box
View the Component Inspector
From the Menu Bar, select Window, then Component Inspector (Shift+F7)
Drag the lower-right pull corner of the Component Inspector to enlarge
Enter parameter values into Component Inspector
Note: The Interaction ID is a code used when integrating Flash content into a learning management system such as Blackboard, WebCT, or Moodle. Learning management systems are beyond the scope of this text.
Note: Question form: This is where you ask the learners to perform a task. The default is "Object number 4 is the correct answer." Replace that with your own question.
Note: The Hot Spot Instance Names forms list the names of the available objects. Be sure to check the box to indicate a correct response. It is a good idea to name the objects with an identifier. For example, RobinHotSpot1, ParrotHotSpot2, PenguinHotSpot3, SparroHotSpot4.
Note: If you do not require all of the Hot Spots, you can remove them by removing their names in the Component Inspector.
Select the Options tab in the lower right-hand side of the Component Inspector
Note: If you want to give the learners feedback, check the Feedback checkbox.
Note: The Initial Feedback form reports instructions to the user. The default is "Click on an object to select it."
Note: The Evaluate Feedback form gives instructions on how to check their responses. The default is "Click on the Check Answer button."
Note: The Correct Feedback form is the report the learner receives if his or her response was correct. The default is, "Yes that is correct."
Note: The Incorrect Feedback form is the report the learner receives if his or her response was incorrect. The default is, "No that is incorrect."
Note: The Tries Feedback form is the report the learner receives if his or her response is incorrect and he or she is allowed to try again (you can set the number of tries in the tries form). The default is, "No that is incorrect. Try again."
Note: Knowledge Track is a set of settings when this component is used in a learning management system.
Set Navigation to off
Note: Navigation can either be turned off or you can create a Next Button that allows you to goto a specific frame on the Flash timeline (that frame must be labeled). You can also choose Auto GoTo Next Frame, which automatically moves the learner to the next frame.
Note: Assets, Bindings, and Scheme are features that can be used with a learning management system.
Hide the Component Inspector by clicking on its bar
Change the background placeholder graphics
Note: The background graphic can be deleted or modified to make the learning component visually compatible with the rest of the application while retaining its functionality.
On the Scene 1 Timeline, double click on the Background graphic
Drag each layer to the trash can to remove the graphics
Select Scene 1 to go up to the main timeline

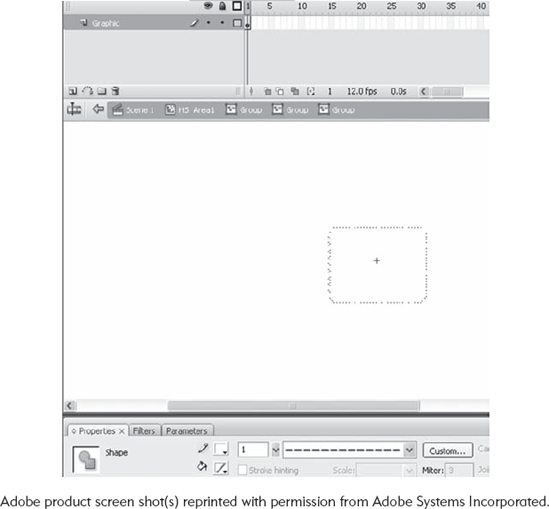
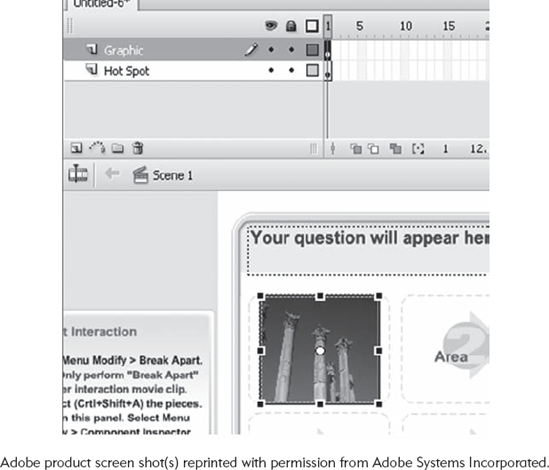
Select and Double Click on the Area1 symbol on the stage
Note: Notice beneath the Timeline that there is an HS area1 symbol icon, which tells you that you are working with the symbol Timeline and not the Scene 1 Timeline.
Double click again to edit the graphics within the HS area1 symbol
Delete the "inner graphics" by selecting the Keyframe of the Graphic layer and hitting the delete key
Reset color of Area Box to white (#FFFFFF)
Note: The Hot Spot Learning Interaction needs a graphic to define an area. If you set the outer box to white, it will blend in with the background (set it to whatever background color is being used).
Rename the HSarea1 instance to SparrowHotSpot
Note: The HotSpot must be named the same thing that you previously named it in the Component Inspector.
Navigate back to the main Timeline and drag the HS area1 symbol to the spot it is needed
Use the transformation tool to resize the HS area1 symbol
Repeat removing the placeholder graphics for all of the Hot Spots
Place graphics underneath Hot Spot Areas
The Hot Spot learning interaction is ideal for practice sequences that require the learners to select detailed items on the screen, particularly, if these items are embedded in a larger graphic. For example, if you asked the learners to "Please select the region of the painting that best illustrates the 'power of three's' principle, you would use the Hot Spot learning interaction. By using the transformation tool to reposition the selection, you can create a Hot Spot of any shape and size. The Hot Spot learning interaction allows you to have the learners perform in context.
Flash has a set of pre-built learning components that allow you to construct interactions that allow you to test the learners. These components are essential online learning tools. You will be familiar with many of these interaction types. The Multiple Choice tool allows the learners to select a response to a question. If a learner has made an acceptable response, he or she can receive supportive feedback.
Create a new Flash file
Rename Layer 1 "Learning Interaction"
Open the Learning Interactions library
From the Menu Bar, select Window, then Common Libraries, then Learning Interaction

Drag the Multiple Choice Learning Interaction onto the Stage
Position the Learning Interaction so that the Instruction box on the left hangs outside of the stage area
Note: Never delete the Instruction box, as it has important information for the learning interaction to operate properly. The instruction box will not be visible when the application is run.
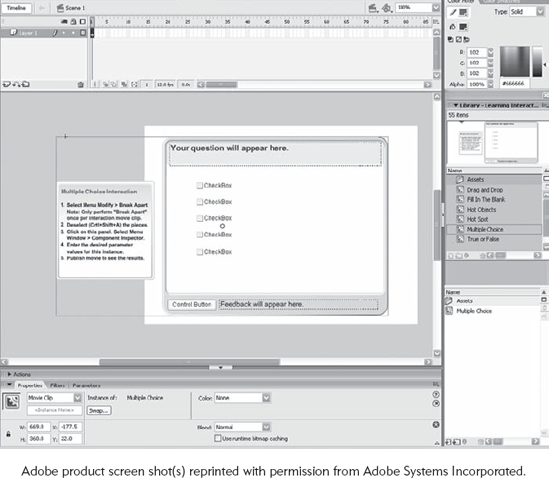
From the Menu Bar, select Modify, then Break Apart (Ctrl+B)
Deselect all of the components
From the Menu Bar, select Edit, then Deselect All (Ctrl+Shift+A)
Select the Instruction box
View the Component Inspector
From the Menu Bar, select Window, then Component Inspector (Shift+F7)
Drag the lower-right pull corner of the Component Inspector to enlarge
Enter parameter values into Component Inspector
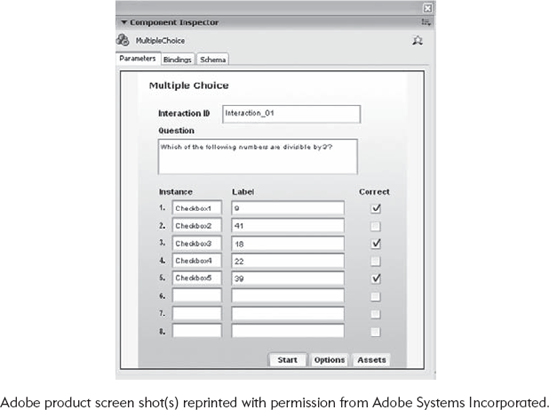
Note: The Interaction ID is a code used when integrating Flash content into a learning management system such as Blackboard, WebCT, or Moodle. Learning management systems are beyond the scope of this text.
Note: Question form: This is where you ask the learners to perform a task. The default is "Which of the following numbers are divisible by 3?" Replace that with your own question.
Note: The Instance forms are the names of the checkboxes. It is a good idea to rename these so that they are easy to match with the labels. For example, checkbox1, checkbox2, checkbox3, and checkbox4 can be renamed to RobinCheckbox1, PenguinCheckbox2, SparrowCheckbox3, and EagleCheckbox4.
Insert answer options in the Label forms. Be sure to indicate which answers are correct in the checkbox next to the Label forms.
Select the Options tab in the lower right-hand side of the Component Inspector
Note: If you want to give the learners feedback, check the Feedback checkbox.
Note: The Initial Feedback form reports instructions to the users. The default is "Click on a Checkbox."
Note: The Evaluate Feedback form gives learners instructions on how to check their responses. The default is "Click on the Check Answer button."
Note: The Correct Feedback form is the report the learner receives if his or her response was correct. The default is, "Yes that is correct."
Note: The Incorrect Feedback form is the report the learner receives if his or her response was incorrect. The default is, "No that is incorrect."
Note: The Tries Feedback form is the report the learner receives if his or her response is incorrect and he or she is allowed to try again (you can set the number of tries in the tries form). The default is, "No that is incorrect. Try again."
Note: Knowledge Track is a set of settings for when this component is used in a learning management system.
Note: Navigation can either be turned off or you can create a Next Button that allows you to goto a specific frame on the Flash timeline (that frame must be labeled). You can also choose Auto GoTo Next Frame, which automatically moves the learners to the next frame.
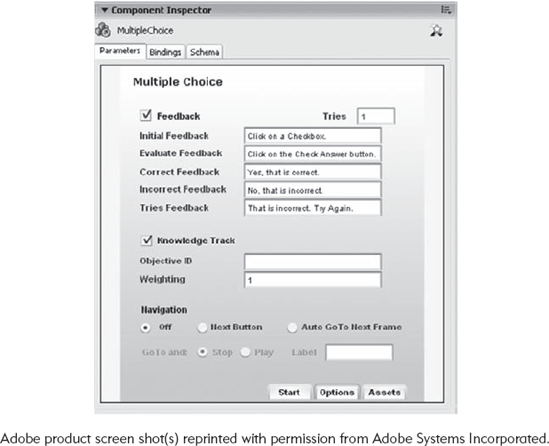
Note: Assets, Bindings, and Scheme are features that can be used with a learning management system.
Hide the Component Inspector by clicking on its bar
Change the background placeholder graphics
Note: The background graphic can be deleted or modified to make the learning component visually compatible with the rest of the application while retaining its functionality.
On the Scene 1 Timeline, double click on the Background graphic
Drag each layer to the trash can to remove the graphics

Return to the main timeline by selecting Scene 1
A multiple-choice type question is the prototypical practice and assessment instrument. It is a particularly important tool for addressing the initial learner action part of a Select, Edit, Produce practice sequence. A multiple-choice question gives the learners an opportunity to select from a set of given choices. It should also be noted that multiple-choice questions must be designed to address a specific objectives. Too often, multiple-choice questions are written to address Facts, even if the learning objective is clearly in a another domain such as the Conceptual one. For example, it might be tempting to write a multiple-choice question such as:
Art deco can be defined as:
An architectural style of the period 1925–1940
An architectural style of the period 1935–1950
An architectural style of the period 1945–1960
An architectural style of the period 1955–1970
However, that question targets the Fact learning domain. If the learning objective were classified as part of the Concept learning domain, the question would be better stated:
An example of the art deco architectural style is:
The Chrysler building in New York City
The John Hancock building in Chicago
The National Gallery of Canada in Ottawa
The Venice Beach House in Venice
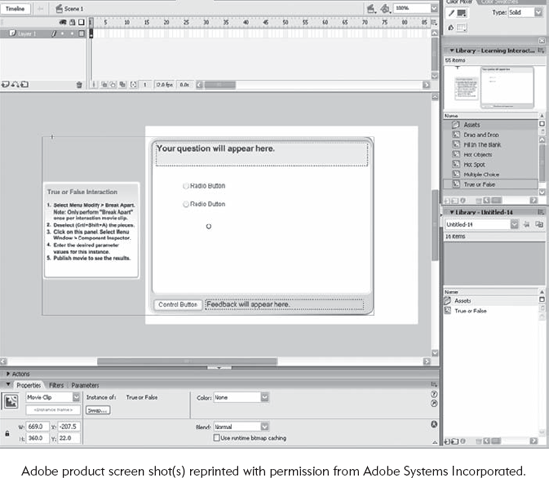
Flash has a set of pre-built learning components that allow you to construct interactions that allow you to test the learners. These components are essential online learning tools. You will be familiar with many of these interaction types. The True or False tools allow learners to select one answer that is true. If a learner has made an acceptable response, he or she can receive supportive feedback.
Rename Layer 1 "Learning Interaction"
Open the Learning Interactions library
From the Menu Bar, select Window, then Common Libraries, then Learning Interaction

Drag the True or False Learning Interaction onto the Stage
Position the Learning Interaction so that the Instruction box on the left hangs outside of the stage area
Note: Never delete the Instruction box, as it has important information for the learning interaction to operate properly. The instruction box will not be visible when the application is run.
From the Menu Bar, select Modify, then Break Apart (Ctrl+B)
Deselect all of the components
From the Menu Bar, select Edit, then Deselect All (Ctrl+Shift+A)
Select the Instruction box
View the Component Inspector
From the Menu Bar, select Window, then Component Inspector (Shift+F7)
Drag the lower-right pull corner of the Component Inspector to enlarge
Enter parameter values into Component Inspector
Note: The Interaction ID is a code for use when integrating Flash content into a learning management system such as Blackboard, WebCT, or Moodle. Learning management systems are beyond the scope of this text.
Note: Question form: This is where you ask the learners to perform a task. The default is "The sky is blue." Replace that with your own question.
Note: The Distracter forms are the label of the learners' choices. By default, the choices are "A. True" and "B. False," although you could change them to something like "A. Yes" and "B. No."
Be sure to indicate which answer is correct in the radio button next to the Distracter forms
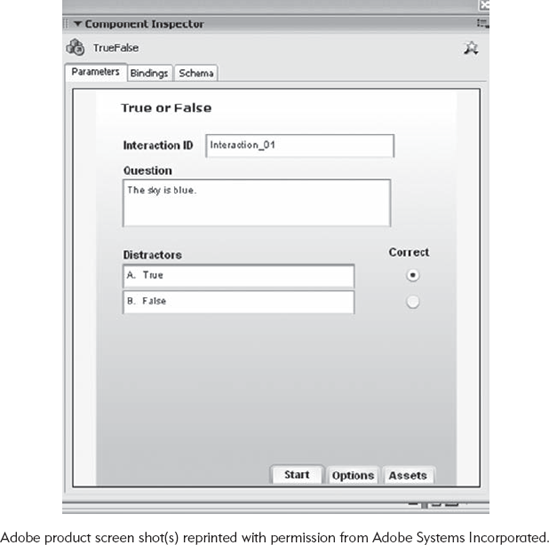
Select the Options tab in the lower right-hand side of the Component Inspector
Note: If you want to give the learners feedback, check the Feedback checkbox.
Note: The Initial Feedback form reports instructions to the users. The default is "Click on a Radio Button."
Note: The Evaluate Feedback form reports instructions on how to check their responses. The default is "Click on the Check Answer button."
Note: The Correct Feedback form is the report the learner receives if his or her response was correct. The default is, "Yes that is correct."
Note: The Incorrect Feedback form is the report the learner receives if his or her response was incorrect. The default is, "No that is incorrect."
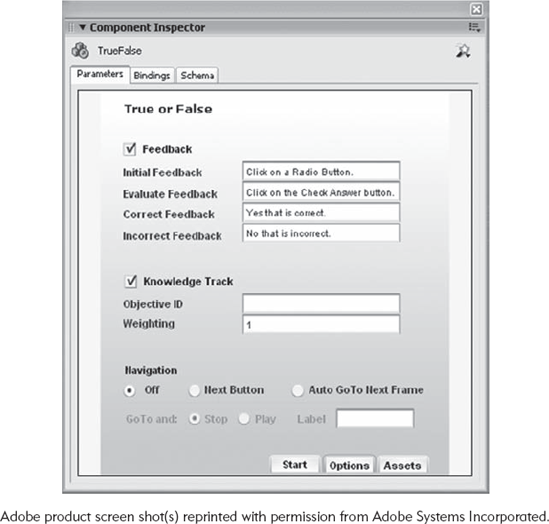
Note: Knowledge Track is a set of settings when this component is used in a learning management system.
Set Navigation to off
Note: Navigation can either be turned off, or you can create a Next Button that allows you to goto a specific frame on the Flash timeline (that frame must be labeled). You can also choose Auto GoTo Next Frame, which automatically moves the learner to the next frame.
Note: Assets, Bindings, and Scheme are features that can be used with a learning management system.
Hide the Component Inspector by clicking on its bar
Change the background placeholder graphics
Note: The background graphic can be deleted or modified to make the learning component visually compatible with the rest of the application while retaining its functionality.
On the Scene 1 Timeline, double click on the Background graphic
Drag each layer to the trash can to remove the graphics