
In This Chapter
Understanding how transformations work
Using the Scale, Rotate, Reflect, and Shear tools
Moving and shaking (even stirring) objects and portions of objects
Blending paths until they're confused and happy
Art that you create in Illustrator can be modified in a number of ways. Perhaps the most powerful of these ways are transformations and distortions. These enable you to bend, move, and manipulate paths and other Illustrator objects like silly putty, shaping them to your every whim. (Power mongers, rejoice!)
In this chapter, you find out how to use the many Illustrator transformation tools to alter the shape of your artwork in any way you desire. For the more extreme stuff — we're talking real distortion here – check out Bonus Chapter 1, available for download from the Web site associated with this book.

You can do five fundamental things to paths: move, scale, rotate, reflect, and shear. Each of these transformations has both a tool and a dialog box associated with it. Move actually has three tools, if you count all the arrow tools (each of which are used to move selections).
The key to using all these tools (and their control-freak dialog boxes) is to select what you want to change first and then to apply the transformation. Use the Selection tool when you want to transform an entire object (Shift-click with the Selection tool to transform multiple objects simultaneously) or use the Direct Selection tool to transform just a few points at a time.
Illustrator enables you to move objects simply by clicking and dragging them with any of the selection arrows. Figure 12-1, for example, shows an object moved from one spot to another. The original illustration (left) is modified (right) by using the Selection tool to move Joey the chit up into the air. (Suddenly the chit seems to defy gravity.)

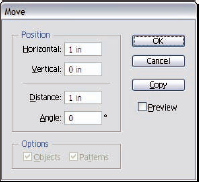
Sometimes, you need to move a selection a specific amount. Suppose you draw a flower (or a weed, if your drawing skills aren't quite up to par yet), and you want to move this flower exactly one inch to the right.
To specify how much you want to move your object, follow these steps:
Select your artwork and choose Object

The Move dialog box appears (see Figure 12-2).
You can also double-click any of the three arrow tools to access the Move dialog box.
In the Distance field, type how far you want the object to move; in this case, type 1 in.
Type 0 in the Angle field.
Setting the Angle field at 0 ensures that the object moves directly to the right without shifting up or down. Leave the other fields at their default settings.
Click OK to exit the Move dialog box.
Tip
Okay, so you might wonder how Illustrator knows to move the flower just an inch to the right, instead of to the left. Well, Illustrator knows because the number you entered in the text field is a positive number. If you enter a negative number, the object moves to the left. In fact, the only way to move something to the left in the Move dialog box is to enter a negative number in the Horizontal text field. If you do that, the Angle field automatically changes to 180 degrees, which is to the left (0 degrees is to the right).
Note
Tell Illustrator the appropriate measurement unit with these symbols: in for inches, p for picas, pt for points, cm for centimeters, mm for millimeters, or px for pixels.
To make something bigger or smaller in Illustrator, you scale it. Illustrator has a Scale tool, a Scale dialog box, and a Scale function as part of the bounding box that surrounds an object after you select it with the Selection tool. Not only can you make an object bigger or smaller, but you can also squish an item to change its size. For instance, you can make an item twice as high but the same width as it was originally. Figure 12-3 shows what happens when you scale an object.

Tip
The easiest way to scale art is not to use the Scale tool but to use the bounding box that appears around objects after you select them with the Selection tool. The bounding box enables you to scale and rotate artwork. To scale artwork, click and drag the handles (big, black squares) around the outside of the artwork.
If you hold down the Shift key while you drag the bounding box handles, you constrain the sizing of the bounding box (and the artwork) so that the width and height are scaled proportionately. This is typically a good thing because it prevents your artwork from getting really, really fat or really, really skinny while you scale it.
Tip
Holding down the Shift key while you use any of a variety of tools keeps the object constrained. For instance, with the Rotate tool, holding down the Shift key constrains rotation to 45° increments (a nice angle sideways, another nice angle upside down, another nice angle sideways the other way, and finally one more lovely angle straight up).
The bounding box is nice and all, but you don't find Illustrator Knights of the Galaxy using it because they like doing things the hard way (you know, greater evidence of artistic prowess, more prestige). The Scale tool is definitely more difficult to use than the bounding box for resizing artwork, but the Scale tool also has all sorts of capabilities that the bounding box doesn't have, such as scaling from a specific origin, using specific values, and copying as you scale. Locate these buried treasures by double-clicking the Scale tool in the Tools panel.
As a certain short, green, levitating philosopher once said, "Try not. Do. Or do not. . . ." Well, okay, you can just try the technique, as shown in Figure 12-4, if you want to. (The galaxy isn't at stake here.) Figure 12-4 shows the original artwork selected (left); the light blue preview that appears when you drag with the Scale tool (center); the final scaled artwork (right).
To scale your artwork with the Scale tool, just follow these steps:
Select your artwork using the regular Selection tool.

The Scale tool icon is supposed to look like a small box being resized into a bigger box. Really. (Call it artistic license.)
Click at the corner of the artwork and drag.
By default, the Scale tool scales from the center of the selection. When you drag, a light blue preview of your artwork appears, indicating the size and shape that your graphic will be after you release the mouse.
Drag away from the graphic to enlarge it; drag toward the center of the graphic to shrink it.
Release the mouse button when the art is the size you want.
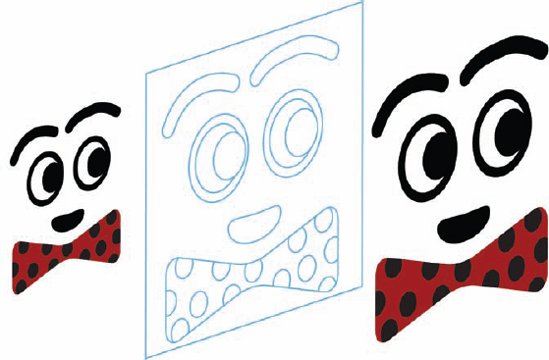
Figure 12-4. Original artwork (left), light blue preview (center), and the final scaled artwork (right).
Tip
All you accuracy addicts out there (you know who you are) can double-click the Scale tool in the Tools panel to indulge your habit: The Scale dialog box appears and offers a nice blank space in which you can type an exact scale percentage. (Some folks just have a hankering to know what an object looks like at 183 percent or 0.5597 percent of its current size.) You can also access this dialog box by choosing Object
But wait, there's more! You also have an option for choosing a Uniform or Non-Uniform scale change. Well, no, choosing Uniform won't dress up the object in khakis. Instead, the object acts as if you pressed some super Shift key and ends up looking like a bigger or smaller version of the original, identically proportioned (nary a squish anywhere). A Non-Uniform scale change enables you to enter separate scale percentages for horizontal or vertical measurements. In addition to scaling objects themselves, you can also scale patterns and/or strokes and effects, if your object(s) contains any of these attributes. See Chapter 5 for more on patterns and strokes and Chapter 11 for more on effects.
Tip
Not content with scaling from the center? The two-click method of using the Scale tool might soothe your yearning for alternatives. It enables you to move the origin point around the screen before scaling. The origin point is a place tacked to the Artboard around which the rest of the artwork scales. Normally, the origin point is in the middle of the selection, but you can put the origin point anywhere, even outside the selection! Just select the Scale tool from the Tools panel and click once before you do the click-and-drag routine to scale the object. Illustrator resets the origin point to the location where you single-clicked.
Tip
If you drag back across the origin point (or the middle if you didn't set one) while using the Scale tool, you might well flip the artwork over. That's a little disconcerting, but as long as you don't release the mouse button, you can always drag back and fix it. If you do release the mouse button, you can undo (choose Edit
Spinning your artwork around in circles is a good way to whittle away an afternoon. Sometimes, I just sit, click, and spin, watching the artwork rotate on-screen. It's mesmerizing. Then again, I don't really get out all that much.

With the Reflect tool, you can flip a selection over any axis, making a mirror image. Figure 12-6 shows original artwork before and after it's flipped over a 90° axis.
To use the Reflect tool to create a mirror image, just follow these steps:
Select the artwork to be reflected.

Press and hold the Shift key. (Release it after you release the mouse button in Step 5.)
The Shift key constrains the reflection to a 45° angle, which makes a horizontal reflection easier to accomplish. (Who knew it took so much work to be a beam of light? Other than Einstein. . . .)
Click the far-right edge of the selected artwork and drag to the left.
Release the mouse button (and then the Shift key) after the artwork "flips" over.
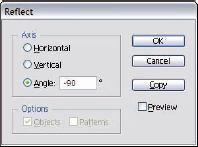
But that's not all! If you act now and double-click the Reflect tool, you get the Reflect dialog box (shown in Figure 12-7) absolutely free! Here are its exciting capabilities:
Horizontal: Select this radio button to flip the image upside down while you reflect it.
Vertical: Select this radio button to flip the image over while you reflect it.
Angle: Select this radio button to rotate the image to a specified, um, angle while you reflect the image.
Most programs call this skew, but Illustrator takes the high road and uses a lofty aviation term. It's commonly used for creating cast shadows (the kind that fall away from an object, like your own shadow does on a sidewalk on a sunny afternoon, also known as perspective shadows) or cast reflection (like a still lake reflecting autumn trees).
The Shear tool can be tricky to use because it can quickly zip out of control and turn your artwork from a mild-mannered logo into something resembling Timothy Leary's nightmares. When you click and drag with the Shear tool, everything on the side of the origin point moves to where you drag it while everything on the other side of the origin point moves an equal distance in the opposite direction. The artwork between distorts accordingly, and you get a slanted version of your artwork. If you drag too far or in the wrong direction, it's back to the land of funky spastic visions of inkblots.
Tip
To make the Shear tool easier to use, always use the two-click method. Before you drag with the Shear tool, click at the edge of the selected artwork to set the origin point. When you do this, you have to pay attention only to your artwork shearing in one direction. The overall effects are the same, but you don't have to worry about the artwork shearing in both directions.
To use the Shear tool
Select the artwork to be sheared.

The Shear tool hides behind the Scale tool in the Tools panel. Click and hold the Scale tool, and the Shear tool pops out from behind it.
Click once at the edge of the artwork to be sheared.
This sets the origin point, making the Shear tool easier to control.
Drag with the Shear tool.
The artwork shears, or distorts, to look slanted, as shown in Figure 12-8.

All this transforming might seem like some pretty amazing stuff. What's really amazing is the bevy of little extras that Illustrator has thoughtfully provided to make transforming easier and faster. The following sections in this chapter show you how to use these extras. Here's a list of what you can do:
Use the Transform panel. This panel keeps all the transformations in one handy place, where you can apply them by typing in numerical values.
Copy while you transform. Rotate a copy of your artwork.
Transform each piece of artwork separately. The Transform Each dialog box enables you to apply transformations to individual objects, instead of to everything at once. This feature is useful, believe it or not.
Repeat the last transformation. Do it again . . . and again . . . all with a simple menu command (or keystroke).
Transform a portion of a path. That's right, you can select just a few points and move, scale, rotate, reflect, or shear them. (This capability is especially useful if you want to give that virtual caterpillar a Mohawk.)
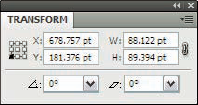
The Transform panel, shown in Figure 12-9, is a one-stop shopping location for all your transformation needs. Access the panel by choosing Window
By entering values in the Transform panel's fields, artwork can be moved, scaled, rotated, and sheared. The panel pop-up menu has options for reflecting (Flip Horizontal and Flip Vertical) as well as options for scaling strokes and effects and transforming the object, the pattern, or both. The W and H (width and height) fields can take both absolute measurements (sizes specified in inches, centimeters, and so on) or relative measurements defined by percentages. Just type the little extra bit after the number that specifies what kind of measurement the number represents — in for inches, cm for centimeters, or % for a percentage. You can also type in the rotation and shear degrees in the two boxes at the bottom (or choose a preset from the drop-down menus).
Tip
If you hate to crunch numbers, rejoice! The Transform panel does the math for you! For instance, if you want an object to be one-third as wide as it currently is, just type /3 after the current value in the text box for width, and the artwork will shrink to ⅓ of its original width.
All five Illustrator transformation functions enable you to copy objects as well as transform them. To accomplish this dazzler, Illustrator applies the transformation to a copy of the original selection, just as if you used cut-and-paste to copy the object, pasted it directly on top of the original, and applied the transformation. In Illustrator, you can do all that in one step.
When using the transformation tools, you can press Alt (Option on a Mac) to make a copy of your selection while transforming. Just press Alt (Option on a Mac) after you start dragging (not before) and hold it down until after you release the mouse button. Illustrator creates a duplicate of the selection.
Note
Illustrator users do this sort of thing so often that they invented a couple of terms (Alt-drag for PCs, Option-drag for Macs) to mean copy an object. (Nine times out of ten, it means move a copy.)
Figure 12-10 shows how a sample of type looks after you transform it with the Shear tool while holding down Alt (Option on a Mac). To get this cool cast shadow with the Shear tool, I copied the text object and filled with a gradient. The result is a cast shadow that appears in front of the original type (which Illustrator treats as an object).

Tip
If you're using a dialog box to accomplish a transformation, click the Copy button instead of OK to create a transformed duplicate of the object. The original artwork stays untransformed.
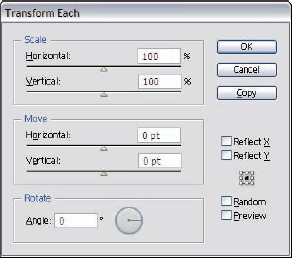
The Transform Each dialog box (see Figure 12-11), accessed by choosing Object
Oddly enough, this approach results in an effect that bears almost no resemblance to transforming everything at once. Figure 12-12 shows the results of regular rotation versus the results of rotation using the Transform Each dialog box. (Just don't say I didn't warn you.)
After you transform something, you can repeat the transformation quickly by choosing Object
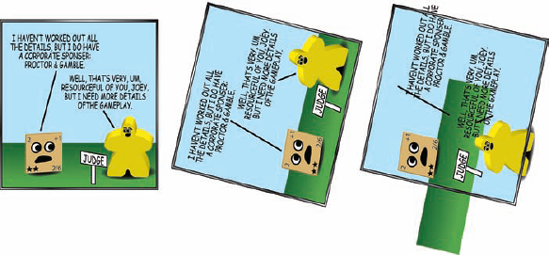
Figure 12-12. Original artwork (left) after it's rotated with the Rotate tool (middle) and using the Transform Each dialog box (right).
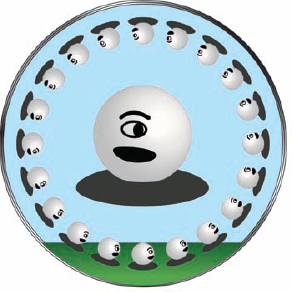
The Transform Again command also works with copying selections, as shown in Figure 12-13. Here, the little "Clarks" around the circle were made with the Transform Again function by rotating a copy around the center in 18° increments.
If you select just a section of a path, you can apply the five basic trans-formations to it, just as you do with an entire object. The result can be quite ordinary (as when you move a few points around) or rather unexpected (as when you scale, shear, or reflect just a few points), as shown in Figure 12-14.
The following steps select, move, and scale just a few points on a path (with some interesting results):
Using the Direct Selection tool, click and drag over a portion of a path.
While you click and drag with the Direct Selection tool, a rectangular marquee appears. Only the points inside this marquee are selected.
With the Direct Selection tool still selected, click a selected (solid) point and drag.
All the selected points move along with the one you click and drag. Be sure to click directly on a point that you selected (indicated by a solid point); otherwise, you'll accidentally drop the selection and select something else.

Dragging toward the middle of the selected points brings the points closer together. Dragging away moves them farther apart.
Tip
Don't click too near the middle of the points, or they get all cantankerous and hard to control.
This section covers what may well be the oddest feature in Illustrator. Illustrator can blend one path into another. For instance, you can blend the shape of a fish into a lowercase letter f. The result is a series of paths that slowly transform from one path into another. In addition to the shape changing from one path to another, the color (and style, if one exists) changes as well.
Note
Sound familiar? No surprise. The results look a lot like the morphing effect you see in every werewolf-vampire-alien-shapeshifter movie made in the past 20 years.
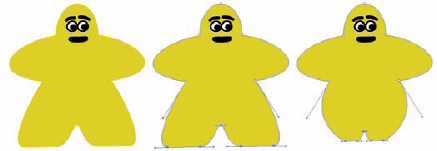
Only paths can be blended together. The paths can be open (lines, curves) or closed (shapes such as circles and squares). They can also contain either solid colors or gradients. You can select any number of paths and blend them together, as shown in Figure 12-15.
To create a blend that takes the artwork from one path to another, just follow these steps:
Create two paths on opposite sides of the document.

Click one path, click the other path, and watch the blend appear.
The number of objects between the two original paths depends on how different the colors are.
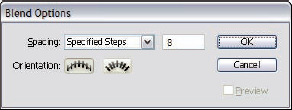
(Optional) To specify the number of steps between the paths, double-click the Blend tool.
In the Blend Options dialog box that appears, as shown in Figure 12-16, select Specified Steps from the Spacing drop-down menu and enter the number of steps you want between the two paths. Click OK.
Illustrator creates the number of objects you specify between the two original paths.
Other options are available in the Blend Options dialog box besides the Specified Steps option. The Smooth Color option lets Illustrator automatically calculate the number of steps for the blend, which allows for a smooth transition of color and shapes. The Specified Distance option specifies the distance between steps in the blend based on the edge of one object to the edge of the next object. You can also specify the orientation of your blend — either with the Align to Page orientation or the Align to Path orientation. The icons for each give you a visual of each orientation.
Tip
You can also edit your blends with selection tools, such as the Arrow or Lasso tools, or with the Rotate or Scale tools. If the blend still doesn't meet your expectations as you make your edits, you can undo a blend by choosing Object