
In This Chapter
Using iTunes to sync calendars and contacts with an iPod or iPhone
Using iTunes to sync e-mail accounts, notes, and bookmarks with an iPod touch or iPhone
Using MobileMe to sync an iPod touch or iPhone over the Internet
Setting up e-mail accounts on your iPod touch or iPhone
You may choose an iPod classic to play music and videos on the road, but you may also find it useful for viewing the personal information — contacts, appointments, and events — that you manage on your home or office computer. The iPod classic, nano, and older models offer one-way synchronization of personal information from your computer to the iPod. (The iPod shuffle doesn't hold personal information, so this chapter isn't relevant for it.)
The iPod touch or iPhone can take care of all aspects of your digital life: It can send and receive e-mail, keep track of your calendar, sort your contacts, and save bookmarks to all your favorite Web sites as you browse them. You can also add personal info directly to your iPod touch or iPhone, and synchronize that information back with your computer, which is two-way synchronization.
If you're a road warrior, you may want to fill your iPod or iPhone with your personal information. This chapter shows you how.
You already manage your contacts, calendars, e-mail, and Web bookmarks with applications on your computer. Now you can use iTunes to synchronize your iPod classic or iPod nano with these calendars and contacts, or your iPod touch or iPhone with these calendars, contacts, e-mail accounts, and bookmarks.
If you're a Mac user, you have it easy: You can use the Address Book application to manage your contacts, iCal for calendars, Mail for e-mail, and Safari for Web bookmarks. All these applications are provided free with Mac OS X. You can also sync contacts from Microsoft Entourage, Yahoo! Address Book, and Google Address Book, and sync calendars from Entourage.
If you're a Windows user, you can sync your contacts with Microsoft Outlook 2003 or 2007, Yahoo! Address Book, Google Address Book, Windows Address Book (Outlook Express), or Vista Contacts. You can sync calendars with Outlook and sync bookmarks with Microsoft Internet Explorer or Apple's Safari for Windows.
The iPod touch and iPhone can also use the Exchange ActiveSync protocol to sync e-mail, calendars, and contacts with Microsoft Exchange Server 2003 Service Pack 2 or Exchange Server 2007 Service Pack 1. For many e-mail accounts, the settings automatically appear, like magic.
If you signed up for Apple's MobileMe service (formerly the .Mac service, now www.me.com), you can automatically keep your iPod touch or iPhone synchronized along with several computers and other iPod touch and iPhone models, all at once, with the latest e-mail, bookmarks, calendar entries, and contacts, as I describe in the section "Going MobileMe to Sync Your iPod touch or iPhone," later in this chapter.
What's cool about "cloud computing" Web services like MobileMe, Microsoft Exchange, and Yahoo! Mail is that their e-mail services push e-mail messages to your computer and your iPod touch or iPhone so that they arrive immediately, automatically. Other types of e-mail account services let you fetch e-mail from the server — you must first select the account in Mail on your iPod touch or iPhone before it can actually retrieve the e-mail.
Note
You probably already know how to manage your calendar activities and your contacts on your computer. In fact, you're probably knee-deep in contacts, and your calendars look like they were drawn up in the West Wing. If not, visit the tips section of my Web site (www.tonybove.com) for advice on using MobileMe and on adding and editing contacts and calendar information on your Mac (with Address Book and iCal) or Windows computer (with Outlook). You can also find out how to use third-party utilities to manage personal information on your iPod touch or iPhone.
You use iTunes to synchronize an iPod classic or iPod nano with calendars and contacts on your computer.
With an iPod touch or iPhone, you can sync your personal information in three ways: using iTunes or using MobileMe (if you purchase the MobileMe service) or Microsoft Exchange. You can switch between these methods anytime you want. If you set up the iPod touch or iPhone to sync contacts, calendars, or bookmarks with MobileMe or Microsoft Exchange, syncing for those items is turned off in iTunes. MobileMe and Microsoft Exchange get their write-ups in the next section, and this section tackles the iTunes method.
To synchronize your iPod or iPhone with contacts, calendars, e-mail accounts, and bookmarks by using iTunes, follow these steps:
Connect the iPod or iPhone, and select its name when it appears in the Devices section of the Source pane.
iTunes displays the iPod or iPhone sync options to the right of the Source pane, with the Summary page (under the Summary tab) open.
Click the Info tab for an iPod touch or iPhone, or the Contacts tab for an iPod classic or iPod nano (or older model).
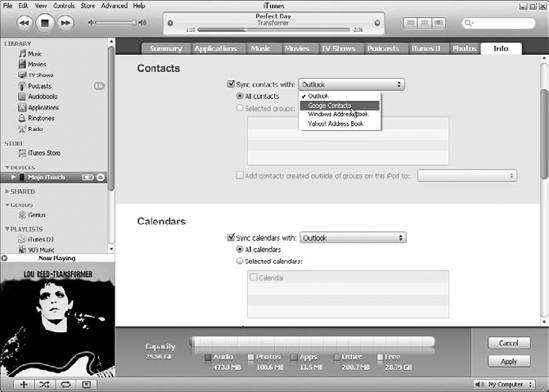
The Info sync options page appears for the iPod touch or iPhone (see Figure 10-1 for an iPod touch), offering the Contacts, Calendars, Web Browser, Notes, Mail Accounts, and Advanced sections. (At the top is a link to the MobileMe service if you are not already using it for syncing.)
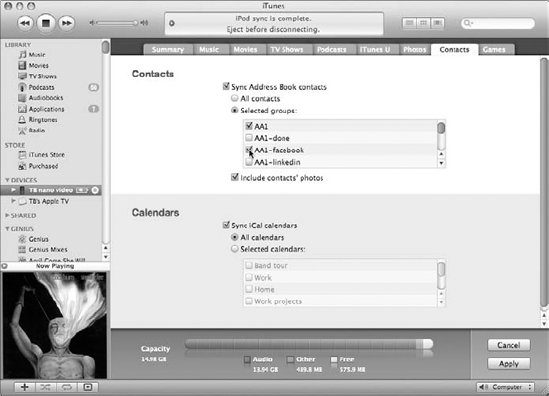
If you have an iPod classic, nano, or older model, what you see is the Contacts and Calendars synchronization options page, as shown in Figure 10-2.
Select the option to synchronize contacts.
On a Mac: Select the Sync Address Book Contacts check box (shown in Figure 10-2). With an iPod touch or iPhone, you also have the option to sync with Yahoo! Address Book — click the Configure button to enter your login information. An option to sync with Microsoft Entourage appears for the iPod touch, iPhone, iPod nano, or iPod classic if you have that application on your Mac.
On a Windows PC: Select the Sync Contents With option and choose Yahoo! Address Book, Windows Address Book, Google Contacts, or Outlook from the pop-up menu (refer to Figure 10-1).
Select the All Contacts option, or select the Selected Groups option and choose which groups to synchronize.
You can synchronize all contacts or just selected groups of contacts (such as the AA1 and AA1-facebook groups selected in Figure 10-2). To choose groups, select the check box next to each group in the list; scroll the list to see more groups.
If you make changes on an iPod touch or iPhone, iTunes automatically keeps all contacts you've selected synchronized with your computer's application.
Scroll the page and select the option to synchronize calendars.
On a Mac, select the Sync iCal Calendars check box (shown in Figure 10-2); an option to sync with Microsoft Entourage also appears if you have the application on your Mac. On a Windows PC, select the Sync Calendars With option and choose Outlook from the pop-up menu (refer to Figure 10-1).
Select the All Calendars option. (Alternatively, if you're using iCal with Mac OS X, select the Selected Calendars option and choose the calendars to synchronize.)
In Windows, you can synchronize all calendars with Microsoft Outlook, but you don't have the option to sync only selected calendars. (The Selected Calendars option is grayed out.) With iCal in Mac OS X, you can synchronize all calendars or just those you select. To choose specific calendars, select the check box next to each calendar in the list.
The iPod touch and iPhone include the Do Not Sync Events Older Than xx Days option, in which you can set the xx number of days.
Unless you are using an iPod touch or iPhone, you can skip to Step 12.
Select the calendar to use for new events entered into your iPod touch or iPhone (Mac OS X only).
If you're using Mac OS X and iCal, you should set the calendar to use for new events you create on your iPod touch or iPhone. Choose a calendar name in the Put New Events into the Calendar option. When you create a new event on your iPod touch or iPhone (as I describe in Chapter 21) and sync it to your computer, the new event appears in this calendar. This affects only new events — events you modify on your iPod touch or iPhone retain their calendar information from before.
Because you can't select individual calendars with Outlook in Windows, this option is grayed out — all events you create on an iPod touch or iPhone synchronize with the Outlook main calendar.
To synchronize Web bookmarks with your iPod touch or iPhone, scroll down to the Web Browser section and select the Sync Bookmarks option.
On a Mac running OS X, the option is Sync Safari Bookmarks; on a Windows PC, iTunes selects Internet Explorer or Safari for this option, depending on which one is your default browser.
To synchronize notes on your computer with an iPod touch or iPhone, scroll down to the Notes section.
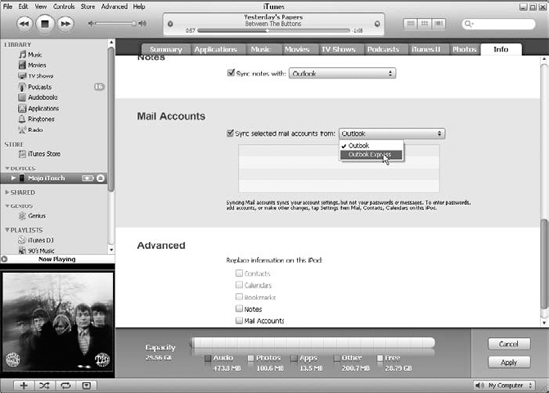
You can sync the notes you create in the Notes app on your iPod touch or iPhone with the Mail application on a Mac or with Outlook on a Windows PC. Select the Sync Notes option; on a Windows PC, choose Outlook from the pop-up menu for the Sync Notes With option.
To synchronize e-mail accounts with an iPod touch or iPhone, scroll down to the Mail Accounts section and select the Sync Selected Mail Accounts option.
Mail Accounts, as shown in Figure 10-3, appears below the Notes and Calendars sections on the Info sync options page. On a Mac, select the Sync Selected Mail Accounts option. On a Windows PC, choose Outlook or Outlook Express from the pop-up menu for the Sync Selected Mail Accounts From option.
Choose the e-mail accounts you want to sync with your iPod touch or iPhone.
After selecting the Sync Selected Mail Accounts option in Step 10, a list of e-mail accounts appears in the box below. To choose accounts, select the check box next to each account in the list; scroll the list to see more e-mail accounts.
Click the Apply button to apply the changes. (Alternatively, click the Cancel button to cancel the changes.)
iTunes starts to synchronize your iPod or iPhone.
Wait for the sync to finish and then click the Eject button next to the iPod or iPhone name in the Source pane to eject the iPod or iPhone.
Wait until the iTunes Status pane (at the top) displays the message
Sync is Complete.
After setting the synchronization options, every time you connect your iPod or iPhone, iTunes automatically synchronizes it with your personal sync options.
Synchronizing an e-mail account to your iPod touch or iPhone copies only the e-mail account setup information; the messages are retrieved by the iPod touch or iPhone over the Internet. Whether the messages in your inbox appear on your iPod touch or iPhone and on your computer depends on the type of e-mail account you have and how you've configured it.
Tip
If you select a calendar or a group of contacts to be synchronized on a Mac and later want to remove that particular calendar or group of contacts, deselect the calendar (see the preceding Step 6) or the group (see the preceding Step 4) and then click the Apply button to resynchronize. iTunes synchronizes only the group of contacts and calendars selected, removing from the iPod or iPhone any that aren't selected.
iTunes also offers Advanced options at the bottom of the Info page for the iPod touch or iPhone (refer to Figure 10-3). Use these options to sync your iPod touch or iPhone from scratch to replace all contacts, calendars, notes, mail accounts, or bookmarks. You can choose which ones you want to replace by selecting the check box next to each option. iTunes replaces the information once, during the next sync operation. After that operation, these Advanced options are automatically turned off.
MobileMe synchronizes MobileMe e-mail accounts, along with contacts, calendars, and bookmarks, on a Web server — also known as the cloud. You can then keep your iPod touch or iPhone synchronized to the cloud wirelessly, without having to connect it to your computer.
Tip
The place to start organizing your information is usually your computer. However, if you've already entered contacts and calendars on your iPod touch or iPhone, sync your contacts and calendars on your iPod touch or iPhone with iTunes first, as I describe in the previous section. Then sync your computer with MobileMe, and then your iPod touch or iPhone with MobileMe.
Warning
Make sure that the information you synchronize the very first time to MobileMe is the correct, complete information. You should synchronize your primary source — typically your computer — with MobileMe before synchronizing your iPod touch or iPhone.
MobileMe first makes its appearance when you set up your iPod touch or iPhone: An advertisement appears with buttons to try MobileMe. If you skipped the ad (like many people do), you can go back and try MobileMe by following these steps:
Connect the iPod touch or iPhone to your computer and select its name when it appears in the Devices section of the Source pane.
iTunes displays the sync options to the right of the Source pane, with the Summary page (under the Summary tab) open.
Click the Info tab.
The Info sync options page appears, offering the MobileMe setup button.
Click the Set Up Now button.
iTunes jumps to your browser to open the MobileMe setup page on the Apple Web site. Here you can find out all about MobileMe, click the Free Trial button, or log in if you already have an account. Apple also provides step-by-step instructions for setting up MobileMe on your computer and syncing with your iPod touch or iPhone — or you can read all about it in the next few sections.
After setting up your MobileMe account on a Mac or Windows PC as described in the next sections, you turn on your MobileMe account on your iPod touch and iPhone, as I describe in section "Setting Up Mail Accounts on Your iPod touch or iPhone," later in this chapter.
Setting up MobileMe is easy on a Mac: When you sign in to MobileMe for the first time, MobileMe automatically configures Mac OS X Mail on your Mac to send and receive e-mail from your MobileMe account and to synchronize contacts from Address Book and calendars from iCal. If you already set up your iPod touch or iPhone with a Mac and MobileMe service, automatic synchronization should already be set up on that Mac.
If not, you can set up a Mac to sync with MobileMe at any time. Follow these steps:
Choose System Preferences from the Apple menu, choose MobileMe, click the Account tab, and sign in.
If you see the .Mac logo instead (for older versions of Mac OS X), select .Mac and sign in. Follow the on-screen instructions, if they appear.
Click the Sync tab.
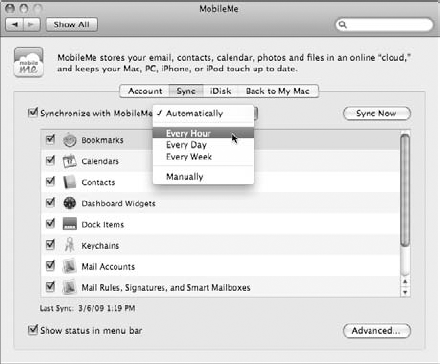
The Sync options for MobileMe appear, as shown in Figure 10-4.
Select the Synchronize with MobileMe check box and then choose a sync interval from the pop-up menu. (Refer to Figure 10-4.)
For the most frequent updates, choose Automatically to sync with MobileMe every 15 minutes.
Select the check boxes to choose information to sync with MobileMe.
You can choose to sync just contacts, calendars, bookmarks, or mail accounts, or all of them. (You can also sync other items, such as Dashboard Widgets, Dock Items, Keychains, and Mail Rules and Signatures, for use with other Macs, but these are not synced to your iPod touch or iPhone.)
Click the Sync Now button.
The sync commences. To make sure that your data has synced, go to
www.me.com, log in, and click the Contacts and Calendar icons along the top row of icons on the left.
Download and install on your PC the latest version of MobileMe Control Panel for Windows, available from http://support.apple.com/downloads. MobileMe Control Panel is required to set up and manage MobileMe syncing and manage iDisk settings on a Windows PC.
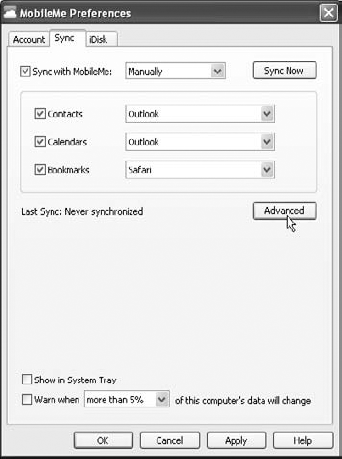
To set up a Windows PC to sync with MobileMe or to check your sync settings or sync immediately, follow these steps:
From the Windows Start menu, open Control Panel and choose MobileMe Control Panel.
The MobileMe panel appears with tabs along the top.
Click the Account tab for the Account pane (if it isn't already visible) and log in with your MobileMe member name and password if you aren't already logged in.
Click the Sync tab.
The sync options appear, as shown in Figure 10-5.
Select the Sync with MobileMe check box and then select a sync interval.
For the most frequent updates, choose Automatically to sync with MobileMe every 15 minutes.
Select the check boxes to sync your contacts, calendars, and bookmarks, and then use the drop-down lists to choose which Windows applications you want to use when syncing with these items.
Click the Sync Now button.
The sync starts. To make sure that your data has synced, go to
www.me.com, log in, and click the Contacts and Calendar icons along the top row of icons on the left.
Tip
If you use Microsoft Outlook in conjunction with Microsoft Exchange Server, MobileMe won't sync contacts or calendars with Outlook — use Exchange Server instead. See the section "Setting Up Mail Accounts on Your iPod touch or iPhone," later in this chapter.
If your contacts or calendar entries show up in duplicate or triplicate in your computer or on your iPod touch or iPhone, as if they were stuck inside of MobileMe with the memory blues again, you probably need to overwrite the data in the MobileMe cloud.
Selecting items to synchronize may not overwrite all the data in the cloud. To overwrite the data stored in the cloud with the data on your computer, open MobileMe (in System Preferences on a Mac or Control Panel in Windows), click the Sync tab, and then click the Advanced button. (Refer to Figure 10-4 for a Mac or Figure 10-5 for Windows.) Select the computer you are syncing from in the list at the top and then click Reset Sync Data.
In the dialog that appears, choose an option from the Replace pop-up menu:
On a Mac, you can choose All Sync Info, or Bookmarks, Calendars, or Contacts. (The other choices on the pop-up menu — Key Chains, Mail Accounts, and so on — don't copy over to the iPod touch or iPhone but are useful for keeping other computers synchronized.)
In Windows, you can choose All Sync Info, or Bookmarks, Calendars, or Contacts.
After choosing an option from the Replace pop-up menu, click the arrow underneath the Cloud icon to change the animation so that the data arrow points from the computer to the cloud. Finally, click the Replace button.
This action replaces the data in the MobileMe cloud with the data on your computer. You can also use these steps to go in reverse — replace the data on your computer with the data in MobileMe. To do this, click the arrow so that the animation points the arrow from the cloud to the computer.
Tip
Your iPod touch or iPhone can receive pushed e-mail, contacts, calendars, and bookmarks from the MobileMe cloud over a Wi-Fi connection as long as it is awake (meaning that the screen is on or the device is connected to your computer or to a power adapter).
Tip
Changes you make to contacts, calendars, and bookmarks in your iPod touch or iPhone are synchronized to the Web server at www.me.com. You can also go to www.me.com and access your information directly with your Web browser.
To set up a Mail account on your iPod touch or iPhone, including a MobileMe e-mail account (with contacts, calendars, and bookmarks) or a Microsoft Exchange account, follow these steps:
Choose Settings

The Mail, Contacts, Calendars settings screen appears, with the Accounts section at the top, as shown in Figure 10-6 (left side).
Tap the Add Account button and then tap the account type from the list of account types that appears.
Your choices are Microsoft Exchange, MobileMe, Gmail, Yahoo! Mail, AOL, or Other, as shown in Figure 10-6 (right side). After tapping the account type, the New Account screen appears for Exchange, MobileMe, Gmail, Yahoo! Mail, and AOL accounts, and the Other screen appears for Other accounts.
Enter your account information as follows:
Generally speaking, you'll need to enter your name, username, password, and optional description by tapping next to a field's name (such as Name or Address) to display the keyboard. Then use the keyboard to enter the information and tap Return on the keyboard to finish entering. As you tap Return, the next field appears ready for you to enter information, until you reach the last field. Tap Return to finish entering information.
MobileMe, Gmail, Yahoo! Mail, or AOL: Enter your name, username, password, and an optional description on the New Account screen, and then tap Save in the upper-right corner to save account information. Your iPod touch or iPhone verifies the account; if the account can't be verified, the message
Cannot Get Mailappears, indicating that the username or password is incorrect. Tap OK and try Steps 2 and 3 again (or tap Cancel to cancel). If the account is verified, you're done for a Gmail, Yahoo! Mail, or AOL account and you can skip the rest of these steps — the Mail, Contacts, Calendars settings screen appears with the new account listed in the Accounts section. For MobileMe, your iPod touch or iPhone displays your account's settings screen.Microsoft Exchange: Enter your name, username, domain (optional), password, and an optional description on the New Account screen, and then tap Next in the upper-right corner to save the account information and move on to the Exchange account's settings screen. Microsoft's Autodiscovery service kicks in to check your username and password to determine the address of the Exchange server. If it can't find the server's address, a dialog appears for you to enter it — enter the complete address in the Server field and tap Save.
Other: Tap Add Mail Account on the Other screen for an IMAP (Internet Message Access Protocol) or POP (Post Office Protocol) account. The New Account screen appears; enter your name, username, password, and an optional description, and then tap Save in the upper-right corner to save the account information. The iPod touch or iPhone searches for the account on the Internet and displays the New Account settings screen.
Set your mail account settings on the New Account settings screen as follows:
MobileMe or Exchange: Turn on any of or all the items you want to sync: Mail, Contacts, Calendars, and Bookmarks (MobileMe only). If you sync contacts, calendars, or bookmarks using your MobileMe or Exchange account, syncing them in iTunes is turned off. Any contacts, calendars, and bookmarks on your iPod touch or iPhone are replaced by the MobileMe or Exchange account versions. You can always return to the account setting's screen to turn them off to enable syncing with iTunes. For Exchange, you can set how many days of e-mail you want to sync to your iPod touch or iPhone. Tap Save in the upper-right corner to finish and save your settings.
Other: Tap IMAP or POP on the New Account settings screen, depending on the type of e-mail account you have — ask your e-mail service provider if you don't know. Then enter or edit the account information, including your user name and password for incoming and outgoing mail. (You get this information from your service provider if you don't know it.) Tap Save in the upper-right corner to finish and save your settings. The Mail, Contacts, Calendars settings screen appears with the new account listed in the Accounts section.
When the Sync or Cancel warning appears for MobileMe or Exchange accounts, tap Sync (or Cancel).
When you tap the Sync button, MobileMe or Exchange overwrites any existing contacts, calendars, and bookmarks on your iPod touch or iPhone (or the subset of these that you chose in Step 4). The Mail, Contacts, Calendars settings screen appears with the new account listed in the Accounts section.
Tap Fetch New Data, and tap Off for Push to turn it on (if it isn't already on).
That's it! Your iPod touch or iPhone syncs automatically from this point on, with data pushed or fetched from the e-mail account depending on your push and fetch settings. (For details, see Chapter 20.)

You can temporarily turn off a Mail account on your iPod touch or iPhone, change its settings, or delete it from your iPod touch or iPhone.
Note
Changes you make to Mail accounts on your iPod touch or iPhone are not transferred back to your computer when you synchronize, so it's safe to make changes without affecting e-mail account settings on your computer.
To turn off a Mail account in your iPod touch or iPhone temporarily, or change account settings, choose Settings
To delete the account, scroll down and tap Delete Account. Deleting a Mail account from an iPod touch or iPhone doesn't delete the e-mail account itself or its settings on your computer.
Note
It's way beyond the scope of this book to explain all the e-mail account and advanced options. Grab your network administrator or Internet service provider and offer free coffee in exchange for help. If you don't have anyone to turn to, visit the Tips section of my Web site (www.tonybove.com) for tips on using MobileMe and other e-mail accounts, and for changing e-mail account settings on your iPod touch or iPhone.