A few things have to come together to make a great photograph. One is being in the right place at the right time. Another is the ability to tell a story. Yet another is excellent composition. Unfortunately, we can't help with your schedule or storytelling, but we can give you several easy tips on how to take photographs that are interesting and well-composed. Some of these tips overlap and contain common concepts. But they're all free; they don't require any extra money or equipment. They require only an open mind and an eye that's willing to be trained over time.
One of the most important tools for properly composing a photo is establishing a focal point — a main point of interest. If too many elements are competing for attention, a photo probably doesn't have a clearly defined focal point. Your eye, therefore, doesn't know where to look. Too many images without a focal point cause the viewer to tire quickly or lose interest. The eye wants to be drawn to a subject.
Excessive background elements, such as furniture, walls, tables, fences, buildings, and even random bystanders don't add much to the compositional or emotional value of your shot. What you really want to capture are the smiles and expressions of your family and friends.
Tip
Keep these tips in mind to help find your focal point:
Pick your subject and then get close to it.
Include a point of interest in scenic shots. Sunrises and sunsets are pretty, but after you've seen a few, you've seen them all. Try to capture an early morning fisherman casting his line off the pier or a child checking out a rogue hermit crab at dusk. That potentially ho-hum scenic shot now has some visual punch.
When it's appropriate, try to include an element in the foreground, middle ground, or background to add depth and a sense of scale, as shown in Figure 17-1. Just make sure that it's a meaningful element and not random clutter.

After you find a focal point for your shot, the next step is to try to put that focal point, or subject, in a prime location within your viewfinder or LCD display. Those prime locations are based on the photographic principle called the rule of thirds. If you divide an image into a grid of nine equal segments, as shown in Figure 17-2, the elements most appealing to the eye and most likely to be noticed first are those that fall close to one of the four intersections of the dividing lines.
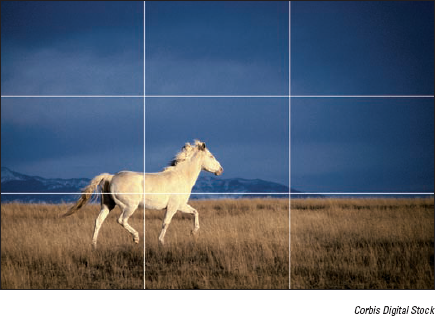
When you're composing your shot, try to mentally divide your frame into vertical and horizontal thirds and position your most important visual element at any intersecting point. When you're shooting landscapes, remember that a low horizon creates a dreamy and spacious feeling and that a high horizon gives an earthy and intimate feeling. For close-up portraits, try putting the face or eyes of a person at one of those points.
If the rule of thirds is too hard for you to remember or employ, when you look through the viewfinder, just repeat the mantra, "Move from center." We all have a natural tendency to want to center everything. Get it nice and orderly. But centered subjects are often static and boring. Asymmetry often gives you more dynamic and interesting images.
Note
If you have an autofocus camera, you need to lock the focus when you're moving from center because the autofocus sensor locks on to whatever's in the center of the viewfinder — not on your point of interest. Autofocus can also be problematic when you're trying to do something as simple as photographing two people (in this case, you may want the two people in the center) and your camera keeps focusing on the space in the distance between them. Center your subject in the viewfinder and apply slight pressure to your shutter-release button to lock the focus. Then, reposition your subject at an intersecting point on the rule-of-thirds grid and press down all the way to snap the photo.
Contrary to what you see on supermarket tabloid covers, those telephone poles, branches, car antennas, and other everyday objects don't naturally grow out of people's heads. Although these mergers, as photographers call them, are good for a laugh, they're not good enough to make it into picture frames and scrapbooks. Here are some ways you can cut the clutter from your background:
Get up close and personal. Many amateur photographers worry that they'll take a photo that accidentally leaves all or a portion of a subject's head outside the frame. But more often than not, photographers tend to capture too much boring or distracting background. Fill your viewfinder frame with your subject. Although you can always crop your image later, you should try to fill the frame with your subject when you take the photo.
Shoot at a different angle. Yes, you can turn your camera! Most photos are horizontal merely because it's easier to hold the camera that way. That's fine for a lot of shots (such as the requisite group photo and some landscape shots), but other subjects (buildings, trees, waterfalls, mountain peaks, giraffes, Shaquille O'Neal) lend themselves to a vertical format.
Move around your subject. Moving around may help eliminate unwanted clutter. Shoot from below or above your subject, if necessary.
Move your subject, if possible, to get the optimum background. Although there are exceptions, an ideal background is usually free from distracting elements, such as tree branches, poles, wires, chain-link fences, signs, bright lights, a lot of loud colors, busy wallpaper, and so on. Include only what complements your subject.
Use background elements to enhance, not distract. On the other hand, if your background is interesting and can make your photo stronger, include it. You can use famous landmarks, props, and even decorations in the background to give context to images, as shown in Figure 17-3.
Use space around a subject to evoke a certain mood. A lot of space around a person can give a sense of loneliness, just as a closely cropped portrait can create a feeling of intimacy. Just make sure that the space is intentionally used in the shot.
Note
If you're stuck with a distracting background, you can try blurring it by using a wider aperture (such as f/4, rather than f/11 or f/16) on your camera. This makes the depth of field (areas of sharpness in relation to your focal point) shallower so that your subject is in focus but the background isn't.
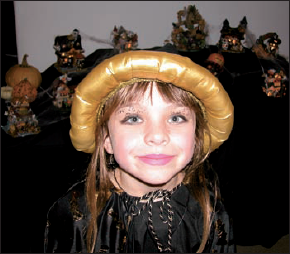
Figure 17-3. Use background elements, such as decorations, to help define an event and add ambience to the subject.
Because consumer digital cameras use image sensors that are typically one-third the size of a 35mm frame, the lens is very close to the sensor, which really increases the depth of field. This deep depth of field can make blurring the background difficult. Not a problem — you can also blur the background by making a selection and using the Blur filter in Elements. See Chapters 7 and 10 for more on selections and the Blur filter, respectively.
When it's appropriate, use foreground elements to frame your subject. Frames lead you into a photograph. You can use elements, such as tree branches, windows, archways, and doorways, to frame a wide or long shot, add a feeling of depth, and create a point of reference, as shown in Figure 17-4. You don't have to reserve the use of framing for wide and long shots, however. Close-ups can also be framed. Your framing elements don't always have to be sharply focused. Sometimes, if they're too sharp, they distract from the focal point. And remember to avoid mergers!

Just remember "Light on dark, dark on light." A light subject has more impact and emphasis if it's shot against a dark background, and vice versa, as shown in Figure 17-5. When people view an image, their eyes go first to the area of the most contrast. Obviously, finding contrast in the environment is sometimes beyond your control. But when you're setting up a shot, you can certainly try to incorporate this technique. Keep in mind, however, that contrast needs to be used carefully. Sometimes, it can be distracting, especially if the high-contrast elements aren't your main point of interest.

Leading lines are lines that, by either the actual elements in the image or the composition of those elements, lead the eye into the picture and, hopefully, to a point of interest. These lines add dimension, depth, and perspective by carrying the eye through the photo:
Diagonal lines are dynamic and evoke movement.
Curves are graceful and harmonious.
Horizontal lines are peaceful and give a feeling of balance.
Vertical lines are direct and active.

Figure 17-6. You don't have to trek to China to find leading lines, although you may not find a longer unbroken curve than the Great Wall.
The best leading lines are those that enter the image from the lower-left corner. Many elements — such as roads, walls, fences, rivers, shadows, skyscrapers, and bridges — provide natural leading lines, especially in scenic or landscape photos. The photo shown in Figure 17-6 of the Great Wall of China is an example of curved leading lines.
Not much in the world looks fascinating photographed from a height of 5 to 6 feet off the ground. Unfortunately, this is the viewpoint of "Snapshotville." Try to break out of this mode by taking photos from another vantage point. Experiment with taking a photo from above the subject (bird's-eye view) or below it (worm's-eye view). A different angle may provide a more interesting image:
Unexpected angles can exaggerate the size of the subject. The subject may appear either larger or smaller than normal, as shown in Figure 17-7. Try extreme angles with scenic shots, which otherwise can tend to be rather static or boring.
Changing your viewpoint can change the mood of the image. If the photo in Figure 17-7 had been taken from a front angle, it would've been pretty dull. Taken from below, looking up, exaggerates the height and makes for a stronger and more exciting composition, making the cactus seem like nature's skyscraper.
Use direct eye contact when you're photographing people. It provides a sense of realism and makes the image more intimate and warm, pulling you into the photo. But remember that children are not at the same eye level as adults. We often shoot down at them, making them appear smaller than they really are. Try kneeling or sitting on the floor and getting down to their level. You'll also find that you get a less distracting background in the frame, and the lighting from your flash more evenly covers the face. Do the same for pets and other short-stature subjects, such as flowers.

When we think of light in regard to photography, the first thing that comes to mind is all those photos we took in the past that are either overexposed (too light) or underexposed (too dark). With lighting, you have to consider not only whether you have the right amount of lighting, but also these factors:
The direction of the light
The intensity of the light
The color of the light
Natural light (outdoors) or artificial light (indoors)
Creative use of lighting to lead the eye and create a certain mood
If the light isn't right for your shot, you have quite a few choices: Hurry up and wait, move yourself, move the subject, add more light with a flash, or diffuse the light. Of course, which one you choose depends on the circumstances of the shot and what's convenient or most productive. Here are a few tips to remember about light:
The best light for photographs is in the early morning and later afternoon. The light is warmer and softer, and the shadows are longer and less harsh.
Avoid taking portraits at midday. The overhead sun causes ugly shadows and makes people squint. If you must shoot then, use a reflector to block some of the sunlight or fill in the shadow areas. Or you can use a scrim (white translucent fabric stretched across a frame) to diffuse the light.
Cloudy or overcast days can be great for photographing, especially portraits. The light is soft and diffused and flatters the face.
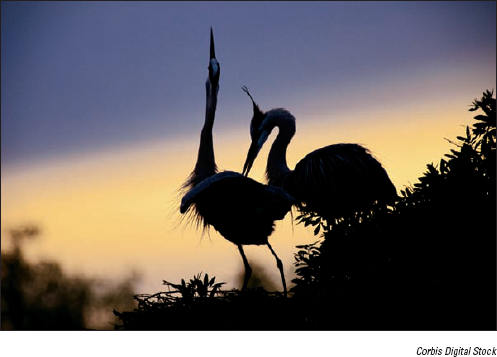
Shooting subjects with backlighting (where the lighting comes from behind the subject) can produce dramatic results. Figure 17-8 shows an example. If you want to see the details of the subject, and not just a silhouette, use a fill flash to lighten the shadow areas.
Ensure that the brightest light source isn't directed right into the lens. This causes lens flare, those strange light circles that appear in the photo.
Take into account the color of the light. The light at noon is white, the light at sunset is orange, and the light at twilight is blue. The color of the light can make an image feel warm or cool.
Use a flash when necessary. Use a flash in low-light conditions. If your built-in flash isn't cutting the mustard, you may want to invest in an accessory flash.
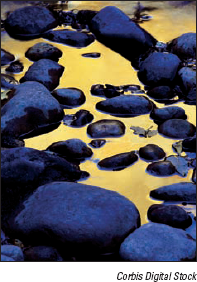
Get creative with light. Look for those unique compositions created by the interplay between light and shadow areas, or how the light illuminates a particular subject. Lighting by itself can make or break a certain mood or emotion. Think of a simple beam of light coming through the roof of an old barn. Even in the lousiest weather, the most beautifully lit images can emerge. When wet objects are lit, they seem to shimmer, as shown in Figure 17-9.
When you look at magazines that feature the year's best photos, they all appear as instances of pure serendipity. Sometimes that's the case, but more often than not, the photographer arranged the shot or waited for the right light or a special moment.
As a photographer, you also shouldn't be afraid to play photo stylist:
Give directions on where you want people to stand, how to stand, and so on. For example, tell people to touch each other, bring their heads toward each other, or put their arms around each other, as shown in Figure 17-10.
Designate the location.
Arrange people around props, such as trees or cars.
Use a variety of poses. Have some people sit and others stand.
If you're dealing with a large group of people, rambunctious kids, or excited pets, get someone to help direct. Just make sure that the parties being photographed pay attention and look at the camera.
Try to get people to relax. Although spontaneity can yield great images, you can still get good photos from posed subjects if they aren't hating the experience.

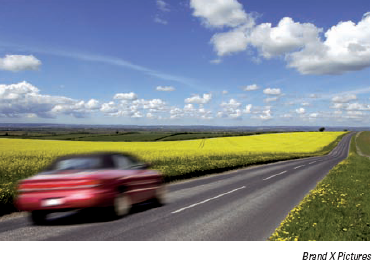
When the subject is capable of movement, such as a car, person, or animal, make sure that you leave more space in front of the subject than behind it, as shown in Figure 17-11. Otherwise, the viewer may subconsciously experience a feeling of departure or discomfort. You want to try to give the person or object room to move into the frame. Likewise, if a person is looking out onto a vista, make sure that you include that vista so that the person is given a point of view and the scene is given context.