
In Chapter 15, "Programming with ADO.NET," you learned how to access data stored in databases with the basic classes of ADO.NET: the Connection and Command classes. A third class, the DataReader class, allows you to read the data retrieved by your command in the client application. Most applications today use a database to store data. These applications are known as front-end applications, because they interact with the user and update the data on a database server, or a back-end data store. They're also known as data-driven applications, because they interact not only with the user but primarily with the database.
Although executing commands and reading the selected data is a straightforward process, you still have to decide where to store the data at the client and how to present it to the user. One approach is to write custom classes that represent the business objects you want to work with and then populate instances of these classes with data. Once the objects have been populated, you can work with familiar business objects. You can even use LINQ to Objects to query collections of custom objects or LINQ to SQL to query database tables directly with LINQ queries, as discussed in Chapter 14, "An Introduction to LINQ."
Finally, there's a standard mechanism for storing data at the client, the DataSet class. A DataSet is an in-memory database, which you can populate with the data you're interested in and work with it at the client.
In this chapter, you'll learn how to do the following:
Create and populate business objects
Establish relations between tables in the DataSet
Submit changes in the DataSet to the database
By now you should be more than familiar with object-oriented programming. One of the ideas behind object-oriented programming is the transformation of flat data (whether they live in files or relational databases) into meaningful objects that reflect the hierarchy of the business objects you're dealing with. As you recall from the preceding chapter, the orders in the Northwind database are stored in two different tables: the order headers in the Orders table and their details in the Order Details table. Books and their authors are spread over three different tables in the Pub database: the Titles table, which stores titles; the Authors table, which stores author names; and the TitleAuthor table, which relates titles to their authors.
If you ignore the data-storage aspect of the application for a moment, you'd probably design an Order object to store orders with the following structure:
Public Class Order
    Dim OrderID As Integer
    Dim OrderDate As Date
    Dim Employee As Employee
    Dim Customer As Customer
    Dim Details As List(Of Detail)
End Class
Public Class Detail
    Dim ProductID As Integer
    Dim ProductPrice As Decimal
    Dim ProductQuantity As Integer
End Class
Public Class Employee
    Dim EmployeeID As Integer
    Dim EmployeeName As Strng
End Class
Public Class Customer
    Dim CustomerID As String
    Dim CompanyName As Strng
End Class
The Order class can be populated with single statements like the following:
Dim newOrder As New Order
newOrder.OrderDate = Now.Today
newOrder.Details = New List(Of Detail)
Dim det As New Detail
det.ProductID=12
det.ProductPrice = 21.90
det.ProductQuantity = 10
newOrder.Details.Add(det)
This is a straightforward approach to modeling an order with a custom object that doesn't take into consideration the structure of the information in the database. The Order class represents an order as a business object, regardless of how the information is stored in the database. Note that the order's ID isn't stored anywhere, because there's no need to associate the order's header with its details. The details simply belong to the order. At a later point we'll have to write some code to extract the various properties of the Order object and submit them to the database with the proper SQL statements, and this is what this section is all about: how to map our data into custom business objects, build our application with object-oriented techniques, and then submit the data to the database. The code that actually contacts the database and either retrieves data or submits edited and new data to the database is the application's data layer, as opposed to the application's user interface (UI), which is the code that manipulates the data at the client.
This object-oriented approach is also more elegant than the structure of the two tables in the database. Some people talk about the impedance mismatch between object-oriented programming and databases. One of the advantages of using business objects to store your data at the client is that the custom objects can be manipulated with traditional programming techniques (and not-so traditional techniques, like LINQ).
The main theme in designing data-driven applications is how to get the relational data out of a database and map it to a business object like Order and how to get the data from a business object and submit it to the database. And as you will see in this and the following chapter, there are many techniques for mapping database data to custom objects. To better understand how to bridge the gap between traditional database data and custom objects, we'll explore this process through a sample application.
In this section, you'll develop a real-world application, which isn't very complicated, to serve as an example in a textbook, but it's by no means trivial. The NWOrders application (available for download from www.sybex.com/go/masteringvb2010) allows you to create new orders for the Northwind database. Although the applications for manipulating the other tables of the database, such as the Products or Customers/Employees tables, are fairly simple and you have already seen a few examples, the application for entering new invoices is entirely different. To begin with, the user interface is the most critical aspect of the application. Users should be able to add new items to the order easily and quickly. The interface should be simple and intuitive, and all operations should be performed with the keyboard. Ideally, users should be able to scan the product's bar code and append the scanned item to the order.
Inserting the new order to the database is also a bit involved. An order is stored in two separate tables: the order's header (the data that usually appear at the top of an invoice, such as the invoice's date and customer) is stored in the Orders table, and the order's details (the items sold that appear in a grid that takes up most of the invoice) are stored in the Order Details table. Moreover, the order's header and its details must be inserted into the corresponding tables in the context of a transaction: All rows must be inserted successfully, or the insertion of an order must fail as a whole. Even if the insertion of a single detail line fails, then the entire order must fail. Otherwise, you may end up with a partial order.
I've implemented the same application with two different techniques to demonstrate the steps of building data-driven applications, as well as the parts of the application that can be streamlined by the Framework. The interface of the application is identical in both versions, because it's a functional interface that shouldn't be tied to a particular implementation of the data-access layer. Likewise, the data-access layer shouldn't be tied to a specific interface. One of the major themes in designing data-driven applications is the separation of the user interface from the data-access layer. The data layer is the code that interacts with the database by retrieving the data requested by the user and submitting the edits to the database.
The UI, on the other hand, is responsible for interacting with the user. Every time it needs to fetch some data from the database or submit data to the database, it calls a method of the data-access layer, which is usually implemented as a class. As you will see shortly, the two applications have an identical UI; even the code is the same. The data-access layer, however, is very different. Yet, the code that implements the UI calls a few methods that have the same signature but are implemented very differently. You can even make the same application work with a different database by rewriting the data-access layer without editing a single line of code in the UI code.
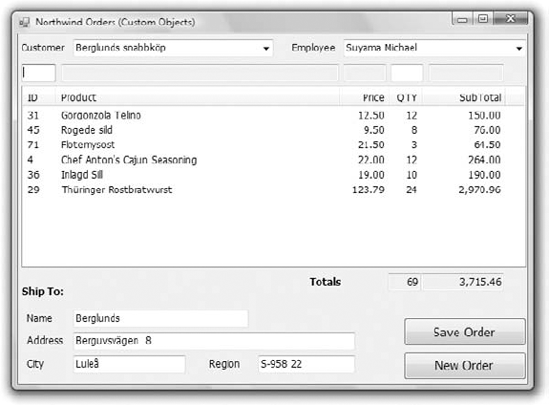
Figure 16.1 shows the interface of the application, and I suggest you open the application to see how it works. To specify the order's header, you simply select the customer who placed the order and the employee who made the sale from the appropriate ComboBox controls and enter the order's shipping address in the TextBox control at the bottom of the form. Then you must enter the products purchased; this is the most challenging part of the application because users should be able to enter new products quickly and safely.
The NWOrders application assumes that you're using an instance of SQL Server running on the same machine and that you have installed the Northwind sample database. If SQL Server is running on a remote machine, you must edit the NorthwindConnectionString setting in the application's configuration file accordingly. To do so, open the app.config file, and edit the connectionString setting in the connectionStrings section:
<connectionStrings>
    <add name="NWOrders.My.MySettings.NorthwindConnectionString"
        connectionString="Data Source=(local);
        Initial Catalog=Northwind;Integrated Security=True"
        providerName="System.Data.SqlClient" />
</connectionStrings>
This application will most likely be used as a point-of-sale (POS) system and must be intuitive, easy to use, and extremely fast. The user of the application is probably a cashier and shouldn't be expected to open the Products table, select the desired one, and then add it to the invoice. With the interface I'm suggesting, users enter the product ID in the TextBox above the ID column of the grid. As soon as the user presses the Enter key, the application retrieves the desired product and displays its description and price. The two TextBoxes are read-only, and the user can't change either. You may want to allow users to edit the price, but this isn't a recommended practice. A general discount that's applied to all items is probably the simplest way to go, but it's trivial to add another TextBox control for entering a different discount for each detail line (along with a new column in the ListView control with the order's details). As soon as the item is retrieved and displayed on the TextBox controls at the top, the focus is moved to the TextBox for the quantity, where the user can type the number of items. After pressing the Enter key for a second time, the new row is added to the grid with the order's details, and the focus is moved automatically to the ID field in anticipation of the next product's ID.
Users aren't expected to know the IDs of the products, obviously. In a real-world scenario, the application should accept the product's bar code instead of the ID. You can use a barcode reader with this application without any modifications. The barcode reader reads the bar's characters and sends them to the computer via the serial or USB port, but to the application they appear as if they were typed at the keyboard. The whole process is transparent, and you need not write a single additional line of code. Since the unique identifier in the Products table is the product ID, we'll use the ID as a bar code for this application.
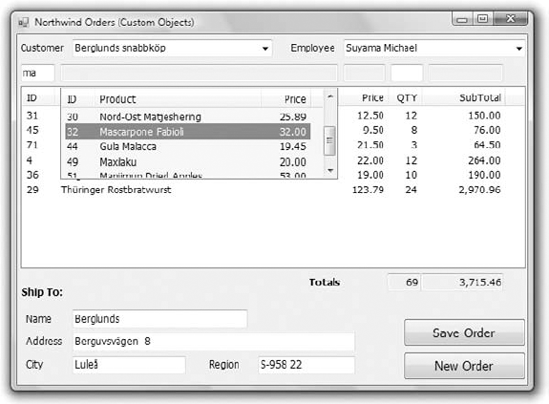
Occasionally, the reader might fail to read a product ID. In that case, users can type a few characters from the product name, and the application will retrieve matching rows and display them so the user can select the desired one. Although searching with an ID will return a single product, searching with a product name may result in multiple matches, so some user intervention is needed to guarantee that the proper product is selected. In the discussion of the application, I will ignore this feature, which isn't trivial, and will focus on the other aspects of the application. If you're interested in the implementation of this feature, please open the NWOrders project with Visual Studio and examine the code; it is well documented. The code retrieves all the products whose name contains the characters specified in the ID box and displays them on a second ListView control, which is normally hidden but remains visible until the user selects the desired product. Figure 16.2 shows the application when a product is selected by name.
While entering new products, the user may decide to delete a product that was added to the grid by mistake or modify the quantity. Although most of the time users work with the TextBox controls located at the top of the grid, in this case they must move the focus to the grid to select a row. This operation doesn't require the use of the mouse. By pressing the down arrow key while they're in the ID TextBox, users can move the focus to the first row of the grid and select it. Once they've landed on the grid with the order's details, users can move up and down with the arrow keys, and the currently selected row's fields are displayed in the TextBox controls on the top of the grid. To delete the selected row, they can simply press the Delete key. They can also use the mouse to locate the row to be removed on the grid, but it will take longer. Data-entry operators just don't like using their mouse. To return to the ID box and enter a new detail, they can press Escape.
Depending on the nature of the business, you may skip the quantity too and add a new row to the grid with a quantity of 1. If the same product is added multiple times, the application will generate multiple detail lines. You can edit the application's code to increase the quantity of the existing row, instead of adding a new row with the same product and a quantity of 1. If the application is going to be used at a bookstore, where people usually purchase a single copy of each title, the alternate approach will work better. You can use this application as your starting point for a POS system and add all the features required by your business needs.
The NWOrders application consists of two forms, the frmLINQ and frmSQL forms. The frmSQL form uses the basic ADO.NET objects to interact with the database, while frmLINQ uses the classes generated by the LINQ to SQL component of Visual Studio. You'll have to change the application's startup form to the desired one to test it.
We have discussed the application's interface, but before you start writing code, you must identify the requests you want to make to the database and implement them as methods in a separate class. The code behind the form will call these methods to retrieve data or submit data to the database and should not know anything about the database. This is not a requirement for small projects, but in a large project there will be different developers working on the data-access layer and different developers working on the user interface. By separating the data-access logic from the user interface, you can also implement multiple interfaces (a Windows application and a Web application, for example) that use the same data-access methods.
When you work on the application UI, you shouldn't need to care about the structure of the tables in the database. Your class should expose the business objects you need for the application and map them to the database tables. For example, the class you'll create shortly for the NWOrders application should expose an Order object that combines an order's header and details. Your UI code will populate an Order object and pass it as an argument to a method of the class that will submit it to the database. When the interface requests an order by its ID, the class should return an object of the Order type. This object will contain all the information about the order but with a structure that's totally different from the structure of the relevant tables in the database. In effect, the custom class will isolate the user interface from the data-access layer; should you have to implement the same application with a different database, you'll only have to revise the class that implements the data-access layer.
The class with the data-access components is referred to as the data-access layer, while the application's interface is the UI layer. In most applications, there's a third layer that implements the business logic. This layer is not related to the database, but it can't be part of the user interface either. You can implement it in either the UI or data-access layer, but logically it doesn't belong there and should be implemented as a separate class. If you ever decide to change some of the business rules, you will revise a specific class and not the entire application. Likewise, if you decide to move to a different database, you only need to revise the data-access layer and not the UI layer.
The business layer contains functionality that's specific to a corporation. For example, you may implement the discount calculations or a customer's credit line as a business layer. All methods that require this functionality, whether they reside in the UI or the data-access layer, should call the appropriate method of the class that implements the business logic.
The most basic rule in the design of data-driven applications is that the UI should not contain code that interacts with the database. Ideally, you must create classes that represent the business objects that represent the entities in your application. These business objects are classes that implement customers, employees, orders, and so on. Let's jump to a practical example to see how the application is structured.
The data-access layer of the frmSql form of the NWOrder application is implemented in the NWOrder class. The two simpler business objects of the NWOrder class are the NWEmployee and NWCustomer objects, which are implemented with two trivial classes by the same name. Both classes expose two properties, the ID and name of the corresponding entity and a custom implementation of the ToString method. I needed a custom implementation of the ToString method because the code in the UI application needs to add customers and employees to a ComboBox control and display their names.
In addition to their properties, the two classes provide the GetAllEmployees and GetAllCustomers methods, which return a strongly typed List of NWCustomer and NWEmployee objects, respectively. Listing 16.1 shows the code of the NWEmployee and NWCustomer classes (I've skipped the implementation of the two methods, which are fairly lengthy).
Example 16.1. The outline of the NWEmployee and NWCustomer business objects
Public Class NWEmployee
    Public EmployeeID As Integer
    Public EmployeeName As String
    Public Overrides Function ToString() As String
        Return EmployeeName
    End Function

    Public Shared Function GetAllEmployees() As List(Of NWEmployee)
    End Function

End Class

Public Class NWCustomer
    Public CustomerID As String
    Public CustomerName As String
    Public Overrides Function ToString() As String
        Return CustomerName
    End Function

    Public Shared Function GetAllCustomers() As List(Of NWCustomer)
    End Function
End Class
Another class, the NWProduct class, represents the products that can appear in the order's details. Although the Products table contains a large number of columns, for the purposes of selling products we only need the product's ID, name, and price. The NWProduct class should also expose a method that allows us to retrieve a product by its ID, the GetProductByID method. All methods used in this application are shared: You can call them without having to create a new instance of the corresponding class.
Public Class NWProduct
    Public ProductID As Integer
    Public ProductName As String
    Public ProductPrice As Decimal

    Public Shared Function GetProductByID(
                    ByVal productID As Integer) As NWProduct
    End Function
End Class
Finally, the core class of the application is the NWOrder class, which represents an order and its details (see Listing 16.2). This class exposes the columns of the Orders table as properties and the columns of the Order Details table as a collection of NWOrderDetail objects.
Example 16.2. The implementation of the NWOrder business object
Public Class NWOrder
    Public Class NWOrderDetail
        Public ProductID As Integer
        Public ProductPrice As Decimal
        Public ProductQuantity As Integer
        Public ProductDiscount As Decimal
    End Class

    Public OrderDate As Date
    Public EmployeeID As Integer
    Public CustomerID As String
    Public Details As New List(Of NWOrderDetail)

    Public Shared Function SaveOrder(ByVal newOrder As NWOrder) As Integer
    End Function
End Class
The implementation of the SaveOrder method is not trivial and is described in detail next.
To create a new order with the data entered by the user on the main form, the application declares a variable of the NWOrder type and populates it. Most of the properties are scalar and are populated with a single statement. The order's details, however, are stored in a property that is a List of NWOrderDetail objects. The code creates a new NWOrderDetail object for each item in the order, populates its properties, and then appends it to the Details property of the order. Listing 16.3 shows the code that iterates through the ListView control with the order's details and appends them to the newOrder variable, as shown in Listing 16.3.
Example 16.3. Appending the details of a new order
For Each LI As ListViewItem In ListView1.Items
    Dim newDetail As New NWOrder.NWOrderDetail
    newDetail.ProductID = LI.Text
     newDetail.ProductPrice =
               System.Convert.ToDecimal(LI.SubItems(2).Text)
     newDetail.ProductQuantity =
               System.Convert.ToInt32(LI.SubItems(3).Text)
     newOrder.Details.Add(newDetail)
NextOnce the newOrder variable has been initialized to the fields of the order on the form, the application submits it to the database by calling the SaveOrder method of the data-access layer, whose code is shown in Listing 16.4.
Example 16.4. The SaveOrder method of the NWData class
Public Shared Function SaveOrder(ByVal newOrder As NWOrder) As Integer
    Dim CN As New SqlClient.SqlConnection(
             My.Settings.NorthwindConnectionString)
    Dim CMD As New SqlClient.SqlCommand
    CN.Open()
    CMD.Connection = CN
    Dim TR As SqlClient.SqlTransaction = CN.BeginTransaction
    CMD.Transaction = TR
    CMD.CommandText = "INSERT Orders (OrderDate, EmployeeID, " &
                "CustomerID) VALUES (@orderDate, @employeeID, " &
                "@customerID);SELECT Scope_Identity()"
    CMD.Parameters.AddWithValue("@orderDate", Today)
    CMD.Parameters.AddWithValue("@employeeID", newOrder.EmployeeID)
    CMD.Parameters.AddWithValue("@customerID", newOrder.CustomerID)
    Dim OrderID As Int32
    Try
        OrderID = System.Convert.ToInt32(CMD.ExecuteScalar)
    Catch ex As Exception
        TR.Rollback()
        CN.Close()
        Throw ex
    End Try
For Each det As NWOrderDetail In newOrder.Details
CMD.CommandText = "INSERT [Order Details] " &
"(OrderID, ProductID, UnitPrice, Quantity) " &
"VALUES(@OrderID, @productID, @price, @quantity)"
CMD.Parameters.Clear()
CMD.Parameters.AddWithValue("@orderID", OrderID)
CMD.Parameters.AddWithValue("@productID", det.ProductID)
CMD.Parameters.AddWithValue("@price", det.ProductPrice)
CMD.Parameters.AddWithValue("@quantity", det.ProductQuantity)
Try
CMD.ExecuteNonQuery()
Catch ex As Exception
TR.Rollback()
CN.Close()
Throw ex
End Try
Next
TR.Commit()
CN.Close()
Return OrderID
End FunctionListing 16.4 contains a large number of trivial statements, such as the statements that prepare the SQL command to be executed and initialize its parameters, which you can ignore; instead, focus on the statements that execute all SQL commands in transactional mode. The statements of interest are shown in bold in Listing 16.4.
To execute a number of statements in the context of a transaction, you must do the following:
Set up a Transaction object by calling the
BeginTransactionmethod on the Connection object that will be used to submit the commands to the database.Assign the Transaction object to the
Transactionproperty of the Command object.Submit multiple commands through the Command object's
ExecuteNonQuerymethod.Should an error condition prevent one of the commands from completing successfully, you can call the
Rollbackmethod of the Transaction object to abort the transaction.If all goes well and none of the exception handlers is entered, the transaction will be committed when the Transaction object's
Commitmethod is called.
Let's take a closer look at the code that commits the new order to the database. First it inserts the order's header to the Orders table and retrieves the ID of the newly created order. This ID will be used as a foreign key with the Order Details table to associate the details of the new order with its header. The INSERT statement is executed from within an exception handler, and in the case of an error, the transaction is aborted.
If the INSERT statement returns the ID of the new order, the code goes through the details of the newOrder variable and submits each one to the database through the same Command object, which is associated with the TR Transaction object. Again, the transaction can be aborted as soon as a detail line fails to update the Order Details table. If all details are inserted successfully, then the code calls the Commit method to finalize the insertions and update the database.
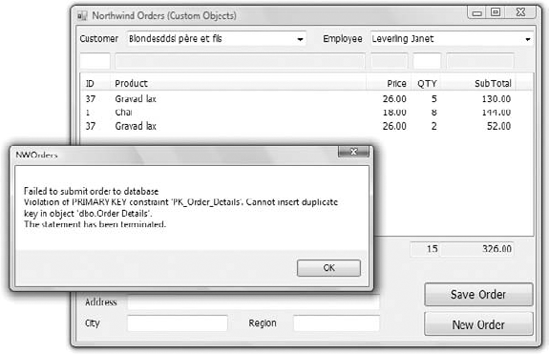
You can easily test the transactional features of the application by adding two detail lines with the same product ID. One of the constraints in the Order Details table is that no order should contain the same product more than once. To comply with this constraint, you can update the quantities of each detail line, rather than attempt to insert multiple lines that refer to the same product. Anyway, I have ignored this constraint in the implementation of the sample application. If you attempt to submit an order that contains the same product twice, the transaction will be aborted with the error message shown in Figure 16.3.
If the order can't be committed to the database, you should display a friendlier error message and either allow the user to further edit the order or clear the fields in anticipation of the next order.
Now, we can switch our attention to the second implementation of the NWOrders applications, which uses LINQ to SQL to implement the data-access layer. The frmLINQ form is based on a LINQ to SQL component, which converts the relevant tables into custom business objects. In effect, the LINQ to SQL component will create the classes for the application objects, which we'll simply use in our application. Our new data layer doesn't contain any code to implement the Product, Order, and Order_Detail classes. The component will expose these three objects for us, and all we have to do is add the GetProductByID, GetProducts, and GetEmployees methods to the class. The code is quite short, because we don't have to request the desired rows and then iterate through them with a DataReader.
Start by adding a new item to the project, a LINQ to SQL Class component. When prompted, enter NW as the name of the new component, and Visual Studio will open it in the designer. Drop the Customers, Employees, Products, Orders, and Order Detail tables onto the design surface, and the designer will generate a class for each table. Once you drop the tables on the designer surface, the designer will create a class for each table and will expose the contents of each table as a collection of typed objects. Each row of the Customers table will be mapped to an object of the Customer type, and the rows of the Customers table will be stored in the Customers collection, which is a List of Customer objects.
To access the collections that represent the tables of the Northwind database, use the DataContext object, which also will be exposed by the same class. Create a variable of the NWDataContext type. (This is an autogenerated class named after the LINQ to SQL Class component with the suffix DataContext appended.)
Dim ctx As New NWDataContext
To access the Customers table, use the following expression, which returns a List of Customer objects, and each element in the List is a variable of the Customer type. Because the collection is typed, you can use LINQ to query its elements, as discussed in Chapter 14. The following query will select a customer by its ID:
Dim cust = (From c In ctx.Customers
            Where c.CustomerID = "ALFKI"
            Select c).FirstOrDefault
The LINQ query will not be executed at the client. Instead, the compiler will convert the LINQ query into a SQL query and will execute it against the database as needed. For more information on LINQ and how LINQ to SQL queries are transformed into SQL queries, see Chapter 14.
Listing 16.5 shows the implementation of the methods of the NWData class. Because the methods are implemented as LINQ queries, they require very little, and straightforward, code.
Example 16.5. The data-access layer of the Orders project implemented with LINQ to SQL
Public Class NWData
    Public Function GetProductByID(
                            ByVal productID As Integer) As Product
        Dim ctx As New NWDataContext
        Dim prod = (From p In ctx.Products
                      Where p.ProductID = productID
                      Select p).FirstOrDefault
        Return prod
    End Function

    Public Function GetEmployees() As List(Of Employee)
        Dim ctx As New NWDataContext
        Dim emps = (From emp In ctx.Employees
                      Select emp).ToList
        Return emps
    End Function
Public Function GetCustomers() As List(Of Customer)
Dim ctx As New NWDataContext
Dim customers = (From cust In ctx.Customers
Select cust).ToList
Return customers
End Function
End ClassThe SaveOrder method of the NWData class uses the SubmitChanges method of the DataContext object generated by the designer, the NWDataContext object, to submit the new order to the database. The SubmitChanges method will insert the header in the Orders table and the details in the Order Details table. It will also handle the identity issue automatically.
The implementation of the SaveOrder method is trivial compared to the SaveOrder method of the NWOrder class we use with the frmSQL form, because now we don't have to perform the INSERT statements ourselves. To submit the changes made to a table back to the database, you must call the InsertOnSumbit/DeleteOnSubmit method of the appropriate table. These two methods do not submit any data to the database. They accept an entity that represents a new or deleted row as an argument and add it to the collection that represents the table. The rows are submitted to the database when you call the SubmitChanges method.
Even though all the rows will be inserted to the database with a single method, the SubmitChanges method, you must still execute this method in the context of a transaction. This time I'll use a different, and simpler, approach to the transactional update. The Framework provides the TransactionScope object, which initiates a transaction automatically. To use TransactionScope, you must first add a reference to the System.Transactions namespace to the project. Then, you must create a new instance of this class and embed the statements that must be executed in the transaction's scope in a Using statement. Listing 16.6 shows the implementation of the SaveOrder method of the NWData class.
Example 16.6. Implementing a transaction with a TransactionScope object
Public Shared Function SaveOrder(ByVal newOrder As Order) As Integer
    Dim ctx As New NWDataContext
    Using TR As New System.Transactions.TransactionScope
        ctx.Orders.InsertOnSubmit(newOrder)
        Try
            ctx.SubmitChanges()
            TR.Complete()
        Catch ex As Exception
            Return (−1)
        End Try
    End Using
    Return newOrder.OrderID
End Function
One statement that may not be clear in the listing is the line that returns the value −1 when the transaction fails. Normally, the method returns the ID of the newly inserted row, and our application expects a positive value. The ID can also be accessed through the OrderID property of the newOrder object. This property has no value when the method is called, but the SubmitChanges method updates the fields of the newOrder object for us.
The newOrder.OrderID property is updated when the SubmitChanges method submits the order header to the Orders table. If this operation succeeds, the ID of the new order is assigned to the OrderID property. Should the transaction fail while inserting the row details, the value of the OrderID property won't change automatically. It will still have a valid value, even though no rows will be committed either to the Orders or Order Details table. That's why you need a return value from the SaveOrders method to indicate the success or failure of the operation.
The data-access layer of the form that uses the LINQ to SQL component to interact with the database is quite short and much easier to understand. I repeat it here for your convenience so you can compare it to the custom NWData class you developed earlier. As you can understand, the code is so much simpler because of the DataContext object, which abstracts the database tables and much of the functionality of the operations that are performed against these tables.
Example 16.7. The implementation of the data-access layer with a DataContext object
Public Class NWData
    Public Function GetProductByID(ByVal productID As Integer) As Product
        Dim ctx As New NWDataContext
        Dim prod = (From p In ctx.Products
                      Where p.ProductID = productID
                      Select p).FirstOrDefault
        Return prod
    End Function

    Public Function GetEmployees() As List(Of Employee)
        Dim ctx As New NWDataContext
        Dim emps = (From emp In ctx.Employees
                      Select emp).ToList
        Return emps
    End Function

    Public Function GetCustomers() As List(Of Customer)
        Dim ctx As New NWDataContext
        Dim customers = (From cust In ctx.Customers
                      Select cust).ToList
        Return customers
    End Function

    Public Shared Function SaveOrder(ByVal newOrder As Order) As Integer
        Dim ctx As New NWDataContext

        Using TR As New System.Transactions.TransactionScope
            ctx.Orders.InsertOnSubmit(newOrder)
Try
ctx.SubmitChanges()
TR.Complete()
Catch ex As Exception
Return (−1)
End Try
End Using
Return newOrder.OrderID
End Function
End ClassThis concludes the first part of the chapter where you've learned how to use objects to represent the data stored in the database tables as custom objects. In the second half, you'll learn about DataSets, which are a standard mechanism for storing data at the client. DataSets are not new to Visual Studio; they have been around for many years, and they are used heavily in data-driven applications.
The process of building data-driven applications isn't complicated and to a large extent is abstracted by the Connection, Command, and DataReader classes. You have seen a few interesting examples of these classes and should be ready to use them in your applications. The problem with these classes is that they don't offer a consistent method for storing the data at the client. The approach of converting the data into business objects and working with classes is fine, but you must come up with a data-storage mechanism at the client. The LINQ to SQL component simplifies this task, and you saw how to automatically convert tables into custom objects.
You can store the data in a ListBox control, as we have done in some examples. You can also create a List of custom objects, as we did in the preceding section. The issue of storing data at the client isn't pressing when the client application is connected to the database and all updates take place in real time. As soon as the user edits a row, the row is submitted to the database, and no work is lost.
In some situations, however, the client isn't connected at all times. There's actually a class of applications that are referred to as occasionally connected or disconnected, and the techniques presented so far do not address the needs of these applications. Disconnected applications read some data when a connection is available, and then they disconnect from the server. Users are allowed to interact with the data at the client, but they work with a local cache of the data; they can insert new rows, edit existing ones, and delete selected rows. The changes, however, are not submitted immediately to the server. It's imperative that the data is persisted at the client. (We don't want users to lose their edits because their notebooks ran out of battery power or because of a bug in the application.) When a connection becomes available again, the application should be able to figure out the rows that have been edited and submit all changes to the server. To simplify the storage of data at the client, ADO.NET offers a powerful mechanism, the DataSet.
You can think of the DataSet as a small database that lives in memory. It's not actually a database, but it's made up of related tables that have the same structure as database tables. The similarities end there, however, because the DataSet doesn't impose all types of constraints, and you can't exploit its data with SQL statements. It's made up of DataTable objects, and each DataTable in the DataSet corresponds to a separate query. Like database tables, the DataTable objects consist of DataColumn and DataRow objects. The DataColumn objects specify the structure of the table, and the DataRow objects contain the rows of the table. You can also establish relations between the tables in the DataSet, and these relations are represented with DataRelation objects. As you realize, the DataSet lets you copy a small section of the database at the client, work with it, and then submit the changes made at the client back to the database.
The real power of the DataSet is that it keeps track of the changes made to its data. It knows which rows have been modified, added, or deleted, and it provides a mechanism for submitting the changes automatically. Actually, it's not the DataSet that submits the changes but a class that's used in tandem with the DataSet: the DataAdapter class. Moreover, the DataSet class provides the WriteXml and ReadXml methods, which allow you to save its data to a local file. Note that these methods save the data to a local file so you can reload the DataSet later, but they do not submit the data to the database.
With the new data-related technologies introduced during the past few years, such as LINQ to SQL, the Entity Framework (EF), and LINQ to Entities (discussed in the next chapter), DataSets will soon become obsolete. Yet, there are only a few data-driven applications out there that are not based on DataSets. I've decided to include this section because you'll inevitably run into applications that use DataSets.
DataSets are filled with DataAdapters, and there are two ways to create a DataSet: You can use the visual tools of Visual Studio or create a DataSet entirely from within your code. DataSets created at runtime are not typed, because the compiler doesn't know what type of information you're going to store in them. DataSets created at design time with the visual tools are strongly typed, because the compiler knows what type of information will be stored in them.
The following statements demonstrate the difference between untyped and typed DataSets. To access the ProductName column of the first row in the Products table in an untyped DataSet, you'd use an expression like the following:
Dim row As DataRow = Products1.Products.Rows(0).Item("ProductName")If the Products1 DataSet is typed, you can create an object of the Products.ProductsRow type with the following statement:
Dim productRow As Products.ProductsRow = Products1.Products.Rows(0)
Then use the productRow variable to access the columns of the corresponding row:
productRow.ProductName
productRow.UnitPrice
The difference between typed and untyped DataSets is also demonstrated by the declaration of the row and productRow variables. Where row is a variable that represents a row in a DataSet, the productRow variable represents a row in a DataSet that stores the rows of the Products table.
As you can see, the visual tools generate a number of classes on the fly, such as the ProductsRow class, and expose them to your code. As soon as you enter the string productRow and the following period in the code window, you will see the members of the ProductsRow class, which include the names of the columns in the corresponding table. In this chapter, I discuss untyped DataSets. In the following chapter, I'll discuss in detail typed DataSets and how to use them in building data-bound applications.
To use DataSets in your application, you must first create a DataAdapter object, which is the preferred technique for populating the DataSet. The DataAdapter is nothing more than a collection of Command objects that are needed to execute the various SQL statements against the database. As you recall from our previous discussion, we interact with the database by using four different command types: one to select the data and load them to the client computer with the help of a DataReader object (a Command object with the SELECT statement) and three more to submit to the database the new rows (a Command object with the INSERT statement), update existing rows (a Command object with the UPDATE statement), and delete existing rows (a Command object with the DELETE statement). A DataAdapter is a container for Connection and Command objects. If you declare a SqlDataAdapter object with a statement like the following:
Dim DA As New SqlDataAdapter
you'll see that it exposes the properties described in Table 16.1.
Table 16.1. SqlDataAdapter object properties
Property | Description |
|---|---|
| A Command object that's executed to insert a new row |
| A Command object that's executed to update a row |
| A Command object that's executed to delete a row |
| A Command object that's executed to retrieve selected rows |
Each of these properties is an object and has its own Connection property, because each may not act on the same database (as unlikely as it may be). These properties also expose their own Parameters collection, which you must populate accordingly before executing a command.
The DataAdapter class performs the two basic tasks of a data-driven application: It retrieves data from the database to populate a DataSet and submits the changes to the database. To populate a DataSet, use the Fill method, which fills a specific DataTable object. There's one DataAdapter per DataTable object in the DataSet, and you must call the corresponding Fill method to populate each DataTable. To submit the changes to the database, use the Update method of the appropriate DataAdapter object. The Update method is overloaded, and you can use it to submit a single row to the database or all edited rows in a DataTable. The Update method uses the appropriate Command object to interact with the database.
Let's build a DataSet in our code to demonstrate the use of the DataAdapter objects. As with all the data objects mentioned in this chapter, you must add a reference to the System.Data namespace with the Imports statement.
Start by declaring a DataSet variable:
Dim DS As New DataSet
To access the classes discussed in this section, you must import the System.Data namespace in your module. Then create the various commands that will interact with the database:
Dim cmdSelectCustomers As String = "SELECT * FROM Customers " &
             "WHERE Customers.Country=@country"
Dim cmdDeleteCustomer As String = "DELETE Customers WHERE CustomerID=@CustomerID"
Dim cmdEditCustomer As String = "UPDATE Customers " &
             "SET CustomerID = @CustomerID, CompanyName = @CompanyName, " &
             "ContactName = @ContactName, ContactTitle = @ContactTitle " &
             "WHERE CustomerID = @CustID"
Dim cmdInsertCustomer As String = "INSERT Customers " &
             " (CustomerID, CompanyName, ContactName, ContactTitle) " &
             "VALUES(@CustomerID, @CompanyName, @ContactName, @ContactTitle) "
You can also create stored procedures for the four basic operations and use their names in the place of the SQL statements. It's actually a bit faster, and safer, to use stored procedures. I've included only a few columns in the examples to keep the statements reasonably short. The various commands use parameterized queries to interact with the database, and you must add the appropriate parameters to each Command object. After the SQL statements are in place, we can build the four Command properties of the DataAdapter object. Start by declaring a DataAdapter object:
Dim DACustomers As New SqlDataAdapter()
Because all Command properties of the DataAdapter object will act on the same database, you can create a Connection object and reuse it as needed:
Dim CN As New SqlConnection(ConnString)
The ConnString variable is a string with the proper connection string. Now we can create the four Command properties of the DACustomers DataAdapter object.
Let's start with the SelectCommand property of the DataAdapter object. The following statements create a new Command object based on the preceding SELECT statement and then set up a Parameter object for the @country parameter of the SELECT statement:
DACustomers.SelectCommand = New SqlClient.SqlCommand(cmdSelectCustomers)
DACustomers.SelectCommand.Connection = CN
Dim param As New SqlParameter
param.ParameterName = "@Country"
param.SqlDbType = SqlDbType.VarChar
param.Size = 15
param.Direction = ParameterDirection.Input
param.IsNullable = False
param.Value = "Germany"
DACustomers.SelectCommand.Parameters.Add(param)
This is the easier, if rather verbose, method of specifying a Parameter object. You are familiar with the Parameter object properties and already know how to configure and add parameters to a Command object via a single statement. As a reminder, an overloaded form of the Add method allows you to configure and attach a Parameter object to a Command object Parameters collection with a single, if lengthy, statement:
DA.SelectCommand.Parameters.Add(
     New System.Data.SqlClient.qlParameter(
     paramName, paramType, paramSize, paramDirection,
     paramNullable, paramPrecision, paramScale,
     columnName, rowVersion, paramValue)
The paramPrecsion and paramScale arguments apply to numeric parameters, and you can set them to 0 for string parameters. The paramNullable argument determines whether the parameter can assume a Null value. The columnName argument is the name of the table column to which the parameter will be matched. (You need this information for the INSERT and UPDATE commands.) The rowVersion argument determines which version of the field in the DataSet will be used—in other words, whether the DataAdapter will pass the current version (DataRowVersion.Current) or the original version (DataRowVersion.Original) of the field to the parameter object. The last argument, paramValue, is the parameter's value. You can specify a value as we did in the SelectCommand example, or you can set this argument to Nothing and let the DataAdapter object assign the proper value to each parameter. (You'll see in a moment how this argument is used with the INSERT and UPDATE commands.)
Finally, you can open the connection to the database and then call the DataAdapter's Fill method to populate a DataTable in the DataSet:
CN.Open
DACustomers.Fill(DS, "Customers")
CN.Close
The Fill method accepts as arguments a DataSet object and the name of the DataTable it will populate. The DACustomers DataAdapter is associated with a single DataTable and knows how to populate it, as well as how to submit the changes to the database. The DataTable name is arbitrary and need not match the name of the database table where the data originates. The four basic operations of the DataAdapter (which are none other than the four basic data-access operations of a client application) are also known as CRUD operations: Create/Retrieve/Update/Delete.
Each DataAdapter object that you set up in your code is associated with a single SELECT query, which may select data from one or multiple joined tables. The INSERT/UPDATE/DELETE queries of the DataAdapter can submit data to a single table. So far, you've seen how to manually set up each Command object in a DataAdapter object. There's a simpler method to specify the queries: You start with the SELECT statement, which selects data from a single table, and then let a CommandBuilder object infer the other three statements from the SELECT statement. Let's see this technique in action.
Declare a new SqlCommandBuilder object by passing the name of the adapter for which you want to generate the statements:
Dim CustomersCB As SqlCommandBuilder =
                New SqlCommandBuilder(DA)
This statement is all it takes to generate the InsertCommand, UpdateCommand, and DeleteCommand objects of the DACustomers SqlDataAdapter object. When the compiler runs into the previous statement, it will generate the appropriate Command objects and attach them to the DACustomers SqlDataAdapter. Here are the SQL statements generated by the CommandBuilder object for the Products table of the Northwind database:
UPDATECommandUPDATE [Products] SET [ProductName] = @p1, [CategoryID] = @p2, [UnitPrice] = @p3, [UnitsInStock] = @p4, [UnitsOnOrder] = @p5 WHERE (([ProductID] = @p6))INSERTCommandINSERT INTO [Products] ([ProductName], [CategoryID], [UnitPrice], [UnitsInStock], [UnitsOnOrder]) VALUES (@p1, @p2, @p3, @p4, @p5)DELETECommandDELETE FROM [Products] WHERE (([ProductID] = @p1))
These statements are based on the SELECT statement and are quite simple. You may notice that the UPDATE statement simply overrides the current values in the Products table. The CommandBuilder can generate a more elaborate statement that takes into consideration concurrency. It can generate a statement that compares the values read into the DataSet to the values stored in the database. If these values are different, which means that another user has edited the same row since the row was read into the DataSet, it doesn't perform the update. To specify the type of UPDATE statement you want to create with the CommandBuilder object, set its ConflictOption property, whose value is a member of the ConflictOption enumeration: CompareAllSearchValues (compares the values of all columns specified in the SELECT statement), CompareRowVersion (compares the original and current versions of the row), and OverwriteChanges (simply overwrites the fields of the current row in the database).
The OverwriteChanges option generates a simple statement that locates the row to be updated with its ID and overwrites the current field values unconditionally. If you set the ConflictOption property to CompareAllSearchValues, the CommandBuilder will generate the following UPDATE statement:
UPDATE [Products]
SET    [ProductName] = @p1, [CategoryID] = @p2,
       [UnitPrice] = @p3, [UnitsInStock] = @p4,
[UnitsOnOrder] = @p5
WHERE (([ProductID] = @p6) AND ([ProductName] = @p7)
AND ((@p8 = 1 AND [CategoryID] IS NULL) OR
([CategoryID] = @p9)) AND
((@p10 = 1 AND [UnitPrice] IS NULL) OR
([UnitPrice] = @p11)) AND
((@p12 = 1 AND [UnitsInStock] IS NULL) OR
([UnitsInStock] = @p13)) AND
((@p14 = 1 AND [UnitsOnOrder] IS NULL) OR
([UnitsOnOrder] = @p15)))This is a lengthy statement indeed. The row to be updated is identified by its ID, but the operation doesn't take place if any of the other fields don't match the value read into the DataSet. This statement will fail to update the corresponding row in the Products table if it has already been edited by another user.
The last member of the ConflictOption enumeration, the CompareRowVersion option, works with tables that have a TimeStamp column, which is automatically set to the time of the update. If the row has a time stamp that's later than the value read when the DataSet was populated, it means that the row has been updated already by another user and the UPDATE statement will fail.
The SimpleDataSet sample project, which is discussed later in this chapter and demonstrates the basic DataSet operations, generates the UPDATE/INSERT/DELETE statements for the Categories and Products tables with the help of the CommandBuilder class and displays them on the form when the application starts. Open the project to examine the code, and change the setting of the ConflictOption property to see how it affects the autogenerated SQL statements.
The DataSet consists of one or more tables, which are represented by the DataTable class. Each DataTable in the DataSet may correspond to a table in the database or a view. When you execute a query that retrieves fields from multiple tables, all selected columns will end up in a single DataTable of the DataSet. You can select any DataTable in the DataSet by its index or its name:
DS.Tables(0)
DS.Tables("Customers")
Each table contains columns, which you can access through the Columns collection. The Columns collection consists of DataColumn objects, with one DataColumn object for each column in the corresponding table. The Columns collection is the schema of the DataTable object, and the DataColumn class exposes properties that describe a column. ColumnName is the column's name, DataType is the column's type, MaxLength is the maximum size of text columns, and so on. The AutoIncrement property is True for Identity columns, and the AllowDBNull property determines whether the column allows Null values. In short, all the properties you can set visually as you design a table are also available to your code through the Columns collection of the DataTable object. You can use the DataColumn class's properties to find out the structure of the table or to create a new table. To add a table to a DataSet, you can create a new DataTable object. Then create a DataColumn object for each column, set its properties, and add the DataColumn objects to the DataTable Columns collection. Finally, add the DataTable to the DataSet. The process is described in detail in the online documentation, so I won't repeat it here.
As far as data are concerned, each DataTable consists of DataRow objects. All DataRow objects of a DataTable have the same structure and can be accessed through an index, which is the row's order in the table. To access the rows of the Customers table, use an expression like the following:
DS.Customers.Rows(iRow)
where iRow is an integer value from zero (the first row in the table) up to DS.Customers.Rows.Count – 1 (the last row in the table). To access the individual fields of a DataRow object, use the Item property. This property returns the value of a column in the current row by either its index,
DS.Customers.Rows(0).Item(0)
or its name:
DS.Customers.Rows(0).Item("CustomerID")To iterate through the rows of a DataSet, you can set up a For...Next loop like the following:
Dim iRow As Integer
For iRow = 0 To DSProducts1.Products.Rows.Count - 1
   ' process row: DSProducts.Products.Rows(iRow)
Next
Alternatively, you can use a For Each...Next loop to iterate through the rows of the DataTable:
Dim product As DataRow
For Each product In DSProducts1.Products.Rows
   ' process prodRow row:
   ' product.Item("ProductName"),
   ' product.Item("UnitPrice"), and so on
Next
To edit a specific row, simply assign new values to its columns. To change the value of the ContactName column of a specific row in a DataTable that holds the customers of the Northwind database, use a statement like the following:
DS.Customers(3).Item("ContactName") = "new contact name"The new values are usually entered by a user on the appropriate interface, and in your code you'll most likely assign a control's property to a row's column with statements like the following:
If txtName.Text.Trim <> "" Then
    DS.Customers(3).Item("ContactName") = txtName.Text
Else
    DS.Customers(3).Item("ContactName") = DBNull.Value
End If
The code segment assumes that when the user doesn't supply a value for a column, this column is set to null (if the column is nullable, of course, and no default value has been specified). If the control contains a value, this value is assigned to the ContactName column of the fourth row in the Customers DataTable of the DS DataSet.
An important (and quite often tricky) issue in coding data-driven applications is the handling of Null values. Null values are special, in the sense that you can't assign them to control properties or use them in other expressions. Every expression that involves Null values will throw a runtime exception. The DataRow object provides the IsNull method, which returns True if the column specified by its argument is a Null value:
If customerRow.IsNull("ContactName") Then
   ' handle Null value
Else
   ' process value
End If
In a typed DataSet, DataRow objects provide a separate method to determine whether a specific column has a Null value. If the customerRow DataRow belongs to a typed DataSet, you can use the IsContactNameNull method instead:
If customerRow.IsContactNameNull Then
   ' handle Null value for the ContactName
Else
   ' process value: customerRow.ContactName
End If
If you need to map Null columns to specific values, you can do so with the ISNULL() function of T-SQL, as you retrieve the data from the database. In many applications, you want to display an empty string or a zero value in place of a Null field. You can avoid all the comparisons in your code by retrieving the corresponding field with the ISNULL() function in your SQL statement. Where the column name would appear in the SELECT statement, use an expression like the following:
ISNULL(customerBalance, 0.00)
If the customerBalance column is Null for a specific row, SQL Server will return the numeric value zero. This value can be used in reports or other calculations in your code. Notice that the customer's balance shouldn't be Null. A customer always has a balance, even if it's zero. When a product's price is Null, it means that we don't know the price of the product (and therefore can't sell it). In this case, a Null value can't be substituted with a zero value. You must always carefully handle Null columns in your code, and how you'll handle them depends on the nature of the data they represent.
To add a new row to a DataTable, you must first create a DataRow object, set its column values, and then call the Add method of the Rows collection of the DataTable to which the new row belongs, passing the new row as an argument. If the DS DataSet contains the Customers DataTable, the following statements will add a new row for the Customers table:
Dim newRow As New DataRow = dataTable.NewRow
newRow.Item("CompanyName") = "new company name"
newRow.Item("CustomerName") = "new customer name"
newRow.Item("ContactName") = "new contact name"
DS.Customers.Rows.Add(newRow)
Notice that you need not set the CustomerID column. This column is defined as an Identity column and is assigned a new value automatically by the DataSet. Of course, when the row is submitted to the database, the ID assigned to the new customer by the DataSet may already be taken. SQL Server will assign a new unique value to this column when it inserts it into the table. It's recommended that you set the AutoIncrementSeed property of an Identity column to 0 and the AutoIncrement property to −1 so that new rows are assigned consecutive negative IDs in the DataSet. Presumably, the corresponding columns in the database have a positive Identity setting, so when these rows are submitted to the database, they're assigned the next Identity value automatically. If you're designing a new database, use globally unique identifiers (GUIDs) instead of Identity values. A GUID can be created at the client and is unique: It can be generated at the client and will also be inserted in the table when the row is committed. To create GUIDs, call the NewGuid method of the Guid class:
newRow.Item("CustomerID") = Guid.NewGuidTo delete a row, you can remove it from the Rows collection with the Remove or RemoveAt method of the Rows collection, or you can call the Delete method of the DataRow object that represents the row. The Remove method accepts a DataRow object as an argument and removes it from the collection:
Dim customerRow As DS.CustomerRow
customerRow = DS.Customers.Rows(2)
DS.Customers.Remove(customerRow)
The RemoveAt method accepts as an argument the index of the row you want to delete in the Rows collection. Finally, the Delete method is a method of the DataRow class, and you must apply it to a DataRow object that represents the row to be deleted:
customerRow.Delete
The DataTables making up a DataSet may be related—they usually are. There are methods that allow you to navigate from table to table following the relations between their rows. For example, you can start with a row in the Customers DataTable, retrieve its child rows in the Orders DataTable (the orders placed by the selected customer), and then drill down to the details of each of the selected orders.
The relations of a DataSet are DataRelation objects and are stored in the Relations property of the DataSet. Each relation is identified by a name, the two tables it relates to, and the fields of the tables on which the relation is based. It's possible to create relations in your code, and the process is really quite simple. Let's consider a DataSet that contains the Categories and Products tables. To establish a relation between the two tables, create two instances of the DataTable object to reference the two tables:
Dim tblCategories As DataTable = DS.Categories
Dim tblProducts As DataTable = DS.Products
Then create two DataColumn objects to reference the columns on which the relation is based. They're the CategoryID columns of both tables:
Dim colCatCategoryID As DataColumn =
                  tblCategories.Columns("CategoryID")
Dim colProdCategoryID As DataColumn =
                  tblProducts.Columns("CategoryID")
And finally, create a new DataRelation object, and add it to the DataSet:
Dim DR As DataRelation
DR = New DataRelation("Categories2Products",
                colCatCategoryID, colProdCategoryID)
Notice that you need to specify only the columns involved in the relation, and not the tables to be related. The information about the tables is derived from the DataColumn objects. The first argument of the DataRelation constructor is the relation's name. If the relation involves multiple columns, the second and third arguments of the constructor become arrays of DataColumn objects.
To navigate through related tables, the DataRow object provides the GetChildRows method, which returns the current row's child rows as an array of DataRow objects, and the GetParentRow/GetParentRows methods, which return the current row's parent row(s). GetParentRow returns a single DataRow object, and GetParentRows returns an array of DataRow objects. Because a DataTable may be related to multiple DataTables, you must also specify the name of the relation. Consider a DataSet with the Products, Categories, and Suppliers tables. Each row of the Products table can have two parent rows, depending on which relation you want to follow. To retrieve the product category, use a statement like the following:
DS.Products(iRow).GetParentRow("CategoriesProducts")The product supplier is given by the following expression:
DS.Products(iRow).GetParentRow("SuppliersProducts")If you start with a category, you can find out the related products with the GetChildRows method, which accepts as an argument the name of a Relation object:
DS.Categories(iRow).GetChildRows("CategoriesProducts")To iterate through the products of a specific category (in other words, the rows of the Products table that belong to a category), set up a loop like the following:
Dim product As DataRow
For Each product In DS.Categories(iRow).
                    GetChildRows("CategoriesProducts")
' process product
NextEach row in the DataSet has a State property. This property indicates the row's state, and its value is a member of the DataRowState enumeration, whose members are described in Table 16.2.
You can use the GetChanges method to find the rows that must be added to the underlying table in the database, the rows to be updated, and the rows to be removed from the underlying table.
If you want to update all rows of a DataTable, call an overloaded form of the DataAdapter Update method, which accepts as an argument a DataTable and submits its rows to the database. The edited rows are submitted through the UpdateCommand object of the appropriate DataAdapter, the new rows are submitted through the InsertCommand object, and the deleted rows are submitted through the DeleteCommand object.
Instead of submitting the entire table, however, you can create a subset of a DataTable that contains only the rows that have been edited, inserted, or deleted. The GetChanges method of the DataTable object retrieves a subset of rows, depending on the argument you pass to it, and this argument is a member of the DataRowState enumeration:
Dim DT As New DataTable =
    Products1.Products.GetChanges(DataRowState.Deleted)
Table 16.2. DataSet state property members
Property Member | Description |
|---|---|
| The row has been added to the DataTable, and the |
| The row was deleted from the DataTable, and the |
| The row has been created with its constructor but has not yet been added to a DataTable. |
| The row has been edited, and the |
| The row has not been edited or deleted since it was read from the database or the |
This statement retrieves the rows of the Customers table that were deleted and stores them in a new DataTable. The new DataTable has the same structure as the one from which the rows were copied, and you can access its rows and their columns as you would access any DataTable of a DataSet. You can even pass this DataTable as an argument to the appropriate DataAdapter's Update method. This form of the Update method allows you to submit selected changes to the database.
In addition to a state, rows have a version. What makes the DataSet such a powerful tool for disconnected applications is that it maintains not only data but also the changes in its data. The Rows property of the DataTable object is usually called with the index of the desired row, but it accepts a second argument, which determines the version of the row you want to read:
DS.Tables(0).Rows(i, version)
This argument is a member of the DataRowVersion enumeration, whose values are described in Table 16.3.
Table 16.3. DataRowVersion enumeration members
Description | |
|---|---|
| Returns the row's current values (the fields as they were edited in the DataSet). |
| Returns the default values for the row. For added, edited, and current rows, the default version is the same as the current version. For deleted rows, the default versions are the same as the original versions. If the row doesn't belong to a DataTable, the default version is the same as the proposed version. |
| Returns the row's original values (the values read from the database). |
| Returns the row's proposed value (the values assigned to a row that doesn't yet belong to a DataTable). |
If you attempt to submit an edited row to the database and the operation fails, you can give the user the option to edit the row's current version or to restore the row's original values. To retrieve the original version of a row, use an expression like the following:
DS.Tables(0).Row(i, DataRowVersion.Original)
Although you can't manipulate the version of a row directly, you can use the AcceptChanges and RejectChanges methods to either accept the changes or reject them. These two methods are exposed by the DataSet, DataTable, and DataRow classes. The difference is the scope: Applying RejectChanges to the DataSet restores all changes made to the DataSet (not a very practical operation), whereas applying RejectChanges to a DataTable object restores the changes made to the specific table rows; applying the same method to the DataRow object restores the changes made to a single row.
The AcceptChanges method sets the original value of the affected row(s) to the proposed value. Deleted rows are physically removed. The RejectChanges method removes the proposed version of the affected row(s). You can call the RejectChanges method when the user wants to get rid of all changes in the DataSet. Notice that after you call the AcceptChanges method, you can no longer update the underlying tables in the database, because the DataSet no longer knows which rows were edited, inserted, or deleted. Call the AcceptChanges method only for DataSets you plan to persist on disk and not submit to the database.
One of the most important topics in database programming is how to submit changes to the database. There are basically two modes of operation: single updates and multiple updates. A client application running on a local-area network along with the database server can (and should) submit changes as soon as they occur. If the client application is not connected to the database server at all times, changes may accumulate at the client and can be submitted in batch mode when a connection to the server is available.
From a developer's point of view, the difference between the two modes is how you handle update errors. If you submit individual rows to the database and the update operation fails, you can display a warning and let the user edit the data again. You can write code to restore the row to its original state, or not. In any case, it's fairly easy to handle isolated errors. If the application submits a few dozen rows to the database, several of these rows may fail to update the underlying table, and you'll have to handle the update errors from within your code. At the very least, you must validate the data as best as you can at the client before submitting it to the database. No matter how thoroughly you validate your data, however, you can't be sure that they will be inserted into the database successfully.
Another factor you should consider is the nature of the data you work with. Let's consider an application that maintains a database of books and an application that takes orders. The book maintenance application handles publishers, authors, translators, and related data. If two dozen users are entering and editing titles, they will all work with the same authors. If you allow them to work in disconnected mode, the same author name may be entered several times, because no user can see the changes made by any other user. This application should be connected: Every time a user adds a new author, the table with the author names in the database must be updated so that other users can see the new author. The same goes for publishers, translators, topics, and so on. A disconnected application of this type should also include utilities to consolidate multiple author and publisher names.
An order-taking application can safely work in a disconnected mode, because orders entered by one user are not aware of and don't interfere with the orders entered by another user. You can install the client application on several salespersons' notebooks so they can take orders on the go and upload them after establishing a connection between the notebook and the database server (which may even happen when the salespeople return to the company's offices).
The simplest method of submitting changes to the database is to use each DataAdapter's Update method. The DataTable object provides the members you need to retrieve the rows that failed to update the database, as well as the messages returned by the database server, and you'll see how these members are used in this section. The Update method may not have updated all the rows in the underlying tables. If a product was removed from the Products table in the database in the meantime, the DataAdapter's UpdateCommand will not be able to submit the changes made to that specific product. A product with a negative value may very well exist at the client, but the database will reject this row, because it violates one of the constraints of the Products table. It's also important to validate the data at the client to minimize errors when you submit changes to the database.
If the database returned any errors during the update process, the HasErrors property of the DataSet object will be set to True. You can retrieve the rows in error from each table with the GetErrors method of the DataTable class. This method returns an array of DataRow objects, and you can process them in any way you see fit. The code shown in Listing 16.8 iterates through the rows of the Categories table that are in error and prints the description of the error in the Output window.
Example 16.8. Retrieving and displaying the update errors
If Products1.HasErrors Then
    If Products1.Categories.GetErrors.Length = 0 Then
        Console.WriteLine("Errors in the Categories DataTable")
            Else
Dim RowsInError() As Products.CategoriesRow
RowsInError = Products1.Categories.GetErrors
Dim row As Products.CategoriesRow
Console.WriteLine("Errors in the Categories table")
For Each row In RowsInError
Console.WriteLine(vbTab & row.CategoryID & vbTab &
row.RowError)
Next
End If
EndifThe DataRow object exposes the RowError property, which is a description of the error that prevented the update for the specific row. It's possible that the same row has more than a single error. To retrieve all columns in error, call the DataRow object's GetColumnsInError method, which returns an array of DataColumn objects that are the columns in error.
An issue that deserves special attention while coding data-driven applications is the handling of Identity columns. Identity columns are used as primary keys, and each row is guaranteed to have a unique Identity value because this value is assigned by the database the moment the row is inserted into its table. The client application can't generate unique values. When new rows are added to a DataSet, they're assigned Identity values, but these values are unique in the context of the local DataSet. When a row is submitted to the database, any Identity column will be assigned its final value by the database. The temporary Identity value assigned by the DataSet is also used as a foreign key value by the related rows, and we must make sure that every time an Identity value is changed, the change will propagate to the related tables.
Handling Identity values is an important topic, and here's why: Consider an application for entering orders or invoices. Each order has a header and a number of detail lines, which are related to a header row with the OrderID column. This column is the primary key in the Orders table and is the foreign key in the Order Details table. If the primary key of a header is changed, the foreign keys of the related rows must change also.
The trick in handling Identity columns is to make sure that the values generated by the DataSet will be replaced by the database. You do so by specifying that the Identity column's starting value is −1 and its autoincrement is −1. The first ID generated by the DataSet will be −1, the second one will be −2, and so on. Negative Identity values will be rejected by the database, because the AutoIncrement properties in the database schema are positive. By submitting negative Identity values to SQL Server, you ensure that new, positive values will be generated and used by SQL Server.
You must also make sure that the new values will replace the old ones in the related rows. In other words, we want these values to propagate to all related rows. The DataSet allows you to specify that changes in the primary key will propagate through the related rows with the UpdateRule property of the Relation.ChildKeyConstraint property. Each relation exposes the ChildKeyConstraint property, which determines how changes in the primary key of a relation affect the child rows. This property is an object that exposes a few properties of its own. The two properties we're interested in are UpdateRule and DeleteRule (what happens to the child rows when the parent row's primary key is changed or when the primary key is deleted). You can use one of the rules described in Table 16.4.
Table 16.4. ChildKeyConstraint property rules
Description | |
|---|---|
| Foreign keys in related rows change every time the primary key changes value so that they'll always remain related to their parent row. |
| The foreign key in the related row(s) is not affected. |
| The foreign key in the related row(s) is set to the |
| The foreign key in the related rows is set to |
As you can see, setting the UpdateRule property to anything other than Cascade will break the relation. If the database doesn't enforce the relation, you may be able to break it. If the relation is enforced, however, UpdateRule must be set to Rule.Cascade, or the database will not accept changes that violate its referential integrity.
If you set UpdateRule to None, you may be able to submit the order to the database. However, the detail rows may refer to a different order. This will happen when the ID of the header is changed because the temporary value is already taken. The detail rows will be inserted with the temporary key and added to the details of another order. Notice that no runtime exception will be thrown, and the only way to catch this type of error is by examining the data inserted into the database by your application. By using negative values at the DataSet, you make sure that the ID of both the header and all detail rows will be rejected by the database and replaced with valid values. It goes without saying that it's always a good idea to read back the rows you submit to the database and "refresh" the data at the client. In the case of the ordering application, for example, you could read back the order before printing it so that any errors will be caught as soon as they occur, instead of discovering later orders that do not match their printouts.
Let's put together the topics discussed so far to build an application that uses a DataSet to store and edit data at the client. The sample application is called SimpleDataSet, and its interface is shown in Figure 16.4.
Click the large Read Products and Related Tables button at the top to populate a DataSet with the rows of the Products and Categories tables of the Northwind database. The application displays the categories and the products in each category in a RichTextBox control. Instead of displaying all the columns in a ListView control, I've chosen to display only a few columns of the Products table to make sure that the application connects to the database and populates the DataSet.
The Edit DataSet button edits a few rows of both tables. The code behind this button changes the name and price of a couple of products in random, deletes a row, and adds a new row. It actually sets the price of the edited products to a random value in the range from −10 to 40 (negative prices are invalid, and they will be rejected by the database). The DataSet keeps track of the changes, and you can review them at any time by clicking the Show Edits button, which displays the changes in the DataSet in a message box, like the one shown in Figure 16.5.
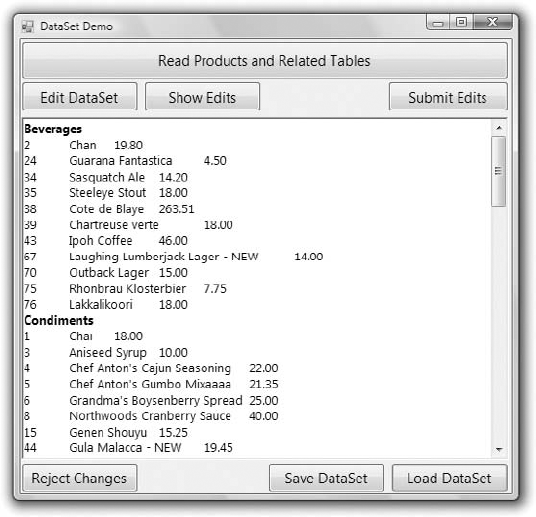
Figure 16.4. The SimpleDataSet project populates a DataSet at the client with categories and products.
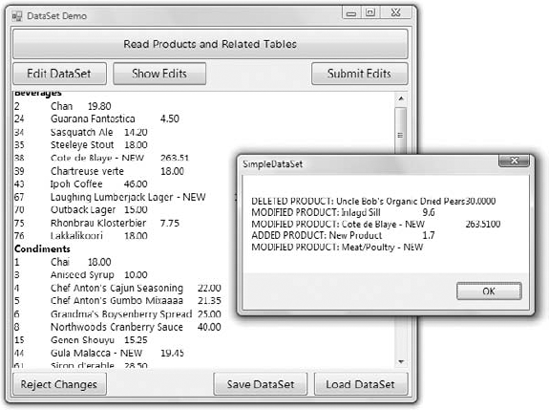
You can undo the changes and reset the DataSet to its original state by clicking the Reject Changes button, which calls the RejectChanges method of the DataSet class to reject the edits in all tables. It removes the new rows, restores the deleted ones, and undoes the edits in the modified rows.
The Save DataSet and Load DataSet buttons persist the DataSet at the client so that you can reload it later without having to access the database. The code shown in Listing 16.9 calls the WriteXml and ReadXml methods and uses a hard-coded filename. WriteXml and ReadXml save the data only, and you can't create a DataSet by calling the ReadXml method; this method will populate an existing DataSet.
To actually create and load a DataSet, you must first specify its structure. Fortunately, the DataSet exposes the WriteXmlSchema and ReadXmlSchema methods, which store and read the schema of the DataSet. WriteXmlSchema saves the schema of the DataSet, so you can regenerate an identical DataSet with the ReadXmlSchema method, which reads an existing schema and structures the DataSet accordingly. The code behind the Save DataSet and Load DataSet buttons first calls these two methods to take care of the DataSet's schema and then calls the WriteXml and ReadXml methods to save/load the data.
Example 16.9. Saving and loading the DataSet
Private Sub bttnSave_Click(...) Handles bttnSave.Click
    Try
        DS.WriteXmlSchema("DataSetSchema.xml")
        DS.WriteXml("DataSetData.xml", XmlWriteMode.DiffGram)
    Catch ex As Exception
        MsgBox("Failed to save DataSet" & vbCrLf & ex.Message)
        Exit Sub
    End Try
    MsgBox("DataSet saved successfully")
End Sub

Private Sub bttnLoad_Click(...) Handles bttnLoad.Click
    Try
        DS.ReadXmlSchema("DataSetSchema.xml")
        DS.ReadXml("DataSetData.xml", XmlReadMode.DiffGram)
    Catch ex As Exception
        MsgBox("Failed to load DataSet" & vbCrLf & ex.Message)
        Exit Sub
    End Try
    ShowDataSet()
End Sub
The Submit Edits button, finally, submits the changes to the database. The code attempts to submit all edited rows, but some of them may fail to update the database. The local DataSet doesn't enforce any check constraints, so when the application attempts to submit a product row with a negative price to the database, the database will reject the update operation. The DataSet rows that failed to update the underlying tables are shown in a message box like the one shown in Figure 16.6. You can review the values of the rows that failed to update the database and the description of the error returned by the database and edit them further. The rows that failed to update the underlying table(s) in the database remain in the DataSet. Of course, you can always call the RejectChanges method for each row that failed to update the database to undo the changes of the invalid rows. As is, the application doesn't reject any changes on its own. If you click the Show Edits button after an update operation, you will see the rows that failed to update the database, because they're marked as inserted/modified/deleted in the DataSet.
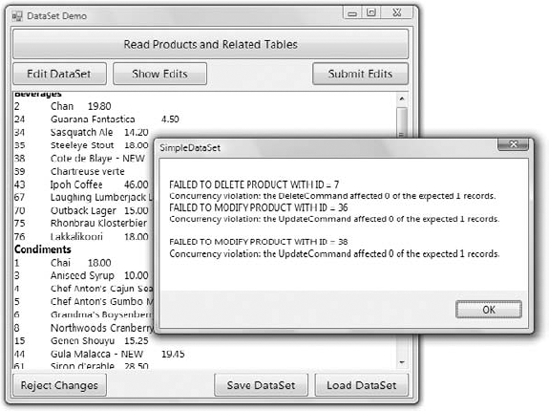
Figure 16.6. Viewing the rows that failed to update the database and the error message returned by the DBMS
Let's start with the code that loads the DataSet. When the form is loaded, the code initializes two DataAdapter objects, which load the rows of the Categories and Products tables. The names of the two DataAdapters are DACategories and DAProducts. They're initialized to the CN connection object and a simple SELECT statement, as shown in Listing 16.10.
Example 16.10. Setting up the DataAdapters for the Categories and Products tables
Private Sub Form1_Load(...) Handles MyBase.Load
    Dim CN As New SqlClient.SqlConnection(
           "data source=localhost;initial catalog=northwind; " &
           "Integrated Security=True")
    DACategories.SelectCommand = New SqlClient.SqlCommand(
           "SELECT CategoryID, CategoryName, Description FROM Categories")
    DACategories.SelectCommand.Connection = CN
    Dim CategoriesCB As SqlCommandBuilder = New SqlCommandBuilder(DACategories)
    CategoriesCB.ConflictOption = ConflictOption.OverwriteChanges
    DAProducts.SelectCommand = New SqlClient.SqlCommand(
           "SELECT ProductID, ProductName, " &
           "CategoryID, UnitPrice, UnitsInStock, " &
           "UnitsOnOrder FROM Products ")
    DAProducts.SelectCommand.Connection = CN
    DAProducts.ContinueUpdateOnError = True
    Dim ProductsCB As SqlCommandBuilder = New SqlCommandBuilder(DAProducts)
    ProductsCB.ConflictOption = ConflictOption.CompareAllSearchableValues
End Sub
I've specified the SELECT statements in the constructors of the two DataAdapter objects and let the CommandBuilder objects generate the update statement. You can change the value of the ConflictOption property to experiment with the different styles of update statements that the CommandBuilder will generate. When the form is loaded, all the SQL statements generated for the DataAdapters are shown in the RichTextBox control. (The corresponding statements are not shown in the listing, but you can open the project in Visual Studio to examine the code.)
The Read Products and Related Tables button populates the DataSet and then displays the categories and products in the RichTextBox control by calling the ShowDataSet() subroutine, as shown in Listing 16.11.
Example 16.11. Populating and displaying the DataSet
Private Sub bttnCreateDataSet_Click(...) Handles bttnCreateDataSet.Click
    DS.Clear()
    DACategories.Fill(DS, "Categories")
    DAProducts.Fill(DS, "Products")
    DS.Relations.Clear()
    DS.Relations.Add(New Data.DataRelation("CategoriesProducts",
         DS.Tables("Categories").Columns("CategoryID"),
         DS.Tables("Products").Columns("CategoryID")))
    ShowDataSet()
End Sub

Private Sub ShowDataSet()
    RichTextBox1.Clear()
    Dim category As DataRow
    For Each category In DS.Tables("Categories").Rows
        RichTextBox1.AppendText(
             category.Item("CategoryName") & vbCrLf)
        Dim product As DataRow
        For Each product In category.GetChildRows("CategoriesProducts")
                RichTextBox1.AppendText(
                    product.Item("ProductID") & vbTab &
                    product.Item("ProductName" & vbTab)
                If product.IsNull("UnitPrice") Then
                    RichTextBox1.AppendText("  " & vbCrLf)
                Else
                    RichTextBox1.AppendText(
                        Convert.ToDecimal(product.Item("UnitPrice"))
                        .ToString("#.00") & vbCrLf)
            End If
        Next
    Next
End Sub
After calling the Fill method to populate the two DataTables, the code sets up a DataRelation object to link the products to their categories through the CategoryID column and then displays the categories and the corresponding products under each category. Notice the statement that prints the products. Because the UnitPrice column may be Null, the code calls the IsNull method of the product variable to find out whether the current product's price is Null. If so, it doesn't attempt to call the product.Item("UnitPrice") expression, which would result in a runtime exception, and prints three asterisks in its place.
The Edit DataSet button modifies a few rows in the DataSet. Here's the statement that changes the name of a product selected at random (it appends the string NEW to the product's name):
DS.Tables("Products").Rows(
    RND.Next(1, 78)).Item("ProductName") &= " - NEW"
The same button randomly deletes a product, sets the price of another row to a random value in the range from −10 to 40, and inserts a new row with a price in the same range. If you click the Edit DataSet button a few times, you'll very likely get a few invalid rows. The Show Edits button retrieves the edited rows of both tables and displays them. It uses the DataRowState property to discover the state of the row (whether it's new, modified, or deleted) and displays the row's ID and a couple of additional columns. Notice that you can retrieve the proposed and original versions of the edited rows (except for the deleted rows, which have no proposed version) and display the row's fields before and after the editing on a more elaborate interface. Listing 16.12 shows the code behind the Show Edits button.
Example 16.12. Viewing the edited rows
Private Sub bttnShow_Click(...)Handles bttnShow.Click
    Dim product As DataRow
    Dim msg As String = ""
    For Each product In DS.Tables("Products").Rows
        If product.RowState = DataRowState.Added Then
            msg &= "ADDED PRODUCT: " &
               product.Item("ProductName") & vbTab &
               product.Item("UnitPrice").ToString & vbCrLf
        End If
        If product.RowState = DataRowState.Modified Then
            msg &= "MODIFIED PRODUCT: " &
               product.Item("ProductName") & vbTab &
               product.Item("UnitPrice").ToString & vbCrLf
        End If
        If product.RowState = DataRowState.Deleted Then
            msg &= "DELETED PRODUCT: " &
               product.Item("ProductName",
               DataRowVersion.Original) & vbTab &
               product.Item("UnitPrice",
               DataRowVersion.Original).ToString & vbCrLf
        End If
    Next
    If msg.Length > 0 Then
MsgBox(msg)
Else
MsgBox("There are no changes in the dataset")
End If
End SubI only show the statements that print the edited rows of the Products DataTable in the listing. Notice that the code retrieves the proposed versions of the modified and added rows but the original version of the deleted rows.
The Submit Edits button submits the changes to the two DataTables to the database by calling the Update method of the DAProducts DataAdapter and then the Update method of the DACategories DataAdapter. After that, it retrieves the rows in error with the GetErrors method and displays the error message returned by the DBMS with statements similar to the ones shown in Listing 16.12.
- Create and populate DataSets.
DataSets are data containers that reside at the client and are populated with database data. The DataSet is made up of DataTables, which correspond to database tables, and you can establish relationships between DataTables, just like relating tables in the database. DataTables, in turn, consist of DataRow objects.
- Master It
How do you populate DataSets and then submit the changes made at the client to the database?
- Establish relations between tables in the DataSet.
You can think of the DataSet as a small database that resides at the client, because it consists of tables and the relationships between them. The relations in a DataSet are DataRelation objects, which are stored in the
Relationsproperty of the DataSet. Each relation is identified by a name, the two tables it relates, and the fields of the tables on which the relation is based.- Master It
How do you navigate through the related rows of two tables?
- Submit changes in the DataSet to the database.
The DataSet maintains not only data at the client but their states and versions too. It knows which rows were added, deleted, or modified (the
DataRowStateproperty), and it also knows the version of each row read from the database and the current version (theDataRowVersionproperty).- Master It
How will you submit the changes made to a disconnected DataSet to the database?